
LS1 and 200-4r to L92 / T56 in 71 Chevelle convertible...now Gen V LT1 6L80e swapping
 03-11-2012, 05:31 PM
#301
TECH Apprentice

Join Date: Jul 2011
Posts: 393
Likes: 0
Received 0 Likes
on
0 Posts
Hey Chuck the freezer isn't going to help you with those bushings for the rear end housing. Check out this video on youtube, its so easy and I did it works great for installing them.
http://www.youtube.com/watch?v=DPMd2x_DYxc
http://www.youtube.com/watch?v=DPMd2x_DYxc


 03-14-2012, 11:30 AM
#304
They are the 3 3/8" in Revolution series. You can customize them and whatnot, but the silver and black default is pretty ideal since it goes with the rest of the dash. When you buy multiples you get a discount and they occasionally have sales as well, and when I bought mine both discounts combined. Still not super cheap, but not too bad if you compare them to what the other options run, and compared to having nothing in the dash working (which is where I was) they should be priceless. A busted fuel gauge and tach and way-off speedo do not make for a confidence-inspiring cruiser.
Here is a link to the speedo with signals built in - http://www.speedhut.com/custom_gauge...number-774.htm
In progress news I got the bushings in and the old upper control arms out. The lowers are held in with one of the damn bolts-inside-the-boxed-frame deals, which wouldn't be a big deal if my mufflers weren't in the way (I can't use a punch to push them through). Speaking of exhaust issues, it looks like I have to cut mine off from the muffler back to clear the shockwaves. Hopefully not a huge deal, but something I had forgotten about. At least if the mufflers stay it will be quiet enough to get it tuned and then driven to the exhaust shop. Kind of a shame though because James's friend did a good job on making it for me.
And, just because I like pictures, here is another old vs new and the motor after a quick blast of Chevy orange. I had my doubts about painting the pretty aluminum block but the orange is tough to beat in old cars. Oil pan will be painted after I pull it again.
Lately I've also been thinking that while I have the motor out I should go ahead and get a better cam and springs. It has an ls7 cam and yellow springs now, but that setup isn't really ideal for my application I don't think.
Last edited by chuckd71; 04-15-2012 at 01:55 AM.
03-14-2012, 12:14 PM
#305
TECH Apprentice
Join Date: Jul 2011
Posts: 393
Likes: 0
Received 0 Likes
on
0 Posts
The orange looks good!
Maybe you can get enough clearance to cut the head off the bolt and push it out the other side then install in the opposite direction when you put them back in...
I wish I had done the cam upgrade before now that the car is running. And the stall converter upgrade. At the time I didn't want to spend the money but now I really don't feel like taking everything back apart to do it at this point.
03-16-2012, 03:51 AM
#306
Thanks, I like it a lot. This is the brighter of the two chevy oranges they had.
The bolt head is about 4 inches inside the frame box with no real way to get to it. I think with a little finesse I can position the arms to take the pressure off it and let me pull it out with some pliers. Putting them in the other way would mean the nut would be inside the frame box, which would suck if (when) I were to drop during reinstall.
I think I've decided to go ahead and do the cam swap. I hate the cam shopping process so I did what everyone always says to do and emailed Pat G to see what he says. The idea of paying $425 for a cam sort of sucks, but then again so does buying an off the shelf cam based on random internet message board comments and hoping for the best. In a perfect world this is more or less what I'm looking for (second half of video).
http://www.youtube.com/watch?v=IfDzSjVn508
03-25-2012, 02:25 AM
#307
Got pretty much everything old under the car taken out and have mocked up most of the new stuff, at this point it looks like once I replace the brake lines (which looks to be fairly simple) I can start putting the other new stuff in place. Having some trouble getting the crank pulley off though. Stripped the threads on the loan 2-ton puller from the parts house so going to try the huge 7-ton puller tomorrow. I did take off the front cover bolts to crack it open and take a peek inside and everything is pretty much as it should be. Super clean in there, everything looks new from what I could tell.
Other than that I spent a while going to various parts houses trying to buy a replacement breather valve for my rear diff/ axle. Apparently every guy behind the counter has rebuilt hundreds of rears but has never seen the piece I'm talking about (I broke mine on accident). Not sure how both statements can be true, but regardless I have a low tolerance for rednecks so I gave up and will just go to the dealer next week.
This is probably a stupid question but I want to make about this before I order my cam; the timing set looks like the one pictured below, is it a 3 or 1 bolt cam? Never seen the two side by side to tell the difference, and while I of course I see the three bolts, I'm not sure if you count them or the one odd hole out.

Edit- Okay that was a dumb question. But some good cam bolt/ gear info here, with pictures that make sense of the whole 'swap an ls2/3 where my ls1 was' stuff. http://www.ls2.com/forums/showthread.php?p=9334933
Double edit - this is the breather I was talking about and this is the cheapest place to find them online. Cheaper than the time and gas to go to the dealer. http://www.ebay.com/itm/NOS-AC-DELCO...#ht_500wt_1180
Other than that I spent a while going to various parts houses trying to buy a replacement breather valve for my rear diff/ axle. Apparently every guy behind the counter has rebuilt hundreds of rears but has never seen the piece I'm talking about (I broke mine on accident). Not sure how both statements can be true, but regardless I have a low tolerance for rednecks so I gave up and will just go to the dealer next week.
This is probably a stupid question but I want to make about this before I order my cam; the timing set looks like the one pictured below, is it a 3 or 1 bolt cam? Never seen the two side by side to tell the difference, and while I of course I see the three bolts, I'm not sure if you count them or the one odd hole out.
Edit- Okay that was a dumb question. But some good cam bolt/ gear info here, with pictures that make sense of the whole 'swap an ls2/3 where my ls1 was' stuff. http://www.ls2.com/forums/showthread.php?p=9334933
Double edit - this is the breather I was talking about and this is the cheapest place to find them online. Cheaper than the time and gas to go to the dealer. http://www.ebay.com/itm/NOS-AC-DELCO...#ht_500wt_1180
Last edited by chuckd71; 03-25-2012 at 10:28 AM.
03-27-2012, 05:09 PM
#308
Great weather outside so spent more time working on random things. Finished pulling the old brake lines and all that, pretty easy overall but the bolts at each flared connection kept stripping and I ended up just taking the entire thing out as one piece. Pulled the old master and have the new lines mocked up, looks like everything will go together fairly painlessly. Once I do that and cut the exhaust out from the mufflers back I can get the rear in place and get the rear shockwaves in.
Progress has been slower than I'd like, but I've been wire wheeling, priming and painting everything as I go. Not going for a professional show car look or anything, but now seems like the ideal time to get the rust off and clean things up a bit. Once I'm finished cutting and grinding I'll hit it with a matte clear to tone the sheen down a bit. The before shots look like something found behind a shed after being left to rot for a few decades, but surprisingly the metal underneath looks great with a little work.


Got the steering stuff (tie rods, idler arm, etc) pulled and replaced with the new Moog stuff, and the angle grinder I ordered from Amazon came in so I went ahead and cut the ear off the frame that interferes with the SPC control arms.
Turns out I shouldn't have cut the mount at a right angle, but hopefully it'll be okay. If not I'll cross that bridge when I get to it.
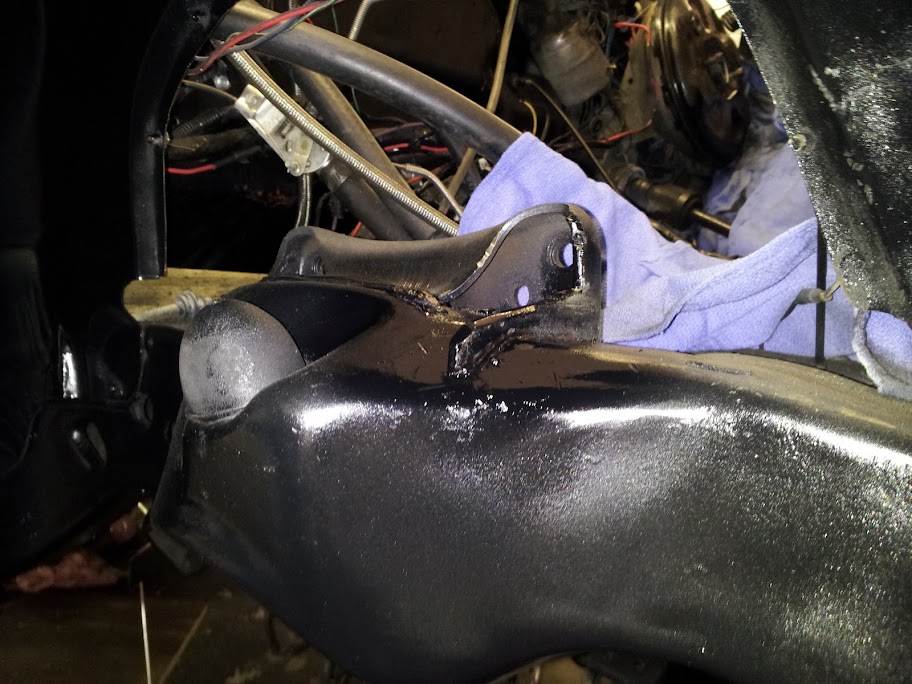
After that I got the lower Strongarm put in and test fit the shock. Will try to run the air lines through the frame to the trunk and the electronics will just go through the firewall I guess. The remote reservoir looks to be on a long enough leash to come around the frame and mount on the inner fender, which will be nice so when I pop the hood the shock-top and reservoir mounted adjustment ***** will be easy to get to.
Pat G sent me the cam card earlier today and I just got off the phone with Geoff at EPS, he said it should be ready in a week or so. Won't bore you with the details but here is the gist of it-
222/230 .597”/.573” 113LSA +2 EPS intake lobes, XE exhaust. 7.425 pushrods and some PAC 1518s round it out and that stuff should be here in a week or so. More than I had wanted to spend but I'd rather do it right than mix and match stuff.
Progress has been slower than I'd like, but I've been wire wheeling, priming and painting everything as I go. Not going for a professional show car look or anything, but now seems like the ideal time to get the rust off and clean things up a bit. Once I'm finished cutting and grinding I'll hit it with a matte clear to tone the sheen down a bit. The before shots look like something found behind a shed after being left to rot for a few decades, but surprisingly the metal underneath looks great with a little work.
Got the steering stuff (tie rods, idler arm, etc) pulled and replaced with the new Moog stuff, and the angle grinder I ordered from Amazon came in so I went ahead and cut the ear off the frame that interferes with the SPC control arms.
Turns out I shouldn't have cut the mount at a right angle, but hopefully it'll be okay. If not I'll cross that bridge when I get to it.
After that I got the lower Strongarm put in and test fit the shock. Will try to run the air lines through the frame to the trunk and the electronics will just go through the firewall I guess. The remote reservoir looks to be on a long enough leash to come around the frame and mount on the inner fender, which will be nice so when I pop the hood the shock-top and reservoir mounted adjustment ***** will be easy to get to.
Pat G sent me the cam card earlier today and I just got off the phone with Geoff at EPS, he said it should be ready in a week or so. Won't bore you with the details but here is the gist of it-
222/230 .597”/.573” 113LSA +2 EPS intake lobes, XE exhaust. 7.425 pushrods and some PAC 1518s round it out and that stuff should be here in a week or so. More than I had wanted to spend but I'd rather do it right than mix and match stuff.
Last edited by chuckd71; 04-17-2016 at 09:20 AM.
03-30-2012, 04:13 PM
#309
Finally got the crank pulley off today. After breaking a loaner 3 ton puller and stripping a 7 ton puller I started looking for something more substantial, and while browsing around came across a harbor freight ad for a hydraulic 5 ton puller. While I hate most everything about that place I was getting desperate so I sucked it up and bought one. . This is it, $50 or so after a coupon. Not sure what I'll ever use it for in the future but it will certainly pull a crank pulley.

Also got the brake lines in their final places today, nothing fully tightened but everything is in place. The Inline Tube guys did a good job building this stuff, as my order was basically just my terrible recounting of what Tobin told me I needed. It fits as well I would expect it to, and other than the grit and grime that kept falling in my face while crawling under the car it was a pretty cake job.

This is the back of the stock master cylinder, notice how the center plunger is almost flush with the round face. The center piston in the new one is recessed a bit (maybe an inch, I don't know) but it comes with an insert that fits inside to make it flush like the old one. I don't know much about this stuff but I'm guessing I need to run it with the insert? That's a partly rhetorical question, a reminder to myself to look that up later.

Weather permitting tomorrow I'll get the brake lines wrapped up, the exhaust cut and the rear back under the car. I really want to get the rear brakes done so I can concentrate on the front end. It's taken a while but I'm finally starting to see some (faint) light at the end of the tunnel.
Also got the brake lines in their final places today, nothing fully tightened but everything is in place. The Inline Tube guys did a good job building this stuff, as my order was basically just my terrible recounting of what Tobin told me I needed. It fits as well I would expect it to, and other than the grit and grime that kept falling in my face while crawling under the car it was a pretty cake job.
This is the back of the stock master cylinder, notice how the center plunger is almost flush with the round face. The center piston in the new one is recessed a bit (maybe an inch, I don't know) but it comes with an insert that fits inside to make it flush like the old one. I don't know much about this stuff but I'm guessing I need to run it with the insert? That's a partly rhetorical question, a reminder to myself to look that up later.
Weather permitting tomorrow I'll get the brake lines wrapped up, the exhaust cut and the rear back under the car. I really want to get the rear brakes done so I can concentrate on the front end. It's taken a while but I'm finally starting to see some (faint) light at the end of the tunnel.
Last edited by chuckd71; 03-30-2012 at 04:18 PM.
04-01-2012, 08:32 PM
#310
Today was a big day, spent 8 1/2 hours working on things, got quite a bit accomplished and learned that a $18 drill bit is much, much better than a $2 drill bit. Better to buy the right thing once instead of the wrong thing 3 times. Should be obvious I guess. Live and learn.
As far as progress goes I started with the rear brakes and kind of never stopped. I had originally intended to only go so far as mocking things up and testing it out I ended up basically getting it all put together. Yes, it will add some heft to it when I go to put the rear back under the car, but having it out made this part of the process so much easier. Ran into a few problems with the spacing of the backing plates and calipers but it was nothing a bit of shimming couldn't fix (I think). As a side note, if you buy someone's F-body backing plates from them make sure to get the horseshoe-shaped spacers as well, I needed them to get things lined up and you might too. I had to grind down the inner lip to fit over the ridge on the end of the axle shaft but it was a quick fix.
The arrows are where I had to shim. The yellow is where the horseshoe shaped piece fit.

And the finished product with the shockwave brackets installed as well.

When installing the backing plates I chose to swap the L to the R side and vice versa. Before I put the rotors on I was concerned that doing so would cause the e brake lever to hit the shock mounts, but once the rotor is in place the arc of movement is tiny and it looks like everything should clear.

All of the rear control arms are in and everything hard (the drilling) related to the Hellwig Pro-Touring bar install is done as well. At this point I just have to bolt it to the axles. Rear shockwaves are in, I just have to drill a couple holes into the trunk for the air and electric lines while the rear diff is still out and that will be good to go. This is how they mount in the car, where the old shock was.

Had to cut the exhaust, not sure how it's going to be routed when it's redone. Kind of a maze under there.

Whoever made the instructions for the Hellwig bar needs to be punched in the crotch a few times. It tells you to enlarge some holes at least three different times but in fact there are only two holes to drill and two to enlarge. The pictures are terrible and it looks like it was made with MS paint, printed once then copied for distribution on a home printer/scanner. Terrible paperwork, but the job itself is pretty easy once you throw the instructions in the trash where they belong.
Bar = cool.
Instructions = garbage (this could also be said for almost everything car-related that I've encountered so far. Maybe parts makers can't use computers, I don't know).
Here is where the bar connects to the frame.

Due to the nature of my car I didn't have to move/ cut/ modify any brake or fuel lines or do anything with the exhaust hangars, but if your car is basically stock then some of those things could be an issue for you. Not a huge deal and certainly not a deal breaker, but it's worth mentioning. Can't imagine trying to install it with the rear in the car though.
Tomorrow the rear goes back in and I'll get back to the front shockwaves. One of the ridetech guys said everything looked okay I just needed to trim the pocket, so I guess I will. Then everything will just be nuts and bolts.
As far as progress goes I started with the rear brakes and kind of never stopped. I had originally intended to only go so far as mocking things up and testing it out I ended up basically getting it all put together. Yes, it will add some heft to it when I go to put the rear back under the car, but having it out made this part of the process so much easier. Ran into a few problems with the spacing of the backing plates and calipers but it was nothing a bit of shimming couldn't fix (I think). As a side note, if you buy someone's F-body backing plates from them make sure to get the horseshoe-shaped spacers as well, I needed them to get things lined up and you might too. I had to grind down the inner lip to fit over the ridge on the end of the axle shaft but it was a quick fix.
The arrows are where I had to shim. The yellow is where the horseshoe shaped piece fit.
And the finished product with the shockwave brackets installed as well.
When installing the backing plates I chose to swap the L to the R side and vice versa. Before I put the rotors on I was concerned that doing so would cause the e brake lever to hit the shock mounts, but once the rotor is in place the arc of movement is tiny and it looks like everything should clear.
All of the rear control arms are in and everything hard (the drilling) related to the Hellwig Pro-Touring bar install is done as well. At this point I just have to bolt it to the axles. Rear shockwaves are in, I just have to drill a couple holes into the trunk for the air and electric lines while the rear diff is still out and that will be good to go. This is how they mount in the car, where the old shock was.
Had to cut the exhaust, not sure how it's going to be routed when it's redone. Kind of a maze under there.
Whoever made the instructions for the Hellwig bar needs to be punched in the crotch a few times. It tells you to enlarge some holes at least three different times but in fact there are only two holes to drill and two to enlarge. The pictures are terrible and it looks like it was made with MS paint, printed once then copied for distribution on a home printer/scanner. Terrible paperwork, but the job itself is pretty easy once you throw the instructions in the trash where they belong.
Bar = cool.
Instructions = garbage (this could also be said for almost everything car-related that I've encountered so far. Maybe parts makers can't use computers, I don't know).
Here is where the bar connects to the frame.
Due to the nature of my car I didn't have to move/ cut/ modify any brake or fuel lines or do anything with the exhaust hangars, but if your car is basically stock then some of those things could be an issue for you. Not a huge deal and certainly not a deal breaker, but it's worth mentioning. Can't imagine trying to install it with the rear in the car though.
Tomorrow the rear goes back in and I'll get back to the front shockwaves. One of the ridetech guys said everything looked okay I just needed to trim the pocket, so I guess I will. Then everything will just be nuts and bolts.
Last edited by chuckd71; 05-23-2012 at 05:10 AM.
04-05-2012, 03:51 PM
#311
The rear made it back in a few days ago. Not the most fun thing to do but having a second person to operate the jack made it fairly straightforward. Running the air line through the frame was taking forever since the tubing kept wanting to curl but I fixed that by threading some flexible hose in from the back, sticking the end of the air line into it then pulling it back out. Simple but effective. All air lines run into the trunk through 1/2 inch holes drilled above where the spring used to be.

Air and rear electric lines going up into trunk.

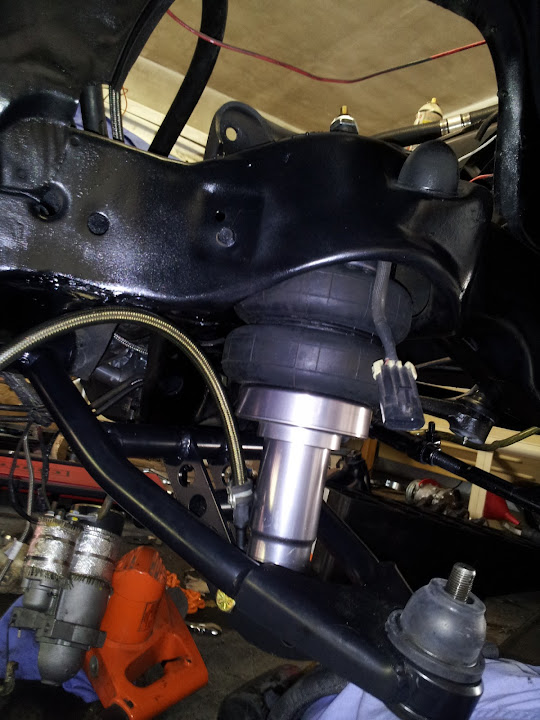
Also got the front passenger side suspension and steering most of the way done. I initially put the spindle on backwards (they are technically reversible but one way works better in my case) so that ate up some time but at least it's together. Getting the other side knocked out should be much quicker and once that is finished

Still waiting on the cam but that's okay as it buys me more time to wrap this stuff up. Tomorrow I hope to have the suspension work completed and then will more on to getting the motor ready for the cam swap, and by that point my madelectrical stuff should be here. After talking to Mark at SC&C I think I'm going to order a fastrax as well and learn to do my own alignment. From what I can tell it should pay for itself pretty quickly.
That LS1 stuff on the fender is going to come off as well.
Air and rear electric lines going up into trunk.
Also got the front passenger side suspension and steering most of the way done. I initially put the spindle on backwards (they are technically reversible but one way works better in my case) so that ate up some time but at least it's together. Getting the other side knocked out should be much quicker and once that is finished
Still waiting on the cam but that's okay as it buys me more time to wrap this stuff up. Tomorrow I hope to have the suspension work completed and then will more on to getting the motor ready for the cam swap, and by that point my madelectrical stuff should be here. After talking to Mark at SC&C I think I'm going to order a fastrax as well and learn to do my own alignment. From what I can tell it should pay for itself pretty quickly.
That LS1 stuff on the fender is going to come off as well.
04-13-2012, 04:55 AM
#312
Not much of an update but the cam is here.
http://www.flickr.com/photos/21527394@N06/6926546690/http://www.flickr.com/photos/21527394@N06/6926546690/
What is not here however is the set of valve springs I ordered at the same time. The 2 weeks to get a custom cam I'm fine with, being told off-the-shelf springs haven't even shipped yet I'm not so happy about. If I had my stuff it would be a simple task to get the cam swapped this weekend, but now with work and vacation I'm set back at least two weeks. Sucks. I don't know who EPS has ship their springs out but they are slow as ****. I'd certainly go back to EPS for the cam itself however.
While I wait for the last of my parts to arrive I think I might try to make something similar to what this guy did - http://www.chevelles.com/forums/show...83&postcount=2
The idea of the false floor should allow me to mount my amps and ridepro without really taking up any of the space needed for other stuff. The MadElectrical 'new system' should be here soon and at that point the battery is getting moved to the trunk, and hopefully the top pump won't prevent doing something like this (but on the driver's side, so as not to run power cables near and parallel to fuel lines down the length of the car).

Unless something crazy happens I think I'm within a few weeks of being finished, then again I think I said that same thing about 14 thread pages ago...
http://www.flickr.com/photos/21527394@N06/6926546690/http://www.flickr.com/photos/21527394@N06/6926546690/
What is not here however is the set of valve springs I ordered at the same time. The 2 weeks to get a custom cam I'm fine with, being told off-the-shelf springs haven't even shipped yet I'm not so happy about. If I had my stuff it would be a simple task to get the cam swapped this weekend, but now with work and vacation I'm set back at least two weeks. Sucks. I don't know who EPS has ship their springs out but they are slow as ****. I'd certainly go back to EPS for the cam itself however.
While I wait for the last of my parts to arrive I think I might try to make something similar to what this guy did - http://www.chevelles.com/forums/show...83&postcount=2
The idea of the false floor should allow me to mount my amps and ridepro without really taking up any of the space needed for other stuff. The MadElectrical 'new system' should be here soon and at that point the battery is getting moved to the trunk, and hopefully the top pump won't prevent doing something like this (but on the driver's side, so as not to run power cables near and parallel to fuel lines down the length of the car).
Unless something crazy happens I think I'm within a few weeks of being finished, then again I think I said that same thing about 14 thread pages ago...
04-13-2012, 06:28 AM
#313
Teching In

Join Date: Oct 2008
Location: Grand Rapids, MI
Posts: 33
Likes: 0
Received 0 Likes
on
0 Posts

What is not here however is the set of valve springs I ordered at the same time. The 2 weeks to get a custom cam I'm fine with, being told off-the-shelf springs haven't even shipped yet I'm not so happy about. If I had my stuff it would be a simple task to get the cam swapped this weekend, but now with work and vacation I'm set back at least two weeks. Sucks. I don't know who EPS has ship their springs out but they are slow as ****. I'd certainly go back to EPS for the cam itself however.
 04-13-2012, 06:51 AM
#314
I had the same exact issue with EPS when I ordered as well. I had a cam in hand but no pushrods, springs, lifter trays or lifters...........even though they are drop shipped from somewhere else. He doesn't order that stuff until the cam ships...............is what I was told anyway. I had an extra week delay as well. Everything worked out in the end and the car runs well. I do like that trunk idea. I'll have to give that a better look. Keep up the good work
Just realized I might need one of these to move the idler away from the intake. At least it's not too terribly overpriced I guess (but if anyone has an alternative feel free to point it out) http://dirtydingo.com/store/Muscle-C....html?CDpath=8
Last edited by chuckd71; 04-13-2012 at 09:58 AM.
04-14-2012, 08:01 PM
#315
For lack of anything better to do today I decided to go ahead and swap the cam in. The old cam came out easily enough but the new one will not go in any farther than halfway. The center most circular part that rides on the bearing will not fit in through the front of the motor. I tried putting it in backwards to test it and got the same result. Just to make sure the bearings were lined up I put the old cam back in, and it went in and out super easily. The center most part of the new cam is just too fat it seems. What the hell. Going to call EPS on Monday I guess.
The old cam looks to be in good shape so I coated it in assembly lube to make sure it stays that way. Once I figure out what it is it's going up for sale, but I'm having a hard time identifying it. I was told it was an LS7 cam, but who knows. I found something saying it was a 3 bolt LS7 cam online but searching for "12517552" doesn't give me much. Here is a picture.

The old cam looks to be in good shape so I coated it in assembly lube to make sure it stays that way. Once I figure out what it is it's going up for sale, but I'm having a hard time identifying it. I was told it was an LS7 cam, but who knows. I found something saying it was a 3 bolt LS7 cam online but searching for "12517552" doesn't give me much. Here is a picture.
05-03-2012, 11:04 AM
#316
Been in Peru/ Chile since the last post but got back yesterday to find that my valve springs had come while I was gone. Also got an email with a return label to ship my cam back to comp to be checked out, they suspect it might have gotten bent somehow (I bought some calipers and it appears to be the okay size-wise) but who knows. The shipping boxes were fine. This whole cam/ spring delay has been a pretty big setback and I missed being able to use vacation time to finish the car.
Using the Lingefelter spring tool it took right at an hour to do the springs on both heads, and a decent amount of that time was spent swearing while looking for the lock I dropped in the floor. While designed for LS1 style heads it worked fine for me on my L92 heads with the offset springs, I just didn't tighten it down all the way. Sadly, this is what passes for progress at this point. This weekend I'll try and get the brakes bled and the Ridepro wired up (assuming my stuff from MadElectrical makes it here).

Using the Lingefelter spring tool it took right at an hour to do the springs on both heads, and a decent amount of that time was spent swearing while looking for the lock I dropped in the floor. While designed for LS1 style heads it worked fine for me on my L92 heads with the offset springs, I just didn't tighten it down all the way. Sadly, this is what passes for progress at this point. This weekend I'll try and get the brakes bled and the Ridepro wired up (assuming my stuff from MadElectrical makes it here).
05-14-2012, 05:07 AM
#317
The Mad electrical stuff came, I ordered the new system with the remote starter solenoid and the stuff for a trunk mount battery. He also sent me three relay kits despite my having told him that everything in the car (fans, headlights, fuel pump, etc) was already hooked up with them, so a couple will go back (on permanent-magnet starters with remote solenoids you need a relay there to prevent run on, or at least that is what I've read). He also threw in and charged me $9 for some sort of book he made, not a big deal but not something I would have asked for since I just bought a bigger more expensive book covering the same stuff. Overall though it looks like a good setup and there are hand-written notes where he has added tips and extra instructions. He certainly seems to take an interest in what you're working on.
One thing the trunk battery kit does not come with is the cable from the battery to the starter, but I found a 1/0 AWG cable with terminals already on it online. Going to add in a remote battery cut off switch as well as a safety measure.

With any luck the car will be back on the ground by the end of the week after spending months on jack stands. The back wheels are on and once I get a couple M14x2x47 bolts the front will be together as well. Might be without a stereo for a bit but that is something I'll have to live with until I can build a trunk box.
Wish I could have used bigger rotors but this looks way better than those old drums.

Need to redo the rear sway bar and install the front one but that should be fairly straightforward. Still no word from Comp about my cam, I called them last week and they said they were working on it and would call me back but of course they never did.
One thing the trunk battery kit does not come with is the cable from the battery to the starter, but I found a 1/0 AWG cable with terminals already on it online. Going to add in a remote battery cut off switch as well as a safety measure.
With any luck the car will be back on the ground by the end of the week after spending months on jack stands. The back wheels are on and once I get a couple M14x2x47 bolts the front will be together as well. Might be without a stereo for a bit but that is something I'll have to live with until I can build a trunk box.
Wish I could have used bigger rotors but this looks way better than those old drums.
Need to redo the rear sway bar and install the front one but that should be fairly straightforward. Still no word from Comp about my cam, I called them last week and they said they were working on it and would call me back but of course they never did.
05-21-2012, 01:18 AM
#318
Still no cam. Pretty awesome.
I got the rear sway bar roughly into place and must say this was some of the least fun I've ever had installing anything, at least since I put the A/C in. If you have a right angle drill and the rear out it'd be much, much easier, but all I had was a regular 1/2 drill. As soon as I finished I went to Lowes and saw that they make a right-angle attachment that is only $20, but who knows how well it works.

The brakes are in place and I think they are bled, at least most of the way. I opened my rear bleeders and filled the master's reservoirs and about 15 min later fluid started dripping out. A couple pumps of the brakes and air stopped coming out, so I repeated this at each corner. Now that there is fluid throughout I'm going to try and final bleed on Wed.
This is the Dirty Dingo idler relocation bracket that will move the topmost pulley out of the way of the car intake. Probably could have made one myself but these guys make good stuff and stand behind their product so I figured I'd give them another shot.

Also picked up a pre-terminaled length of marine-grade SGT 1/0 battery cable to mount the battery in the trunk. While the cable will be electrically dead 99.999% of the time I opted for marine grade since I like the idea of it being self-extenguishing should something bad happen.
There is a thread floating around about wire coverings but I can't seem to find it. I have tons of wires to cover and hide so I ordered some of the stuff linked to below. It's more plasticy than the expensive stuff that feels like mesh fabric, but it's fairly tough and there is plenty of overlap at the split so it stays closed well. My harness is just your average tape-wrapped deal so this will clean things up a bit.
http://www.ebay.com/itm/360267165442
These velcro things are pretty cool and are an easy alternative to zip ties http://www.ebay.com/itm/170531577457...84.m1439.l2649
If the cam comes in this week I think there is a good chance this thing will be done by Chevellabration.
I got the rear sway bar roughly into place and must say this was some of the least fun I've ever had installing anything, at least since I put the A/C in. If you have a right angle drill and the rear out it'd be much, much easier, but all I had was a regular 1/2 drill. As soon as I finished I went to Lowes and saw that they make a right-angle attachment that is only $20, but who knows how well it works.
The brakes are in place and I think they are bled, at least most of the way. I opened my rear bleeders and filled the master's reservoirs and about 15 min later fluid started dripping out. A couple pumps of the brakes and air stopped coming out, so I repeated this at each corner. Now that there is fluid throughout I'm going to try and final bleed on Wed.
This is the Dirty Dingo idler relocation bracket that will move the topmost pulley out of the way of the car intake. Probably could have made one myself but these guys make good stuff and stand behind their product so I figured I'd give them another shot.
Also picked up a pre-terminaled length of marine-grade SGT 1/0 battery cable to mount the battery in the trunk. While the cable will be electrically dead 99.999% of the time I opted for marine grade since I like the idea of it being self-extenguishing should something bad happen.
There is a thread floating around about wire coverings but I can't seem to find it. I have tons of wires to cover and hide so I ordered some of the stuff linked to below. It's more plasticy than the expensive stuff that feels like mesh fabric, but it's fairly tough and there is plenty of overlap at the split so it stays closed well. My harness is just your average tape-wrapped deal so this will clean things up a bit.
http://www.ebay.com/itm/360267165442
These velcro things are pretty cool and are an easy alternative to zip ties http://www.ebay.com/itm/170531577457...84.m1439.l2649
If the cam comes in this week I think there is a good chance this thing will be done by Chevellabration.
Last edited by chuckd71; 05-21-2012 at 01:29 AM.