
71 Pontiac Lemans
 02-22-2013, 01:12 PM
#81
Teching In
Join Date: Feb 2013
Location: Highlandville, MO
Posts: 10
Likes: 0
Received 0 Likes
on
0 Posts
awesome build. thanks for posting, i'm learning a lot.
where can I find plans for a "rolltisserie?"
also, did you buy that alternator/tensioner bracket or fab. it yourself?
where can I find plans for a "rolltisserie?"
also, did you buy that alternator/tensioner bracket or fab. it yourself?
 02-25-2013, 03:40 PM
#83
Staging Lane
Thread Starter

Dashboard
The next few posts will partially cover how I am getting the interior from the GTO donor into the Lemans. This first post will talk about the installation of the dashboard.
The dashboard is a geometric and ergonomic challenge. I am trying to incorporate mechanical parts and design from a car built in 2004 into a car built in 1971. The philosophy behind the designs of the dash area was quite a bit different between these two time periods. Some compromises have to be done to merge the two together. The main issue is that the windshield on newer cars such as the 2004 GTO are much more steeply angled than on the 1971 Lemans. This means the top of the dash is deeper in length as well. Setting the newer dash as is under the Lemans windshield pushes everything else in the interior back to the point where the front seat would be immediately in front of the rear seat making the rear seat useless and probably looking awkward. This would also end up with a lot of wasted space under the dash behind the firewall. Going to the other extreme pushing the dash forward so the firewall of the GTO donor would end up in the same place as the Lemans firewall would force trimming a great deal from the depth of the dash probably looking awkward as well. I compromised somewhere in the middle.
I first removed the original welded sheet metal dash section from the Lemans at the base of the windshield. I had to remove this anyway because I had rust in the lower windshield channel and had to weld a new channel in. I then removed the plastic and vinyl dash cover from the GTO donor and propped it up in place to check the fit. I did end up trimming the plastic sub structure of this assembly and therefore temporarily lost the defroster vents.
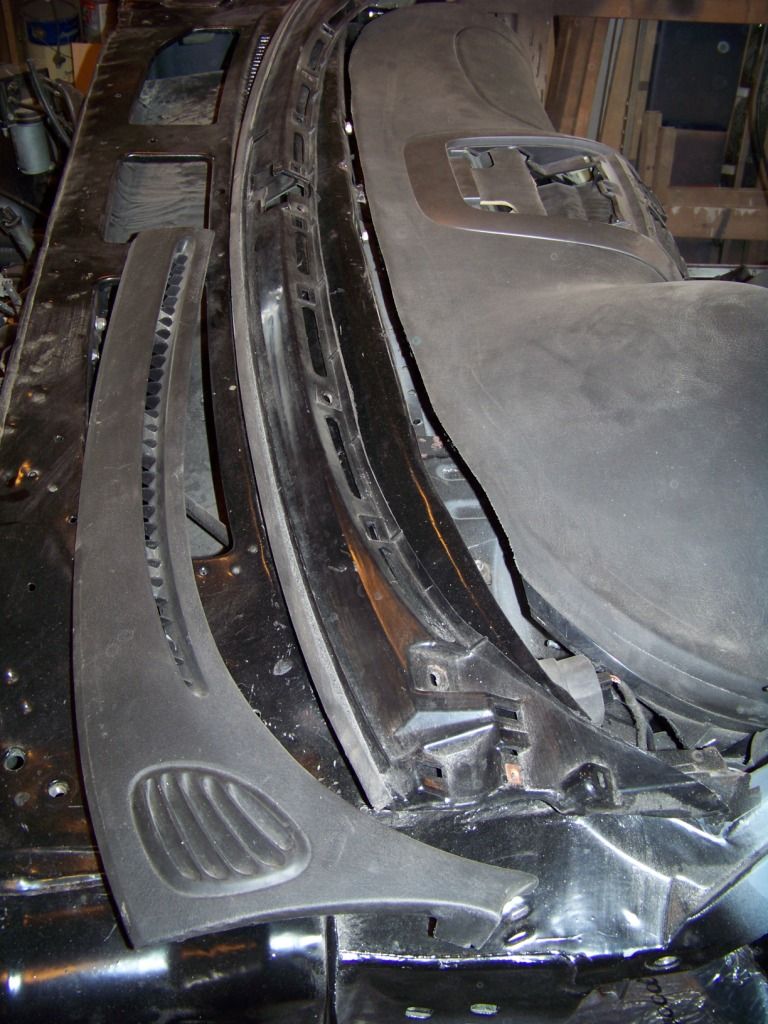
It's hard to see what is going on above since everything is black, but looking right to left we have the GTO dash pad, the windshield channel of the Lemans, the plastic section I cut from the GTO dash structure that was trimmed from the GTO dash pad, and the defroster vent grill. My plan is trim the vinyl top of the GTO dash a little more and install the defroster grills in the gap between the windshield channel and GTO dash pad.
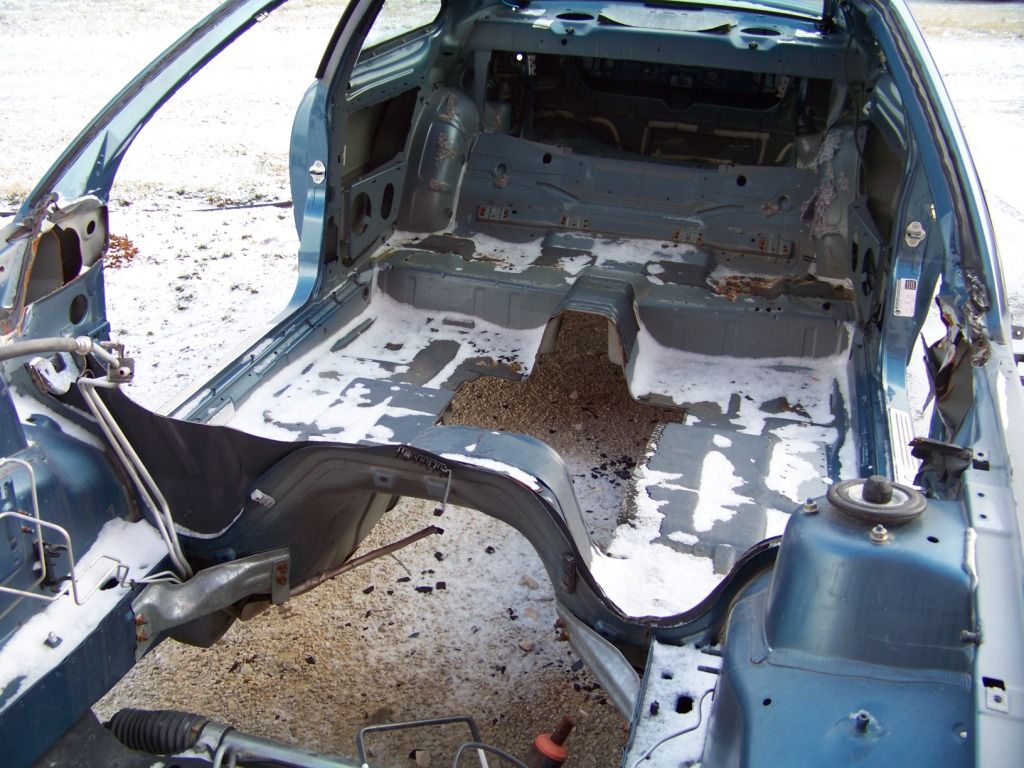
I hope to relocate the vents into the vinyl area of the dash. As I was doing this mock up I took the seats from the GTO donor and placed them on the floor of the Lemans to get a feel for how it was going.
As I removed the dash components from the GTO donor, taking pictures as I went to aid re-assembly, I studied how everything went together and was supported. I decided to remove part of the firewall from the GTO donor and mount it into the Lemans to help support the new dash and the AC unit. This firewall/cowl structure also forms the ductwork for the defroster vents and supports the dash wire harness and steering column. I first removed the windshield (a mess since it broke and came out in pieces) and then cut the firewall out.
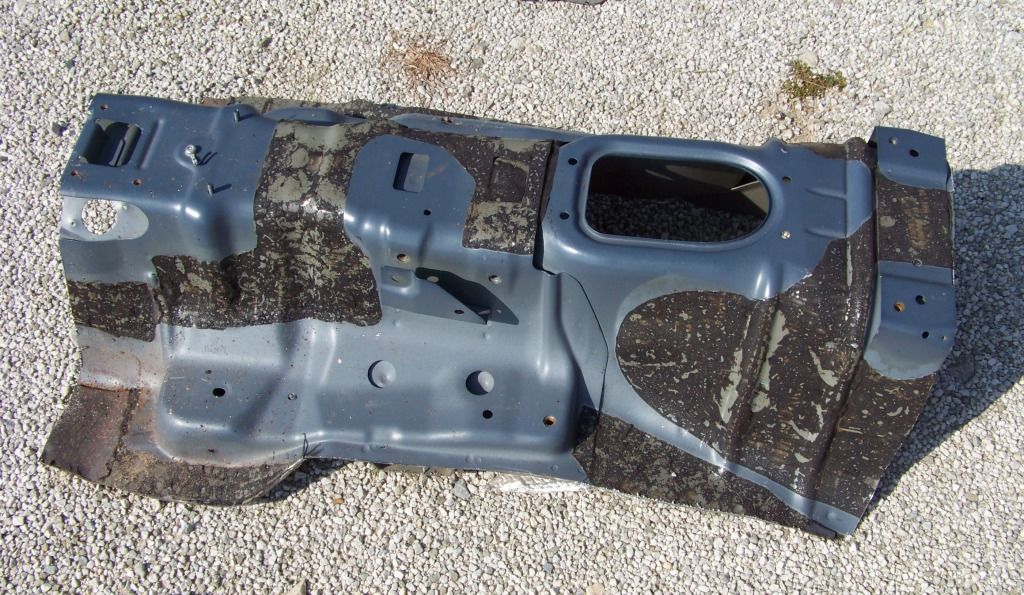
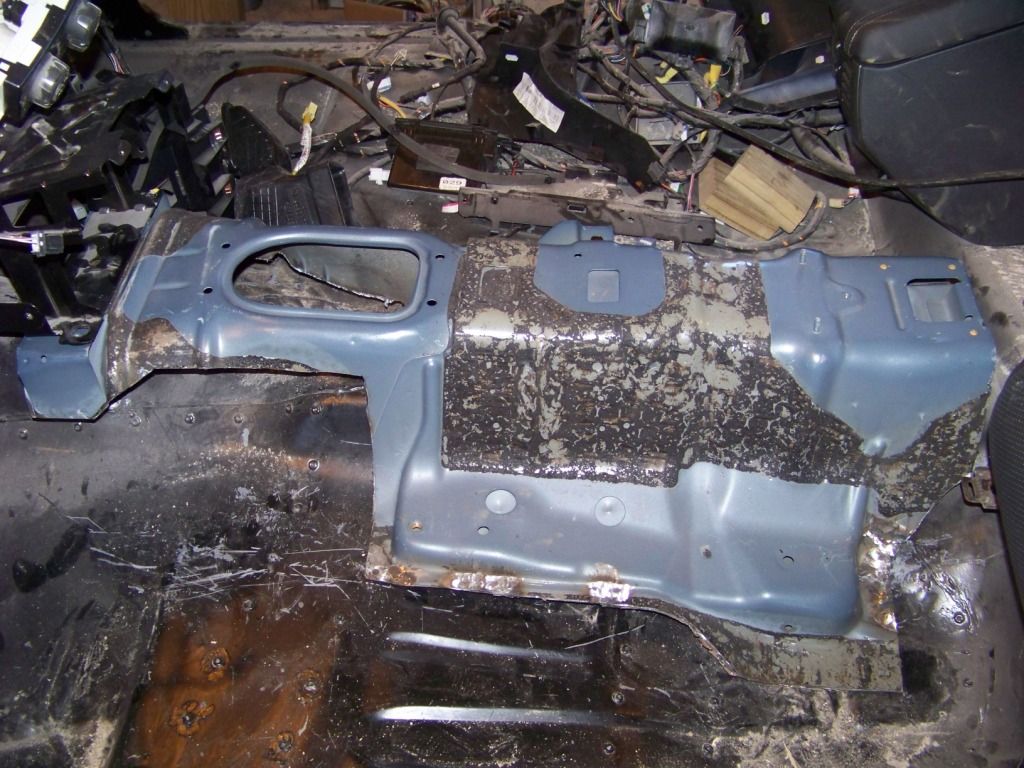
From there it was a trial and error process of fitting it into place, trimming areas here and there, and making brackets to support the GTO firewall into the Lemans. The two pictures below show the front and rear views of the removed firewall structure after all the trimming was done.
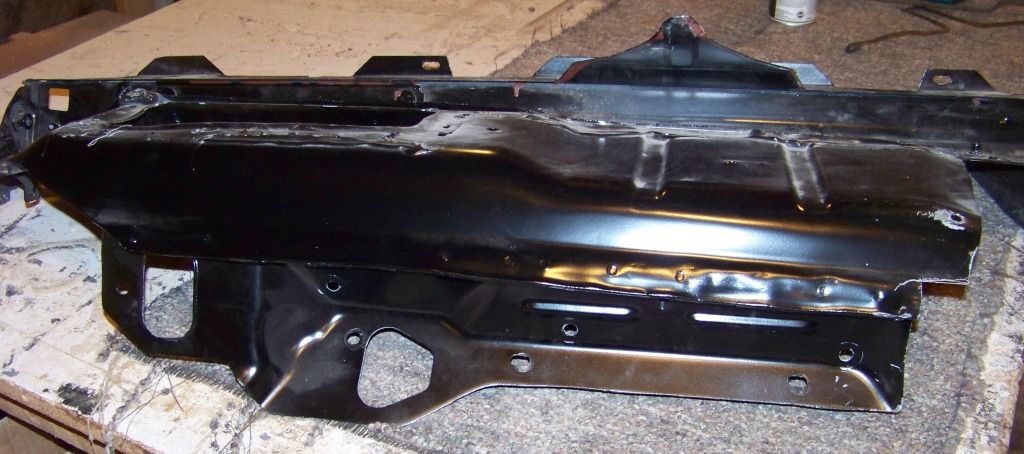
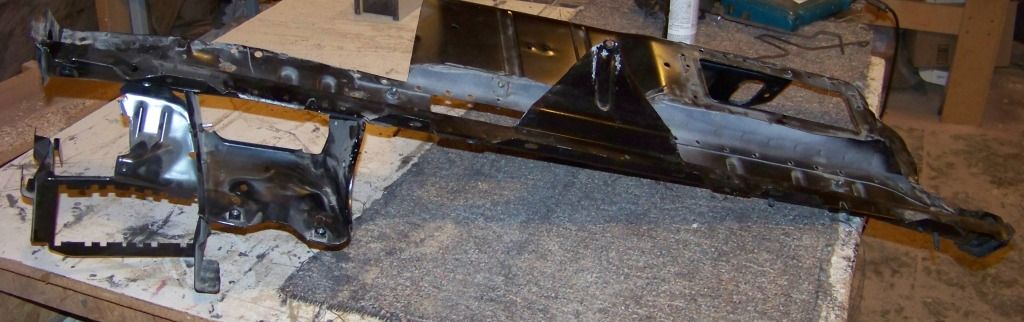
I tried to have the firewall supported at several different points so it�s sturdy. This GTO firewall ended up being about 4 inches behind the Lemans firewall.
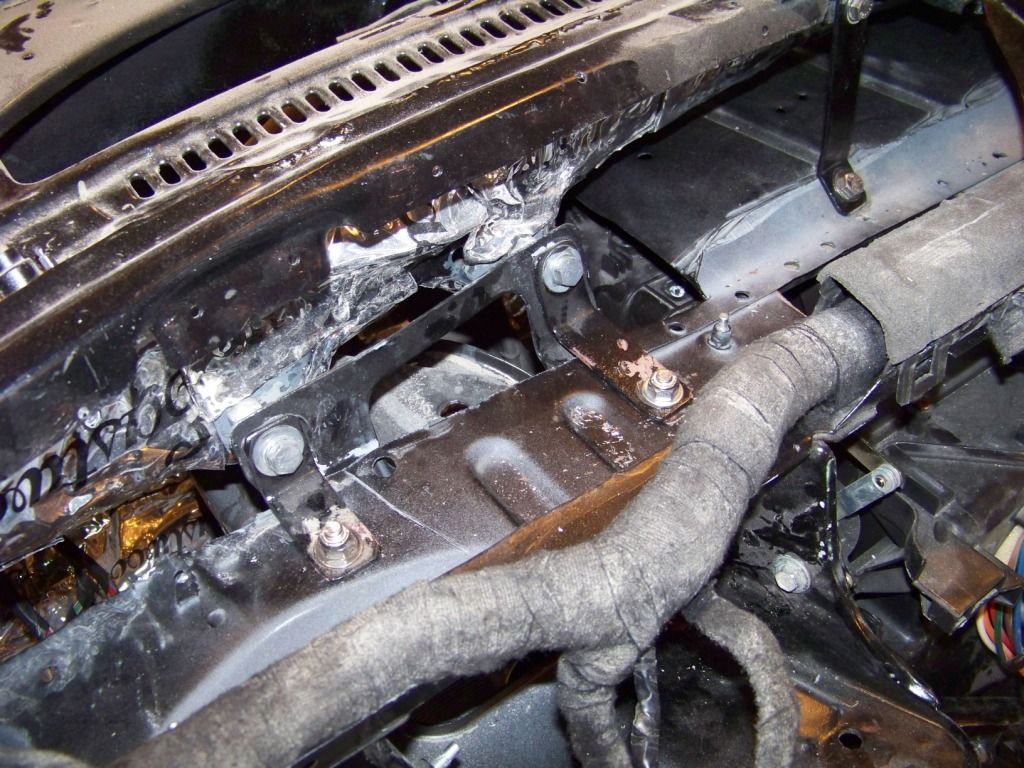
The view below shows the attachment of the firewall above the steering column, these two small brackets connected the GTO firewall to the brake pedal bracket support locations on the Lemans.
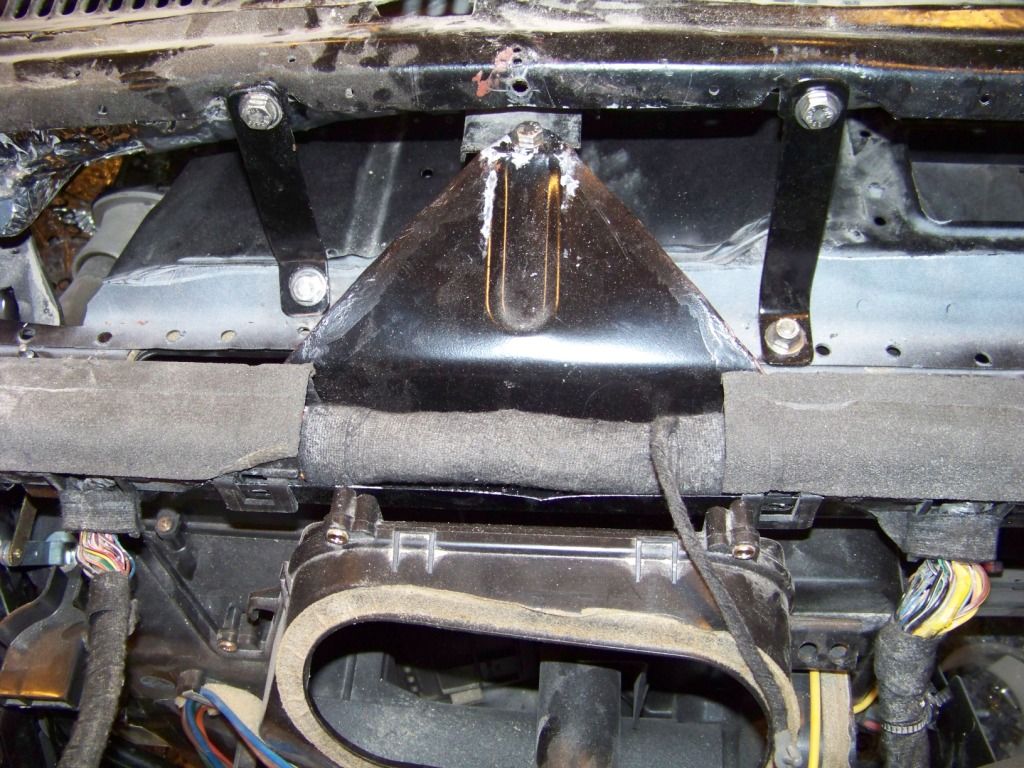
This picture shows the support of the GTO firewall in the center.
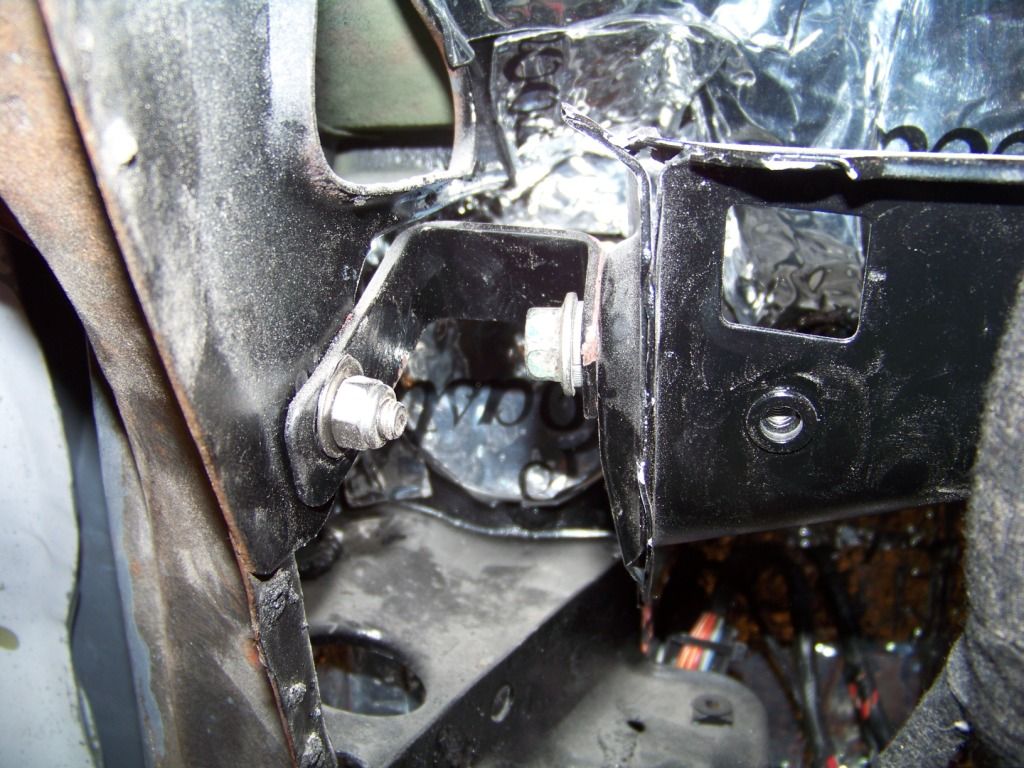
On the outer ends the GTO firewall is supported by these small u-shaped brackets.
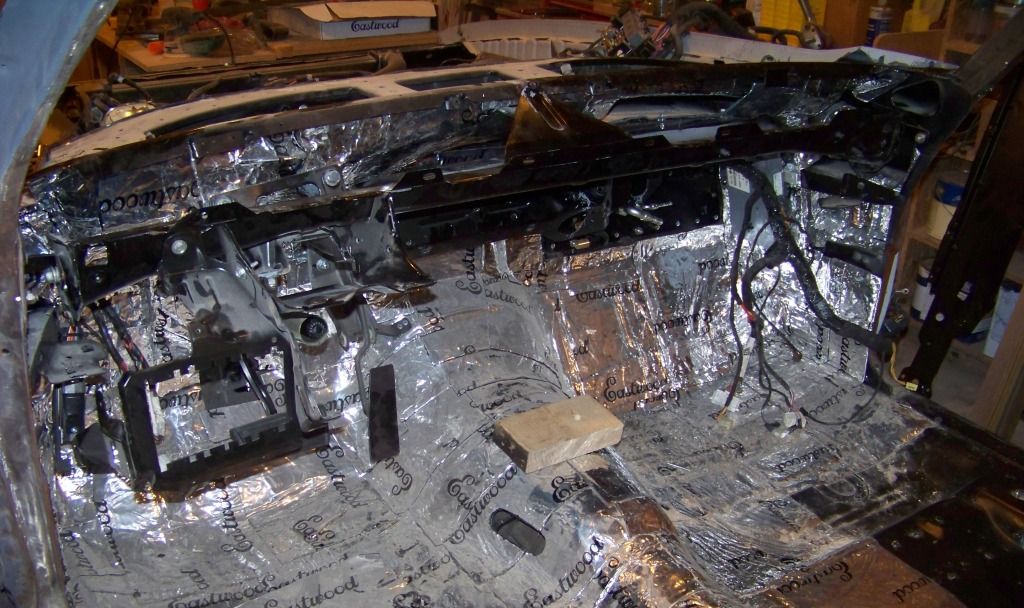
At this point the GTO firewall structure is attached and it�s just a matter of reinstalling the dash parts. First the dashboard wire harness is installed and the HVAC unit is bolted in. The large white object on the right is the passenger airbag module.
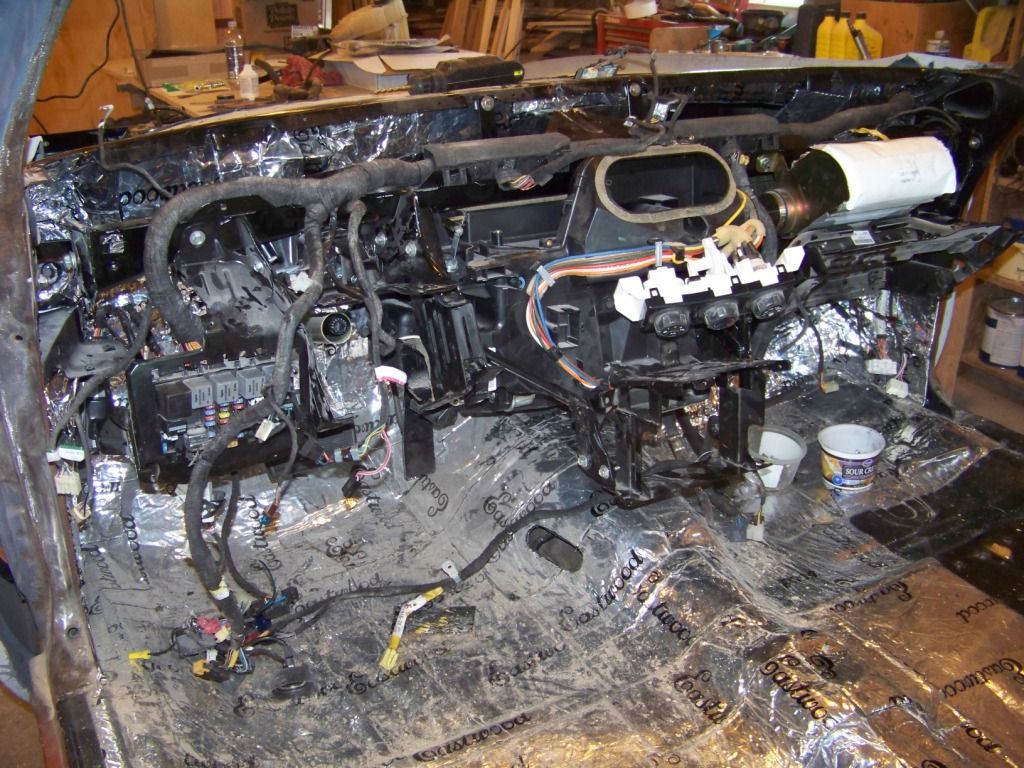
From here parts are installed in the reverse order in that they were removed, connecting electrical components as I go. This is pretty much where I am at the moment, except I do have the upper part of the steering column and wheel installed also.
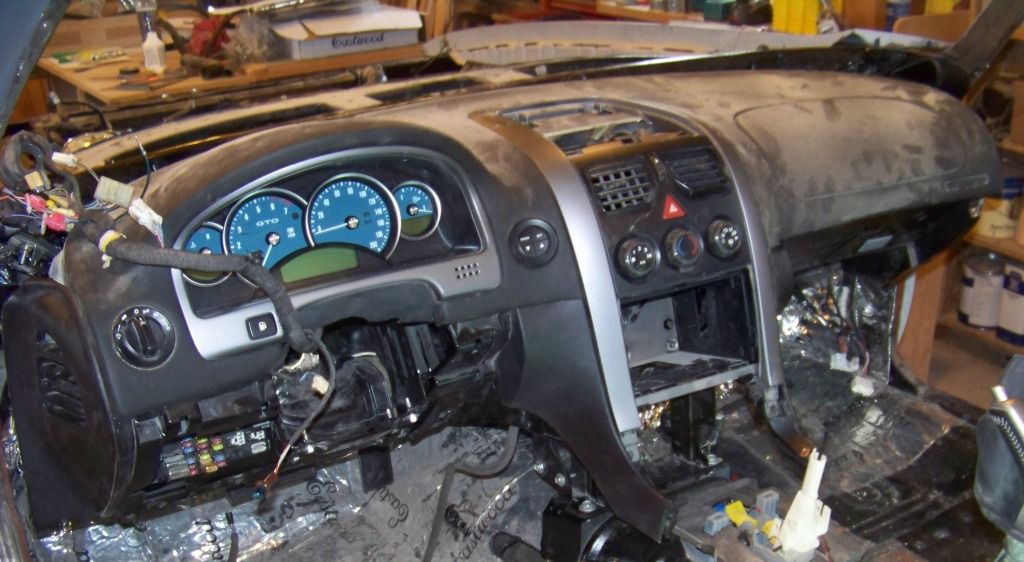
I obviously still have a lot to do to in the interior such as redo the defroster vents, rework the door panels so they flow into the dash as they did in the GTO (the side AC vents are actually in the door panels), install the seats, install the console, install the rear seats, etc. All of these things will be covered in future posts, starting with the console installation.
Now that everything is hooked up I was able to successfully start the engine (after some delay finding a connector under the hood that wasn�t hooked up). It pretty much fired right up thinking it was still in the GTO. I do have some codes such as two for the O2 sensors (the rear ones are obviously missing) and one for a injector circuit malfunction which I don�t how that happened. But the engine seems to be running great; it was exciting to see and hear it come to life!
The next few posts will partially cover how I am getting the interior from the GTO donor into the Lemans. This first post will talk about the installation of the dashboard.
The dashboard is a geometric and ergonomic challenge. I am trying to incorporate mechanical parts and design from a car built in 2004 into a car built in 1971. The philosophy behind the designs of the dash area was quite a bit different between these two time periods. Some compromises have to be done to merge the two together. The main issue is that the windshield on newer cars such as the 2004 GTO are much more steeply angled than on the 1971 Lemans. This means the top of the dash is deeper in length as well. Setting the newer dash as is under the Lemans windshield pushes everything else in the interior back to the point where the front seat would be immediately in front of the rear seat making the rear seat useless and probably looking awkward. This would also end up with a lot of wasted space under the dash behind the firewall. Going to the other extreme pushing the dash forward so the firewall of the GTO donor would end up in the same place as the Lemans firewall would force trimming a great deal from the depth of the dash probably looking awkward as well. I compromised somewhere in the middle.
I first removed the original welded sheet metal dash section from the Lemans at the base of the windshield. I had to remove this anyway because I had rust in the lower windshield channel and had to weld a new channel in. I then removed the plastic and vinyl dash cover from the GTO donor and propped it up in place to check the fit. I did end up trimming the plastic sub structure of this assembly and therefore temporarily lost the defroster vents.
It's hard to see what is going on above since everything is black, but looking right to left we have the GTO dash pad, the windshield channel of the Lemans, the plastic section I cut from the GTO dash structure that was trimmed from the GTO dash pad, and the defroster vent grill. My plan is trim the vinyl top of the GTO dash a little more and install the defroster grills in the gap between the windshield channel and GTO dash pad.
I hope to relocate the vents into the vinyl area of the dash. As I was doing this mock up I took the seats from the GTO donor and placed them on the floor of the Lemans to get a feel for how it was going.
As I removed the dash components from the GTO donor, taking pictures as I went to aid re-assembly, I studied how everything went together and was supported. I decided to remove part of the firewall from the GTO donor and mount it into the Lemans to help support the new dash and the AC unit. This firewall/cowl structure also forms the ductwork for the defroster vents and supports the dash wire harness and steering column. I first removed the windshield (a mess since it broke and came out in pieces) and then cut the firewall out.
From there it was a trial and error process of fitting it into place, trimming areas here and there, and making brackets to support the GTO firewall into the Lemans. The two pictures below show the front and rear views of the removed firewall structure after all the trimming was done.
I tried to have the firewall supported at several different points so it�s sturdy. This GTO firewall ended up being about 4 inches behind the Lemans firewall.
The view below shows the attachment of the firewall above the steering column, these two small brackets connected the GTO firewall to the brake pedal bracket support locations on the Lemans.
This picture shows the support of the GTO firewall in the center.
On the outer ends the GTO firewall is supported by these small u-shaped brackets.
At this point the GTO firewall structure is attached and it�s just a matter of reinstalling the dash parts. First the dashboard wire harness is installed and the HVAC unit is bolted in. The large white object on the right is the passenger airbag module.
From here parts are installed in the reverse order in that they were removed, connecting electrical components as I go. This is pretty much where I am at the moment, except I do have the upper part of the steering column and wheel installed also.
I obviously still have a lot to do to in the interior such as redo the defroster vents, rework the door panels so they flow into the dash as they did in the GTO (the side AC vents are actually in the door panels), install the seats, install the console, install the rear seats, etc. All of these things will be covered in future posts, starting with the console installation.
Now that everything is hooked up I was able to successfully start the engine (after some delay finding a connector under the hood that wasn�t hooked up). It pretty much fired right up thinking it was still in the GTO. I do have some codes such as two for the O2 sensors (the rear ones are obviously missing) and one for a injector circuit malfunction which I don�t how that happened. But the engine seems to be running great; it was exciting to see and hear it come to life!
 02-26-2013, 11:23 AM
#86
TECH Apprentice
iTrader: (10)
Join Date: Dec 2005
Location: Peoria IL
Posts: 340
Likes: 0
Received 0 Likes
on
0 Posts

I want to relocate the battery from the driver side to the passenger side of my '70 GTO. What battery tray did you end up using to move yours? Will a Chevelle tray fit?
Thanks!
Thanks!
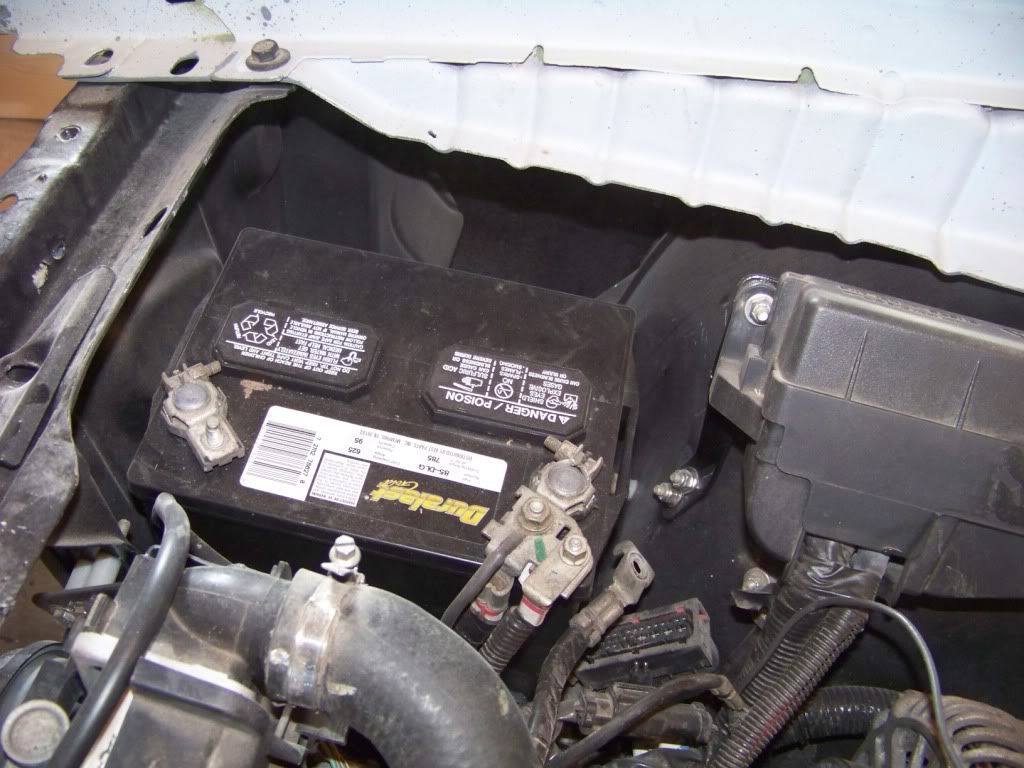
On the new GTO the battery is located on the passenger side just behind the headlight. I was at a car show a few months ago and noticed on Pontiac A-bodies the battery is on the driver�s side and on Chevelles the battery is on the passenger side. To keep things the same as the new GTO I mounted the battery on the Chevelle or passenger side. Since my GTO donor didn�t come with a battery I got a new one from Autozone. I got the correct battery for the new GTO, it fits in the a-body location just fine.
02-26-2013, 04:53 PM
#88
Staging Lane
Thread Starter
oldgoat69: Thanks for keeping up with my build! I hope it will be an awesome cruiser some day, I just don't know when that day is coming, I guess it's getting sooner with everything I get done.
50adrod: Using the donor car has been extremely helpful. It seems like I am on a mission to use as much as possible from the GTO. I will try to document everything I use as much as possible.
krwyellowZ28: I ended up reworking the Pontiac a-body battery tray to fit into the Chevelle location by cutting off tabs that were no longer useful and welding tabs where necessary. I thought about buying a Chevelle tray but didn't want to spend the money when I had already bought a new Pontiac tray. See posts 46 and 47 for comments about the Chevelle tray, it may not fit.
otiger50: Thanks for the compliment! I was fussing with the defroster vents today, made some progress with that. I am using the entire harness from the GTO donor. I stripped all of the old wiring from the Lemans, after 40 years I thought it was ready to be retired. As far as lights go I plan on splicing Lemans pigtails onto the GTO donor harness at the appropriate places. As far as other things such as interior lights, door locks and windows I will probably do something similar; splicing into the GTO donor harness as required to hook up those components. I haven't even looked inside the GTO donor doors yet so I have no idea if the lock and window hardware can be used. By the way, I did look for my rolltisserie plans, what I have is pretty basic and would be hard for someone to use. I still have the rolltisserie in my shop, when I have some free time I will get it out for pictures and put some dimensions on.
02-27-2013, 06:26 AM
#89
TECH Fanatic
Per fsdproject, the Chevelle battery tray wont fit the Pontiac without surgery. I ended up slicing and dicing my Pontiac tray to make it work. Remember there is no job you can't accomplish with brute force and ignorance!
02-27-2013, 07:27 AM
#90
TECH Apprentice
iTrader: (10)
Join Date: Dec 2005
Location: Peoria IL
Posts: 340
Likes: 0
Received 0 Likes
on
0 Posts
Good to know... thanks for the replies! Guess I'll have to start throwin' sparks again. 
Awesome work on the LeMans, btw. Diagnosing mechanical/electrical issues down the road shouldn't be much different than as if it were still a 2004, just with old sheet metal.
Awesome work on the LeMans, btw. Diagnosing mechanical/electrical issues down the road shouldn't be much different than as if it were still a 2004, just with old sheet metal.
02-28-2013, 04:46 PM
#91
Staging Lane
Thread Starter
krwyellowZ28: Thanks for the feedback. I am hoping future troubleshooting if any will be easy since the car will essentially still be a 2004 GTO mechanically and electrically. Looked over your thread again, you are making great progress! I am impressed with all the powder coating you did to parts, I am going to have to look into that.
It would be fun to have a get together at Good Guys Columbus this year, we will see if I get mine done in time.
It would be fun to have a get together at Good Guys Columbus this year, we will see if I get mine done in time.
02-28-2013, 05:10 PM
#92
Staging Lane
Thread Starter
Supporting the Console and Seats
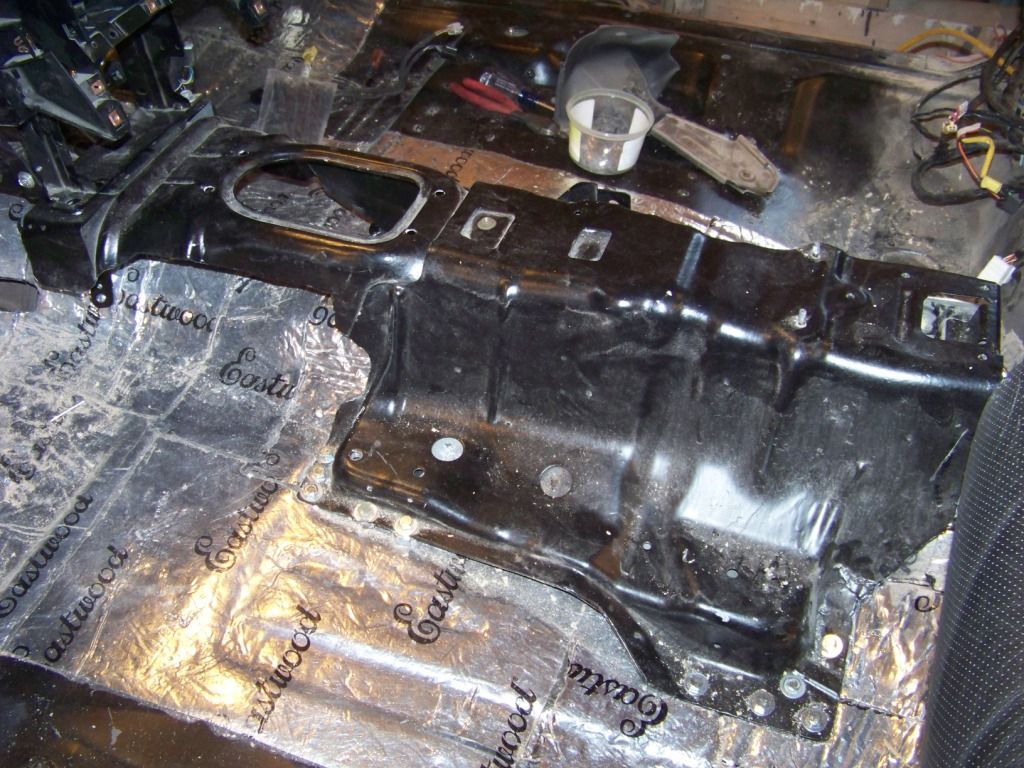
With the dash and steering pretty much all set, I moved further back and worked on the console area. I used the same philosophy I used for the dash in that I removed the structure from the GTO donor that supports the console and mounted it into the floor of the Lemans. This structure supports more than just the console, it also provides mounting points for the shifter, e-brake handle, and the inboard mounts of the front seats. As I did with the dash, I removed the structure from the GTO:
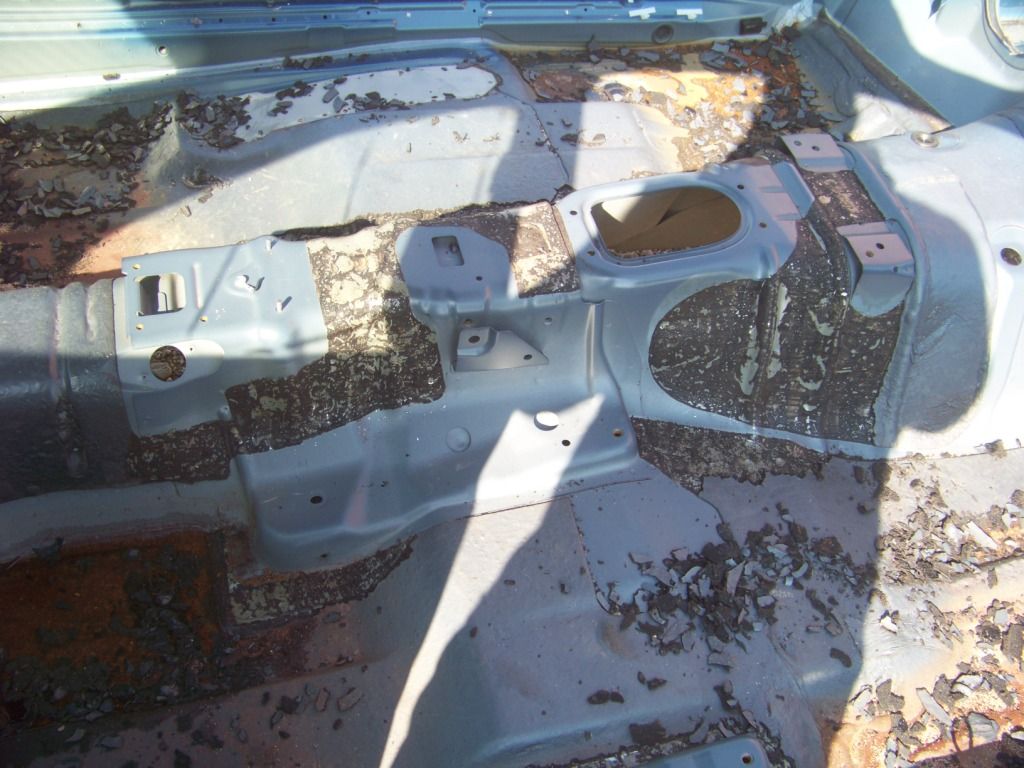
And trimmed it to fit onto the Lemans floor:
I still am not comfortable enough with my welding skills for sheet metal to install something like this with welding, plus my floor is already finished top and bottom, so I thought it better that I bolted it in. I used several 5/16� grade 8 bolts to install it. I knew it had to be fairly secure since this structure also supports the inboard seat mounts and the seats have integral seat belt buckles. Before bolting it in for good I removed all of the sound deadener, sandblasted it and painted it. I also installed sound deadening material to the floor before the tunnel installation.
From here the console components can be installed, starting with the shifter which I will document next.
With the dash and steering pretty much all set, I moved further back and worked on the console area. I used the same philosophy I used for the dash in that I removed the structure from the GTO donor that supports the console and mounted it into the floor of the Lemans. This structure supports more than just the console, it also provides mounting points for the shifter, e-brake handle, and the inboard mounts of the front seats. As I did with the dash, I removed the structure from the GTO:
And trimmed it to fit onto the Lemans floor:
I still am not comfortable enough with my welding skills for sheet metal to install something like this with welding, plus my floor is already finished top and bottom, so I thought it better that I bolted it in. I used several 5/16� grade 8 bolts to install it. I knew it had to be fairly secure since this structure also supports the inboard seat mounts and the seats have integral seat belt buckles. Before bolting it in for good I removed all of the sound deadener, sandblasted it and painted it. I also installed sound deadening material to the floor before the tunnel installation.
From here the console components can be installed, starting with the shifter which I will document next.
02-28-2013, 05:25 PM
#93
Staging Lane
Thread Starter
Shifter
Since my interior installation including the shifter was going to be a few inches further rearward from the transmission than it was on the GTO donor the shifter linkage wasn�t going to work. I used the parts from the GTO with a longer rod I fabricated myself to connect the shifter to the transmission.
Shown below are the parts I fabricated.
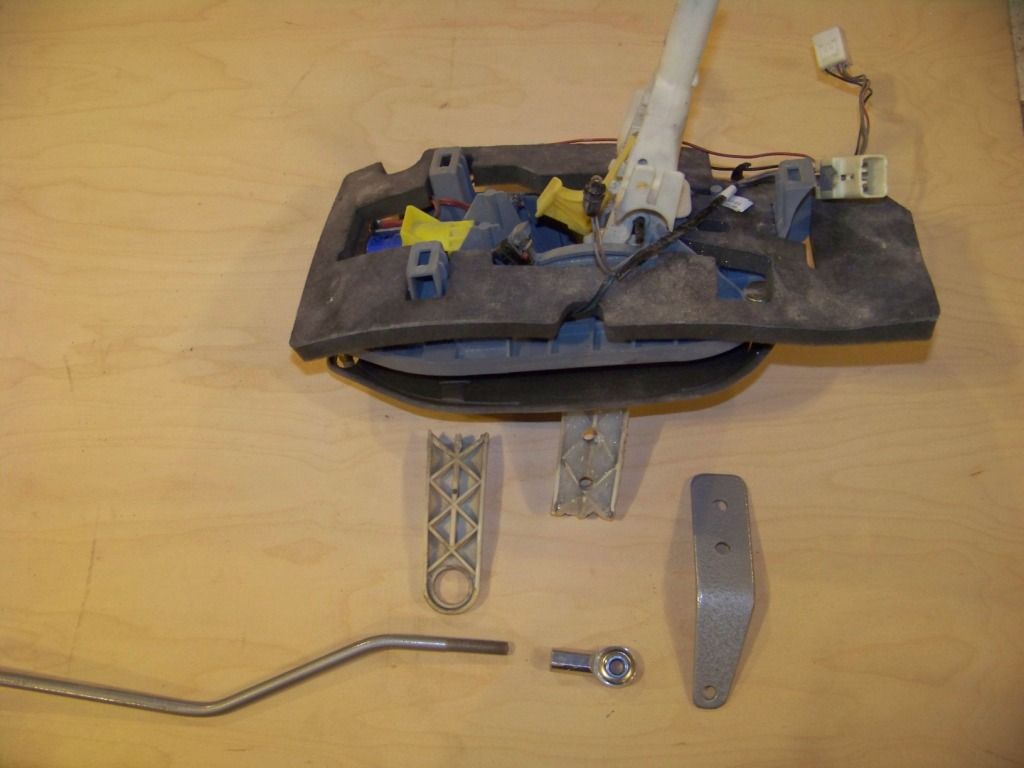
When I installed the shifter into the console substructure I found the lower lever on the shifter rubbed along the top of the Lemans� floor. I tried to bend the lever with heat from a heat gun but ended up breaking it off. I realized it was too long to work anyway so that led to plan B which was to rework the linkage to work with a smaller lever. Originally the lever had a radius of about 6 inches, the reworked lever reduced that to about 4 � inches. I filled the cavities in the lever with epoxy and then made a lever extension from steel strap as shown above. The lever extension was just bolted to the remains of the plastic lever with two 5/16" bolts.
I cut an oval in the Lemans� floor as shown to provide a place for the new linkage rod to pass through.
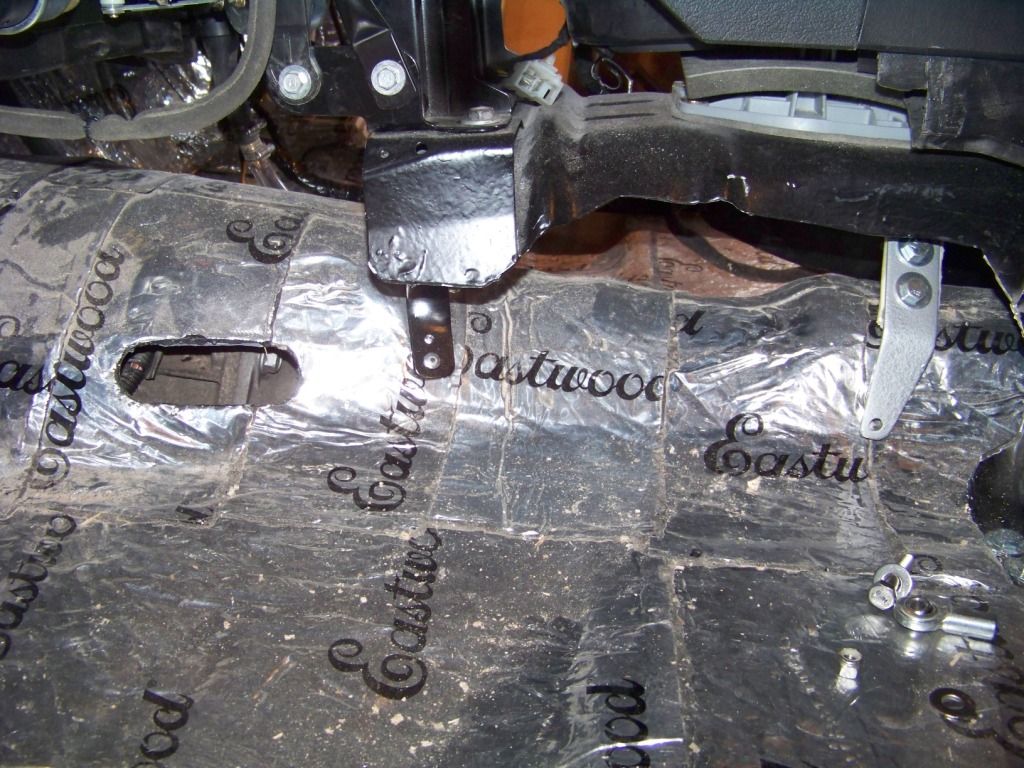
The lever on the transmission was shortened a proportional amount to get the same travel there.
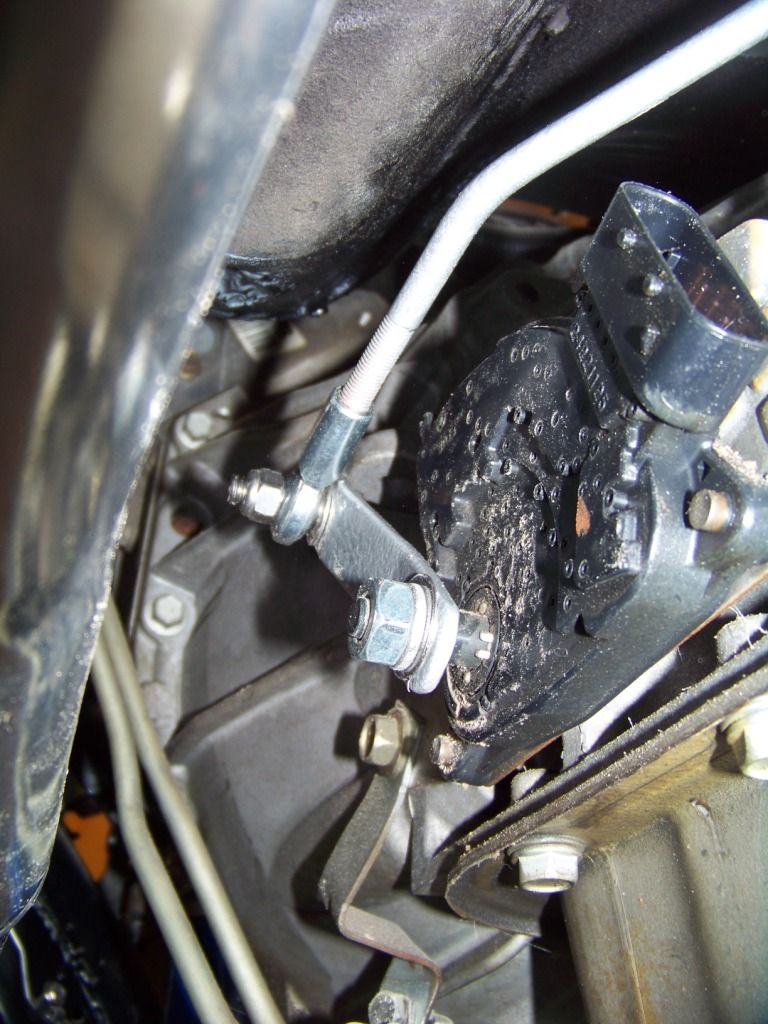
The final picture below shows the shifter and new reworked linkage installed. I made the linkage rod from 5/16� dia steel rod bent as required and then cut threads on both ends. I then installed rod ends that had female 5/16� x 24 threads and bolted them to each of the two levers with 5/16" bolts. I used rod ends bought from McMaster, part number 60645K331.
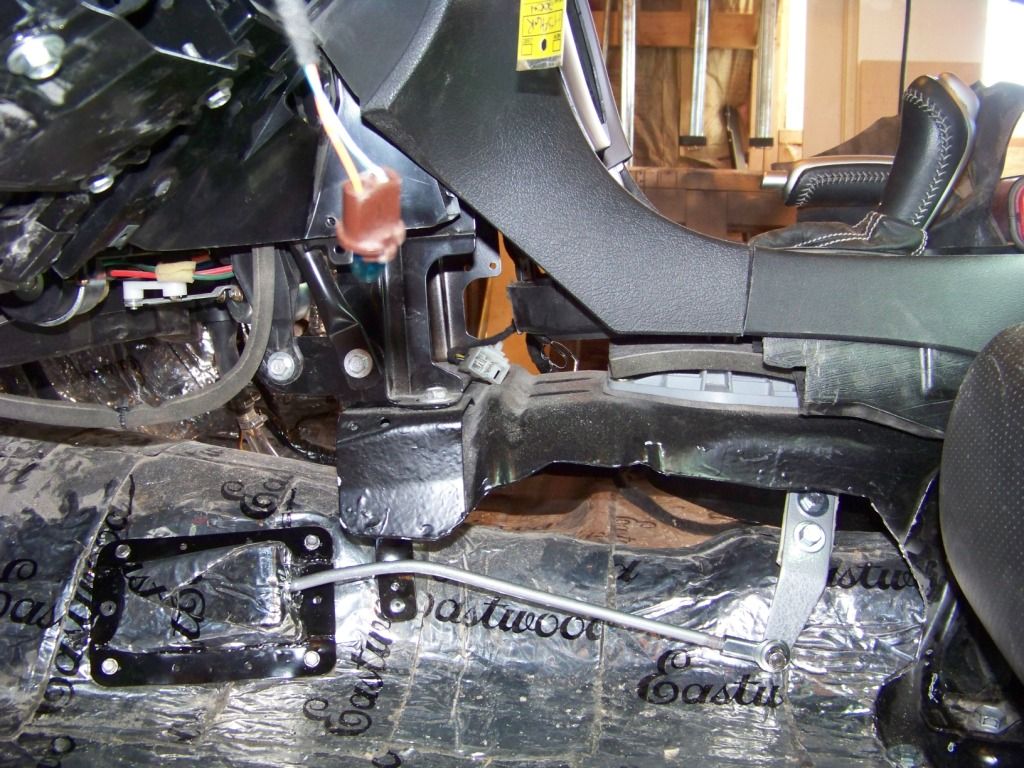
The cover was made from bent and welded sheet steel to cover the hole made in the floor, the cover has a hole in the back face of it to allow travel of the linkage rod. A little minor adjusting to the rod ends and it works great!
Since my interior installation including the shifter was going to be a few inches further rearward from the transmission than it was on the GTO donor the shifter linkage wasn�t going to work. I used the parts from the GTO with a longer rod I fabricated myself to connect the shifter to the transmission.
Shown below are the parts I fabricated.
When I installed the shifter into the console substructure I found the lower lever on the shifter rubbed along the top of the Lemans� floor. I tried to bend the lever with heat from a heat gun but ended up breaking it off. I realized it was too long to work anyway so that led to plan B which was to rework the linkage to work with a smaller lever. Originally the lever had a radius of about 6 inches, the reworked lever reduced that to about 4 � inches. I filled the cavities in the lever with epoxy and then made a lever extension from steel strap as shown above. The lever extension was just bolted to the remains of the plastic lever with two 5/16" bolts.
I cut an oval in the Lemans� floor as shown to provide a place for the new linkage rod to pass through.
The lever on the transmission was shortened a proportional amount to get the same travel there.
The final picture below shows the shifter and new reworked linkage installed. I made the linkage rod from 5/16� dia steel rod bent as required and then cut threads on both ends. I then installed rod ends that had female 5/16� x 24 threads and bolted them to each of the two levers with 5/16" bolts. I used rod ends bought from McMaster, part number 60645K331.
The cover was made from bent and welded sheet steel to cover the hole made in the floor, the cover has a hole in the back face of it to allow travel of the linkage rod. A little minor adjusting to the rod ends and it works great!

 03-06-2013, 08:12 AM
#97
Staging Lane
Thread Starter
Thanks for all the comments, it is appreciated! The feedback comes at a good time, I have been feeling a little burned out with the project; especially as time goes by and I am starting to realize I probably won't get it presentable by this summer. Oh well, it will get done when it gets done. I will keep plugging away at it and posting my progress.
Phil
Phil
03-06-2013, 02:31 PM
#98
TECH Apprentice
iTrader: (10)
Join Date: Dec 2005
Location: Peoria IL
Posts: 340
Likes: 0
Received 0 Likes
on
0 Posts
I know exactly how you feel with getting burned out. I had to step away from my project for a few days and reboot my brain. However, you're making great progress at a great pace and I would be surprised if its not running by the summer.
Plus, your project is a lot more in depth than mine so I've been using your progress as motivation to get mine done.
Plus, your project is a lot more in depth than mine so I've been using your progress as motivation to get mine done.
03-07-2013, 07:17 PM
#100
Staging Lane
Thread Starter
skimms98: Thanks for your feedback! It's gratifying to hear people enjoy my build and find it useful. It's helping me get enthused again to head back out to the shop.
During my break from my build I have been shoveling snow (got about 8 inches of it the other day) and selling unused parts from both the GTO donor and Lemans on eBay. Hope to get back to it tomorrow.
During my break from my build I have been shoveling snow (got about 8 inches of it the other day) and selling unused parts from both the GTO donor and Lemans on eBay. Hope to get back to it tomorrow.