

71 Pontiac Lemans
 03-08-2013, 12:14 AM
#101
Registered User

Join Date: Mar 2013
Posts: 1
Likes: 0
Received 0 Likes
on
0 Posts
I usually just get on here and get info and browse but i just went through your build and the quality of work and how cool and good everything is coming together i had to register just to let you know you are doing a great job and it looks very very good and keep it up.
 03-30-2013, 08:28 AM
#102
Staging Lane
Thread Starter

Donor Destruction
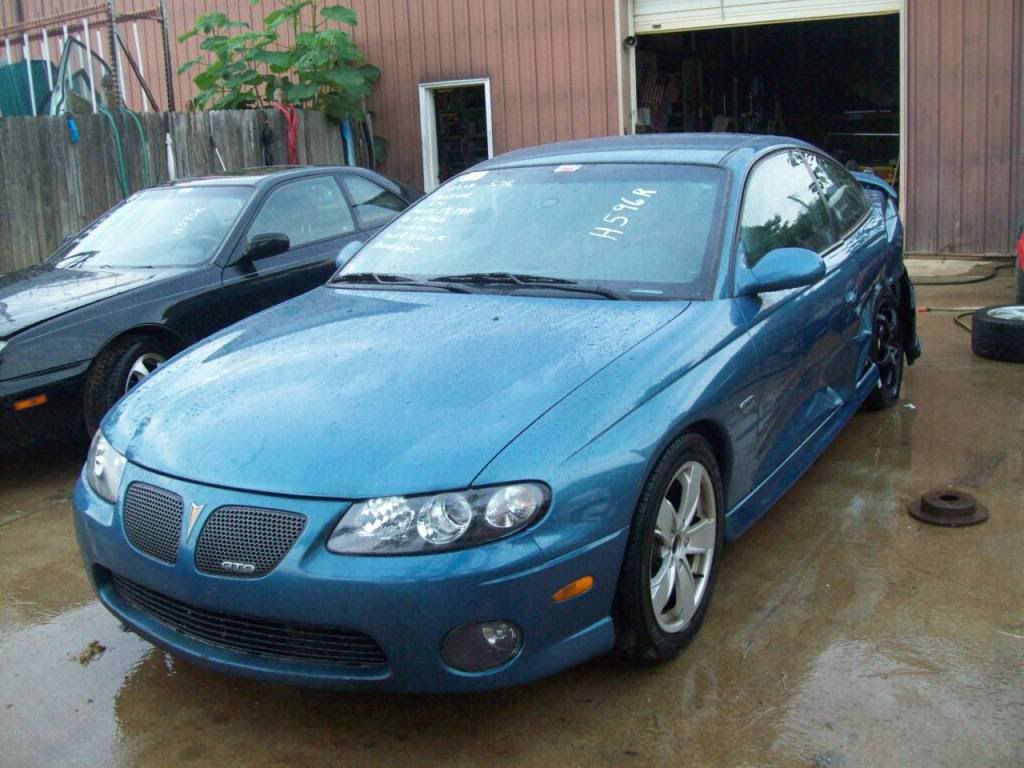
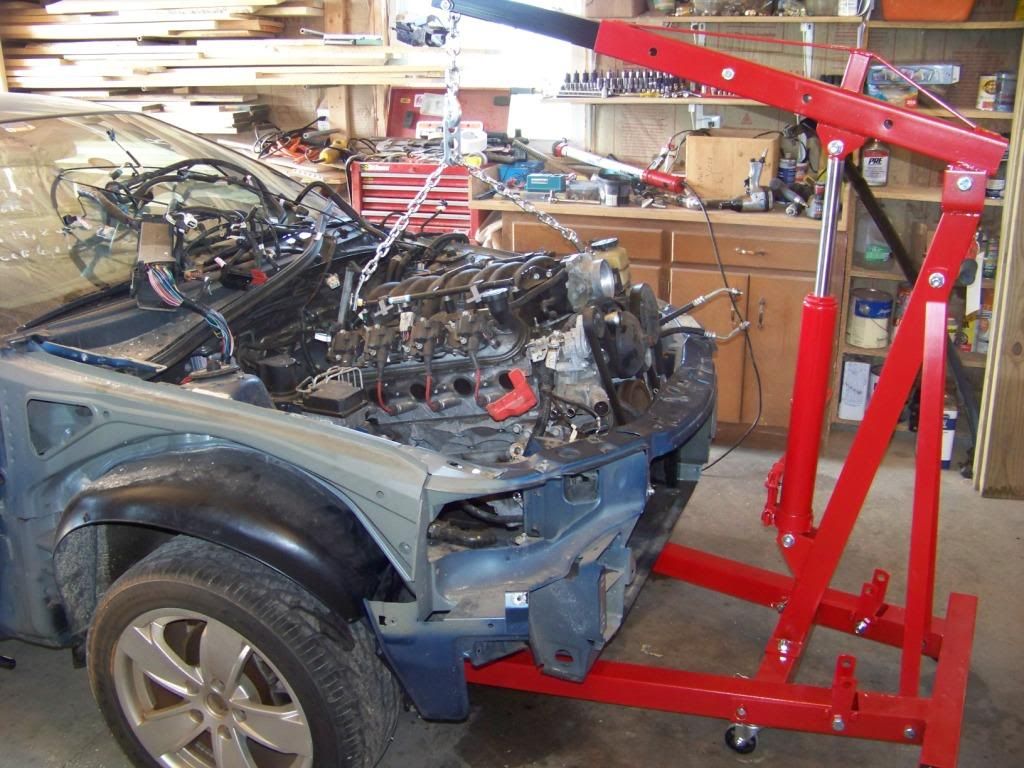
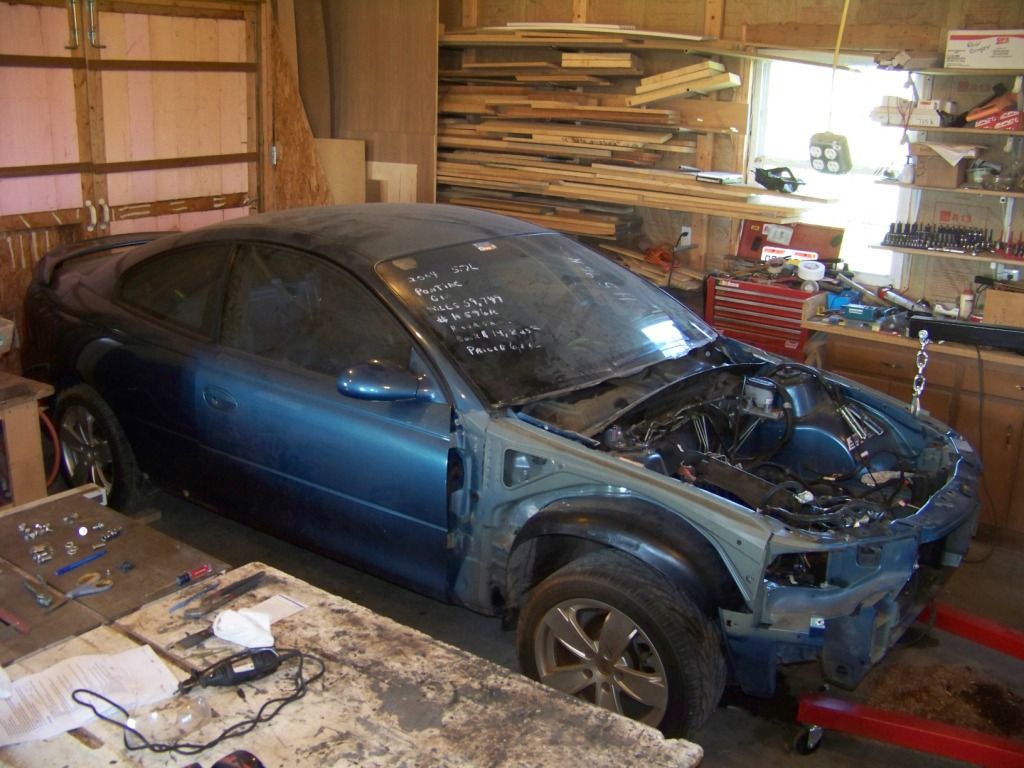
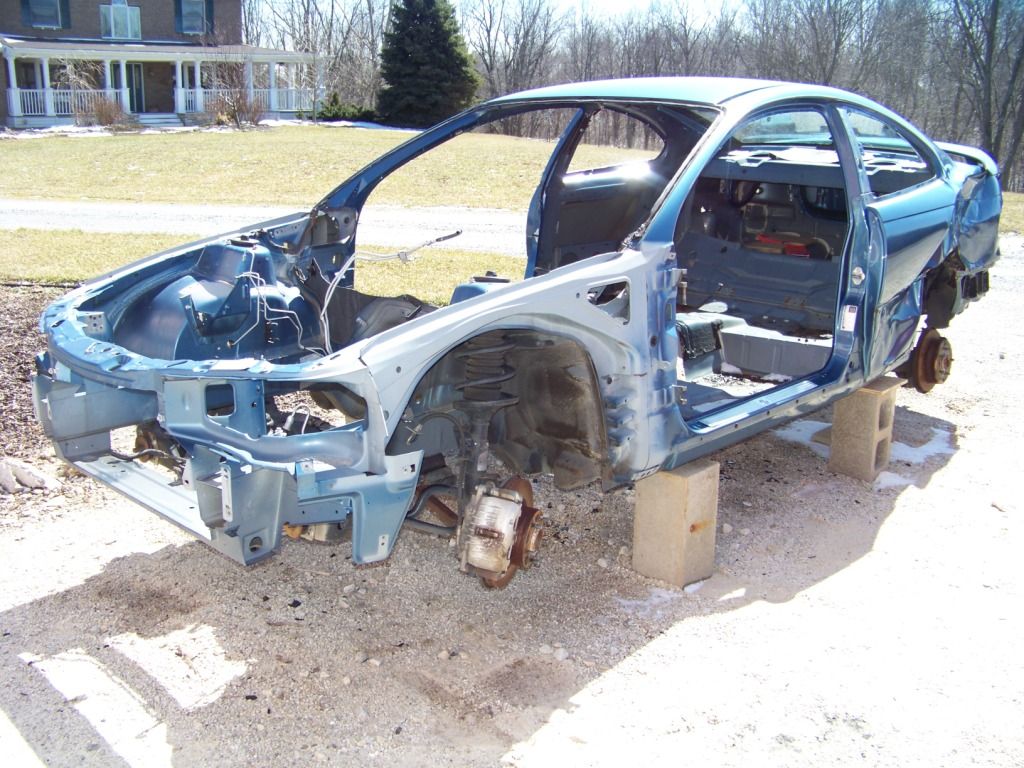
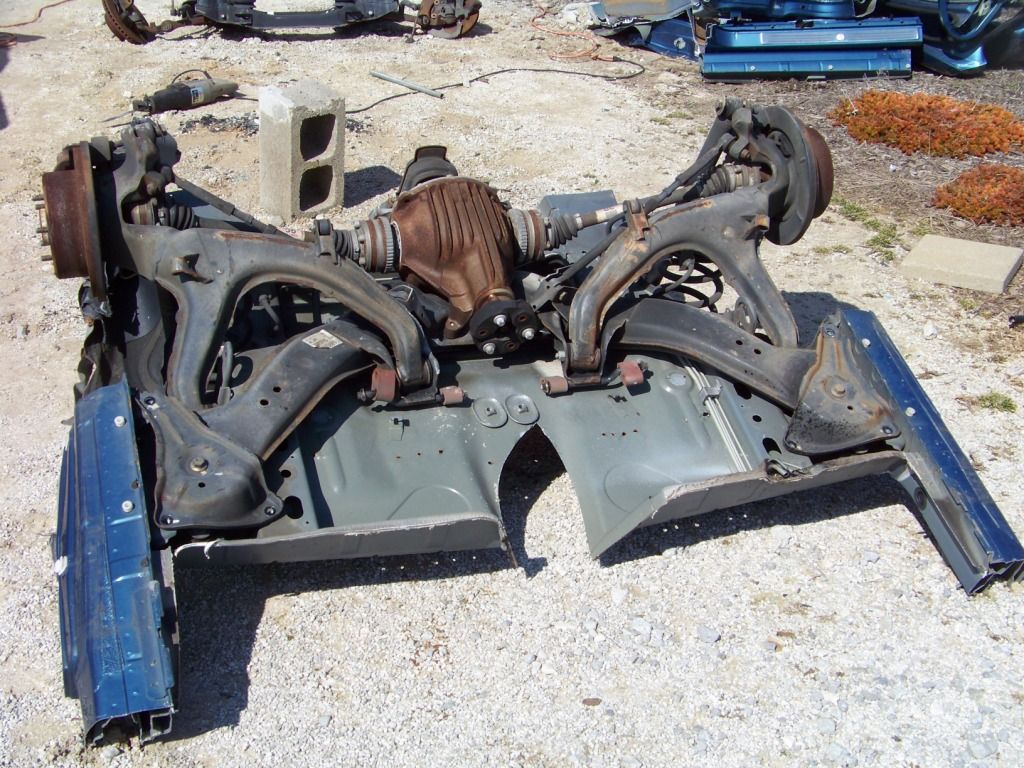
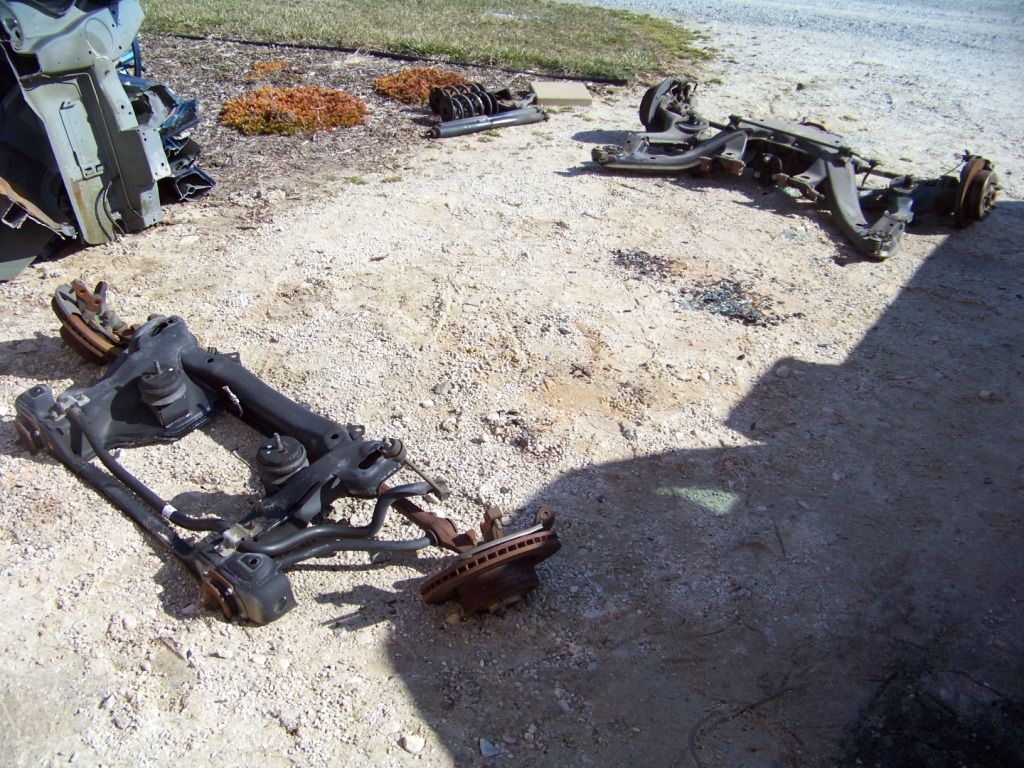
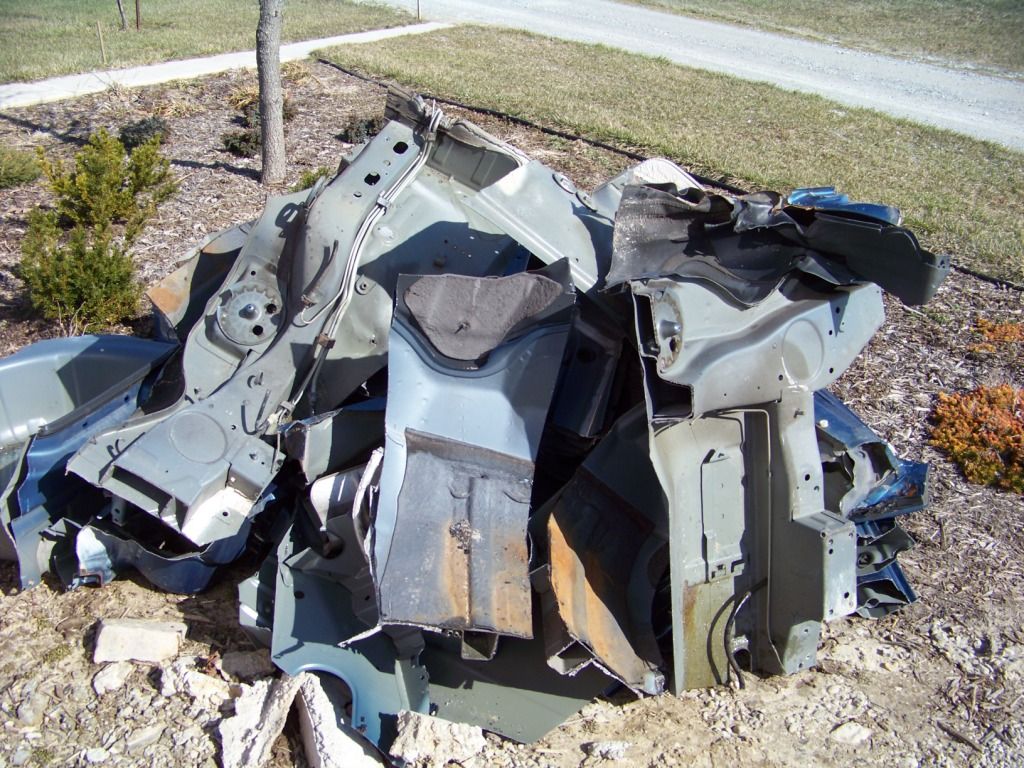
The last few weeks I have been selling unused parts both from the GTO donor and Lemans on ebay and Craigslist and have done pretty well with it. I have used some of the funds to buy parts for a 1970 GTO front end which I almost have everything for.
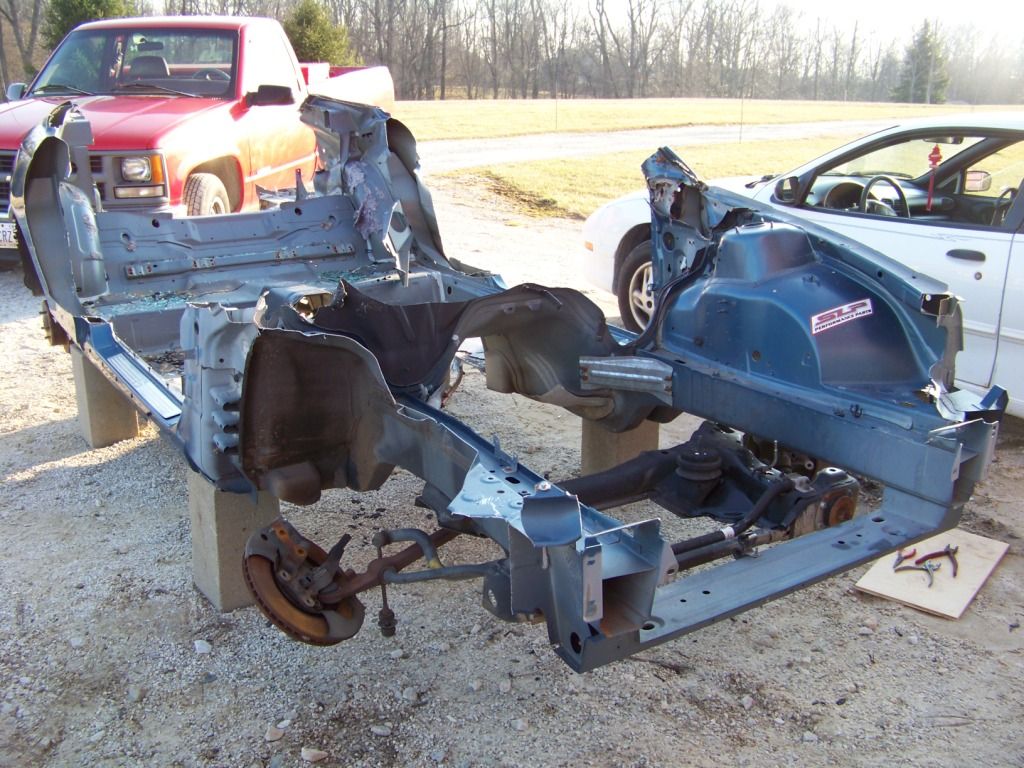
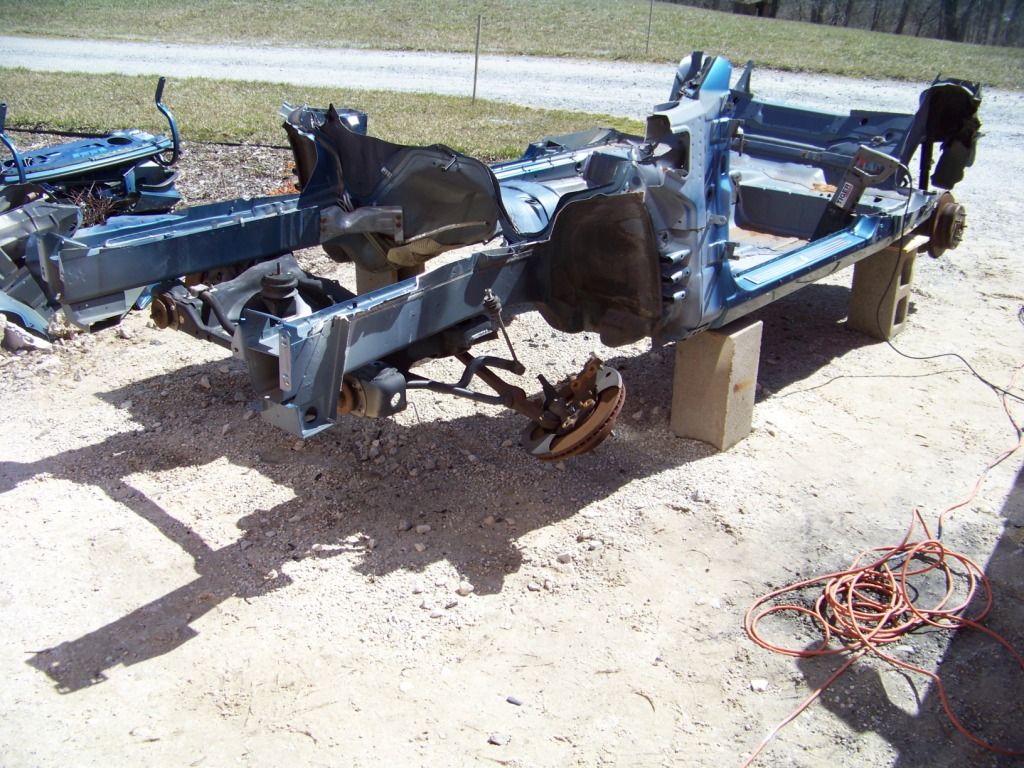
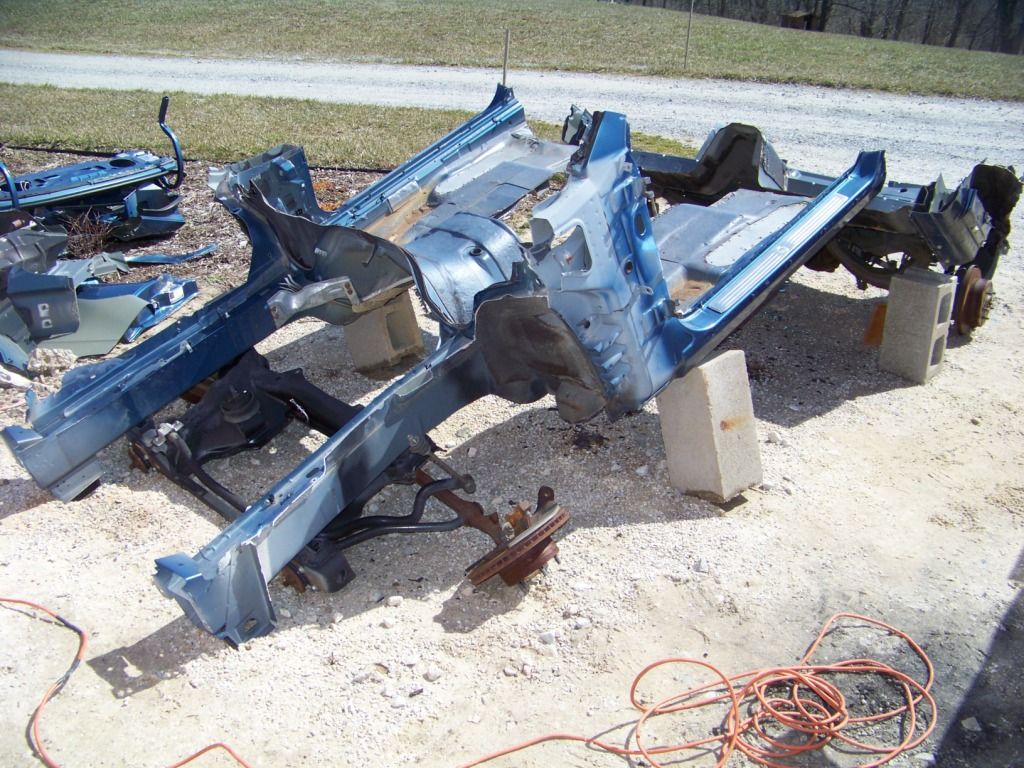
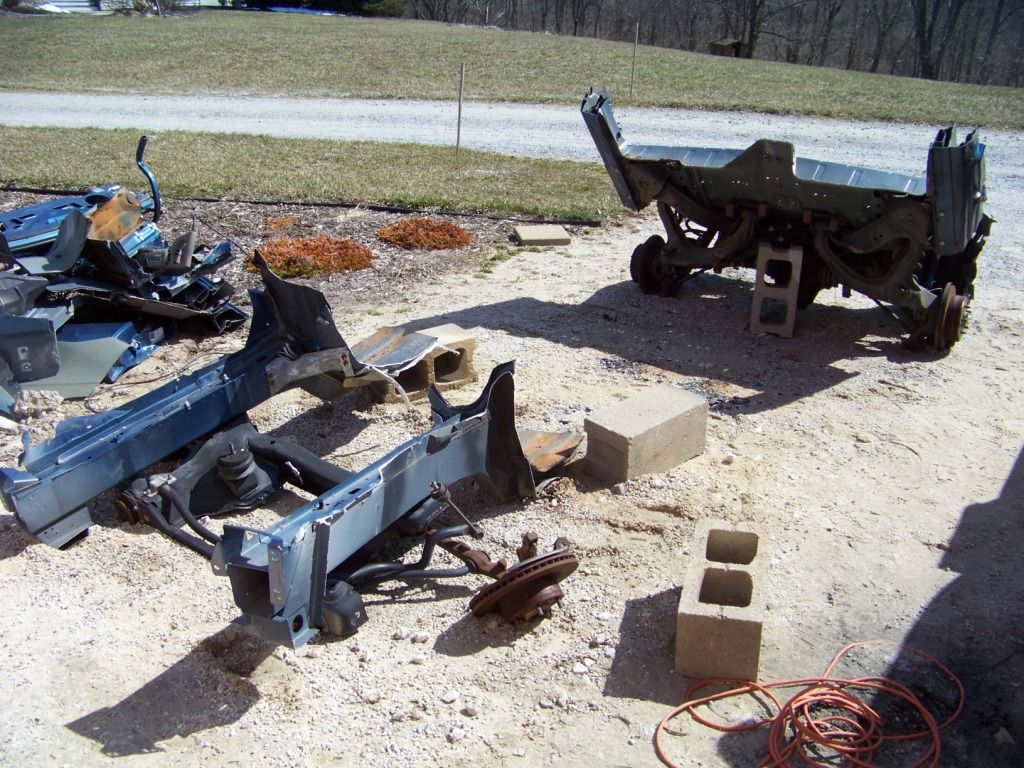
We finally got some warm weather here in Ohio so I took the opportunity to deal with the carcass of the donor. Thought it might be interesting to you . . .
The last few weeks I have been selling unused parts both from the GTO donor and Lemans on ebay and Craigslist and have done pretty well with it. I have used some of the funds to buy parts for a 1970 GTO front end which I almost have everything for.
We finally got some warm weather here in Ohio so I took the opportunity to deal with the carcass of the donor. Thought it might be interesting to you . . .
04-29-2013, 08:57 AM
#103
Teching In

Join Date: Jun 2012
Posts: 11
Likes: 0
Received 0 Likes
on
0 Posts
great job, I posted the other night for some help and a member sent me to your forum as I am doing the same thing to a 66 lemans, I also picked up a 04 gto complete, I will be using interior minus dash, and converting mine to stick with the t56 that came in my 04, just starting so it will be a long process. Thanks for all the hard work and wright up it will help greatly. Brian in Alaska
04-29-2013, 04:00 PM
#104
Teching In

Join Date: May 2011
Location: San Antonio
Posts: 3
Likes: 0
Received 0 Likes
on
0 Posts
I really appreciated finding your thread, as I am doing a very similar build. I am putting an LS2 out of an 06 GTO into a 71 le mans convertible, that I am altering into a 70 GTO Pro touring car. This is my first post, so I hope this gets to you.
I will try to get some pics and info on what I have done up soon.
We are nearly ready for paint. I didn't think of buying the whole car when I went looking for a drive train. You have been very creative in utilizing the 04.
I will try to get some pics and info on what I have done up soon.
We are nearly ready for paint. I didn't think of buying the whole car when I went looking for a drive train. You have been very creative in utilizing the 04.
04-30-2013, 06:48 AM
#105
Staging Lane
Thread Starter
sprinkfitter: Thanks for your comments, I am glad my build thread will be helpful to you. I will be watching your thread for progress. You got a killer deal on your GTO donor, you will be very happy that you got it. Keep the donor until you are almost done with your build, you never know what you might want to use from it. It's almost like having a very handy parts store for your build. Also sell what you don't use, there is a pretty good market for these GTO parts. Just the headlights go for $200-250 each on ebay.
bad billy goat: What a coincidence, we are doing almost the exact same thing, I also would like to have the 1970 GTO front on mine. Over the last few months I have been collecting the parts for it and almost have everything, just looking for the bumper to frame brackets and the left headlight mounting plate. Ebay has been really helpful to me finding those things. Looking forward to seeing your updates also, thanks for your comments.
I sent both of your PMs offering to answer any future questions you may have, if others also have questions on what I have done I will be happy to help.
I am in the process of selling unused parts from the GTO donor now; have sold about $2000 and hope to sell another $1000 or so. Subtracting that from the $7000 I spent on the GTO will leave me with a cost of about $4000; I got a LOT of parts from the GTO for that $4000.
As far as build progress goes I have been fabricating the outboard seat brackets and starting to do some body work such as stripping paint from sheet metal. Probably going to have to replace the right quarter skin.
10-17-2013, 07:00 PM
#106
Staging Lane
Thread Starter
It's been several months since I last posted but I have been working steadily on the Lemans. I have been doing a variety of things as the mood strikes me and have time available, such as getting the driveline done, bodywork, and collecting parts. I have been on what seems like a quest to get all the parts for the 1970 GTO front end. It took me several months buying individual parts through craiglist and ebay but I finally have everything I need for the cloning process.
The next major milestone I have been working towards is getting the car to move under it's own power after being stuck in the shop for more than two years and who knows how long in the barn I bought it from (the most recent registration sticker on the plate was 1999). If it's going to move on it's own I thought it would be best if the brakes were working, so worked on finishing that up. I originally had the distribution block and adjustable proportioning valve on top of the frame just forward of the firewall. When I started adding brake fluid to the system of course it started leaking from one of the connections there which were pretty much inaccessible because of the body and inner fender were now installed. I wasn't really happy with the way I installed and plumbed those parts so I decided to tear it all out and redo it. I relocated the block and valve under the master cylinder so they were accessible and it is now much easier to get to the **** on the valve.
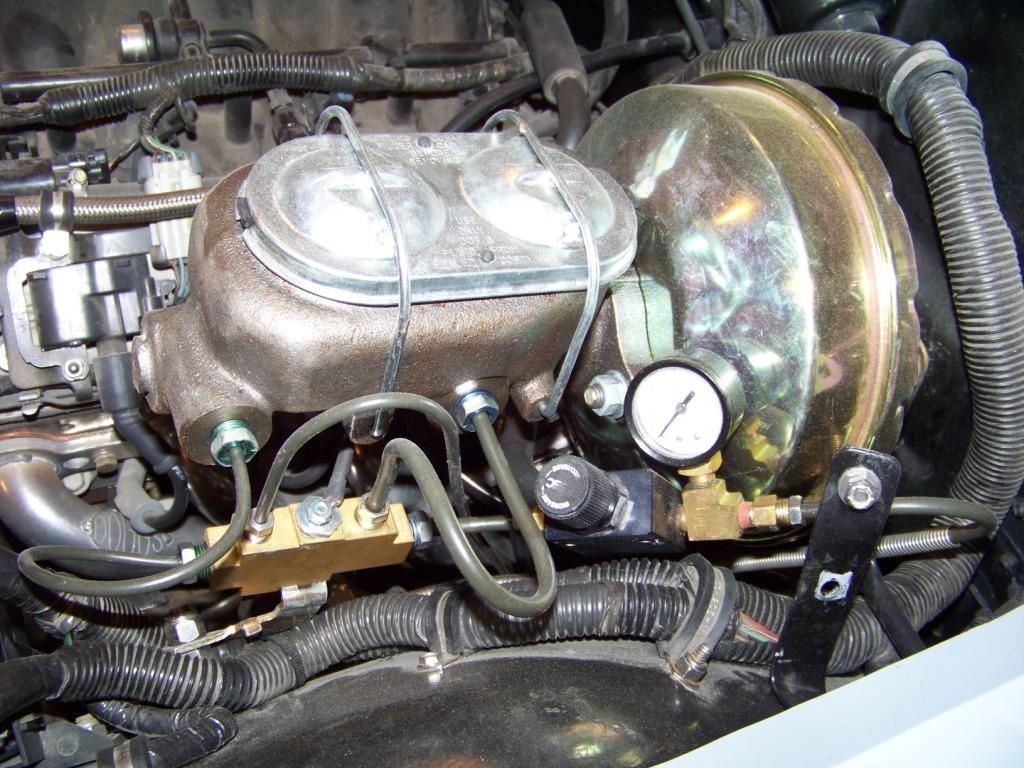
I had previously installed Speed Bleeders on the calipers to help in bleeding since most of the time I work alone. These were a help when I bled the system. I have never done it before so I took my time and tried to do it right. The pedal feels just a little soft but they do work to stop the car during the low speed trip I took on my driveway. The pressure gauge to the rear brakes doesn't move when I press the pedal, but I know the rear calipers are working. On my to do list is to check brake pressure at each caliper.
The last piece of the puzzle to get it moving was the driveshaft. The previous owner had given me a driveshaft, I sandblasted it and had it reworked by a local driveline company to work with the 4L60E and the correct length. I believe it was shortened by an inch or two, u-joints were replaced, and the correct transmission yoke was added. When I got that home I epoxy primed it and painted it. When I went to install it the x-pipe on the exhaust prevented the driveshaft from rotating down enough to meet the rearend. I decided to move the x-pipe forward so it was almost directly below the transmission yoke. This involved removing the two one-foot length pipes that were between the header collector reducers and the curved pipes that went to the x-pipe, thereby moving the x-pipe forward by that amount. These pipes would then be reinstalled forward of the mufflers. Unfortunately for that to happen means I would have to rework my transmission crossmember since it didn't allow the pipes to immediately curve towards the x-pipe. I always thought I would make another crossmember at some point anyway because I felt the first one I made was like something Dr Frankenstein would create.
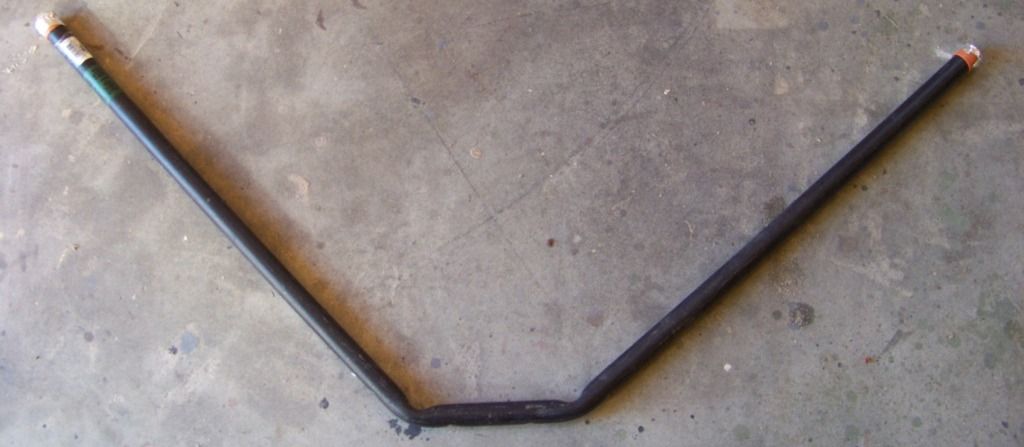
I wanted to make the next one a little simpler; I was inspired to create something similar to the Chevelle crossmember which is basically just a bent piece of tubing. I could have bought one and modified it as a lot of people do but didn't want to spend the money. I decided to use 3/4" iron pipe bent as necessary to get the shape I need. I did some measuring, drew up something on CAD that I thought would work and got started.
This picture shows the initial bends I made at the center of the crossmember where it supports the transmission.
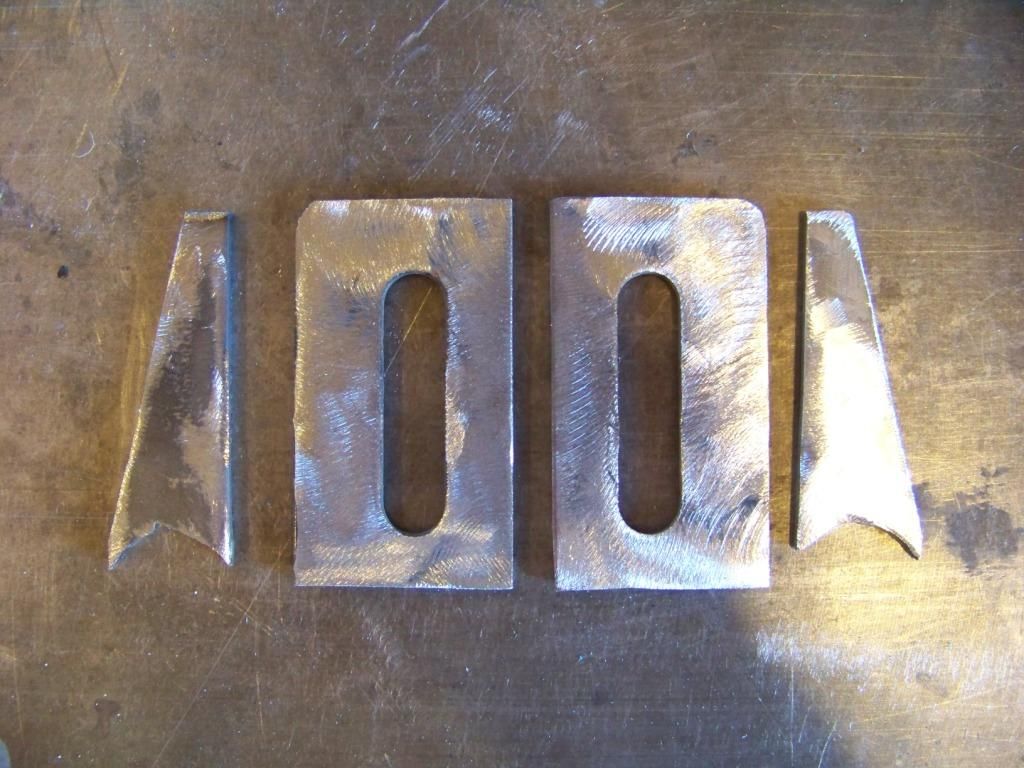
This shows the parts I made for the bracket that supports the transmission. The parts with the slots came from some brackets I removed from the 04 GTO (you never know what you will use from your donor car).
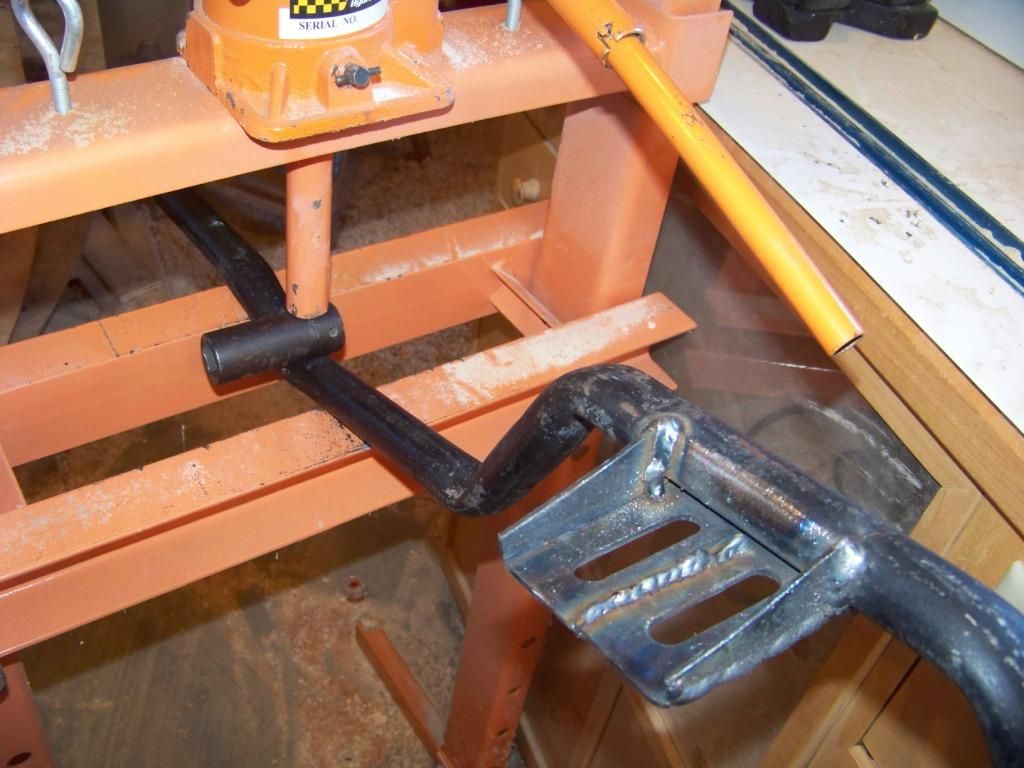
The next picture shows the process for bending the pipe. I used my shop press and a impact socket as shown to get the bends I wanted. It did kink the pipe quite a bit but I welded some gussets on as you will see. This picture also shows the transmission support bracket, but this was later removed and flipped over to get it to fit better.
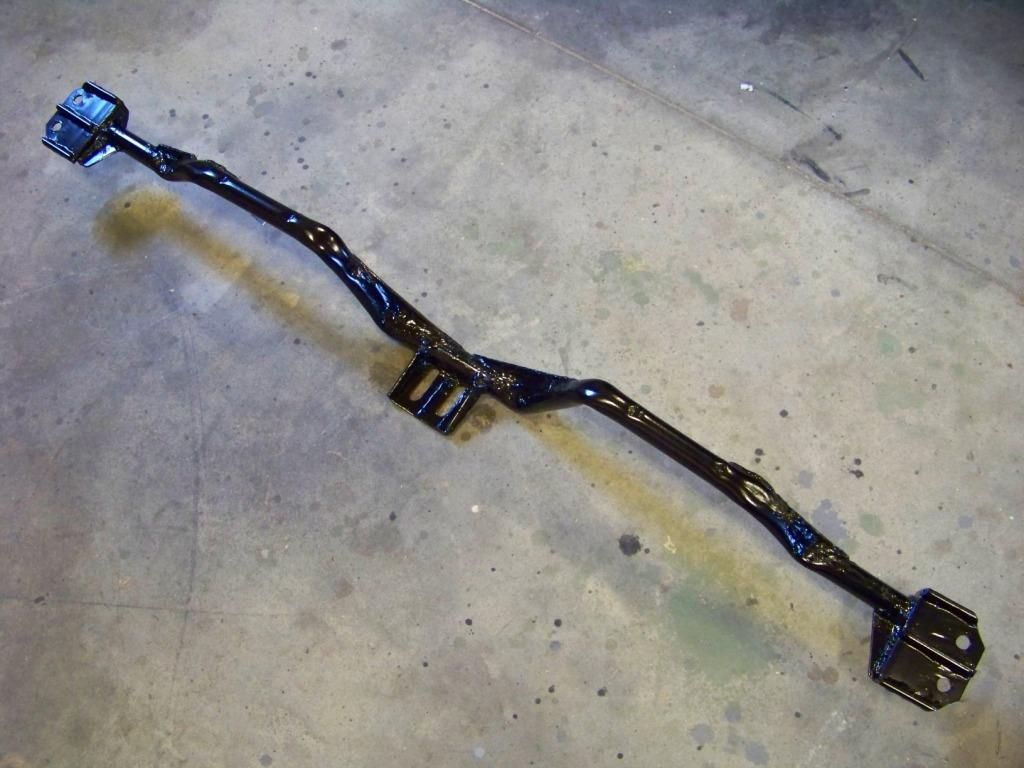
The next picture shows the completed crossmember with gussets welded on at each bend to stiffen it. I also used the support brackets on the ends that I previously made for my first crossmember, this time welded on to give me a one-piece crossmember. The crossmember here has just been sandblasted in preparation for finish.
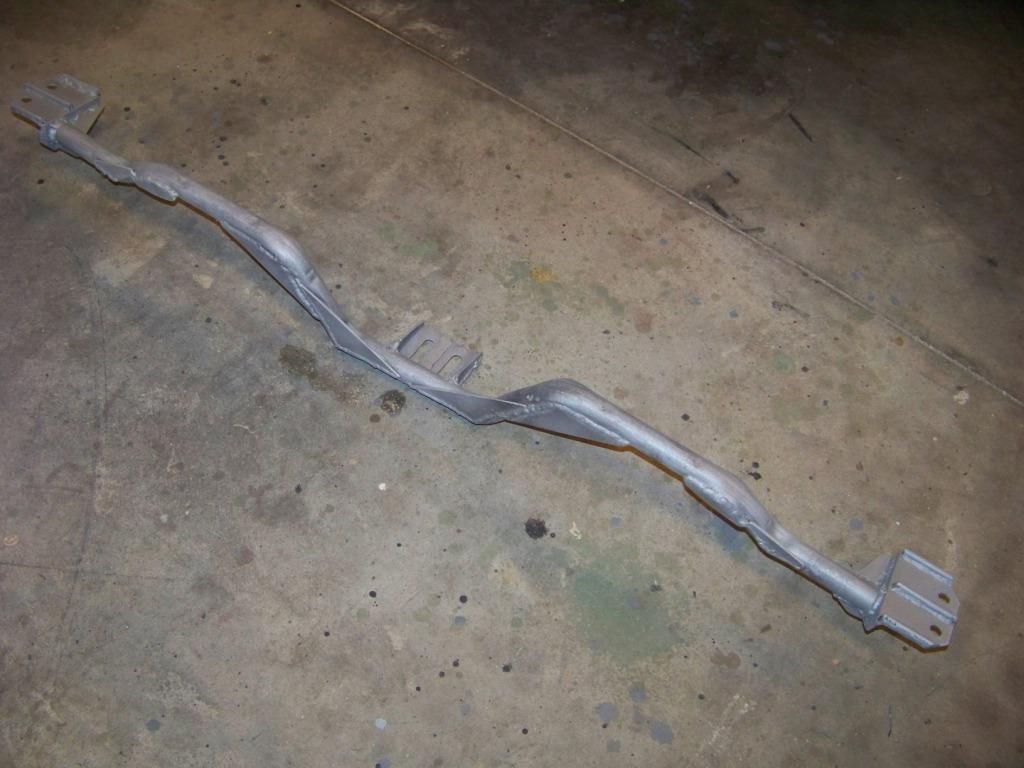
This picture shows the crossmember painted and ready for installation.
The next two pictures show the new crossmember installed. You can also see the new driveshaft I had made.

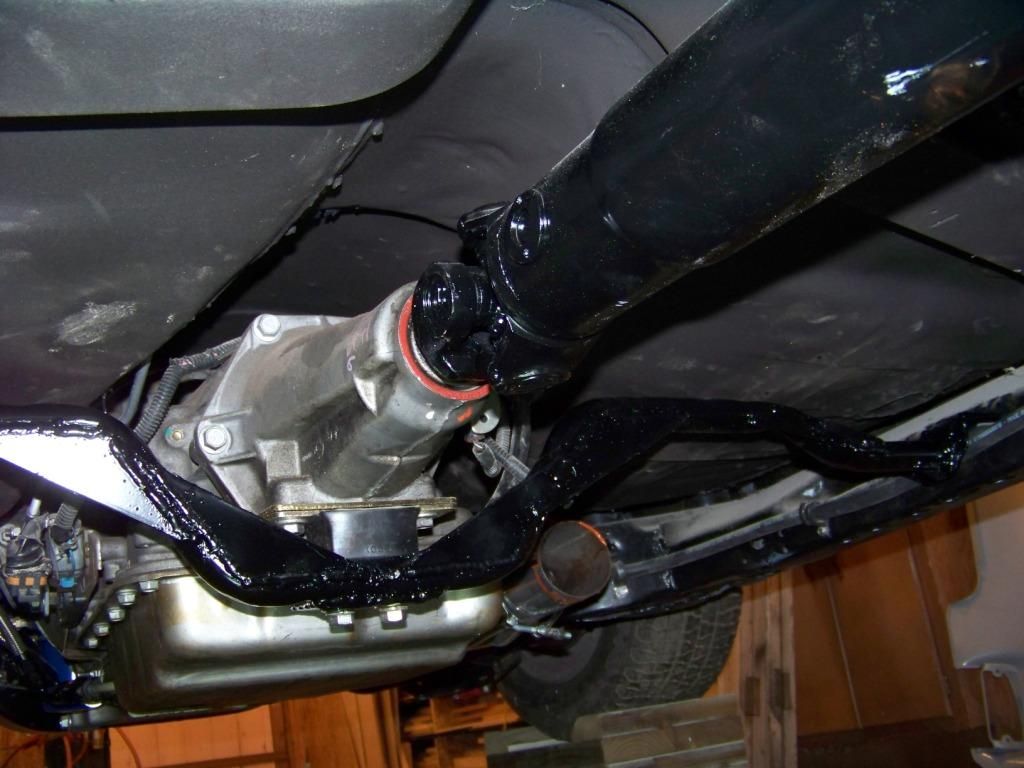
After this was all done I reinstalled the exhaust with the change I mentioned before, put those nasty old tires on and pumped them up. The car was then lowered to the floor for the first time in more than a year.
And then finally the major milestone as I mentioned, the car can now move under it's own power for the first time in many years:
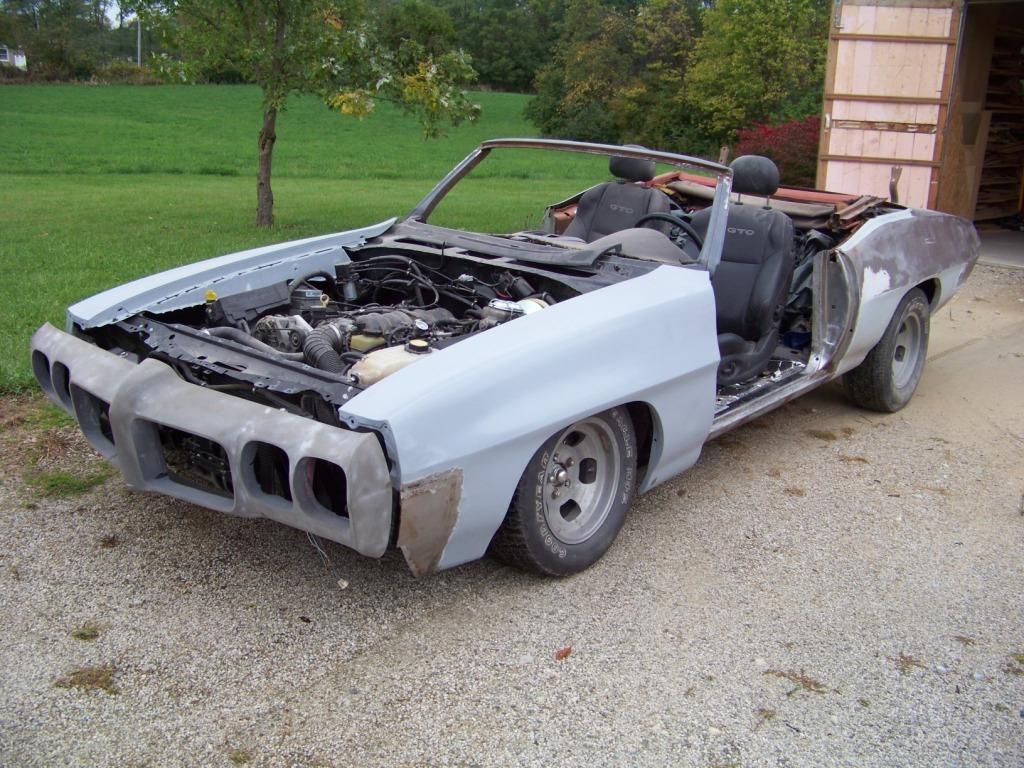
I took it for one trip up and down my gravel driveway. The front suspension is really low, the front crossmember is just 2-3 inches above the ground, something I need to look into to. The rear is a little high, but once more weight is added to the car that should come down some.
In the picture above you can also see the the 70 GTO bumper I am getting ready for paint and the rework of the Lemans fronts fenders into GTO fenders. I will document this work in a future post.
The next major milestone I have been working towards is getting the car to move under it's own power after being stuck in the shop for more than two years and who knows how long in the barn I bought it from (the most recent registration sticker on the plate was 1999). If it's going to move on it's own I thought it would be best if the brakes were working, so worked on finishing that up. I originally had the distribution block and adjustable proportioning valve on top of the frame just forward of the firewall. When I started adding brake fluid to the system of course it started leaking from one of the connections there which were pretty much inaccessible because of the body and inner fender were now installed. I wasn't really happy with the way I installed and plumbed those parts so I decided to tear it all out and redo it. I relocated the block and valve under the master cylinder so they were accessible and it is now much easier to get to the **** on the valve.

I had previously installed Speed Bleeders on the calipers to help in bleeding since most of the time I work alone. These were a help when I bled the system. I have never done it before so I took my time and tried to do it right. The pedal feels just a little soft but they do work to stop the car during the low speed trip I took on my driveway. The pressure gauge to the rear brakes doesn't move when I press the pedal, but I know the rear calipers are working. On my to do list is to check brake pressure at each caliper.
The last piece of the puzzle to get it moving was the driveshaft. The previous owner had given me a driveshaft, I sandblasted it and had it reworked by a local driveline company to work with the 4L60E and the correct length. I believe it was shortened by an inch or two, u-joints were replaced, and the correct transmission yoke was added. When I got that home I epoxy primed it and painted it. When I went to install it the x-pipe on the exhaust prevented the driveshaft from rotating down enough to meet the rearend. I decided to move the x-pipe forward so it was almost directly below the transmission yoke. This involved removing the two one-foot length pipes that were between the header collector reducers and the curved pipes that went to the x-pipe, thereby moving the x-pipe forward by that amount. These pipes would then be reinstalled forward of the mufflers. Unfortunately for that to happen means I would have to rework my transmission crossmember since it didn't allow the pipes to immediately curve towards the x-pipe. I always thought I would make another crossmember at some point anyway because I felt the first one I made was like something Dr Frankenstein would create.
I wanted to make the next one a little simpler; I was inspired to create something similar to the Chevelle crossmember which is basically just a bent piece of tubing. I could have bought one and modified it as a lot of people do but didn't want to spend the money. I decided to use 3/4" iron pipe bent as necessary to get the shape I need. I did some measuring, drew up something on CAD that I thought would work and got started.
This picture shows the initial bends I made at the center of the crossmember where it supports the transmission.

This shows the parts I made for the bracket that supports the transmission. The parts with the slots came from some brackets I removed from the 04 GTO (you never know what you will use from your donor car).

The next picture shows the process for bending the pipe. I used my shop press and a impact socket as shown to get the bends I wanted. It did kink the pipe quite a bit but I welded some gussets on as you will see. This picture also shows the transmission support bracket, but this was later removed and flipped over to get it to fit better.

The next picture shows the completed crossmember with gussets welded on at each bend to stiffen it. I also used the support brackets on the ends that I previously made for my first crossmember, this time welded on to give me a one-piece crossmember. The crossmember here has just been sandblasted in preparation for finish.

This picture shows the crossmember painted and ready for installation.

The next two pictures show the new crossmember installed. You can also see the new driveshaft I had made.


After this was all done I reinstalled the exhaust with the change I mentioned before, put those nasty old tires on and pumped them up. The car was then lowered to the floor for the first time in more than a year.
And then finally the major milestone as I mentioned, the car can now move under it's own power for the first time in many years:

I took it for one trip up and down my gravel driveway. The front suspension is really low, the front crossmember is just 2-3 inches above the ground, something I need to look into to. The rear is a little high, but once more weight is added to the car that should come down some.
In the picture above you can also see the the 70 GTO bumper I am getting ready for paint and the rework of the Lemans fronts fenders into GTO fenders. I will document this work in a future post.
11-30-2013, 04:33 PM
#107
Staging Lane
Thread Starter
Time for a couple of small updates. I have been hopping around from one thing to another as the mood hits me.
In my previous update I mentioned that the front end was really low. I ended up inserting all of the coil spring spacers in the lower control arm spring pocket. That raised the front about 2 1/2 inches. I am happy with it for now, when the car is almost done with all the weight on it and the final wheels & tires installed I can fine-tune it then.
This post talks about redoing the transmission cooling lines, my next post will be about the outer seat brackets.
Transmission Cooling Lines 2.0
I had some leaks from the transmission cooling lines that I originally cobbled together from the 04 GTO lines and several AN fittings (See post #54). I decided to simplify the lines and reduce the number of connections.
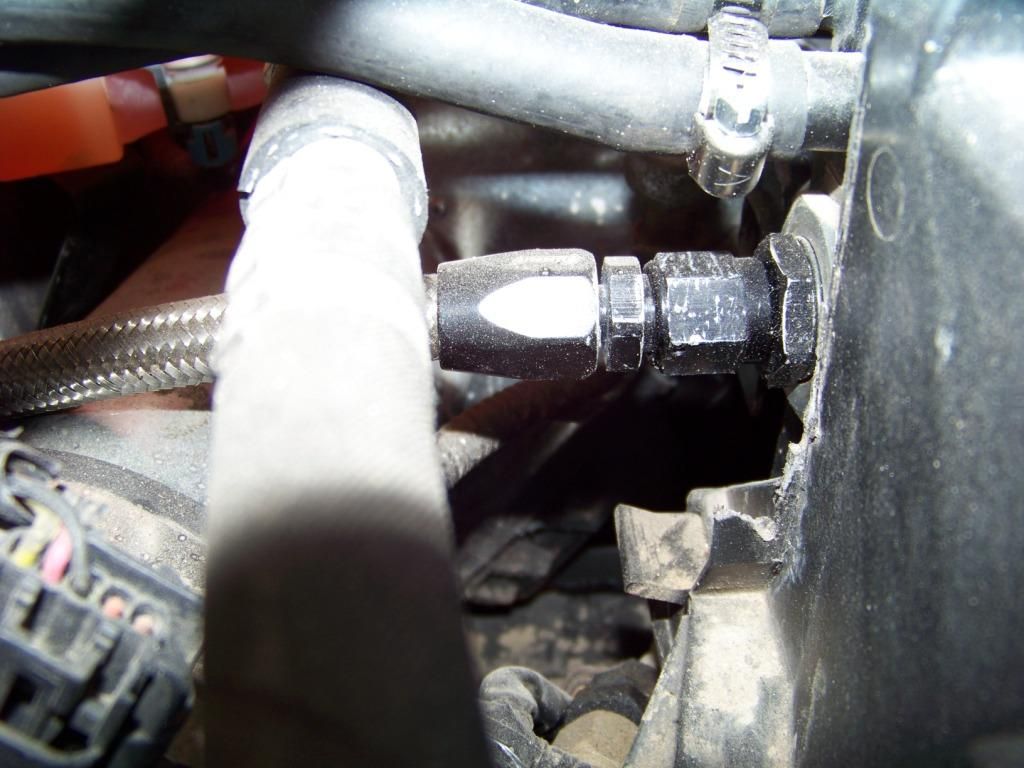
At the bottom of the transmission I had some hard tube adapters, one was leaking and it was between the header and transmission and therefore hard to get to to tighten it. I got two more -6 AN 3/8 hard tube adapters (part number SUM-2200077B at Summit) and re-cut the 04 GTO transmission lines lower down closer to the transmission for easier access:
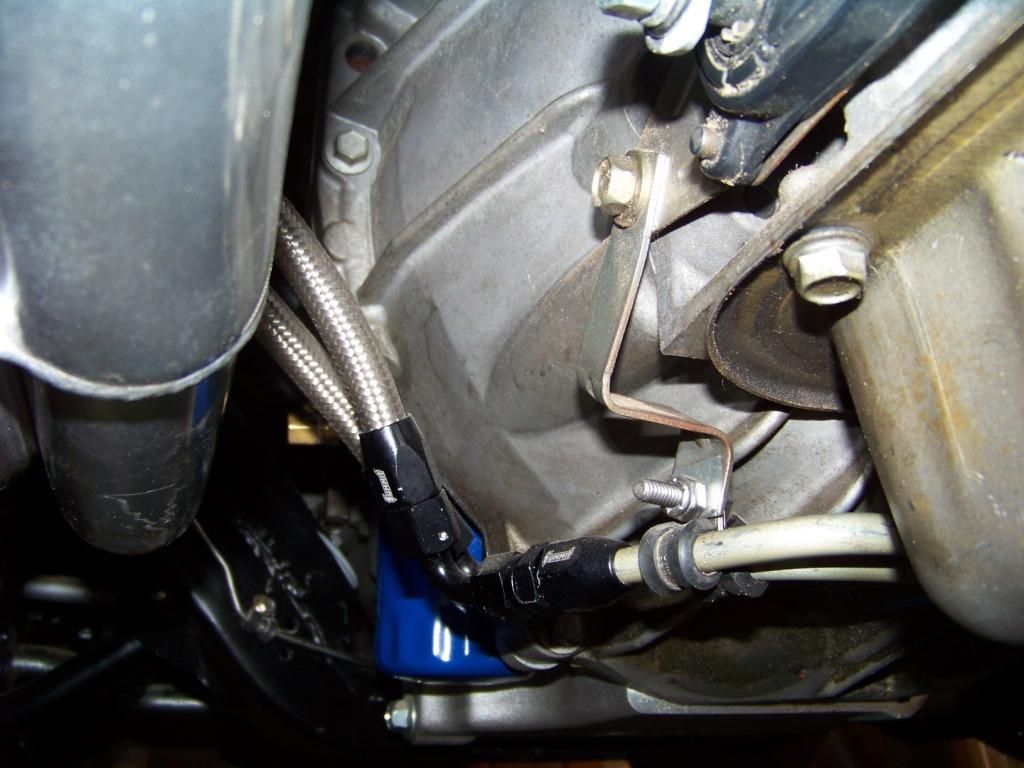
I made new braided steel lines with 90 degree hose ends.
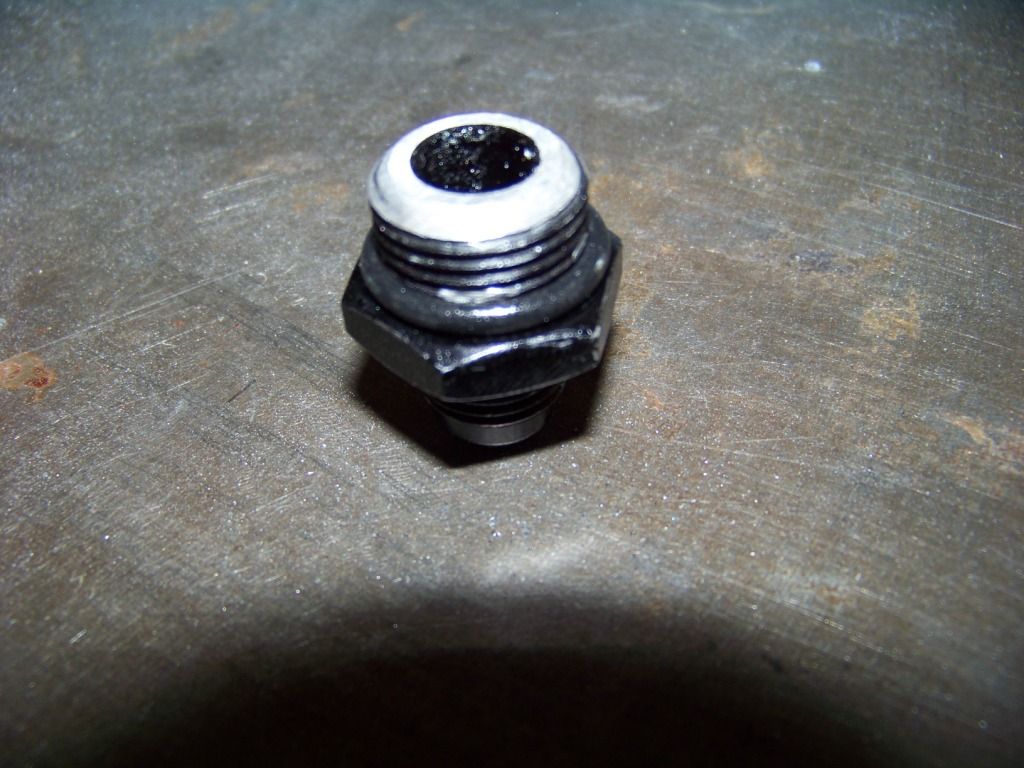
I originally had more hard tube adapters on the tube ends that originally connected to the 04 GTO trans cooler in the radiator, but I had some leaks there too. I went ahead and bought some adapters to fit into the connections in the GTO radiator and converted the connection to -6 AN. These adapters (from Fragola, part number FRA-460618 at Summit) convert the 18mm x 1.5 mm threads on the transmission cooler connection on the radiator to -6 AN. One issue though is that the threads on the adapter were deeper than the threads on the recess in the radiator. I ground down the threaded portion of the adapter so it would fit:
This final picture shows the upper connection at the radiator, the lower connection is similar. From right to left we have the GTO plastic radiator, a rubber o-ring to seal the new adapter, the trimmed adapter, and the -6 AN hose end and hose:
This new version of the transmission cooling lines is working out well with no leaks.
In my previous update I mentioned that the front end was really low. I ended up inserting all of the coil spring spacers in the lower control arm spring pocket. That raised the front about 2 1/2 inches. I am happy with it for now, when the car is almost done with all the weight on it and the final wheels & tires installed I can fine-tune it then.
This post talks about redoing the transmission cooling lines, my next post will be about the outer seat brackets.
Transmission Cooling Lines 2.0
I had some leaks from the transmission cooling lines that I originally cobbled together from the 04 GTO lines and several AN fittings (See post #54). I decided to simplify the lines and reduce the number of connections.
At the bottom of the transmission I had some hard tube adapters, one was leaking and it was between the header and transmission and therefore hard to get to to tighten it. I got two more -6 AN 3/8 hard tube adapters (part number SUM-2200077B at Summit) and re-cut the 04 GTO transmission lines lower down closer to the transmission for easier access:
I made new braided steel lines with 90 degree hose ends.
I originally had more hard tube adapters on the tube ends that originally connected to the 04 GTO trans cooler in the radiator, but I had some leaks there too. I went ahead and bought some adapters to fit into the connections in the GTO radiator and converted the connection to -6 AN. These adapters (from Fragola, part number FRA-460618 at Summit) convert the 18mm x 1.5 mm threads on the transmission cooler connection on the radiator to -6 AN. One issue though is that the threads on the adapter were deeper than the threads on the recess in the radiator. I ground down the threaded portion of the adapter so it would fit:
This final picture shows the upper connection at the radiator, the lower connection is similar. From right to left we have the GTO plastic radiator, a rubber o-ring to seal the new adapter, the trimmed adapter, and the -6 AN hose end and hose:
This new version of the transmission cooling lines is working out well with no leaks.
12-01-2013, 10:47 AM
#108
TECH Fanatic

Hey, there you are , I thought you abandoned the project. Guess I have not been as diligent as I thought. Pretty exciting to see that you have been able to finally drive it!
12-01-2013, 12:44 PM
#109
Staging Lane
Thread Starter
oldgoat69: The thought of abandoning (selling) the project has occurred to me, but I am pushing through as I am very persistent and don't like to quit. In hindsight I would have probably bought a car that was drive-able and then do upgrades here and there, but hindsight is golden as they say. A project of this magnitude does get a little overwhelming at times. I appreciate you following my build. Sometimes I feel like Click and Clack on that radio show CarTalk, I have 2 regular listeners . . .
Outer Seat Brackets
As promised this post will talk about the fabrication and installation of the outboard seat brackets. See post #93 that shows using the tunnel structure from the GTO donor for the inner seat bolt connections. I considered using the sheet metal bracket for the outer seat bolt connections from the GTO donor but due to the floor shape in the Lemans it would have required a fair amount of work. So I thought if I am going to go to all that effort I will make my own more substantial brackets.
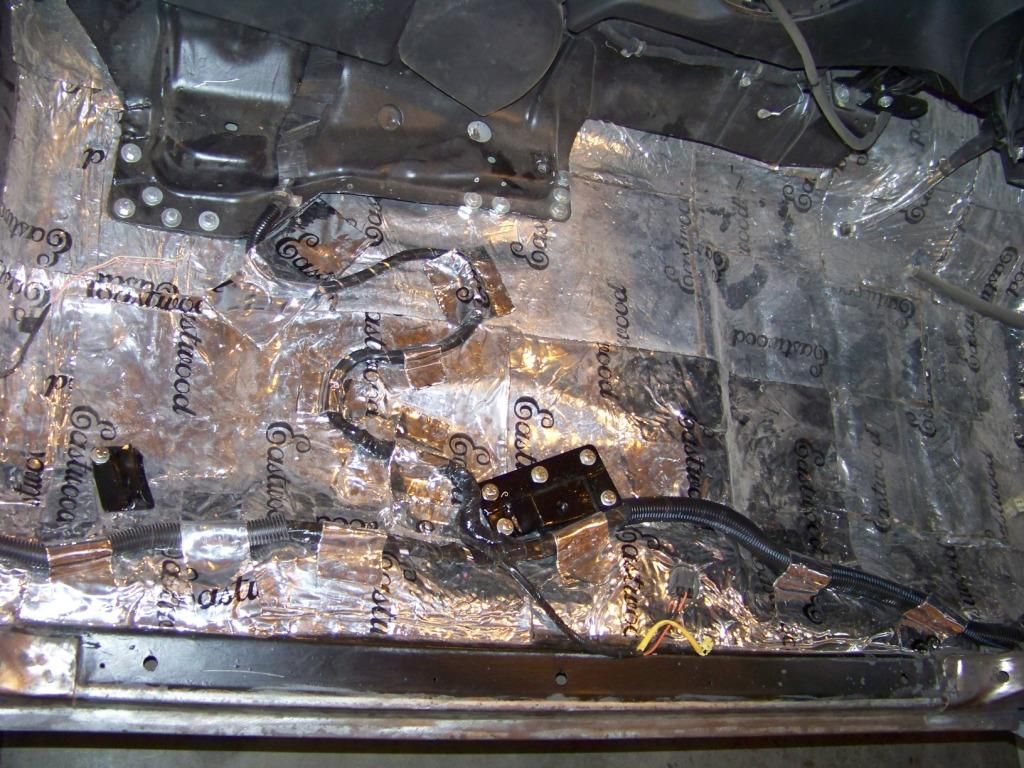
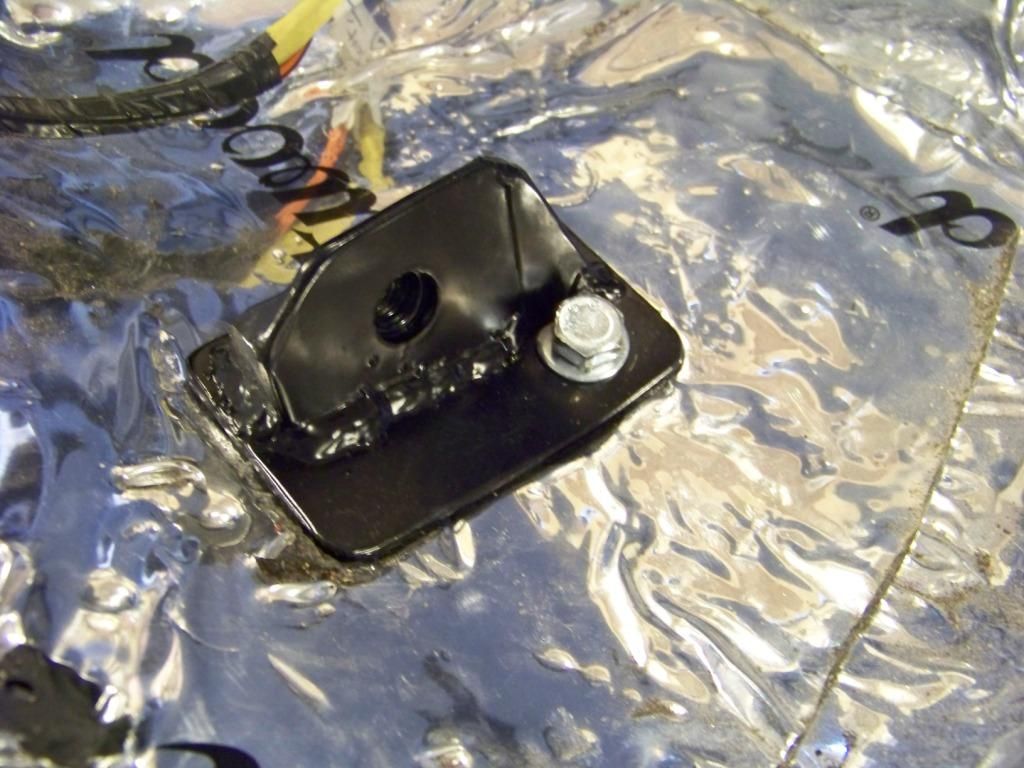
The picture below shows the brackets I made installed on the passenger side floor, the following picture shows the driver's side floor. The forward bracket on the passenger side had to be installed at an angle due to the shape of the floor in that side. You can also see here I secured the wiring harness in this area with leftover scraps of sound deadener, I thought that worked out well. In areas where the carpet would cover the harness and it could get stepped on I added convoluted harness cover.

The next picture shows the forward bracket on the driver's side. These brackets are made from 1/8" steel welded into a tower-like shape as shown. The threads for the seat bolt are a flanged metric nut welded in place onto the underside of the bracket similar to what the GTO donor had. The brackets are bolted through the floor with several 5/16" bolts.
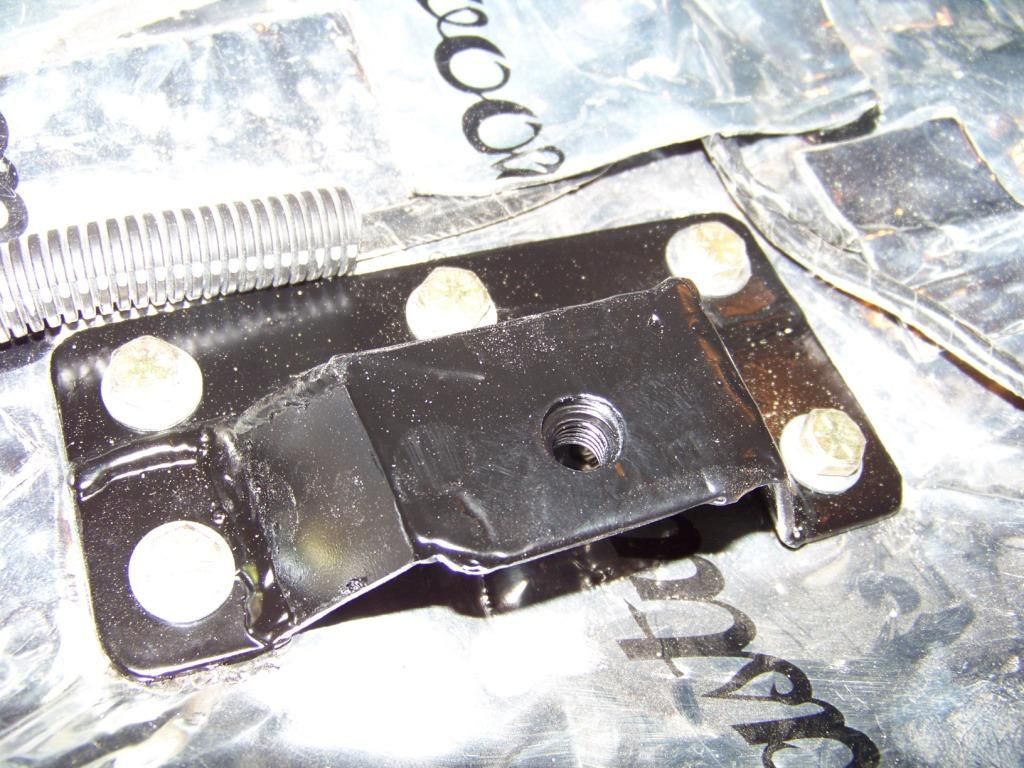
This picture shows the rear bracket on the driver's side.
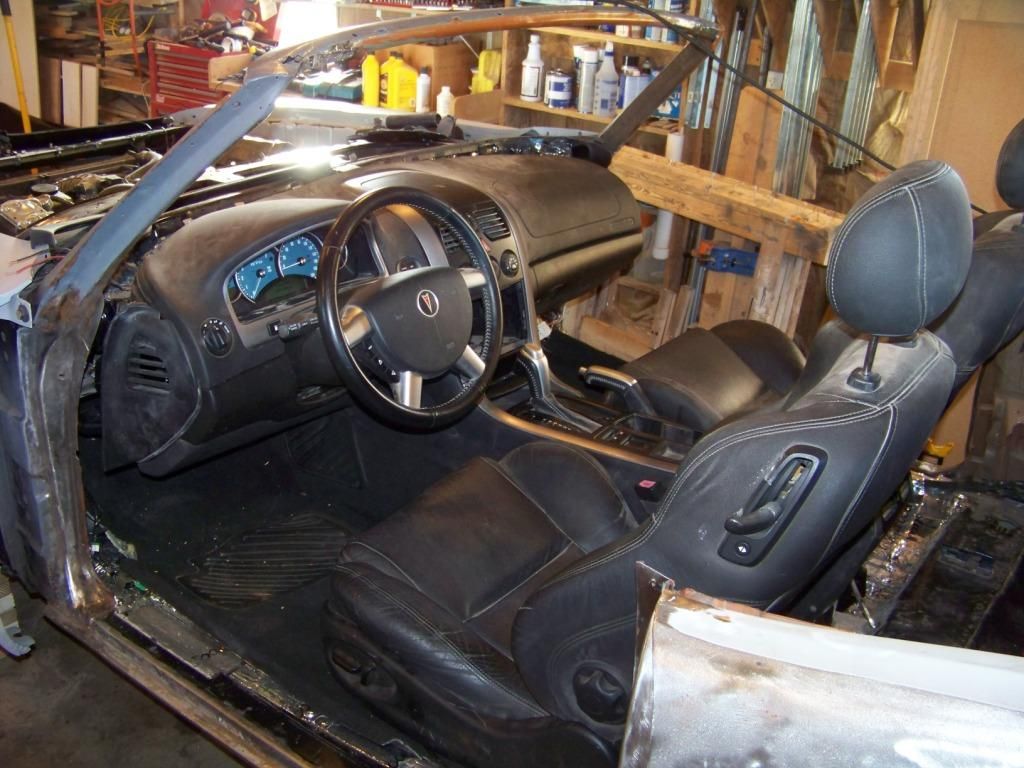
Once these brackets were installed I then tried fitting the carpet from the 04 GTO. With some trimming here and there it fits okay, but I think at some point I will get the correct a-body carpet. My future desire is to someday redo the interior in a two-tone tan and brown theme (I think that would look good with the dark blue I have planned for the outside), at that time I can get a brown a-body carpet.
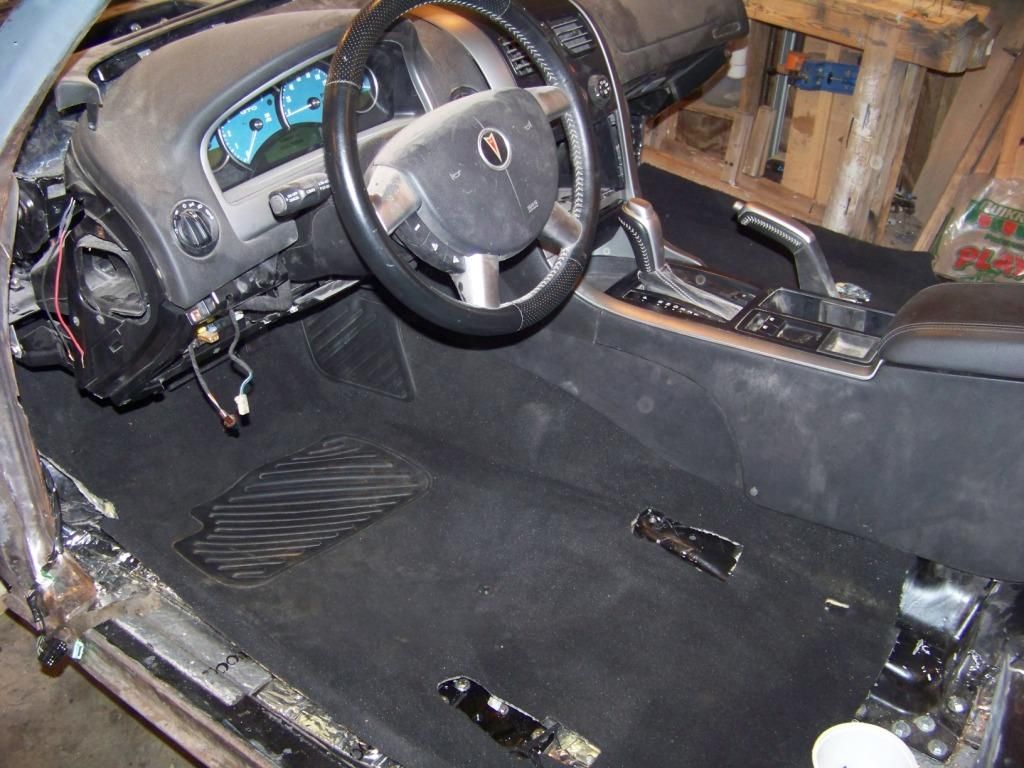
The carpet had to be trimmed a little around the new outer seat brackets, then the seats were installed using the original bolts from the GTO donor. The seats themselves were trimmed slightly around the rear outer brackets to comform to the slope of the Lemans floor.
That's all I will probably do to the interior for now, my next major effort will be towards the bodywork with the goal of maybe getting it in paint sometime over the winter.
Outer Seat Brackets
As promised this post will talk about the fabrication and installation of the outboard seat brackets. See post #93 that shows using the tunnel structure from the GTO donor for the inner seat bolt connections. I considered using the sheet metal bracket for the outer seat bolt connections from the GTO donor but due to the floor shape in the Lemans it would have required a fair amount of work. So I thought if I am going to go to all that effort I will make my own more substantial brackets.
The picture below shows the brackets I made installed on the passenger side floor, the following picture shows the driver's side floor. The forward bracket on the passenger side had to be installed at an angle due to the shape of the floor in that side. You can also see here I secured the wiring harness in this area with leftover scraps of sound deadener, I thought that worked out well. In areas where the carpet would cover the harness and it could get stepped on I added convoluted harness cover.


The next picture shows the forward bracket on the driver's side. These brackets are made from 1/8" steel welded into a tower-like shape as shown. The threads for the seat bolt are a flanged metric nut welded in place onto the underside of the bracket similar to what the GTO donor had. The brackets are bolted through the floor with several 5/16" bolts.

This picture shows the rear bracket on the driver's side.

Once these brackets were installed I then tried fitting the carpet from the 04 GTO. With some trimming here and there it fits okay, but I think at some point I will get the correct a-body carpet. My future desire is to someday redo the interior in a two-tone tan and brown theme (I think that would look good with the dark blue I have planned for the outside), at that time I can get a brown a-body carpet.

The carpet had to be trimmed a little around the new outer seat brackets, then the seats were installed using the original bolts from the GTO donor. The seats themselves were trimmed slightly around the rear outer brackets to comform to the slope of the Lemans floor.

That's all I will probably do to the interior for now, my next major effort will be towards the bodywork with the goal of maybe getting it in paint sometime over the winter.
12-02-2013, 06:07 AM
#110
TECH Fanatic
I completely appreciate the sentiment. I spent 9 years on one car, got burnt out on the project, drove it once, sold it and bought it back a year later. Keep going, take a break fro the big stuff and hit some small details you have put off. It is amazing how tying up some loose ends makes the project seem more finished.
My big winter project is redoing the dash with a set of custom Speedhut Freedom Can-bus gauges and getting the top install completed. I will post some pictures as the project progresses.
My big winter project is redoing the dash with a set of custom Speedhut Freedom Can-bus gauges and getting the top install completed. I will post some pictures as the project progresses.
12-08-2013, 12:43 PM
#111
Staging Lane
Thread Starter
oldgoat69: Yes, I have noticed that sometimes when I get burned out with something I go in a different direction or work on small things I can get re-enthused with the project. That's the nice thing about a extensive project like this, there is always something to do.
Front Fender Rework
When I bought the car it came with fenders for a 1970-2 Lemans that were in really good condition with minimal rust behind the wheel wells which I patched. But since I decided to clone the car into a 1970 GTO they wouldn't work with the rubber GTO bumper. 1970 GTO front fenders are available as reproductions but they are $600 a side, plus I would have had to fuss around selling the Lemans fenders. I came across some info on the Internet about reworking the Lemans fenders into GTO fenders so that's what I did. At the moment I have more time than money.
The first step is to remove the pocket in the front of the fender that the Lemans bumper and front valance fit into:
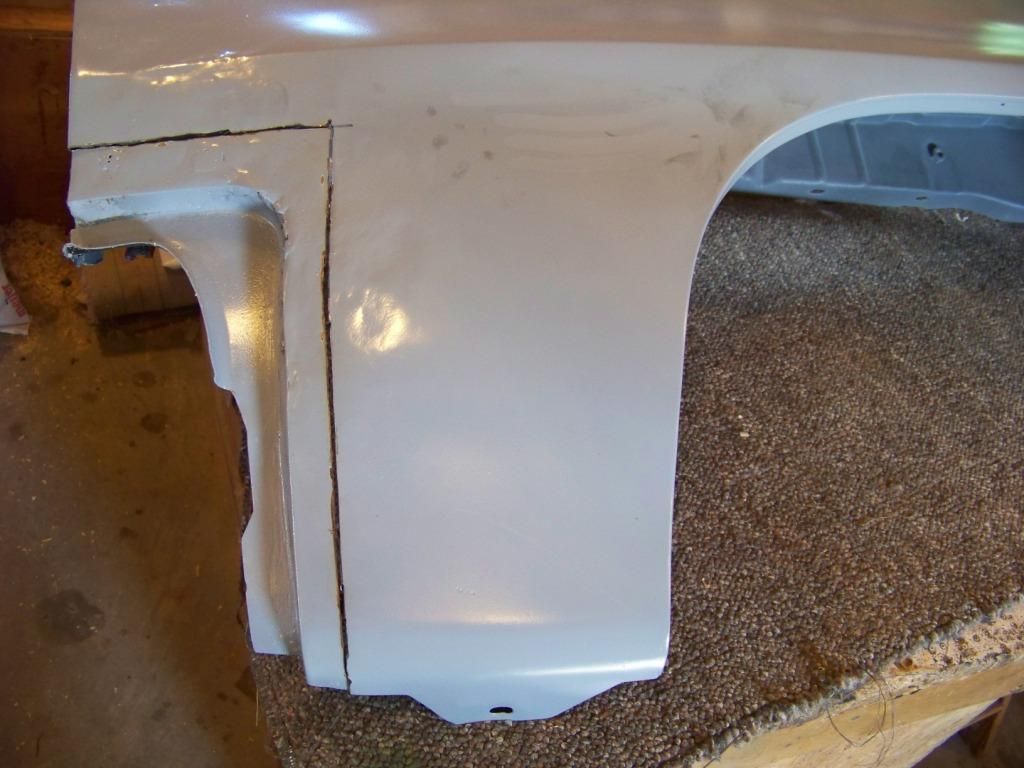
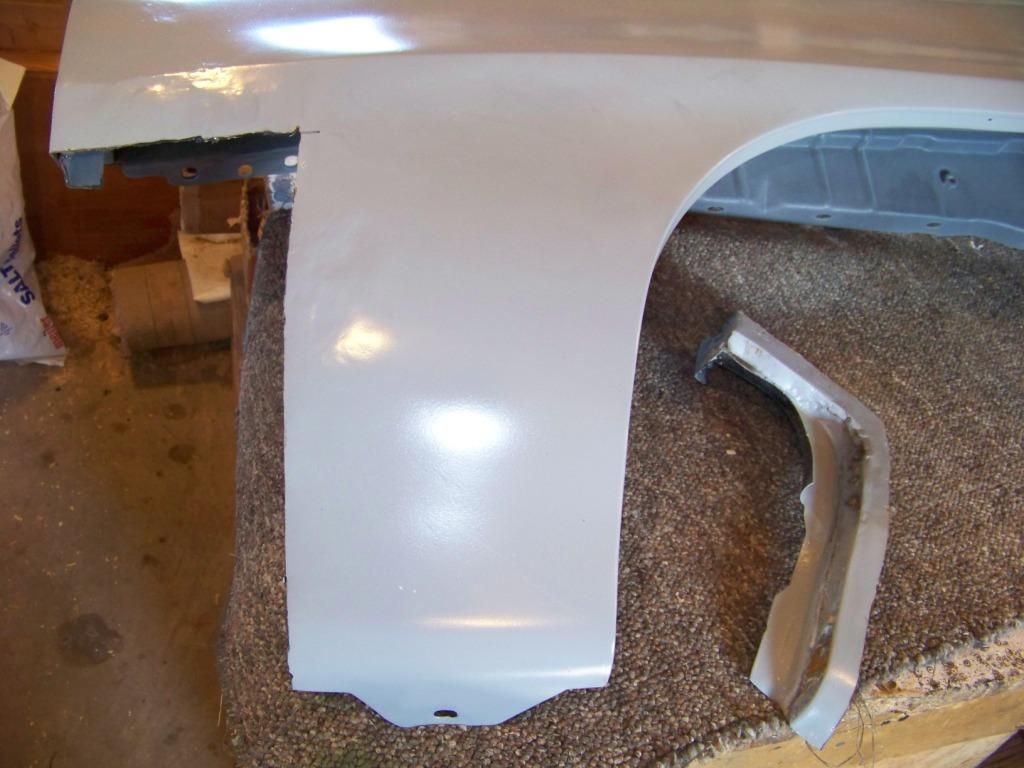
Then I shaped some sheet metal to match the curvature of the fender and welded it in:
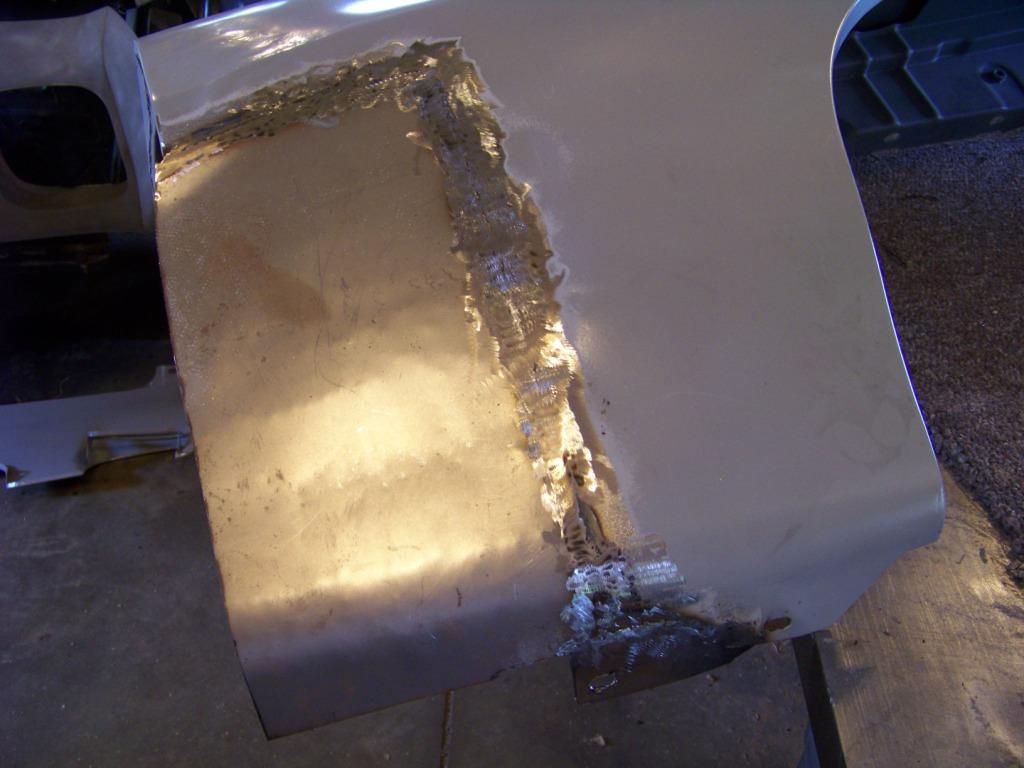
From there it was fitting on additional parts on the front of the fender where it meets the lower valance panel and rubber bumper:
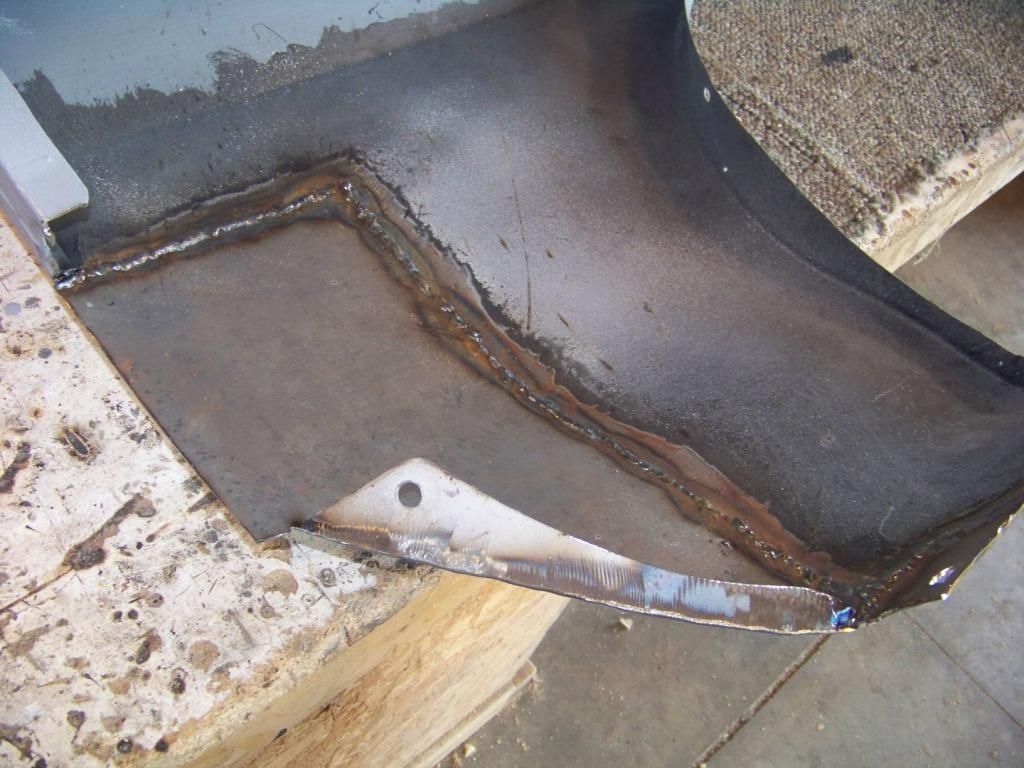
I didn't have any measurements or example GTO fender to copy from, this was all just winging it to some degree, using pictures on installations I found on the internet. As you can imagine, this required a lot of trail and error and fitting. For example, I found my initial effort to support the valance panel was too far to the rear so I had to cut that portion off and move it forward:
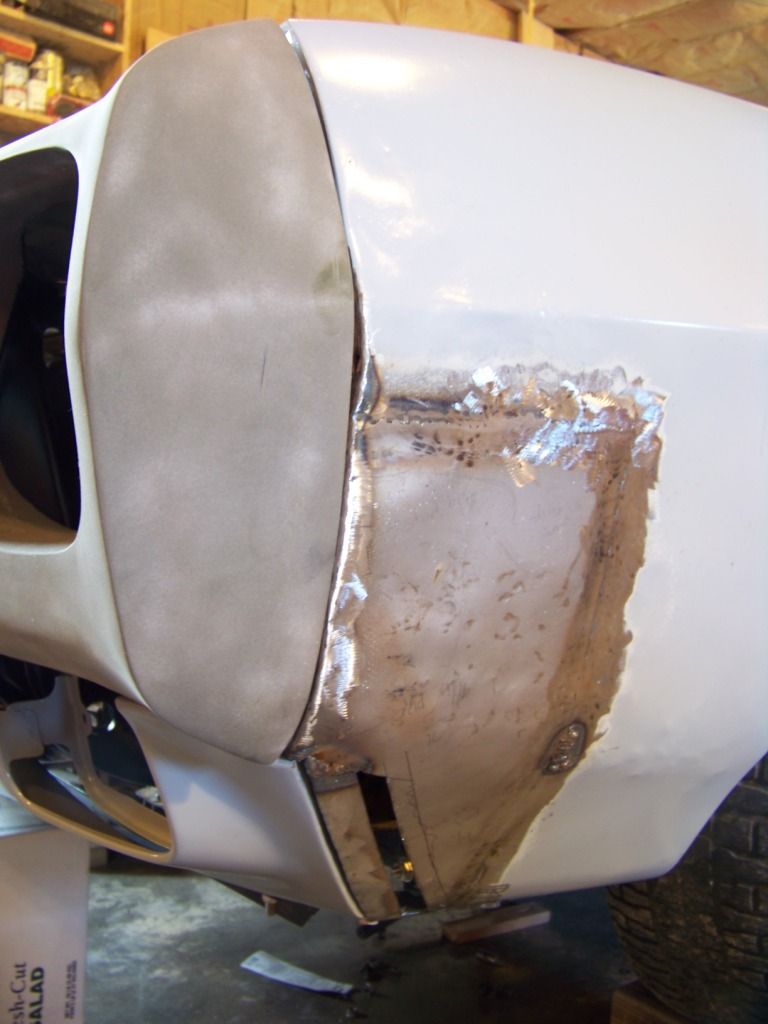
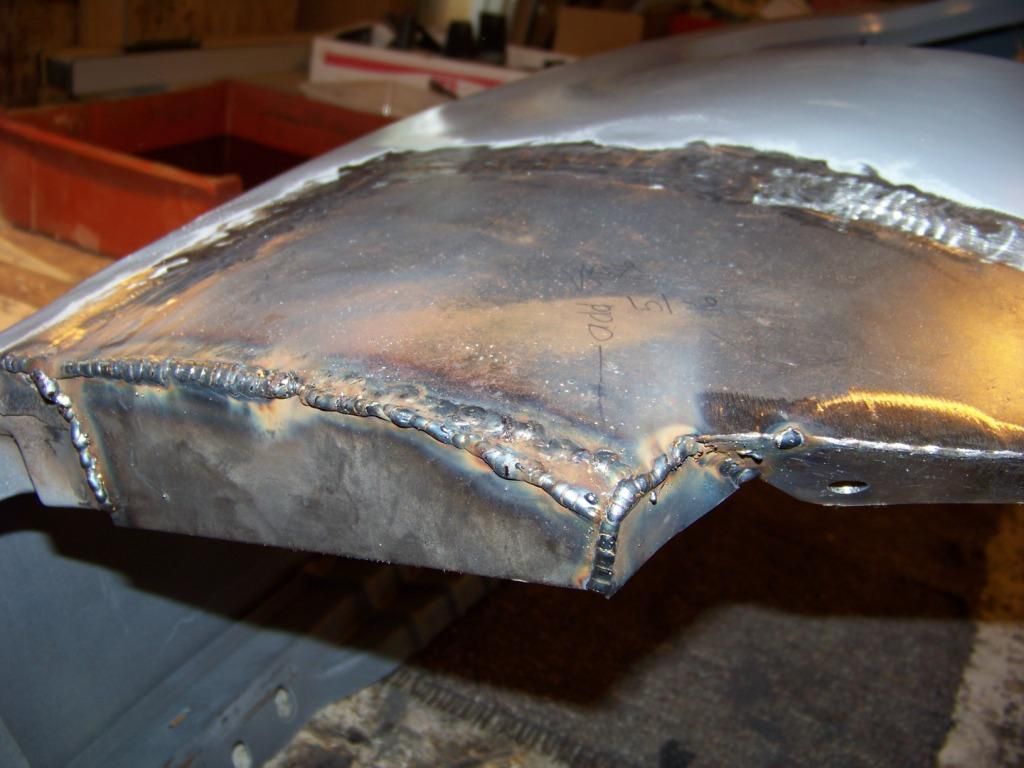
After more such tweaking I was pretty happy with the outcome:
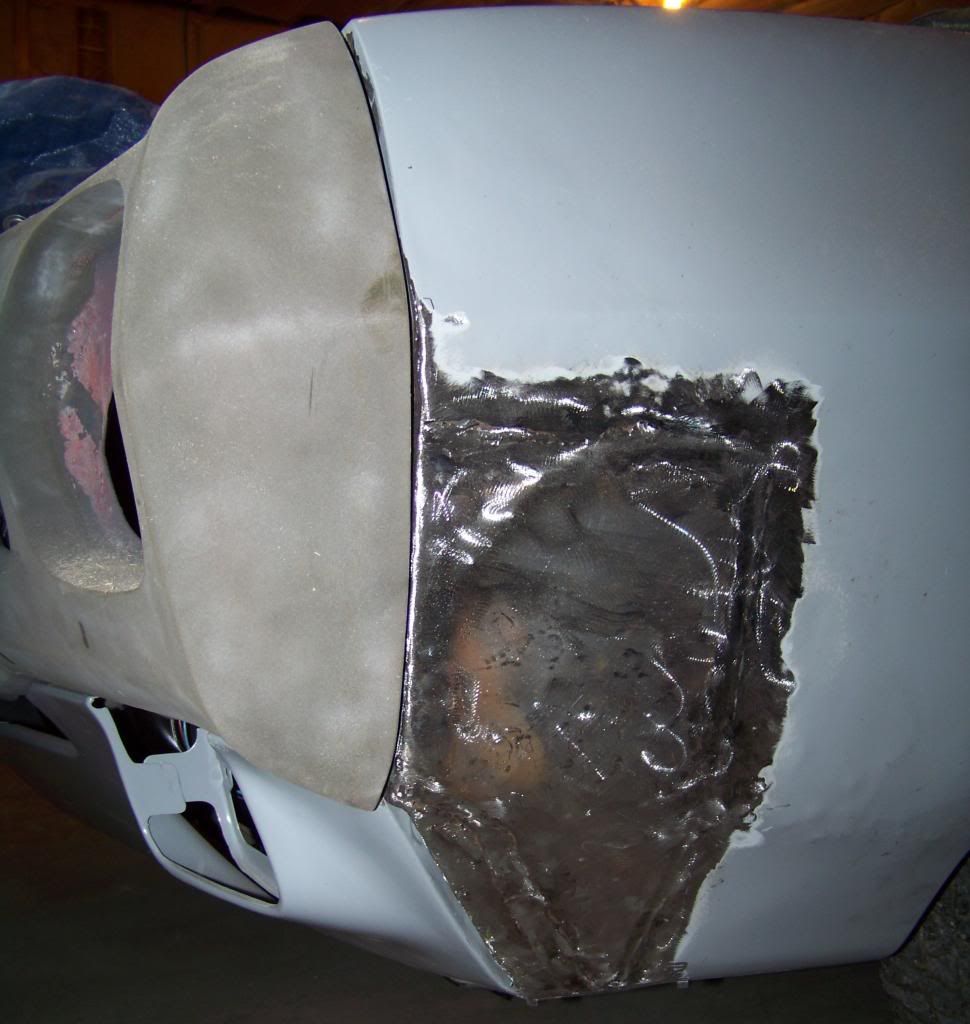
I didn't try to add the cutout for the front side market light, I figure I would just do without it and go for the shaved look. After some hammer and dolly work and some filler this should look pretty good. It actually appears to fit better than some of the pictures of finished cars I found online.
After doing both fenders and rough fitting the bumper and valance panels I came to this point:
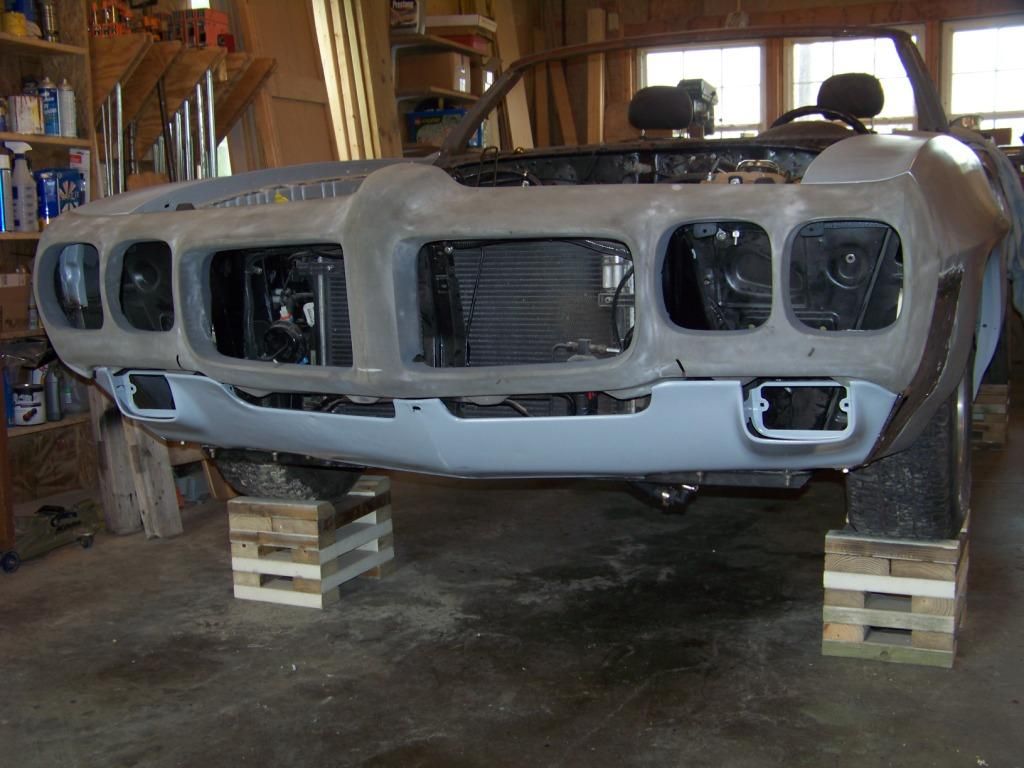
It feels good to have the front sheet metal well on it's way, I just need to fit the doors and hood and check the alignment of everything.
Since then I have been working on the back; starting to replace the passenger quarter, reworking the trunk lid, and repairing some minor rust issues other places. Those will be featured in future posts.
Front Fender Rework
When I bought the car it came with fenders for a 1970-2 Lemans that were in really good condition with minimal rust behind the wheel wells which I patched. But since I decided to clone the car into a 1970 GTO they wouldn't work with the rubber GTO bumper. 1970 GTO front fenders are available as reproductions but they are $600 a side, plus I would have had to fuss around selling the Lemans fenders. I came across some info on the Internet about reworking the Lemans fenders into GTO fenders so that's what I did. At the moment I have more time than money.
The first step is to remove the pocket in the front of the fender that the Lemans bumper and front valance fit into:


Then I shaped some sheet metal to match the curvature of the fender and welded it in:

From there it was fitting on additional parts on the front of the fender where it meets the lower valance panel and rubber bumper:


I didn't have any measurements or example GTO fender to copy from, this was all just winging it to some degree, using pictures on installations I found on the internet. As you can imagine, this required a lot of trail and error and fitting. For example, I found my initial effort to support the valance panel was too far to the rear so I had to cut that portion off and move it forward:

After more such tweaking I was pretty happy with the outcome:

I didn't try to add the cutout for the front side market light, I figure I would just do without it and go for the shaved look. After some hammer and dolly work and some filler this should look pretty good. It actually appears to fit better than some of the pictures of finished cars I found online.
After doing both fenders and rough fitting the bumper and valance panels I came to this point:

It feels good to have the front sheet metal well on it's way, I just need to fit the doors and hood and check the alignment of everything.
Since then I have been working on the back; starting to replace the passenger quarter, reworking the trunk lid, and repairing some minor rust issues other places. Those will be featured in future posts.
12-12-2013, 06:42 AM
#114
Staging Lane
Thread Starter
stoning volcom: I am sorry but I scrapped the carcase of the GTO donor several months ago so I can't give you the dimension you ask for. Perhaps go to a salvage yard and find a GTO with the engine removed?
05-15-2014, 08:17 PM
#115
Staging Lane
Thread Starter
Haven't posted in several months but I have been working mostly on bodywork during that time. The next several posts will get this thread caught up to where I am now.
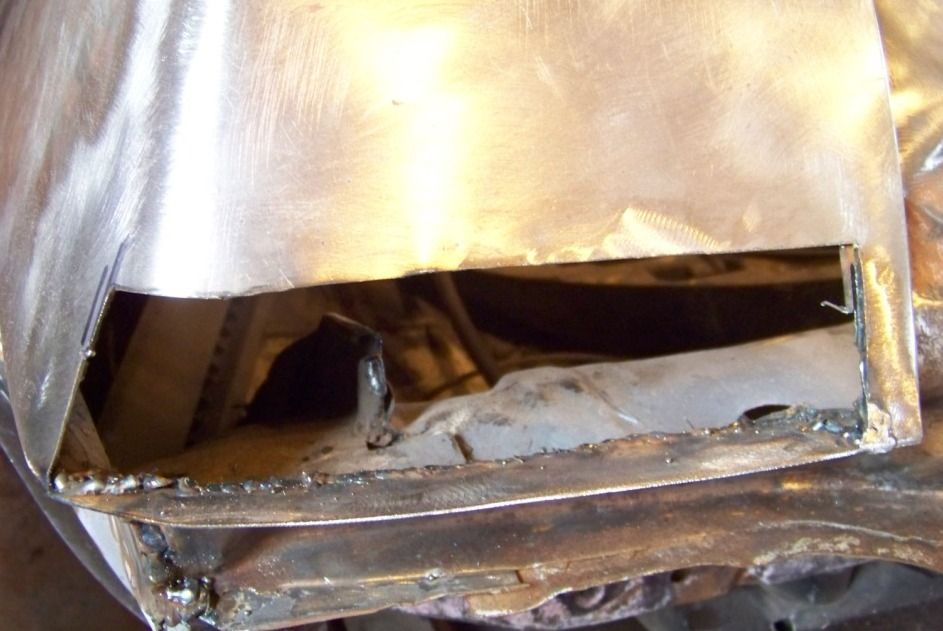
This post will talk about the rust repair I did to the left rear corner. First pic is cutting out the rust:
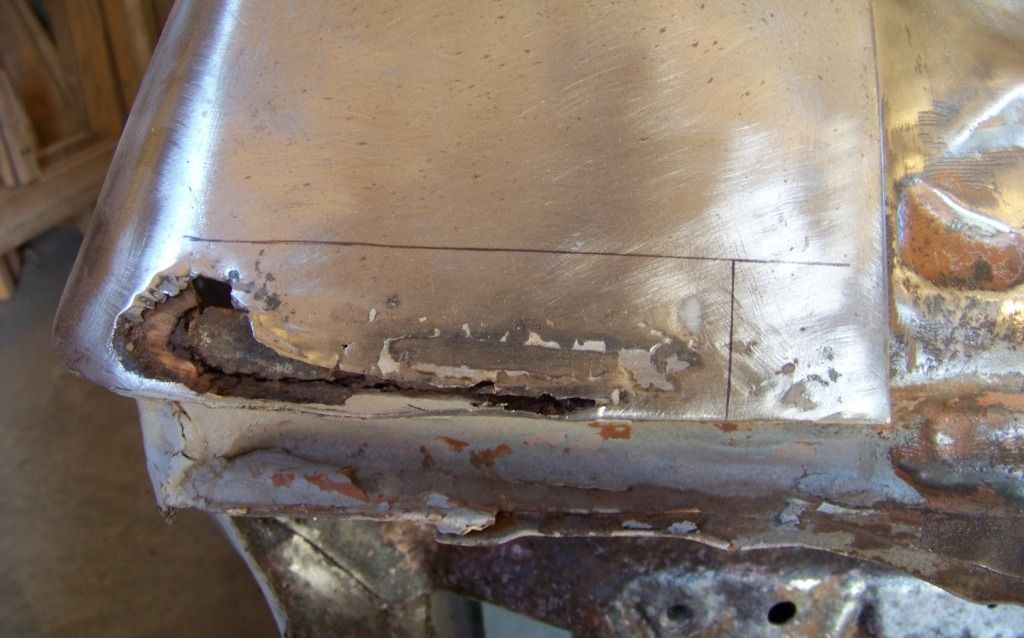
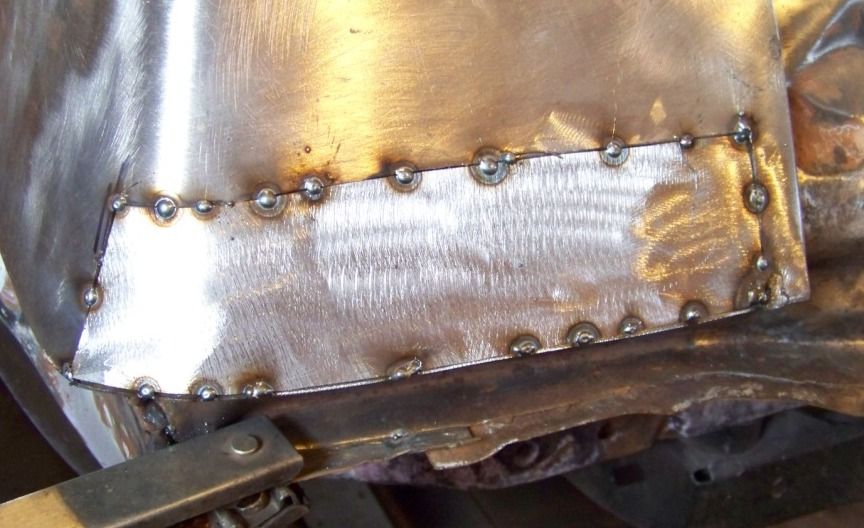
This shows the rust removed and the first lower patch piece welded in:
The main patch was trimmed and shaped to size and tacked in:
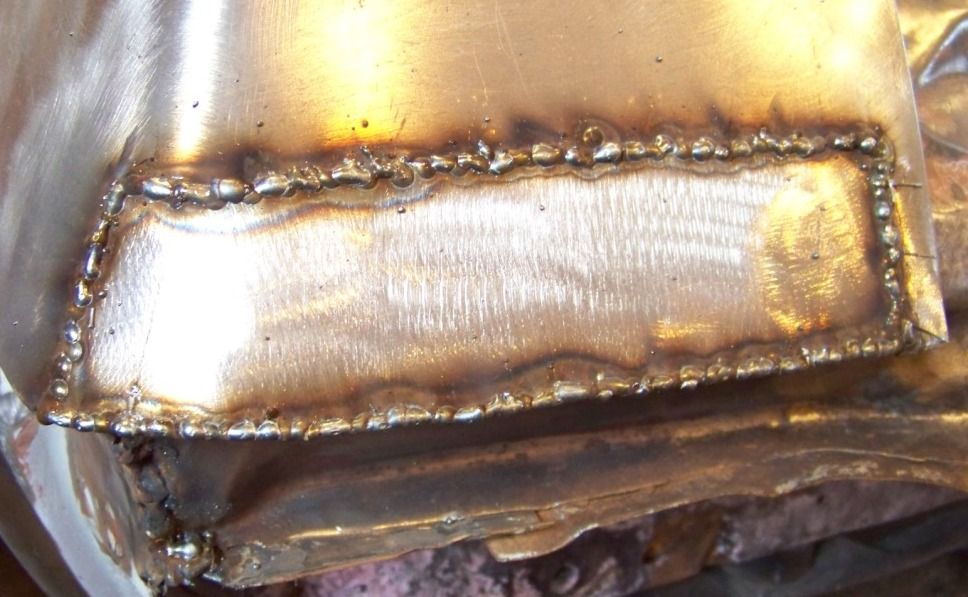
Welding complete:
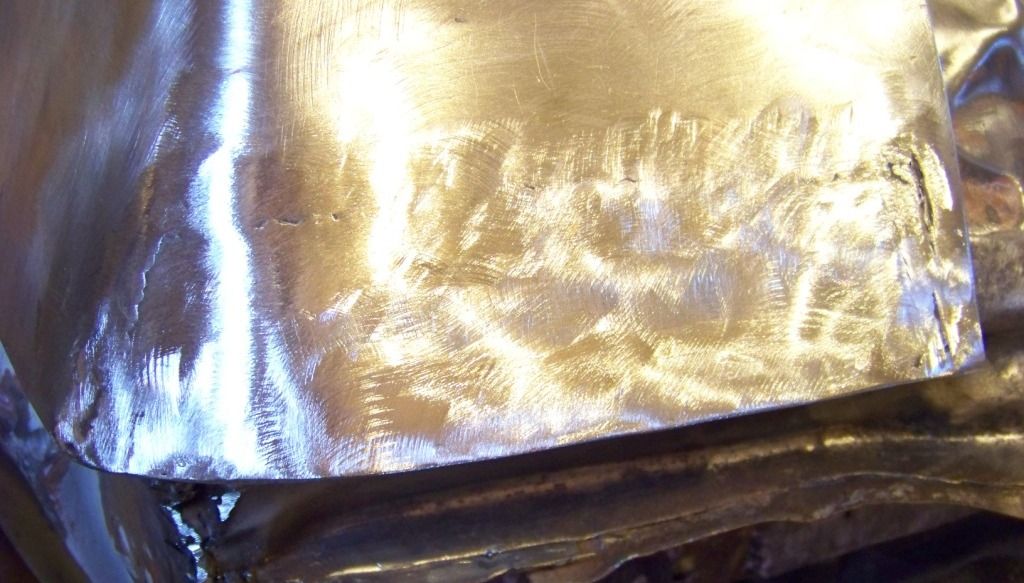
And ground down flat:
My welding skills have progressed with practice but improving the conditions also helps. I have found seeing the weld area and getting adequate light there is critical. These old eyes don't see as well as they use to and need all the help they can get. I thought about buying a welding light but decided just to make one, it can't be that hard. Here are the parts involved: a small LED flashlight I got on sale for $2, a scrap of aluminum, and two hose clamps.
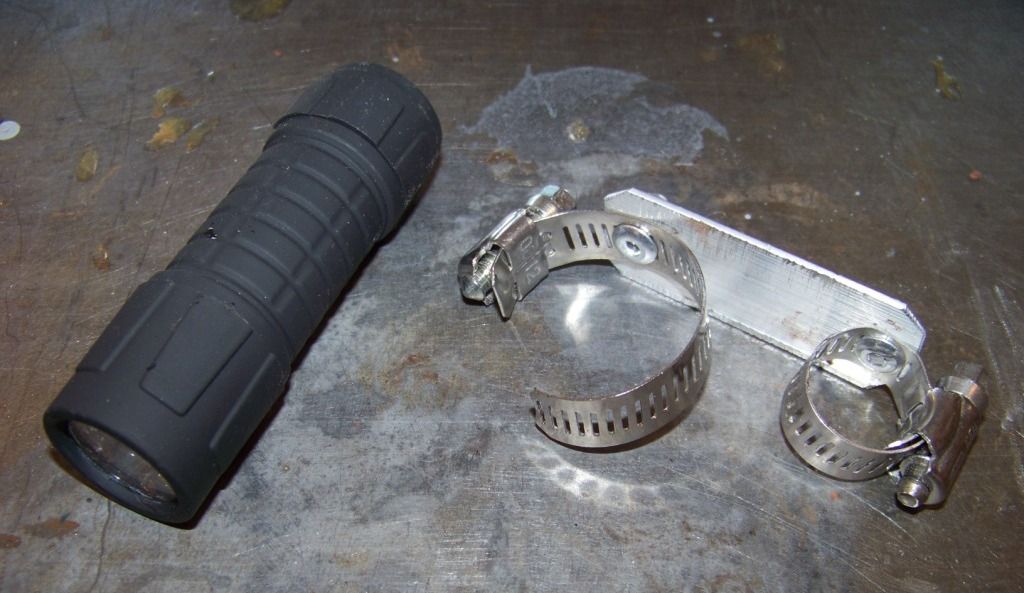
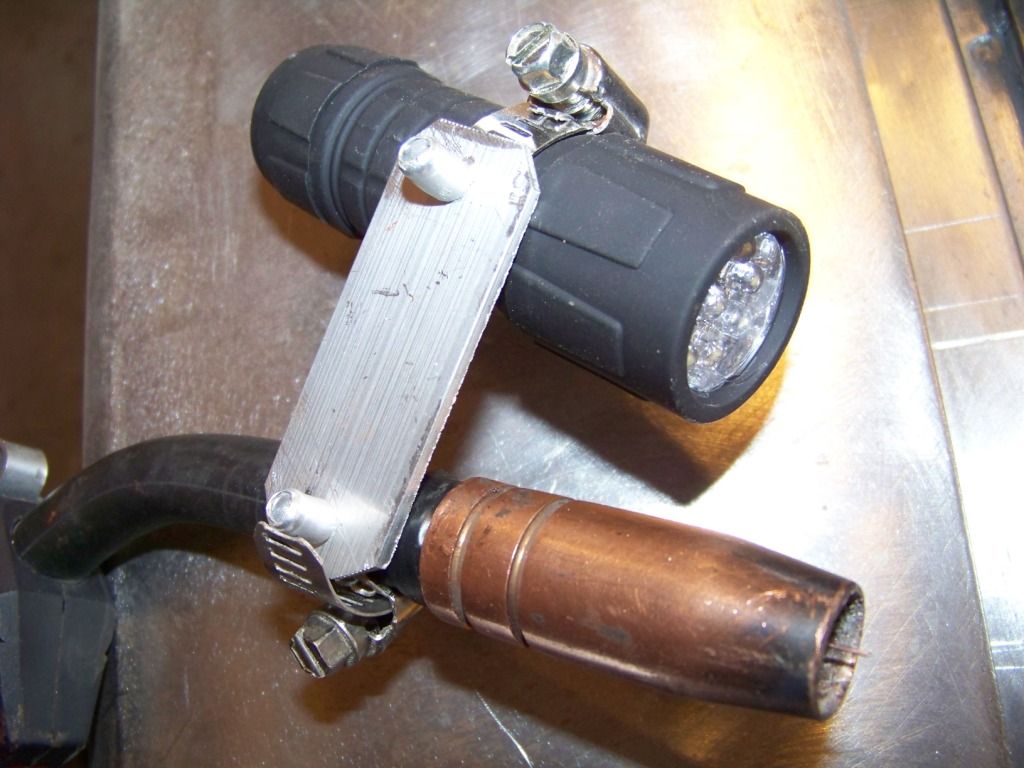
It has really helped see what I am welding which is especially helpful when welding sheet metal.
This post will talk about the rust repair I did to the left rear corner. First pic is cutting out the rust:

This shows the rust removed and the first lower patch piece welded in:

The main patch was trimmed and shaped to size and tacked in:

Welding complete:

And ground down flat:

My welding skills have progressed with practice but improving the conditions also helps. I have found seeing the weld area and getting adequate light there is critical. These old eyes don't see as well as they use to and need all the help they can get. I thought about buying a welding light but decided just to make one, it can't be that hard. Here are the parts involved: a small LED flashlight I got on sale for $2, a scrap of aluminum, and two hose clamps.


It has really helped see what I am welding which is especially helpful when welding sheet metal.
05-21-2014, 08:08 PM
#118
Staging Lane
Thread Starter
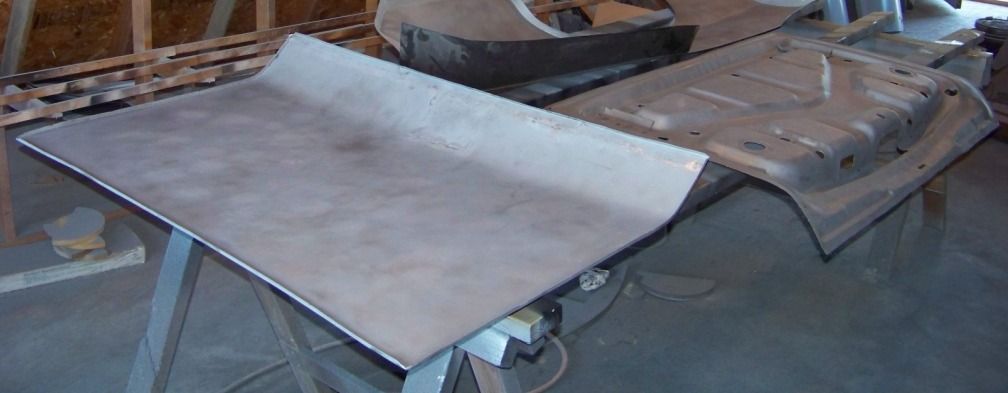
Trunk Lid Rework
Next task for body work was reworking the trunk lid. The one that came on the car was all rusted out along the lower edge but in good shape otherwise. The area around the key hole was also somewhat mangled. Reproduction trunk lids are available at $400 a pop but I decided to take on the challenge of reworking this one.
I cut off the lower inch along the bottom of the lid and separated the inner and outer skins. This picture shows the inside of the outer skin and the primer, paint, sealant and wax cavity undercoating (that didn't do any good here) that I had to remove:
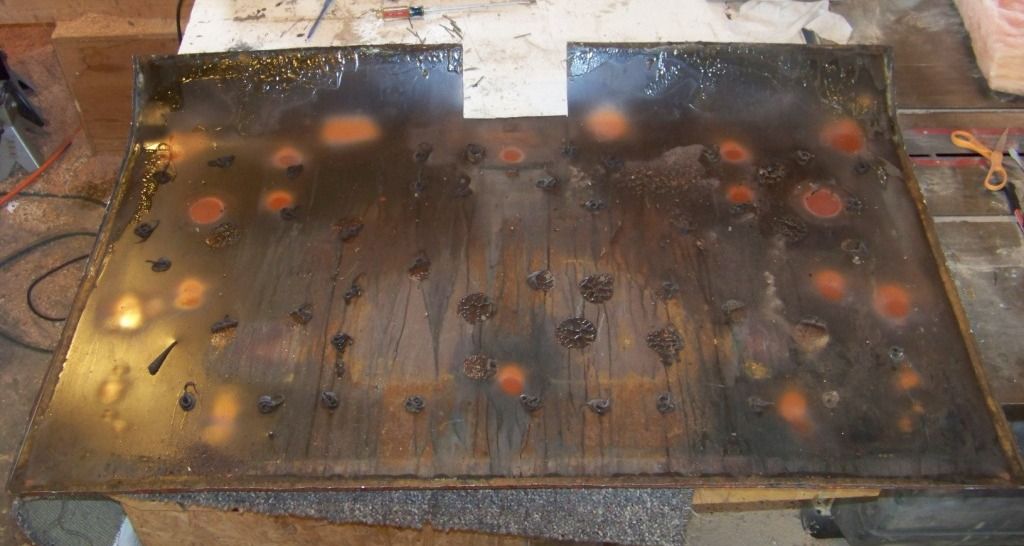
The next picture shows the new metal I added to the bottom and to replace the mangled key hole area.
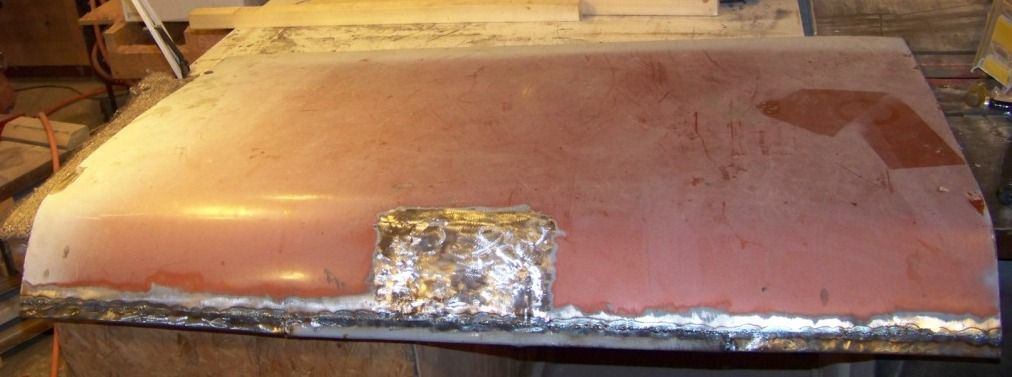
I have also modified the trunk lid to use the latch and electric actuator from the donor GTO, I will document that in a future post.
Both the inner and outer skins were sandblasted to bare metal and then the mating surfaces were given two coats of epoxy primer:
I applied seam sealer to the inside edges and then reassembled the lid and installed it to check the fit:
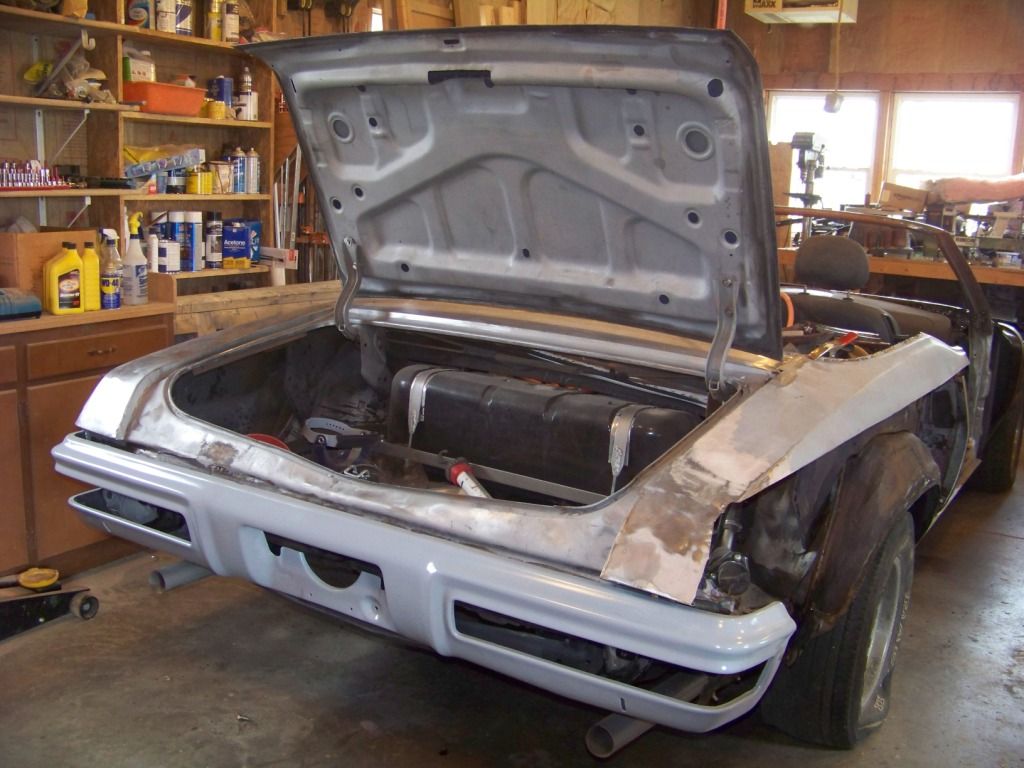
I have also sandblasted and primed the rear bumper, the chrome wasn't great and I wanted to paint it body color anyway to match the front bumper which were originally painted on these cars.
Next task for body work was reworking the trunk lid. The one that came on the car was all rusted out along the lower edge but in good shape otherwise. The area around the key hole was also somewhat mangled. Reproduction trunk lids are available at $400 a pop but I decided to take on the challenge of reworking this one.
I cut off the lower inch along the bottom of the lid and separated the inner and outer skins. This picture shows the inside of the outer skin and the primer, paint, sealant and wax cavity undercoating (that didn't do any good here) that I had to remove:

The next picture shows the new metal I added to the bottom and to replace the mangled key hole area.

I have also modified the trunk lid to use the latch and electric actuator from the donor GTO, I will document that in a future post.
Both the inner and outer skins were sandblasted to bare metal and then the mating surfaces were given two coats of epoxy primer:

I applied seam sealer to the inside edges and then reassembled the lid and installed it to check the fit:

I have also sandblasted and primed the rear bumper, the chrome wasn't great and I wanted to paint it body color anyway to match the front bumper which were originally painted on these cars.
05-22-2014, 08:44 PM
#120

I like your enginuity on the trans crossmember. I may go that route as I have a 71 Chevelle with M6, hooker headers and mounts. It is not fitting as others have had good luck with flipping the mount, rewelding. My right side header and Pypes will not clear. I may fabricate something like yours
