
54 Bel Air w/LS1 and 4L60e
 11-25-2013, 08:36 AM
#81
awesome update! I think I read earlier you're in Baytown? If so it is supposed to clear up on Wednesday... (BTW, I live north of Beaumont and we should get together once we both have road worthy cars!)
Keep up the good work, its keeping me motivated to get mine running!
Keep up the good work, its keeping me motivated to get mine running!
Thanks for the encouragement. Progress is slow and when the car is complete I’ll be making some long run to test her out. There are a number of old school car shows around that I’d like to make and show off the LS-1.
Last edited by DEEDDUDE; 11-25-2013 at 11:32 AM.
 11-25-2013, 11:10 AM
#82
Teching In

Join Date: Sep 2013
Posts: 35
Likes: 0
Received 0 Likes
on
0 Posts
I made a discovery this weekend. They now sell fittings for a one person brake bleeding job. They are bleeder fittings with a built in check valve. Saved me a ton of work while bleeding the brakes on my 36 coupe.
11-25-2013, 11:38 AM
#83
Couper, I have a set of those for use when bleeding my stock car brakes and I thought about buying a set for this one, but the brake calipers I have are remanufactured units. When I was bleeding the brakes I had more fluid coming from the caliper threaded area where the bleeder screws in not the bleeder itself. I figured when one of the kids aren�t busy doing nothing they would help me.
11-25-2013, 02:26 PM
#84

Leadfoot I don�t live in Baytown, I�m in Beach City just east of there. I moved out of Baytown as fast as I could, Ha Ha. It�s a joke in these parts. I drive from BC to Beaumont every day, been out here since the Ching-a-lay. My wife and I want to move out your way. We�re internet shopping for property a couple hours north of Beaumont.
Thanks for the encouragement. Progress is slow and when the car is complete I�ll be making some long run to test her out. There are a number of old school car shows around that I�d like to make and show off the LS-1.
Thanks for the encouragement. Progress is slow and when the car is complete I�ll be making some long run to test her out. There are a number of old school car shows around that I�d like to make and show off the LS-1.

 11-26-2013, 01:07 PM
#86
I�ll post the pictures when I get home this evening, if I can remember too.
11-26-2013, 03:38 PM
#88
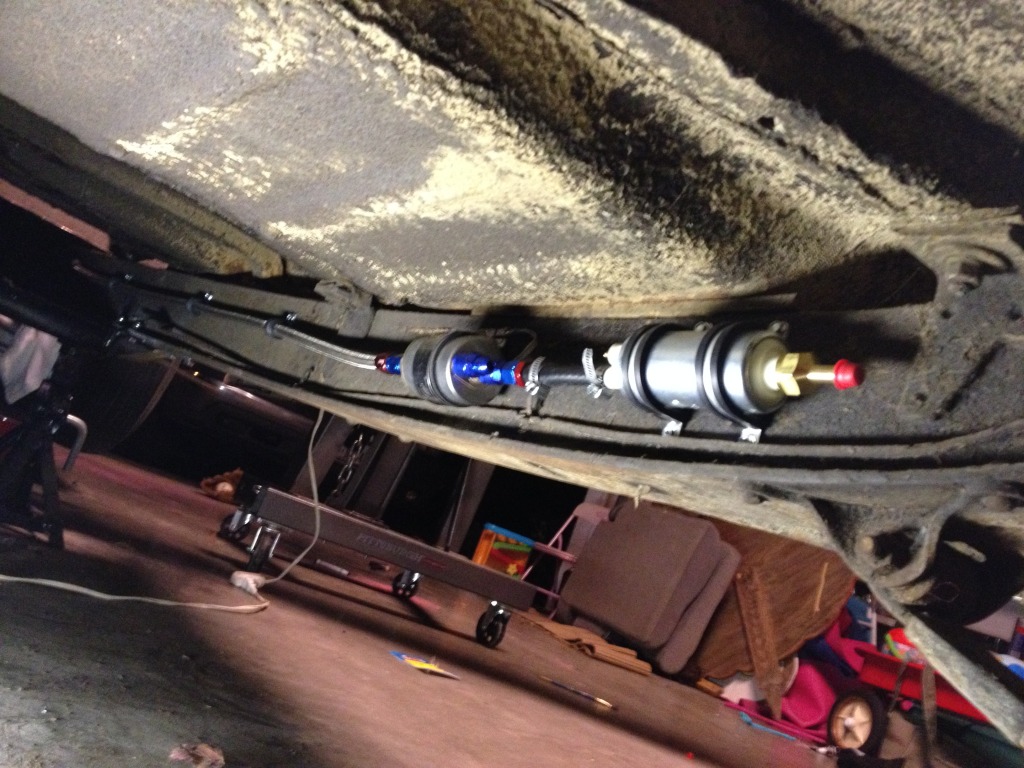
I bought the same Tanks Inc. tank, should be waiting for me when I get home today! I am running an external fuel pump with the corvette regulator. Already have them mounted, just waiting for the new tank to drop in and finish running my hoses.
Here is a pic of my pump and filter/reg installed on pass frame rail:
Here is a pic of my pump and filter/reg installed on pass frame rail:
 11-26-2013, 06:52 PM
#89
Pictures as promised. Tank uncoated.

Earlier in the thread it's coated and mounted. I reused a sending unit I used when I mounted a racing fuel cell in temporarily. I used a 0-30 ohm unit to work with the factory gauge. I built a voltage step down unit so the gauge would work with the 12 volt system.

Starting to modify the fuel pick up.

Finished product.
12-28-2013, 06:35 PM
#90
Sorry guy it's been so long since I've updated, I've been real busy working on the car and forgetting to take pictures. I finished the exhaust and I did this while the floor was in the car. I removed the floor today. I took 2-45 degree bends, found the centers and cut them to make an offset to clear the driveshaft.


Before adding the straight run of pipe after the "y" I noticed this, from a well "marketed" exhaust company, and cut it all out; this is supposed to be a 3" outlet, it's actually 2-3/4" and this made it less than 2". hmm. no pic of the finished product.

The exhaust was heading right to the rear cross member so I modified it with some 5" tubing I had laying around.

I started the body work a week or so ago. The right side didn't have an previous repairs so it went ok.


The left side had these issues.


The bondo went as high as you see the paint buffed off.

Also modified one of the rear wheel tubs to put some fat tires in the back to hopefully plant the power the LS-1 makes.

I've gotten only a few days work into it and this is what's completed, I still need to continue to grind the welds flush. I'm learning to use body hammers and dollies. I've never done any body work before except on my stock cars and that was using rivets and duct tape.
This is the rot I cut out and that's the reason for all of the mounts.


Enjoy the pictures. Still plenty to do, wish me luck.
Last edited by DEEDDUDE; 12-28-2013 at 06:41 PM.
12-30-2013, 06:35 AM
#92
Leadfoot I don�t live in Baytown, I�m in Beach City just east of there. I moved out of Baytown as fast as I could, Ha Ha. It�s a joke in these parts. I drive from BC to Beaumont every day, been out here since the Ching-a-lay. My wife and I want to move out your way. We�re internet shopping for property a couple hours north of Beaumont.
Thanks for the encouragement. Progress is slow and when the car is complete I�ll be making some long run to test her out. There are a number of old school car shows around that I�d like to make and show off the LS-1.
Thanks for the encouragement. Progress is slow and when the car is complete I�ll be making some long run to test her out. There are a number of old school car shows around that I�d like to make and show off the LS-1.
I'm right down the road from you in Plantation Estates on 565......We're practically neighbors. Give me a shout sometimes, I'd like to swing by and see your project. I'm doing a LS3 swap on a 63 Nova SS right now...
T,
12-30-2013, 09:24 AM
#93
Thanks guys I appreciate the comments.
Tom it's ironic you found this post. I've been meaning to PM you and ask about programming my PCM. I followed your build on the 66 and used the info in the thread to lay out my wiring, my wiring doesn't look as good as yours; I still need to loom it with the braided stuff if I can ever decide if I want the PCM in or outside the car.
I've always wanted a 66 or 67 Nova. I passed up a deal on one back in the late 80's fresh out of high school, but $1000 was all I had and that was the asking price.
After tomorrow I'm taking the rest of the week off so anytime after that is good with me. I'll send a PM with my contact info.
Thanks again guys.
I like what you're doing here...great work, gonna be a bitcin ride...
I'm right down the road from you in Plantation Estates on 565......We're practically neighbors. Give me a shout sometimes, I'd like to swing by and see your project. I'm doing a LS3 swap on a 63 Nova SS right now...
T,
I'm right down the road from you in Plantation Estates on 565......We're practically neighbors. Give me a shout sometimes, I'd like to swing by and see your project. I'm doing a LS3 swap on a 63 Nova SS right now...
T,
I've always wanted a 66 or 67 Nova. I passed up a deal on one back in the late 80's fresh out of high school, but $1000 was all I had and that was the asking price.
After tomorrow I'm taking the rest of the week off so anytime after that is good with me. I'll send a PM with my contact info.
Thanks again guys.
02-11-2014, 03:27 PM
#95
Hey Tom. I've been meaning to upload a few photos, I've got most of the floor back in and the rear firewall; but still have the tubs to complete. I spent a lot of time on the floors and didn't get a ton of work completed considering the amount of time and effort put in to it. This is mostly due to not having the skill or tools to do the job. It turned out OK. A lot of work went into the supports under the car also. Too much boring stuff and not a lot of cool.
Hopefully I can finish the Honey Do's and I can get back on the car. I'll try to get some photos of the floor soon, but no promises.
Thanks for checking in.
Hopefully I can finish the Honey Do's and I can get back on the car. I'll try to get some photos of the floor soon, but no promises.
Thanks for checking in.
02-24-2014, 08:38 PM
#96
Small update. Not getting a lot of work done and what little I do is under the floor boards. A couple photos of the interior, I still need to finish welding a few spots and repair others. The next day I have off I'll start working the rear quarters again and hopefully get the tubs installed.


 02-25-2014, 08:22 AM
#99
Thanks guys. I’ll probably do a dynamat alternative inside and some type of rust / sound proof under the floors. I’ve looked at several different options and the peal and seal looks appealing and seems to be an affordable option for the interior.
03-16-2014, 06:33 PM
#100
A few more pics. I'm getting a little bit done each weekend. Finally got the tubs in and started on the trunk. I have more completed than the pics show. One more weekend and I believe I'll be finished in the trunk and start back underneath the car. My goal is to be back running, not finished, by the end of April.
I built a frame with 1" x 1" under the center of the trunk sheet metal and made it removeable so I can get to the battery. The fuel tank just fit in the area thanks to my BFH. I'll get pics of that later. Also built a frame to support the sides with 1/2" x 1/2". Pics to follow as well.


I built a frame with 1" x 1" under the center of the trunk sheet metal and made it removeable so I can get to the battery. The fuel tank just fit in the area thanks to my BFH. I'll get pics of that later. Also built a frame to support the sides with 1/2" x 1/2". Pics to follow as well.


