

Project Sudden Delivery


Hello,
Haven't done much on here aside from buy a few thing in the sales forums and an introduction way back when I was focusing on my truck. Fast forward to a month and a half ago, I got my new project!
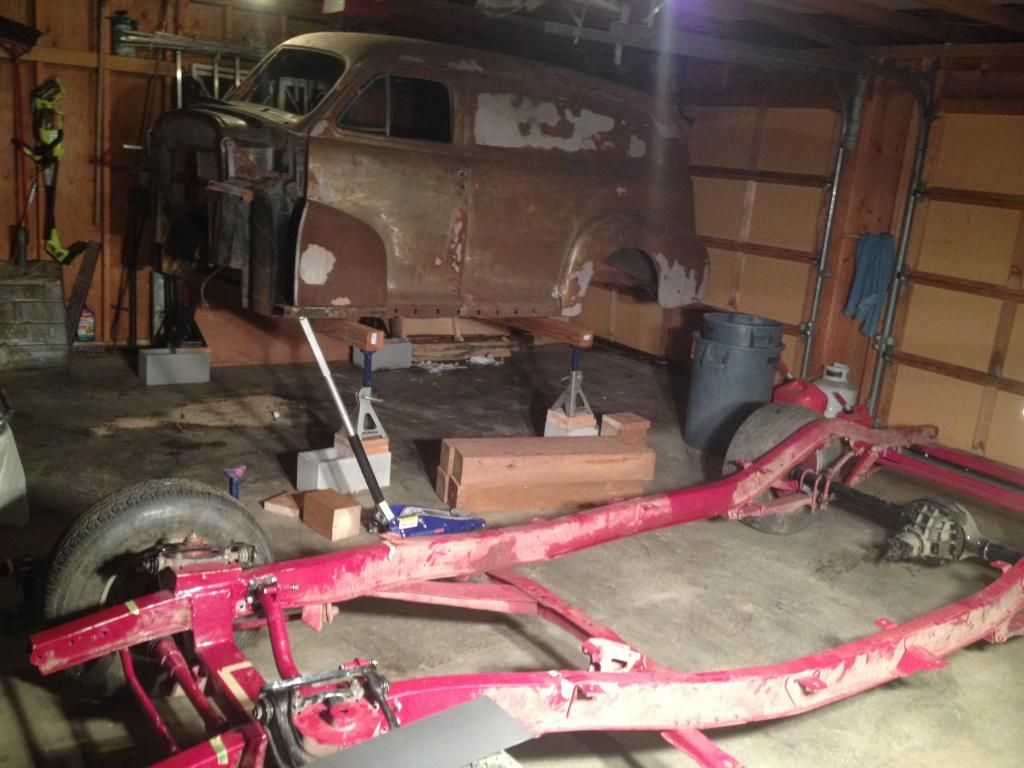
A 1947 Chevrolet Sedan Delivery. The car was a work in progress from the guy I bought it from, he did a lot of frame work to it including putting a Ford 9" in the rear with new springs, shocks, etc and a Mustang ii IFS in the front. The whole body is there and in fairly good shape aside from some surface rust. 95% of the trim has been chromed and is still in its protective wrapping from the chromer.

This was when I first brought it home.
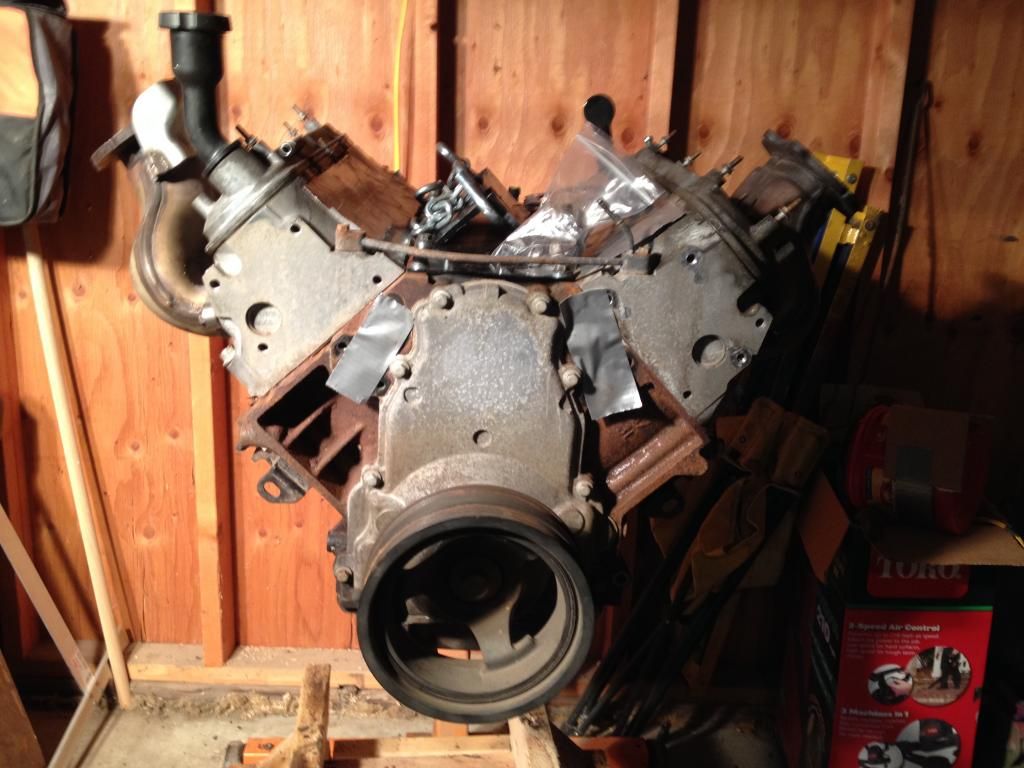
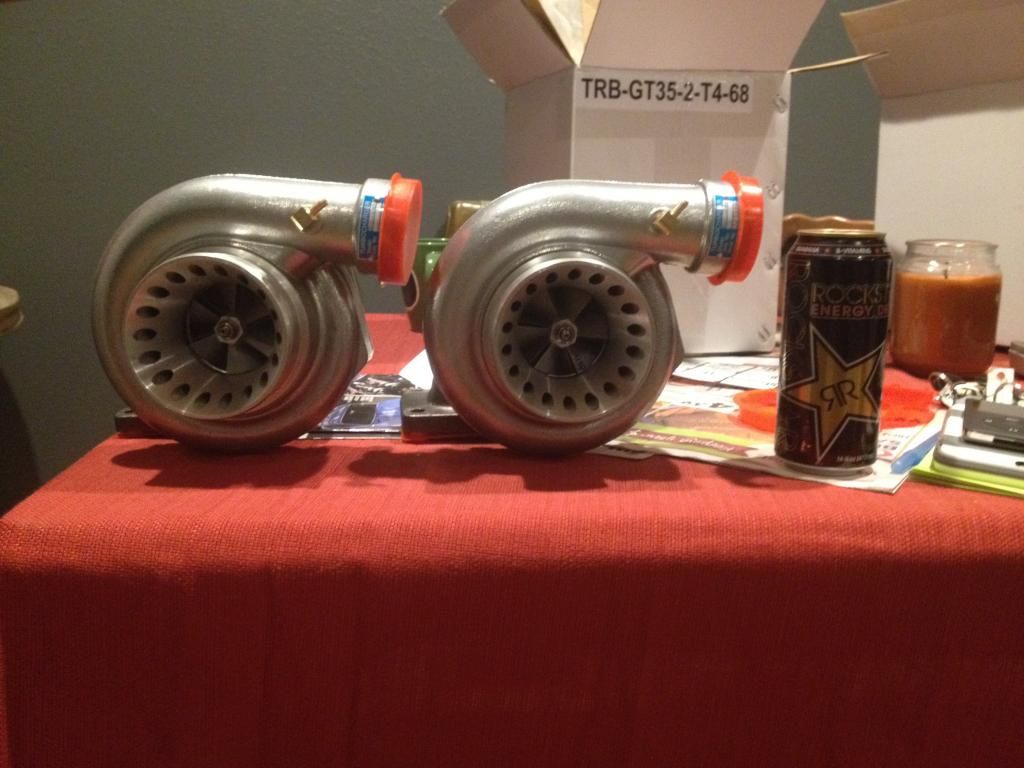
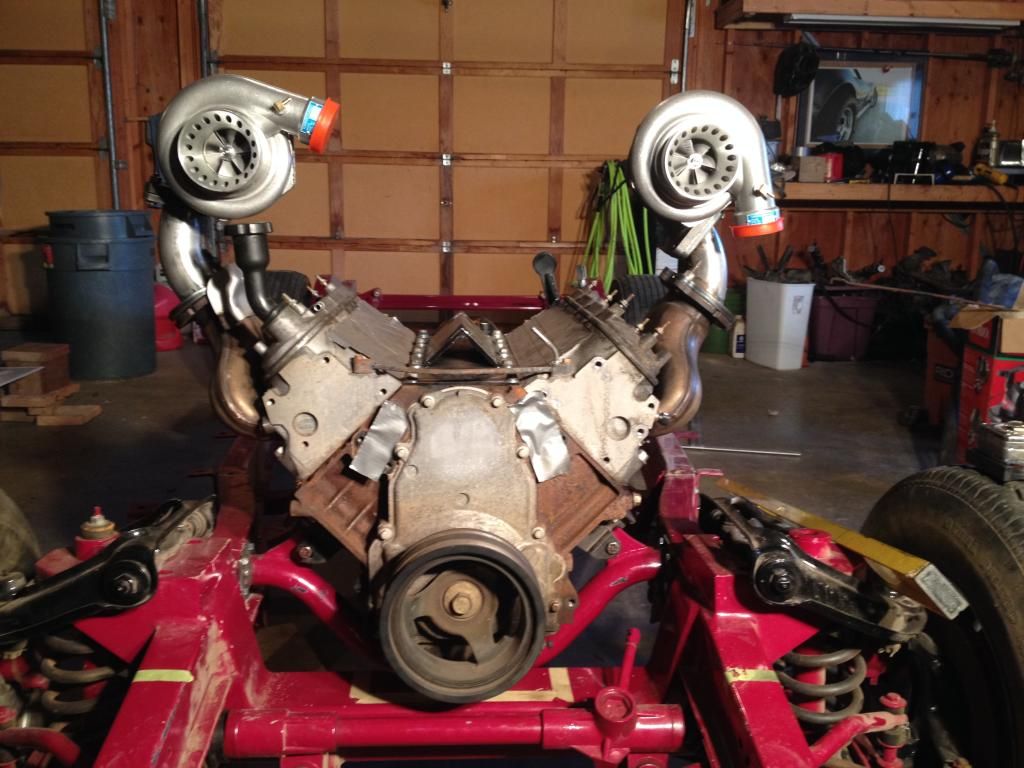
Since then I've picked up a junkyard 5.3, a T56 off of a member here, Jody (SumtinCoo), a pair of CXRacing GT35s (yes this is going to be a budget build for now) and a few other items.
My goals are to have a fun car to drive around, and attend car shows with as very few people do LS swaps, and those that do stay NA. I want twins for the symmetrical look, and its mostly for show as I don't plan on doing any track times, nor is there a dyno within 100 miles of me. However I'm shooting for around 600HP and if things go well would like to build a forged motor that can handle more in the future.
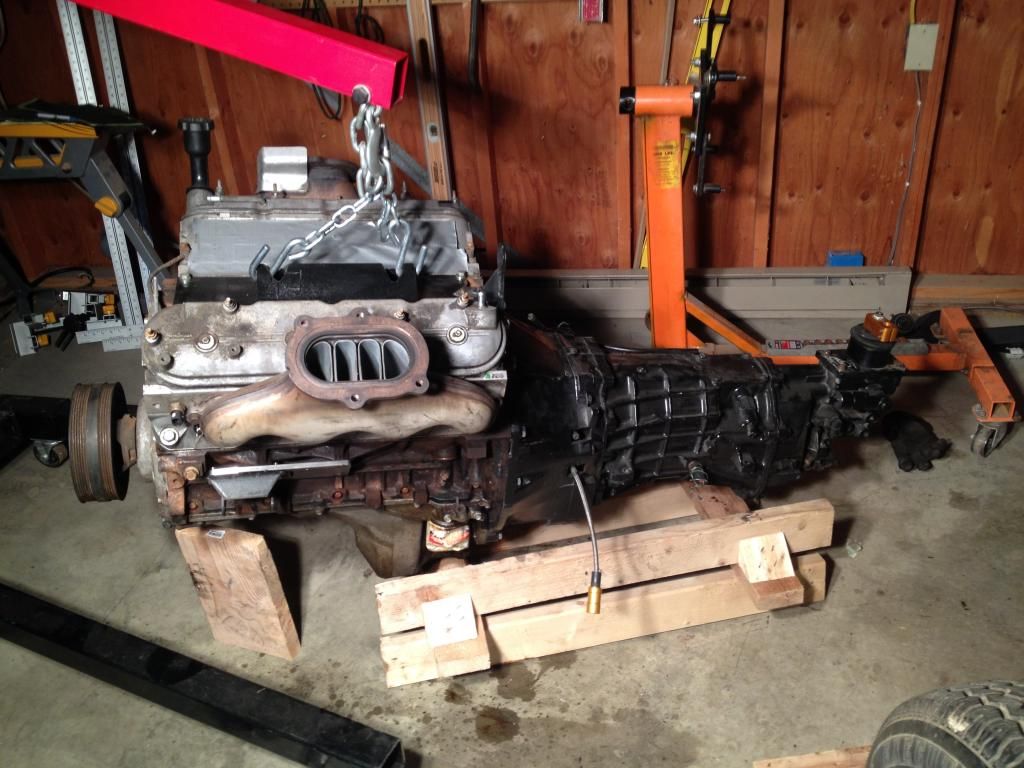
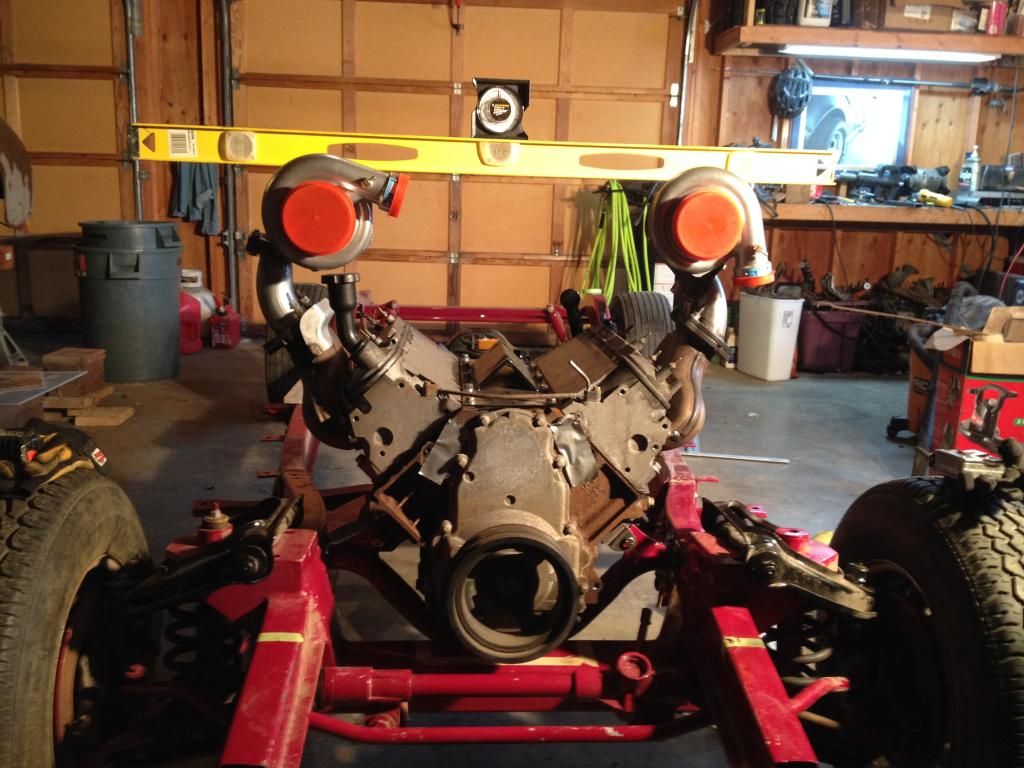
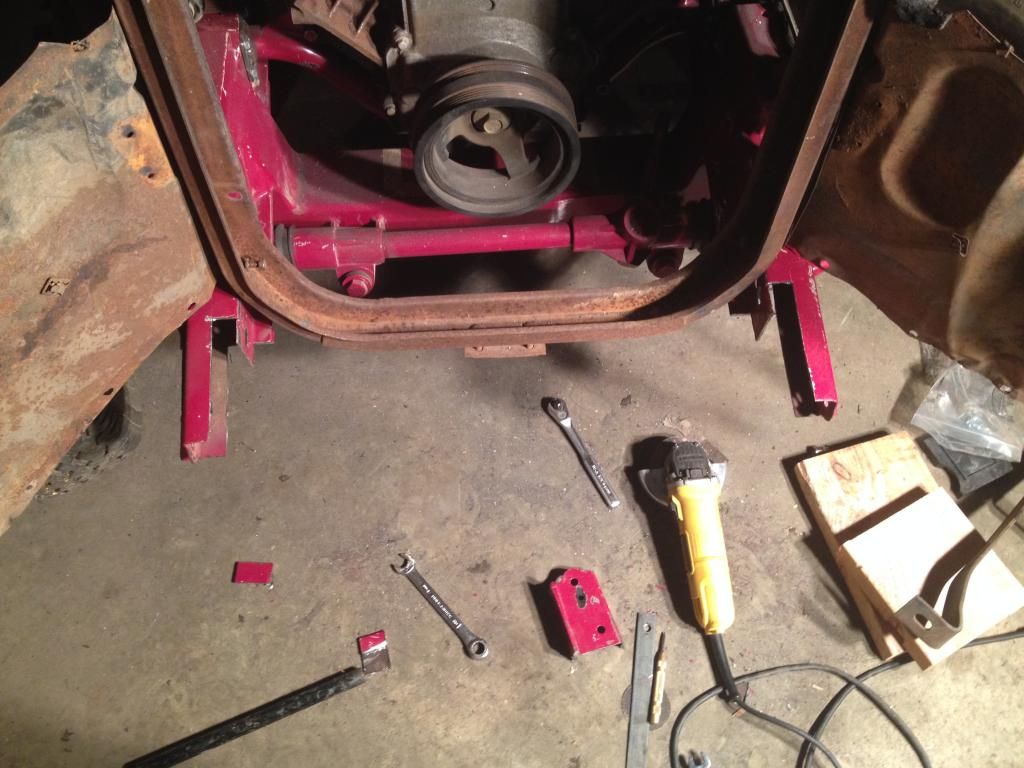
So far, I relocated the engine mounts so that the oil pan would clear the front crossmember as well as the radiator. Plus I've seen pictures of a couple LS swaps into these post-war chevy's and they always look like they're sitting down too low, so I think the added transmission tunnel work will be worth it.
This evening I lifted the body off the frame and got the frame back into the stall nearest the heater, and now I'm ready to place the engine and transmission back on the frame so I can fab up a transmission crossmember.
At this point I have a few questions that maybe you guys can help me out with. I hear a lot of people saying the best angle to set these engines is 3 degrees down in the rear, how crucial is this? If I do that I will have to notch or remove the current riveted 'k member.' The new mount for the transmission will be about 3" behind the old crossmember. If I set the engine in there perfectly level, it would clear the original crossmember, thereby saving the trouble of fabbing a new mount for the brake master cylinder. Though it would also place the output shaft a lot higher than the pinion. My other concern is the pinion angle currently points down and forward (I'm not sure how much this guy knew about what he was doing). I have read a lot on driveline angles and know I should get them parallel, but offset to achieve a 2 degree operating angle to reduce vibration and save u joints. I guess my questions at this stage are: should I completely remove the perches on the rear axle and reweld them, or should I just shim them? Also, just curious for recommendations as far as crossmembers. I've pretty well came to terms with needing to remove the riveted one, but I was thinking a 2x2 .120 wall steel tube all the way across, and then two more coming at 45s to create a nice solid x-member (still leaving room for the trans/driveshaft).
Well, I'm sure I've forgot a lot of what I wanted to say, but that should cover most of it for now. Thanks for looking and let me know what you think of the project! I appreciate all input. The project will be somewhat slow, but it will definitely make it to fruition!
Haven't done much on here aside from buy a few thing in the sales forums and an introduction way back when I was focusing on my truck. Fast forward to a month and a half ago, I got my new project!
A 1947 Chevrolet Sedan Delivery. The car was a work in progress from the guy I bought it from, he did a lot of frame work to it including putting a Ford 9" in the rear with new springs, shocks, etc and a Mustang ii IFS in the front. The whole body is there and in fairly good shape aside from some surface rust. 95% of the trim has been chromed and is still in its protective wrapping from the chromer.

This was when I first brought it home.
Since then I've picked up a junkyard 5.3, a T56 off of a member here, Jody (SumtinCoo), a pair of CXRacing GT35s (yes this is going to be a budget build for now) and a few other items.
My goals are to have a fun car to drive around, and attend car shows with as very few people do LS swaps, and those that do stay NA. I want twins for the symmetrical look, and its mostly for show as I don't plan on doing any track times, nor is there a dyno within 100 miles of me. However I'm shooting for around 600HP and if things go well would like to build a forged motor that can handle more in the future.


So far, I relocated the engine mounts so that the oil pan would clear the front crossmember as well as the radiator. Plus I've seen pictures of a couple LS swaps into these post-war chevy's and they always look like they're sitting down too low, so I think the added transmission tunnel work will be worth it.
This evening I lifted the body off the frame and got the frame back into the stall nearest the heater, and now I'm ready to place the engine and transmission back on the frame so I can fab up a transmission crossmember.

At this point I have a few questions that maybe you guys can help me out with. I hear a lot of people saying the best angle to set these engines is 3 degrees down in the rear, how crucial is this? If I do that I will have to notch or remove the current riveted 'k member.' The new mount for the transmission will be about 3" behind the old crossmember. If I set the engine in there perfectly level, it would clear the original crossmember, thereby saving the trouble of fabbing a new mount for the brake master cylinder. Though it would also place the output shaft a lot higher than the pinion. My other concern is the pinion angle currently points down and forward (I'm not sure how much this guy knew about what he was doing). I have read a lot on driveline angles and know I should get them parallel, but offset to achieve a 2 degree operating angle to reduce vibration and save u joints. I guess my questions at this stage are: should I completely remove the perches on the rear axle and reweld them, or should I just shim them? Also, just curious for recommendations as far as crossmembers. I've pretty well came to terms with needing to remove the riveted one, but I was thinking a 2x2 .120 wall steel tube all the way across, and then two more coming at 45s to create a nice solid x-member (still leaving room for the trans/driveshaft).
Well, I'm sure I've forgot a lot of what I wanted to say, but that should cover most of it for now. Thanks for looking and let me know what you think of the project! I appreciate all input. The project will be somewhat slow, but it will definitely make it to fruition!


The 'Cuda is a project my dad and I have had for 5 years. It's got a 340 out of a 1971. A833 Four Speed in it. Dad busted 3rd gear a couple years ago doing some spirited driving so I gutted the Trans and rebuilt it using OD innards and rebuild supplies. We've gone through te full interior, new wiring, rebuilt suspension front and rear, authentic rear louvers. All around great car.
The car is stock power-wise, which is why I decided I needed a project of my own (dad doesn't like the idea of forced iduction after my turbo Cavalier broke back in college despite him having a '69 427 Corvette which was what got me interested in Horsepower).
The car is stock power-wise, which is why I decided I needed a project of my own (dad doesn't like the idea of forced iduction after my turbo Cavalier broke back in college despite him having a '69 427 Corvette which was what got me interested in Horsepower).


With the HP you want there are several things that need to be done. First, you need to add a much better K member that runs from the firewall back to the front spring perch. I recommend 1" x 2" square tubing upper and lower on each side so that the frame won't twist. Upgrade the rear suspension to triangle 4 bars with air bags. Won't be able to set the final pinion angle until all weight is on the suspension but right now 2 down isn't bad. Where are you going to put the two turbos?
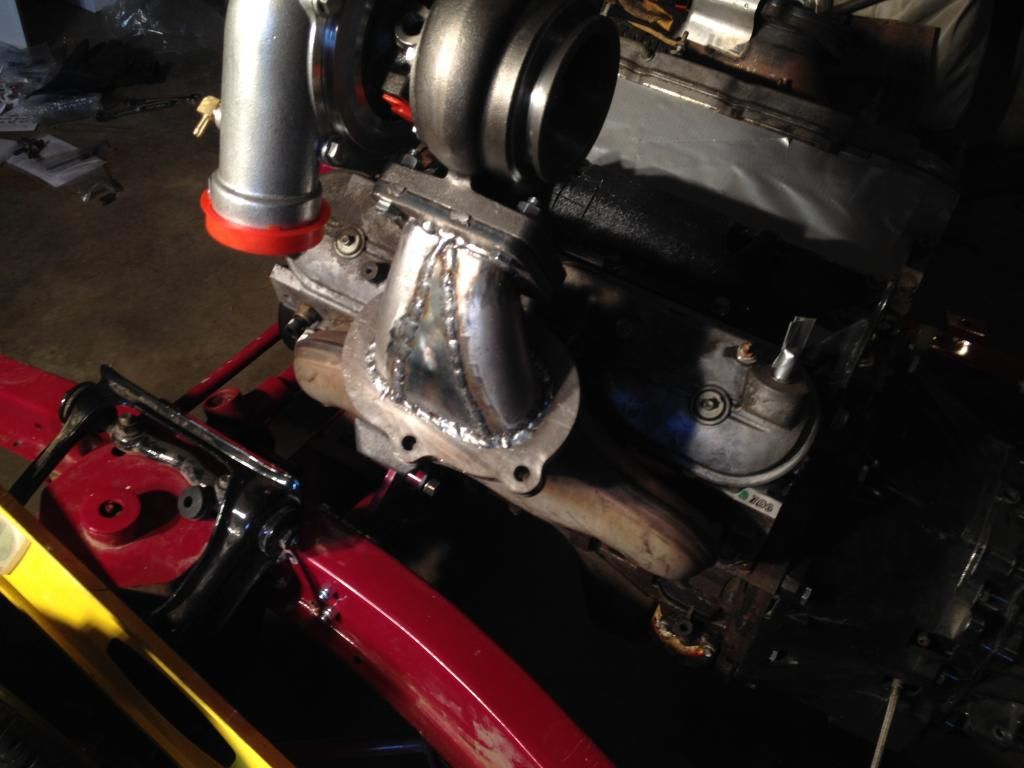
The turbos will sit above the valve covers (since the engine compartment is deeper than it is wide. I've designed the transition from the LS7 manifolds to the T4 flanges in Cad and an waiting on my piping to get here to start fabricating them. I was thinking about something like this for my frame strengthening (minus the dual brakes?!)

I don't think it will be quite that involved, but I'd take off from about the fire wall, 45 degrees and bring it out just enough to still clear the transmission, then run parallel to the frame back to another 45, do this on each side, top and bottom. Then have a solid welded tube between the two sides just back behind the transmission and another I could bolt in where the transmission mount would be placed. Is that a bit overkill? The 40s Chevys had fully boxed 'top hat' style frames that I understood to be pretty strong. I don't plan on running slicks, just street tires, so there won't be any hard launches. If it's what's needed I have no problems doing it. Just asking. Also, are you saying there's no way for the leaf spring rear to hold up under that power? As said before, this won't be a track car. Just a fun street car. I haven't been in the 600 Horsepower neighborhood so I'm just asking.

I don't think it will be quite that involved, but I'd take off from about the fire wall, 45 degrees and bring it out just enough to still clear the transmission, then run parallel to the frame back to another 45, do this on each side, top and bottom. Then have a solid welded tube between the two sides just back behind the transmission and another I could bolt in where the transmission mount would be placed. Is that a bit overkill? The 40s Chevys had fully boxed 'top hat' style frames that I understood to be pretty strong. I don't plan on running slicks, just street tires, so there won't be any hard launches. If it's what's needed I have no problems doing it. Just asking. Also, are you saying there's no way for the leaf spring rear to hold up under that power? As said before, this won't be a track car. Just a fun street car. I haven't been in the 600 Horsepower neighborhood so I'm just asking.
Can't build a house on shifting sands. I was also thinking that a "tophat" frame was strong but later found out there is frame flex. Your picture above is an excellent example of a strong K-member with upper and lower 1" x 2" connected together so that there can not be twisting. I did a 33 ****** sedan delivery with 10" tires and triangle four bars. Couldn't get the tires to break loose but it would try to rotate the earth. I've done two Chevy "tophat" styles and planning a new frame for my present '39 ride. While you are down to the frame like that you may want to concider running a plate the length of the outside of the frame and built a K member.
Trending Topics
Thanks for your help! I'll definitely keep you in mind if I have other frame issues. So you're sting a plate on the outside of the frame? So the K member would have a plate inside and outside of the frame rails and slide down over the frame and bolt through? Or a plate on the outside to strengthen it while the K member would be welded to the inside face or carried through? Or am I misunderstanding you entirely?
Only telling you what I would do and what I have found out and learned over the years. First, weld a 3/16" plate on the outside of the frame. Next, construct a K member like pictured. Give serious thought to the rear suspension. NOW is the time to make changes to the frame. Nothing wrong with parallel leafs on a street rod but twin turbos and a throttle pedal...?
Not disagreeing, just looking for info. Thanks or the clarification. Do you have any recommendations on reading material? I have a chassis fabrication book, and I've been trying to research it as much as possible on the internet. I've got quite a while to work on it so I won't jump into anything without being sure it's what I want. I don't plan on this being finished for another couple years.
Art Morrison has some nice looking stuff. Education is the key to success so keep asking questions and searching. Whatever you do be happy with the frame before you go further. Redoing something after the body is on or after it's on the road is no fun...and costly.

Teching In
Joined: Nov 2014
Posts: 29
Likes: 0
Very cool delivery truck project. I'm looking forward to following your build. I'm usually not huge fan of camo. But I love it on that truck. I'm going to save that picture for future reference. Well the Cuda just speaks for it self. I love those cars.
Thanks, the camo is a vinyl wrap a friend of mine did to showcase what his sign shop can do for vehicles. Tonight I got a bunch of frame measurements so I can build it in cad and get an idea of where I want stuff to sit as well as how much material I would need for a crossmember. Also found out that I have a Ford 8" not a 9", so that was a disappointment...
Here's a rough screenpic of where I plan on mounting the turbos relative to the engine/hood for clearances.
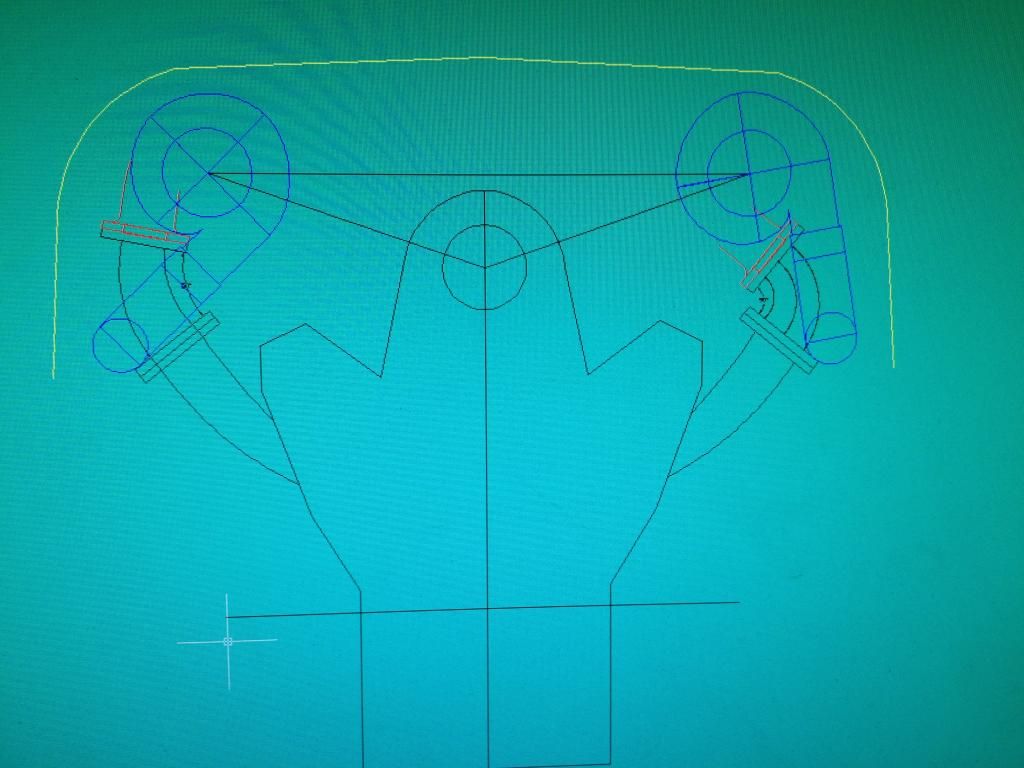
Here's a rough screenpic of where I plan on mounting the turbos relative to the engine/hood for clearances.

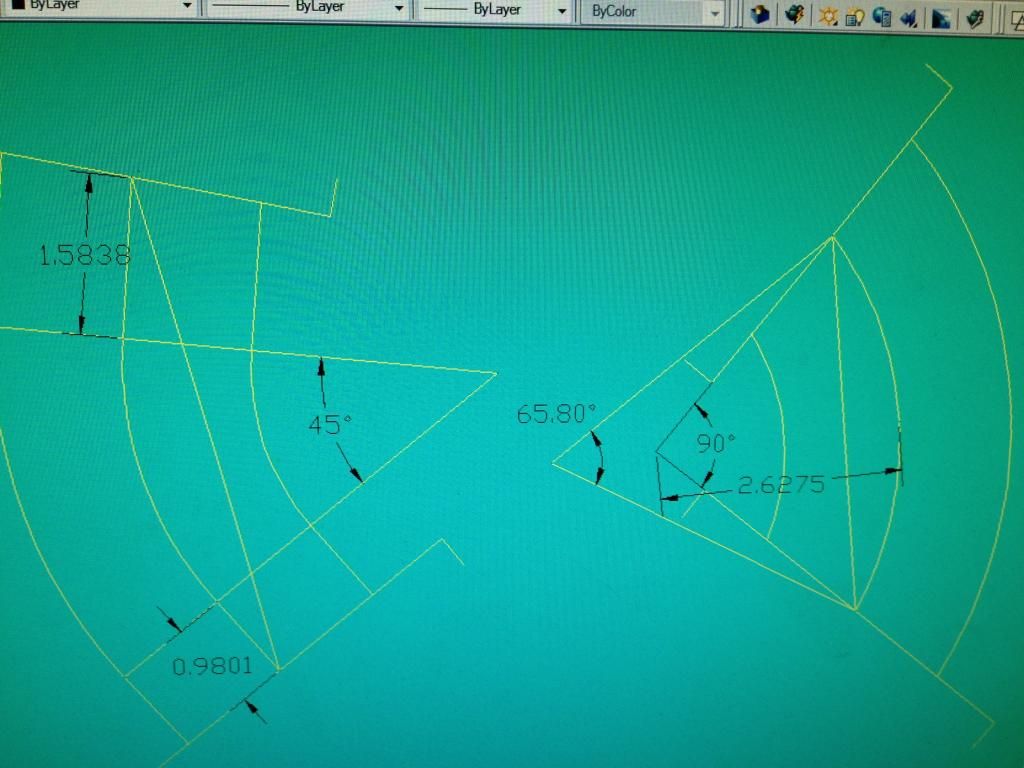
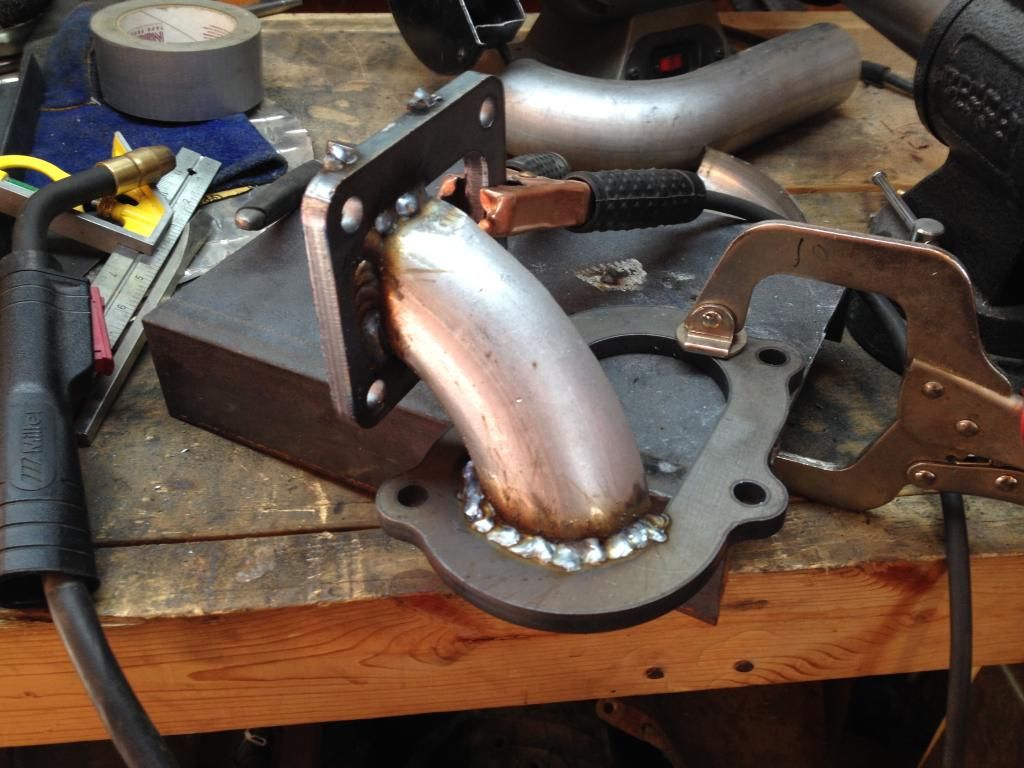
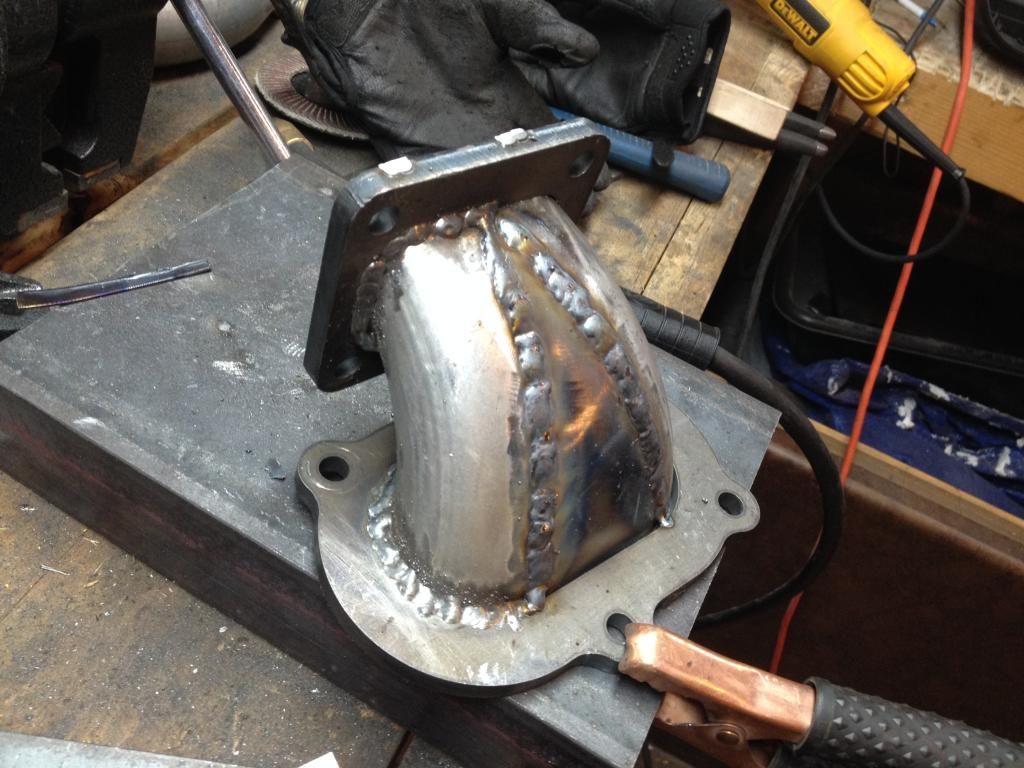
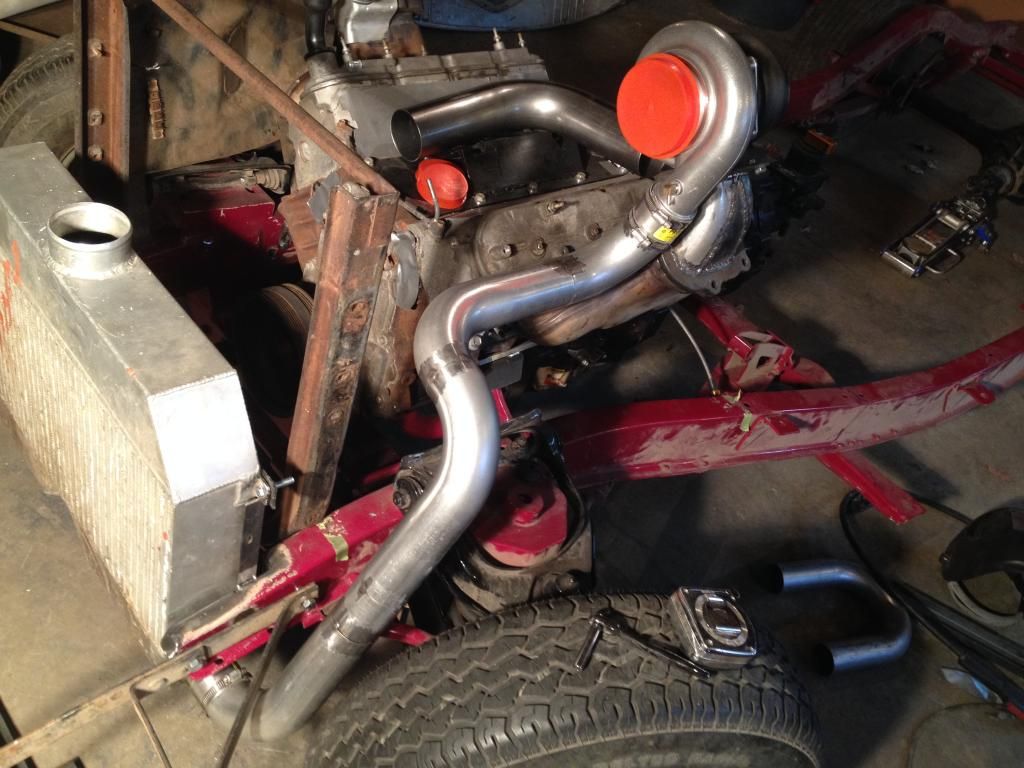
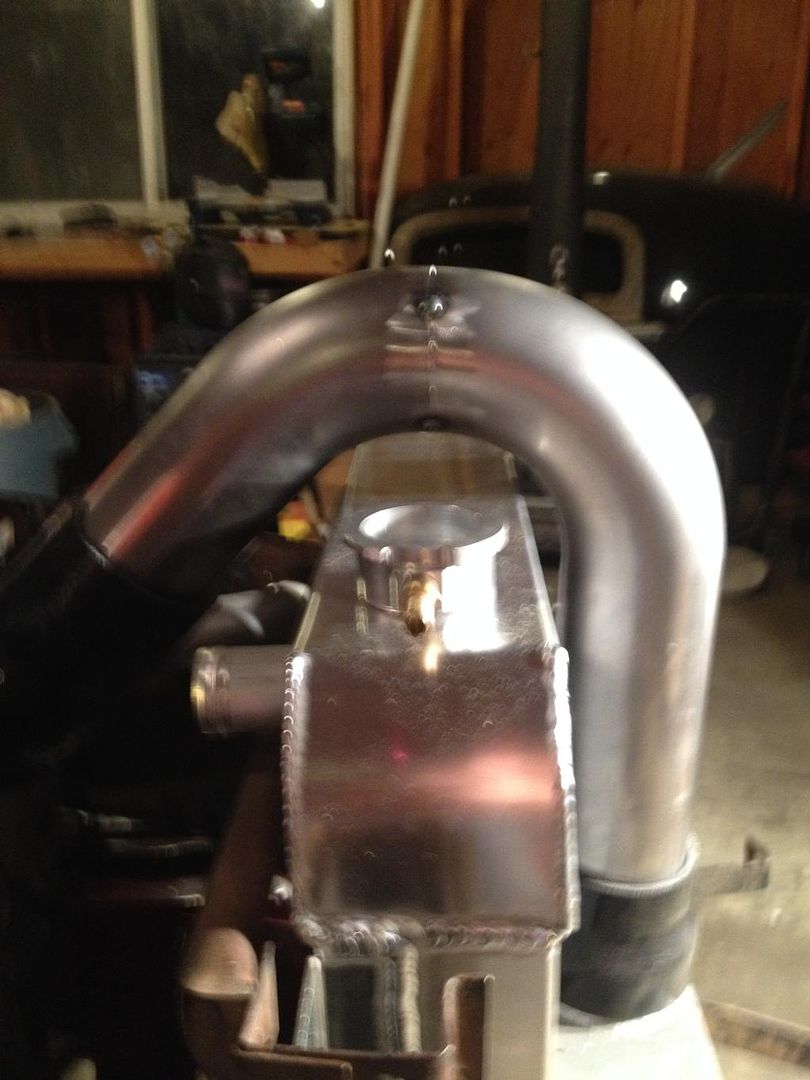
Progress for the weekend. Got the transition pipes from the manifolds to the turbos. I designed them in Cad first so it was much easier to fabricate an they're almost perfectly symmetrical! Right as I started welding I noticed my mig gas was running out, so I lowered the operating pressure and moved my gun closer to the work attempting to compensate, kinda worked, but there was some excess splatter. I've got a bit more welding to do, plus add a wastegate offshoot then clean them up and get them ceramic coated. Hopefully they hold up well. I'll start the frame mods once I get a new gas bottle. I've also planned the intercooler piping, should be pretty simple. Does anyone know a clean way to run the piping through body panels? Rubber gasket? Flange? Trim? Haven't found much for ideas there. Anyways, on with the pictures...


Update so far this weekend.
Got a good deal on a used intercooler but it was larger than what I was planning on using. I ended up rebuilding the front 6" of the frame using 1x2 steel tubing. This way I can mount the intercooler lower so the radiator can still get plenty of cool air. I'm also working on the piping from the turbos to the intercooler trying to get both sides symetrical. Then I'll get to work on the crossmembers.
On to the pics!
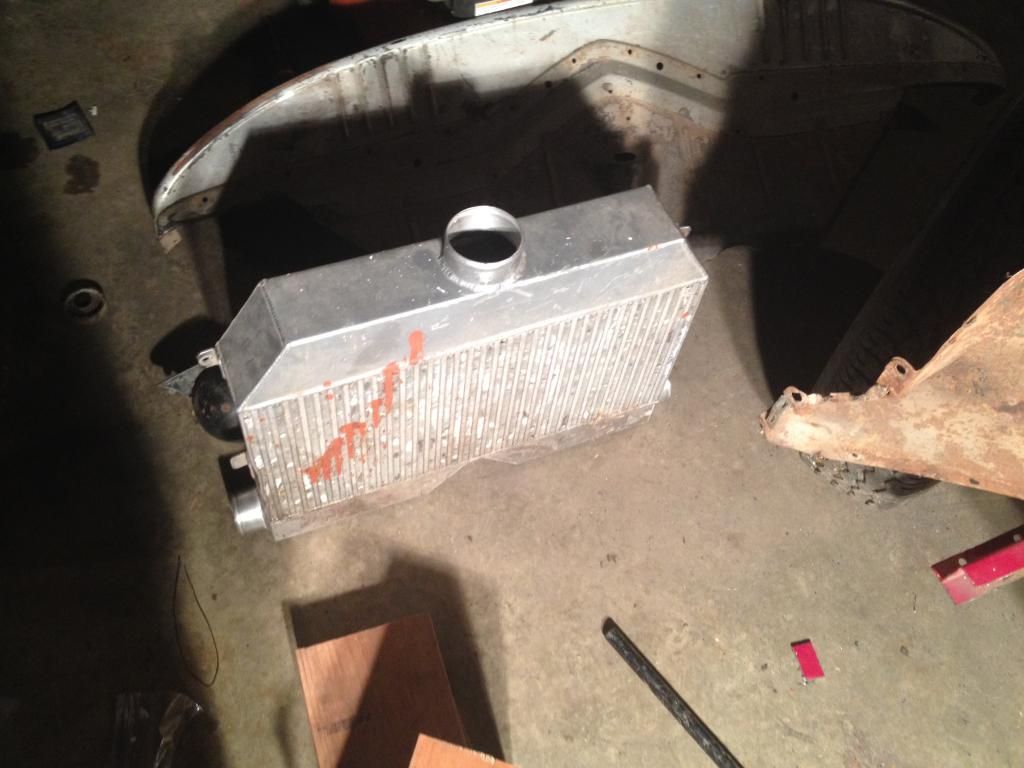
The intercooler is pretty ugly, but Cerakote recently came out with a powdercoat specifically designed to dissipate heat rather than insulate, so I'll have it cleaned up and coated 'arctic black' when I take everything else in to get coated.
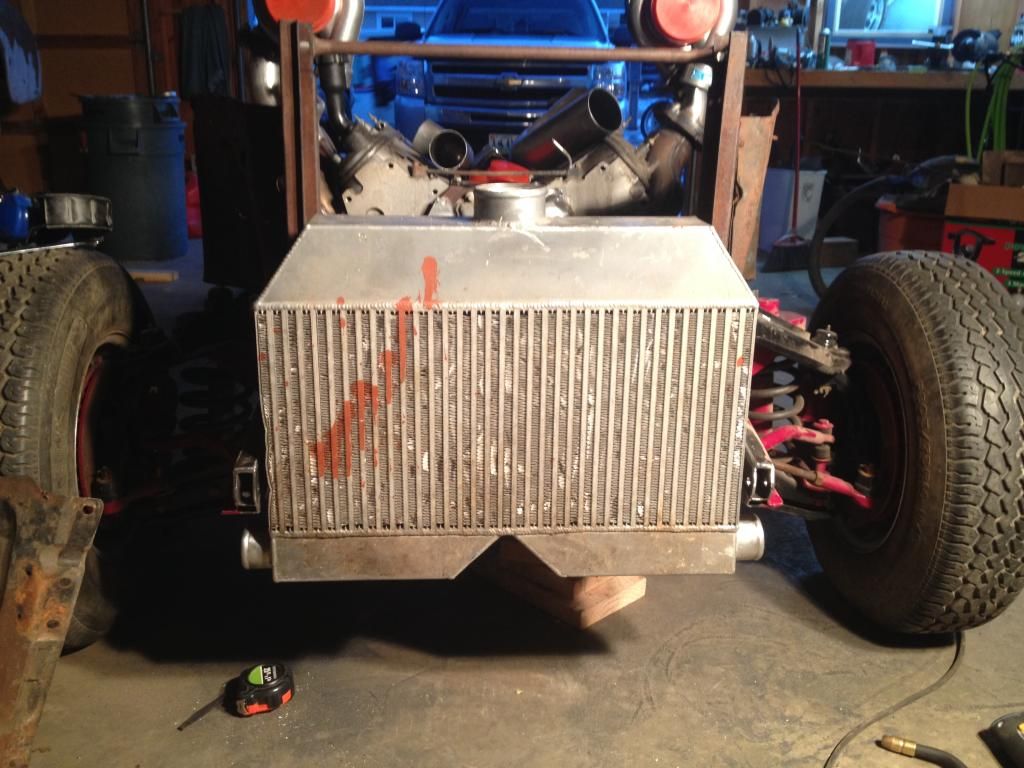


Very cool Casias! Do you have any other pics or a build thread? How'd you run your oil returns? If I felt I could weld Stainless I would've liked to do something like that. I really like how muh closer your's are to the motor. If mine don't hold up I will probably take the manifolds to a fab shop to have them redone similar to yours. I REALLY want to go with the holley Hi Ram intake and currently the height of my turbos will dwarf the intake by about 2".
Today I got the turbo-intercooler piping tacked together. Then I had to help a friend, and within a couple hours the temp dropped from 50 to about 0 so the framework will have to wait yet again. Here's the pics of the piping, I couldn't find the right hole saw to cut the inner fenders so that will have to wait also.
Today I got the turbo-intercooler piping tacked together. Then I had to help a friend, and within a couple hours the temp dropped from 50 to about 0 so the framework will have to wait yet again. Here's the pics of the piping, I couldn't find the right hole saw to cut the inner fenders so that will have to wait also.


I don't have the turbos installed yet. I just wanted to see if LS7 manifolds would make work for turbos. They are going into a 1999 Dakota.
I am going to run the piping just like you are doing. 2 in 1 intercooler to the throttle body.
Some people don't like the look of the turbos so high, but the Dakota has hood clearance for it, and they are actually level with the truck manifold.
Good luck with your build.
I am going to run the piping just like you are doing. 2 in 1 intercooler to the throttle body.
Some people don't like the look of the turbos so high, but the Dakota has hood clearance for it, and they are actually level with the truck manifold.
Good luck with your build.
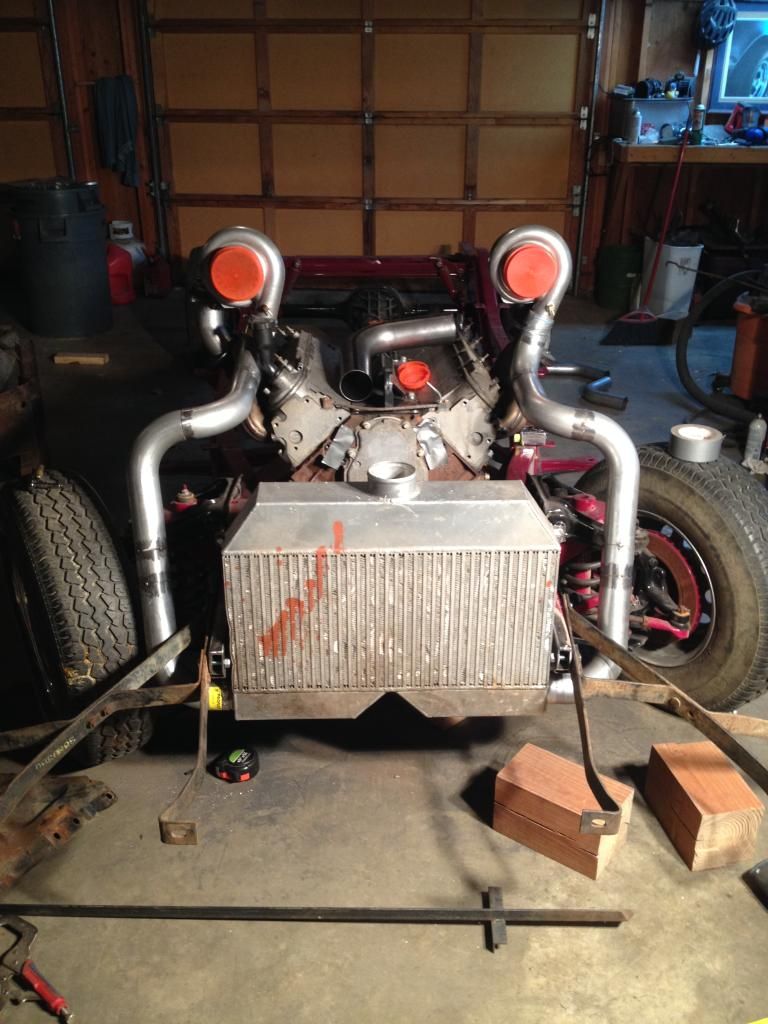
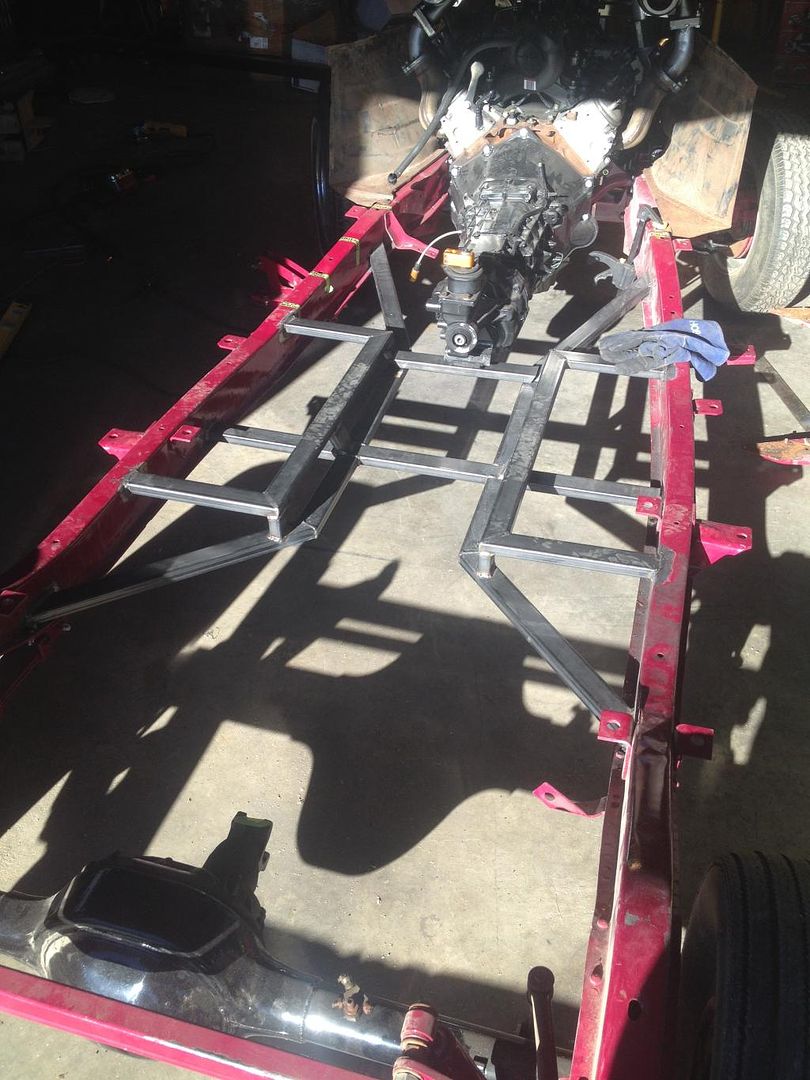
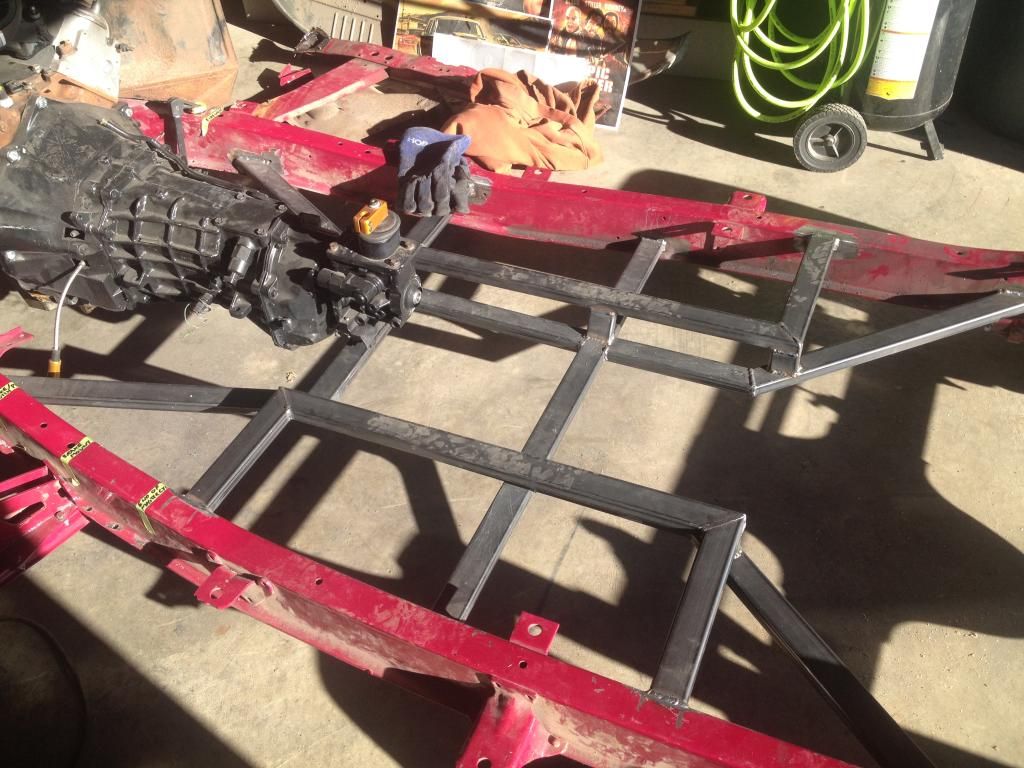
Progress update, finished mocking up the piping. Still gotta finish welding them. Also, I finally built my crossmembers. Now I'm waiting on V-bands in order to build my downpipes. Starting to come together a bit. Looking pretty cool (to me).

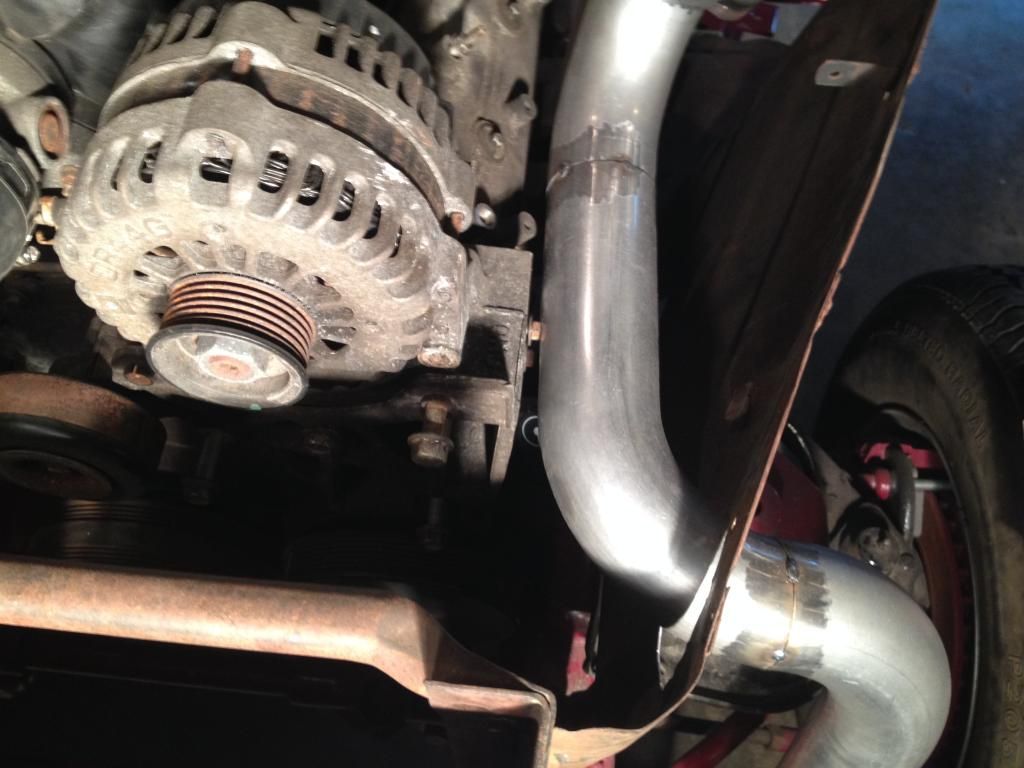
Lucked out and cleared my alternator even though I hadn't accounted for it during my mock up.
Looking pretty interesting
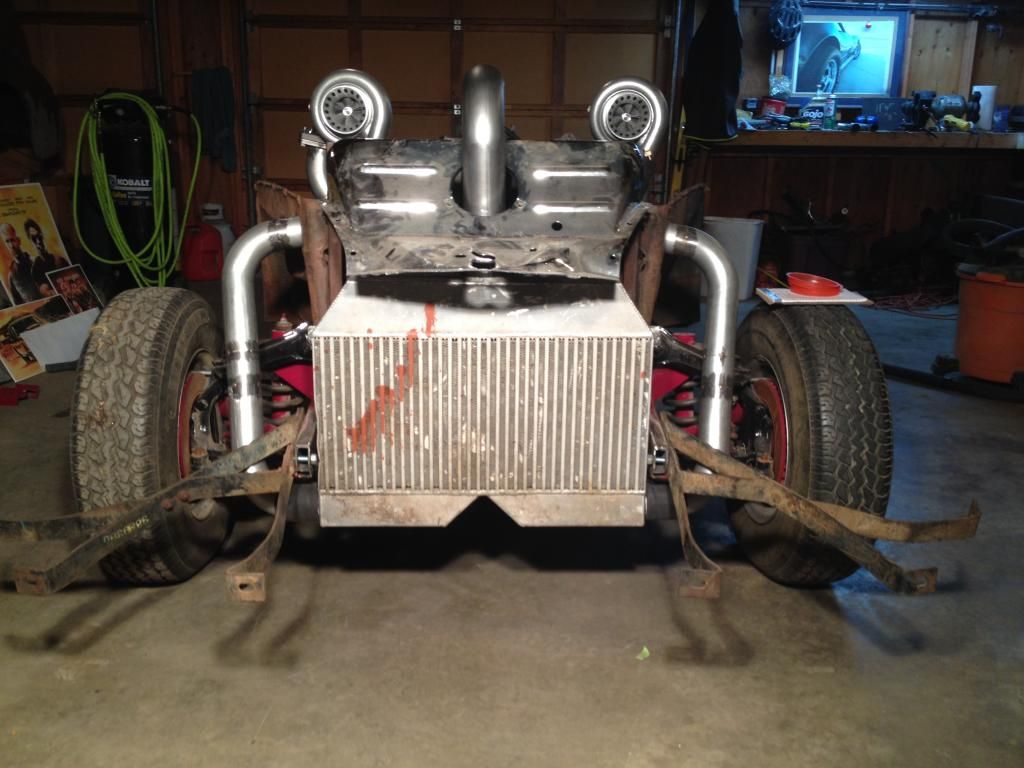
Modeled my crossmember off of a tubular unit that a chassis fabrication shop offered as an add on to one of their frames.

Probably not as strong as the bent tubing, but definitely stronger than te original riveted unit.
AND!!! As I sat down and started writing this out, I heard a knock at my door. UPS showed up with my custom radiator!

Pretty good clearance!
Well, that's it for now. I'm anxious to get started on the wastegate and downpipe plumbing. Already have a good idea of where I will run my exhaust.

Lucked out and cleared my alternator even though I hadn't accounted for it during my mock up.

Looking pretty interesting

Modeled my crossmember off of a tubular unit that a chassis fabrication shop offered as an add on to one of their frames.


Probably not as strong as the bent tubing, but definitely stronger than te original riveted unit.

AND!!! As I sat down and started writing this out, I heard a knock at my door. UPS showed up with my custom radiator!

Pretty good clearance!

Well, that's it for now. I'm anxious to get started on the wastegate and downpipe plumbing. Already have a good idea of where I will run my exhaust.


