
another 2nd gen camaro swap..
 02-11-2009, 01:18 AM
#21
Is there any difference in yeear one big block stands and any other big block stands. I have yet to remaove the existing 454 from my engine bay but i figure if they'll work y not leave them there instead of "locating" the motor.
 02-11-2009, 07:31 AM
#22
Teching In
I have the edelbrock headers on the car now and they look and fit great plus they are priced right.I dont have anything from the headers back and I think I will be using the edelbrock exhaust setup to finish my swap.Anybody use the complete edelbrock swap exhaust and how did it work out?
Thanks,
 02-12-2009, 05:40 PM
#24
11 Second Club
Join Date: Mar 2008
Location: New Westminster, B.C., Canada
Posts: 445
Likes: 0
Received 1 Like
on
1 Post

Take a look at this thread, sums up the engine mount situation...
https://ls1tech.com/forums/conversio...ml#post9054000
https://ls1tech.com/forums/conversio...ml#post9054000
Last edited by Marktainium; 02-12-2009 at 05:50 PM.
03-26-2009, 05:56 PM
#26

Used BRP's Updated kit along with their stepped headers and am very happy with the fit and finish. Yes I used the LH8 pan and yes I lowered the suspension a lot, but I am not worried. I have a '78 TA, LS1, magnacharged...hopefully be able to drive the stinking thing soon!
03-26-2009, 07:26 PM
#27
Teching In

Join Date: Apr 2006
Location: ct
Posts: 29
Likes: 0
Received 0 Likes
on
0 Posts
The trans dapt # is 4592 and comes with plates and early stye rubber motor mounts.It,s about 60.00. I used the plate and ditched the motor mounts for clam shells.If you try to use the edelbrock plates with clam shells, the clam shell hits the alternator on a f body setup.I don,t know on the truck setup.
04-02-2010, 07:41 PM
#29

pics people. we need more detailed pics of different mounts with pan and bellhousing clearance. Also. if plates are used. how about stating what "setback" they are.
thanks,
Jim
thanks,
Jim
04-03-2010, 11:09 PM
#31
Launching!
iTrader: (49)
Join Date: Feb 2004
Location: Davenport, IA
Posts: 289
Likes: 0
Received 0 Likes
on
0 Posts
The brp kits lack quality and real world fitment, I have seen several units that they claim to have built complete cars with that just don't fit. You can't jack a motor up to the moon just to make the stock accessories work, it also creates terrible driveline angles and trans tunnel clearances. I used the carshop 1" setback plates on my conversion, With the 4l60e I will just have to redrill the stock crossmember location for it all to work. The firewall clearance is excellent and the alternator works in the factory location.
04-04-2010, 02:30 AM
#32
Staging Lane

Join Date: Mar 2007
Posts: 65
Likes: 0
Received 0 Likes
on
0 Posts
The edelbrock plates work with the clam shell mounts and no motor relocation is required. If you have clam shell mounts don't switch to the big block mounts, you'll have to drill new mounting holes. Also the clam shell mounts are better than the big block mounts, less likley to break with bigger power and provide superior vibration isolation. The edelbrock headers are the best buy for stainless and fit well with no clearance issues. Steer clear of BRP and Street & Performance, overpriced with and no engineering. They're garage shops who throw pieces together, case in point using a truck pan to make their plates work. Good luck, stick with it, you won't be disappointed.....
04-04-2010, 10:28 AM
#33
Launching!
iTrader: (49)
Join Date: Feb 2004
Location: Davenport, IA
Posts: 289
Likes: 0
Received 0 Likes
on
0 Posts
Here are a few pics I snapped


If you have a F body pan I would use it as it has zero clearance issues.
My engine was busy playing in the mud and forgot to take a bath prior to this....
If you have a F body pan I would use it as it has zero clearance issues.
My engine was busy playing in the mud and forgot to take a bath prior to this....
04-04-2010, 10:58 AM
#34
04-05-2010, 12:53 PM
#35
04-23-2010, 06:29 AM
#36
TECH Enthusiast
iTrader: (8)

Join Date: Dec 2009
Location: N. E. Arkansas
Posts: 639
Likes: 0
Received 0 Likes
on
0 Posts
I noticed your using the F-body alternator bracketry and alternator.....have you tried bolting up the drag link and pittman arm yet/ Any clearance issues?
I'm at this stage and my pitman arm is hitting the alternator...
What are you other second gen guys using for bracketry?
I'm at this stage and my pitman arm is hitting the alternator...
What are you other second gen guys using for bracketry?
04-23-2010, 09:52 AM
#37
11 Second Club
Join Date: Mar 2008
Location: New Westminster, B.C., Canada
Posts: 445
Likes: 0
Received 1 Like
on
1 Post
I used all F-body brackets and accesories. I used the Trans Dapt motor mount plates, no setback, ( I think ), and the pitman arm misses my alternator by very little, maybe 1/2". * I welded up my subframe and positioned the motor where I wanted it for front to back, marked it, then drilled the holes and bolted it down.
02-06-2011, 03:06 PM
#40
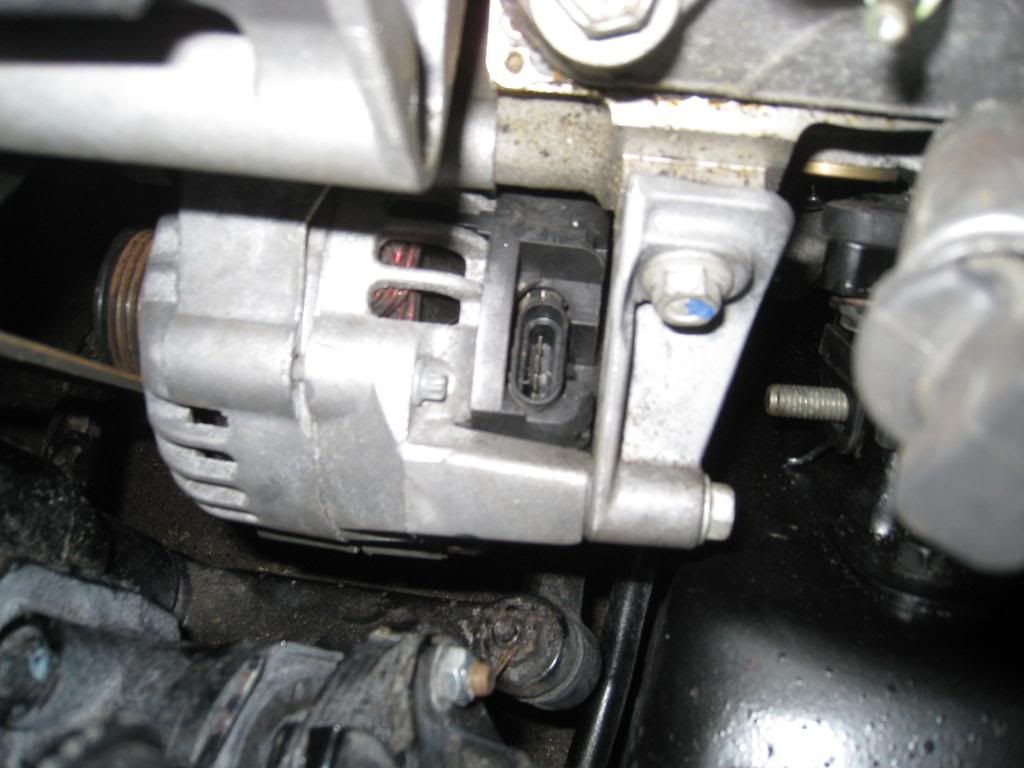
I'm using a 2001 LS1 longblock from a Corvette, with the stock batwing oil pan. The headers are Edelbrock 65073's and my motor mounts are Moroso SB Chevy Solid mounts, and offset locator plates. The mounts are welded to the frame. My trans is a early 70s TH350 in the the stock location, with a stock cross member.
Explanation of pics:
The engine is "mocked up" right now. It's running, but my wires are a bit cluttered.
Pic #1 shows oil pan, with engine in place. Yellow arrow indicates where I drilled and tapped a new oil drain plug. The Red arrow shows the original plug. It won't come out all the way with the engine in place, and would make a big mess on the frame even if it could.

pic #2 shows driver side of engine, with the engine mount appearing clearly. The lower half is welded to the frame. I am using a Holley commander 950 EFI and Edelbrock intake/controller. I wanted my shaker hood to remain operational AND I had the 950 sitting around from a previous engine. It runs beautifully.

pic#3 shows a few mods I did to make this work.
I plan on getting the GM accessory drive kit 19155067 (Corvette style, with alternator up high) to complete this build.
Explanation of pics:
The engine is "mocked up" right now. It's running, but my wires are a bit cluttered.
Pic #1 shows oil pan, with engine in place. Yellow arrow indicates where I drilled and tapped a new oil drain plug. The Red arrow shows the original plug. It won't come out all the way with the engine in place, and would make a big mess on the frame even if it could.
pic #2 shows driver side of engine, with the engine mount appearing clearly. The lower half is welded to the frame. I am using a Holley commander 950 EFI and Edelbrock intake/controller. I wanted my shaker hood to remain operational AND I had the 950 sitting around from a previous engine. It runs beautifully.
pic#3 shows a few mods I did to make this work.
- Blue arrow indicates my positive battery junction post. A BMW 328 gave this up. My battery is in the trunk, and I wanted convenient location to disconnect the battery which I was poking around under the hood. The thick red/green wire coming into the junction is the lead from the battery. The black wire leading away is routed so that it goes nowhere near the header. No seen is the heat reflective wrap around the starter and the wires that lead to it.
- Green arrow indicates where I connected the tach output from the Edelbrock/MSD controller to the yellow/black striped ignition connection on the Holley Commander 950. IMPORTANT: for others considering this setup (doubtful, but you never know), DO NOT connect the yellow lead from the MSD to the solid yellow lead on the Holley. You might cook the ECU. The ECU is set to use GM Square wave tach signal.
- Yellow arrow indicates the relocated stock water temp sensor from the LS1. This is used by the commander 950 as well.
- Red arrow indicates the relocated stock water temp sensor for early chevy small blocks. It is 1/2 inch NPT, and I've got it mounted to/through 1/4 inch angle aluminum which has been trimmed to fit (hacksaw and file). It is grounded via a 6MM mount hole on the valve cover. The T-pipe came from Menards, along with the hose fittings.
I plan on getting the GM accessory drive kit 19155067 (Corvette style, with alternator up high) to complete this build.
Last edited by 1981TA; 02-06-2011 at 07:30 PM.