

94 Mustang LQ4 Swap Build Thread
 11-08-2010, 09:47 PM
#41
Staging Lane
Thread Starter
iTrader: (7)

Join Date: Sep 2005
Location: Vista, CA
Posts: 94
Likes: 0
Received 0 Likes
on
0 Posts

Work is about to suck this next coming month so I'm trying to get as much done as I can. Yesterday I fitted the dash...needless to say, I'm not happy with how the forward bars came out BUT it IS my first cage in a non-open top car so...I'm not loosing sleep over it.
Onto the pics
Driver's side seat brackets....2x2 boxed steel and 1/8" plate welded on top and too the subframe....think it will hold

Front is 1/8" plate bolted to the seat and factory seat mounts. I'm going to swiss cheese it with holes and possibly dimple it. It will obvioulsy be bolted to the seat bar as well.
[imh]http://pic50.picturetrail.com/VOL474/12733729/23251221/393244194.jpg[/img]
Driver's side bar. The tape is where the other bar of the "X" is going to be.

Seat bar is IN along with the passenger bar.

Dash fitment and passenger bar

Here is what I was talking about with the dash. I had to cut it WAY back. I should have pushed the "Halo" bar more fwd and that would have pushed the A-pillar bars tighter to the windshield...oh well. Live and learn. Next cage will be mo' betta. I have a plan though....

Here is the slots I hacked out...

And here is my cover-up....I'm going to take some aluminum cut to the shape, hole sawed and dimple died, black bedliner spray for a nice matte texture, and put them into the dash with stainless allen head machine screw. Should look pretty decent once I'm done.

You don't see them on drag cars that often but I REALLY dig the way these look and I think I wanna do them on my setup down the a-pilars and on the main hoop at the door sills...thoughts?

Onto the pics
Driver's side seat brackets....2x2 boxed steel and 1/8" plate welded on top and too the subframe....think it will hold
Front is 1/8" plate bolted to the seat and factory seat mounts. I'm going to swiss cheese it with holes and possibly dimple it. It will obvioulsy be bolted to the seat bar as well.
[imh]http://pic50.picturetrail.com/VOL474/12733729/23251221/393244194.jpg[/img]
Driver's side bar. The tape is where the other bar of the "X" is going to be.
Seat bar is IN along with the passenger bar.
Dash fitment and passenger bar
Here is what I was talking about with the dash. I had to cut it WAY back. I should have pushed the "Halo" bar more fwd and that would have pushed the A-pillar bars tighter to the windshield...oh well. Live and learn. Next cage will be mo' betta. I have a plan though....
Here is the slots I hacked out...
And here is my cover-up....I'm going to take some aluminum cut to the shape, hole sawed and dimple died, black bedliner spray for a nice matte texture, and put them into the dash with stainless allen head machine screw. Should look pretty decent once I'm done.
You don't see them on drag cars that often but I REALLY dig the way these look and I think I wanna do them on my setup down the a-pilars and on the main hoop at the door sills...thoughts?
 12-23-2010, 03:20 AM
#43
Staging Lane
Thread Starter
iTrader: (7)
Join Date: Sep 2005
Location: Vista, CA
Posts: 94
Likes: 0
Received 0 Likes
on
0 Posts
Cage is all but done. A couple more tubes to burn in final and she is in there permanently. I again, have HUGE respect to fabricators that knock this kinda stuff out all day. I feel like a damn contortionist trying to get to some of these joints. I swear I planned it better than this! Being it IS my first all out cage, I''m satisfied. The welds may not be the prettiest but I am MORE than confident they're fuggin' STRONG. Either way. On to the pics.
Rear bars...nothing interesting going on here. Massaging the trunk floor into the right shape was not easy....

front to back. I'm going to add a couple bars and plates to the upper tq boxes.

Windshield view. Its a tad narrower than I'd like it to have been but the fwd view is still good. I added the gussets b/c I had some 1" material left over from my bike's bars.

driver's side view

I've got the seat mount in for the driver's side. Still need to brace the kirkey to the rear seat bar. I'll be tieing that into the upper tq box bar so that will be a project this week. I'm going to work on the shifter mount and sorting out the chassis harness routing as well. Questions, comments, concerns? Bitches, moans, complaints?

Rear bars...nothing interesting going on here. Massaging the trunk floor into the right shape was not easy....
front to back. I'm going to add a couple bars and plates to the upper tq boxes.
Windshield view. Its a tad narrower than I'd like it to have been but the fwd view is still good. I added the gussets b/c I had some 1" material left over from my bike's bars.
driver's side view
I've got the seat mount in for the driver's side. Still need to brace the kirkey to the rear seat bar. I'll be tieing that into the upper tq box bar so that will be a project this week. I'm going to work on the shifter mount and sorting out the chassis harness routing as well. Questions, comments, concerns? Bitches, moans, complaints?
 12-24-2010, 07:03 AM
#45

This is the manufacturer of the bender website
http://www.jd2.com/shop/custom.aspx?recid=7
and here is the bracket maker for the hyd conversion
http://copperheadfab.com/index.php?a...&productid=164
http://www.jd2.com/shop/custom.aspx?recid=7
and here is the bracket maker for the hyd conversion
http://copperheadfab.com/index.php?a...&productid=164
thanks dude
02-27-2011, 11:30 PM
#49
Staging Lane
Thread Starter
iTrader: (7)
Join Date: Sep 2005
Location: Vista, CA
Posts: 94
Likes: 0
Received 0 Likes
on
0 Posts
Headers? DONE!
Bought a 1 7/8th primary to 3" collect header kit from JEGS and a pair of flanges. THIS time I paid attention to plug location as well as every other component that could pose a potential problem. Steering, oil filter, shifter linkage/cable, starter, tranny pan, etc. Everything I could think of that I could mock up on the mock up motor clears. The kit comes like this.
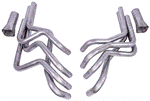
As expected, I had to cut the bends out of pretty much every bend but for the most part, it had every bend I needed and only required shortening the straight pipes and clocking the bends. All in all I'm stoked. First set of headers I've ever built and I have $200 bucks in them. Sure the hell beats 500-700 for an already built set! Ground clearance is a tad below the tranny pan.
Passenger side.

Driver side.

Driver's side out of the car


Belly shot

Both sides are able to slide in and out by only unhooking the steering shaft and putting the car on ramps. These are easier to install that my smaller MAC Longtubes when I had a ford motor in the car!
I may be doing an LS-x into a buddies 72 Le Mans and I will DAMN sure be using this same kit again. Plan is to have them coated eventually before I finish up the project. I'll finish out the exhaust when I get a driveshaft in the car.
Bought a 1 7/8th primary to 3" collect header kit from JEGS and a pair of flanges. THIS time I paid attention to plug location as well as every other component that could pose a potential problem. Steering, oil filter, shifter linkage/cable, starter, tranny pan, etc. Everything I could think of that I could mock up on the mock up motor clears. The kit comes like this.
As expected, I had to cut the bends out of pretty much every bend but for the most part, it had every bend I needed and only required shortening the straight pipes and clocking the bends. All in all I'm stoked. First set of headers I've ever built and I have $200 bucks in them. Sure the hell beats 500-700 for an already built set! Ground clearance is a tad below the tranny pan.
Passenger side.
Driver side.
Driver's side out of the car
Belly shot
Both sides are able to slide in and out by only unhooking the steering shaft and putting the car on ramps. These are easier to install that my smaller MAC Longtubes when I had a ford motor in the car!
I may be doing an LS-x into a buddies 72 Le Mans and I will DAMN sure be using this same kit again. Plan is to have them coated eventually before I finish up the project. I'll finish out the exhaust when I get a driveshaft in the car.
04-05-2011, 10:04 PM
#50
Staging Lane
Thread Starter
iTrader: (7)
Join Date: Sep 2005
Location: Vista, CA
Posts: 94
Likes: 0
Received 0 Likes
on
0 Posts
The short block components are at the machine shop now being built by JR Competition out of Escondido, CA. While thats out, I started getting on patching up the now useless holes in the firewall....**** I HATE body work.
the start


in progress

and now

welded in patches, ground smooth, bondo'd, and primed.


The bigger holes i didn't feel like messing with. Compound angles, and well...frankly I was getting frustrated with the bondo drying so damn fast in the heat today. The bigger patches I had to skim coat twice and they still aren't perfect but I'm no stressing it. For the final paint scheme I'm going to do something a bit off the wall I think. I KNOW its a honda and it IS over the top and I won't go quite this over the top with it but I wanna do something like this....NOT with the this bright of colors either. Trying to find someone who can do graffitti right now....

My goal is to have the car fired up and running by June. More to come...
the start
in progress
and now
welded in patches, ground smooth, bondo'd, and primed.
The bigger holes i didn't feel like messing with. Compound angles, and well...frankly I was getting frustrated with the bondo drying so damn fast in the heat today. The bigger patches I had to skim coat twice and they still aren't perfect but I'm no stressing it. For the final paint scheme I'm going to do something a bit off the wall I think. I KNOW its a honda and it IS over the top and I won't go quite this over the top with it but I wanna do something like this....NOT with the this bright of colors either. Trying to find someone who can do graffitti right now....
My goal is to have the car fired up and running by June. More to come...
04-06-2011, 07:33 AM
#51

Lookin good, thats the next item on my list, get the inner fender wells patched up a little & make the engine bay presentable. How much time do you have into the patching & priming as of now?
Question for ya, are you going to run the stock ford underhood fuse/relay panel? If so, where are mounting it? I want mine out of the engine bay to free up some space and to keep it as clean looking as possible.
Question for ya, are you going to run the stock ford underhood fuse/relay panel? If so, where are mounting it? I want mine out of the engine bay to free up some space and to keep it as clean looking as possible.
04-06-2011, 10:12 AM
#52
Staging Lane
Thread Starter
iTrader: (7)
Join Date: Sep 2005
Location: Vista, CA
Posts: 94
Likes: 0
Received 0 Likes
on
0 Posts
I am still running it. I mounted the entire thing inside the driver's side fender well. I think the ONLY thing I had to extend when I did it with a ford motor was the alternator charge wire. Everything else was just kinda rerouting stuff. I've already cut all the factory sheath of of the harness and plan on pulling out all the wires going to the circuits not being used.
04-06-2011, 12:36 PM
#53
I am still running it. I mounted the entire thing inside the driver's side fender well. I think the ONLY thing I had to extend when I did it with a ford motor was the alternator charge wire. Everything else was just kinda rerouting stuff. I've already cut all the factory sheath of of the harness and plan on pulling out all the wires going to the circuits not being used.
I just finished eliminating the useless circuits in my harness. I kept the airbag stuff hoping that it'll work without the ford ecm. I'm told that it will, hope to never find out the hard way. Gotta get rid of the ABS pump next, how do you plan to re-do your brake lines? I read somewhere that the 94 v6 cars don't have abs and you can use their brake lines as direct replacements. Another option would be to pay classic tube $180 + shipping for a new set. Not too bad really, its all stainless & is supposed to be direct fit. Not sure what to do.
04-06-2011, 02:01 PM
#54
Staging Lane
Thread Starter
iTrader: (7)
Join Date: Sep 2005
Location: Vista, CA
Posts: 94
Likes: 0
Received 0 Likes
on
0 Posts
Could you snap a pic of how you mounted it in the fender well? Did it fit behind the plastic fender liner?
I just finished eliminating the useless circuits in my harness. I kept the airbag stuff hoping that it'll work without the ford ecm. I'm told that it will, hope to never find out the hard way. Gotta get rid of the ABS pump next, how do you plan to re-do your brake lines? I read somewhere that the 94 v6 cars don't have abs and you can use their brake lines as direct replacements. Another option would be to pay classic tube $180 + shipping for a new set. Not too bad really, its all stainless & is supposed to be direct fit. Not sure what to do.
I just finished eliminating the useless circuits in my harness. I kept the airbag stuff hoping that it'll work without the ford ecm. I'm told that it will, hope to never find out the hard way. Gotta get rid of the ABS pump next, how do you plan to re-do your brake lines? I read somewhere that the 94 v6 cars don't have abs and you can use their brake lines as direct replacements. Another option would be to pay classic tube $180 + shipping for a new set. Not too bad really, its all stainless & is supposed to be direct fit. Not sure what to do.
 04-06-2011, 11:13 PM
#58
Teching In
Join Date: Apr 2011
Posts: 4
Likes: 0
Received 0 Likes
on
0 Posts
Sweet build!!! Props on your fab work, tool making ideas, and you "just friggin do it" attitude on things. Even just the simplest little home made tools can make a world of difference on various jobs.
