
Camaro LS3 has arrived for my 65 Malibu


 04-30-2012, 10:33 PM
#22
Staging Lane
Thread Starter

Join Date: Nov 2008
Location: Mile High City
Posts: 82
Likes: 0
Received 0 Likes
on
0 Posts
Wow 2009! I didn't realize how long it had been since I updated my build thread. Well, we've got some serious catching up to do.
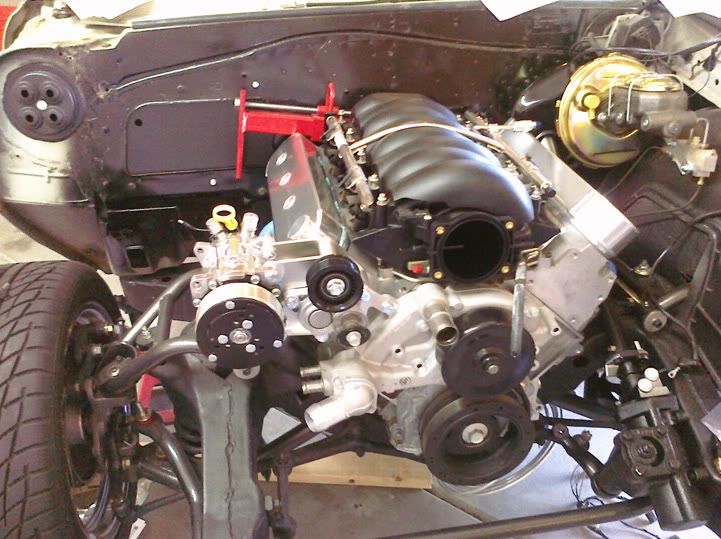
For starters, the motor and trans have been in there for sometime now. First dropped it in back in May of 2010.
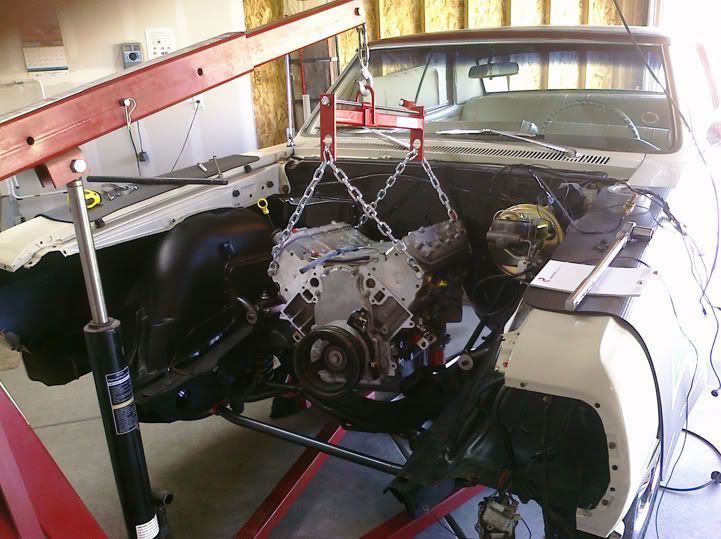
But even now it still hasn't been started, but it's getting really close. I'll skip ahead of all the trial fitting, muttering and bitching parts of getting my LS3 with the 6L80 backing it up actually in the car. So the short story is I ended up notching the cross member a little bit to give the F-body oil pan some breathing room and cut out most all of the trans tunnel to get that beast of a trans in there. But we will get to some of that later. Lets start with getting that trans in there.
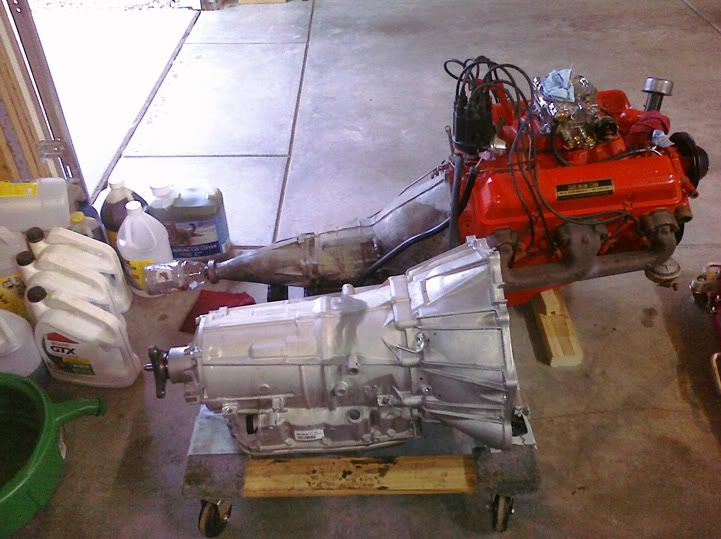
And I mean beast when compared to the old powerglide.
At this point I hadn't really figured out how this was all going to go back together or fit together, but my stupidity kept me going. Just figuring it out as I went along.
The long and the short of it is that my 6L80 came out of a 2010 Camaro. Well I wasn't prepared for the lack of a slip yoke. So once I started to try and figure out what I was going to do for a driveshaft, well I needed a little help. So over on the transmission forums here at LS1Tech I got some great advice and some discouraging advice that at times seemed to out way the good.
Without an option for simply switching over the tailshaft easily or cheaply, I opted to buy a 2010 Camaro driveshaft and make it work. But I hated the two piece shaft. And if I was going to get it lengthened I was going to have to send it out of state since no one here wanted to work on it.

This picture is with the 2010 Camaro driveshaft in place. I was told that if you didn't get the bearing mounted perfectly that it would **** that big rubber dounut out pretty quick.
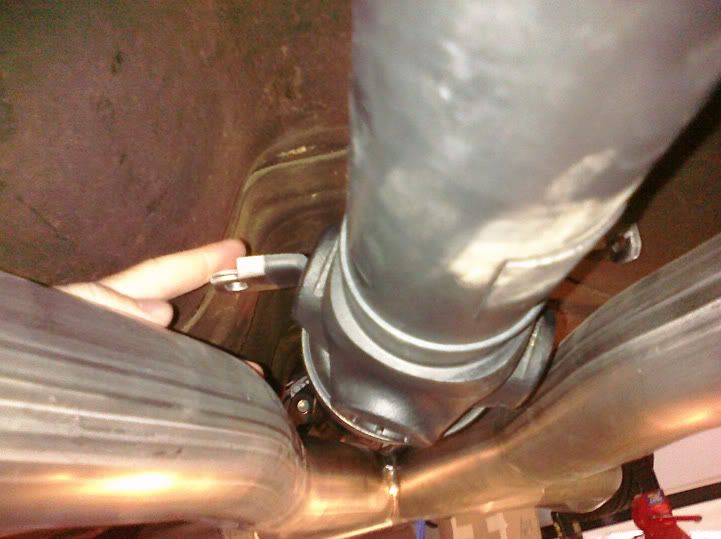
The center bearing. Eew!
So thankfully, as I said, I got some great advice over at the trans forum. Come to find out 50 bucks for a little CNC work and you can make a turbo 400 bolt on yoke work with these transmissions.
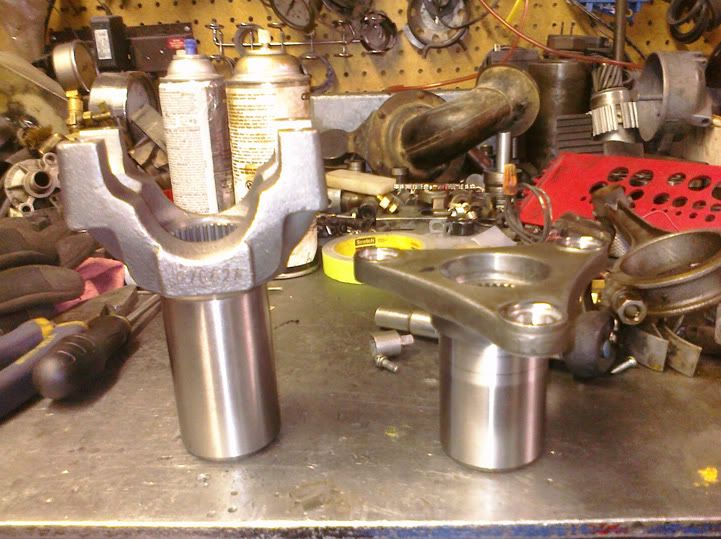
So then I was able to get a much simpler driveshaft made locally. But unfortunately the Camaro driveshaft I bought was the most expensive lesson learned on this project so far. So if anyone needs one, I can hook you up with a brand new one...
Well that's enough for tonight. I'll post some more tomorrow.
Cheers,
Jay
For starters, the motor and trans have been in there for sometime now. First dropped it in back in May of 2010.
But even now it still hasn't been started, but it's getting really close. I'll skip ahead of all the trial fitting, muttering and bitching parts of getting my LS3 with the 6L80 backing it up actually in the car. So the short story is I ended up notching the cross member a little bit to give the F-body oil pan some breathing room and cut out most all of the trans tunnel to get that beast of a trans in there. But we will get to some of that later. Lets start with getting that trans in there.
And I mean beast when compared to the old powerglide.
At this point I hadn't really figured out how this was all going to go back together or fit together, but my stupidity kept me going. Just figuring it out as I went along.
The long and the short of it is that my 6L80 came out of a 2010 Camaro. Well I wasn't prepared for the lack of a slip yoke. So once I started to try and figure out what I was going to do for a driveshaft, well I needed a little help. So over on the transmission forums here at LS1Tech I got some great advice and some discouraging advice that at times seemed to out way the good.
Without an option for simply switching over the tailshaft easily or cheaply, I opted to buy a 2010 Camaro driveshaft and make it work. But I hated the two piece shaft. And if I was going to get it lengthened I was going to have to send it out of state since no one here wanted to work on it.
This picture is with the 2010 Camaro driveshaft in place. I was told that if you didn't get the bearing mounted perfectly that it would **** that big rubber dounut out pretty quick.
The center bearing. Eew!
So thankfully, as I said, I got some great advice over at the trans forum. Come to find out 50 bucks for a little CNC work and you can make a turbo 400 bolt on yoke work with these transmissions.
So then I was able to get a much simpler driveshaft made locally. But unfortunately the Camaro driveshaft I bought was the most expensive lesson learned on this project so far. So if anyone needs one, I can hook you up with a brand new one...
Well that's enough for tonight. I'll post some more tomorrow.
Cheers,
Jay
04-30-2012, 11:44 PM
#23

Thanks Jay for the post. I am collecting the parts to put a L92/6L80E into a 1965 Buick Skylark. Similiar vehicle to yours. I will be following your thread closely, especially the transmission tunnel and what you did for the transmission support piece.
I have a 6L80E from a truck that had 2WD and the tail housing is slightly different from yours. From what I can tell a yoke for a 4L80E will work without modification. Fingers are crossed.
I have a 6L80E from a truck that had 2WD and the tail housing is slightly different from yours. From what I can tell a yoke for a 4L80E will work without modification. Fingers are crossed.
 05-01-2012, 10:07 AM
#25
Staging Lane
Thread Starter
Join Date: Nov 2008
Location: Mile High City
Posts: 82
Likes: 0
Received 0 Likes
on
0 Posts
Good luck 1989GTA! I actually have the original cross member in there with about 1" tall spacers to get the angle right. I'm not familiar with the 4L80e yoke. I was limited in trying to find a bolt-on yoke that would work.
bmf5150, I've got about 5k in the motor and trans setup, but beyond that, I don't even want to think what this will have cost me when it's done. Which is one of the reasons it's taken me almost 3 years to accumulate all the parts; I've had pretty low funds. But it's finally getting close.
I'll post some more pictures from my journey tonight. I'll also take one of the cross member for you 1989GTA.
Cheers,
Jay
05-01-2012, 10:55 PM
#26
Staging Lane
Thread Starter
Join Date: Nov 2008
Location: Mile High City
Posts: 82
Likes: 0
Received 0 Likes
on
0 Posts
This is kind of fun going back over the things I did a year or so ago and trying to remember all the stuff I ran into. And fun looking thru the pictures. I can't wait to post the youtube video. But that will probably have to wait till tomorrow though.
So I had been buying parts slowly over those first couple years, mainly so my wife wouldn't notice, but secondly because I was slow to make up my mind or to even figure out what I needed. I guess everything kind of started to get interesting last September though when I got a hair up my butt and decided to get a welder. (No matter what the project, I never miss an opportunity to justify a new tool.) So at a point when I had finally gotten all the interior pieces I needed. I had gotten a Covan dash insert, Scat bucket seats and scored an 08 Cadillac CTS console off from Ebay, a new Flaming River column and had the Vintage air unit.
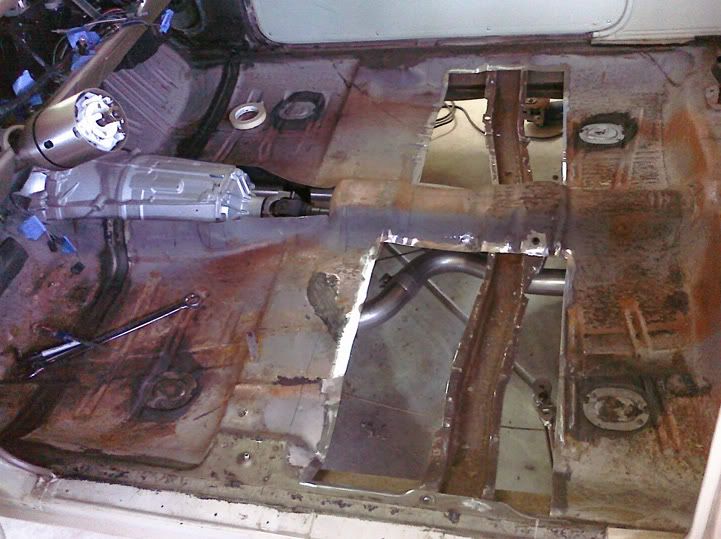
But with the new welder I decided to finally fix the floor. So unfortunately all my progress on the interior had to come back out. Sure I still had to make a piece for the tunnel I had ditched and probably should have started there. But there had been some rot under the front seat that had bothered me for years because I could see it any time I was under the car. I had just always figured I'd pay someone else fix it. But armed with too much Mt.Dew and blinding stupidity I decided to do it myself!
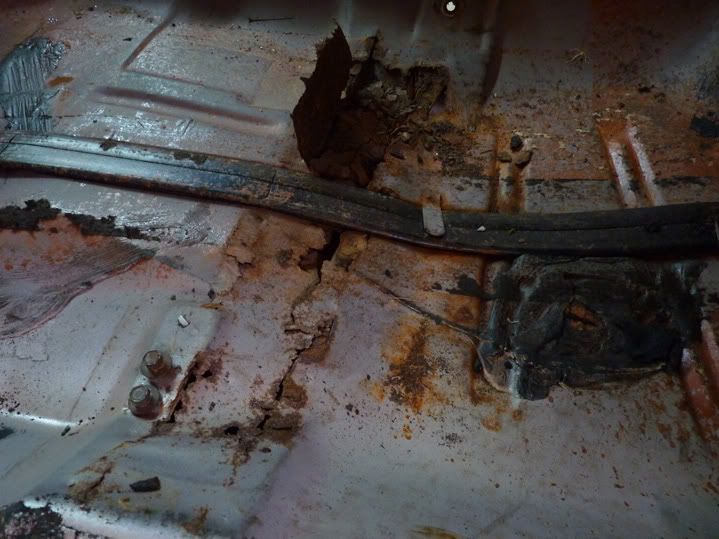
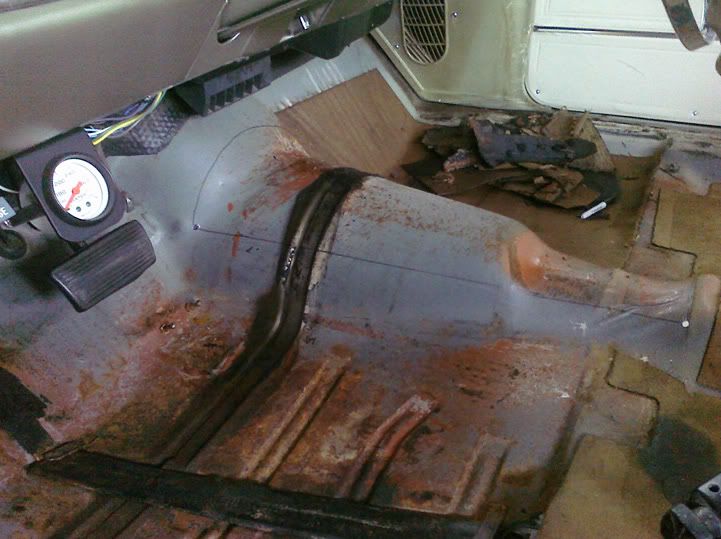
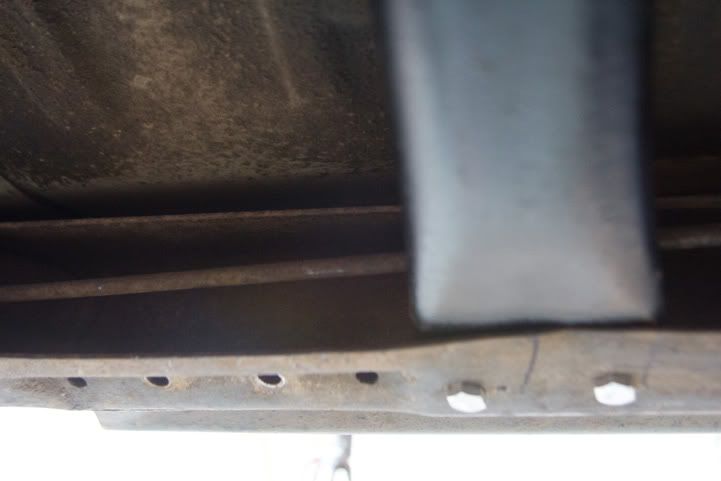
It wasn't much, only rusted over top of where the beam goes across the car. So I got some Goodmark panels and not really knowing what I was doing, decided to just piece in enough to get rid of the rot, instead of trying to get the entire sheet in there. So I cut out the bad and patched in the new.
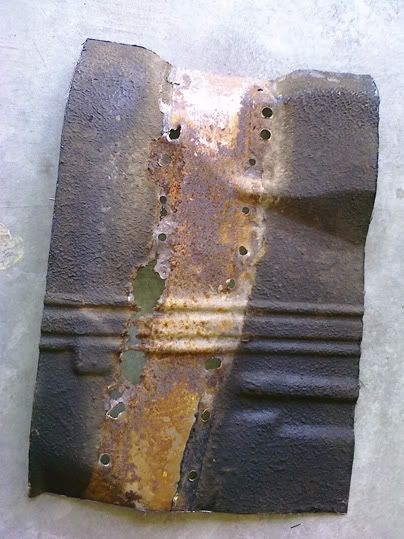
It totally surprises me it wasn't rusted worse than this exposed to 40 plus years of elements with not even a coat of primer on it. There was plenty of under coating on the rest of the floor, but where that beam was, there was nothing at all.
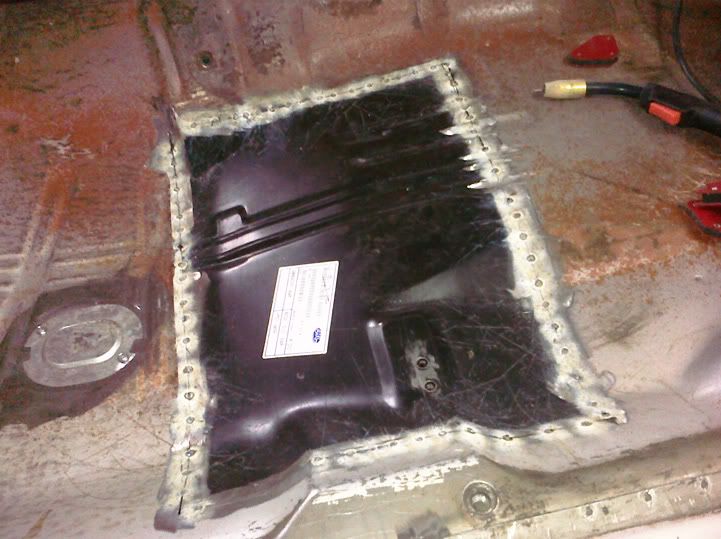
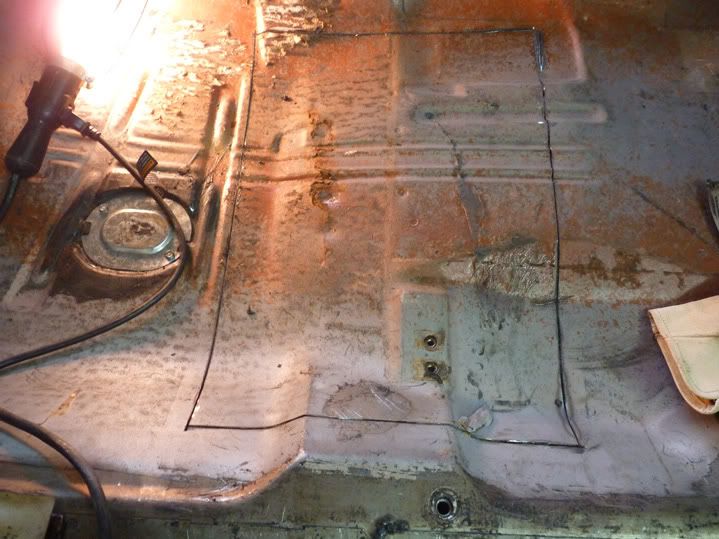
I'm sure there are some guys that do this for a living looking at this and saying 'He butt welded the whole thing!' Well, yeah, I did. Remember, 'blinding stupidity'. I'm sure there has to be an easier way. But I gotta say, I got pretty good at the connect the dots game. Monotonous, but effective.
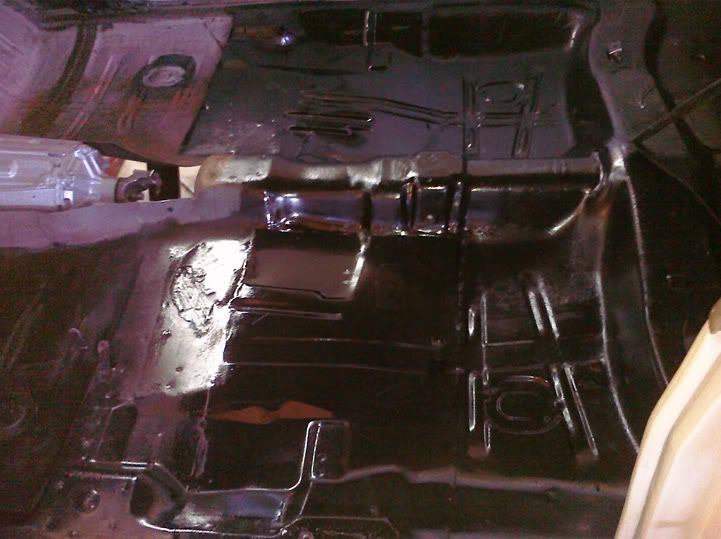
So once everything was done and had gotten a coat of POR15 on everything, I sure felt a lot better about bolting a bucket seat to the floor and mashing the loud pedal without ending up in the backseat.
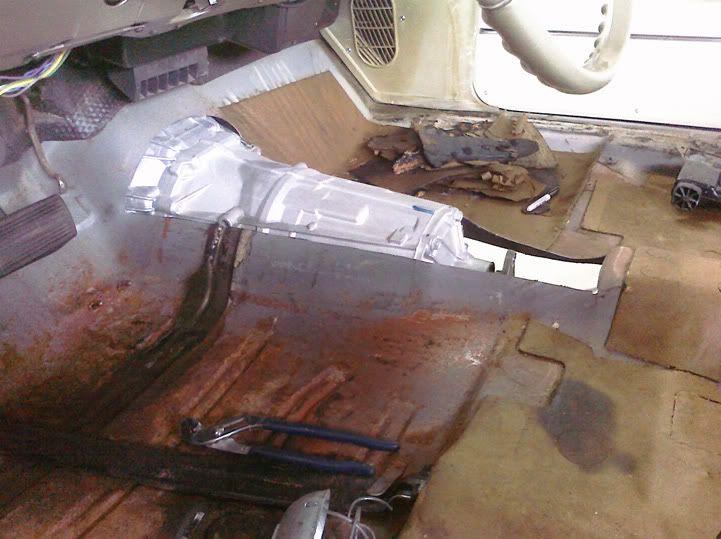
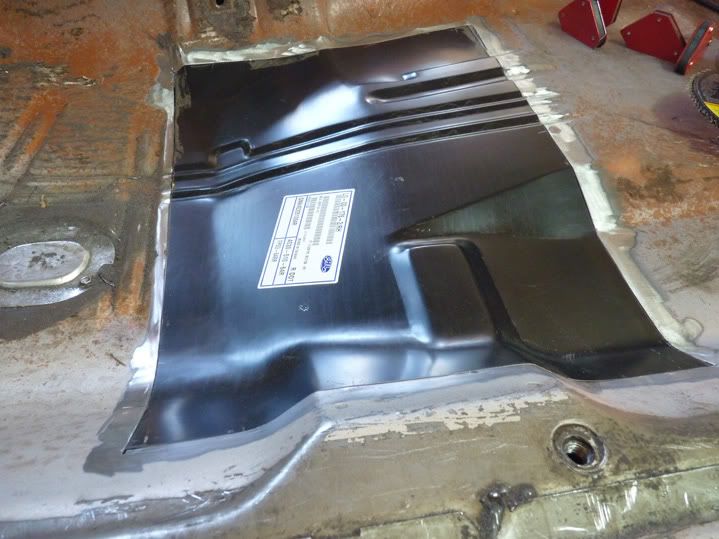
So after that, it was time to move on to cover the trans up. I had a friend roll a piece of sheet metal for me. And after a couple hours with a cardboard template and a cut off wheel, it was close.
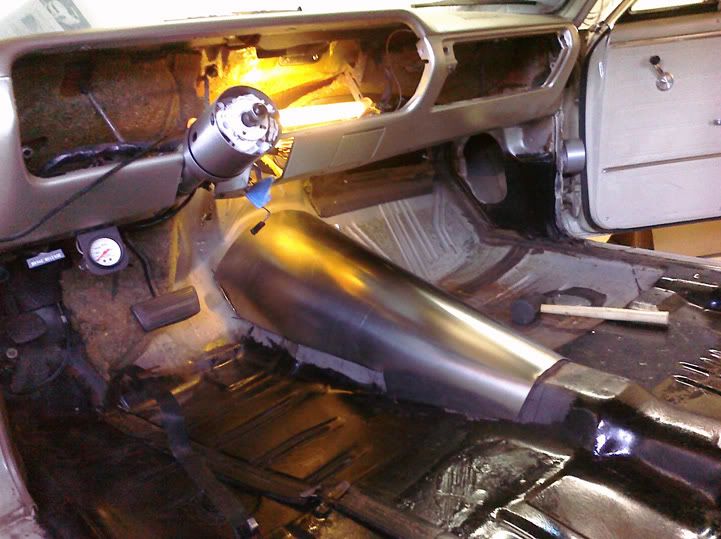
It took another couple hours to get it to where I liked it and to a point that I could at least tack it in place. But once it was in and solid it was time to start fabbing a mount for the shifter from Speartech.
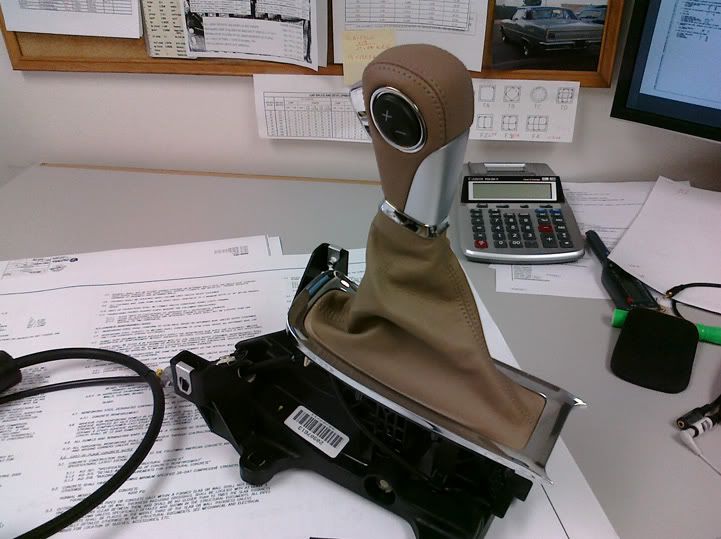
It's a neat little piece; its out of a 2011 Malibu. He modifies it to work with his harness so you'll be able to use the tap up tap down shifting button located right on the ****. But as for right now, I'm still not sure how I am going to make the cable work that he sent, but that's a story for later.

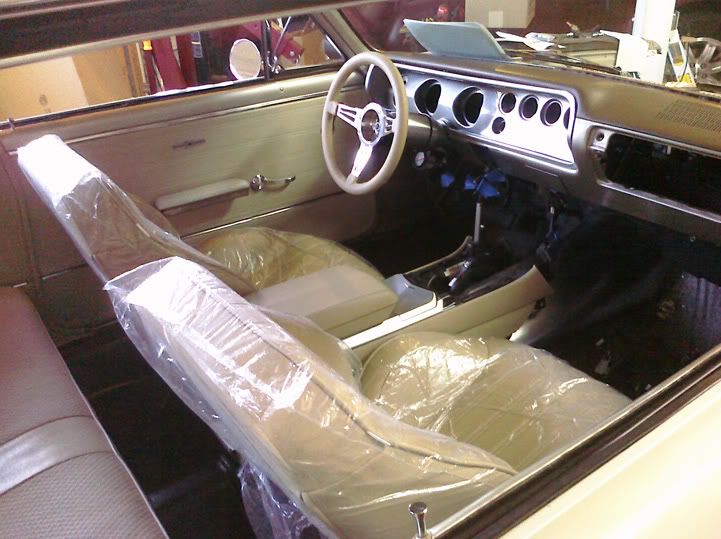
So I slowly stated putting the interior back together and making brackets for the console and seats as I went along. And at this point this is when I started to think about where I was going to run the harness, where to mount the computer and all that.
But somehow that all lead me to thinking about the firewall. So that's when I got a little distracted. But again I'll need to get back to this tomorrow night, I'm cooked.
Cheers,
Jay
So I had been buying parts slowly over those first couple years, mainly so my wife wouldn't notice, but secondly because I was slow to make up my mind or to even figure out what I needed. I guess everything kind of started to get interesting last September though when I got a hair up my butt and decided to get a welder. (No matter what the project, I never miss an opportunity to justify a new tool.) So at a point when I had finally gotten all the interior pieces I needed. I had gotten a Covan dash insert, Scat bucket seats and scored an 08 Cadillac CTS console off from Ebay, a new Flaming River column and had the Vintage air unit.
But with the new welder I decided to finally fix the floor. So unfortunately all my progress on the interior had to come back out. Sure I still had to make a piece for the tunnel I had ditched and probably should have started there. But there had been some rot under the front seat that had bothered me for years because I could see it any time I was under the car. I had just always figured I'd pay someone else fix it. But armed with too much Mt.Dew and blinding stupidity I decided to do it myself!
It wasn't much, only rusted over top of where the beam goes across the car. So I got some Goodmark panels and not really knowing what I was doing, decided to just piece in enough to get rid of the rot, instead of trying to get the entire sheet in there. So I cut out the bad and patched in the new.
It totally surprises me it wasn't rusted worse than this exposed to 40 plus years of elements with not even a coat of primer on it. There was plenty of under coating on the rest of the floor, but where that beam was, there was nothing at all.
I'm sure there are some guys that do this for a living looking at this and saying 'He butt welded the whole thing!' Well, yeah, I did. Remember, 'blinding stupidity'. I'm sure there has to be an easier way. But I gotta say, I got pretty good at the connect the dots game. Monotonous, but effective.
So once everything was done and had gotten a coat of POR15 on everything, I sure felt a lot better about bolting a bucket seat to the floor and mashing the loud pedal without ending up in the backseat.
So after that, it was time to move on to cover the trans up. I had a friend roll a piece of sheet metal for me. And after a couple hours with a cardboard template and a cut off wheel, it was close.
It took another couple hours to get it to where I liked it and to a point that I could at least tack it in place. But once it was in and solid it was time to start fabbing a mount for the shifter from Speartech.
It's a neat little piece; its out of a 2011 Malibu. He modifies it to work with his harness so you'll be able to use the tap up tap down shifting button located right on the ****. But as for right now, I'm still not sure how I am going to make the cable work that he sent, but that's a story for later.
So I slowly stated putting the interior back together and making brackets for the console and seats as I went along. And at this point this is when I started to think about where I was going to run the harness, where to mount the computer and all that.
But somehow that all lead me to thinking about the firewall. So that's when I got a little distracted. But again I'll need to get back to this tomorrow night, I'm cooked.
Cheers,
Jay
 05-02-2012, 08:39 AM
#29
Staging Lane
Thread Starter
Join Date: Nov 2008
Location: Mile High City
Posts: 82
Likes: 0
Received 0 Likes
on
0 Posts
05-02-2012, 10:42 PM
#30
Staging Lane
Thread Starter
Join Date: Nov 2008
Location: Mile High City
Posts: 82
Likes: 0
Received 0 Likes
on
0 Posts
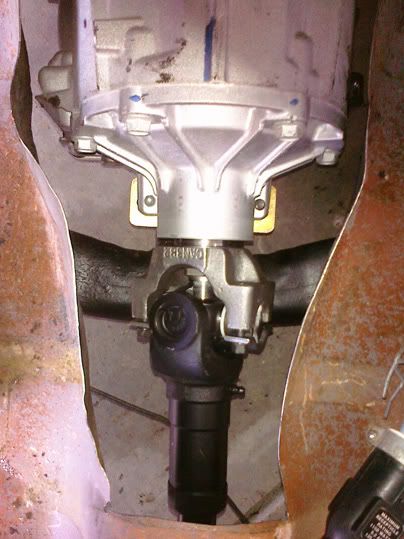
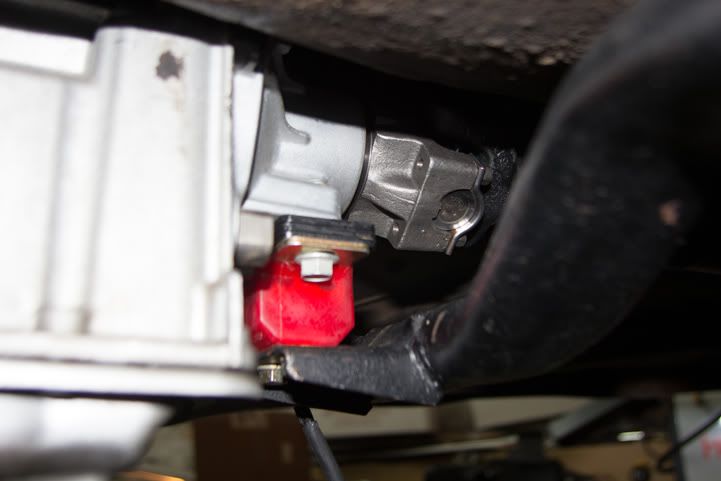
As promised for 1989GTA, here are a couple of shots of my trans support. Sorry for the crappy shots, but its pretty tight on space down there.
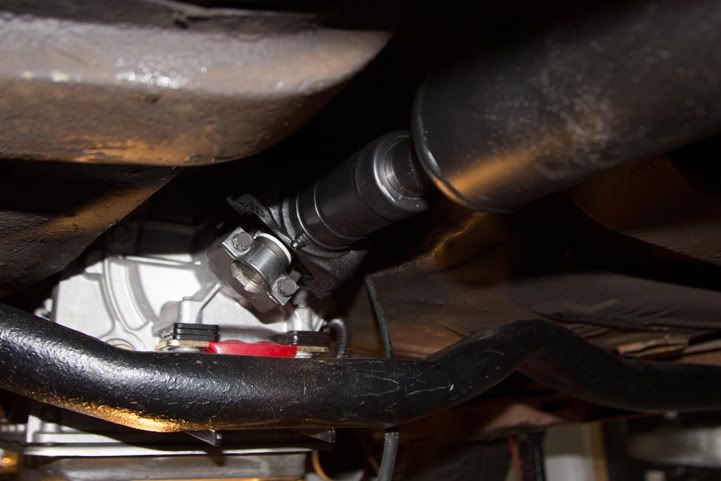
It's the factory piece, with just about a � of spacers sitting on an Energy Suspension trans mount.
You can see in this photo how much its moved toward the rear from it's factory location.
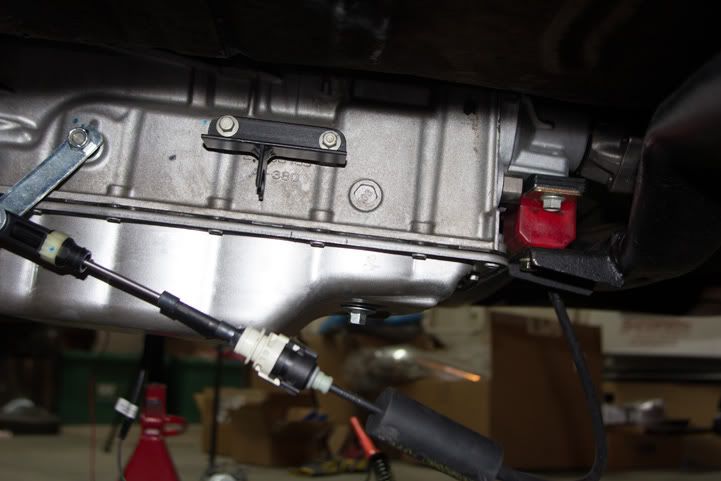
In this photo you can see the dilemma I'm currently dealing with for the shifter cable. The arm is from a 2010 Camaro and the cable is from the 2011 Malibu that Speartech sends with his shifter. Well, I think the throw is different and doesn't match. So that when trying to reach a gear lower than drive the cable bottoms out. Anyone know of a better setup?
Cheers,
Jay
It's the factory piece, with just about a � of spacers sitting on an Energy Suspension trans mount.
You can see in this photo how much its moved toward the rear from it's factory location.
In this photo you can see the dilemma I'm currently dealing with for the shifter cable. The arm is from a 2010 Camaro and the cable is from the 2011 Malibu that Speartech sends with his shifter. Well, I think the throw is different and doesn't match. So that when trying to reach a gear lower than drive the cable bottoms out. Anyone know of a better setup?
Cheers,
Jay
05-02-2012, 11:13 PM
#31
Thank you for the pictures, that helps alot and will save me some money.  Another part I do not have to buy.
Regarding you shifter delema, maybe shorten the (silver)lever that is attached to the transmission or make one that is a little shorter on the throw. You would have to experiment to see how much shorter to make it or where to drill the hole where the cable attaches.
Another part I do not have to buy. Regarding you shifter delema, maybe shorten the (silver)lever that is attached to the transmission or make one that is a little shorter on the throw. You would have to experiment to see how much shorter to make it or where to drill the hole where the cable attaches.
05-02-2012, 11:14 PM
#32
Staging Lane
Thread Starter
Join Date: Nov 2008
Location: Mile High City
Posts: 82
Likes: 0
Received 0 Likes
on
0 Posts
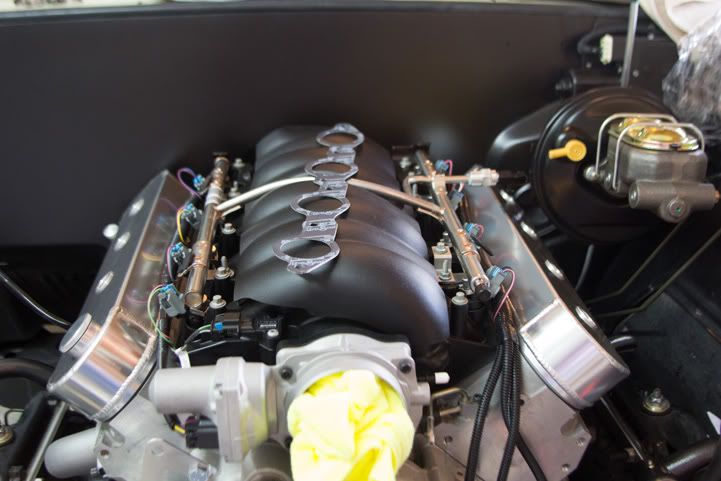
Oh crap, I said I'd post that youtube video. Well, the short story is that the new welder empowered me to fix the floor and the floor gave me the confidence to tackle the firewall. So with a weekend of coffee and Mt.Dew I installed ABC's smooth firewall. It was such a nice piece and fit perfectly. The biggest compliment I expect to get is that no one notices when I open the hood.
I just felt that I wasn't going to be able to live with this as a backdrop.

The results speak for themselves.
Here is the video I made for my own personal amusement. As if building this car isn't hard enough, I need to find ways to make it harder.
Enjoy http://youtu.be/DkHesh-t67g
Cheers,
Jay
I just felt that I wasn't going to be able to live with this as a backdrop.
The results speak for themselves.
Here is the video I made for my own personal amusement. As if building this car isn't hard enough, I need to find ways to make it harder.
Enjoy http://youtu.be/DkHesh-t67g
Cheers,
Jay
05-02-2012, 11:24 PM
#33
Hahaha, you video was good. By the way what rear end are you going with? Maybe that is in a coming chapter.  I can see I will be following your thread real close. I am already going to copy your ideas on the transmission tunnel covering and the transmission mount.
By the way what rear end are you going with? Maybe that is in a coming chapter. I can see I will be following your thread real close. I am already going to copy your ideas on the transmission tunnel covering and the transmission mount.
05-03-2012, 11:07 AM
#34
Staging Lane
Thread Starter
Join Date: Nov 2008
Location: Mile High City
Posts: 82
Likes: 0
Received 0 Likes
on
0 Posts
Thanks dude! There is zero instructional value to it, so it's 4 minutes of your life you can't get back. But I giggle every time I watch it.
The rearend is still the factory 10-bolt. Back when I did the disc brake conversion I also put a posi unit in it and a heavy duty aluminum brace cover on it. It�s certainly the weakest link in my drivetrain, but I�m hoping that the tires are the flash point. So long as they never hook, I�m hoping not to eat an axel. But I would think that at some point (gawd I hope years from now) that I could see myself going with some mini-tubs and moving some frame rails to get more tire under it in the rear. Hopefully it makes it that long.
The rearend is still the factory 10-bolt. Back when I did the disc brake conversion I also put a posi unit in it and a heavy duty aluminum brace cover on it. It�s certainly the weakest link in my drivetrain, but I�m hoping that the tires are the flash point. So long as they never hook, I�m hoping not to eat an axel. But I would think that at some point (gawd I hope years from now) that I could see myself going with some mini-tubs and moving some frame rails to get more tire under it in the rear. Hopefully it makes it that long.
05-03-2012, 11:48 AM
#35
"The rearend is still the factory 10-bolt."
That is an option I am seriously considering. If I went that route I would be using an Eaton posi, aftermarket axles with the stronger material and something in the 3:27 to 3:42 gears without looking at the 8.2 gear tables. That would be stronger than stock and maybe allow me a couple of trips down the dragstrip to see what she can do.
That is an option I am seriously considering. If I went that route I would be using an Eaton posi, aftermarket axles with the stronger material and something in the 3:27 to 3:42 gears without looking at the 8.2 gear tables. That would be stronger than stock and maybe allow me a couple of trips down the dragstrip to see what she can do.
Last edited by 1989GTA; 05-03-2012 at 11:54 AM.

 05-07-2012, 04:22 PM
#37
Staging Lane
Thread Starter
Join Date: Nov 2008
Location: Mile High City
Posts: 82
Likes: 0
Received 0 Likes
on
0 Posts
As soon as I get the front carpet cut around them, they will get put into place. The plug wires are all made and run from the motor and thru the firewall. But one of my projects that I need to finish this week, after the carpet, is putting the coil pack ends on them. I have the coil pack holders all made and the mount on the tunnel. They aren't in any of the pictures so far but I while be posting them shortly.
I'm not sure I would go this route a second time. But I didn't know how much firewall clearance I was going to end up with and besides I kind of fell in love with the valve covers before I actually figured out how I was going to make the rest of this work.
Thanks,
Jay
08-04-2012, 02:59 PM
#38
Staging Lane
Thread Starter
Join Date: Nov 2008
Location: Mile High City
Posts: 82
Likes: 0
Received 0 Likes
on
0 Posts
I've got three questions I need answers to that are holding me up right now. These aren't hard, I just don't know what I'm doing.
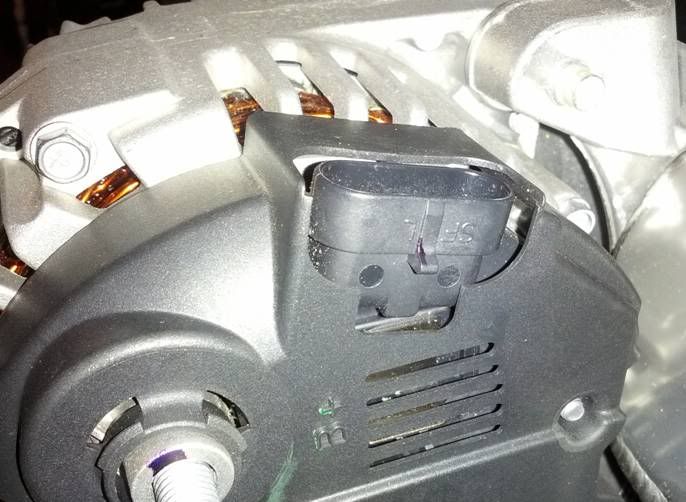
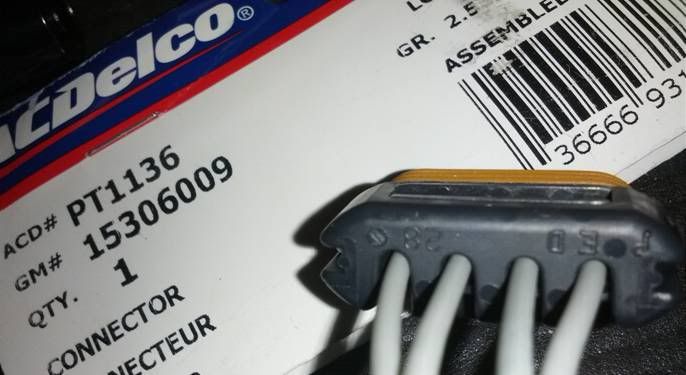
The first is the Corvette accessory kit I got for my LS3 came with a 4 wire alternator and Speartech's harness is wired for a two wire alternator. I asked John how to wire the new pigtail and here is his response: 'On the alternator you can cut off our plug and hook the red wire to position "B" of the new connector and the gray wire to position "C".' Problem is my alternator isn't marked with A,B,C,D. It's marked with S,F,L. Anyone know how to wire this?
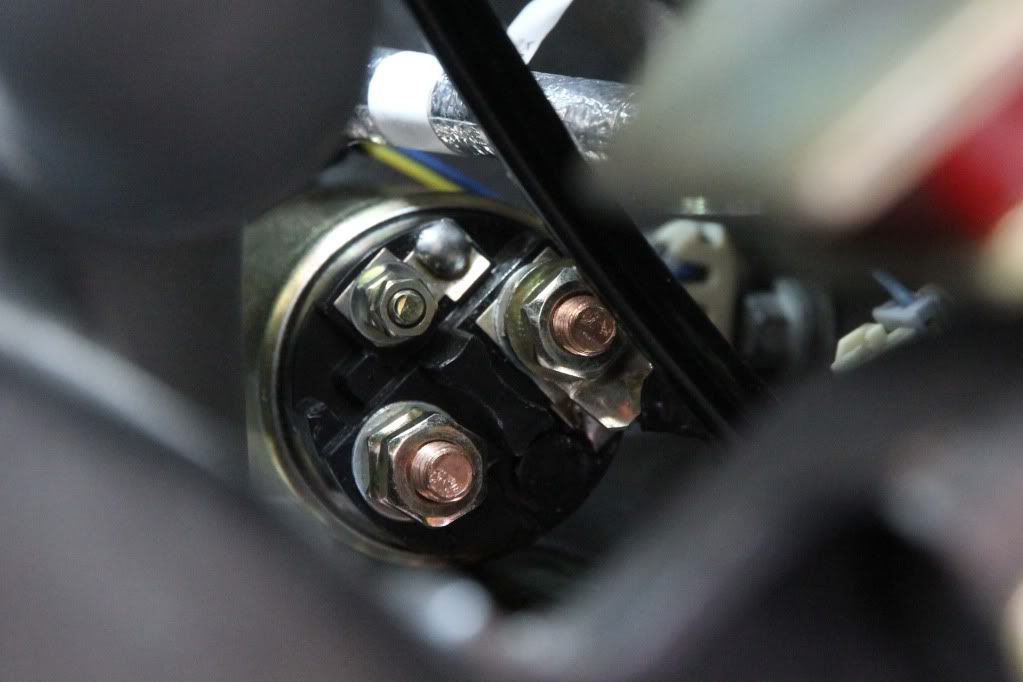
Ok, next is the starter. For some reason I do remember there being 3 wires connected to the old starter on the 283. one being the BIG lead from the battery and then two small wires from the harness. One of those obviously from the ignition switch and the other a ground maybe? So on this starter do I just connect the battery lead to the large post on the left and the ignition on the upper?
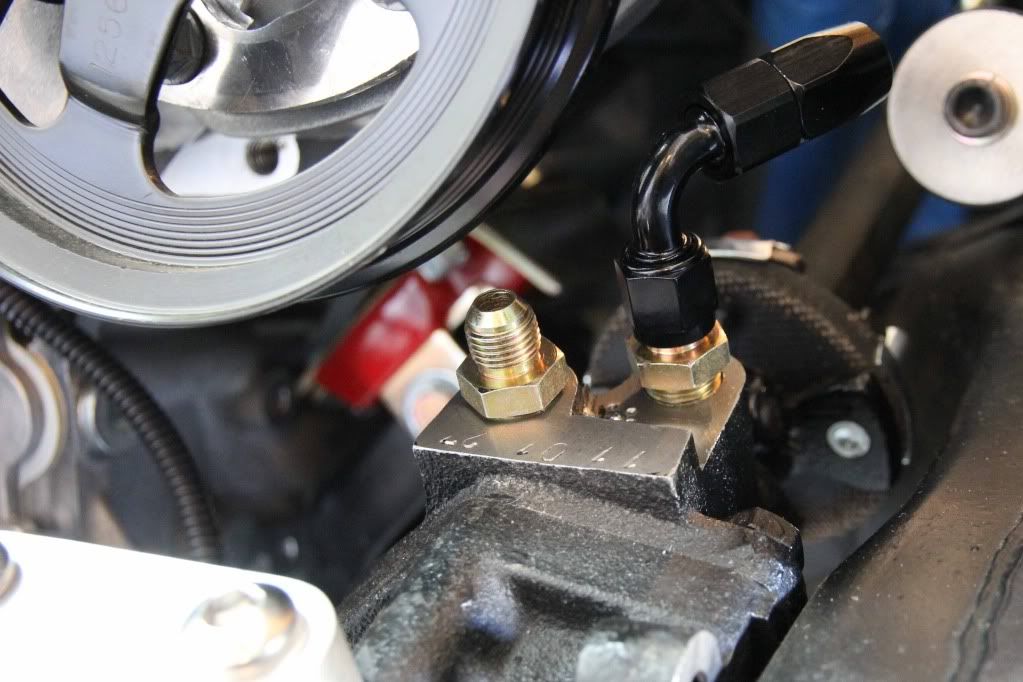
And lastly, I have the '500 series' power steering box from CPP and I need to make or buy the hoses to connect it to the pump. I'm not sure which side is the supply and which is the return. But the one on the left is really close to the pulley and isn't going to give me enough room to run a 90 degree AN-6 fitting on it. Does anyone make a banjo fitting for that?
Thanks again for all your help. Every step forward on this project is a step I've never taken before. Couldn't do it without this forum.
Cheers,
Jay
The first is the Corvette accessory kit I got for my LS3 came with a 4 wire alternator and Speartech's harness is wired for a two wire alternator. I asked John how to wire the new pigtail and here is his response: 'On the alternator you can cut off our plug and hook the red wire to position "B" of the new connector and the gray wire to position "C".' Problem is my alternator isn't marked with A,B,C,D. It's marked with S,F,L. Anyone know how to wire this?
Ok, next is the starter. For some reason I do remember there being 3 wires connected to the old starter on the 283. one being the BIG lead from the battery and then two small wires from the harness. One of those obviously from the ignition switch and the other a ground maybe? So on this starter do I just connect the battery lead to the large post on the left and the ignition on the upper?
And lastly, I have the '500 series' power steering box from CPP and I need to make or buy the hoses to connect it to the pump. I'm not sure which side is the supply and which is the return. But the one on the left is really close to the pulley and isn't going to give me enough room to run a 90 degree AN-6 fitting on it. Does anyone make a banjo fitting for that?
Thanks again for all your help. Every step forward on this project is a step I've never taken before. Couldn't do it without this forum.
Cheers,
Jay
