


67 Camaro - Dad and Son build

Thread Starter
On The Tree
Joined: May 2010
Posts: 159
Likes: 0
As for the motor heres the plan so far:
EFI
s+p adapter plates
stainless works headers
oil pan from prodigy
fast lsxr 102 intake
fast fuel rails
ported ls7 throttle body or 92mm fast
gm front accessories
gm stock ecu and wiring
still have to research injectors
Im sure they will be more..
Last friday I found a used c6 set up on lateral-g and luckly jumped on it first, being as they are on backorder and pretty pricey from gm. Well I recieved that yesterday and my dad came over to help put it all together. Its a gm kit and it went on very nicely. In other news we ordered motor mounts and the adapter plates from frank over at prodigy so they should be here soon and we ordered poly mounts from summit and they will be here by friday. If all goes as planned I hope to mock up the motor on the frame to see what kind of clearance we have for the oil pan. Here is some quick pictures from last night.


more to come soon..
Damn i just read the whole thread MAJOR PROPS TO YOU seriously beautiful car. Im fixing to buy a 69 camaro if you dont mind me asking how much you got in it already besides the shell mine will be perfect?
Thanks
Thanks
LS1 Tech Stories
The Best V8 Stories One Small Block at Time

Gas Monkey Built a 6-Wheel Ferrari Testarossa With a Corvette LT4 Engine
Verdad Gallardo
7 Most Reliable High-Performance Engines GM Has Ever Built
Verdad Gallardo
Amazing '71 Camaro Restomod Is Modern Muscle Car Under the Skin
Verdad Gallardo
6 Common C5 Corvette Failures and What's Involved In Repairing Them
Pouria Savadkouei
Retro Modern Bandit Pontiac Trans AM Comes With Burt Reynolds' Autograph
Verdad Gallardo
Top 10 Greatest Cadillac V Series Performance Models Ever, Ranked
Pouria Savadkouei
Top 10 Most Powerful Chevy Trucks Ever Made!

Hennessey's New Supercharged Silverado ZR2 Has 700 HP
Verdad Gallardo
Coachbuilt N2A Anteros Is an LS2-Powered C6 Corvette In Italian Clothes
Verdad Gallardo Thread Starter
On The Tree
Joined: May 2010
Posts: 159
Likes: 0
So got the motor mounts and adapter plates last night from Frank over at prodigy. Big Thanks to him and their team for dealing with me:thumbsup: The old man came over and we mocked everything up to see what where dealing with. Im going to take it apart again and have the mounts painted nice and finished with stainless hardware when it goes in for the final time. Starting to look like a car more and more as we go...I cant wait to start this thing for the first time. Next up is the oil pan and headers, then intake, tb..ect..onto the pictures.
I got polyurethane mounts from summit and they come with a piece they say to install. When we mocked it up is didnt seem to fit. I left it out for now. Any input on if this plate needs to be installed??


Getting it ready


Ready for touch down.

Shes in:thumbsup:


more to come soon..
Thread Starter
On The Tree
Joined: May 2010
Posts: 159
Likes: 0
My dad pointed out another thing I need an opinion on. When we where putting the motor mounts onto the actual frame the one way they hang over the edge, but the other way they sit on the frame touching it all the way. Seeing the way it hung over the edge I said it cant be that way. My dad though it was. We put it the way I thought and he emailed me today saying he was right...see the picture below. Can someone confirm which way they sit? Does it matter?


Thread Starter
On The Tree
Joined: May 2010
Posts: 159
Likes: 0
So I didnt get over to work on the car as much as I wanted to this weekend. My dog has been pretty sick but she seems to be doing a lot better. I did get the oil pan installed but no painting, maybe next weekend. I looked over the internet for tourqe specs on the pan and pickup and came up with the following on top of the pictures. if any of this sounds wrong please let me know.
Heres some pictures.


I torqued the bolts that hold the pickup mounts on the deflector pan to 28 lb-ft

The pickup tube to the pump was torqued to 9 lb-ft or 106 in-lb.

Here is the view from when I first put the bolt in. It made me uneasy seing it that close to the chain so I went to the hardware store and got a shorter bolt that did not come out of the back.

The main 13 bolts for the pan where torqued to 18 lb-ft and the 2 end bolts that go into the crankshaft cover where torqued to 9 lb-ft or 106 in-lb.


There it is all done.


and just incase anyone wants to see where I got my info from here is the link.
http://www.gmhightechperformance.com...ne_covers.html
Heres some pictures.
I torqued the bolts that hold the pickup mounts on the deflector pan to 28 lb-ft
The pickup tube to the pump was torqued to 9 lb-ft or 106 in-lb.
Here is the view from when I first put the bolt in. It made me uneasy seing it that close to the chain so I went to the hardware store and got a shorter bolt that did not come out of the back.
The main 13 bolts for the pan where torqued to 18 lb-ft and the 2 end bolts that go into the crankshaft cover where torqued to 9 lb-ft or 106 in-lb.
There it is all done.
and just incase anyone wants to see where I got my info from here is the link.
http://www.gmhightechperformance.com...ne_covers.html

Regarding the use of that plate whch comes with the mount. It wouldn't fit with my motor...not enough room left using the plate. So, I didn't use it.
In the sticky "LS1 Swap FAQS"..then, 'Swap into 67-69 Camaro/Firebird', Olly also leaves out this plate, and so do others who come across the same fitment dilemma.
So far, I haven't heard of any problems from leaving this plate out. What else is one to do?
Hopefully, my motor won't come springing out of the engine bay.
Wonderful job you've done with your project!
Thread Starter
On The Tree
Joined: May 2010
Posts: 159
Likes: 0
Regarding the use of that plate whch comes with the mount. It wouldn't fit with my motor...not enough room left using the plate. So, I didn't use it.
In the sticky "LS1 Swap FAQS"..then, 'Swap into 67-69 Camaro/Firebird', Olly also leaves out this plate, and so do others who come across the same fitment dilemma.
So far, I haven't heard of any problems from leaving this plate out. What else is one to do?
Hopefully, my motor won't come springing out of the engine bay.
Wonderful job you've done with your project!
In the sticky "LS1 Swap FAQS"..then, 'Swap into 67-69 Camaro/Firebird', Olly also leaves out this plate, and so do others who come across the same fitment dilemma.
So far, I haven't heard of any problems from leaving this plate out. What else is one to do?
Hopefully, my motor won't come springing out of the engine bay.
Wonderful job you've done with your project!
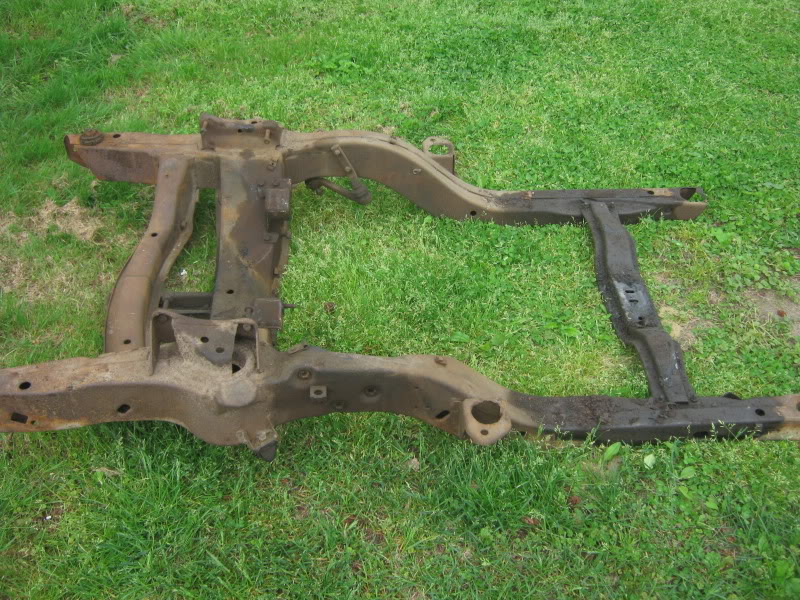
So the guy that I bought the shell from had told me he painted the underside in eastwood black. I have used por-15 on the frame and loved the results. I wanted to redo the underside since the subframe connectors where welded in and there was some flash rust. So instead of doing a sub-par job and just doing the actual connectors and part of the floor pan I decided to do the whole underside. Well not wanting to buy a rotisserie I had to figure out how to get under there without being on my back and getting all the cleaners and por-15 in my face. With some help from my brother in law here is what he came up with. Big thanks to him and my little brother for all the help. It was definitely a lot of work. Ill let the pictures tell the rest.


Next up...the inside.
Thread Starter
On The Tree
Joined: May 2010
Posts: 159
Likes: 0
Thanks man. Not much of an update this weekend. When me and my brother where painting the underbody I noticied that there was some pin holes that needed to be sealed up and all around the frame connectors needed to be sealed up also. That being said I got some seam sealer and did that this weekend. My younger brother bought his 70 chevelle over also to do some little stuff, oil change, belts, bulbs..ect. So i spent most of my day helping him. We also put my wheels on his car just for fun. Heres some picture of it. Next up is putting the undercoating on and I still have to por15 the whole inside.


More to come.
More to come.
Thread Starter
On The Tree
Joined: May 2010
Posts: 159
Likes: 0
Have not had much of an update due to a very close friend of mine passing away last Friday. Me and him always worked on our cars together and shared a love of automobiles and life. He will be greatly missed forever.
I now cherish the time with my friends and family that much more. My good friend came over last night to just hang out, talk about old times and do another dry fit of the motor now that the engine mounts are positioned correct and the oil pan is on. I’ve had some people asking about the fit of the mast pan. It sits perfect. Tons of clearance around the steering components and frame. The pan is just about equal to the sub frame also in depth. Here are the pictures. If anyone wants to see a certain shot please let me know.


In other news were saving for the tranny and still have to paint the inside and apply the rubberized coating to the underside. Need to find the time. More to come soon.
I now cherish the time with my friends and family that much more. My good friend came over last night to just hang out, talk about old times and do another dry fit of the motor now that the engine mounts are positioned correct and the oil pan is on. I’ve had some people asking about the fit of the mast pan. It sits perfect. Tons of clearance around the steering components and frame. The pan is just about equal to the sub frame also in depth. Here are the pictures. If anyone wants to see a certain shot please let me know.
In other news were saving for the tranny and still have to paint the inside and apply the rubberized coating to the underside. Need to find the time. More to come soon.
Thread Starter
On The Tree
Joined: May 2010
Posts: 159
Likes: 0
So its been awhile. No money will do that to you. Picked up a used fast ls7 lsxr 102 also order brake line stuff from Frank that should be here soon. Got the intake last night and did a dry fit. I cant wait. Dad is coming over tonight and we are going to do some undercoating. More pictures coming soon.


Heres a cool HDR shot also.

More to come..
Heres a cool HDR shot also.
More to come..
Thread Starter
On The Tree
Joined: May 2010
Posts: 159
Likes: 0
So the old man came by on friday night and we went at it to do the undercoating. Overall pretty easy and simple to apply. Came out really nice. This stuff is so hard to photograph though. Looks blotchy but in person it looks awsome. On saturday I was looking at the rear before I put it back in and I didnt like the way the links where grey so I went at them also with the undercoating also. When my dad and buddy chris where over on friday night and we where looking at the manifold they both said it looks out of place and that it would look better black. I thought about it but wanted to really think about it. Well my brother came over on saturday to give me a hand and saw the manifold also. He said the same thing. I knew what I had to do. Onto the pictures..


In more news I was talking to my dad about the inside and he said do you plan to drive the car in the rain. I said no not unless I get stuck. he then said why are you going to go craxy on the inside? The inside is already epoxed? Im guessing I have to rethink this. Opinions?
In more news I was talking to my dad about the inside and he said do you plan to drive the car in the rain. I said no not unless I get stuck. he then said why are you going to go craxy on the inside? The inside is already epoxed? Im guessing I have to rethink this. Opinions?