


67 Camaro - Dad and Son build

Thread Starter
On The Tree
Joined: May 2010
Posts: 159
Likes: 0
Good Luck on getting them to fit, like we say at work, "ain't happin captain" might as well send them right out to get rehooped or save for the frame,
right now your right in the middle of no where, no plan and no money, and you bought something you cant use, without spending a ton of money, I'm not picking on you I trying to show/learn you, because I've been there done that,
reevaluate what your doing make a plan to get it running driving, not a 20 yr project, like I said been there done that,
Thats fine, I hope they work, and I have no clue about your life or money, I'm just saying I would have bought more necessary parts than wheels, but since your offensive, I'll butt out,
Thread Starter
On The Tree
Joined: May 2010
Posts: 159
Likes: 0
Im not asking you to butt out I have more respect for you on here than most. Your thread is one that I have visited more than once. Im not one to impulse buy but I had plans for a nice set of 3 piece wheels in the future and for the price it was a one time type of deal. Sure I should be buying other more important things first but if you ask my wife shell say that about the whole car. No disrespect ment. From one Steven/1st gen owner to another.

Thread Starter
On The Tree
Joined: May 2010
Posts: 159
Likes: 0
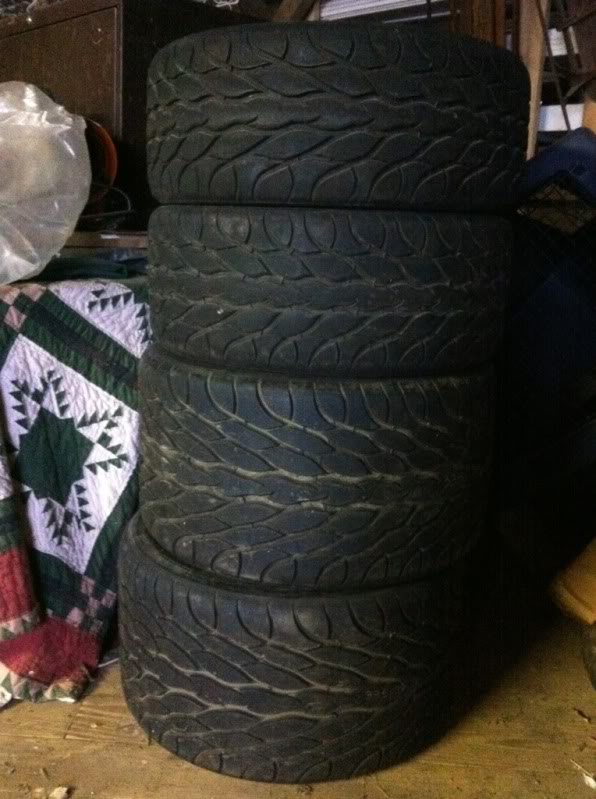
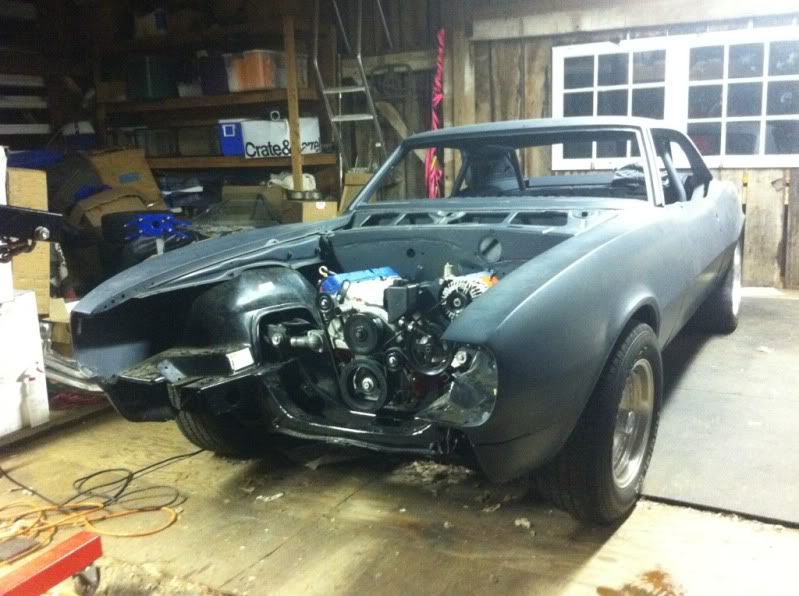
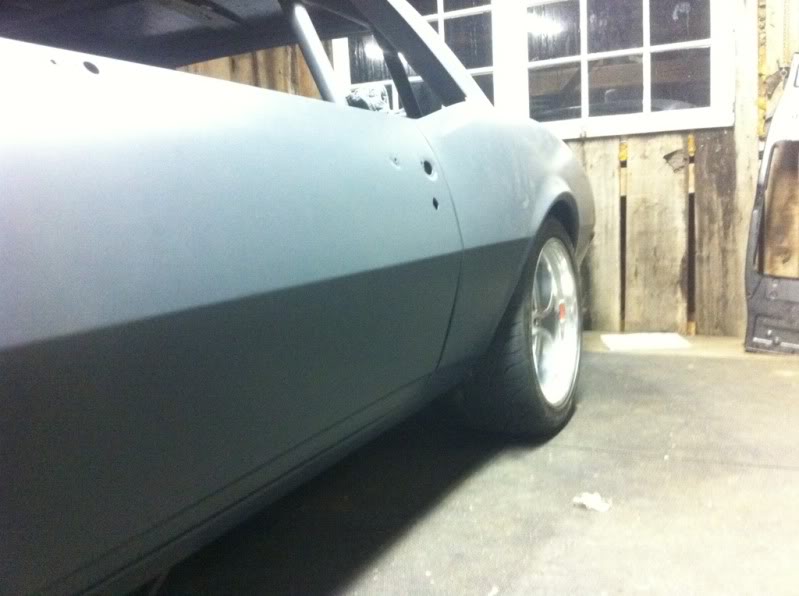
Ok so its been a bit of time. Ive lost a lot of my free time due to my son, the holidays..But im ok with that. Im sure you all know how that goes. I do what I can when I can. With that being said I did get some wonder gifts for x-mass this year. My wife and parents always treat me well. My wife got me the the fast fuel rails and my parents gave me money for my tires..still looking for them atm.. I want 335/30/18 for the rear and something like 225-245/40/18 for the front. Just waiting to find a set that matches all the way around or a good deal to pop up. In other news I treated myself to a x-mass gift and bought a nick williams 102mm tb.. all polished also. I pulled the rear as I need to have it narrowed to fit the 18x12. Just need to buy the rear tires first to get a good measurment before decide how much needs to come off. The best price so far for the narrowing is 300 and the guy is going to cut the old perchs off and weld on the ridetech ones.
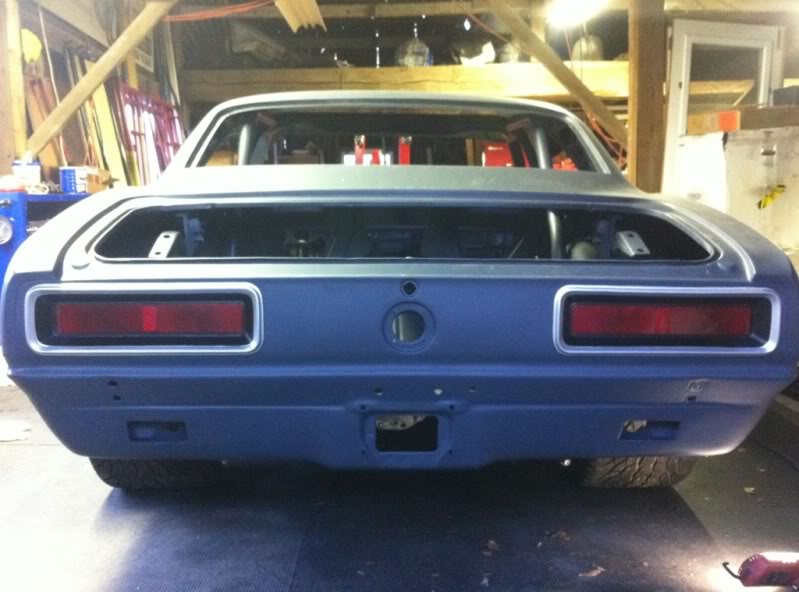
I also had timmy take the lower valance, grill trim and lower carbon spoiler and clean them up.. He did an awesome job again and Im a very picky person. He took all the dents out of it, welded the holes shut, straigthened the lower valance, primed it and assembled it all. He also cleaned up the trim and game it a brushed look. Im not sure what im doing with it yet, either keeping the brushed look or going to have it painted a satin black with a small edge polished through. Time will tell. Since he did such a nice job I gave him the rest of the window trim and tail lights to work on..Im sure ill be amazed again.. ok enough talk onto the pictures..
Rear all pulled apart.

Polished goodness.


Timmy's magic..


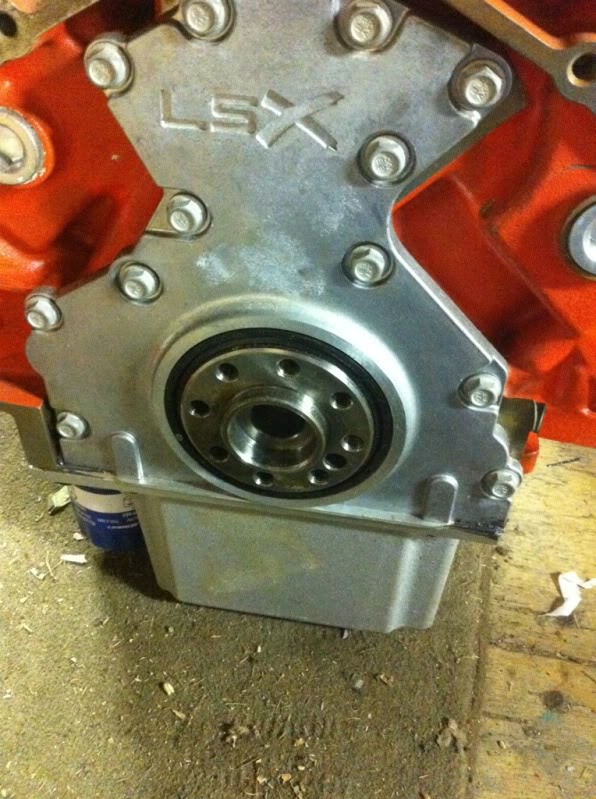
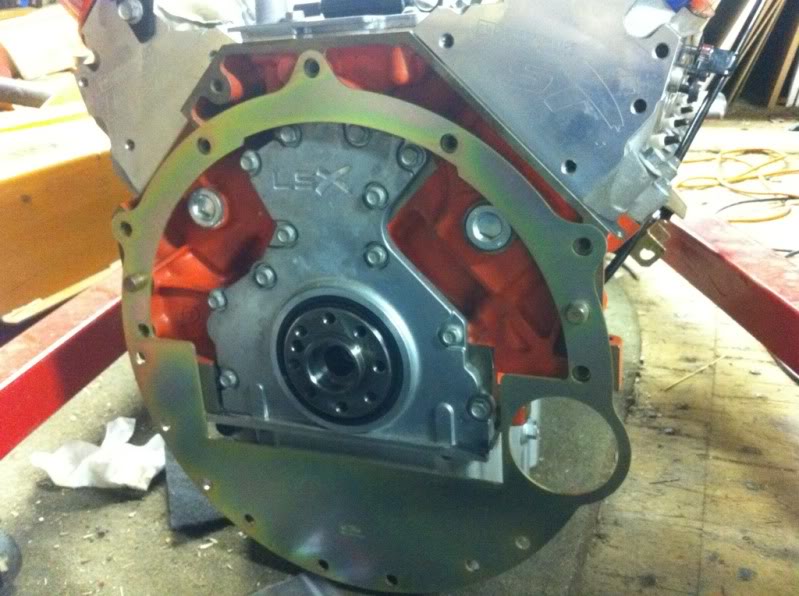
Im almost wrapped up with the motor at this point..just need a few more items(injectors, headers,wiring) and it is done..then transmission time...Hey frank want to give me a killer deal/sponsor so I can drive this thing in this lifetime..?? haha..
I also had timmy take the lower valance, grill trim and lower carbon spoiler and clean them up.. He did an awesome job again and Im a very picky person. He took all the dents out of it, welded the holes shut, straigthened the lower valance, primed it and assembled it all. He also cleaned up the trim and game it a brushed look. Im not sure what im doing with it yet, either keeping the brushed look or going to have it painted a satin black with a small edge polished through. Time will tell. Since he did such a nice job I gave him the rest of the window trim and tail lights to work on..Im sure ill be amazed again.. ok enough talk onto the pictures..
Rear all pulled apart.
Polished goodness.
Timmy's magic..
Im almost wrapped up with the motor at this point..just need a few more items(injectors, headers,wiring) and it is done..then transmission time...Hey frank want to give me a killer deal/sponsor so I can drive this thing in this lifetime..?? haha..
Thread Starter
On The Tree
Joined: May 2010
Posts: 159
Likes: 0
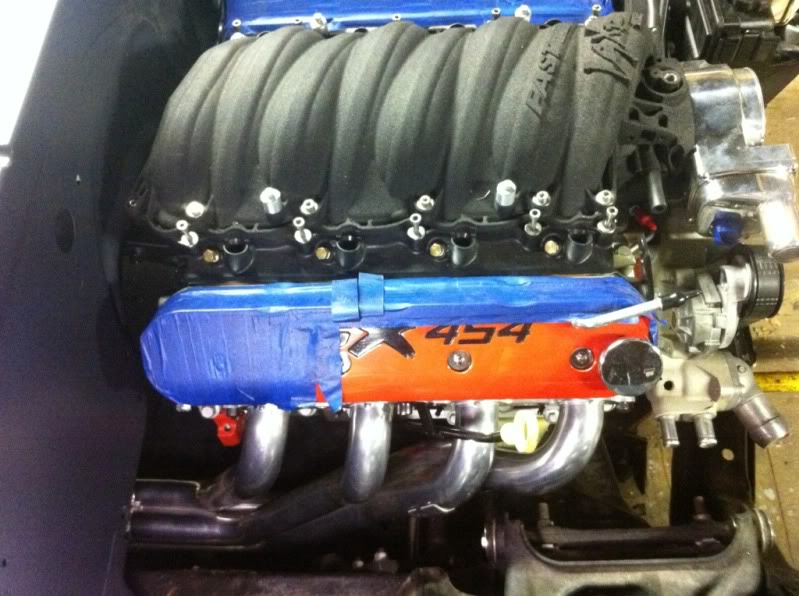
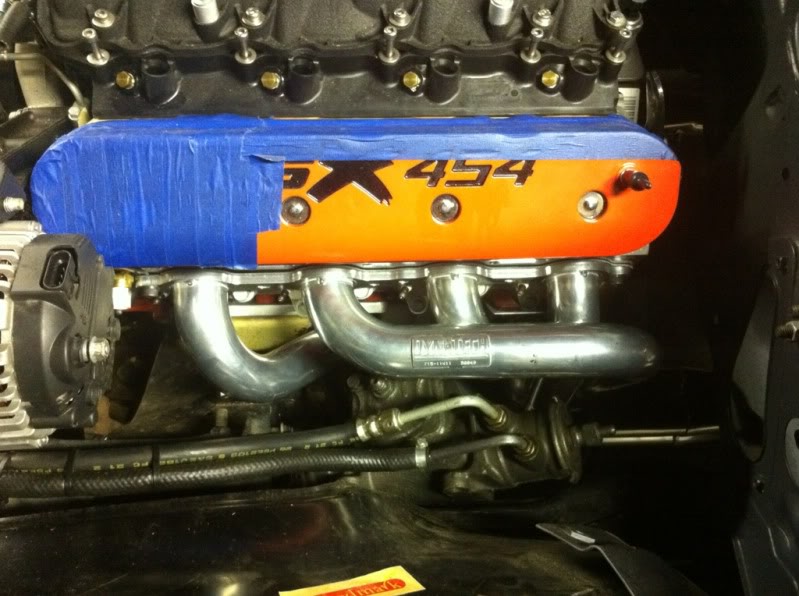
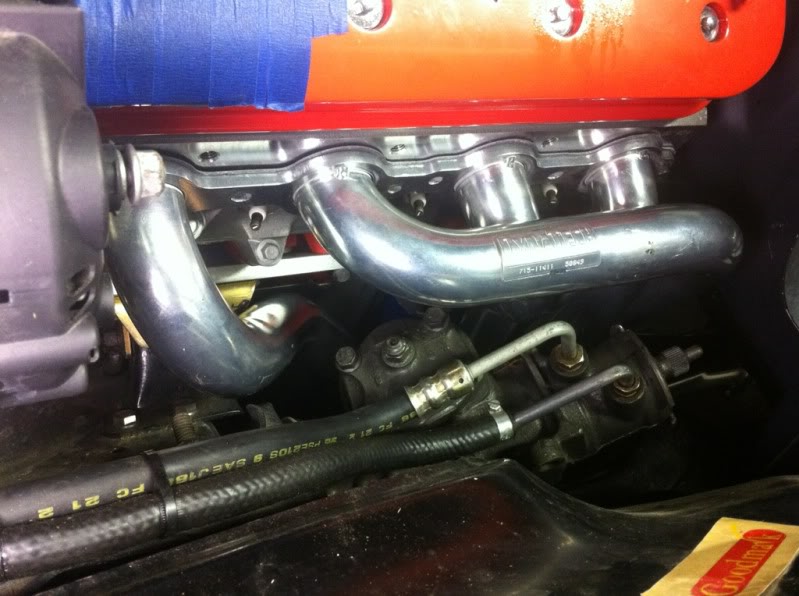
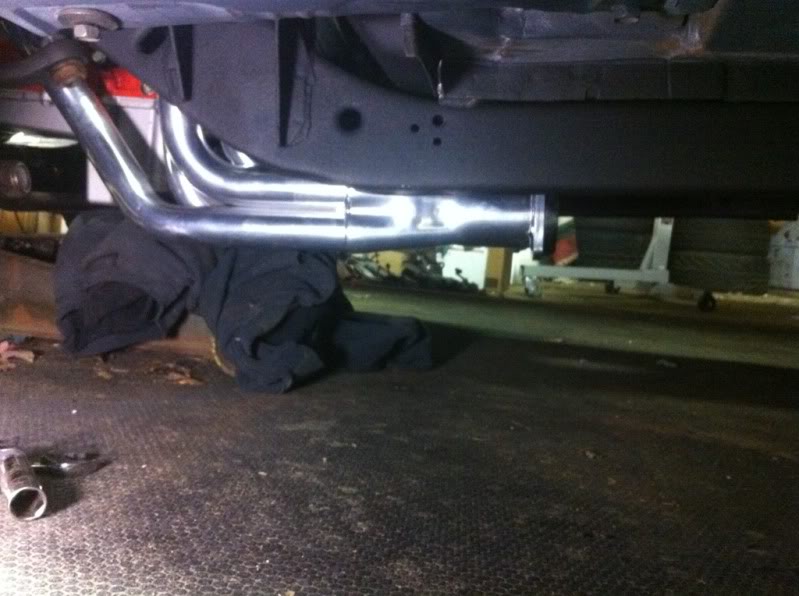
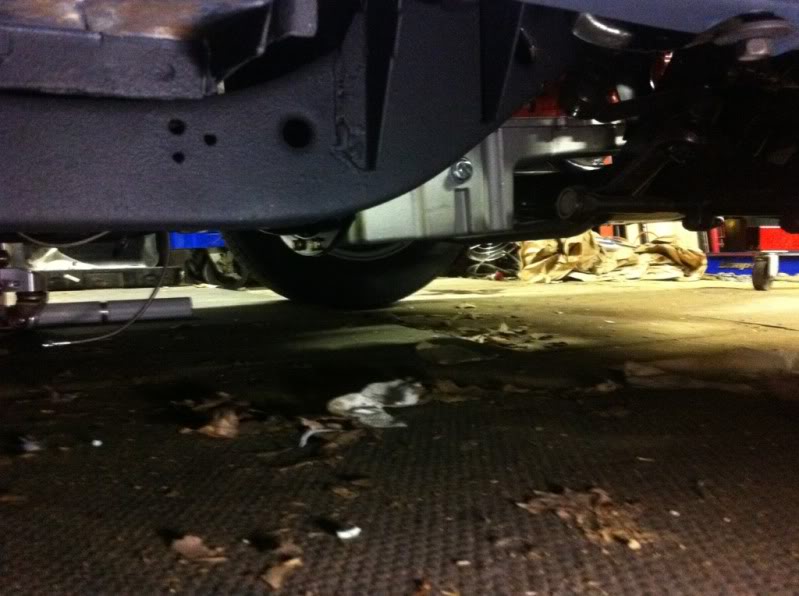
Not too much going on atm. Ridetech was selling tires so I bought a used set or bfgoodrich KDW for a killer deal. 335/30/18 for the rears and 235/40/18 for the fronts. Going to try to get the rear wheels/tires mounted this Saturday, then get a good measurement for the width of the rear. In other news a good deal came up for a set of dynatech headers so I bought them. A good friend of mine came over and gave me a hand on getting the headers mocked up to see how they sit. Overall for the price I'm very impressed. The clear the steering box with ease. The one tube is slightly touching the mount, but that's nothing a little grinding won't fix. Here are some pictures for viewing pleasure. More to come soon..


LS1 Tech Stories
The Best V8 Stories One Small Block at Time

Gas Monkey Built a 6-Wheel Ferrari Testarossa With a Corvette LT4 Engine
Verdad Gallardo
7 Most Reliable High-Performance Engines GM Has Ever Built
Verdad Gallardo
Amazing '71 Camaro Restomod Is Modern Muscle Car Under the Skin
Verdad Gallardo
6 Common C5 Corvette Failures and What's Involved In Repairing Them
Pouria Savadkouei
Retro Modern Bandit Pontiac Trans AM Comes With Burt Reynolds' Autograph
Verdad Gallardo
Top 10 Greatest Cadillac V Series Performance Models Ever, Ranked
Pouria Savadkouei
Top 10 Most Powerful Chevy Trucks Ever Made!

Hennessey's New Supercharged Silverado ZR2 Has 700 HP
Verdad Gallardo
Coachbuilt N2A Anteros Is an LS2-Powered C6 Corvette In Italian Clothes
Verdad Gallardo
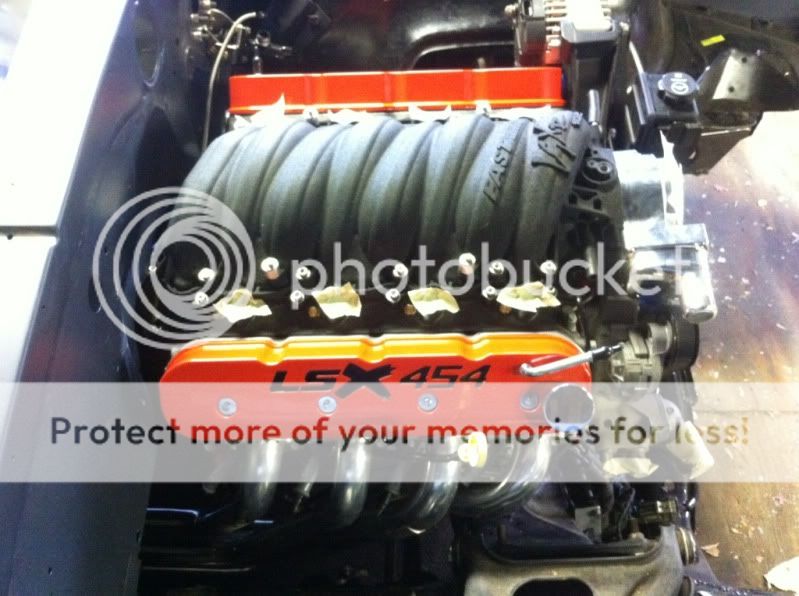
Congrats on the little guy, you children do take up some time. But its worth it. Hey my question for ya is what paint did you use on the intake? Looks great.
Oh ya, the car looks ok too!
Oh ya, the car looks ok too!
Thread Starter
On The Tree
Joined: May 2010
Posts: 159
Likes: 0
http://www.mastmotorsports.com/2010/...ew.php?cat=Oil Pans&id=160
Thank you.
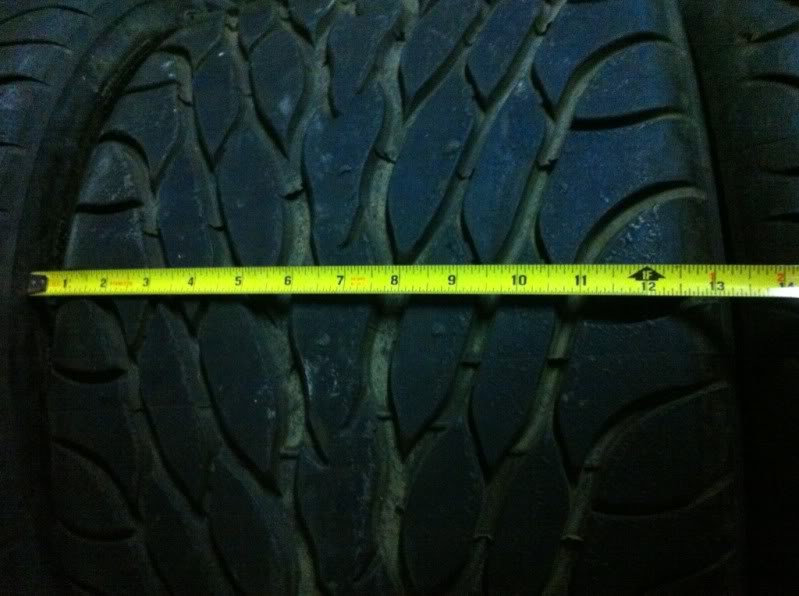
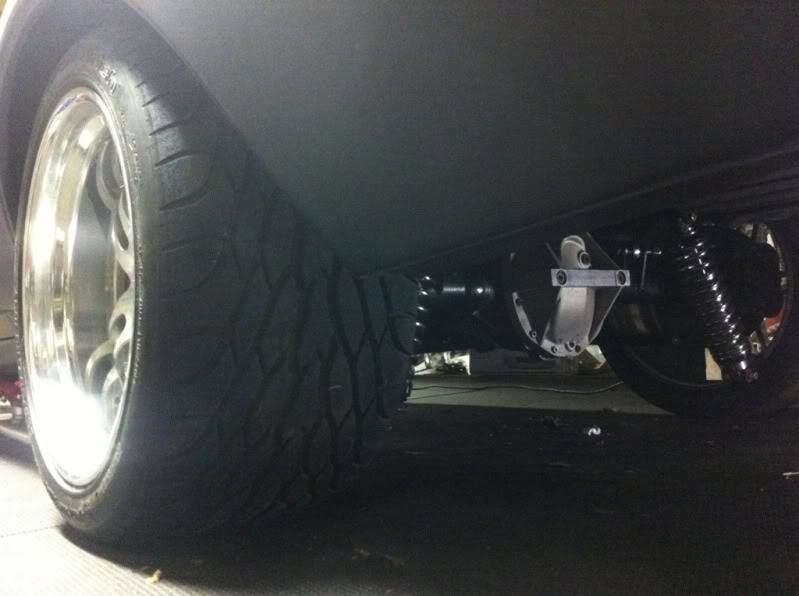
Got over to the car this weekend for a bit and got my rear tires mounted so I could get a measurment for the rear. I came up with 55 1/2 from wheel to wheel. I have to subtract out the other stuff also. Does this seem correct to you guys? The wheels are 18x12 w/ 5.75 of backspacing or -19 offset. Im guessing my final rear width will be somewhere around 54 1/2....sound right? Here are some pictures as no one likes reading..


In others news Im hoping to drop the rear off this week/weekend to get it narrowed..
Also have been doing some research on other parts that are needed like injectors and was thinking 50-60 lbs would be enough. For the radiator I was looking at the entropy unit as the price is fair and Ive read great things about the quality of the unit. Also getting close to buying the t-55 magnum...hoping me and the old man can start the beast by spring..time/money will tell.
Thread Starter
On The Tree
Joined: May 2010
Posts: 159
Likes: 0
So me and my dad have been saving up to buy the transmission and as many of you know its very expensive. I recieved and email from a guy named Vance on wednesday night saying he had a brand new t56 magnum and he was looking to sell. We talked and struck a deal and the transmission is on the way. I also bought a complete set of autometer gauges off of him. All I can say is what a pleasure it has been doing business with him and thank you VERY much for the great deal man. Pictures and install pictures will be up soon enough..here some teaser pictures for now...


Heres a list of whats needed next...
wiring harness, ecu, all sensors, dbw pedal
power steering hoses
battery
all power cables (+,-)
starter
injectors
fuel lines (fittings, lines, corvette filter/regulator)
radiator
rad hoses
its getting there...more to come soon.
Heres a list of whats needed next...
wiring harness, ecu, all sensors, dbw pedal
power steering hoses
battery
all power cables (+,-)
starter
injectors
fuel lines (fittings, lines, corvette filter/regulator)
radiator
rad hoses
its getting there...more to come soon.
Thread Starter
On The Tree
Joined: May 2010
Posts: 159
Likes: 0
A lot going on lately. Going in a thousand directions it seems like so ill try to write all my notes in here to keep things in order/give updates.
Transmission:
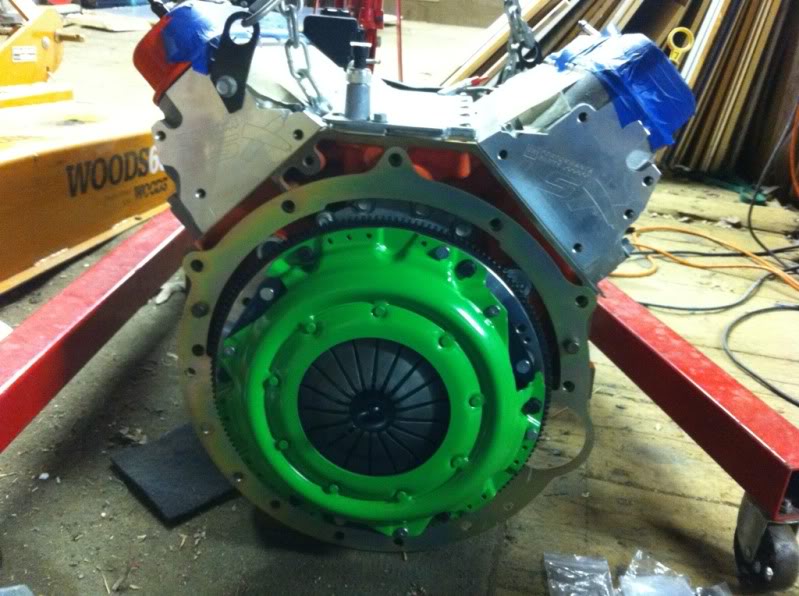
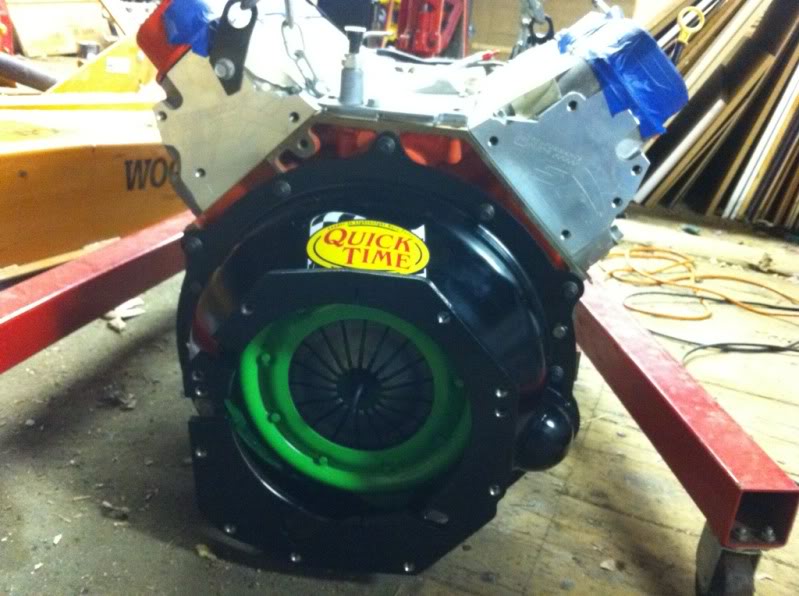
I order all my parts needed from american powertrain. All I can say is that if you are looking for anything transmission or transmission related they are the place to go to. Those guys over there have seriously bent over backwards to get me my stuff and keep me happy. Josh your the man. I recieved all my parts from them on wednesday and was waiting on the bellhousing to come on thursday. Somewhere along the line my crossmember ripped through the box and was not there when I opened the boxes. I was also upset that the instructions and the white lightening shifter was not in the boxes. I decided to call their 24-hour hotline as it was after business hours. John the person I have been dealing with answers so I am pretty upset at this point being that I was excited to intall this stuff. He emailed me a copy of the instuctions while I was on the phone..and tells me he will send out a crossmember and my shifter tommorrow for 1 day delivery at no additional cost to me. Talk about service. Then last night I had some questions about the install and I called him. He was on the phone with me for over 20 minutes taking me through the steps. I can not even begin to tell you how helpful he is when it comes to this stuff. He truely has put the customer first in every single way. Big thanks to him and the guys over there. It has been my pleasure. Heres is there contact info.. 931-646-4836 x107. With Josh's help I installed the flywheel, pilot bearing, clutch, pressure plate and bellhousing last night. My dad and I will be wrapping up the rest of the install on this weekend so more to come.
Fuel System:
I posted a thread about running the lines and such. I got a lot of reponses about the vaporworx system so I started digging and after talking with my dad we are going to go that route. Hector over at ricks tank has agreed to take back my old tank and for an additional cost provide me with a vaporworx setup tank w/ cadillac cts-v pump..ect. Again another company going above and beyond to make the customer happy. Big thanks to Hector. Im glad its all going to work out. Now that we have this all figured out we can start buying the stuff needed for the fuel system. I placed an order for 25' of an-6 line at aeroquip.cc so that will be coming soon. Still need to order all the fitting and fuel filter. I will also need to order the flowworx control system from carl so that will be done soon. That should just about wrap up the fuel system
Interior Wiring:
I called Mike over at Musclerodz and ordered the AAW classic update kit for the camaro. Its on back order but will ship once back in stock. So thats going to be up next once it comes in. Seem to be a very nice complete kit from all Ive read.
12 Bolt Moser Rear:
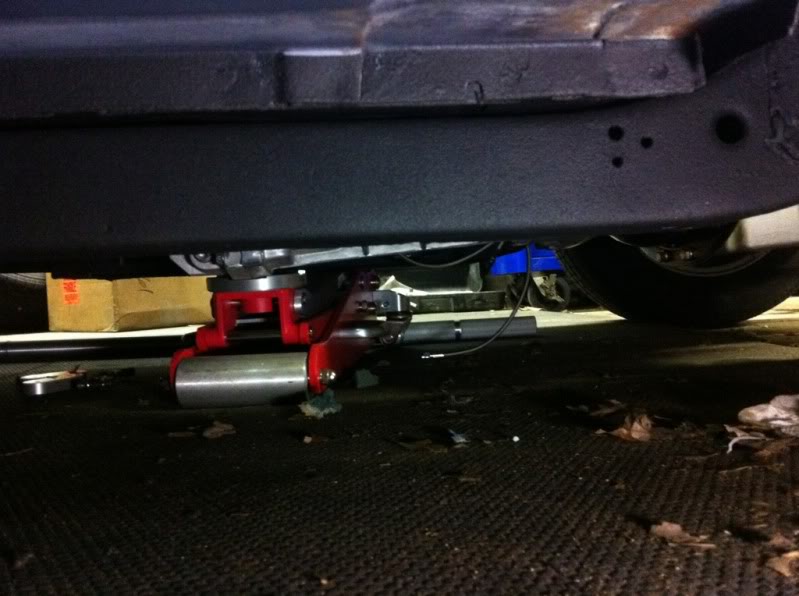
I got sick of dealing with all these local guys not calling me back, not sure on price, can do the axles... So I figured why not send it back to moser to get narrowed and have the lower leaf prechs cut off and have them weld on the prodigy lower shock mount. Well its going to cost around 600 total but I know it will be done right and they are very good communication wise. So that is being worked on and I should have it back sooner than later.
Battery/Power wiring:
Again more reading and nothing ordered yet but im thinking Im going to go with 1/0 for the main power wire. I know I want to run a cutoff and the ford selonid. Still reading and learning on this to make sure its done right before the trigger is pulled on buying stuff.
Engine wiring/ecu
Spoke to Jon over at PSI conversion. Another great guy to talk to, super quick response to email, phone..ect. Going to be about 1200 for everything that is needed from him. ECU, all wiring, O2 sensors, dbw pedal, and Maf. Looking to order this whole setup within the next month.
I think thats it for right now...a lot more to come soon.
Here some install pictures from last night..

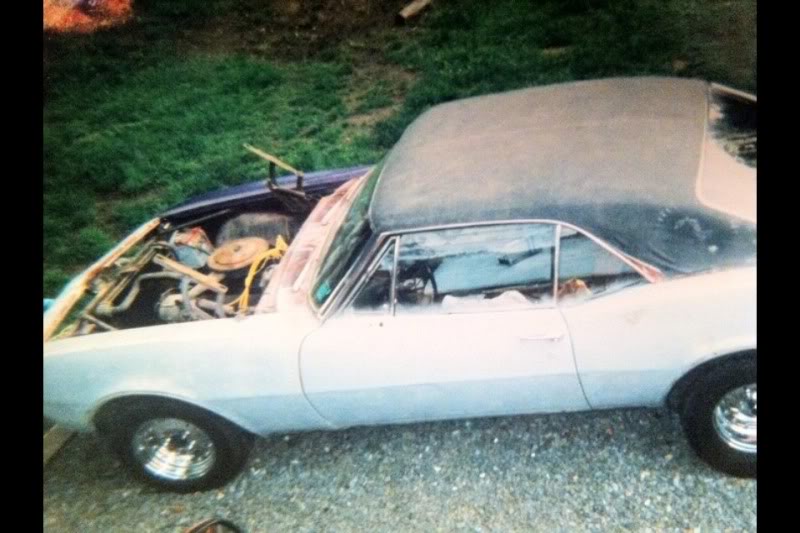
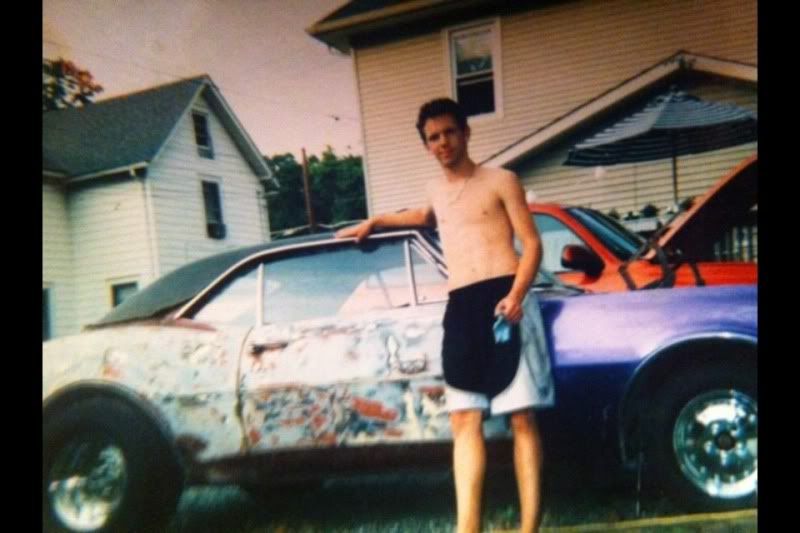
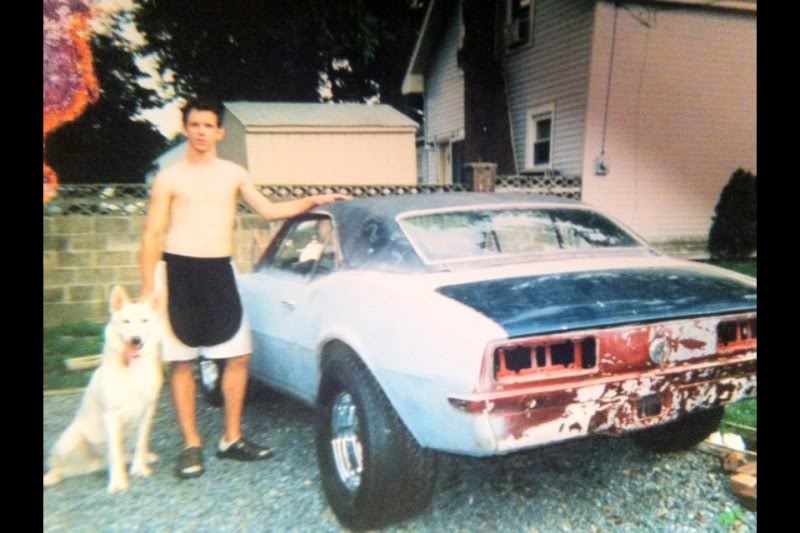
Heres some old pictures of me when I was 15-16 and thought I was going to do all the body work myself and primer the car with rattle cans...haha...the good old days.
Transmission:
I order all my parts needed from american powertrain. All I can say is that if you are looking for anything transmission or transmission related they are the place to go to. Those guys over there have seriously bent over backwards to get me my stuff and keep me happy. Josh your the man. I recieved all my parts from them on wednesday and was waiting on the bellhousing to come on thursday. Somewhere along the line my crossmember ripped through the box and was not there when I opened the boxes. I was also upset that the instructions and the white lightening shifter was not in the boxes. I decided to call their 24-hour hotline as it was after business hours. John the person I have been dealing with answers so I am pretty upset at this point being that I was excited to intall this stuff. He emailed me a copy of the instuctions while I was on the phone..and tells me he will send out a crossmember and my shifter tommorrow for 1 day delivery at no additional cost to me. Talk about service. Then last night I had some questions about the install and I called him. He was on the phone with me for over 20 minutes taking me through the steps. I can not even begin to tell you how helpful he is when it comes to this stuff. He truely has put the customer first in every single way. Big thanks to him and the guys over there. It has been my pleasure. Heres is there contact info.. 931-646-4836 x107. With Josh's help I installed the flywheel, pilot bearing, clutch, pressure plate and bellhousing last night. My dad and I will be wrapping up the rest of the install on this weekend so more to come.
Fuel System:
I posted a thread about running the lines and such. I got a lot of reponses about the vaporworx system so I started digging and after talking with my dad we are going to go that route. Hector over at ricks tank has agreed to take back my old tank and for an additional cost provide me with a vaporworx setup tank w/ cadillac cts-v pump..ect. Again another company going above and beyond to make the customer happy. Big thanks to Hector. Im glad its all going to work out. Now that we have this all figured out we can start buying the stuff needed for the fuel system. I placed an order for 25' of an-6 line at aeroquip.cc so that will be coming soon. Still need to order all the fitting and fuel filter. I will also need to order the flowworx control system from carl so that will be done soon. That should just about wrap up the fuel system
Interior Wiring:
I called Mike over at Musclerodz and ordered the AAW classic update kit for the camaro. Its on back order but will ship once back in stock. So thats going to be up next once it comes in. Seem to be a very nice complete kit from all Ive read.
12 Bolt Moser Rear:
I got sick of dealing with all these local guys not calling me back, not sure on price, can do the axles... So I figured why not send it back to moser to get narrowed and have the lower leaf prechs cut off and have them weld on the prodigy lower shock mount. Well its going to cost around 600 total but I know it will be done right and they are very good communication wise. So that is being worked on and I should have it back sooner than later.
Battery/Power wiring:
Again more reading and nothing ordered yet but im thinking Im going to go with 1/0 for the main power wire. I know I want to run a cutoff and the ford selonid. Still reading and learning on this to make sure its done right before the trigger is pulled on buying stuff.
Engine wiring/ecu
Spoke to Jon over at PSI conversion. Another great guy to talk to, super quick response to email, phone..ect. Going to be about 1200 for everything that is needed from him. ECU, all wiring, O2 sensors, dbw pedal, and Maf. Looking to order this whole setup within the next month.
I think thats it for right now...a lot more to come soon.
Here some install pictures from last night..
Heres some old pictures of me when I was 15-16 and thought I was going to do all the body work myself and primer the car with rattle cans...haha...the good old days.
You guys do great work.
I'm glad to see that your dealings with the vendors are going well.
I have to say that that was a bright spot in my build, also.
You just can't beat good service!
Who is your friend in the white coat with the large tongue?
I'm glad to see that your dealings with the vendors are going well.
I have to say that that was a bright spot in my build, also.
You just can't beat good service!
Who is your friend in the white coat with the large tongue?
Thread Starter
On The Tree
Joined: May 2010
Posts: 159
Likes: 0
The crossmember that will be used is from american powertrain. Here's a link..
http://www.xfactorcrossmembers.com/
Thread Starter
On The Tree
Joined: May 2010
Posts: 159
Likes: 0
Thanks man..I's just a small bit wiser. Not to much. Haha:thumbsup:
So it has been a long last couple of days. Many hours spent cursing, laughing, reading directions, and on the phone with Josh and Gray at American powertrain. Can’t say enough about them and the after hour hotline. Has been a huge help for me all around. Both those guys are A++++. So we received the shim for the hydromax clutch assembly and the narrowed rear/axels from Moser on Tuesday. Got over there after work to put the transmission together and also assemble the rear so that is can be a roller again. Starting on the rear and realize that the axle seals are not there...stopped that for the night.
Ok..on to the transmission. Excited to finally put it all together. Measure for the shims again..and throw the shims on and bolt it all together, place it in the car. Talked to Gray and figured out the crossmember, realized that we are missing the offset plate. He tells me he will over night it tomorrow for delivery on Thursday. Later Wednesday morning I wake up at 3:30 to give the baby his binky and I remembered that we didnt put the feed line on the clutch assembly. Well that sucks..it has to come back apart. So back over there after work on Wednesday... my dad already started pulling it all out. We finish getting it out. Take it apart, install the feed line, back together, in the car. Not to bad all things considered.
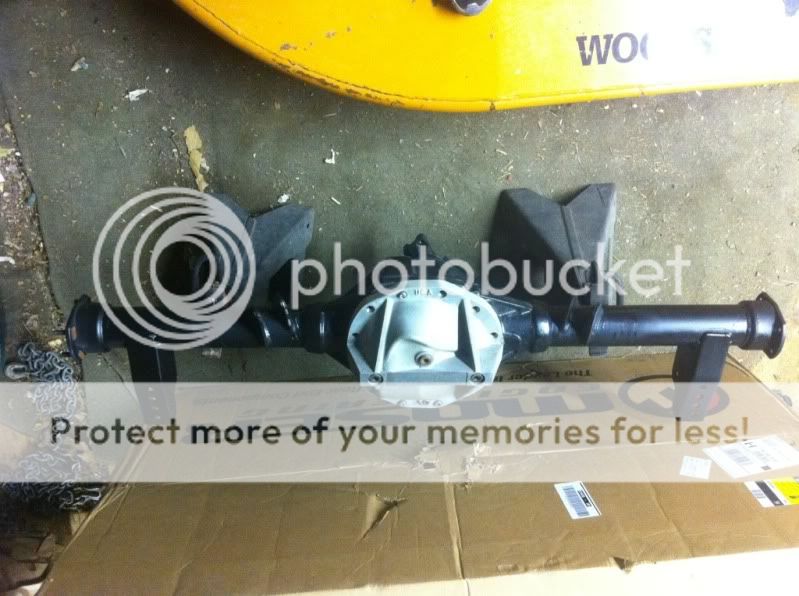
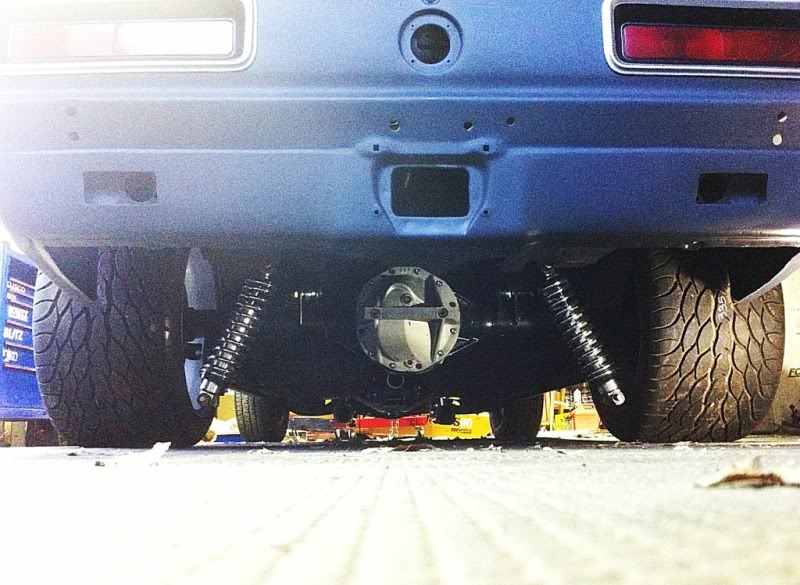
Next onto the rear. I had my wonderful wife who has not seen me to much recently go over to the auto parts store while I was at work and pick me up a new 12 bolt gasket, some hi-temp sealer, and two big ford end axle seals. Thanks babe. After the transmission was back in for the second time, me and my brother started on the rear. Not too bad..axles in, brakes on, cover on. Place her in and bolt it all up. Still need to tighten down all the bolts for the links but other than that it’s done back there.
Some where in-between all of that I got my stock cluster pulled apart and semi-mounted my speedo and tach in the housing. I’m going to give it all to Timmy this week so he can finish it up nice with some repairs to the cracked areas and give it a nice coat of black paint..here is some pictures.

In other news.. I sent back my old tank to ricks so the new tank should be coming soon. Carl is sending the controller over, that should be here today. The gauges I bought where all electrical other than the speedo and oil pressure. I didn’t want to run an oil line into the car so on Sunday I bought a electrical oil pressure gauge to match my others. I want to run this to the back of the stock port behind the intake. I made sure I bought the adapter also. Did a dry fit late last night to realize that I need some sort of 45 or 90 degree fitting as the autometer sensor is huge and hits the intake. So that has to be figured out. The fuel line and fittings have also been ordered now that the tank situation is final, so they will be coming soon. The interior wiring harness is on back order from AAW and should be going out sometime early next week, this is next of big things to do on the list. More to come soon...Still need to order:
55-60lbs fast injectors
Radiator/fan set up/hoses
Engine wiring/sensor - PSI
Battery
Battery tray/wiring/solenoid/kill switch
So it has been a long last couple of days. Many hours spent cursing, laughing, reading directions, and on the phone with Josh and Gray at American powertrain. Can’t say enough about them and the after hour hotline. Has been a huge help for me all around. Both those guys are A++++. So we received the shim for the hydromax clutch assembly and the narrowed rear/axels from Moser on Tuesday. Got over there after work to put the transmission together and also assemble the rear so that is can be a roller again. Starting on the rear and realize that the axle seals are not there...stopped that for the night.
Ok..on to the transmission. Excited to finally put it all together. Measure for the shims again..and throw the shims on and bolt it all together, place it in the car. Talked to Gray and figured out the crossmember, realized that we are missing the offset plate. He tells me he will over night it tomorrow for delivery on Thursday. Later Wednesday morning I wake up at 3:30 to give the baby his binky and I remembered that we didnt put the feed line on the clutch assembly. Well that sucks..it has to come back apart. So back over there after work on Wednesday... my dad already started pulling it all out. We finish getting it out. Take it apart, install the feed line, back together, in the car. Not to bad all things considered.
Next onto the rear. I had my wonderful wife who has not seen me to much recently go over to the auto parts store while I was at work and pick me up a new 12 bolt gasket, some hi-temp sealer, and two big ford end axle seals. Thanks babe. After the transmission was back in for the second time, me and my brother started on the rear. Not too bad..axles in, brakes on, cover on. Place her in and bolt it all up. Still need to tighten down all the bolts for the links but other than that it’s done back there.
Some where in-between all of that I got my stock cluster pulled apart and semi-mounted my speedo and tach in the housing. I’m going to give it all to Timmy this week so he can finish it up nice with some repairs to the cracked areas and give it a nice coat of black paint..here is some pictures.
In other news.. I sent back my old tank to ricks so the new tank should be coming soon. Carl is sending the controller over, that should be here today. The gauges I bought where all electrical other than the speedo and oil pressure. I didn’t want to run an oil line into the car so on Sunday I bought a electrical oil pressure gauge to match my others. I want to run this to the back of the stock port behind the intake. I made sure I bought the adapter also. Did a dry fit late last night to realize that I need some sort of 45 or 90 degree fitting as the autometer sensor is huge and hits the intake. So that has to be figured out. The fuel line and fittings have also been ordered now that the tank situation is final, so they will be coming soon. The interior wiring harness is on back order from AAW and should be going out sometime early next week, this is next of big things to do on the list. More to come soon...Still need to order:
55-60lbs fast injectors
Radiator/fan set up/hoses
Engine wiring/sensor - PSI
Battery
Battery tray/wiring/solenoid/kill switch

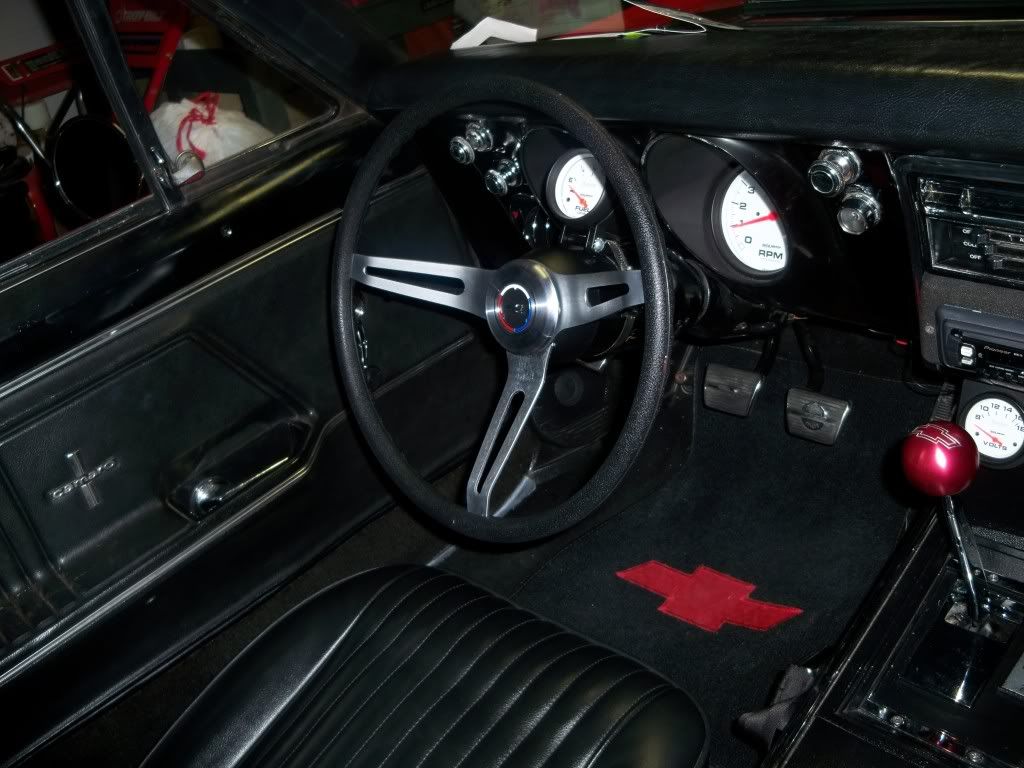
Great looking project. I run the same gauge setup in my 67. I like the white face autometer gauges, they are easy to see, and much more accurate than stock. I chose to put green LEDs in the top center part of the bezel for my turn signal indicators. I picked them up from radio shack I think.

then I put my fuel gauge on my steering column because I had a 3 gauge pod for the voltmeter, oil pressure and water temp below the dash/above the console.
then I put my fuel gauge on my steering column because I had a 3 gauge pod for the voltmeter, oil pressure and water temp below the dash/above the console.
Thread Starter
On The Tree
Joined: May 2010
Posts: 159
Likes: 0
Looks great man! I hope my car comes out as clean as yours on the interior. My only questions with the gauges is driving at night with them. I hope they are easy to see.
Found some time this weekend to try to wrap up things as I’m waiting on the fuel tank, lines, fitting and interior wiring harness. The steering links needed to be torqued and have cotter pins put in, got that all done. Some of the steering column to floor hardware needs to be ordered which will happen sooner than later. I also took the column out and scuffed it and gave it some black paint. When I bought the front accessory kit from the forums the guy sent me the power steering hoses also. I had forgotten about them until I was looking for my coil packs. I looked at them and realized that the correct fitting have already been put on...bonus!! So I was pretty stoked about that as its one less thing to worry about. That should just about wrap up the steering part of the car.
I also did a mock up for the wires and coils. I’m thinking I’m going to put the coils inside the cabin or mount them on the sub frame. I just have to figure out how to run them under the headers and have them look neat and not make contact. I think it shouldn't be too hard. Another cool surprise was that with the dynatech headers I’ve done a lot of reading stating that you need to run flexible msd wire ends for the 7 & 5 cylinders as the headers is bent up to clear the steering box. I order 2 sets of msd boots from jegs on Friday. Well while mocking up the wires I noticed that the ends of the taylor wires had msd ends on them..not putting one and two together I was adjusting a wire and pushed on the boot end. Well it bent to a 90 and stayed...sweet I already have what I need...another bonus.
I ordered a couple of items of Friday from jegs that where needed. My order consits of: (2) set of msd wire ends which I don’t think I need now, apr header bolts, an braided extender for the oil pressure gauge, a shifter boot and trim to finish up around the shifter, and for the (5) - 2 1/16" gauges I was having a hard time finding something to house that many and not look bad. Most companies only make a 2-3 pod to mount to the underside of the dash. I didn’t want to run a 2 and a 3 so I was looking for other options... Whie searching I came across a 5 pod angled piece made by autometer for a jeep that im guessing Ill have to modify some but I think it should work so I ordered that also. That shipment should be here early this week.
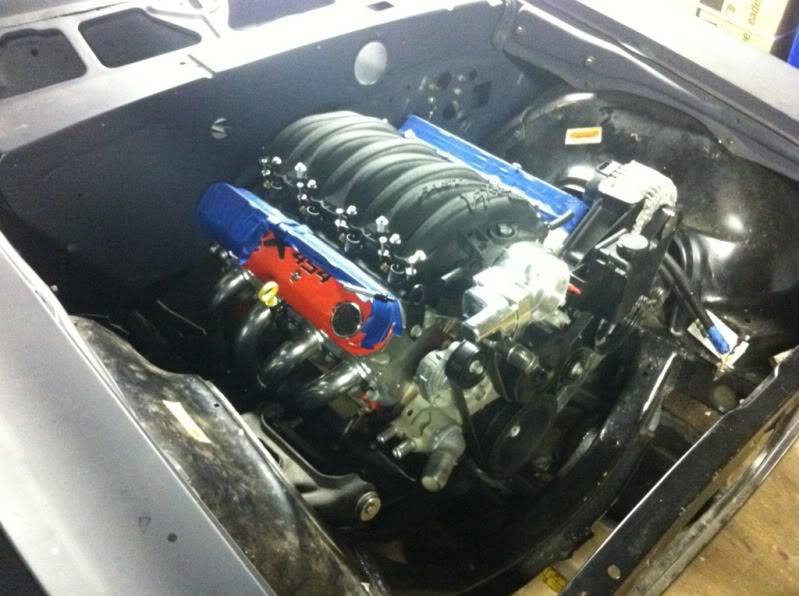
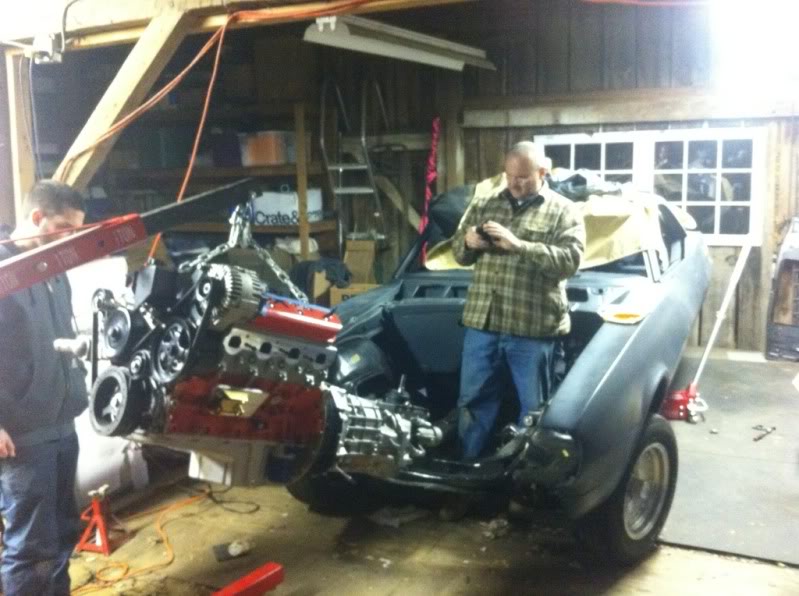
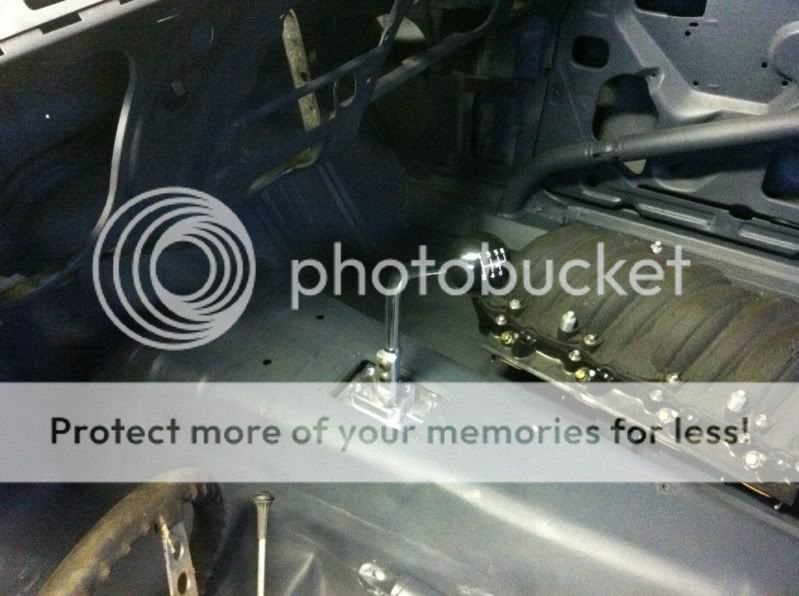
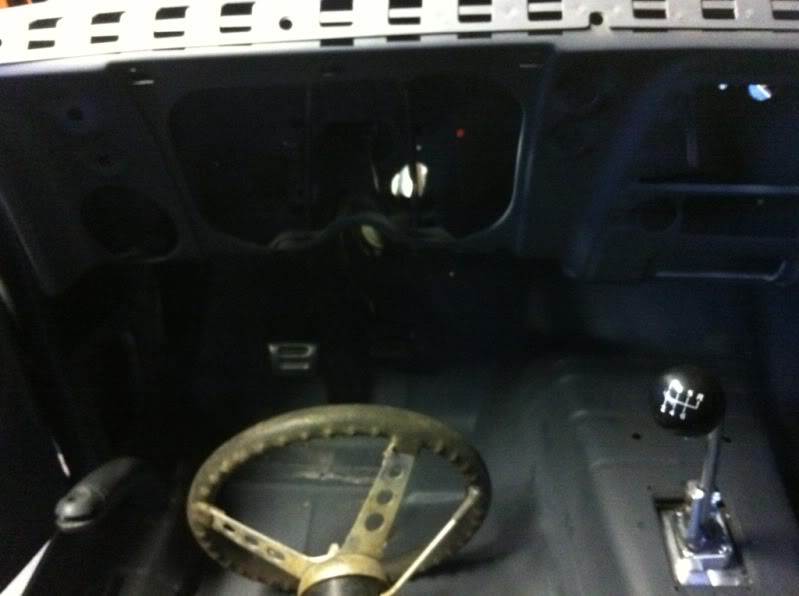
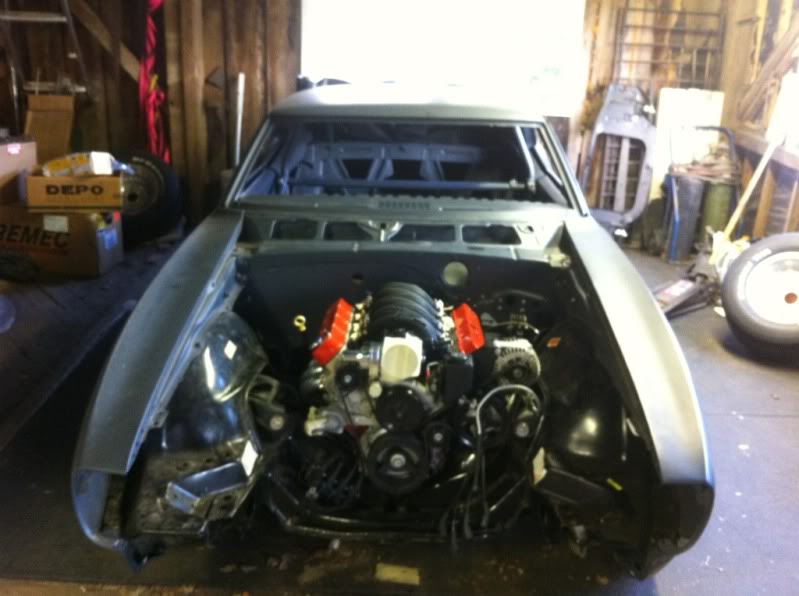
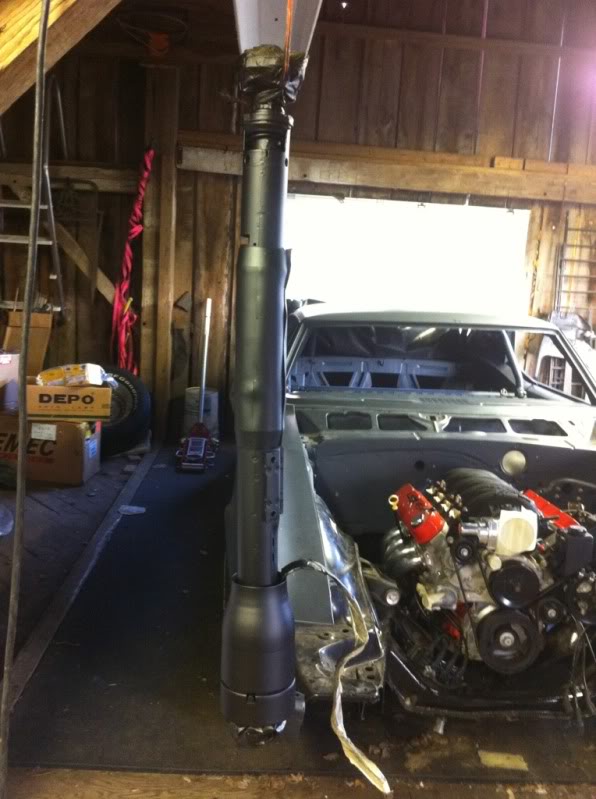
Being that I had been looking at the motor for almost a year with blue tape on it I figured that the motor and transmission are in for now why not finally uncover those valve covers and put the intake on for a final fitment, hopefully. So that is what I did. I also got a couple pictures of the rear end complete other than tightening everything. Timmy cleaned up and painted the tail tight covers, might have them done in all black as I'm not too sure about the silver we’ll see. Grabbed some shots of the shifter position too as I have had people asking. It’s the white lightening from American powertrain, really a quality piece with a ton of adjustment. Onto the pictures...

much more to come...
Found some time this weekend to try to wrap up things as I’m waiting on the fuel tank, lines, fitting and interior wiring harness. The steering links needed to be torqued and have cotter pins put in, got that all done. Some of the steering column to floor hardware needs to be ordered which will happen sooner than later. I also took the column out and scuffed it and gave it some black paint. When I bought the front accessory kit from the forums the guy sent me the power steering hoses also. I had forgotten about them until I was looking for my coil packs. I looked at them and realized that the correct fitting have already been put on...bonus!! So I was pretty stoked about that as its one less thing to worry about. That should just about wrap up the steering part of the car.
I also did a mock up for the wires and coils. I’m thinking I’m going to put the coils inside the cabin or mount them on the sub frame. I just have to figure out how to run them under the headers and have them look neat and not make contact. I think it shouldn't be too hard. Another cool surprise was that with the dynatech headers I’ve done a lot of reading stating that you need to run flexible msd wire ends for the 7 & 5 cylinders as the headers is bent up to clear the steering box. I order 2 sets of msd boots from jegs on Friday. Well while mocking up the wires I noticed that the ends of the taylor wires had msd ends on them..not putting one and two together I was adjusting a wire and pushed on the boot end. Well it bent to a 90 and stayed...sweet I already have what I need...another bonus.
I ordered a couple of items of Friday from jegs that where needed. My order consits of: (2) set of msd wire ends which I don’t think I need now, apr header bolts, an braided extender for the oil pressure gauge, a shifter boot and trim to finish up around the shifter, and for the (5) - 2 1/16" gauges I was having a hard time finding something to house that many and not look bad. Most companies only make a 2-3 pod to mount to the underside of the dash. I didn’t want to run a 2 and a 3 so I was looking for other options... Whie searching I came across a 5 pod angled piece made by autometer for a jeep that im guessing Ill have to modify some but I think it should work so I ordered that also. That shipment should be here early this week.
Being that I had been looking at the motor for almost a year with blue tape on it I figured that the motor and transmission are in for now why not finally uncover those valve covers and put the intake on for a final fitment, hopefully. So that is what I did. I also got a couple pictures of the rear end complete other than tightening everything. Timmy cleaned up and painted the tail tight covers, might have them done in all black as I'm not too sure about the silver we’ll see. Grabbed some shots of the shifter position too as I have had people asking. It’s the white lightening from American powertrain, really a quality piece with a ton of adjustment. Onto the pictures...
much more to come...

Great job! I've been following your build on lateral-g since you started on it. It's come a LONG WAY and looks awesome. Nice wheels too!
I may have missed it in your notes here, but did you dial in the bellhousing and check for runout? I know a lot of guys are having to use the offset dowels on them to get it centered correctly.
I may have missed it in your notes here, but did you dial in the bellhousing and check for runout? I know a lot of guys are having to use the offset dowels on them to get it centered correctly.
