
1973 RS Camaro LSX Swap
 06-19-2010, 08:21 PM
#21
On The Tree

Join Date: Oct 2008
Posts: 178
Likes: 0
Received 0 Likes
on
0 Posts
Keep the information flow coming, this is really helping me a lot. I am putting things together so I can get a 6.0 in my 70 camaro drag car.
The motor I have now is a 1999 6.0L so I have to come up with a different set of heads, I don't want to run the 317 cast iron heads that are on it now.
I also want to run a carb, MSD ingition setup ect.
Have you thought about how you are going to run your accesories? Only thing I will need to run is my alternator and water pump. Haven't got the foggiest how I am going to fab that up to make work.
 06-19-2010, 08:48 PM
#22
Great work on the clean up and detailing of the under body, firewall and front clip. What method did you use to strip the underbody and fireway ?
I have just been looking at some plates, both standard and 1" set back plates.. and was talking to another forum member about the Edelbrock (they are 1" setback) and he stated that the plates are 1/2" but that the motor mounts are 3/8" lower than the four engine holes to compensate for thicker plates (much like the Good Car Shop set you showed). How much offset are those Car Shop ones ?
I have just been looking at some plates, both standard and 1" set back plates.. and was talking to another forum member about the Edelbrock (they are 1" setback) and he stated that the plates are 1/2" but that the motor mounts are 3/8" lower than the four engine holes to compensate for thicker plates (much like the Good Car Shop set you showed). How much offset are those Car Shop ones ?
06-19-2010, 09:04 PM
#23

Keep the information flow coming, this is really helping me a lot. I am putting things together so I can get a 6.0 in my 70 camaro drag car.
The motor I have now is a 1999 6.0L so I have to come up with a different set of heads, I don't want to run the 317 cast iron heads that are on it now.
I also want to run a carb, MSD ingition setup ect.
The motor I have now is a 1999 6.0L so I have to come up with a different set of heads, I don't want to run the 317 cast iron heads that are on it now.
I also want to run a carb, MSD ingition setup ect.
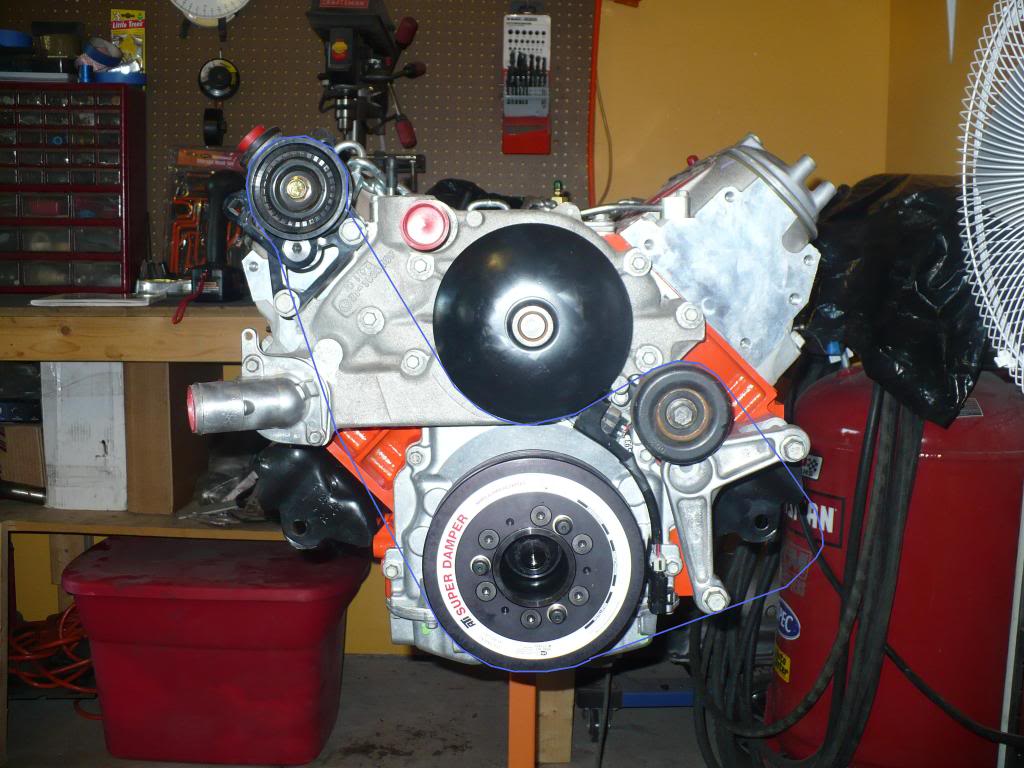
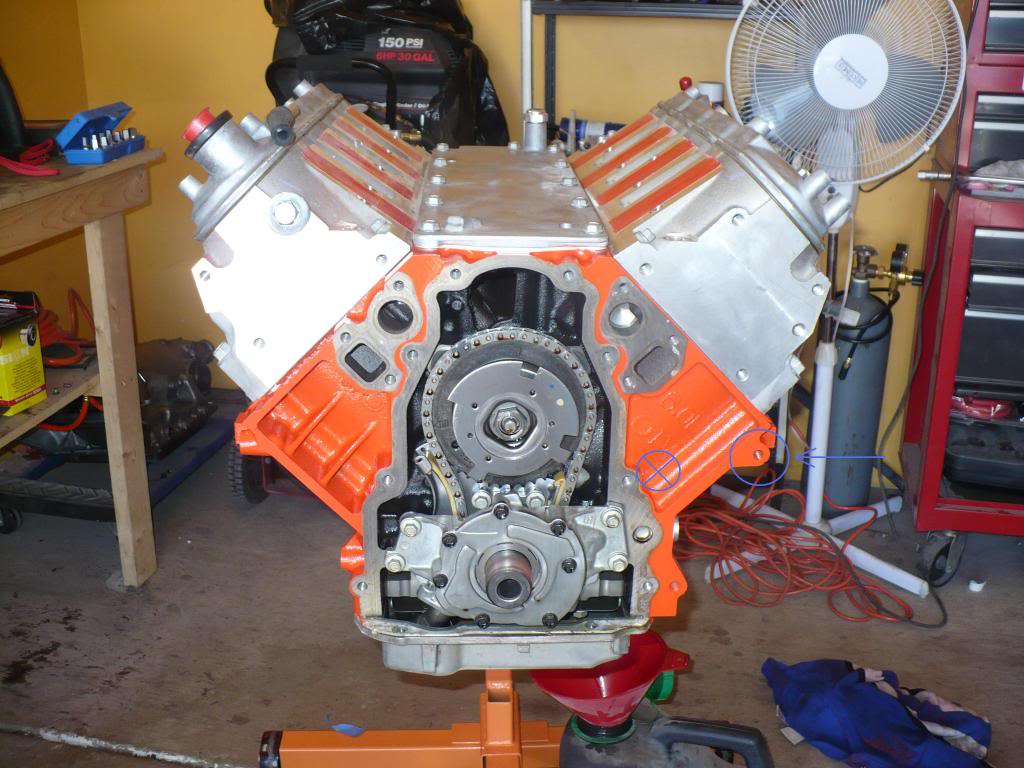
The only challenges I know of with running the F-body accessories for these swaps are that some guys run into having slight contact between the pitman nut/centerlink ball stud and the alternator. Most just grind it down a little and are fine. Others never have the issue. The other thing with an iron block is that two of the holes used to mount the alternator bracket to the block aren't there on the iron block. However, you really only need two of them. One is already there and the other one just needs to be drilled and tapped. The circled area with the arrow pointing to it is where you'll need to drill and tap a hole. The circle with an "X" through it is where there is another hole on the aluminum blocks but there's no way to add this hole on the iron block since the boss isn't there. Refer back to the pic showing the alternator bracket bolted to my block and you'll see I simply don't use this hole. This is done all the time when guys swap iron block 370s and 408s into their 4th gen f-bodys. I hope this all makes sense.
Last edited by GC99TA; 06-26-2010 at 11:12 PM.
06-19-2010, 09:12 PM
#24
I have just been looking at some plates, both standard and 1" set back plates.. and was talking to another forum member about the Edelbrock (they are 1" setback) and he stated that the plates are 1/2" but that the motor mounts are 3/8" lower than the four engine holes to compensate for thicker plates (much like the Good Car Shop set you showed). How much offset are those Car Shop ones ?
Last edited by GC99TA; 06-19-2010 at 09:18 PM.
06-19-2010, 09:45 PM
#25
On The Tree
Join Date: Oct 2008
Posts: 178
Likes: 0
Received 0 Likes
on
0 Posts
Man, I wish you lived close to me, I would love to be able to see this stuff first hand to get my mind wrapped around everything I am going to need done for this swap.
I do have a question about the ATI dampner, are you going to buy another pully to attach to it or what??
I haven't really gotten down and looked the 6.0 motor I have over real close, for some reason I was thinking that the factory dampner and front pully were one piece.
I do have a question about the ATI dampner, are you going to buy another pully to attach to it or what??
I haven't really gotten down and looked the 6.0 motor I have over real close, for some reason I was thinking that the factory dampner and front pully were one piece.
06-19-2010, 09:52 PM
#26
Man, I wish you lived close to me, I would love to be able to see this stuff first hand to get my mind wrapped around everything I am going to need done for this swap.
I do have a question about the ATI dampner, are you going to buy another pully to attach to it or what??
I haven't really gotten down and looked the 6.0 motor I have over real close, for some reason I was thinking that the factory dampner and front pully were one piece.
I do have a question about the ATI dampner, are you going to buy another pully to attach to it or what??
I haven't really gotten down and looked the 6.0 motor I have over real close, for some reason I was thinking that the factory dampner and front pully were one piece.
You're correct. All of the LS motors' dampners also act as the pulley. The ATI is no different. You probably can't see it, but it's a pulley as well. The three bolts on the front of it are there so you could bolt additional drive pullies to it; I guess to drive things like external oil pumps or who knows what else.
06-19-2010, 10:24 PM
#28
You probably could easily attach a v-belt pulley to it. The only problem I see is how far out the alternator would have to be spaced to line up with it unless the pulley was basically flat with no bell to it. You really don't have the option of recessing or reversing the pulley back over the dampner to space it backwards because you'd lose the drivebelt for your water pump. I guess you could do something like that if you went with an electric water pump and were only driving the alt off the crank, but boy that'd still have to be one huge pulley to recess back over the dampner.
I'd just keep it simple and stick with the factory stuff if you can.
06-19-2010, 10:35 PM
#29
On The Tree
Join Date: Oct 2008
Posts: 178
Likes: 0
Received 0 Likes
on
0 Posts
I was thinking about the electric water pump route, or stay with the factory type stuff.
What I haven't seen yet is someone to use the truck stuff and just run the water pump and alternator. I would like to see how someone tackled that using factory truck stuff.
The way it is, this thing is going to nickel and dime me to death.
I was thinking about getting a set of L92 heads setup for 650 lift, flycut the pistons if they need it, run the super victor or victor Jr, MSD 6010 or 6012 (which ever one is for the 99 model 6.0l).
What really sucks around where I live is that nobody is doing any of these LSx motors so I am kindof on my own with searching the net and finding guys like you and those here on the board.
06-19-2010, 10:47 PM
#30
I was thinking about the electric water pump route, or stay with the factory type stuff.
What I haven't seen yet is someone to use the truck stuff and just run the water pump and alternator. I would like to see how someone tackled that using factory truck stuff.
The way it is, this thing is going to nickel and dime me to death.
What I haven't seen yet is someone to use the truck stuff and just run the water pump and alternator. I would like to see how someone tackled that using factory truck stuff.
The way it is, this thing is going to nickel and dime me to death.
I'm in the same situation and that's not always a bad thing. Part of the appeal of this swap for me is the "different" factor. There's nothing like someone walking up to your open hood at the drag strip, peering in and saying "What the hell is that?" This will be especially true with the carb set up.
Last edited by GC99TA; 07-30-2010 at 05:22 PM.
 06-21-2010, 08:48 PM
#33
Well, I got two great e-mails today; both containing tracking info for parts I need to move on with my build. First, my valvesprings and pushrods are no longer on backorder and shipped from Thunder today. They'll be here on Thursday. Also, my new Car Shop Inc plates shipped today and will be here on Friday. So with any luck the engine will be sitting in the car by the end of the weekend.......but time will tell....
06-21-2010, 10:44 PM
#34
Teching In
Join Date: Mar 2010
Location: Nebraska
Posts: 24
Likes: 0
Received 0 Likes
on
0 Posts
I was thinking it and bczee asked it. How long did this take you to do? Also, you're doing a phenomenal job. Nice work!
06-21-2010, 10:54 PM
#35
Thanks man! I appreaciate it. I couldn't really say for sure how long it took, but I'd guess I had around 16 to 20 hours in stripping everything down to the bare metal. I usually spend around 8 hours working in the garage on Saturdays, and if I remember correctly, I was probably at it for at least two weekends. Honestly, removing the undercoating was the real work and took the majority of the time. The paint came off pretty easy with the aircraft stripper and wire wheels. Either way, that's one job I'm glad is done!
06-21-2010, 11:00 PM
#36
On The Tree

Join Date: Feb 2007
Posts: 156
Likes: 0
Received 0 Likes
on
0 Posts

Car is looking great man!!!Im doing a LS3 swap into my 78 nova right now.Got some useful info from your thread here.The adapter plates I have are 3/8" thick also.They are from Speed Way Motors.Was planning on using the factory mounts with poly inserts also....Im gonna go ahead and grind the hump off the back of the factory clamshell mount and see how it goes.Let us know how it fits with the Car Shop plates.If its better I may machine my down to 5/16" and try it again.
06-21-2010, 11:10 PM
#37
Car is looking great man!!!Im doing a LS3 swap into my 78 nova right now.Got some useful info from your thread here.The adapter plates I have are 3/8" thick also.They are from Speed Way Motors.Was planning on using the factory mounts with poly inserts also....Im gonna go ahead and grind the hump off the back of the factory clamshell mount and see how it goes.Let us know how it fits with the Car Shop plates.If its better I may machine my down to 5/16" and try it again.
06-26-2010, 02:15 PM
#38
My Patriot spring kit and Comp pushrods showed up on Thursday so I was able to get them swapped in. But first, I installed lightweight checker springs and checked my piston to valve clearance. Once I determined I had at least .100 on both the intake and exhaust I didn’t bother to go any further.
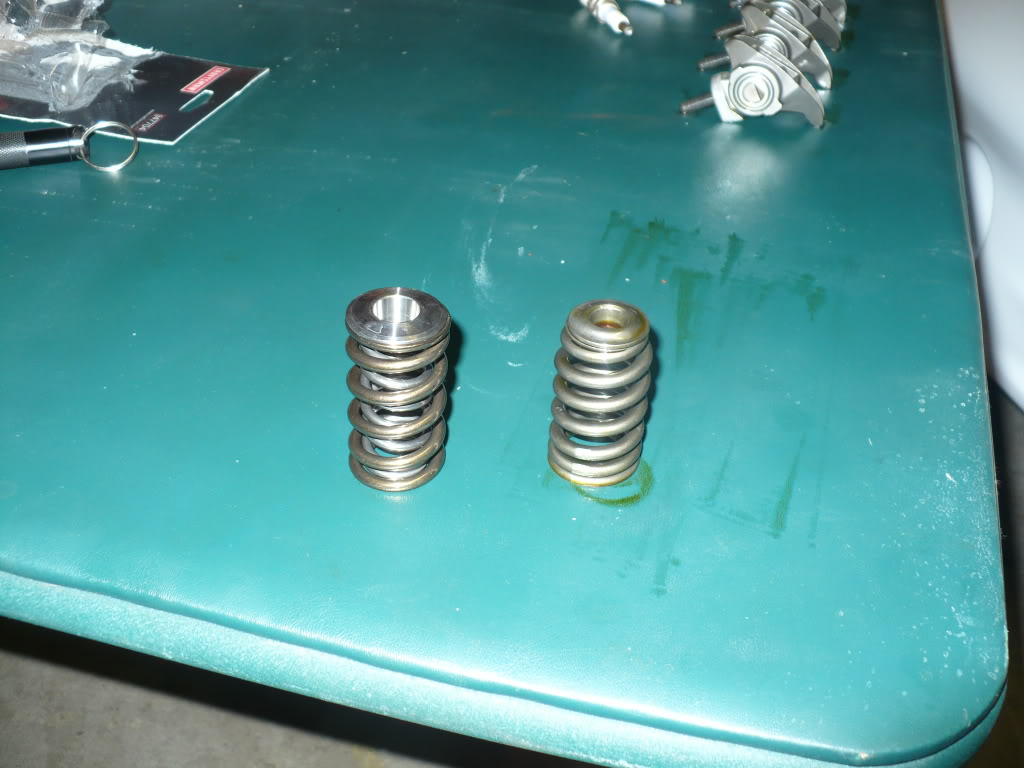
Here’s some comparison shots of the factory beehive springs next to the Patriot Extreme Dual Golds. The Patriot springs are rated at 155lbs of seat pressure when installed at 1.80, 410lbs open, and are good to .660 lift. These springs should be a little bit of overkill for my cam, but I wanted a good heavy spring due to the larger 2.16 L92 intake valves. I didn’t have a good way to weigh them but the larger titanium retainers for the Patriot springs are significantly lighter than the smaller factory steel beehive spring retainers.
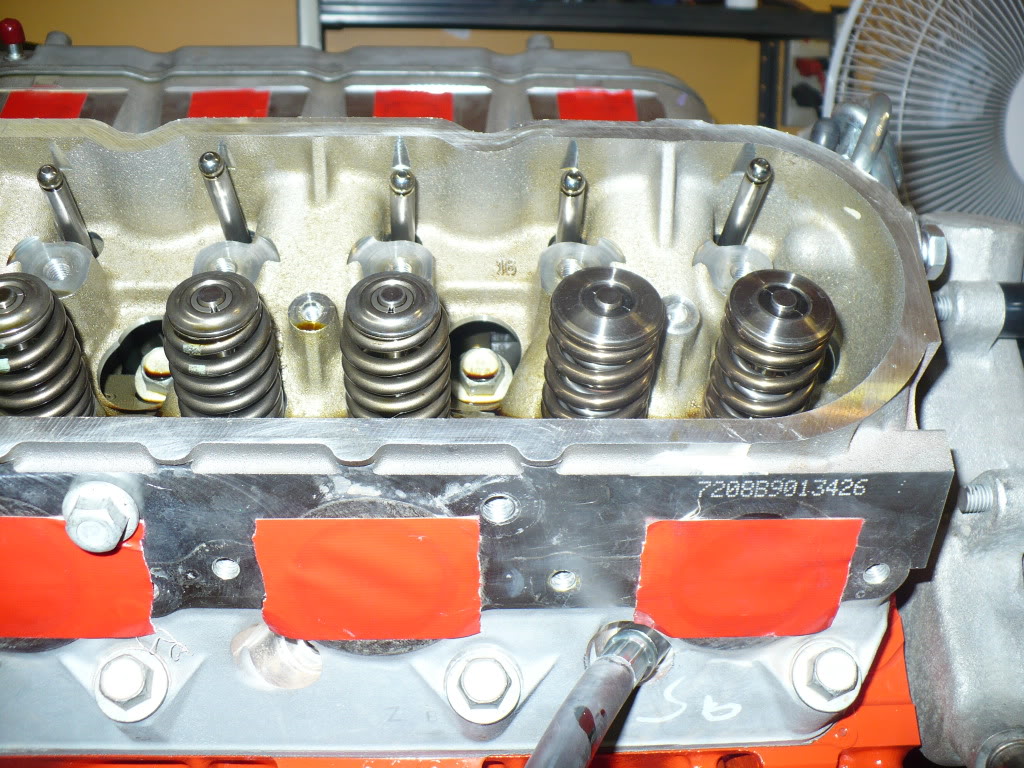
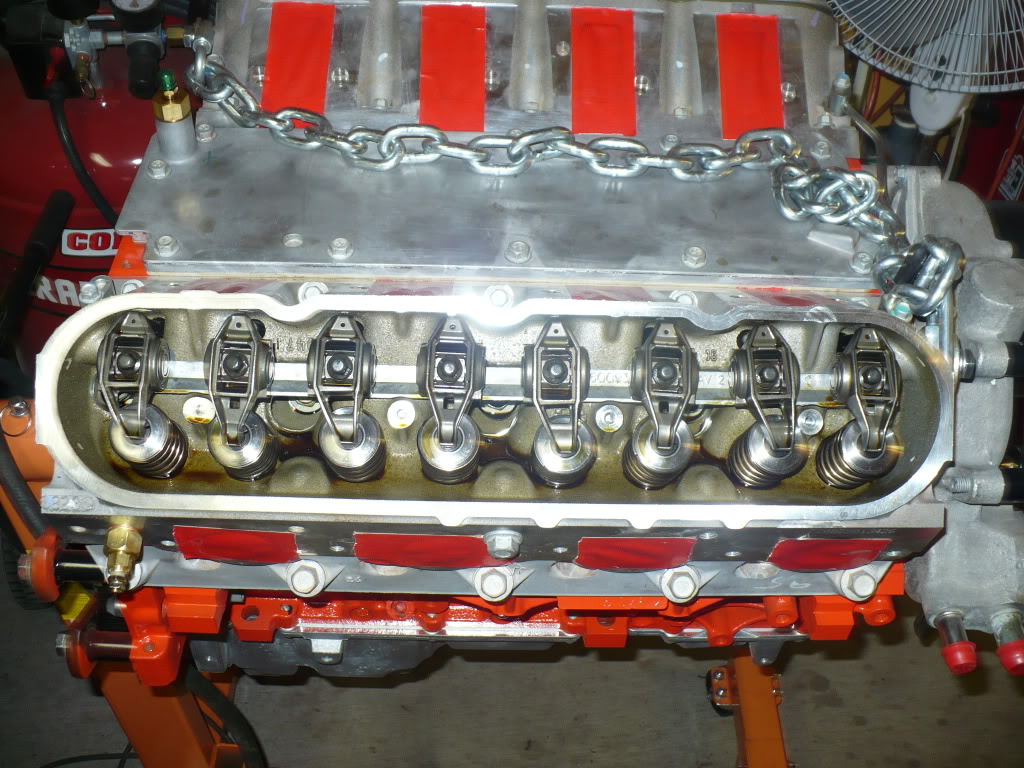
Here’s a shot of all the new springs installed on one side and a comparison of a factory pushrod with the one piece hardened Comp pushrod.

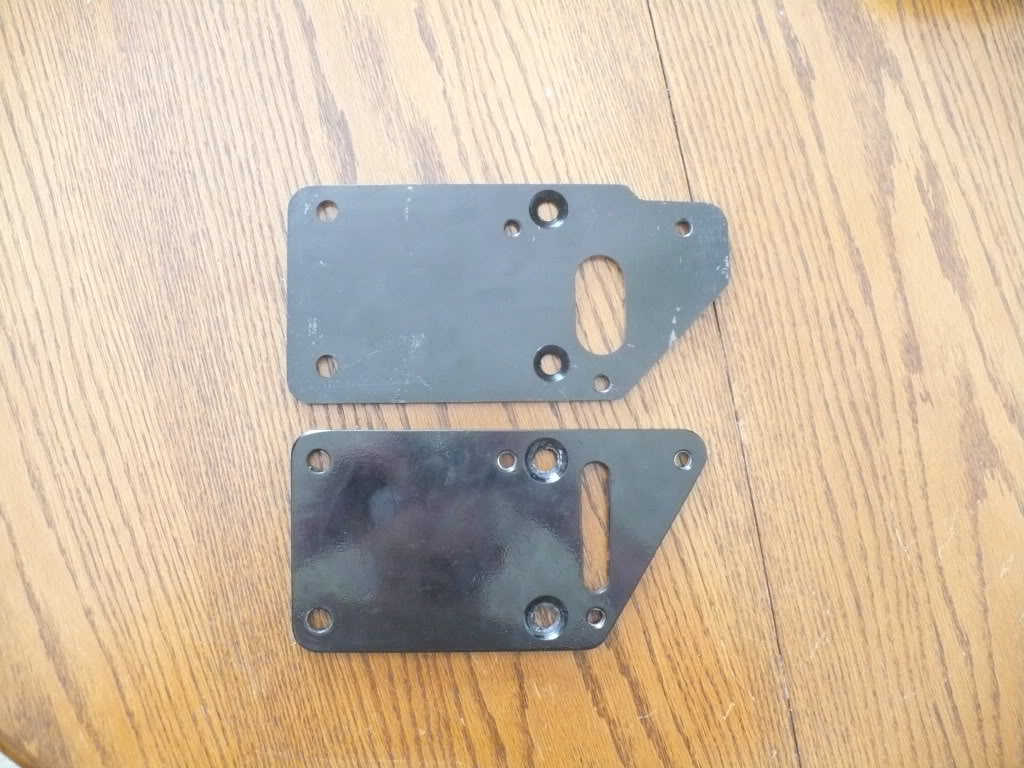
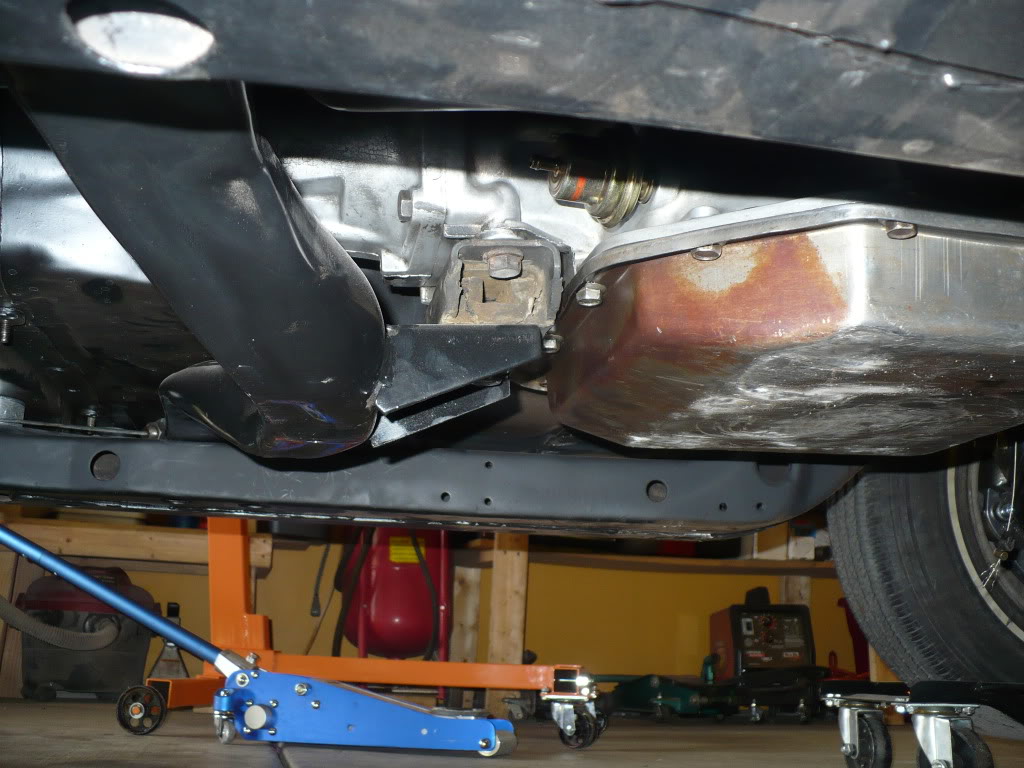
Friday afternoon my new Car Shop 1-inch set back mounting plates arrived. All I can say is these plates were exactly what I needed to fix my issues! (Thanks MeanYellowZ!) Here’s a Car Shop plate (on top) compared to one of my old plates. The Car Shop plates are thinner measuring a little less than 5/16th (.305) and the motor mount holes are at least 3/8in lower on the plates.
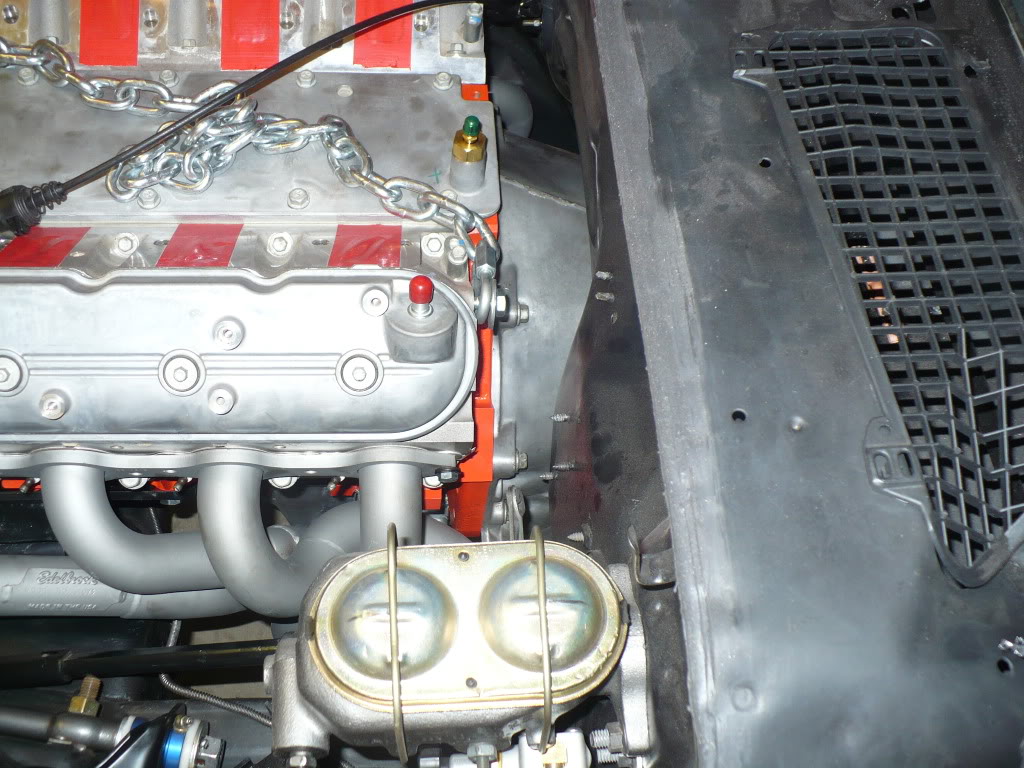
The lower mounting hole location did cause a clearance issue on the passenger side of the block. I had to cut a notch in the motor mount to clear a mounting boss on the block. This wasn’t an issue on the driver’s side.
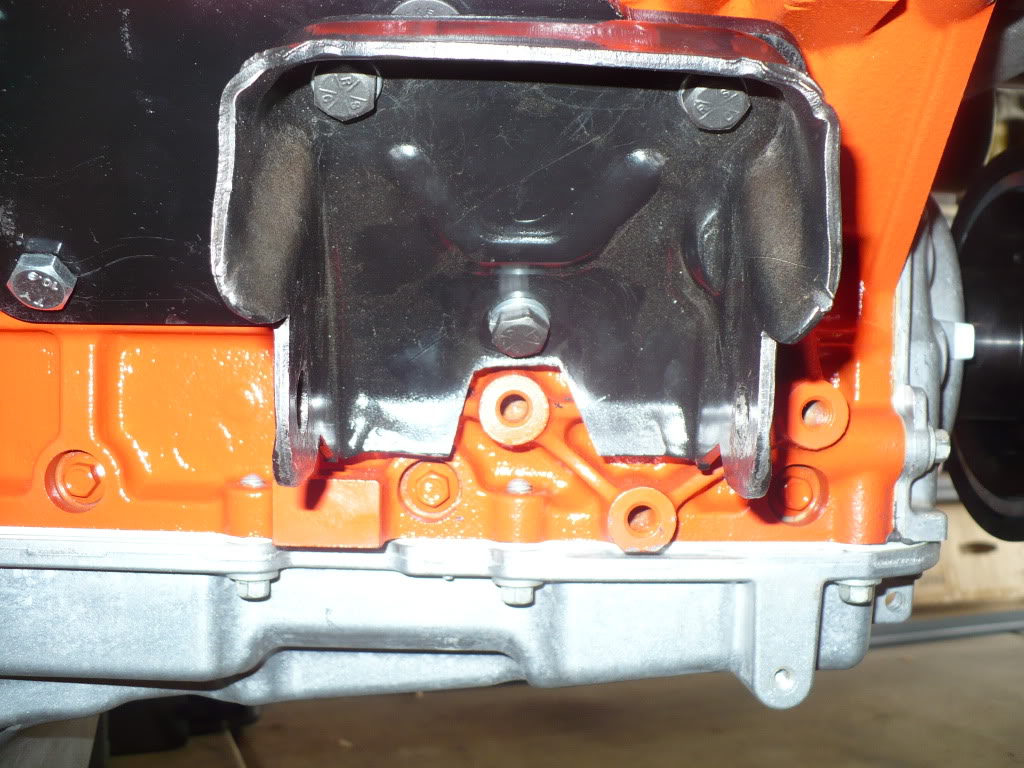
Once I had the mount situation taken care of, I was ready to set the engine down in the car. I can’t tell you how happy I was when it dropped right into place with no issues whatsoever! Everything lined up perfectly just like it was a factory set up.

Then I was really curious to see where the transmission would end up relative to the stock cross member location. So I pulled the motor back out and since I don’t have my TH400 here yet, I decided to drop it back in with my TH350 attached.
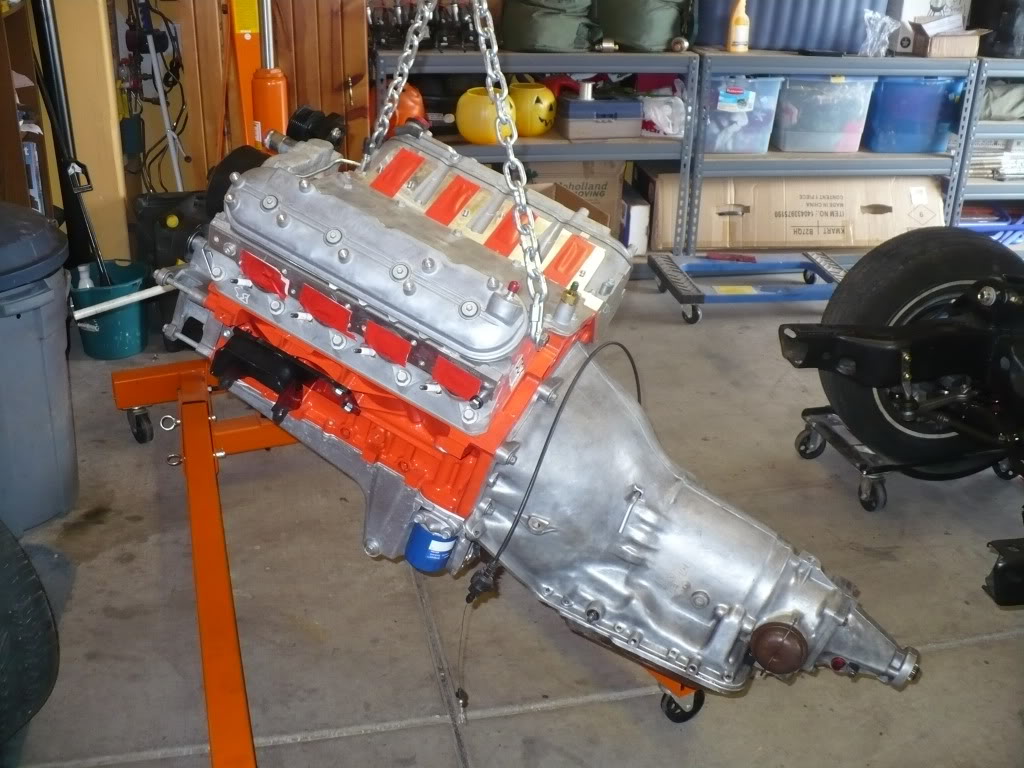
I was really happy again to see that these mounts put the transmission in the exact stock location. Everything bolted right up with no alignment issues. Even though I won’t be running the TH350, this at least tells me that I should be able to pick up a factory TH400 cross member and have it bolt right in too. My other option would be to cut the mounting pad off the front of my TH350 cross member and weld it on to the back side. I’m not sure which option I’m going to go with, but either way I’m glad the cross member will be able to bolt into the factory location.
Here’s some comparison shots of the factory beehive springs next to the Patriot Extreme Dual Golds. The Patriot springs are rated at 155lbs of seat pressure when installed at 1.80, 410lbs open, and are good to .660 lift. These springs should be a little bit of overkill for my cam, but I wanted a good heavy spring due to the larger 2.16 L92 intake valves. I didn’t have a good way to weigh them but the larger titanium retainers for the Patriot springs are significantly lighter than the smaller factory steel beehive spring retainers.
Here’s a shot of all the new springs installed on one side and a comparison of a factory pushrod with the one piece hardened Comp pushrod.
Friday afternoon my new Car Shop 1-inch set back mounting plates arrived. All I can say is these plates were exactly what I needed to fix my issues! (Thanks MeanYellowZ!) Here’s a Car Shop plate (on top) compared to one of my old plates. The Car Shop plates are thinner measuring a little less than 5/16th (.305) and the motor mount holes are at least 3/8in lower on the plates.
The lower mounting hole location did cause a clearance issue on the passenger side of the block. I had to cut a notch in the motor mount to clear a mounting boss on the block. This wasn’t an issue on the driver’s side.
Once I had the mount situation taken care of, I was ready to set the engine down in the car. I can’t tell you how happy I was when it dropped right into place with no issues whatsoever! Everything lined up perfectly just like it was a factory set up.
Then I was really curious to see where the transmission would end up relative to the stock cross member location. So I pulled the motor back out and since I don’t have my TH400 here yet, I decided to drop it back in with my TH350 attached.
I was really happy again to see that these mounts put the transmission in the exact stock location. Everything bolted right up with no alignment issues. Even though I won’t be running the TH350, this at least tells me that I should be able to pick up a factory TH400 cross member and have it bolt right in too. My other option would be to cut the mounting pad off the front of my TH350 cross member and weld it on to the back side. I’m not sure which option I’m going to go with, but either way I’m glad the cross member will be able to bolt into the factory location.
06-26-2010, 02:16 PM
#39
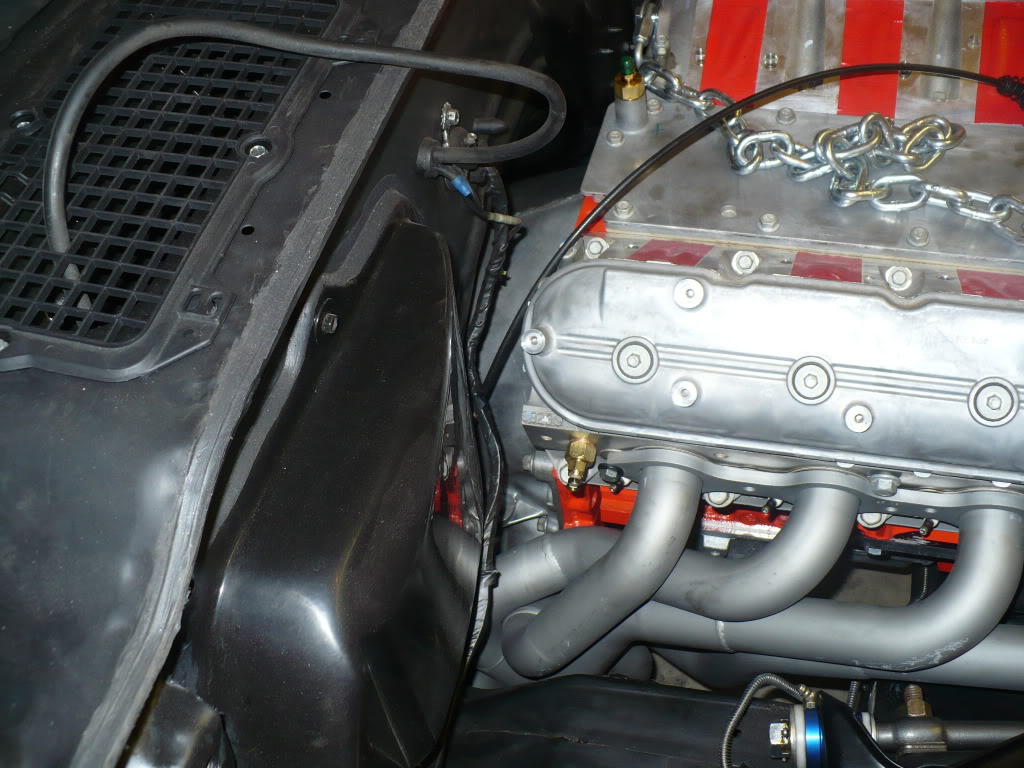
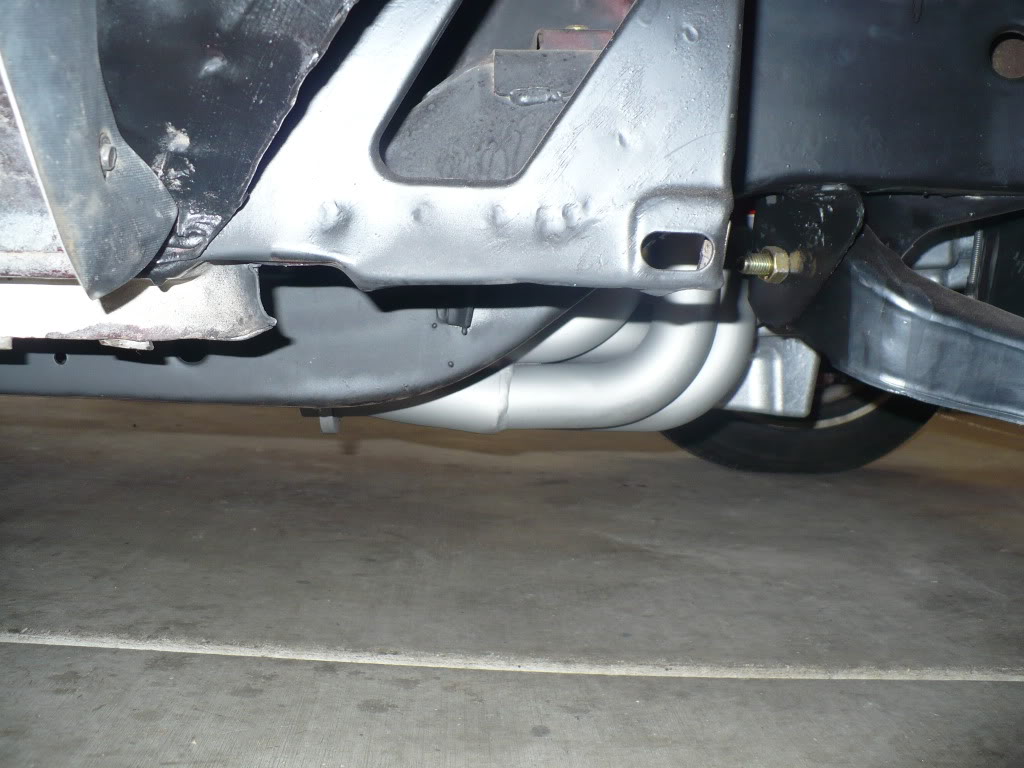
Next I wanted to check my header clearance again since the engine was now in its final location. Everything checked out great. There is still plenty clearance everywhere and I don’t think they hang too low. They’re not right up against the floor boards, but I don’ think I’d want them much higher. The last three pictures were taken with the car down off of the wheel dollies and sitting on it’s tires. Measured from the lowest point on the headers, I have 6 3/4 inches of ground clearance. Also, my oil pan hangs about two inches below the cross member and has 6 ˝ inches of clearance at it’s lowest point.
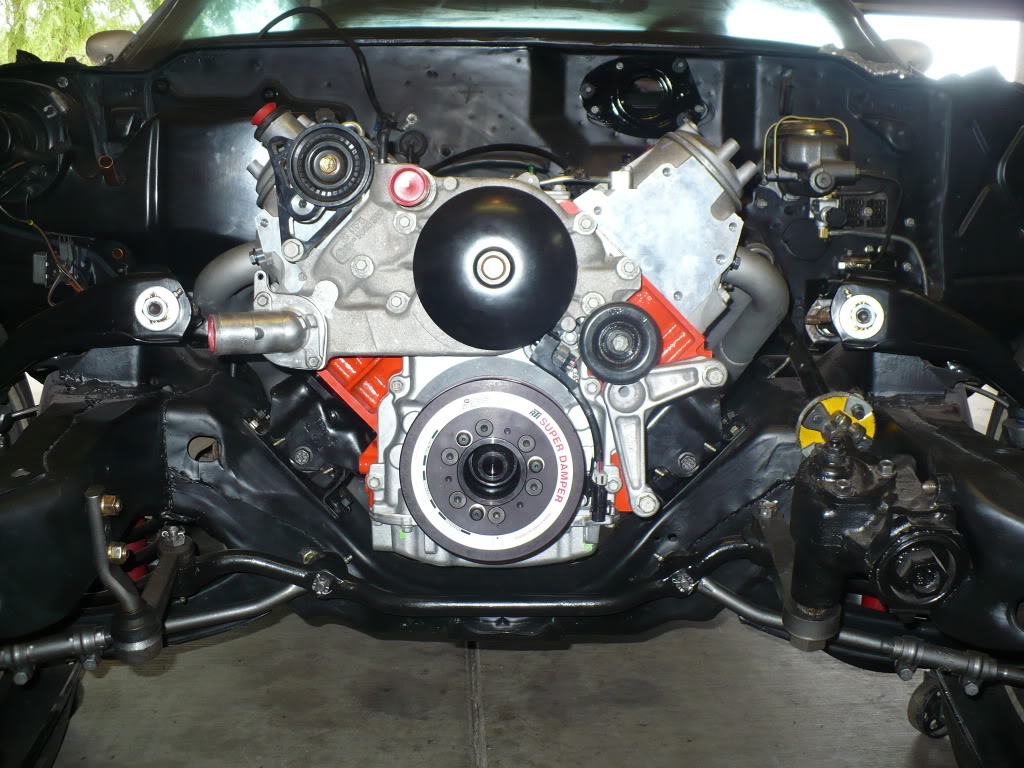
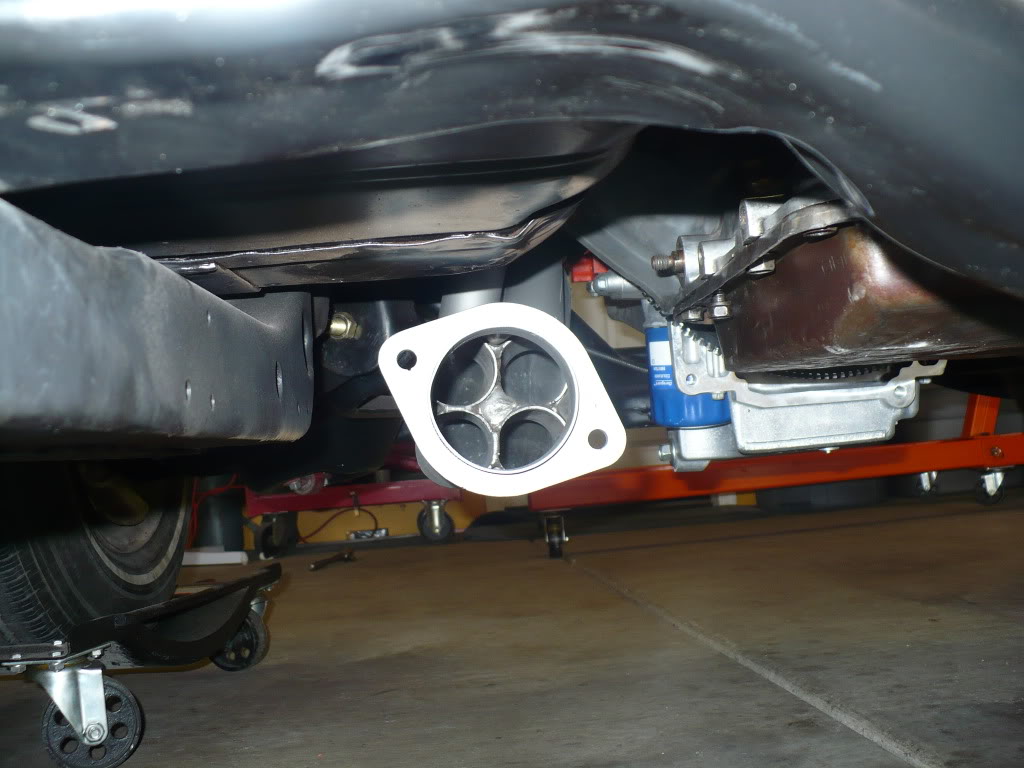
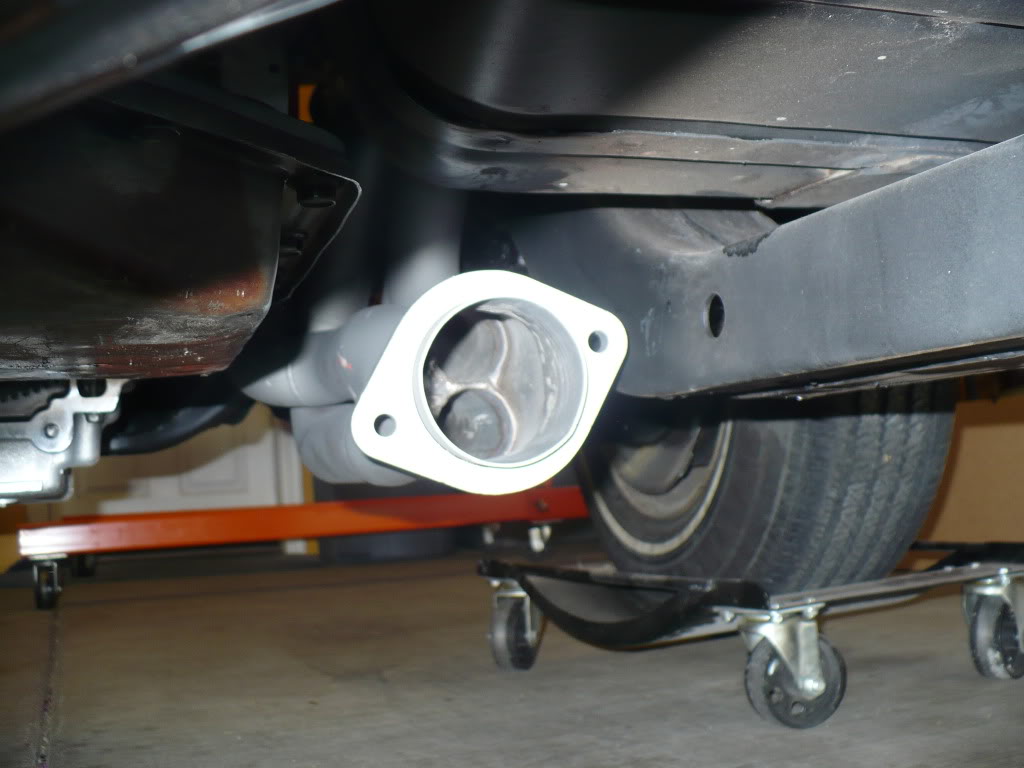


The car is still sitting a little high in the front so I may lose just a little more ground clearance once all of the weight (sheet metal) is back on the car or if I need to cut the Moroso springs a little bit to adjust my stance, but it’s nothing I’m too concerned with. The next hurdle I need to get past is the possible alternator/pitman arm clearance issue. I don’t have the alternator here yet that I’m going to use so if I get bored enough I may pull the one off of my 99 Trans Am just to test the clearance. More to follow on that I guess.
The car is still sitting a little high in the front so I may lose just a little more ground clearance once all of the weight (sheet metal) is back on the car or if I need to cut the Moroso springs a little bit to adjust my stance, but it’s nothing I’m too concerned with. The next hurdle I need to get past is the possible alternator/pitman arm clearance issue. I don’t have the alternator here yet that I’m going to use so if I get bored enough I may pull the one off of my 99 Trans Am just to test the clearance. More to follow on that I guess.