
71 Nogo slowly getting a boring lq4/4l80 build

 08-18-2011, 08:20 PM
#102

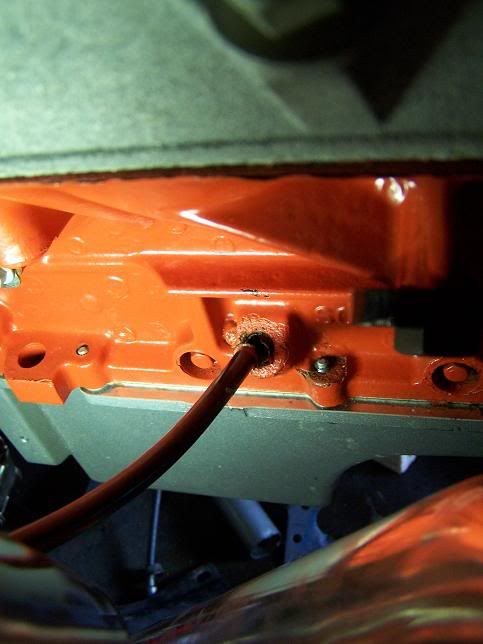
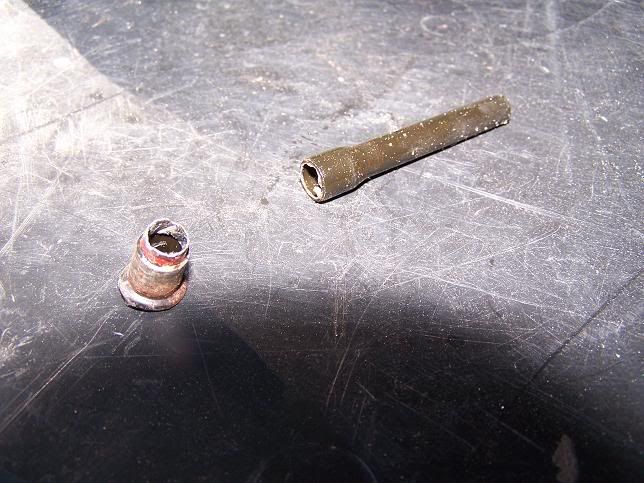
Got the tranny fully bolted down, bolted on the headers and broke off my oil dipstick trying to get the passengers side header on. Is there a way I can get the remainder out without getting metal in the oil pan requiring me to pull the motor again? 
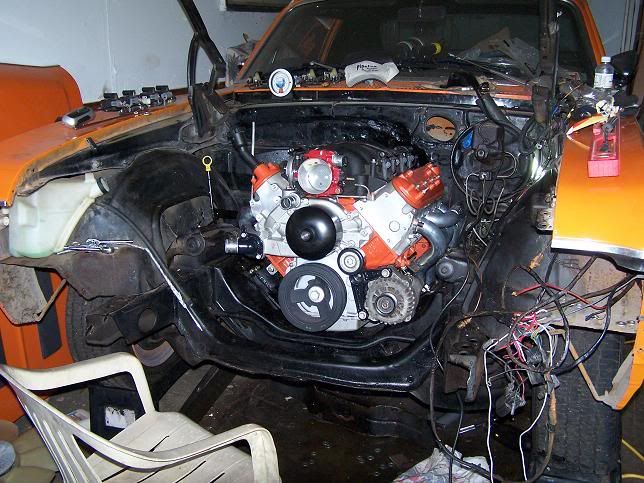
Headers fit pretty good, only clearance issue is with the shift arm on the steering column. It hits the #3 header tube. The o2 sensors hopefully will clear the tranny pan
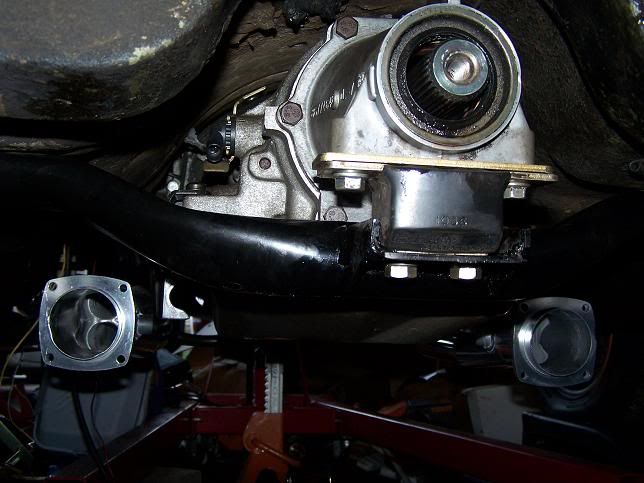
Also had to trim the drivers side engine mount
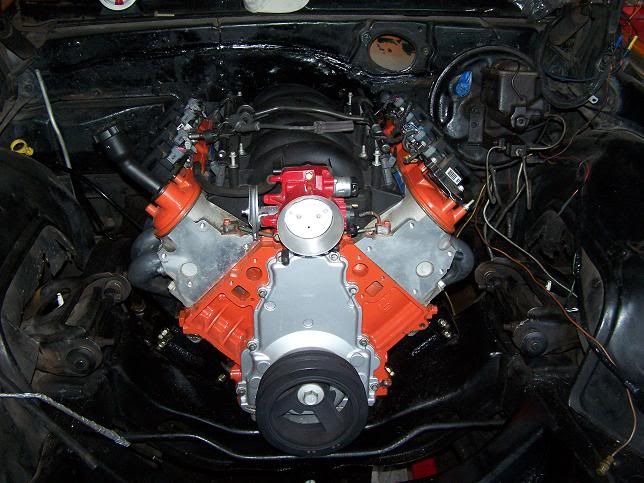
and now it is starting to look like a motor again. Will probably need to do custom spark plug wires and a coil relocation.
Headers fit pretty good, only clearance issue is with the shift arm on the steering column. It hits the #3 header tube. The o2 sensors hopefully will clear the tranny pan
Also had to trim the drivers side engine mount
and now it is starting to look like a motor again. Will probably need to do custom spark plug wires and a coil relocation.
08-18-2011, 11:09 PM
#103

I learned this from my build. You can get the tool from Snap On to Sears to Harbour freight. You guessed it, I used harbour freight.
See this:
https://ls1tech.com/forums/conversio...l#post14662110
Good luck.
See this:
https://ls1tech.com/forums/conversio...l#post14662110
Good luck.
08-19-2011, 04:12 PM
#105

I think you could get a straight blade screwdriver and sort of gently tap it into the hole. After you have it in give it a twist and pull at the same time. This should free it up. I know we have used flat files on the rear intake water outlets on the mid ninties 350 with great success but I wouldnt dare say to do this on the lower end. I also agree with futureuser, get a screw extractor, the tapered left hand thread style. I would be sure not to break that off in there though. Good luck and let us know what you did to resolve this problem.
08-21-2011, 06:40 PM
#106
Thanks for the suggestions. I went with what futureuser's suggestion and used one of my screw extractors, and it had loosened and would turn with ease, but would not allow me to pull it out. Kept at it, pulling/turning/rocking it and eventually it came out, but only part of it . I had to lift the motor up so I could remove the pan, and remove the remaining piece. Once I had a big enough gap to reach the other piece, it pulled right out, and then decided to remove the o-ring and then that fell in the oil pan, and since the pan was not fully removed, it took me a while to feel it and remove it. Still, not a big deal, just lots of little problems. Now I need to buy a new one.
Then I put the passengers side header back on, then decided to put the 85 Monte Carlo SS steering box in, and it looks like I had lost one of the bolts for the steering box, but the two will do for now as long as I don't forget to buy another. The rag joint was a little pain to get lined up, and then it looks like I had lost the castle nut for the pitman arm also. I hate it when I take cars apart and ALWAYS loose things along the way
Tried cleaning the aluminum alternator bracket, but could not get it to look like new, so painted it, added the water pump, alternator, and thermostat. Alternator looks like poo, but don't have the right sockets to take it apart and paint that too, so it will just have to do.
that is all for now.....
. I had to lift the motor up so I could remove the pan, and remove the remaining piece. Once I had a big enough gap to reach the other piece, it pulled right out, and then decided to remove the o-ring and then that fell in the oil pan, and since the pan was not fully removed, it took me a while to feel it and remove it. Still, not a big deal, just lots of little problems. Now I need to buy a new one.Then I put the passengers side header back on, then decided to put the 85 Monte Carlo SS steering box in, and it looks like I had lost one of the bolts for the steering box, but the two will do for now as long as I don't forget to buy another. The rag joint was a little pain to get lined up, and then it looks like I had lost the castle nut for the pitman arm also. I hate it when I take cars apart and ALWAYS loose things along the way
Tried cleaning the aluminum alternator bracket, but could not get it to look like new, so painted it, added the water pump, alternator, and thermostat. Alternator looks like poo, but don't have the right sockets to take it apart and paint that too, so it will just have to do.
that is all for now.....
08-21-2011, 09:59 PM
#107
Ooops, 'hope I didn't give bad advice. It just seemed it would work. 'Good you got it out. I'm happy you're working on this and I think it will all be worth it. I ran 12. 67 @ 114 my first night out with no chassis tuning, terrible 60' time, and a stock van converter on a hot, humid day.
08-21-2011, 10:03 PM
#108
Ooops, 'hope I didn't give bad advice. It just seemed it would work. 'Good you got it out. I'm happy you're working on this and I think it will all be worth it. I ran 12. 67 @ 114 my first night out with no chassis tuning and a stock van converter on a hot, humid day.

Forgot to add, I have plenty of clearance for the alternator, no need to notch the subframe. My coils are not the type that are easy to line up for a coil relocation, so kind of stuck on that for the moment. Would not mind leaving them on the valve covers, except it interferes with the power booster, and the small block heater core. Cheaper to relocate, just not easier.....
08-22-2011, 04:03 AM
#109
Not bad advice at all, I just did not have the luck of getting off easy
Forgot to add, I have plenty of clearance for the alternator, no need to notch the subframe. My coils are not the type that are easy to line up for a coil relocation, so kind of stuck on that for the moment. Would not mind leaving them on the valve covers, except it interferes with the power booster, and the small block heater core. Cheaper to relocate, just not easier.....
Forgot to add, I have plenty of clearance for the alternator, no need to notch the subframe. My coils are not the type that are easy to line up for a coil relocation, so kind of stuck on that for the moment. Would not mind leaving them on the valve covers, except it interferes with the power booster, and the small block heater core. Cheaper to relocate, just not easier.....
08-23-2011, 10:34 AM
#110
I really like where Katech puts the coils: picture here. They charge an arm and a leg for their bracketry, but I'm sure you could make something yourself that would do the trick. Also take a look here for a less expensive version: http://forums.corvetteforum.com/1559559686-post6.html and here http://forums.corvetteforum.com/1559588419-post15.html
Last edited by -TheBandit-; 08-23-2011 at 10:45 AM.
08-23-2011, 11:08 AM
#111

Not bad advice at all, I just did not have the luck of getting off easy
Forgot to add, I have plenty of clearance for the alternator, no need to notch the subframe. My coils are not the type that are easy to line up for a coil relocation, so kind of stuck on that for the moment. Would not mind leaving them on the valve covers, except it interferes with the power booster, and the small block heater core. Cheaper to relocate, just not easier.....
Forgot to add, I have plenty of clearance for the alternator, no need to notch the subframe. My coils are not the type that are easy to line up for a coil relocation, so kind of stuck on that for the moment. Would not mind leaving them on the valve covers, except it interferes with the power booster, and the small block heater core. Cheaper to relocate, just not easier.....
I dont have a heater box so i didnt have to do that side. but im sure it could be done the same. I couldnt justify buying a new brake booster that had a smaller diameter when for .30 i could buy two nuts and move the coil.
It really only took 20 minutes to move the coil.
 08-24-2011, 09:34 PM
#115
Working on the fuel system right now, that and finishing up the accessories. Looks like the power steering lines for an f-body are too short to reach my monte carlos ss steering box. Need to do a search and see what others have done.
09-02-2011, 07:49 AM
#117
Working on the fuel system and am almost done, except I can not get the nylon fuel line over one of my barbed fittings. Went over the others fine, but it just flat out refuses to go in straight to a 3/8 barb fitting needed for my in line filter. Might have to run braided hose there instead.
Also, what are people doing for pcv valve routing? PCV valve in the drivers side cover, run a hose all the way up to the intake manifold? Any molded hoses for this or just try and bend it?
Man, there is soooooo much left to do.
Need to decide on gauges
Figure out how to run the tranny lines
find my 12586243 ecu and someone to load a van tune on it
have the driveshaft made or cut
find a 8" dual diaphram brake booster and big block heater core setup to gain clearance for coils (decided this route to just speed it up)
Trade my floor shift tilt steering column for tilt column shifted setup
find/buy shift rod that will allow the use of a stock column shift
finish wiring harness
find/buy radiator/fans/hoses
buy O2 sensors
modify plug wires due to weird routing of headers
find/buy throttle cable
buy new dipstick tube
and much more I am forgetting....... oh boy
Last edited by billsnogo; 09-02-2011 at 08:02 AM.
09-02-2011, 03:16 PM
#119
Yep. Hope to either add my steel cowl hood, or find a stock flat hood and make it look like a plain jane copo car
Working on the fuel system and am almost done, except I can not get the nylon fuel line over one of my barbed fittings. Went over the others fine, but it just flat out refuses to go in straight to a 3/8 barb fitting needed for my in line filter. Might have to run braided hose there instead.
Also, what are people doing for pcv valve routing? PCV valve in the drivers side cover, run a hose all the way up to the intake manifold? Any molded hoses for this or just try and bend it?
Man, there is soooooo much left to do.
#1-find a 8" dual diaphram brake booster and big block heater core setup to gain clearance for coils (decided this route to just speed it up)
#2-have the driveshaft made or cut
#3-find/buy radiator/fans/hoses
#4-Figure out how to run the tranny lines
#5-Trade my floor shift tilt steering column for tilt column shifted setup
#6-find/buy shift rod that will allow the use of a stock column shift
#7-find/buy throttle cable
#8-modify plug wires due to weird routing of headers
#9-buy new dipstick tube
#10-find my 12586243 ecu and someone to load a van tune on it
#11-buy O2 sensors
#12-finish wiring harness
Last-Need to decide on gauges
and much more I am forgetting....... oh boy
You seem to be a patient person and that will pay off in the end. This swap was a stressful process for me as I am used to quick fixes and parts that are a mere bolt on. I dont mind modifying or fabbing items up but to avoid the high costs of pre-made items I had to pretty much one-off my ride. I have missed every cruise in and car show since last June and it has bugged me to death not to have my car on the road. I take a break from her from time to time and think things through as I gather some funds. I cant wait to see your car fired up and ripping down the road, best of luck!!!