


1963 Chevy Nova LS6 Swap
I can reflash your computer, no problem, it will be cheaper if you have a year 2000......
For the crossmember, I used this one, fits a 700R4, but the 60E and R4 are the same, worked like a champ.....
http://www.classicperform.com/Store/...va/CP16002.htm
I used S&P's mid length headers, worked great, unless you are just deadset on long tubes. Just short of building your own, CBR has about the best bet going. I put a set on Clint's car with a Heidt's, and they dropped right in......they are very well made, and worth the money IMO...both sides fit like a glove, plus you get a set of motor plates in the deal. I have a set waiting to go on the wagon, when I get to that point.
Headers always seem to be the sticking point. I have a template that you can make your own engine plates, that will allow at least three different positions, if you wanted to make your own.....then just use regular SB motor mounts.......I will have to get it from work tomorrow, if interested..
I attached a pic of the S&P headers, and where the #1 tube needs to be, this is on a Heidt's clip....
T,
Thread Starter
On The Tree
Joined: Sep 2010
Posts: 155
Likes: 0
From: San Luis Obispo CA
December 15, 2010
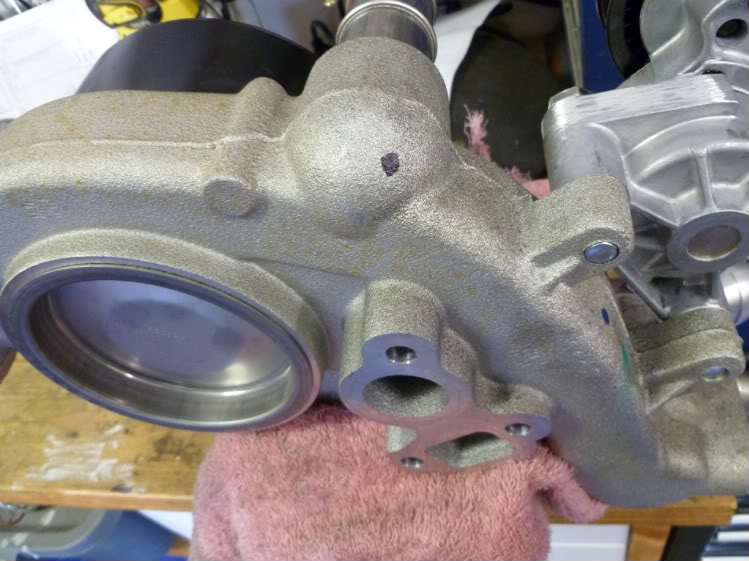
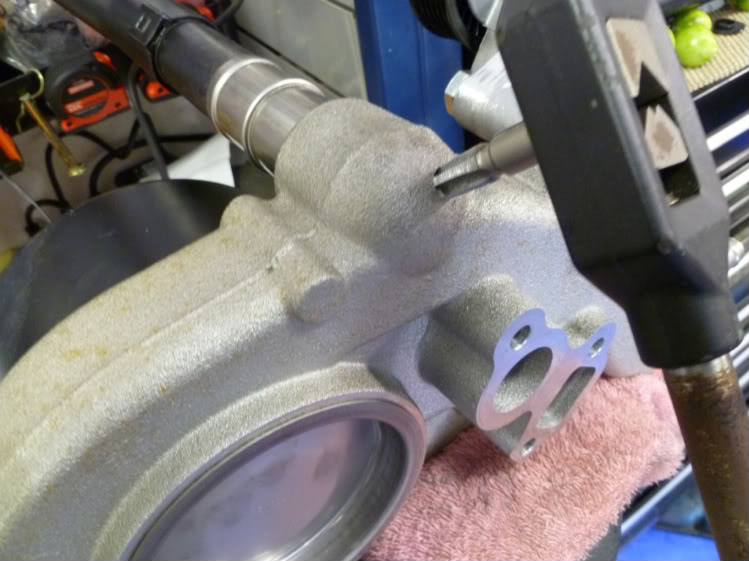
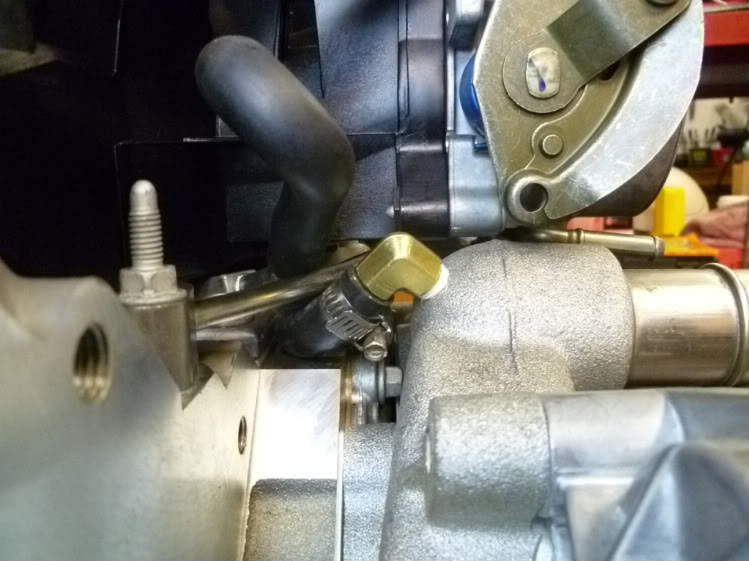
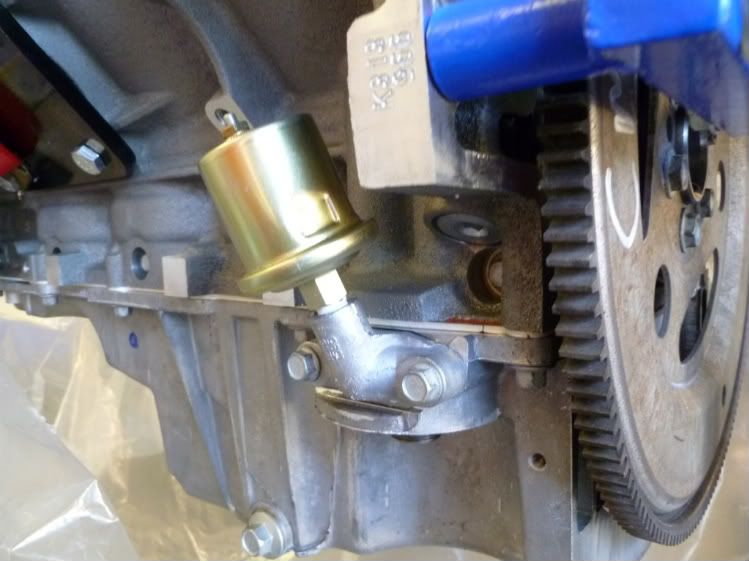
Since the steam lines must be routed to the return tank on the radiator, I decided to take off the water pump and tap it for the steam line fitting (as has been suggested by numerous other people on this site). While I had the tap out, I drilled and threaded my oil pressure sensor as well.

Since the steam lines must be routed to the return tank on the radiator, I decided to take off the water pump and tap it for the steam line fitting (as has been suggested by numerous other people on this site). While I had the tap out, I drilled and threaded my oil pressure sensor as well.
Last edited by NovaKid; Jan 1, 2011 at 03:38 PM.
Thread Starter
On The Tree
Joined: Sep 2010
Posts: 155
Likes: 0
From: San Luis Obispo CA
Yeah, I'm seriously considering CBR long tube headers now, since BRP's application won't work on aftermarket front ends. I see what you mean with the #1 tube. How was the ground clearance with CBR's headers? Up against the floorboards?
I already installed some motor mount adapter plates. Just the run of the mill plates that allow the motor mounts to bolt up in the stock locations. I figure those would probably work fine if I go with the CBR headers. I hope?
By the way, did you ever have any clearance problems between your oil pan and rack and pinion steering?
Thanks again Tom, you're the man.
Attached a couple of pictures of Clint's car, no problem on ground clearance as you can see......used the F-body pan. I don't think there are any clearance issues with the power rack, maybe just the supply lines needed tweaking, haven't run one, but shouldn't be a show stopper...
No clearance issues anywhere, Clint's pictures are on a Heidt's superide clip..these are the CBR headers......nice piece....
and a little sound clip.......
http://www.youtube.com/user/TomMLS1#p/a/u/0/uglIjAYRaHU
T,
No clearance issues anywhere, Clint's pictures are on a Heidt's superide clip..these are the CBR headers......nice piece....
and a little sound clip.......
http://www.youtube.com/user/TomMLS1#p/a/u/0/uglIjAYRaHU
T,

Staging Lane
Joined: Oct 2009
Posts: 97
Likes: 0
From: ohio
Yeah, I'm seriously considering CBR long tube headers now, since BRP's application won't work on aftermarket front ends. I see what you mean with the #1 tube. How was the ground clearance with CBR's headers? Up against the floorboards?
I already installed some motor mount adapter plates. Just the run of the mill plates that allow the motor mounts to bolt up in the stock locations. I figure those would probably work fine if I go with the CBR headers. I hope? Yes, your plates are locating the engine in the same place as the ones that are supplied with our Headers.
By the way, did you ever have any clearance problems between your oil pan and rack and pinion steering?
Thanks again Tom, you're the man.
Thread Starter
On The Tree
Joined: Sep 2010
Posts: 155
Likes: 0
From: San Luis Obispo CA
February 19, 2011
Well, I’m back at it. I had to take a break for a while to concentrate on school and save up some moolah for a trans, headers, and some various other parts.
I ended up getting a stage III 4L60E transmission and torque converter from Johnny at Xtreme Transmissions who is an LS1Tech sponsor. Although my engine will probably only put out 450 to 470 hp when I’m done with this swap, I opted for the stage III 650+ hp transmission mostly for peace of mind. I’ll be able to abuse it some and not have to worry about anything breaking. Maybe in the future, I’ll put a cam in. Besides, Johnny has some good prices so I figured I would do it right the first time instead of purchasing a borderline trans rated at 450-500 hp.
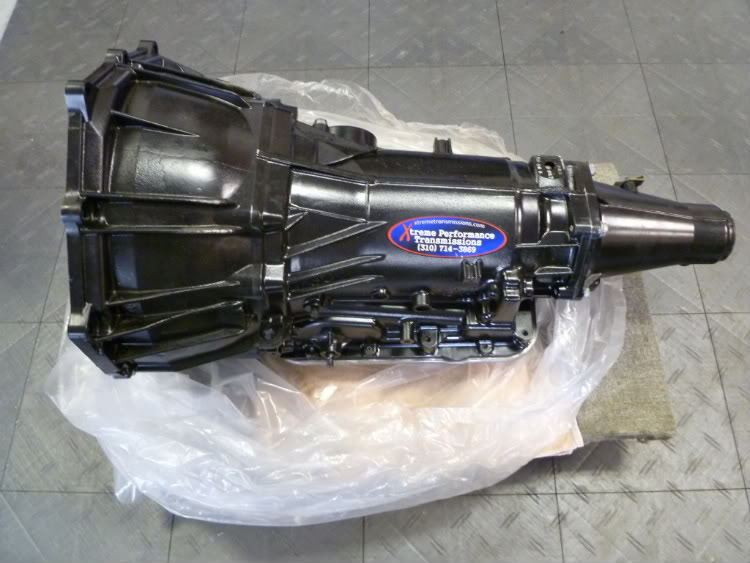
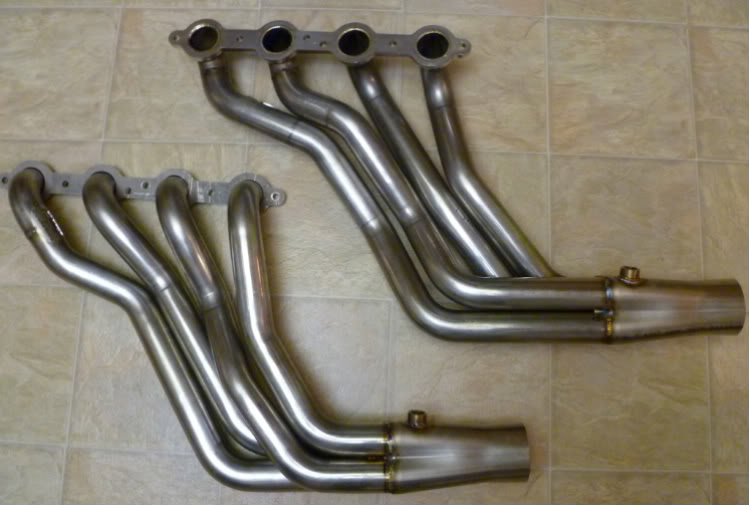
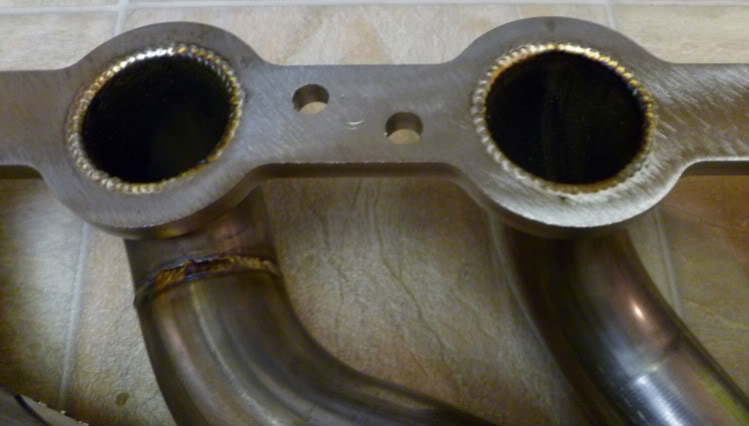
Speaking of saving up some cash and doing it right the first time, I also purchased a set of Church Boys Racing, stainless steel, long tube headers. I looked at several different companies that offer headers for my application (S&P, BRP, and TCI) and decided to go with CBR for a few reasons. Although they are priced higher than other headers on the market, once I received them in the mail, it became evident that the extra cash was worth it. I’m a big fan of the slip fit collectors, thick flanges, and the additional power/torque long tube headers put out over shorty headers. Check out the pics below. This is the only stainless set I’ve seen on the market. If the installation is anything like these headers look, I’m sure they will fit like a glove. I’ll comment on the installation when I get to that point. Chuck at CBR was a pleasure to deal with.
Well, I’m back at it. I had to take a break for a while to concentrate on school and save up some moolah for a trans, headers, and some various other parts.
I ended up getting a stage III 4L60E transmission and torque converter from Johnny at Xtreme Transmissions who is an LS1Tech sponsor. Although my engine will probably only put out 450 to 470 hp when I’m done with this swap, I opted for the stage III 650+ hp transmission mostly for peace of mind. I’ll be able to abuse it some and not have to worry about anything breaking. Maybe in the future, I’ll put a cam in. Besides, Johnny has some good prices so I figured I would do it right the first time instead of purchasing a borderline trans rated at 450-500 hp.
Speaking of saving up some cash and doing it right the first time, I also purchased a set of Church Boys Racing, stainless steel, long tube headers. I looked at several different companies that offer headers for my application (S&P, BRP, and TCI) and decided to go with CBR for a few reasons. Although they are priced higher than other headers on the market, once I received them in the mail, it became evident that the extra cash was worth it. I’m a big fan of the slip fit collectors, thick flanges, and the additional power/torque long tube headers put out over shorty headers. Check out the pics below. This is the only stainless set I’ve seen on the market. If the installation is anything like these headers look, I’m sure they will fit like a glove. I’ll comment on the installation when I get to that point. Chuck at CBR was a pleasure to deal with.
Last edited by NovaKid; Feb 25, 2011 at 08:19 PM.
Staging Lane
Joined: Oct 2009
Posts: 97
Likes: 0
From: ohio
Thank you for the kind words and for posting the pictures. Of course pictures do nothing for how nice they really are. I too am anxious to see them installed!
Last edited by 67 church; Feb 28, 2011 at 10:55 AM.
LS1 Tech Stories
The Best V8 Stories One Small Block at Time

Gas Monkey Built a 6-Wheel Ferrari Testarossa With a Corvette LT4 Engine
Verdad Gallardo
7 Most Reliable High-Performance Engines GM Has Ever Built
Verdad Gallardo
Amazing '71 Camaro Restomod Is Modern Muscle Car Under the Skin
Verdad Gallardo
6 Common C5 Corvette Failures and What's Involved In Repairing Them
Pouria Savadkouei
Retro Modern Bandit Pontiac Trans AM Comes With Burt Reynolds' Autograph
Verdad Gallardo
Top 10 Greatest Cadillac V Series Performance Models Ever, Ranked
Pouria Savadkouei
Top 10 Most Powerful Chevy Trucks Ever Made!

Hennessey's New Supercharged Silverado ZR2 Has 700 HP
Verdad Gallardo
Coachbuilt N2A Anteros Is an LS2-Powered C6 Corvette In Italian Clothes
Verdad Gallardo Thread Starter
On The Tree
Joined: Sep 2010
Posts: 155
Likes: 0
From: San Luis Obispo CA
No prob Chuck. Thanks again.


Teching In
Joined: Nov 2008
Posts: 22
Likes: 0
From: Atascadero, CA
this is a great write up...subscribed. novakid, i'm just 10 minutes from you in atascadero. i'm also a member on SNS. we should talk shop one of these days. i've got a 63 that i'm putting a ls1/t56 into that also has the tci front clip and rear 4-link/currie 9" (just got that in a week ago). just got my dse mini tubs in the mail a couple days ago, so i'll be tackling that beast for the next few weeks or so. oh yeah, why didn't the cts-v pan fit? was it the rear mount sway bar? i'm bummed as this is the oil pan i bought. i haven't got to the point of installing motor/tranny yet. i've been under the impression the cts-v pan will fit the tci clip. damn. anywho, hope to hear from ya soon. again, great write up. thanks for putting time into it.

TECH Fanatic


Joined: Sep 2008
Posts: 1,654
Likes: 531
Just an note. On my 67 Nova LS swap I used the Sanderson mid length header 1.75 tube. They fit well and they use a common colletor gasket. Clears the steering nice. Close to the frame rail on the right side but doable.The S&P header uses a odd ball square design from my expirence is less than durable and you can only get them from S&P. Maybe their design has changed?
I'm running the Heidt super ride. The rear mount sway bar does not work with the fbody pan. I used an Auto Kraft pan. CTSV pan may work. If you want a power rack the motor mounts need to be raised so the pan clears the rack.
I'm running the Heidt super ride. The rear mount sway bar does not work with the fbody pan. I used an Auto Kraft pan. CTSV pan may work. If you want a power rack the motor mounts need to be raised so the pan clears the rack.
Thread Starter
On The Tree
Joined: Sep 2010
Posts: 155
Likes: 0
From: San Luis Obispo CA
this is a great write up...subscribed. novakid, i'm just 10 minutes from you in atascadero. i'm also a member on SNS. we should talk shop one of these days. i've got a 63 that i'm putting a ls1/t56 into that also has the tci front clip and rear 4-link/currie 9" (just got that in a week ago). just got my dse mini tubs in the mail a couple days ago, so i'll be tackling that beast for the next few weeks or so. oh yeah, why didn't the cts-v pan fit? was it the rear mount sway bar? i'm bummed as this is the oil pan i bought. i haven't got to the point of installing motor/tranny yet. i've been under the impression the cts-v pan will fit the tci clip. damn. anywho, hope to hear from ya soon. again, great write up. thanks for putting time into it.
That's great to hear you're into the shoebox novas too. Not many people have the TCI front clips that have posted information on the web anyway. Sounds like your install is going to be pretty bad-***. I'd like to do something like your rear end setup, but I think that's going to be down the road for me. I bet those mini tubs look freakin' sweet.
I usually check my thread about once every four of five days. As for the CTSV oil pan, I ended up doing A LOT of research about that and talking to a lot of people on the phone. Long story short, the CTSV oil pan midsection will hit the crossmember of the TCI front clip. If you look at page one on my thread, there should be a pic of the F-Body oil pan clearing the crossmember by an inch or so. Also, I have yet to install the motor and trans, but I think the F-Body pan will be very close to my rack and pinion as well. In this case, the CTSV pan will definitely not fit, but the F-body pan will. I'll PM you and give you my number and email address if you have any questions.
Oh yeah, also... the rear sway bar has to be relocated to the front since the pan sump length of any GM pan would end up hitting it.
Just an note. On my 67 Nova LS swap I used the Sanderson mid length header 1.75 tube. They fit well and they use a common colletor gasket. Clears the steering nice. Close to the frame rail on the right side but doable.The S&P header uses a odd ball square design from my expirence is less than durable and you can only get them from S&P. Maybe their design has changed?
I'm running the Heidt super ride. The rear mount sway bar does not work with the fbody pan. I used an Auto Kraft pan. CTSV pan may work. If you want a power rack the motor mounts need to be raised so the pan clears the rack.
I'm running the Heidt super ride. The rear mount sway bar does not work with the fbody pan. I used an Auto Kraft pan. CTSV pan may work. If you want a power rack the motor mounts need to be raised so the pan clears the rack.
Last edited by NovaKid; Mar 8, 2011 at 08:02 PM.

On The Tree
Joined: Apr 2011
Posts: 129
Likes: 0
From: Vancouver, WA
I too am working on installing an LS1 and hopefully a T56 in my '63 Nova.
I purchased the TCI front clip and their new 3 link rear. I wanted to install mini tubs but can not as then there is no spot on my car to mount the crossmember for the coil overs and sway bar.
I bought the GM "Muscle Car" oil pan. PN 19212593 I am very worried about how far it hangs down below the cross member. Tomorrow I plan on doing a test fit with the wrong T56 LT1 tranny. I am hoping that installing it with the tranny will raise the pan enough that I will not have to build a skid plate. Or maybe I'll just spend another $150 and get the F-car pan PN 12628771. This will really excite the wife!!
I really like the look of the stainless headers you bought! Those are sweet! Do you know if those headers are available with bell collectors?
I purchased the TCI front clip and their new 3 link rear. I wanted to install mini tubs but can not as then there is no spot on my car to mount the crossmember for the coil overs and sway bar.
I bought the GM "Muscle Car" oil pan. PN 19212593 I am very worried about how far it hangs down below the cross member. Tomorrow I plan on doing a test fit with the wrong T56 LT1 tranny. I am hoping that installing it with the tranny will raise the pan enough that I will not have to build a skid plate. Or maybe I'll just spend another $150 and get the F-car pan PN 12628771. This will really excite the wife!!
I really like the look of the stainless headers you bought! Those are sweet!
Do you know if those headers are available with bell collectors? Last edited by 1bigoldman; May 11, 2011 at 08:45 AM.
Thread Starter
On The Tree
Joined: Sep 2010
Posts: 155
Likes: 0
From: San Luis Obispo CA
I bought the GM "Muscle Car" oil pan. PN 19212593 I am very worried about how far it hangs down below the cross member. Tomorrow I plan on doing a test fit with the wrong T56 LT1 tranny. I am hoping that installing it with the tranny will raise the pan enough that I will not have to build a skid plate. Or maybe I'll just spend another $150 and get the F-car pan PN 12628771. This will really excite the wife!!
I really like the look of the stainless headers you bought! Those are sweet! Do you know if those headers are available with bell collectors?
I really like the look of the stainless headers you bought! Those are sweet!
Do you know if those headers are available with bell collectors?I bought the headers from Chuck at Church Boys Racing (CBR). There should be a link to CBR on my page, about 3 or 4 messages up. I'm not sure if he offers them with bell collectors, but that would be a good question for Chuck.
I'd like to do a mini tub eventually... it looks badass on these novas. I'm sure you won't be disappointed with that decision! Good luck with your project, and convincing the wife!
December 15, 2010
Since the steam lines must be routed to the return tank on the radiator, I decided to take off the water pump and tap it for the steam line fitting (as has been suggested by numerous other people on this site). While I had the tap out, I drilled and threaded my oil pressure sensor as well.
Since the steam lines must be routed to the return tank on the radiator, I decided to take off the water pump and tap it for the steam line fitting (as has been suggested by numerous other people on this site). While I had the tap out, I drilled and threaded my oil pressure sensor as well.
Thread Starter
On The Tree
Joined: Sep 2010
Posts: 155
Likes: 0
From: San Luis Obispo CA
Sorry I didn't get back to you sooner. That was an oil sending unit I had on my old Gen I 350 motor. I imagine you could use any old sending unit (since it only measures pressure) as long as you can drill and tap that aluminum adapter. I just used a standard thread tap and it screwed right in.
Thread Starter
On The Tree
Joined: Sep 2010
Posts: 155
Likes: 0
From: San Luis Obispo CA
April 16, 2011
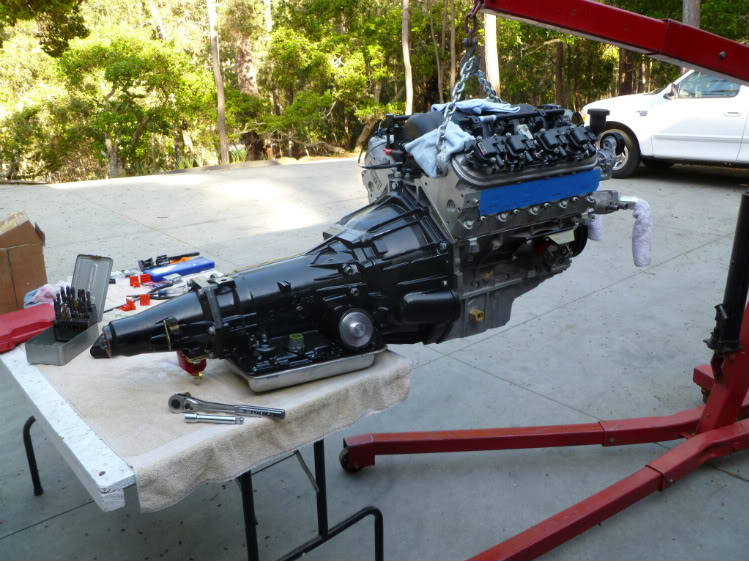
Been a busy quarter for me in school and I haven't gotten as much done as I thought I would. I managed to get the motor and trans installed. It's in its final resting place (at least for a while).
Bolted up the trans... I love Miners/Ace Hardware and their huge selection of 8.8, 9.8, and 10.9 Grade Metric bolts, they always come through when I'm in a bind.
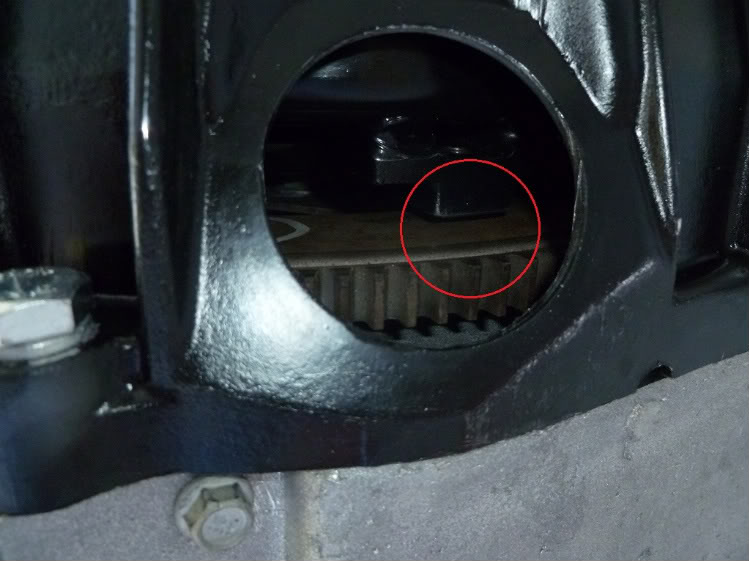
I was psyched I didn't have to shim anything since the torque converter and flexplate clearance was about 1/8 in.
I went with a BTO transmission crossmember and let's just say I was less than satisfied with them overall.
In my search, I found this great site for transmission dimensions: Tech Info - Transmissions Dimensions
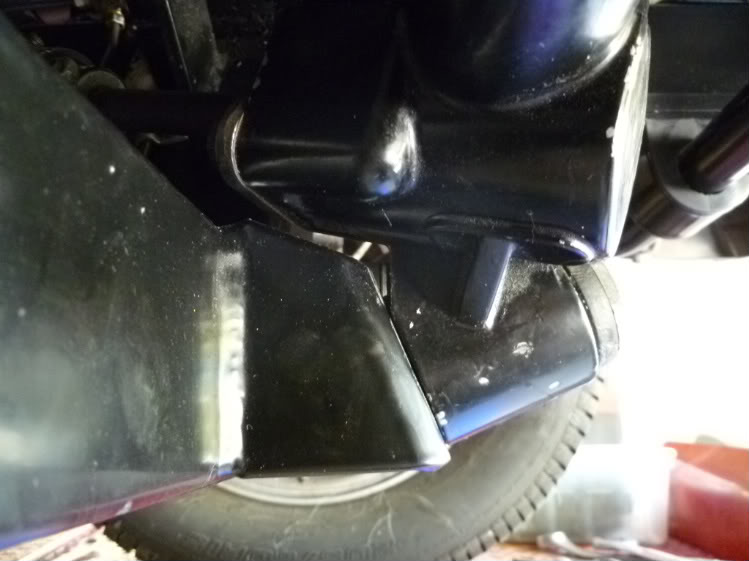
Here's some pics of the motor and trans installed. It looks good, but I came across a pretty big problem...

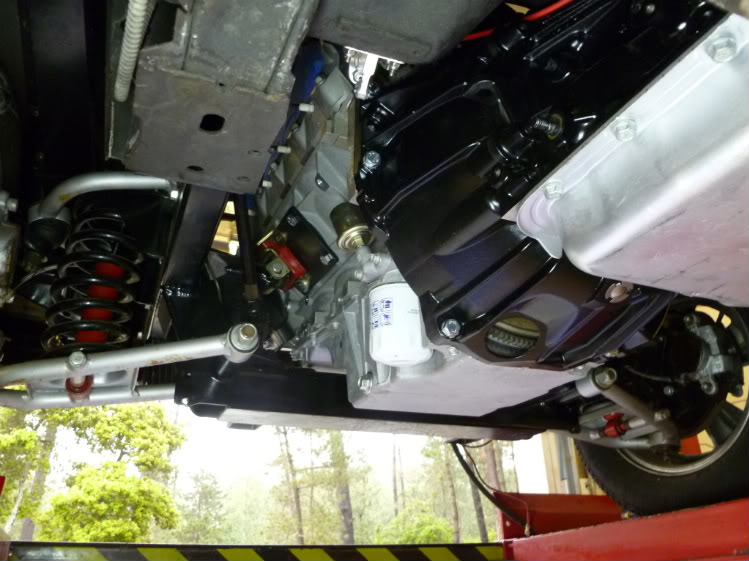
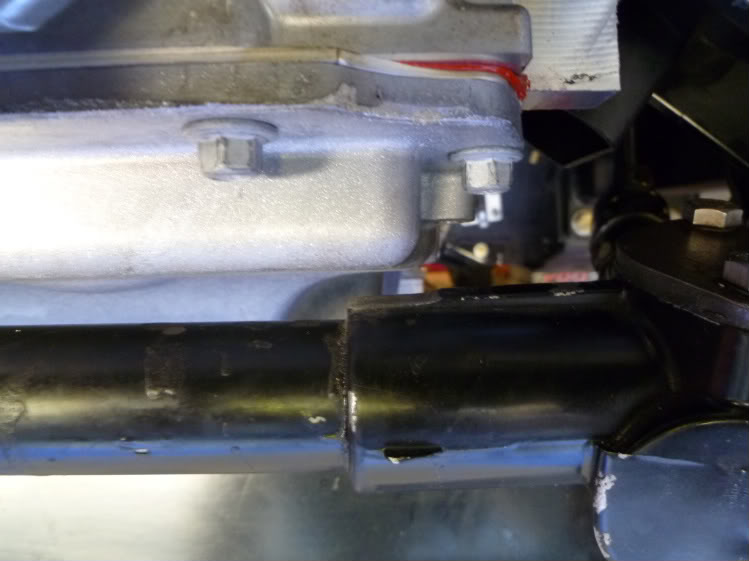
No clearance between the rack and pinion and oil pan!!
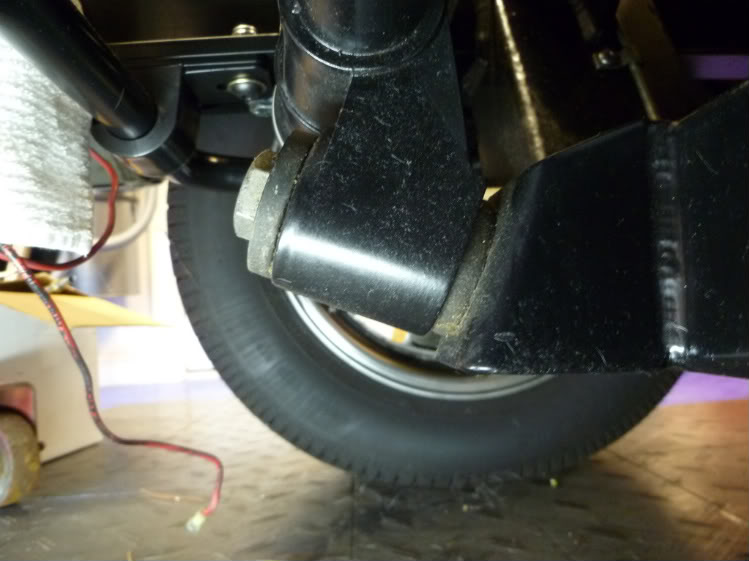
To solve this problem, I had to do a few things. First, There was a rubber grommet with a steel sleeve that ran through my rack and pinion mounts. I cut a portion of the rubber grommet off and ground down part of the internal steel mounting sleeve. You can see the difference below. It lowered my rack and pinion about 1/8 in and will still maintain the dampening effect from the rubber (I needed all the room I could get). Before and after pics:
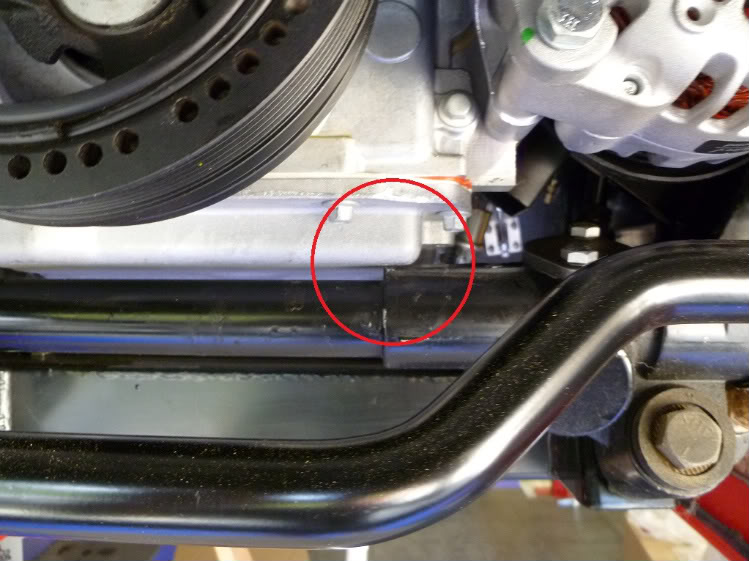
The next thing I did was add a 1/8 in. spacer under the driver's side motor mount. For some reason, the engine is still level. Lastly, I ground off a thin layer of the aluminum rack and pinion casting. After all that, it seemed to work out:
I took care of some small odds and ends in the last week too. I installed the starter, bent some brake lines, and put in the trans dipstick tube and dipstick. The dipstick and tube fit great and are from a 2004 GTO. Part #'s 92159815 and 92057977. I'll post some more pics soon.
Next on the list is the throttle cable, radiator, trans cooler & lines, and a shifter. Probably install the headers after that, then do the fuel system.
Been a busy quarter for me in school and I haven't gotten as much done as I thought I would. I managed to get the motor and trans installed. It's in its final resting place (at least for a while).
Bolted up the trans... I love Miners/Ace Hardware and their huge selection of 8.8, 9.8, and 10.9 Grade Metric bolts, they always come through when I'm in a bind.
I was psyched I didn't have to shim anything since the torque converter and flexplate clearance was about 1/8 in.
I went with a BTO transmission crossmember and let's just say I was less than satisfied with them overall.
In my search, I found this great site for transmission dimensions: Tech Info - Transmissions Dimensions
Here's some pics of the motor and trans installed. It looks good, but I came across a pretty big problem...
No clearance between the rack and pinion and oil pan!!
To solve this problem, I had to do a few things. First, There was a rubber grommet with a steel sleeve that ran through my rack and pinion mounts. I cut a portion of the rubber grommet off and ground down part of the internal steel mounting sleeve. You can see the difference below. It lowered my rack and pinion about 1/8 in and will still maintain the dampening effect from the rubber (I needed all the room I could get). Before and after pics:
The next thing I did was add a 1/8 in. spacer under the driver's side motor mount. For some reason, the engine is still level. Lastly, I ground off a thin layer of the aluminum rack and pinion casting. After all that, it seemed to work out:
I took care of some small odds and ends in the last week too. I installed the starter, bent some brake lines, and put in the trans dipstick tube and dipstick. The dipstick and tube fit great and are from a 2004 GTO. Part #'s 92159815 and 92057977. I'll post some more pics soon.
Next on the list is the throttle cable, radiator, trans cooler & lines, and a shifter. Probably install the headers after that, then do the fuel system.