

The Yellow Submarine goes Nuclear - LS2/T56 Miata

 02-06-2011, 01:36 PM
#282
TECH Fanatic
iTrader: (14)
Join Date: Mar 2007
Location: Phoenix/Tempe, AZ
Posts: 1,968
Likes: 0
Received 0 Likes
on
0 Posts

meh more yellow, haha
i like the 'natural' fast style, but if you did an aluminum type finish that matched the cast valve covers itd be the bees knees
i like the 'natural' fast style, but if you did an aluminum type finish that matched the cast valve covers itd be the bees knees
02-06-2011, 05:57 PM
#283
TECH Apprentice
Thread Starter
iTrader: (1)

Join Date: Oct 2008
Location: Grand Rapids, MI
Posts: 324
Likes: 0
Received 0 Likes
on
0 Posts
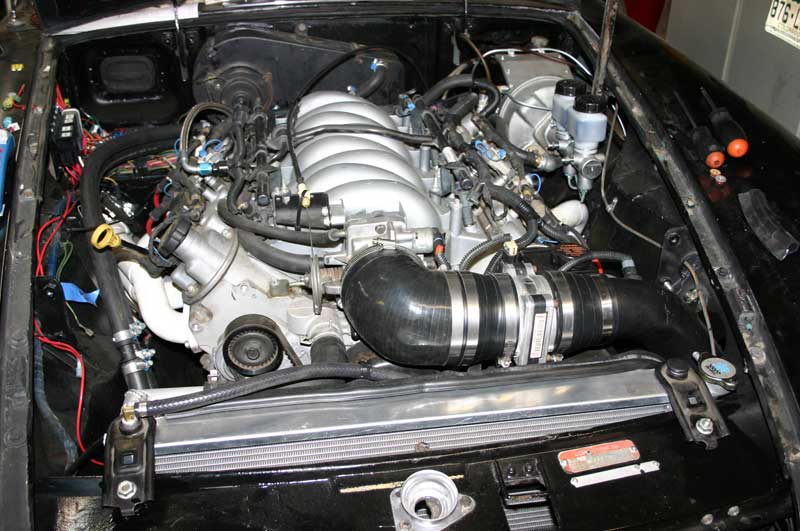
Plan is to paint the intake to match the engine block, heads, etc. Basically a 95% "aluminum" paint colored motor (block, heads, intake, TB, oil pan, accessory brackets, alternator, AC compressor, WP), black pulleys, black (I think) coil mounts, black silicone intake elbows (with hints of silver aluminum piping between), red plug wires, red coils (if I can paint the stocker ones), red fuel rail (with black AN fittings and lines). All wiring in black looming, but tucked so you aren't going to see much of that.
I have custom coil covers coming, either red or silver on those, I think.. they are natural stainless right now. Heck, could even do black and I think it would look fine. Will likely photoshop up the colors once the rest is painted to see what I like with the engine.
Only color 'oops' is the oil lines are blue.. but whatever.
 Won't break my heart, you will barely see them anyhow.
02-06-2011, 06:26 PM
Won't break my heart, you will barely see them anyhow.
02-06-2011, 06:26 PM
#284
TECH Apprentice
Thread Starter
iTrader: (1)
Join Date: Oct 2008
Location: Grand Rapids, MI
Posts: 324
Likes: 0
Received 0 Likes
on
0 Posts
Build Update:
Engine - Installed the oil pickup and pan.. somehow I lost one pan bolt (grrr) but the GTO pan has two long bolts at the rear which need to be swapped out for something shorter also. On the list for tomorrow.
Front Hubs - Unwrapped them, they came out quite lovely I think. The clear ran the aluminum paint a little, but considering the goal was "not dingy ugly gray/black" I'm happy. It's going to be hidden behind rotors and wheels soooooo.. good 'nuff!

Front Suspension - Instead of ticking a bunch of little things off the list, I somehow ended up building the entire front cradle.

Upper and lower control arms, front hubs, steering rack, front shocks, motor mounts and motor mount heat shields all connected. Haven't torqued anything, will do that once it is installed.
One thing I found very odd, I didn't change the outer tie rods on the steering rack, but now I have a slew of toe out. See here, first one is the passenger side approximately pointed straight:

And here is the driver's side that is waaaaay toe out:

No clue why this is, but first thought is that the cradle is narrower but that makes no sense. Soooo... dunno. Will test fit the cradle and see if things are square or amuck.
Heater Core in/out relocation - Fiddled with this a little, should be fairly straightforward and simple. Thanks to a bathroom remodel, I just happen to have all kinds of 1/2" copper pipe laying around, and I slapped a couple pieces together to see how it would fit.


The pipes route nicely up and over the heater box. I'm going to stack the pipes to give more clearance at the firewall, and hopefully allow for the PCM mounting like FM does. Still unsure of the point at which I'll penetrate the firewall, going to wait until the engine is in the bay to be sure of possible obstructions. Thinking just inboard of the AC fittings, near to the heads. We shall see.
Engine - Installed the oil pickup and pan.. somehow I lost one pan bolt (grrr) but the GTO pan has two long bolts at the rear which need to be swapped out for something shorter also. On the list for tomorrow.
Front Hubs - Unwrapped them, they came out quite lovely I think. The clear ran the aluminum paint a little, but considering the goal was "not dingy ugly gray/black" I'm happy. It's going to be hidden behind rotors and wheels soooooo.. good 'nuff!
Front Suspension - Instead of ticking a bunch of little things off the list, I somehow ended up building the entire front cradle.
Upper and lower control arms, front hubs, steering rack, front shocks, motor mounts and motor mount heat shields all connected. Haven't torqued anything, will do that once it is installed.
One thing I found very odd, I didn't change the outer tie rods on the steering rack, but now I have a slew of toe out. See here, first one is the passenger side approximately pointed straight:
And here is the driver's side that is waaaaay toe out:
No clue why this is, but first thought is that the cradle is narrower but that makes no sense. Soooo... dunno. Will test fit the cradle and see if things are square or amuck.
Heater Core in/out relocation - Fiddled with this a little, should be fairly straightforward and simple. Thanks to a bathroom remodel, I just happen to have all kinds of 1/2" copper pipe laying around, and I slapped a couple pieces together to see how it would fit.
The pipes route nicely up and over the heater box. I'm going to stack the pipes to give more clearance at the firewall, and hopefully allow for the PCM mounting like FM does. Still unsure of the point at which I'll penetrate the firewall, going to wait until the engine is in the bay to be sure of possible obstructions. Thinking just inboard of the AC fittings, near to the heads. We shall see.
02-07-2011, 06:55 PM
#285
TECH Apprentice
Thread Starter
iTrader: (1)
Join Date: Oct 2008
Location: Grand Rapids, MI
Posts: 324
Likes: 0
Received 0 Likes
on
0 Posts
Build Update:
Parts Returned - Sent back the fuel rail.
Parts Bought - Bought a few items:
White LED strips for various places in the car (footwell and trunk, taking a slow boat from Hong Kong)
Rocker Arm Trunion Upgrade (Comp 13702 - Vengeance)
Replacement Fuel Rail (Professional Products 10613 - bare LS2 rail)
Full compliment of VDO Gauges and senders:
-160 speedo
-8k tach
-250* water temp
-300* oil temp
-100 psi oil temp
-volts
-fuel level
Parts Sold - Stock GTO shifter and related nuts-n-bolts sold to Tony LaBoy - thanks Tony!
Parts Received - The super-doooooper secret mod!
BLING!

Custom emblem from Emblem Pros. Thoughts, everyone?? Very VERY pleased with the end product.
Parts Returned - Sent back the fuel rail.
Parts Bought - Bought a few items:
White LED strips for various places in the car (footwell and trunk, taking a slow boat from Hong Kong)
Rocker Arm Trunion Upgrade (Comp 13702 - Vengeance)
Replacement Fuel Rail (Professional Products 10613 - bare LS2 rail)
Full compliment of VDO Gauges and senders:
-160 speedo
-8k tach
-250* water temp
-300* oil temp
-100 psi oil temp
-volts
-fuel level
Parts Sold - Stock GTO shifter and related nuts-n-bolts sold to Tony LaBoy - thanks Tony!
Parts Received - The super-doooooper secret mod!
BLING!
Custom emblem from Emblem Pros. Thoughts, everyone?? Very VERY pleased with the end product.
02-08-2011, 09:36 AM
#288
TECH Apprentice
Thread Starter
iTrader: (1)
Join Date: Oct 2008
Location: Grand Rapids, MI
Posts: 324
Likes: 0
Received 0 Likes
on
0 Posts
I only bought one of the emblems, going to go on the rear of the car in a location TBD. I didn't like how fender badges would look, and since the car has been de-badged there is plenty of room on the rear to put it.
Besides I wanted it somehwere where everyone would see it longest. :
Oh, and I bought new plates for the car, too. In keeping with the FC vert ("355 RX7") I tried "364 MX5" but didn't like that, so I went with this:

I toyed with some of the more 'witty' options (SHUHRND, STUFFD, MX5PLS1, MX6PNT0, etc) but in the end I think this fits my style. Perhaps redundant, the exhaust tone probably won't leave any question what it has!
Besides I wanted it somehwere where everyone would see it longest. :
Oh, and I bought new plates for the car, too. In keeping with the FC vert ("355 RX7") I tried "364 MX5" but didn't like that, so I went with this:
I toyed with some of the more 'witty' options (SHUHRND, STUFFD, MX5PLS1, MX6PNT0, etc) but in the end I think this fits my style. Perhaps redundant, the exhaust tone probably won't leave any question what it has!
02-08-2011, 02:43 PM
#289
TECH Apprentice
Thread Starter
iTrader: (1)
Join Date: Oct 2008
Location: Grand Rapids, MI
Posts: 324
Likes: 0
Received 0 Likes
on
0 Posts
Research Update:
Gauge Sender Locations - I think I may have found my temp/oil sending unit location(s).
Coolant - above starter, M16x1.5


Coolant and Oil - Towards front of block


Found them thanks to these threads: http://www.ls1gto.com/forums/showpos...82&postcount=4 and https://ls1tech.com/forums/654164-post4.html
[I gotta tell ya, taking a billion pictures sure comes in handy when you aren't in the garage to check stuff!!]
Looks like these may work for the temp gauge and high temp warning light sending units.. Need to pull them out to see if all 3 are M16x1.5 thread, which can be adapted with the Equus 9848 kit, Autometer 2268 or eGauges R7964 (all M16x1.5 to 1/8" NPT female).
For the oil temp, I think I am going to put it in my remote filter block which has 1/2" NPT fittings ont eh in/out sides that are plugged. based on this:

I would be measuring the hottest oil right after the oil pump before it goes through the engine, seems like that would be a good thing.
Will be super nice to have solved this little issue.
Gauge Sender Locations - I think I may have found my temp/oil sending unit location(s).
Coolant - above starter, M16x1.5
Coolant and Oil - Towards front of block
Found them thanks to these threads: http://www.ls1gto.com/forums/showpos...82&postcount=4 and https://ls1tech.com/forums/654164-post4.html
[I gotta tell ya, taking a billion pictures sure comes in handy when you aren't in the garage to check stuff!!]
Looks like these may work for the temp gauge and high temp warning light sending units.. Need to pull them out to see if all 3 are M16x1.5 thread, which can be adapted with the Equus 9848 kit, Autometer 2268 or eGauges R7964 (all M16x1.5 to 1/8" NPT female).
For the oil temp, I think I am going to put it in my remote filter block which has 1/2" NPT fittings ont eh in/out sides that are plugged. based on this:
I would be measuring the hottest oil right after the oil pump before it goes through the engine, seems like that would be a good thing.
Will be super nice to have solved this little issue.
02-09-2011, 03:25 PM
#290
TECH Apprentice
Thread Starter
iTrader: (1)
Join Date: Oct 2008
Location: Grand Rapids, MI
Posts: 324
Likes: 0
Received 0 Likes
on
0 Posts
Build Update:
$50 to Death Items - bought the stuff always forgetten about..
$34 - ATE Super Blue Brake (and clutch) Fluid
$43 - GM LS Rear Diffy Fluid
$45 - Mobil 1 Syntechtic ATF
Was just looking, the only items I currently know I still need is this short list (sweet!)
Fuel line fittings (odds-n-ends adapters and crap)
Replacement Coolant Overflow bottle (stocker is yellow and cracked)
High Water Temp sending unit (just need to locate a cheap OEM 1/8" NPT one)
Misc. Electrical connectors (for connecting the LS2 harness to the car so it can be easily disconnected)
Radiator Cowl Cover
That's it! Feels good to be nearing the end of the buy-stuff phase. Should have everything still en route by mid next week.
02-09-2011, 03:56 PM
#291
I was not aware of the plug above the starter. I will have to take a look at my car when I get home. I could put my extra coolant temp sensor there.
however now that I look at it alittle closer, the sensor might interfere with the CPS connector and/or starter
however now that I look at it alittle closer, the sensor might interfere with the CPS connector and/or starter
Last edited by Schitzo; 02-09-2011 at 04:30 PM.
02-09-2011, 05:24 PM
#292
TECH Apprentice
Thread Starter
iTrader: (1)
Join Date: Oct 2008
Location: Grand Rapids, MI
Posts: 324
Likes: 0
Received 0 Likes
on
0 Posts
I need to actually get my hands on the motor and pull them out to see if they are coolant passages and whatnot.
02-09-2011, 05:56 PM
#293
I always like getting the coolant temp sensor within a place where coolant is actively flowing as opposed to a remote area where the coolant might collect
Since I needed a second place to put a coolant sensor, I had this little adapter machined for me. It would would replace the big plug on the driver side. I just haven't gotten to finishing the install. May be this spring

Since I needed a second place to put a coolant sensor, I had this little adapter machined for me. It would would replace the big plug on the driver side. I just haven't gotten to finishing the install. May be this spring
02-10-2011, 09:19 AM
#294
TECH Apprentice
Thread Starter
iTrader: (1)
Join Date: Oct 2008
Location: Grand Rapids, MI
Posts: 324
Likes: 0
Received 0 Likes
on
0 Posts
There may be a little progress tonight, but then it's a short break for Valentines Weekend. The next big push is to get the engine assembled (intake, accessories, gauge sending units) and then test fit. I may work on the assembly tonight, but gauge stuff won't be here till next Wed/Thursday. If things work out well, I may have the test fit next weekend (just before the birthday, which would be a nice present!) then out of state for a few days. We'll see how it goes.
Build Update:
Distraction - Bathroom remodel is DONE. What a giant PITA. Put it all back together Tuesday night, just waiting for the *&&!@#$^ tub reglazing to cure (24 hour cure, we are at 4 days and counting).. don't ask. Bottom line, the King of the Castle got a new throne room!
Parts Arrival - ATE Super Blue showed up. Bought the last 2 quarts of Mobil 1 Synthetic ATF also. Still waiting on a bunch of stuff:
GM LS Getrag Fluid (Today)
Viper 5701 (Today)
Rocker Trunion Upgrade (2/14 or 2/15)
Professional Products Fuel rail (2/15+)
VDO Gauges and sending units (2/16 or 2/17)
eBay LED strips (2/25+)
Stainless coil covers (someday soon, I hope!)
I hate to say it, but the running total surpased $20k last week.. my perception of the breakdown:
$14,744.20 <--- Total Essential Mods
$980.05 <--- Total Maintenance Mods
$4,504.69 <--- Total Improvement Mods
$971.10 <--- Total "$50 to Death" Items
$20,912.66 <--- Total spent to date (probably +/- 1% or so)
That's just... silly. But **** it, the car is gonna rock!

Build Update:
Distraction - Bathroom remodel is DONE. What a giant PITA. Put it all back together Tuesday night, just waiting for the *&&!@#$^ tub reglazing to cure (24 hour cure, we are at 4 days and counting).. don't ask
. Bottom line, the King of the Castle got a new throne room! Parts Arrival - ATE Super Blue showed up. Bought the last 2 quarts of Mobil 1 Synthetic ATF also. Still waiting on a bunch of stuff:
GM LS Getrag Fluid (Today)
Viper 5701 (Today)
Rocker Trunion Upgrade (2/14 or 2/15)
Professional Products Fuel rail (2/15+)
VDO Gauges and sending units (2/16 or 2/17)
eBay LED strips (2/25+)
Stainless coil covers (someday soon, I hope!)
I hate to say it, but the running total surpased $20k last week.. my perception of the breakdown:
$14,744.20 <--- Total Essential Mods
$980.05 <--- Total Maintenance Mods
$4,504.69 <--- Total Improvement Mods
$971.10 <--- Total "$50 to Death" Items
$20,912.66 <--- Total spent to date (probably +/- 1% or so)
That's just... silly. But **** it, the car is gonna rock!
Last edited by Wallyman; 02-10-2011 at 05:11 PM.
02-11-2011, 09:04 AM
#296
The custom emblem looks nice. I prefer the sleeper look myself to advertising but it is well thought out and executed. If you are going to advertise, the tail of the car is the best place for it.
The steering rack is a weird one, I would like to see what is off from a curiosity stand point. Everything I have in my head doesn't make much sense. I hope it's something simple and obvious.
The steering rack is a weird one, I would like to see what is off from a curiosity stand point. Everything I have in my head doesn't make much sense. I hope it's something simple and obvious.
02-13-2011, 12:15 AM
#297
On The Tree
iTrader: (1)
Join Date: Aug 2008
Location: Colorado
Posts: 100
Likes: 0
Received 0 Likes
on
0 Posts
Plan is to paint the intake to match the engine block, heads, etc. Basically a 95% "aluminum" paint colored motor
Last edited by Keith Tanner; 02-13-2011 at 01:57 PM.
02-13-2011, 12:17 AM
#298
On The Tree
iTrader: (1)
Join Date: Aug 2008
Location: Colorado
Posts: 100
Likes: 0
Received 0 Likes
on
0 Posts
Oh, and the steering: I suspect you have the suspension at an extreme compression position, thus the bumpsteer. Outside of the car, you can put that suspension in positions that just aren't possible in situ.
02-13-2011, 11:50 AM
#299
Wow, just found this thread and read through all fifteen pages. Awesome build! The rate of progress and way you lay out each post is superb.
I've had a pair of NA miatas in the past and now I drive a 98' camaro. Nothing like a small nimble car with an excess of power.
I've had a pair of NA miatas in the past and now I drive a 98' camaro. Nothing like a small nimble car with an excess of power.
02-14-2011, 04:57 PM
#300
TECH Apprentice
Thread Starter
iTrader: (1)
Join Date: Oct 2008
Location: Grand Rapids, MI
Posts: 324
Likes: 0
Received 0 Likes
on
0 Posts
Dunno, seems like sitting level isn't that extreme but I can't say for sure. We'll see what happens when I get it in the car in a week or so.