


DIY Cold air intake

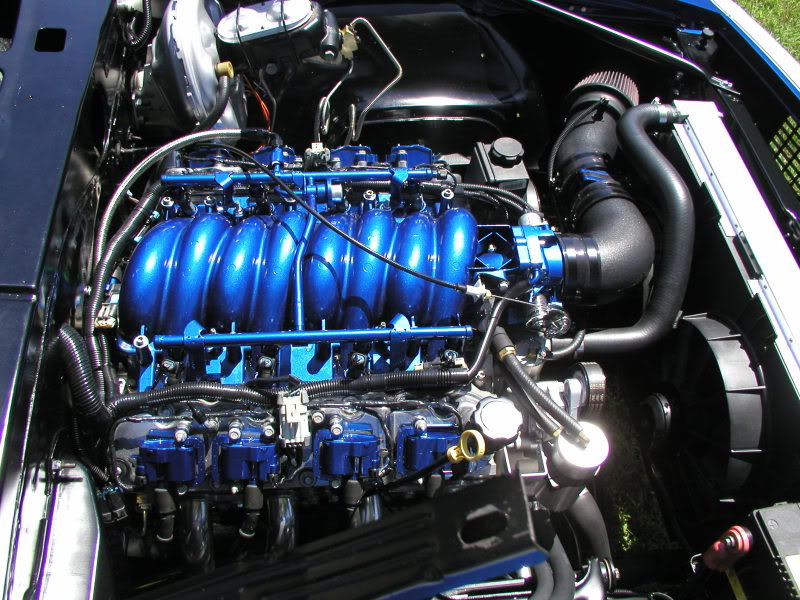
The MAF is inserted at the end of the tube. With a 4" tube the fit was perfect if not a little snug. Spectre make a bracket that supports the end of the tube MAF and the filter. I purposely mounted it so you couldn't see it. It is bolted to the inner fender under the tube. Bitch to get at but makes the install clean
Sam
Last edited by SamHatco; Jan 30, 2012 at 11:56 AM. Reason: sp
The MAF is inserted at the end of the tube. With a 4" tube the fit was perfect if not a little snug. Spectre make a bracket that supports the end of the tube MAF and the filter. I purposely mounted it so you couldn't see it. It is bolted to the inner fender under the tube. Bitch to get at but makes the install clean
Sam
The pieces were ordered from Speed Inc. I cut the tubes to size, painted the clamps, cut off the excess metal from the clamps, and fabbed a support.

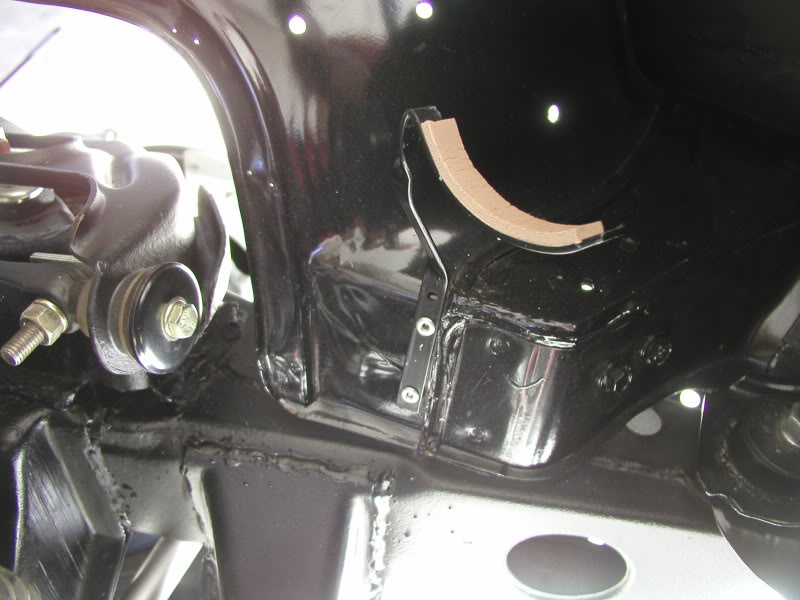
The CAI needs support. I used one of those steel frames that you would find in a file drawer. The steel frame was cut, then bent in a vise to obtain its' shape. A couple of rivets hold it in place. The design helped to center the filter for best air intake.
The CAI needs support. I used one of those steel frames that you would find in a file drawer. The steel frame was cut, then bent in a vise to obtain its' shape. A couple of rivets hold it in place. The design helped to center the filter for best air intake.
Last edited by gMAG; Feb 5, 2012 at 03:43 PM.
Originally Posted by SamHatco
 Think I might just have to look at that, thanks for the tip!!!
LS1 Tech Stories
The Best V8 Stories One Small Block at Time

Topdon ONE vs. Artidiag 800 BT2: Which is the Diagnostic Tablet For You?
Pouria Savadkouei
Gas Monkey Built a 6-Wheel Ferrari Testarossa With a Corvette LT4 Engine
Verdad Gallardo
7 Most Reliable High-Performance Engines GM Has Ever Built
Verdad Gallardo
Amazing '71 Camaro Restomod Is Modern Muscle Car Under the Skin
Verdad Gallardo
6 Common C5 Corvette Failures and What's Involved In Repairing Them
Pouria Savadkouei
Retro Modern Bandit Pontiac Trans AM Comes With Burt Reynolds' Autograph
Verdad Gallardo
Top 10 Greatest Cadillac V Series Performance Models Ever, Ranked
Pouria Savadkouei
Top 10 Most Powerful Chevy Trucks Ever Made!

Hennessey's New Supercharged Silverado ZR2 Has 700 HP
Verdad Gallardo

TECH Senior Member


Joined: Jul 2009
Posts: 8,034
Likes: 663
SamHatCo
Do you have any type of support/hanger on the CAI? Looks killer. I was orgianlly thinking of this setup, but I am starting to concider aluminum tubing too. Any thoughts of the alum? I would imagine the plastic wouldn't soakup heat even better than aluminum.
Do you have any type of support/hanger on the CAI? Looks killer. I was orgianlly thinking of this setup, but I am starting to concider aluminum tubing too. Any thoughts of the alum? I would imagine the plastic wouldn't soakup heat even better than aluminum.


Sam

TECH Senior Member
Joined: Jul 2009
Posts: 8,034
Likes: 663
I used a t-bolt clamp bracket from Spectre. Look in their accessories section of their catalog. The plastic tubing I used is easier for me to work with compared to aluminum. It doesn't transfer as much engine heat as aluminum would and since I was looking for a seamless one piece look and I can't weld aluminum the AirRaid kit was the right choice for me. Hope this helps
Sam
Sam


First off, as you can see from my posting in this thread, I had seen what SamHatco had done with the AirRaid kit.
However, that was only after I had already pieced together my first Cold Air Intake from the net for my LS2 swap.
Now that I have pulled the LS2 and in place am putting in, essentially, an Eforce LS9, I wanted to revisit this subject.
So for this round, When selecting a DIY Cold Air Intake solution, I set out to achieve the following objectives:
1. That it would be durable yet lightweight.
2. That it would not conduct or transfer Engine compartment heat.
3. That it would look seamless and not pieced together.
So With advice, and a great example here from SamHatco , I decided to explore the AirRaid U-build-it Air intake system.
Honestly, I will say that the only item I was skeptical about was how durable the bonded cut tube would be, as He had used Crazy glue to bond the pieces together.
For this reason, I purchased the following kit and decided to put it to the test.

Below is a short video that demonstrates the durability of the bond with a simple drop test.
https://www.youtube.com/watch?v=eMdZ...ature=youtu.be
Please keep in mind that it was not only After this test, but also several more drops and several hand held stress pulls not in this video, that I decided that it was indeed suitable to adhere this material.
I will post more here after I assemble my kit and finish.
A big (and Very late) thanks to SamHatco for sharing.
However, that was only after I had already pieced together my first Cold Air Intake from the net for my LS2 swap.
Now that I have pulled the LS2 and in place am putting in, essentially, an Eforce LS9, I wanted to revisit this subject.
So for this round, When selecting a DIY Cold Air Intake solution, I set out to achieve the following objectives:
1. That it would be durable yet lightweight.
2. That it would not conduct or transfer Engine compartment heat.
3. That it would look seamless and not pieced together.
So With advice, and a great example here from SamHatco , I decided to explore the AirRaid U-build-it Air intake system.
Honestly, I will say that the only item I was skeptical about was how durable the bonded cut tube would be, as He had used Crazy glue to bond the pieces together.
For this reason, I purchased the following kit and decided to put it to the test.
Below is a short video that demonstrates the durability of the bond with a simple drop test.
https://www.youtube.com/watch?v=eMdZ...ature=youtu.be
Please keep in mind that it was not only After this test, but also several more drops and several hand held stress pulls not in this video, that I decided that it was indeed suitable to adhere this material.
I will post more here after I assemble my kit and finish.
A big (and Very late) thanks to SamHatco for sharing.
