

79 Cutlass Wagon, 5.3 G machine


 09-28-2011 | 08:50 PM
#42
Thread Starter
On The Tree
Joined: Aug 2010
Posts: 143
Likes: 0
Received 0 Likes
on
0 Posts
From: Eagle Mountain, Utah
Thanks!
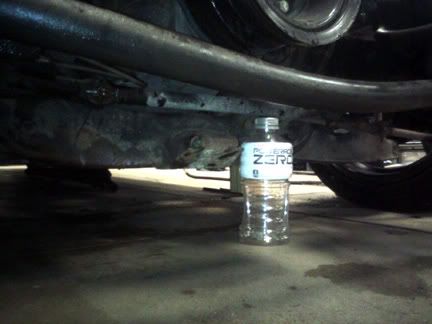
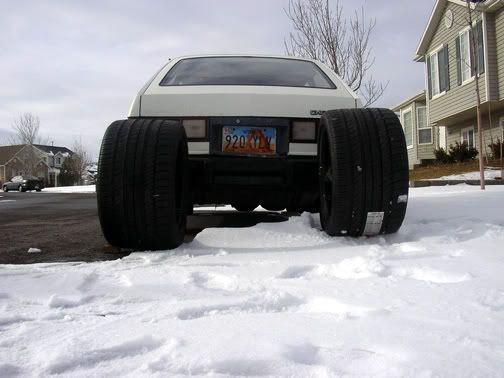
One extreme ride height photo. Just for kicks I put the old "skinnier" rims on and let the car down. This is with 2" spindles and 2 3/4 coils cut off the springs. There was about 2.5" of clearance under the front cross member. That wood block is 5.5" tall. Wish I could drive this low all the time, but definitely not here in Utah, the land of lousy roads.
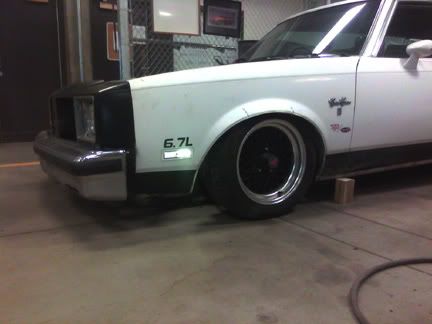
One extreme ride height photo. Just for kicks I put the old "skinnier" rims on and let the car down. This is with 2" spindles and 2 3/4 coils cut off the springs. There was about 2.5" of clearance under the front cross member. That wood block is 5.5" tall. Wish I could drive this low all the time, but definitely not here in Utah, the land of lousy roads.
09-28-2011 | 08:53 PM
#43
Thread Starter
On The Tree
Joined: Aug 2010
Posts: 143
Likes: 0
Received 0 Likes
on
0 Posts
From: Eagle Mountain, Utah
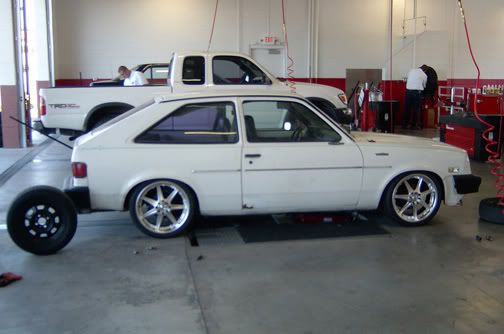
Now back to the proposed ride height with the 17's bolted on. I figured this was a good reference point, maybe Powerade will sponsor me now, lol!
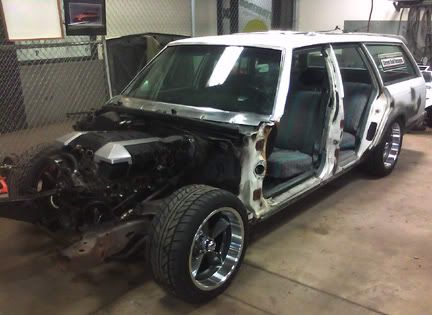
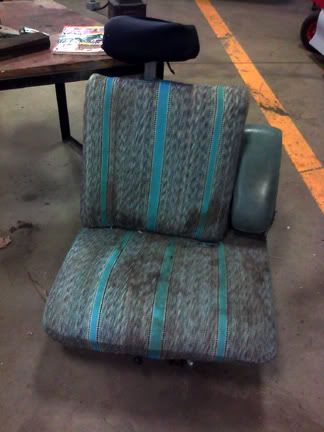
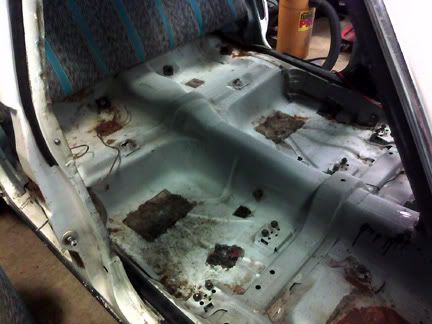
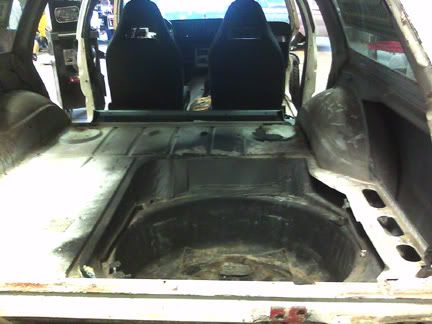
I spent today's spare lab time tearing the car down to get it ready to come off the frame. Just a few shots of the aftermath so far. How about those great seat covers!
Nice granny blue carpet, Eeeeew! The new interior will match the theme of the car, mostly black with silver and orange accents. The factory carpet had a pretty thick layer of a flexible plastic backing, something I've never seen before. Much to my surprise the jute pad underneath looked almost brand new. I suspect the plastic backing saved it from dirt and grime and all the milk bottles spilled in the back.

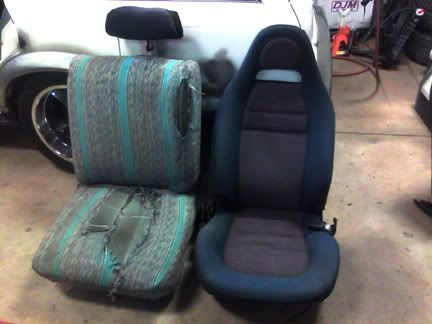
Here's Grandpa's Oldsmobile driver's side portion of the split bench next to the Mazda seat. Looking forward to getting them in, I'll be building the mounts after the car is the rest of the way torn down. The Mazda seats will make a huge difference in keeping my backside planted in hard cornering. Woohoo!
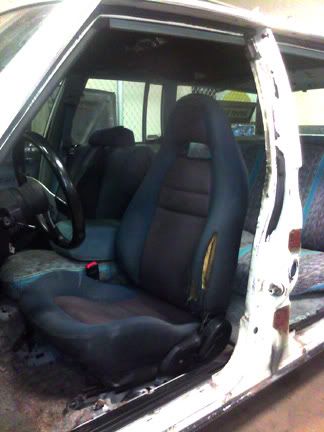
Finally a quick mock up of the driver's seat in place. I need to build custom mounts to raise them up about 3", more to come later on these...
I spent today's spare lab time tearing the car down to get it ready to come off the frame. Just a few shots of the aftermath so far. How about those great seat covers!
Nice granny blue carpet, Eeeeew! The new interior will match the theme of the car, mostly black with silver and orange accents. The factory carpet had a pretty thick layer of a flexible plastic backing, something I've never seen before. Much to my surprise the jute pad underneath looked almost brand new. I suspect the plastic backing saved it from dirt and grime and all the milk bottles spilled in the back.
Here's Grandpa's Oldsmobile driver's side portion of the split bench next to the Mazda seat. Looking forward to getting them in, I'll be building the mounts after the car is the rest of the way torn down. The Mazda seats will make a huge difference in keeping my backside planted in hard cornering. Woohoo!
Finally a quick mock up of the driver's seat in place. I need to build custom mounts to raise them up about 3", more to come later on these...

 09-28-2011 | 09:37 PM
#45
Thread Starter
On The Tree
Joined: Aug 2010
Posts: 143
Likes: 0
Received 0 Likes
on
0 Posts
From: Eagle Mountain, Utah
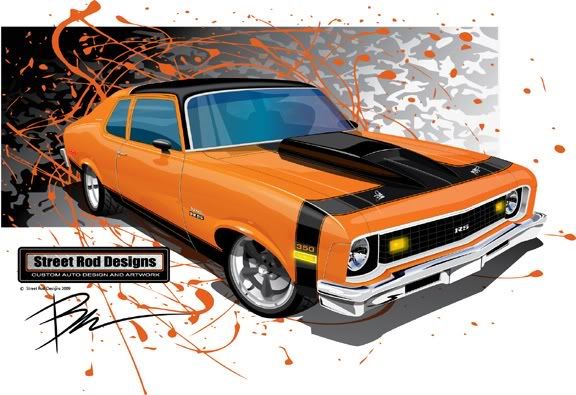
Here's a photo or two and the rendering I did of it. Look for the subtle body changes...
 09-28-2011 | 09:43 PM
#46
Thread Starter
On The Tree
Joined: Aug 2010
Posts: 143
Likes: 0
Received 0 Likes
on
0 Posts
From: Eagle Mountain, Utah
Thanks! 
My first love is Novas. I currently have a 74 street strip car and I bought my 13 yr old son a 73 Hatch that we'll be working on next year after the wagon's done. Someday I want to do a full-on pro-touring disco Nova. Here's a shot of the one for my son and the rendering I did for him...
My first love is Novas. I currently have a 74 street strip car and I bought my 13 yr old son a 73 Hatch that we'll be working on next year after the wagon's done. Someday I want to do a full-on pro-touring disco Nova. Here's a shot of the one for my son and the rendering I did for him...
09-28-2011 | 11:03 PM
#47
sawzall wielding director
iTrader: (4)
Your chevette looks like the body was in really nice shape. Mine is also long gone, I swapped the 4.3L v6 in took it for a couple rides and decided it was too slow.
Currently I`m putting together a 85 Monte Carlo SS 5.3L / 4L80E with a single magnum T72 turbo
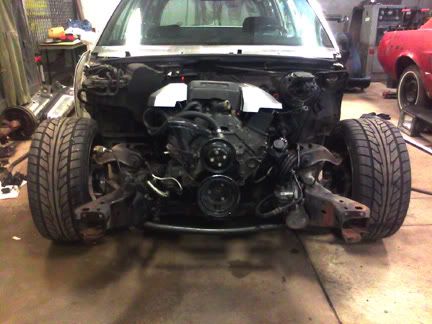
I can`t believe you got 245`s to fit up front I have 225/60-15`s up front and they slightly rub the inner fenders at full lock and they actually have a wear mark on the inner fender just in from the wheelwell lip.
Currently I`m putting together a 85 Monte Carlo SS 5.3L / 4L80E with a single magnum T72 turbo
I can`t believe you got 245`s to fit up front I have 225/60-15`s up front and they slightly rub the inner fenders at full lock and they actually have a wear mark on the inner fender just in from the wheelwell lip.
09-29-2011 | 01:11 AM
#48
TECH Enthusiast
iTrader: (9)
Joined: Mar 2008
Posts: 698
Likes: 0
Received 0 Likes
on
0 Posts
From: IL
Nice build seen this over at G body forum too. Love the brakes you just made me want to do those on my car. Can't beleive you got 255s up there, my 245s rub when turning on a bump.
09-29-2011 | 07:55 PM
#49
Thread Starter
On The Tree
Joined: Aug 2010
Posts: 143
Likes: 0
Received 0 Likes
on
0 Posts
From: Eagle Mountain, Utah
Thanks! It's tight and I will most likely work the front wheel openings a bit, but the end result kicks.
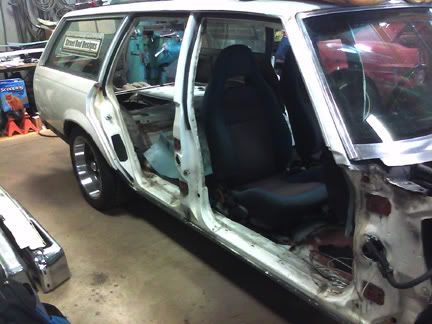
Finished pulling doors and interior today.
Last ugly seat photo, I'm really glad to see these things hit the dumpster. On this passenger side I pulled out the foam which was in great shape so that I can fab a small jump seat that will fit in between the buckets so that I can still fit my wife and 4 kids in the car with me. When not in use the back will fold down and do double duty as an arm rest. I also pulled off the factory arm rest to save for another project.
09-29-2011 | 07:59 PM
#50
Thread Starter
On The Tree
Joined: Aug 2010
Posts: 143
Likes: 0
Received 0 Likes
on
0 Posts
From: Eagle Mountain, Utah
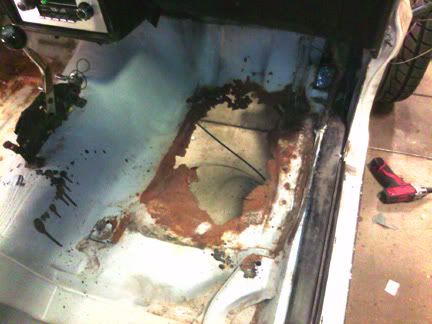
Here's a shot of the passenger side floor. I knew this was there and screwed down a piece of sheet aluminum a couple years ago until I could get to this point to fix it. Funny, the parts car on page one had a large hole in exactly the same spot. My guess is that because this is right above the gynormis factory cat, I'm thinking that the cat got hot enough to cook off the under coating, and the salt they use on the roads here in winter just took it's toll over time. With the school shop tools handy I'll use the bead roller and brake to make another insert out of 16 ga sheet steel and weld it in properly.
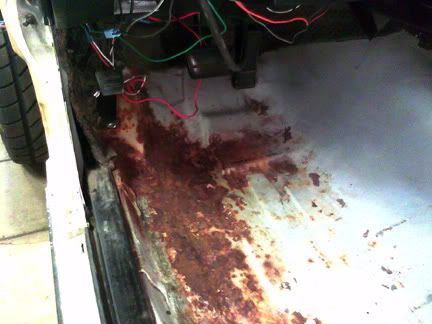
Unfortunately I didn't know this was here. The previous owner had filled the gap above the windshield between the roof and trim with clear silicone, a tell tale sign of a windshield leak. I'll bet that's what caused this. Luckily it hasn't rusted to the point that the floor integrity has been sacrificed so some cleaning with a wire wheel and some Por-15 should take care of it. I'll be pulling the windshield trim to patch up any problems around there.
The rest of the floor pan is luckily in great shape. Interesting how at the factory instead of gluing the jute pad to the floor they just slapped down some double stick squares and laid it down. Quick and simple.
09-29-2011 | 08:03 PM
#51
Thread Starter
On The Tree
Joined: Aug 2010
Posts: 143
Likes: 0
Received 0 Likes
on
0 Posts
From: Eagle Mountain, Utah
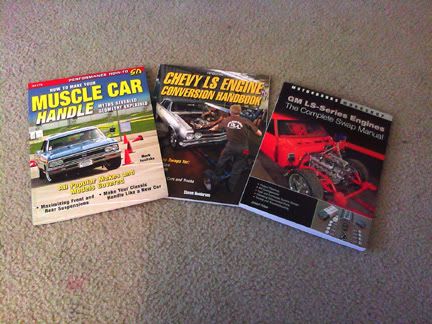
And last for today, new goodies came in. I ordered 2 LS swap books from Joseph Potak and Shawn Henderson and Marcus Savitske's handling book from Amazon. Right around $50, free shipping. I glanced through Marcus' book so far and I like the way he writes. I'm artsie fartsie so when people talk to me like I'm an engineer at Boeing it goes over my head sometimes. From what I can see he spells things out in a way that even I can wrap my head around the concepts. Really looking forward to reading it. PS I see Tony has his Monte's photo in the g-body section! Coool!
09-29-2011 | 08:12 PM
#52
Thread Starter
On The Tree
Joined: Aug 2010
Posts: 143
Likes: 0
Received 0 Likes
on
0 Posts
From: Eagle Mountain, Utah
Your chevette looks like the body was in really nice shape. Mine is also long gone, I swapped the 4.3L v6 in took it for a couple rides and decided it was too slow.
Currently I`m putting together a 85 Monte Carlo SS 5.3L / 4L80E with a single magnum T72 turbo
I can`t believe you got 245`s to fit up front I have 225/60-15`s up front and they slightly rub the inner fenders at full lock and they actually have a wear mark on the inner fender just in from the wheelwell lip.
10-05-2011 | 09:41 PM
#53
Thread Starter
On The Tree
Joined: Aug 2010
Posts: 143
Likes: 0
Received 0 Likes
on
0 Posts
From: Eagle Mountain, Utah
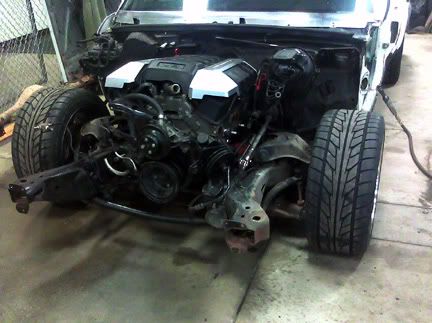
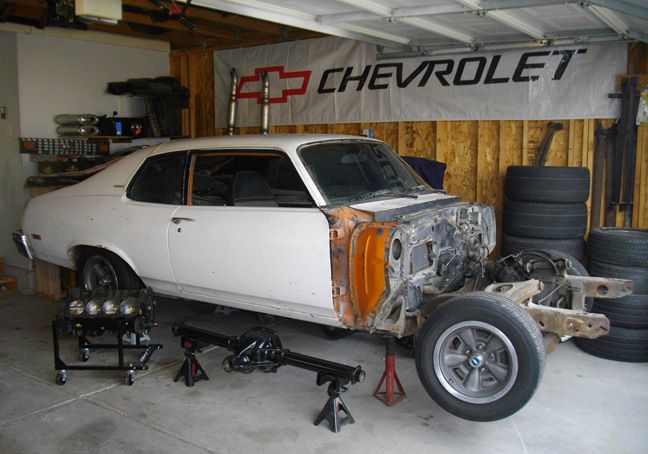
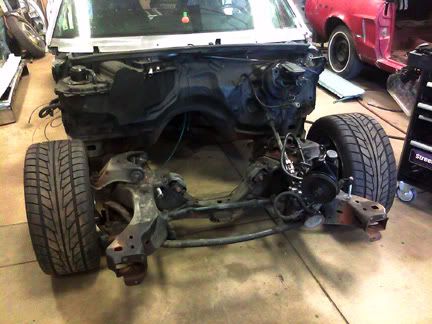
Finally got the motor and trans out.
Also finished up stripping the rest of the car. I find it fascinating to see how things were engineered and imagine how they put it together at the factory.
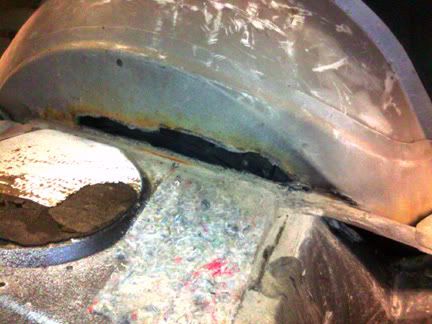
Unfortunately I found this on the rear passenger side wheel well, rotted clear through. I'll be moving them inward slightly so I'll fix the hole when I extend the tubs. Driver's side was fine.
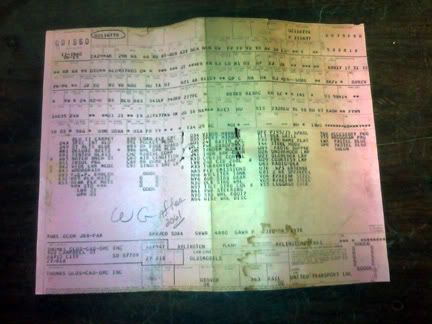
But with the bad comes the good, found this inside the rear seat. Looks like the car was built in Texas and delivered to an Olds dealership in Rapid City, South Dakota. Funny, that's where my wife is from too.
Also finished up stripping the rest of the car. I find it fascinating to see how things were engineered and imagine how they put it together at the factory.
Unfortunately I found this on the rear passenger side wheel well, rotted clear through. I'll be moving them inward slightly so I'll fix the hole when I extend the tubs. Driver's side was fine.
But with the bad comes the good, found this inside the rear seat. Looks like the car was built in Texas and delivered to an Olds dealership in Rapid City, South Dakota. Funny, that's where my wife is from too.
10-05-2011 | 09:42 PM
#54
Thread Starter
On The Tree
Joined: Aug 2010
Posts: 143
Likes: 0
Received 0 Likes
on
0 Posts
From: Eagle Mountain, Utah
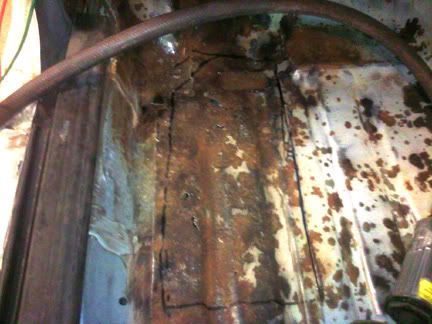
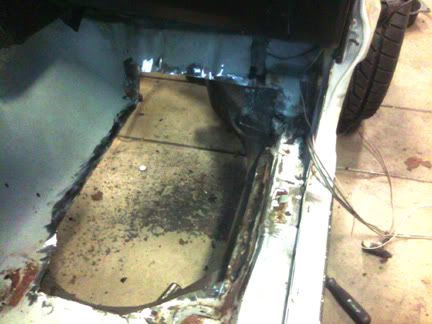
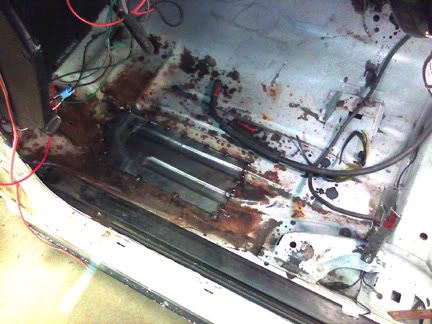
I bought a heavy duty wire wheel for my electric grinder and hit the driver's floor. Under the flakes I did find some holes, so I decided to go ahead and replace the area marked out.
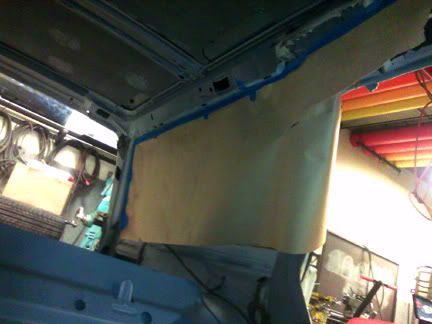
To protect it from any stray sparks I covered up the rear window with some heavy butcher paper doubled over and cut the floor with a die grinder.
Here's the hole left for the passenger side. Yikes!
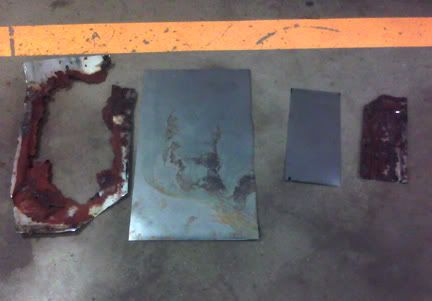
Once I got the rust cut out I sheared off some 18 ga sheet metal. I got basic dimensions traced on the sheet stock and did a rough cut with beverly sheers.
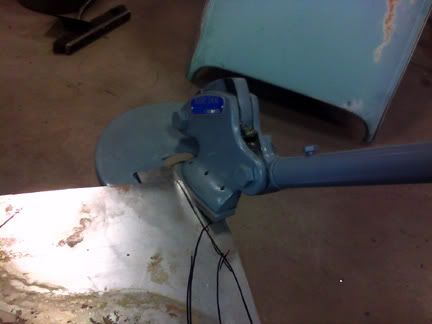
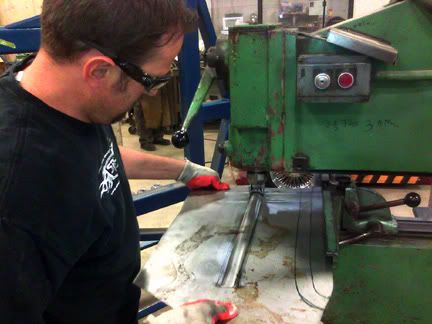
I used a machine called a Pullmax to duplicate the factory reinforcing ribs, here I am working on the passenger side.
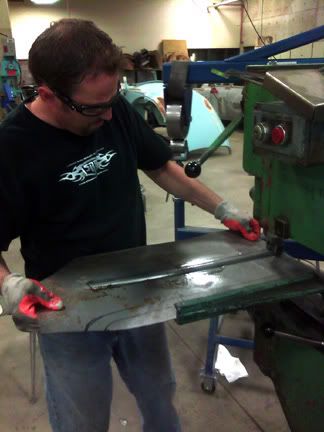
You use an upper female and lower male die, and the machine's up and down action beats the metal into place. I made 3-4 passes raising the lower die each time to get the correct depth imprint.
This is the end result of trimming and using the Pullmax, here's the driver's side tacked in place. Notice how the formed ribs line up with the factory floor ribs. This was as far as I got today, tomorrow I'll finish up the passenger side. More to come...
To protect it from any stray sparks I covered up the rear window with some heavy butcher paper doubled over and cut the floor with a die grinder.
Here's the hole left for the passenger side. Yikes!
Once I got the rust cut out I sheared off some 18 ga sheet metal. I got basic dimensions traced on the sheet stock and did a rough cut with beverly sheers.
I used a machine called a Pullmax to duplicate the factory reinforcing ribs, here I am working on the passenger side.
You use an upper female and lower male die, and the machine's up and down action beats the metal into place. I made 3-4 passes raising the lower die each time to get the correct depth imprint.
This is the end result of trimming and using the Pullmax, here's the driver's side tacked in place. Notice how the formed ribs line up with the factory floor ribs. This was as far as I got today, tomorrow I'll finish up the passenger side. More to come...

 10-07-2011 | 05:14 PM
#59
Awesome build, looks like its coming along. Lookin forward to your updates.
LS/6spd Chevette = BAD EFFIN ***. That would be an awesome project.
There is a chevette that looks just like that in the back of my work parking lot.
LS/6spd Chevette = BAD EFFIN ***. That would be an awesome project.
There is a chevette that looks just like that in the back of my work parking lot.
10-07-2011 | 10:14 PM
#60

Good lookin project. I have 245/45/17 on the front of my MCSS..they barely kiss the Sway Bar..I'm using the TT M-series 17x8, 4.5" BS. Stock 2000 Blazer Spindles & Brakes. That might be what's helping me out.
I might be able to squeeze 255's in there if I wanted to..
I might be able to squeeze 255's in there if I wanted to..