


LS1 / T56 DD e28 BMW Build
Progress is moving along. I should be starting it next weekend if all goes well.
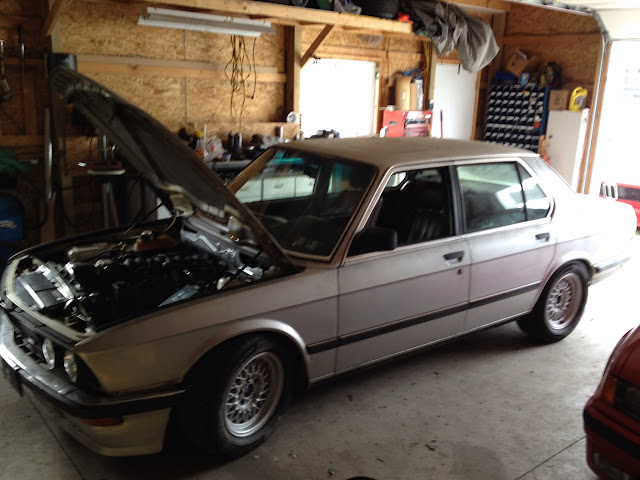
Driveshaft is in and fits really nice.

I might trim a little off the CSB mount as the shaft is about 1/4" away. It would probably be fine as is but a little extra clearance would give me a little piece of mind.

Rear brakes are all done...new parking brake cables, brakes, lines, etc
[img]https://lh3.googleusercontent.com/-OSFsdNtMK-c/T4N9-xhcEwI/AAAAAAAAAlM/LBlirMIbTQE/s640/IMAGE_47583C0E-784B-4FE7-A41D-5E4060DA29BD.JPG[/img

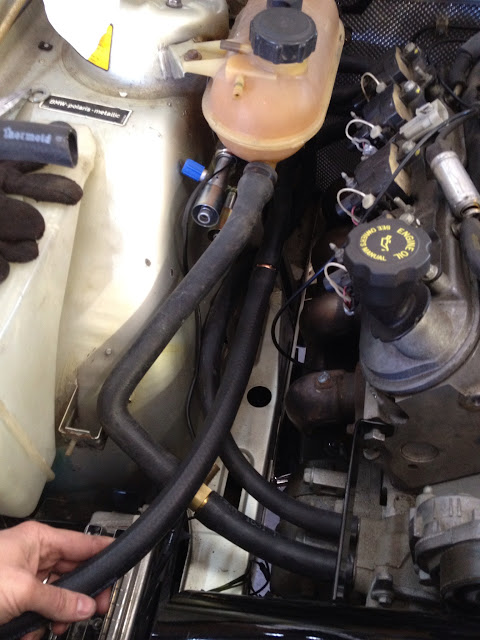
Power steering hoses are all figured out.
Russel adapter fitting in the GM pump to adapt to an -AN6

Banjo fitting to an -AN6 at the bottom of the steering box

I had a high pressure line made up at the local hydraulic shop

Heater valve and hoses are worked out.

Started on the wiring....
I had to change the routing of the wires to reach the PCM. A handful of wires will have the be lengthened and some were removed.
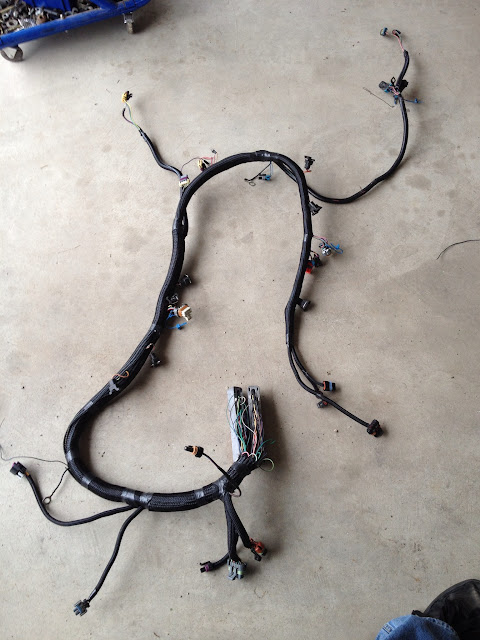
First step was to remove all the tape from the harness. This step was not very fun....
Harness laid out and ready to pull unneeded circuits and depin the PCM connectors.

One connector depinned

Both depinned....that's a lot of wires.

I then pulled each connector and circuit out of the bundle, cut any commons (pwr/gnd) and coiled each wire up and put it aside. Sorry no picture of this.
Then I started plugging the connectors back in on the engine and routing the wires. Injector and coils were first as they were pretty much still all in one big bundle.
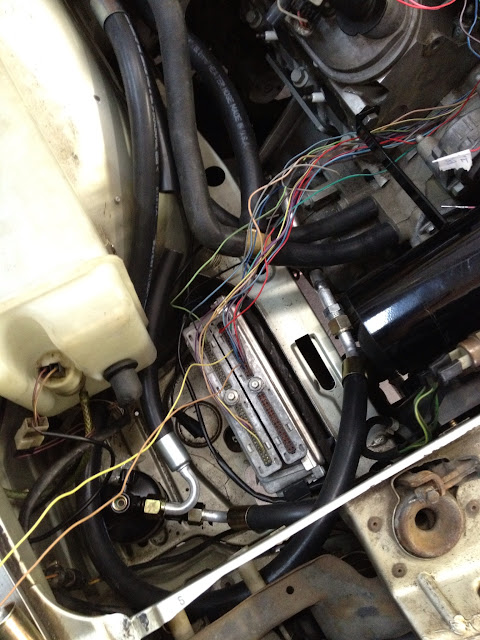
You can see here that the harness will come out the front right of the engine. The PCM is down by the AC drier.


Once all the wires are where they need to go I'll bundle them all together with tape where ever wires enter and exit the harness. The entire thing will then either get covered in split loom or split mesh....still unsure which to go with at this point.
I had to have some lines brazed for the AC system so those should be here today and I can get that wrapped up. Lines crimped, etc.
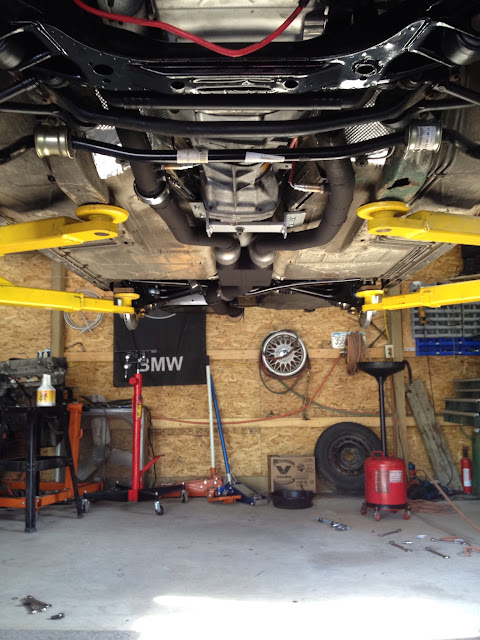
I have a smaller spintech muffler in route that will be here Thursday so I can tuck the exhaust up a bit more. I wasn't happy with 4" or less of ground clearance. I should be able to get about 6" with the new muffler. That should be fine.
Things are getting close....
Driveshaft is in and fits really nice.
I might trim a little off the CSB mount as the shaft is about 1/4" away. It would probably be fine as is but a little extra clearance would give me a little piece of mind.
Rear brakes are all done...new parking brake cables, brakes, lines, etc
[img]https://lh3.googleusercontent.com/-OSFsdNtMK-c/T4N9-xhcEwI/AAAAAAAAAlM/LBlirMIbTQE/s640/IMAGE_47583C0E-784B-4FE7-A41D-5E4060DA29BD.JPG[/img
Power steering hoses are all figured out.
Russel adapter fitting in the GM pump to adapt to an -AN6
Banjo fitting to an -AN6 at the bottom of the steering box
I had a high pressure line made up at the local hydraulic shop
Heater valve and hoses are worked out.
Started on the wiring....
I had to change the routing of the wires to reach the PCM. A handful of wires will have the be lengthened and some were removed.
First step was to remove all the tape from the harness. This step was not very fun....
Harness laid out and ready to pull unneeded circuits and depin the PCM connectors.
One connector depinned
Both depinned....that's a lot of wires.
I then pulled each connector and circuit out of the bundle, cut any commons (pwr/gnd) and coiled each wire up and put it aside. Sorry no picture of this.
Then I started plugging the connectors back in on the engine and routing the wires. Injector and coils were first as they were pretty much still all in one big bundle.
You can see here that the harness will come out the front right of the engine. The PCM is down by the AC drier.
Once all the wires are where they need to go I'll bundle them all together with tape where ever wires enter and exit the harness. The entire thing will then either get covered in split loom or split mesh....still unsure which to go with at this point.
I had to have some lines brazed for the AC system so those should be here today and I can get that wrapped up. Lines crimped, etc.
I have a smaller spintech muffler in route that will be here Thursday so I can tuck the exhaust up a bit more. I wasn't happy with 4" or less of ground clearance. I should be able to get about 6" with the new muffler. That should be fine.
Things are getting close....
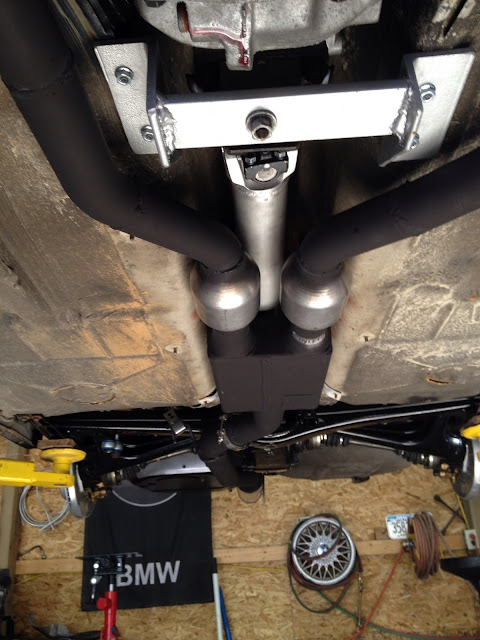
New muffler came yesterday....I was able to gain 2" of ground clearance. There is about 3/8" between the driveshaft and the muffler. Debating dropping it down a little bit...The driveshaft can't really move tho...
What do you all think?
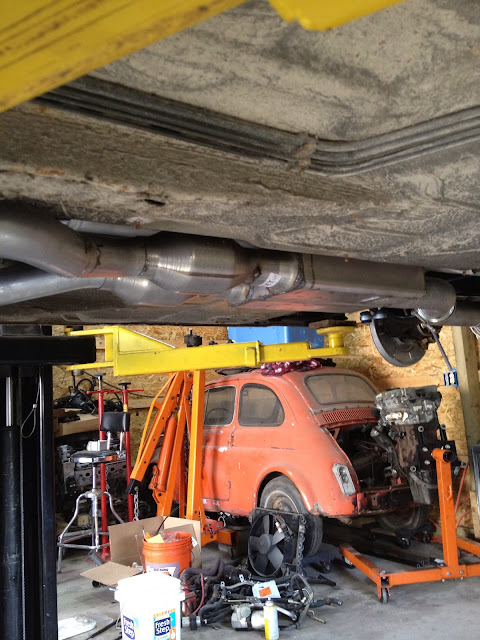


Here is the clearance to the drive shaft. Sorta hard to see but there is about 3/8"

I got the centers back from the powder coater. I am very happy with the color choice.

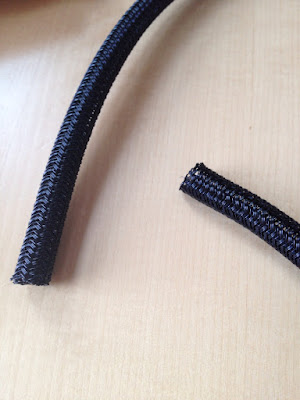
Got sot some mesh wrap for the harness.
What do you all think?
Here is the clearance to the drive shaft. Sorta hard to see but there is about 3/8"
I got the centers back from the powder coater. I am very happy with the color choice.
Got sot some mesh wrap for the harness.
I am able to adjust the exhaust up and down maybe 1/2-3/4" each way so if I end up being too close the to driveshaft I can lower it down a bit. Added some more tack welds to the exhaust and took it off the car before I weld it all the way.


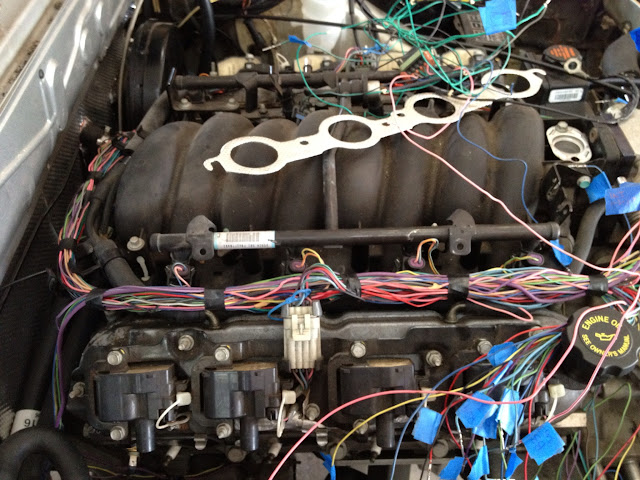
More wiring done....
Wiring coming off the TPS and IAC

Alternator and PCM coolant sensor

Wiring routed along from the injectors, coil, evap valve. Tapped anytime a wire comes in or out of the bundle.

Goes along the back of the engine...you can just see the wires coming up from the trans (O2 sensors, VSS, reverse lockout). Then it picks up, oil dummy light, cam sensor, maf, knock sensors.

From the passenger side...You can also see the crank sensor, coolant gauge, and starter wiring coming up into the bundle.
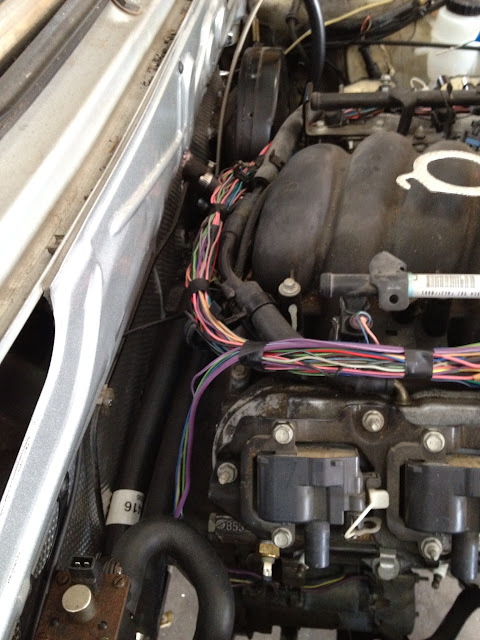
Passenger side bundle....it's getting bigger. Picks up the other injectors and coil wires.
Here you can see the wires started to be plugged back into the PCM in its new location. Some of the wires are too short and some are too long. The short ones will have to be lengthened of course but I am debating shortening the ones that are too long.... Some are up to 12" too long and I could sorta fold them back on themselves in the bundle or I can shorten them..... Any suggestions which way is best?

All connections of wires have been soldered and then covered in dual walled heat shrink. Inside has a adhesive that melts and bonds to the wire to provide moisture protection.
The rest of the AC parts will be here tomorrow so then I can finish the AC pressure sensor wiring as well as the MAF/IAC wiring.
If anyone else is doing a similar swap and needs harness work let me know. I really enjoy this step.
I was hoping it would be running next weekend but I am guessing it is the following. One of the problems I have is when I start to see the end of a project I almost don't want it to end...it's like a really good movie.
More wiring done....
Wiring coming off the TPS and IAC
Alternator and PCM coolant sensor
Wiring routed along from the injectors, coil, evap valve. Tapped anytime a wire comes in or out of the bundle.
Goes along the back of the engine...you can just see the wires coming up from the trans (O2 sensors, VSS, reverse lockout). Then it picks up, oil dummy light, cam sensor, maf, knock sensors.
From the passenger side...You can also see the crank sensor, coolant gauge, and starter wiring coming up into the bundle.
Passenger side bundle....it's getting bigger. Picks up the other injectors and coil wires.
Here you can see the wires started to be plugged back into the PCM in its new location. Some of the wires are too short and some are too long. The short ones will have to be lengthened of course but I am debating shortening the ones that are too long.... Some are up to 12" too long and I could sorta fold them back on themselves in the bundle or I can shorten them..... Any suggestions which way is best?
All connections of wires have been soldered and then covered in dual walled heat shrink. Inside has a adhesive that melts and bonds to the wire to provide moisture protection.
The rest of the AC parts will be here tomorrow so then I can finish the AC pressure sensor wiring as well as the MAF/IAC wiring.
If anyone else is doing a similar swap and needs harness work let me know. I really enjoy this step.
I was hoping it would be running next weekend but I am guessing it is the following. One of the problems I have is when I start to see the end of a project I almost don't want it to end...it's like a really good movie.
There is a wind storm here today and the school I teach at lost power so I ended up with a half day.
I had power at my house tho..
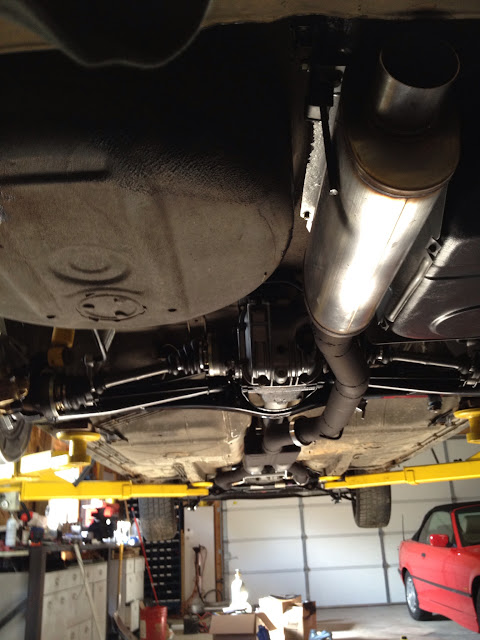
I was able to get the exhaust all welded up.

The rest of my AC parts came today....and once again one of them is wrong. The company I got them from knows what they messed up....new one should get made and on the way. But the part I needed to be able to route all the lines was correct so that is good.
A couple AC line pictures..still need to be crimped


This is the part that is wrong....for the second time. It should have a #8 beadlock with a high side fill port. This one has #10 and a low side port.

Started plugging things back into the PCM. Lengthening or shortening by soldering and covering with adhesive lined heat shrink. Matching wire colors as close as I can get .
I had power at my house tho..
I was able to get the exhaust all welded up.
The rest of my AC parts came today....and once again one of them is wrong. The company I got them from knows what they messed up....new one should get made and on the way. But the part I needed to be able to route all the lines was correct so that is good.
A couple AC line pictures..still need to be crimped
This is the part that is wrong....for the second time. It should have a #8 beadlock with a high side fill port. This one has #10 and a low side port.
Started plugging things back into the PCM. Lengthening or shortening by soldering and covering with adhesive lined heat shrink. Matching wire colors as close as I can get .
Well I was hoping to have it running today but that didn't happen. Worked on it all day but ran out of time. It's getting closer and closer though.
My list...

Engine harness off, fully wrapped. I went through and checked every pin just to be sure.
Harness back on the engine


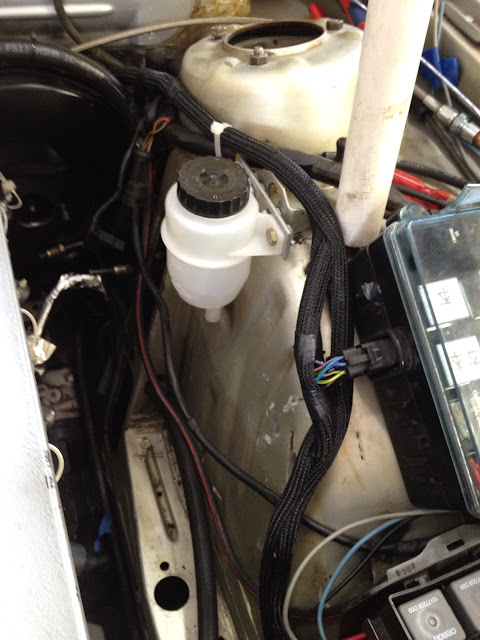
Where it ties into the chassis
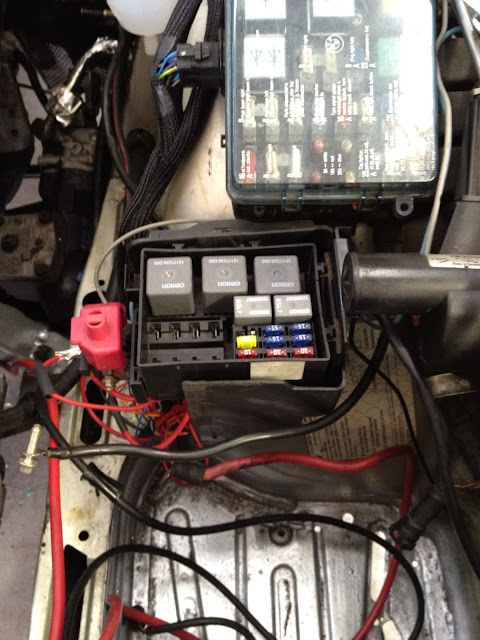
GM fuse box all wired up
I got some used GTO fuel rail covers....they need a little trimming to fit. They will get repainted and the GTO will get shaves off. Should they be black or silver? Or something else?

Other things that got done today but really no pictures to show...
new radiator is in, lower radiator hose is done, upper rad hose is ready, heater hoses just need a couple more clamps, brake booster line hooked up, power steering lines ready to go... I think that is it
I should be able to work out there tomorrow a little bit but I doubt I will have it ready to start Coming soon tho.
My list...
Engine harness off, fully wrapped. I went through and checked every pin just to be sure.
Harness back on the engine
Where it ties into the chassis
GM fuse box all wired up
I got some used GTO fuel rail covers....they need a little trimming to fit. They will get repainted and the GTO will get shaves off. Should they be black or silver? Or something else?
Other things that got done today but really no pictures to show...
new radiator is in, lower radiator hose is done, upper rad hose is ready, heater hoses just need a couple more clamps, brake booster line hooked up, power steering lines ready to go... I think that is it
I should be able to work out there tomorrow a little bit but I doubt I will have it ready to start Coming soon tho.
LS1 Tech Stories
The Best V8 Stories One Small Block at Time

Gas Monkey Built a 6-Wheel Ferrari Testarossa With a Corvette LT4 Engine
Verdad Gallardo
7 Most Reliable High-Performance Engines GM Has Ever Built
Verdad Gallardo
Amazing '71 Camaro Restomod Is Modern Muscle Car Under the Skin
Verdad Gallardo
6 Common C5 Corvette Failures and What's Involved In Repairing Them
Pouria Savadkouei
Retro Modern Bandit Pontiac Trans AM Comes With Burt Reynolds' Autograph
Verdad Gallardo
Top 10 Greatest Cadillac V Series Performance Models Ever, Ranked
Pouria Savadkouei
Top 10 Most Powerful Chevy Trucks Ever Made!

Hennessey's New Supercharged Silverado ZR2 Has 700 HP
Verdad Gallardo
Coachbuilt N2A Anteros Is an LS2-Powered C6 Corvette In Italian Clothes
Verdad Gallardo Its really not as close as it looks...maybe in a few spots but not bad...
It's running!!!
Video is pretty boring but this was the first start.....running smooth. Still have to finish a few things before it can be driven.
http://www.youtube.com/watch?v=hDydIYsUalA
A few pics of the exhaust painted and back on the car.

Also picked this up for my wife yesterday.....I am thinking it will get a 60 degree GM v6.....around 200hp or so.
67 volvo amazon

It's running!!!
Video is pretty boring but this was the first start.....running smooth. Still have to finish a few things before it can be driven.
http://www.youtube.com/watch?v=hDydIYsUalA
A few pics of the exhaust painted and back on the car.
Also picked this up for my wife yesterday.....I am thinking it will get a 60 degree GM v6.....around 200hp or so.
67 volvo amazon

Teching In
Joined: Jun 2009
Posts: 40
Likes: 0
I've been thinking of picking up an E34 and trying out this swap. I've heard of a few being around, but the one thread I found on here has since had the pics removed so not much help. I'm thinking since the E34 could be had with 2 different V8s it might be easier, but not entirely sure. I don't want to run into a ton of issues with the steering and what not, so more investigation will be done before I buy anything...
An e34 would be pretty similar to my swap as they share a lot of front end parts. The e34 also had the m30 which the e28 got too.
The engine bay is a little bigger tho than the e28 so I bet there wouldn't be much trouble fitting it.
Where are you located?
The engine bay is a little bigger tho than the e28 so I bet there wouldn't be much trouble fitting it.
Where are you located?
First time off the lift in 5 months..first time moving under it's own power. It needs an alignment really badly...also need insurance and a plate but it drove around the block a few times. I love the way the clutch feels and the trans shifts. Very happy I had the trans gone through.
I live in a residential area (25mph) so I really wasn't able to get on it much. But when I did it put a smile on my face for sure.
Hoping to get an alignment today and plates tomorrow and start driving the thing!
A few pictures.
back on the ground
Location of shifter...I need a new boot. I might make a different selector so I can use a newer style BMW shift **** and also bring it just a tad higher. But this will work for now.

Another engine bay shot....

I live in a residential area (25mph) so I really wasn't able to get on it much. But when I did it put a smile on my face for sure.
Hoping to get an alignment today and plates tomorrow and start driving the thing!
A few pictures.
back on the ground
Location of shifter...I need a new boot. I might make a different selector so I can use a newer style BMW shift **** and also bring it just a tad higher. But this will work for now.
Another engine bay shot....


Exhaust sounds excellent....really quiet, tight sounding, rumble under idle, really quiet when cruising. I have only driven it MAYBE 3 miles so time will tell
Got the car aligned today....drives a lot better. Hoping to find some time tomorrow to get tags so it is legal to drive.
Gave it a quick wash today after months of dust and grime in the garage.
These tires are a little too tall so it will look a little different but you can get the idea...
The paint it mostly dull....My cousin who does paintless dent repair and some amazing things with a buffer said he thinks he can bring some of the shine back. I will probably paint it next summer....still unsure if it will stay silver or change to black.


A few of the interior.


The guys at the alignment shop were blown away. I actually did most of the alignment as the rear is all adjustable now. Makes everything easy when it is all brand new.
Got the car aligned today....drives a lot better. Hoping to find some time tomorrow to get tags so it is legal to drive.
Gave it a quick wash today after months of dust and grime in the garage.
These tires are a little too tall so it will look a little different but you can get the idea...
The paint it mostly dull....My cousin who does paintless dent repair and some amazing things with a buffer said he thinks he can bring some of the shine back. I will probably paint it next summer....still unsure if it will stay silver or change to black.
A few of the interior.
The guys at the alignment shop were blown away. I actually did most of the alignment as the rear is all adjustable now. Makes everything easy when it is all brand new.
The seats are stock BMW seats but not to this car. They came in the car when I bought it but they are from a 535is of the same era...my car is a 528e. The seats are 10 way power...even the head rests and knee bolsters are power. The headrests don't currently work so that needs to be fixed. Also plan to add heat to them.
TECH Resident
Joined: Aug 2003
Posts: 960
Likes: 1
From: Central, FL
Looks great! I had a 84 528e for a long time... i loved that car and miss it everyday... I see you had the M front spoiler and badges. I really wanted to the do the front spoiler on mine before I sold it.
I have put just over 400 miles on it and all seems good. I am going to change the cone air filter to an airbox as the intake sound is just too loud. You can't hear the engine at all really....just all air sucking.
I have an airbox from a e30 that fits and one from an e23 that is a little bigger but I think it will fit too. I will have some time this week to make something work. One plus about the e23 is the box is metal so I can change it as needed and weld to it.
I was hoping to have the AC charged by now but the heater core is leaking so I need to replace that first...
It was around 90 degrees here this weekend so I spent a lot of time inside. Worked on refinishing the wheels today. Right now the lips are just bare aluminum...with two coats of wax on them. I don't have them put together yet and I am at the point of should I powder coat the lips clear or leave them bare..... What do you all think?


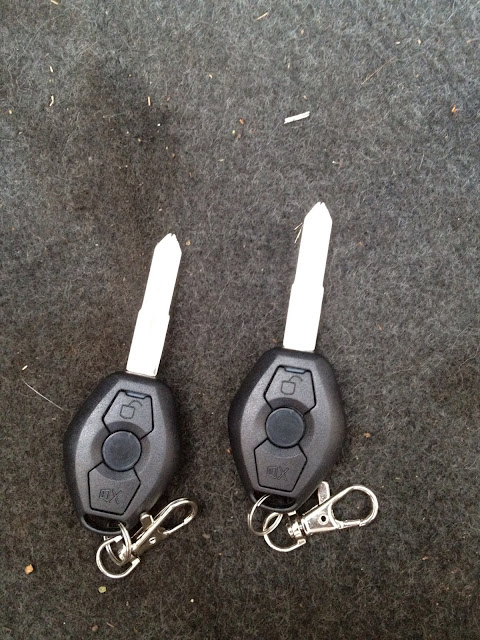
I bought a keyless entry/alarm off ebay with the remote in the key. I didn't hook up the alarm part. Just the keyless. It is all hooked up. I just need to get the keys cut.

Worked on adapting the BMW cruise cable to work with the LS1 TB. Just need to add a crimp after the little snap thingy.


I have an airbox from a e30 that fits and one from an e23 that is a little bigger but I think it will fit too. I will have some time this week to make something work. One plus about the e23 is the box is metal so I can change it as needed and weld to it.
I was hoping to have the AC charged by now but the heater core is leaking so I need to replace that first...
It was around 90 degrees here this weekend so I spent a lot of time inside. Worked on refinishing the wheels today. Right now the lips are just bare aluminum...with two coats of wax on them. I don't have them put together yet and I am at the point of should I powder coat the lips clear or leave them bare..... What do you all think?
I bought a keyless entry/alarm off ebay with the remote in the key. I didn't hook up the alarm part. Just the keyless. It is all hooked up. I just need to get the keys cut.
Worked on adapting the BMW cruise cable to work with the LS1 TB. Just need to add a crimp after the little snap thingy.