
84 Corvette 5.3 build
 01-10-2012, 11:55 AM
#21
Staging Lane

Join Date: May 2011
Posts: 72
Likes: 0
Received 0 Likes
on
0 Posts
You may find this thread helpful:
https://ls1tech.com/forums/conversio...e-my-swap.html
For my EROD swap we're using the GMPP accessory kit (part #19155067) & are looking at an AC bracket from KWiK, per the above thread.
https://ls1tech.com/forums/conversio...e-my-swap.html
For my EROD swap we're using the GMPP accessory kit (part #19155067) & are looking at an AC bracket from KWiK, per the above thread.
 01-10-2012, 02:20 PM
#22

I figured since I don't need the ac compressor or bracket that kit is a little overkill for me... but I did score a 99 vette ps pump and bracket for $100 bux today from one of our exchange yards. which is lucky because most people sell the engines complete and don't separate the accessories and brackets around here.
01-10-2012, 07:53 PM
#24
I did a few little things like take the hood off the car and tag some wires...gotta wait til I get the engine done and all the parts before I can really continue. I'd like to not pull the old one too soon so everything is fresh in my mind when I throw it back together. On another good note I looked at the owners manual while I was diggin thru the car for the hell of it and it reminded me to look at the rpo codes! to my surprise I found out it has both the z51 handling package and the l83 3.31 gears instead of 3.07's so this was all good news to me!
01-11-2012, 06:15 PM
#25
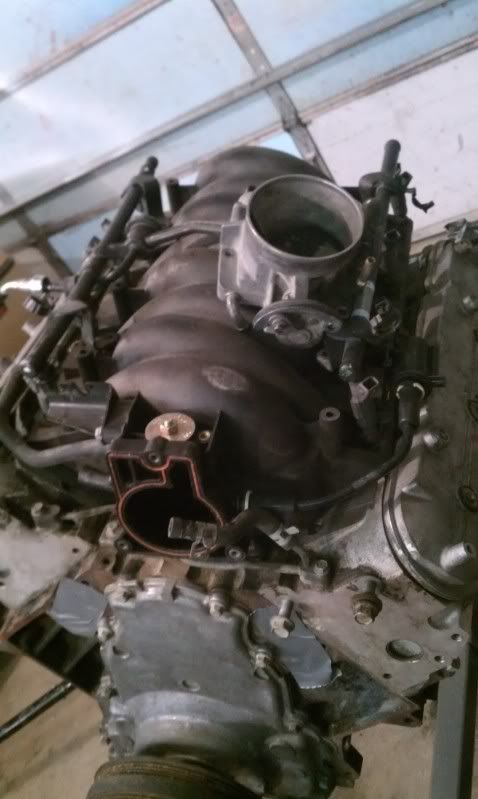
big thanks to Iownfast for the manifold setup! it got here quick and looks good! a lot cleaner than the sloppy truck manifold.
I also brought home a 4l60e out of a 03 chevy express van from work today, that should be much nicer than the 700r4 in there.
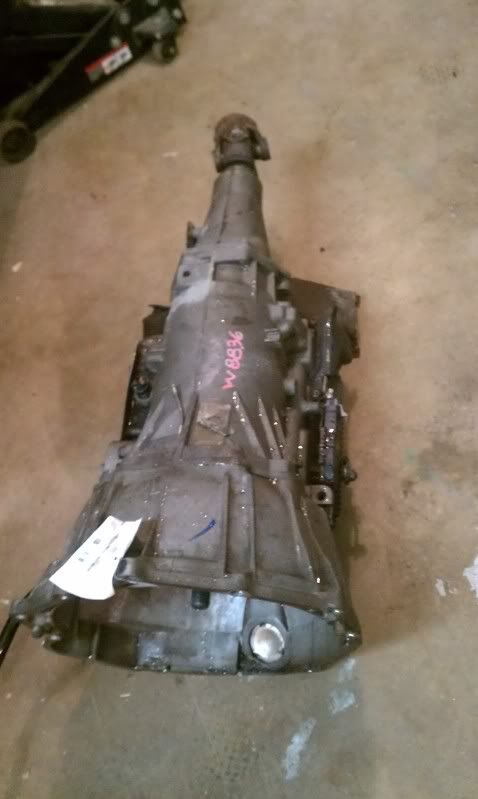
I should have some disassembly photos of taking the old engine/tranny out here within the next few days hopefully for everyone
I also brought home a 4l60e out of a 03 chevy express van from work today, that should be much nicer than the 700r4 in there.
I should have some disassembly photos of taking the old engine/tranny out here within the next few days hopefully for everyone
 01-12-2012, 10:07 AM
#27
I am going to try and keep a compiled list of parts and bolts etc. along with pics of everything I run into. I probably won't have to buy to many bolts tho because I work at a salvage yard and I can get plenty of those right off vehicles  . M10x1.5x75mm were what My engine stand took. Depending on your arms you might need longer bolts but those are what I used in case anyone wondered.
. M10x1.5x75mm were what My engine stand took. Depending on your arms you might need longer bolts but those are what I used in case anyone wondered.
01-17-2012, 07:56 PM
#28
Alright so after reading more and more and more..........I'm very highly thinking about skipping the 800 dollar headers and the cam and the heads and just buying an ebay turbo and fabbing up all the piping to make it work and run it on the stock block. I have been seeing some pretty impressive numbers and to be honest it will be a lot cheaper initially.....Then later on I could build the complete engine and upgrade to a bigger turbo.....has n e one fit a turbo in one of these cars? I just hope there is plenty of space to make it work. I have acess to all sorts of tubing, a bender and I already have a welder and have fabbed up intercooler setups from scratch before. What ya'll think?
01-19-2012, 01:50 PM
#29
Just got my shiny new Oil pan, pickup tube and tray!!!!! bought it thru work with my discount from the dealer for $247 which I thought was a pretty good price since it was $30 cheaper than gmpartsdirect and especially since it got here in 1 day! I decided to get a camaro wiring harness I got a good deal on and within the next few weeks I should have my mounts and trans adapter and I am going to pull the old engine out and start test fitting the 5.3 and 4l60e tranny. I will make sure to get lots of pics of the swap and especially pics of spots where I get hung up.
01-21-2012, 01:23 AM
#30

Truck crank may not work for the vette! It will stick too far out toward the crossmember. That is why there are 2 LSx crank types. Cars and truck listed in order of their overall length. Same for accessories because of the alignment of the belt to the pulleys, namely the balancer. There are 3 types of accessory setups--Vette,F-body and Truck. The harmonic balancer mounted will not clear the crossmember on the truck crank.
If you goto a 4l60e (which is what i am going to do in my 85 C4) then you will need an adapter that goes in between the tailshaft housing and tranny case. (you have to remove your tailshaft housing off your old 700r4 and bolt it onto the 4l60e), remember you got a longitudinal tranny mount that bolts to the rearend.
That old 700r4 was a dog that should have been shot! But it was the early makings of the 4l60e. The TV (throttle valve) sucks! You get it misadjusted and drive it, you burn your tranny up. The early 700r4 (around 1985) had alot of design flaws. The valve body has a "million" updates and the front seal loved to walk out and blow all your fluid on the road.
I am almost certain you will also need to take apart the 4l60e and replace the tailshaft because the newer will have more splines than the 700r4. This will be a problem with your driveshaft yoke. I would rebuild the tranny anyway since most of them are lucky to make it to 125k on the factory build. Do all the upgrades! Beast sunshell, kevlar 2-4 band, corvette servo, etc.
Original fuel pump has to go. Doesn't have the correct volume and PSI.
Your tranny is a PWM (pulse with modulation) which has to do with how the lock-up is initiated and completed. The older was just a flat out 12vdc "slammed" to a coil terminal. The PWM is modulated so its "feathered" to the coil for torque converter lockup. Make sure your PCM is PWM compatible or you will fry the tranny with a non PWM computer!
Good luck and let me know what problems you run into so i dont have to learn the hard way on my build/conversion.
Im going with a ironblock 5.3L LM7 bored to 5.7L/ls6 intake/799 heads
Last edited by remauto1187; 01-21-2012 at 02:22 AM.
01-23-2012, 08:48 PM
#31
Well I got a little more done. My buddy starting taking out the old AC lines and drained coolant etc. etc. while I put on the new pan and got the broke manifold bolt out. Hope you enjoy the pics and hopefully all this info will help people. If I forget to put a pic up or tell how I did something and you are curious just ask
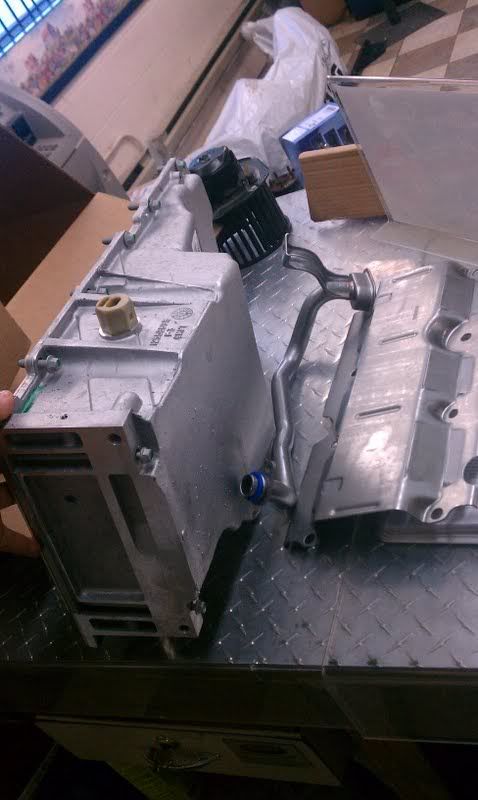
car windage tray vs truck tray
in the middle of lubing up that o-ring like a **** star so she slides right in
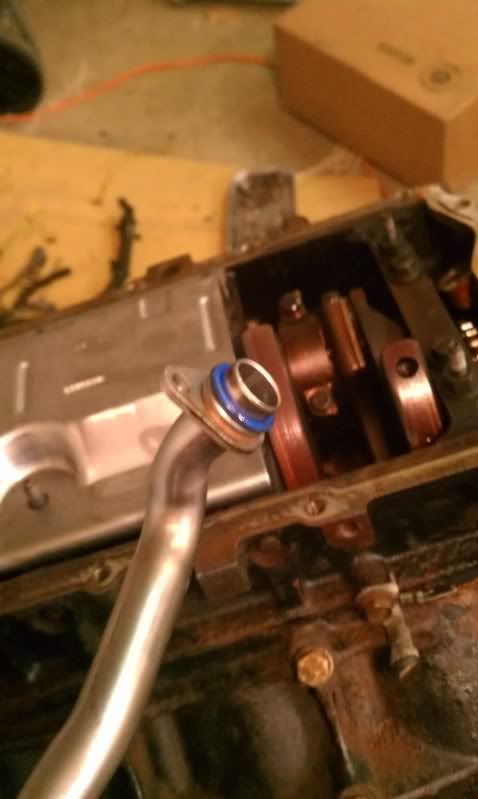
new tray and tube installed. Also see where the bead of red is between the covers and the block.....thats where you silicone when putting the pan on to help prevent leaks.

got the pan all bolted on

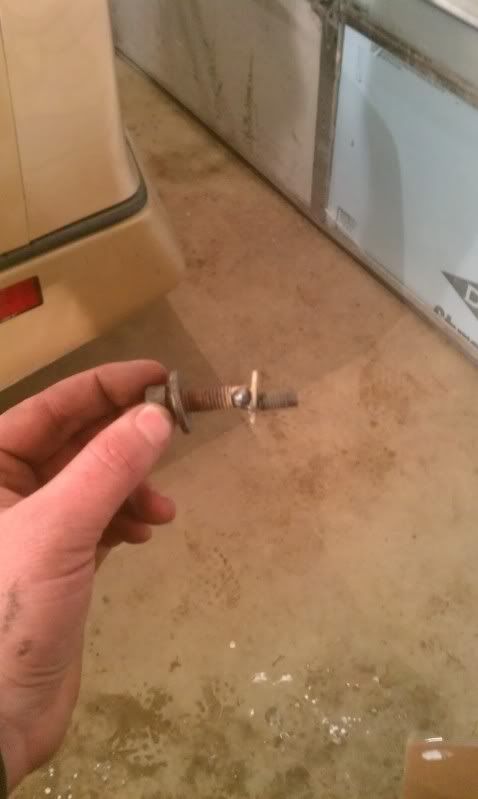
and a little welding and that damn broke off exhaust manifold bolt came right out
car windage tray vs truck tray
in the middle of lubing up that o-ring like a **** star so she slides right in
new tray and tube installed. Also see where the bead of red is between the covers and the block.....thats where you silicone when putting the pan on to help prevent leaks.
got the pan all bolted on
and a little welding and that damn broke off exhaust manifold bolt came right out
Last edited by 84lsvette; 01-23-2012 at 09:02 PM.
01-24-2012, 08:52 AM
#32
Truck crank may not work for the vette! It will stick too far out toward the crossmember. That is why there are 2 LSx crank types. Cars and truck listed in order of their overall length. Same for accessories because of the alignment of the belt to the pulleys, namely the balancer. There are 3 types of accessory setups--Vette,F-body and Truck. The harmonic balancer mounted will not clear the crossmember on the truck crank.
If you goto a 4l60e (which is what i am going to do in my 85 C4) then you will need an adapter that goes in between the tailshaft housing and tranny case. (you have to remove your tailshaft housing off your old 700r4 and bolt it onto the 4l60e), remember you got a longitudinal tranny mount that bolts to the rearend.
That old 700r4 was a dog that should have been shot! But it was the early makings of the 4l60e. The TV (throttle valve) sucks! You get it misadjusted and drive it, you burn your tranny up. The early 700r4 (around 1985) had alot of design flaws. The valve body has a "million" updates and the front seal loved to walk out and blow all your fluid on the road.
I am almost certain you will also need to take apart the 4l60e and replace the tailshaft because the newer will have more splines than the 700r4. This will be a problem with your driveshaft yoke. I would rebuild the tranny anyway since most of them are lucky to make it to 125k on the factory build. Do all the upgrades! Beast sunshell, kevlar 2-4 band, corvette servo, etc.
Original fuel pump has to go. Doesn't have the correct volume and PSI.
Your tranny is a PWM (pulse with modulation) which has to do with how the lock-up is initiated and completed. The older was just a flat out 12vdc "slammed" to a coil terminal. The PWM is modulated so its "feathered" to the coil for torque converter lockup. Make sure your PCM is PWM compatible or you will fry the tranny with a non PWM computer!
Good luck and let me know what problems you run into so i dont have to learn the hard way on my build/conversion.
Im going with a ironblock 5.3L LM7 bored to 5.7L/ls6 intake/799 heads
If you goto a 4l60e (which is what i am going to do in my 85 C4) then you will need an adapter that goes in between the tailshaft housing and tranny case. (you have to remove your tailshaft housing off your old 700r4 and bolt it onto the 4l60e), remember you got a longitudinal tranny mount that bolts to the rearend.
That old 700r4 was a dog that should have been shot! But it was the early makings of the 4l60e. The TV (throttle valve) sucks! You get it misadjusted and drive it, you burn your tranny up. The early 700r4 (around 1985) had alot of design flaws. The valve body has a "million" updates and the front seal loved to walk out and blow all your fluid on the road.
I am almost certain you will also need to take apart the 4l60e and replace the tailshaft because the newer will have more splines than the 700r4. This will be a problem with your driveshaft yoke. I would rebuild the tranny anyway since most of them are lucky to make it to 125k on the factory build. Do all the upgrades! Beast sunshell, kevlar 2-4 band, corvette servo, etc.
Original fuel pump has to go. Doesn't have the correct volume and PSI.
Your tranny is a PWM (pulse with modulation) which has to do with how the lock-up is initiated and completed. The older was just a flat out 12vdc "slammed" to a coil terminal. The PWM is modulated so its "feathered" to the coil for torque converter lockup. Make sure your PCM is PWM compatible or you will fry the tranny with a non PWM computer!
Good luck and let me know what problems you run into so i dont have to learn the hard way on my build/conversion.
Im going with a ironblock 5.3L LM7 bored to 5.7L/ls6 intake/799 heads
I already have a 4l60e as show above and all you need to do is put the tailhousing adapter on and switch the tailhousing which is no big deal
I am sumping the tank and running a walbro 255 external pump (or I might just use dual pumps right off the bat) with the corvette filter setup with aftermarket rails/braided line. I will also be running either 60 or 80 lb injectors....might as well go with 80 since all I'm gonna do is keep upping the boost, then I'm not maxing duty cycle and have some room to grow.
01-24-2012, 08:48 PM
#33
Registered User

Join Date: Jan 2012
Location: Iowa
Posts: 6
Likes: 0
Received 0 Likes
on
0 Posts
Your welcome for the help  cant wait to help you more and get to the test fit excited to see where you go with the vette since it had been in my family for awhile!!! btw if you want to work on her this week or weekend im game the gf can wait the swap is up and going.
cant wait to help you more and get to the test fit excited to see where you go with the vette since it had been in my family for awhile!!! btw if you want to work on her this week or weekend im game the gf can wait the swap is up and going.
02-21-2012, 09:46 PM
#34
Well I am finally getting close to having eveything collected to install this thing. Got a wiring harness and balancer thanks to a few members on here. Last night I spent a few hours with a wire wheel cleaning up the heads and block. Tonight I painted up the block and valve covers. They are almost done except I plan on painting the 2 grooves in the valve cover black for a little detail...This engine sure has come a long way since hitting my shop...Looks a hell of a lot cleaner now!
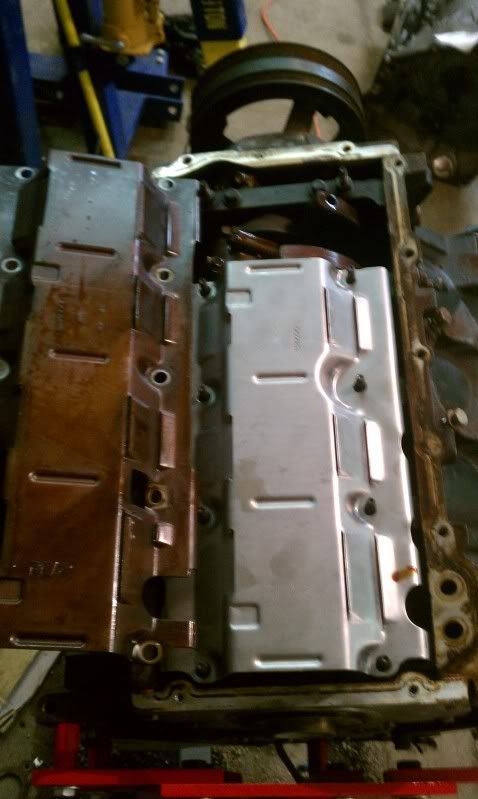
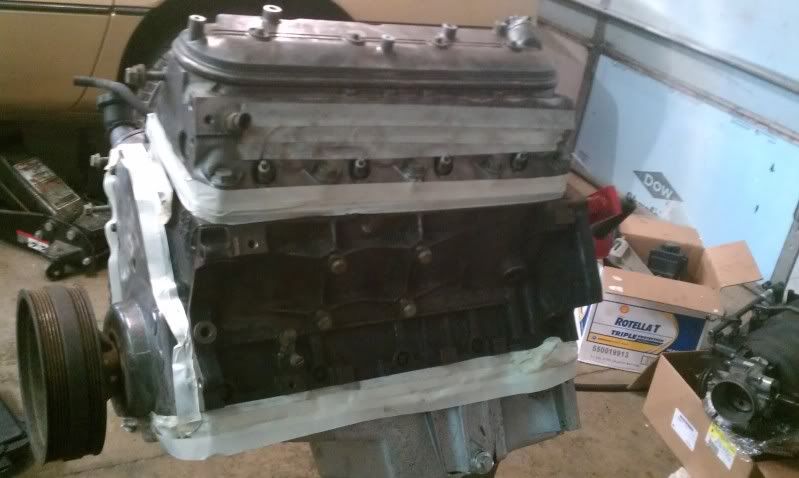
everything cleaned with a wire wheel and block ready for painting
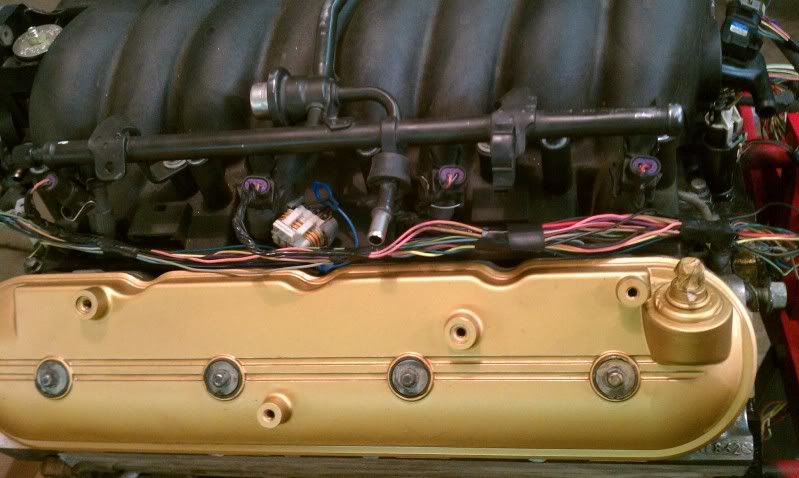
Valve covers and block painted
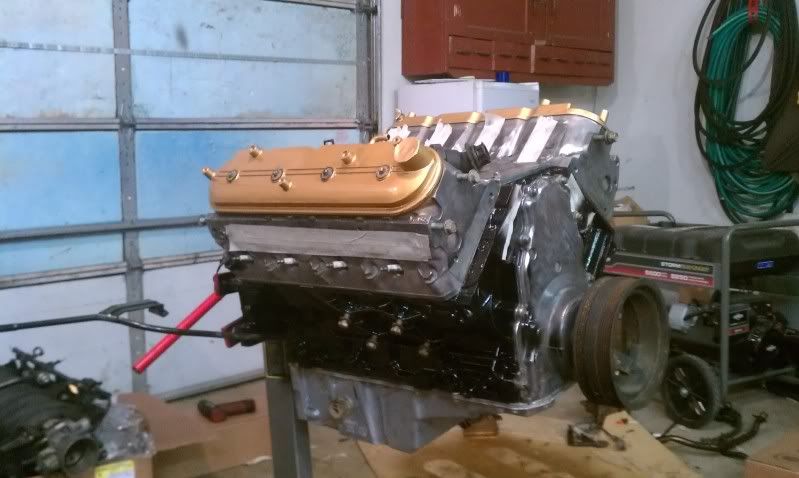
after the pics I cleaned up the little overspray on the heads and timing cover. After I install the cam here in the next few weeks I plan on painting the timing cover also.
everything cleaned with a wire wheel and block ready for painting
Valve covers and block painted
after the pics I cleaned up the little overspray on the heads and timing cover. After I install the cam here in the next few weeks I plan on painting the timing cover also.
02-27-2012, 11:59 PM
#35
well big thanks to my buddy minnow81469 for helping me pull the old crossfire turd out of the car tonight after work. We got her pulled in about 4 hours and a few beers  . Still got a long ways to go and lots of money to spend but it's getting a lot closer to a reality now!
. Still got a long ways to go and lots of money to spend but it's getting a lot closer to a reality now!
04-08-2012, 11:05 AM
#36
Haven't had much time to work on the project due to a lack to time. But I got my conversion mounts yesterday and my trans adapter and converter should be here within the next week and a half! to anyone considering revmax converters... Their customer service is OUTSTANDING and they are great to deal with
 04-16-2012, 09:28 PM
#38
I need to upload my pics still but a little update. Got the intake manifold bolted. With a little work and CAREFUL bending I made the truck steam lines fit with the ls1 intake. I separated the 98 camaro wiring harness I have and hooked the connectors all up to the engine. So in the next few days I will be cleaning that up and removing unnecessary connectors and all and re-pinning the ecu to mate with one from a 2000. I will try and get good pics and info on this since it seems overwhelming but once you get it all straight it's pretty straightforward. On another good side note, my torque converter came in today along with wastegate and bov. Everything else should start rolling in within the week! can't wait to get this thing running.
05-07-2012, 04:56 PM
#39
Well I had a good solid Sunday to spend on the car finally so I made A LOT more progress with it. More pictures and fun here to post!
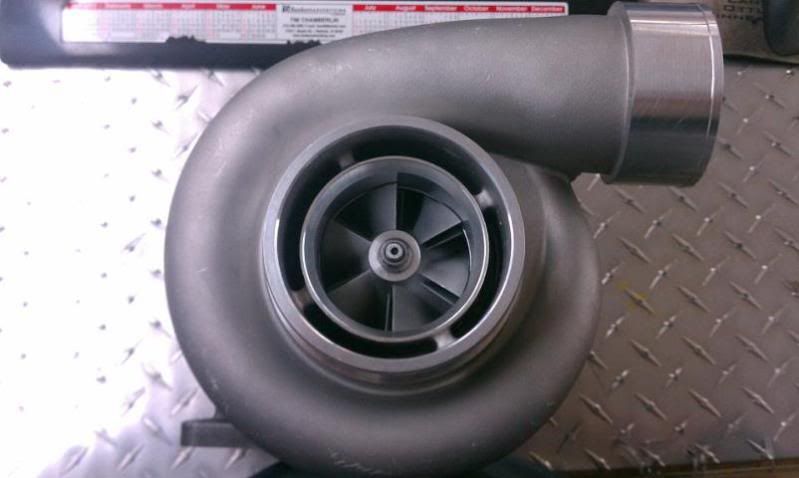
We will start off with a picture of my new snail
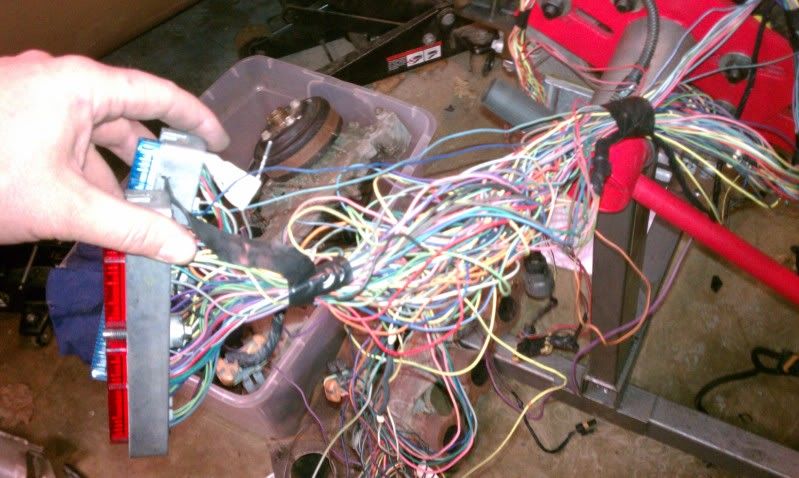
We will start with some wiring. I de-pinned the entire harness and labeled every single wire. I had a 98 harness so this needed to be done anyway. I followed a few good writeup and laid the whole harness out and deleted things I didn't need like the MAF, 02 sensors, etc. I am running speed density open loop for this setup so I didn't need any of these.
Here are some wiring progress pics. Getting it laid out on the engine after I re-pinned it.
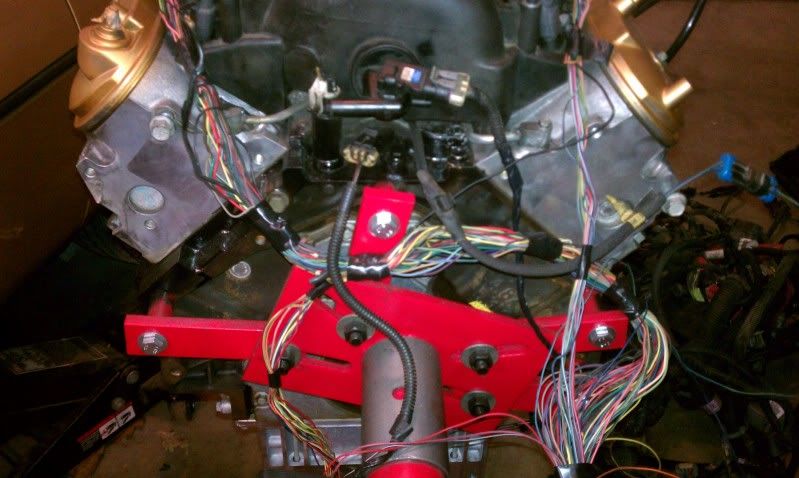
OMG spaghetti!!! this is about the time u wanna start pulling your hair out cuz it's so messy
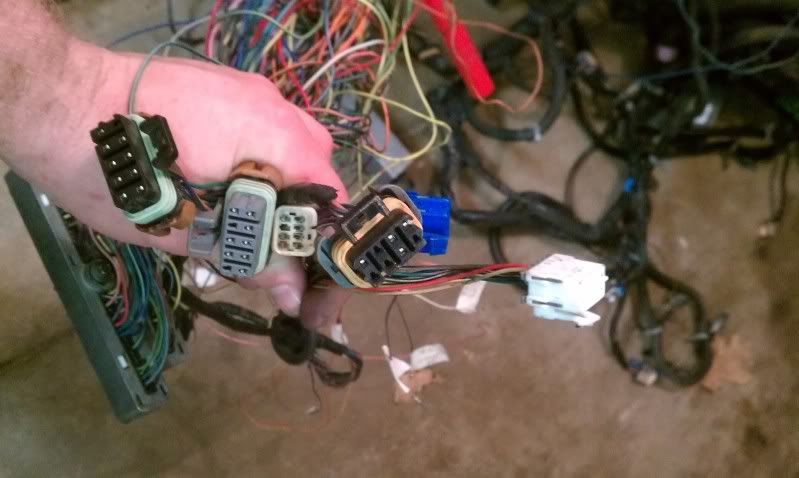
Now these are all the C connectors. These come off the harness and give power to your injectors/coils, relay wires, ecm etc. You need to fuse/relay these and then connect them to the vehicle side. I will be wiring up a fuse box I got out of a car in the salvage yard I work at. That will be another write-up in a few days.
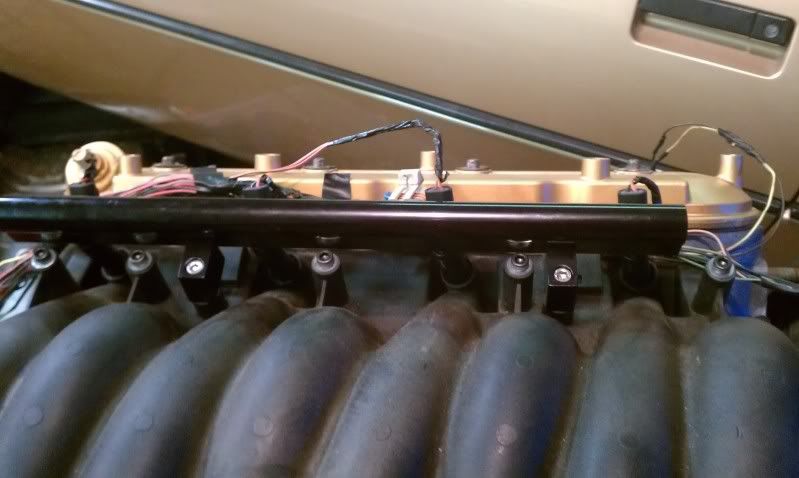
I had to take a break from the wiring madness so I put on these pretty rails. First put your injectors in the rail after lubing the o-rings well. I used vaseline on mine.
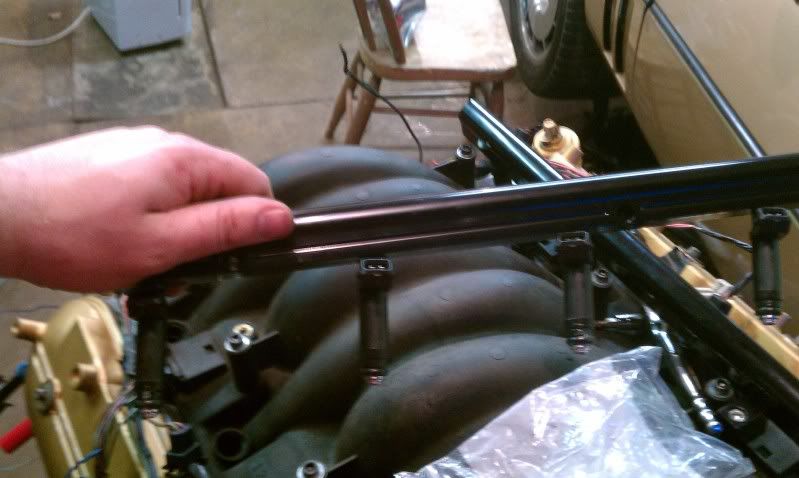
Then bolt your pretty new rails on to your manifold like so. These units were from speed inc. and are the high flow rails and seem like nice pieces. they fit fantastic
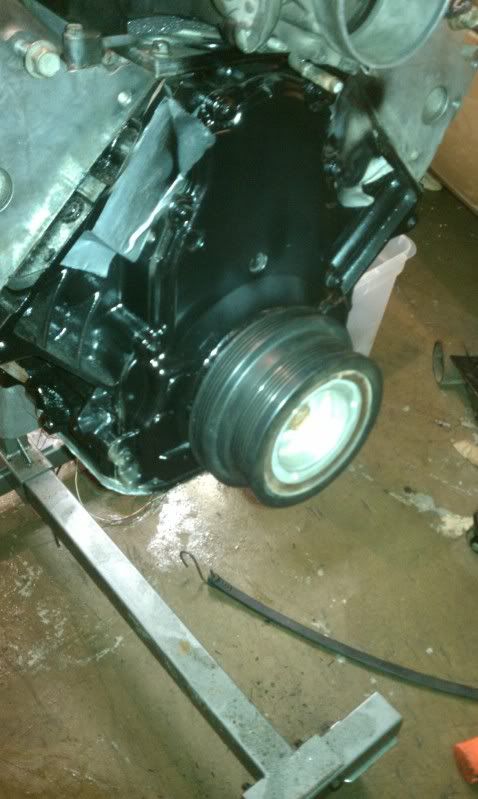
I also installed my new corvette balancer which is much cleaner than that old truck piece
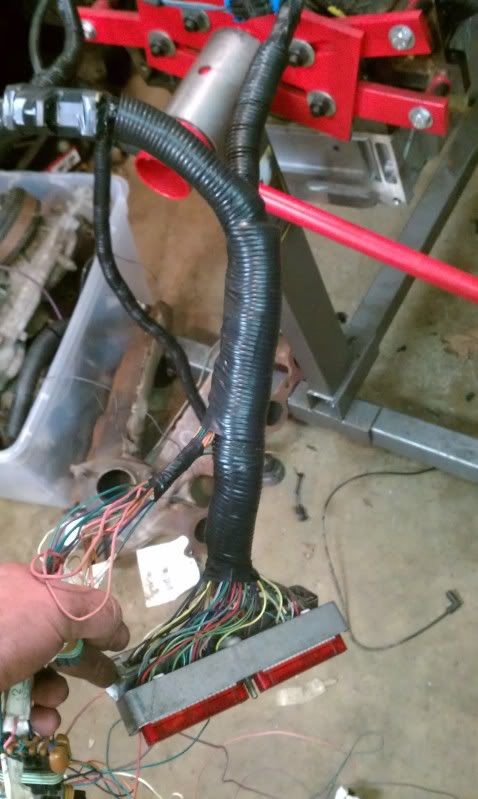
So after laying off the wiring for a bit I got back after it. I turned that giant mess of noodles into this! just gotta tape it off by sections and wrap it in convoluted tubing.
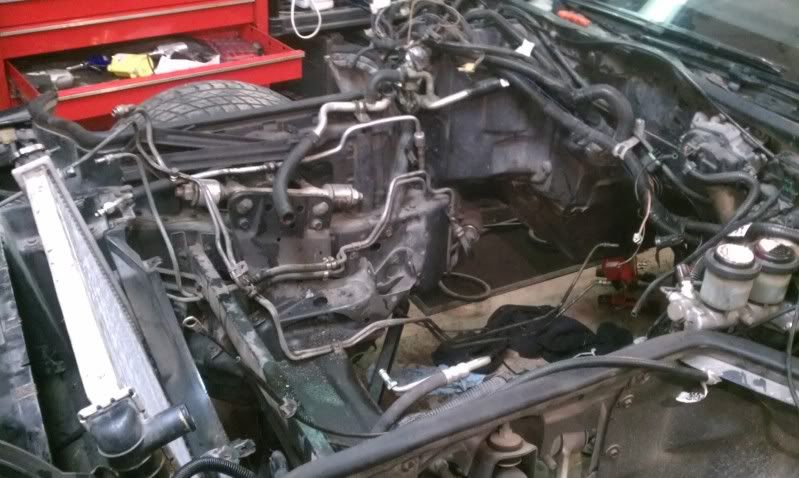
Next I started tackling the car side. I removed the entire passenger side wiring harness which runs the engine/accessories and hvac stuff which I also deleted and won't have any need for. You can see its a lot cleaner than before.

Here is the empty holes where the wiring bulkhead went through. I kept the 1 ground wire that goes to the washer fluid reservoir.

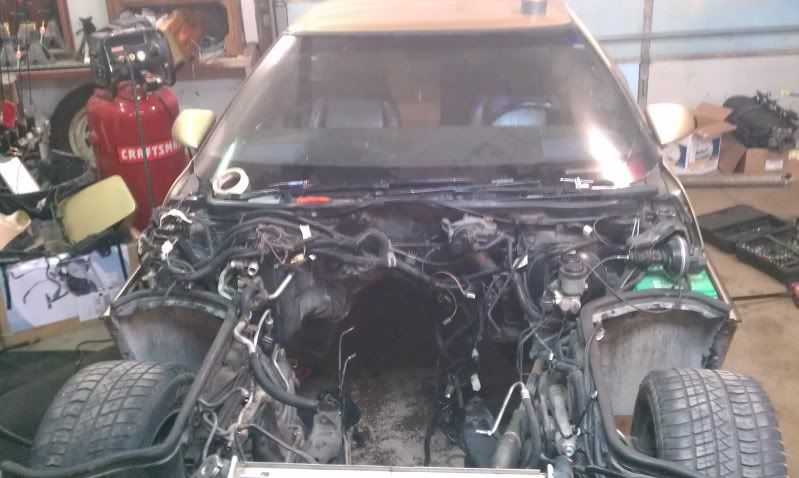
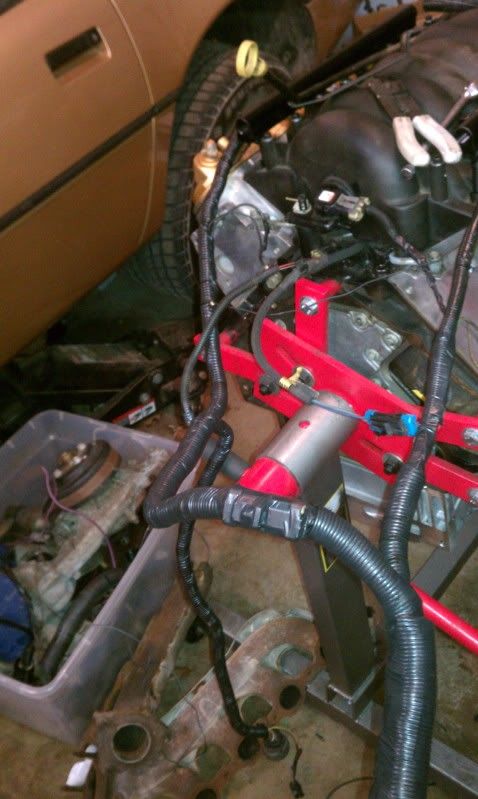
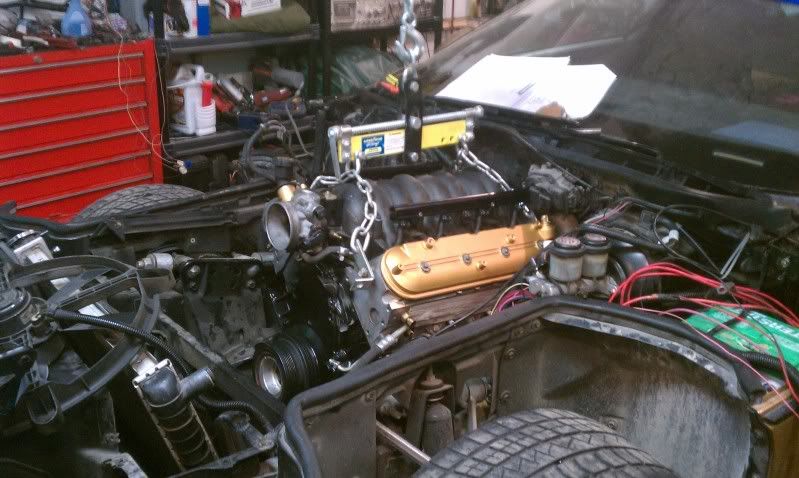
and Last but not least.... I test fitted it! The wiper motor has to go like many have said before. I will have to do the modified blazer motor to make it work......(or just leave it off because it will only get driven on nice days and at the track). It prevents the engine from fully seating down on the driver side mount. I will tackle that tonight. Sure looks a hell of a lot better and cleaner than the old crossfire clunker!
Next on the list as stated is make a fuse box and get all the wiring taken care of. I will get pictures of the harness that is left in the car to show how it all hooks up. Then take the engine back out and pull the pan off and weld my oil return bung in it for the turbo return line. Then install the engine for good, accessories/fuel pump and make my turbo kit!
If anyone has any question about this swap or anything in general I will be happy to answer to the best of my knowledge!
We will start off with a picture of my new snail
We will start with some wiring. I de-pinned the entire harness and labeled every single wire. I had a 98 harness so this needed to be done anyway. I followed a few good writeup and laid the whole harness out and deleted things I didn't need like the MAF, 02 sensors, etc. I am running speed density open loop for this setup so I didn't need any of these.
Here are some wiring progress pics. Getting it laid out on the engine after I re-pinned it.
OMG spaghetti!!! this is about the time u wanna start pulling your hair out cuz it's so messy
Now these are all the C connectors. These come off the harness and give power to your injectors/coils, relay wires, ecm etc. You need to fuse/relay these and then connect them to the vehicle side. I will be wiring up a fuse box I got out of a car in the salvage yard I work at. That will be another write-up in a few days.
I had to take a break from the wiring madness so I put on these pretty rails. First put your injectors in the rail after lubing the o-rings well. I used vaseline on mine.
Then bolt your pretty new rails on to your manifold like so. These units were from speed inc. and are the high flow rails and seem like nice pieces. they fit fantastic
I also installed my new corvette balancer which is much cleaner than that old truck piece
So after laying off the wiring for a bit I got back after it. I turned that giant mess of noodles into this! just gotta tape it off by sections and wrap it in convoluted tubing.
Next I started tackling the car side. I removed the entire passenger side wiring harness which runs the engine/accessories and hvac stuff which I also deleted and won't have any need for. You can see its a lot cleaner than before.
Here is the empty holes where the wiring bulkhead went through. I kept the 1 ground wire that goes to the washer fluid reservoir.
and Last but not least.... I test fitted it! The wiper motor has to go like many have said before. I will have to do the modified blazer motor to make it work......(or just leave it off because it will only get driven on nice days and at the track). It prevents the engine from fully seating down on the driver side mount. I will tackle that tonight. Sure looks a hell of a lot better and cleaner than the old crossfire clunker!
Next on the list as stated is make a fuse box and get all the wiring taken care of. I will get pictures of the harness that is left in the car to show how it all hooks up. Then take the engine back out and pull the pan off and weld my oil return bung in it for the turbo return line. Then install the engine for good, accessories/fuel pump and make my turbo kit!
If anyone has any question about this swap or anything in general I will be happy to answer to the best of my knowledge!

