
Superdave's 65 Impala SS 5.3 Swap
 03-22-2012, 09:57 PM
#1
TECH Resident
Thread Starter
Hello all
Just thought I'd start a thread on my build. I bought a 65 Impala SS in January and I totally got burned. The frame was swiss cheese, but it was patched over and fiberglassed so it was all hidden. I ended up finding another frame in town but man, a frame-off restoration was not what I was anticipating when I bought it.
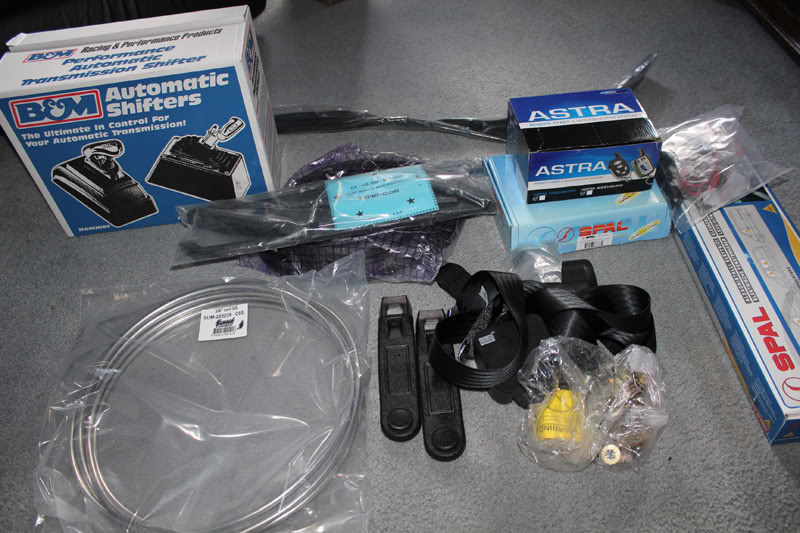
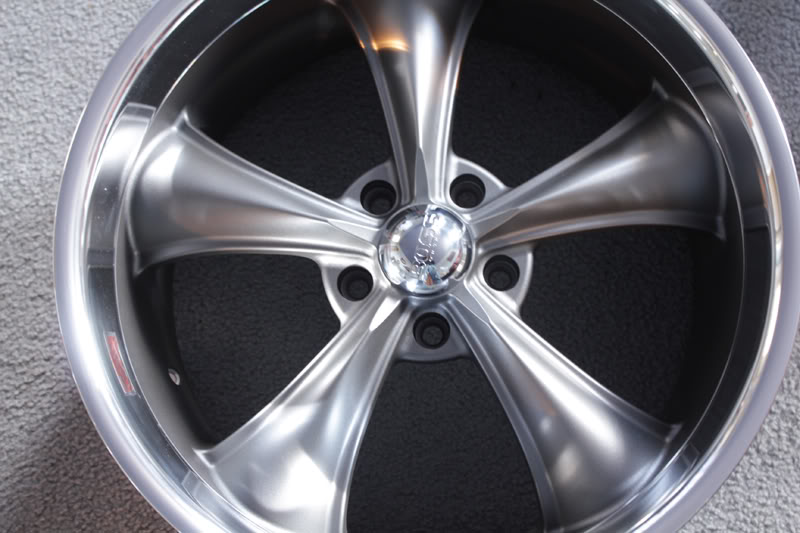
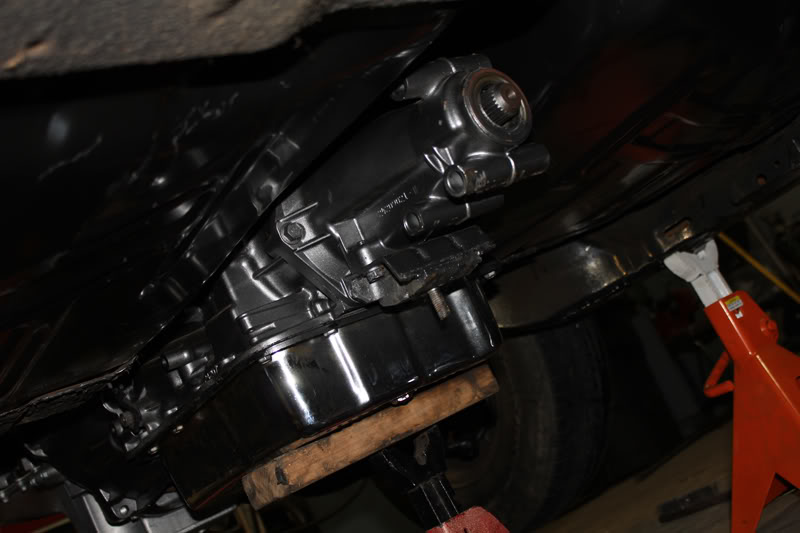
Anyway, after we pulled the car off the old frame and scrapped it, I prepared the new frame and painted it with Chassis Saver paint. We then did a 4 wheels disc brake conversion, which was pretty painless...especially without the body on the frame. The stock wheels hide the brakes in the pictures, but I have 20" Boss 338 wheels in gray that will show them off. Ditched the control arms and went with tubular ones. I also put 3" lowering springs in the rear. The front springs will wait until we mount the engine and see how far it needs to come down.
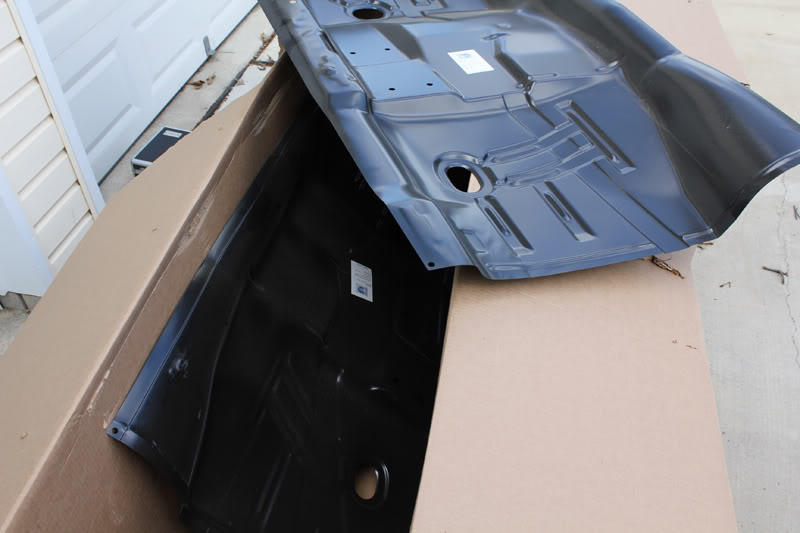
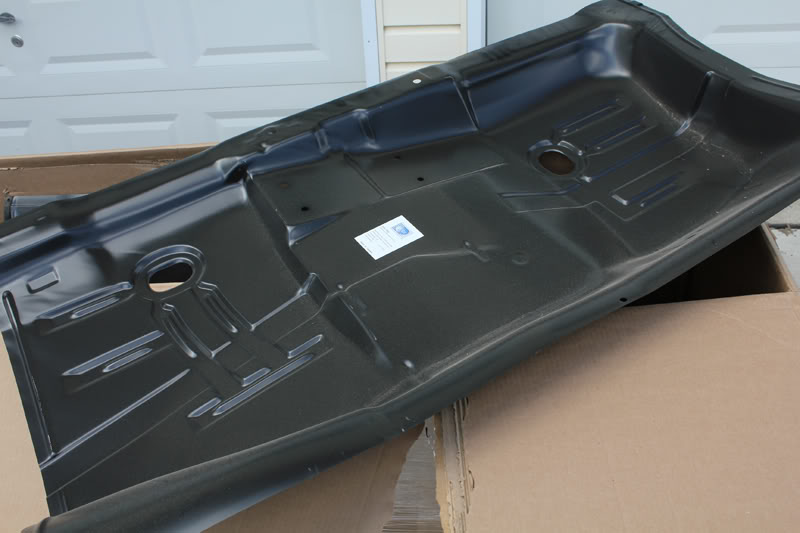
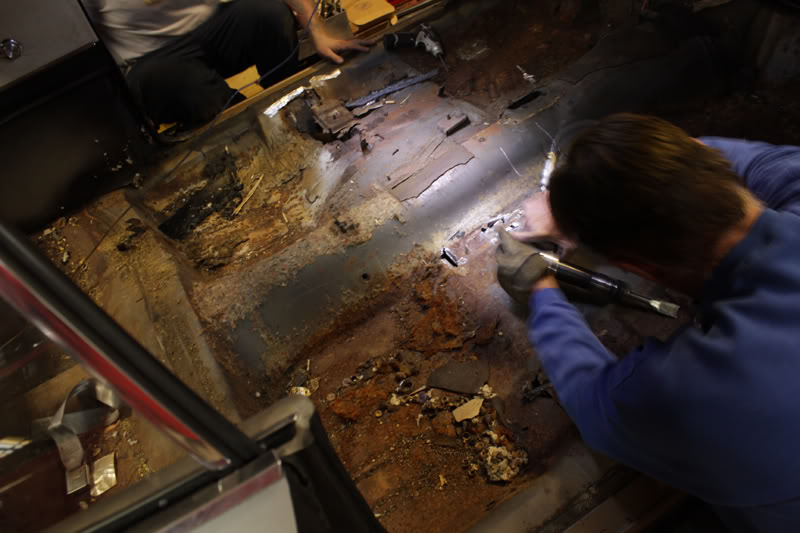
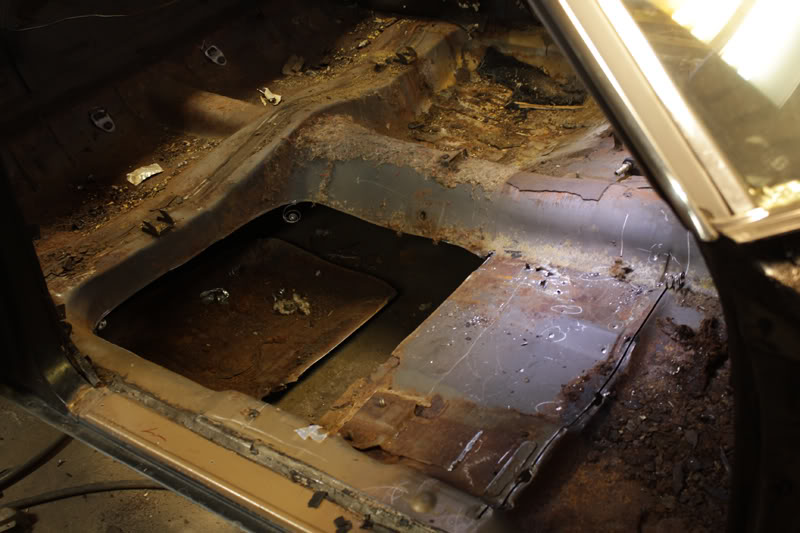
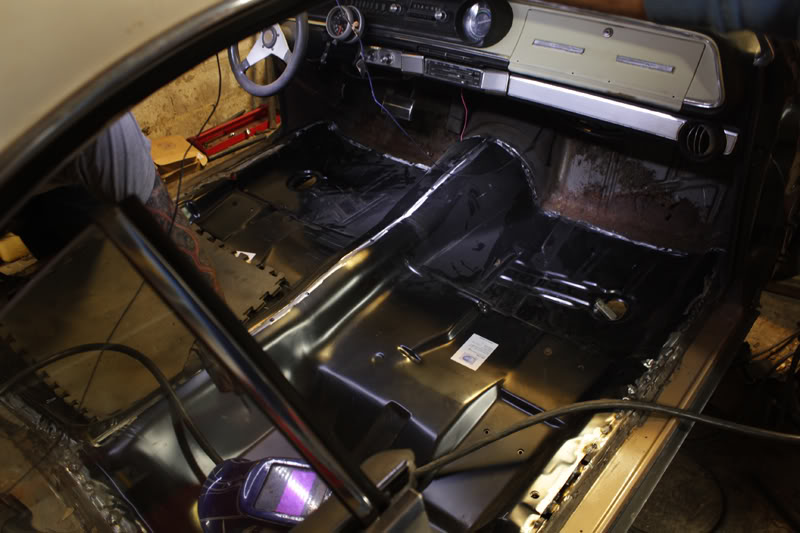
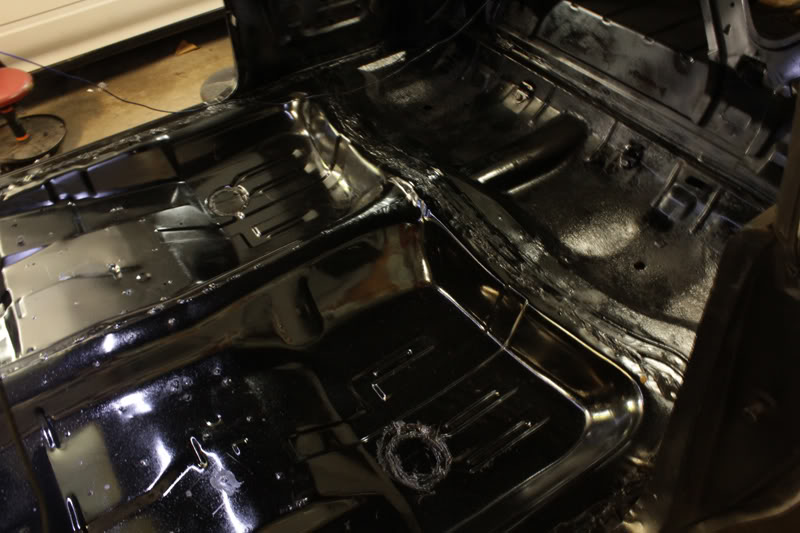
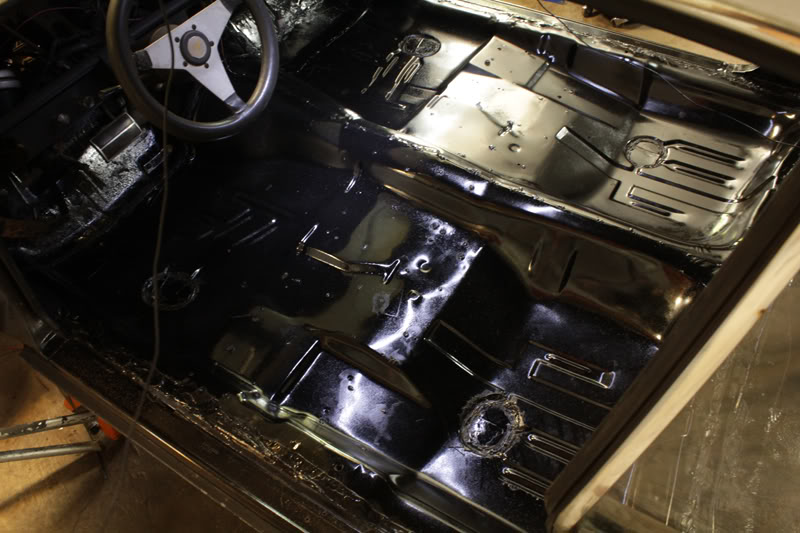
The floors are a disaster, and I have ordered new pans, front and rear. Haven't gotten them yet so can't start that project.
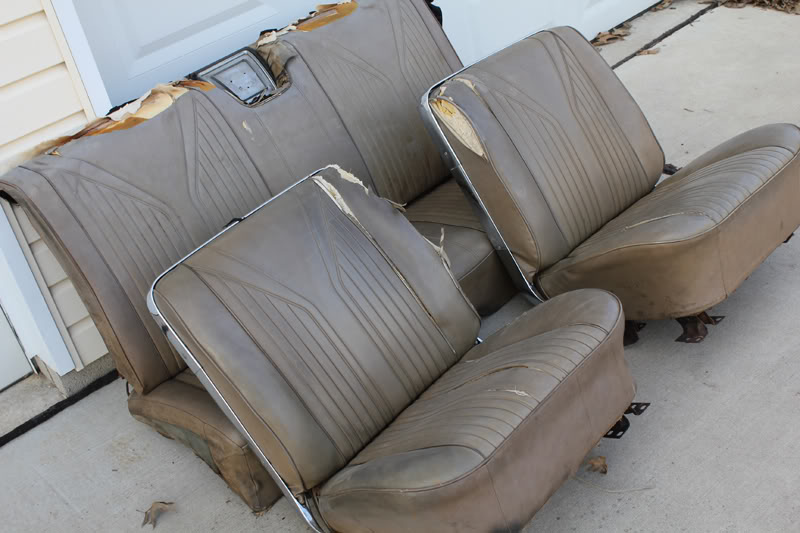
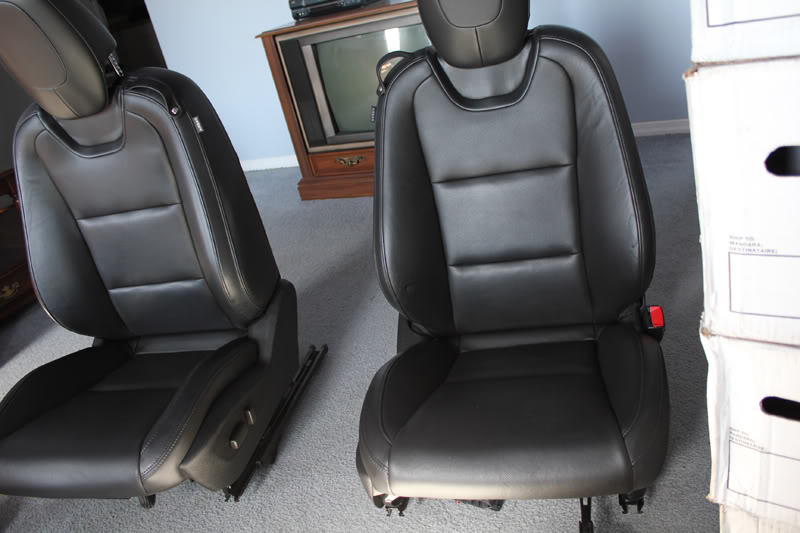
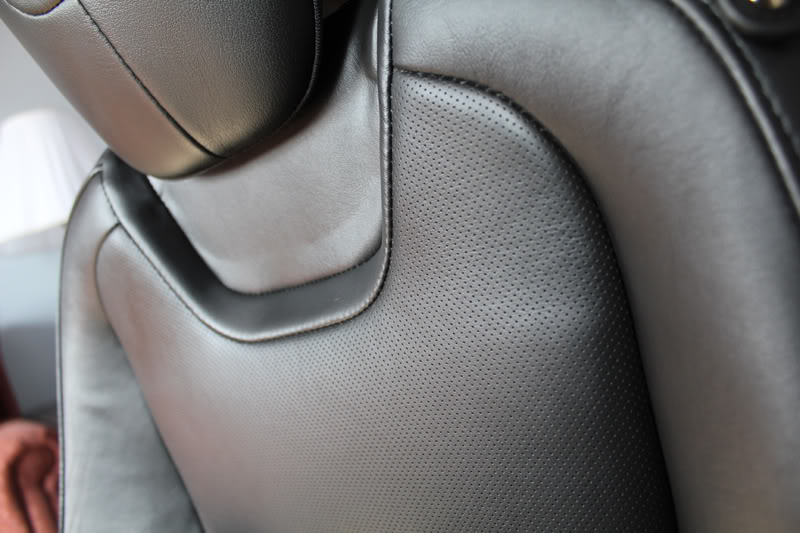
I was able to score some near perfect 2010 leather Camaro seats ($450) that I will fit into the car. I will also be doing my own full custom interior (all leather)
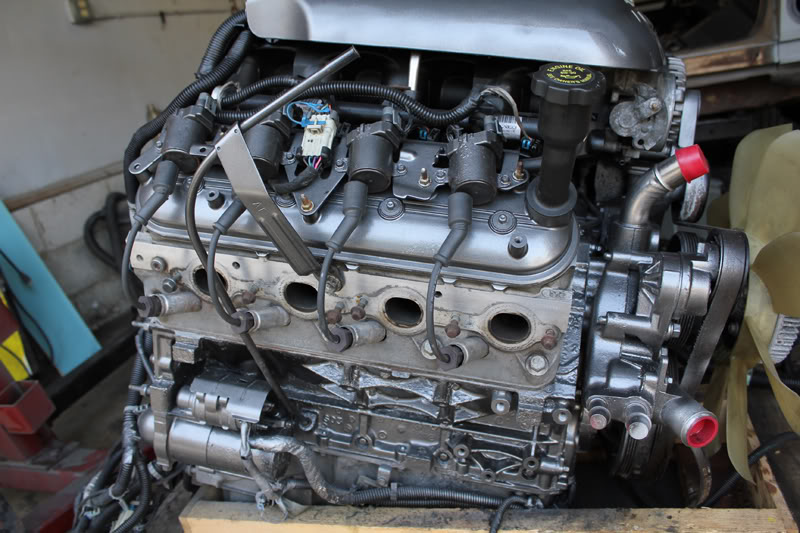
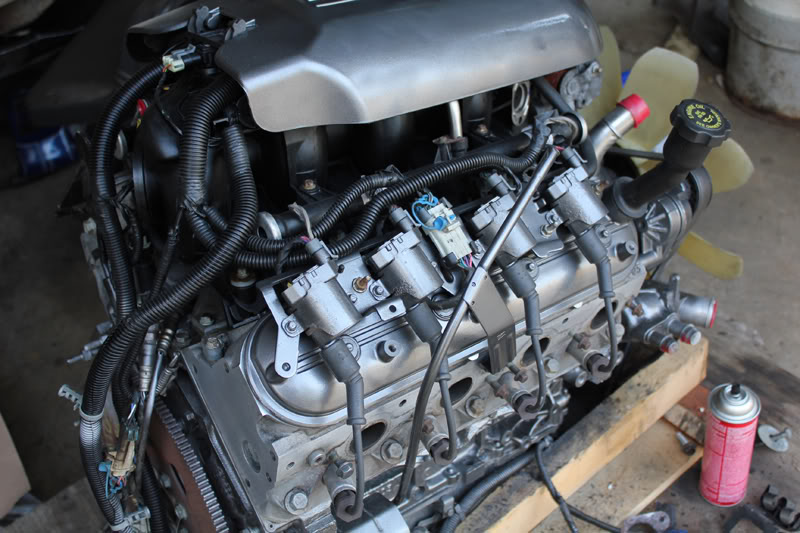
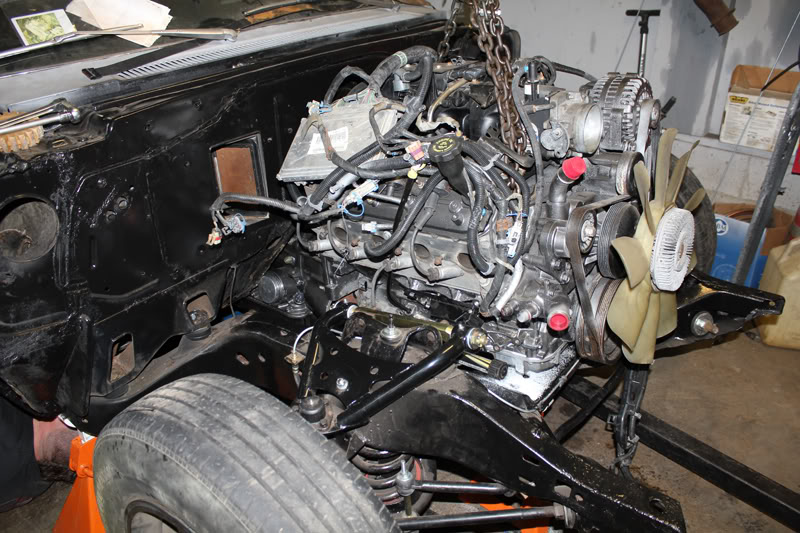
The engine is a used 5.3 from a 2002 Yukon. For now, the motor is going in as is, and I will pull it again and rebuild it next summer or maybe even the summer after that, depending on how it holds up. When I do the rebuild, I will be doing the LS6 intake and accessories swap, a cam and a new tune, etc. If the hood doesn't close with the truck intake....well, I'll be doing all those mods THIS summer.
I got the motor from Bow Auto in NH. great price and I literally had the engine 26 hours after I bought it...and I am in MD. Couldn't be happer with those guys. I wish the people I ordered the floors from were that fast. Transmission I pick up Saturday, a 4L60e.
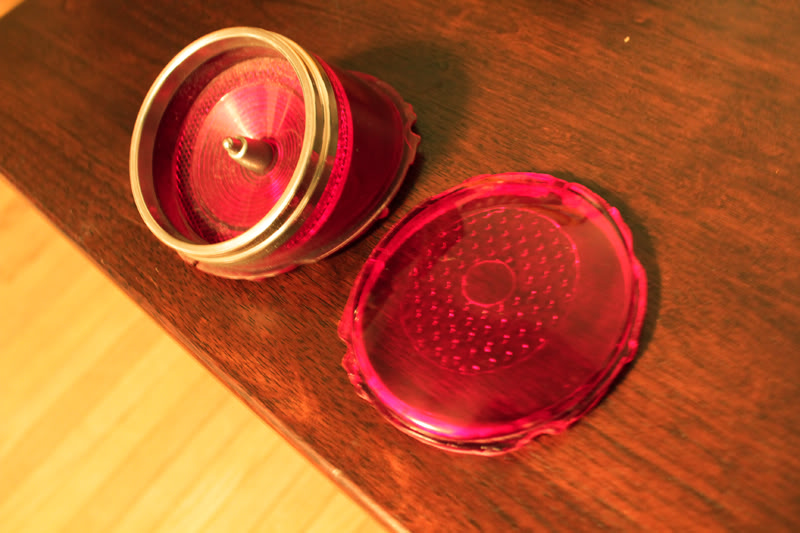
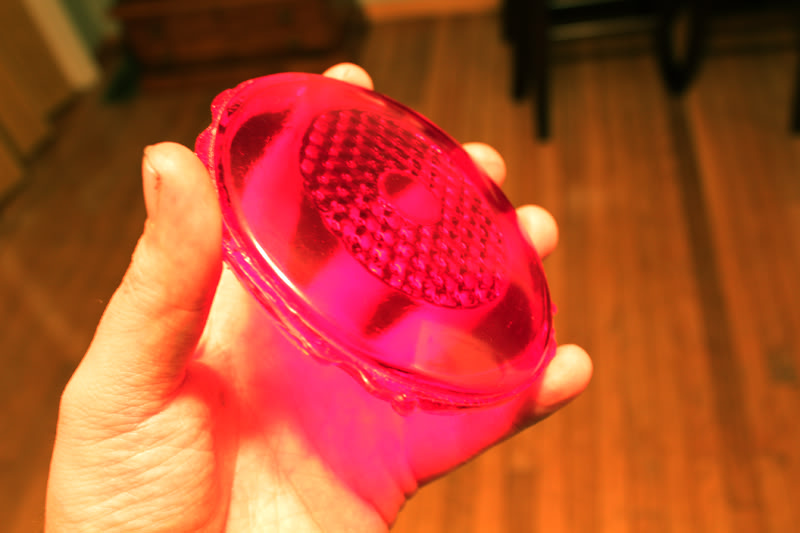
I have lots of changes I want to make, like shaved drip rails and locks, etc. I also made my own flat tail lenses to replace the clunky rocketship boosters the 65 comes with stock.
We'll be putting the motor in as soon as the mounting plates arrive....as long as the GMPP oil pan fits. We'll see. More to come.


Just thought I'd start a thread on my build. I bought a 65 Impala SS in January and I totally got burned. The frame was swiss cheese, but it was patched over and fiberglassed so it was all hidden. I ended up finding another frame in town but man, a frame-off restoration was not what I was anticipating when I bought it.
Anyway, after we pulled the car off the old frame and scrapped it, I prepared the new frame and painted it with Chassis Saver paint. We then did a 4 wheels disc brake conversion, which was pretty painless...especially without the body on the frame. The stock wheels hide the brakes in the pictures, but I have 20" Boss 338 wheels in gray that will show them off. Ditched the control arms and went with tubular ones. I also put 3" lowering springs in the rear. The front springs will wait until we mount the engine and see how far it needs to come down.
The floors are a disaster, and I have ordered new pans, front and rear. Haven't gotten them yet so can't start that project.
I was able to score some near perfect 2010 leather Camaro seats ($450) that I will fit into the car. I will also be doing my own full custom interior (all leather)
The engine is a used 5.3 from a 2002 Yukon. For now, the motor is going in as is, and I will pull it again and rebuild it next summer or maybe even the summer after that, depending on how it holds up. When I do the rebuild, I will be doing the LS6 intake and accessories swap, a cam and a new tune, etc. If the hood doesn't close with the truck intake....well, I'll be doing all those mods THIS summer.
I got the motor from Bow Auto in NH. great price and I literally had the engine 26 hours after I bought it...and I am in MD. Couldn't be happer with those guys. I wish the people I ordered the floors from were that fast. Transmission I pick up Saturday, a 4L60e.
I have lots of changes I want to make, like shaved drip rails and locks, etc. I also made my own flat tail lenses to replace the clunky rocketship boosters the 65 comes with stock.
We'll be putting the motor in as soon as the mounting plates arrive....as long as the GMPP oil pan fits. We'll see. More to come.
Last edited by superdave84; 09-24-2013 at 09:54 AM. Reason: Edit to title of thread


 04-15-2012, 12:30 AM
#5
TECH Resident
Thread Starter
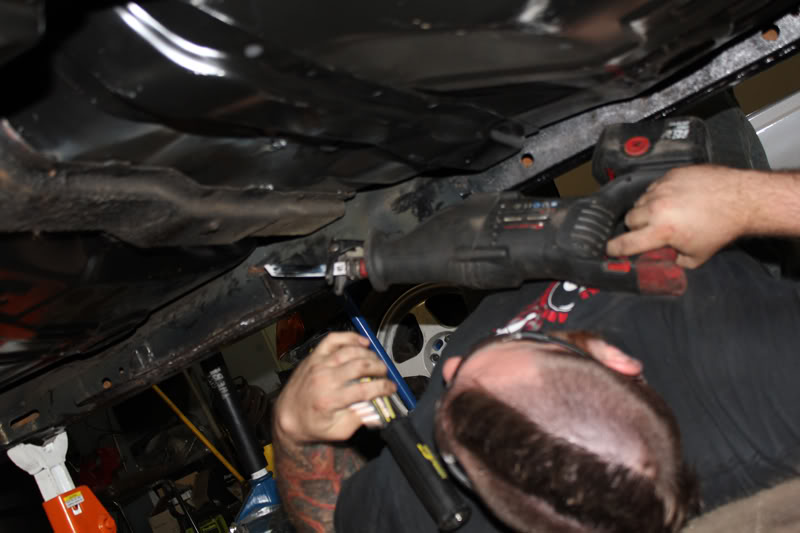
A few minor updates. We did get the engine in place, however the transmission hits the floor pan in one spot, and the oil pan hits the crossmember. We will be raising the frameside motor mounts with some kind of spacers, and then welding them in place and boxing them in. The floor pan at the tunnel/footwell on the passenger side needed to be cut out anyway, so creating some space there for the transmission shouldn't be too hard.
Unfortunately I didn't have my camera with me when we had the motor in place, but I will have photos of the fabrication and install next time.
I do have a few photos of some other progress though. Here's a few shots of us tearing out the Swiss cheese floors (they actually look a lot better in the photos than they did in real life) And the new floor pans installed
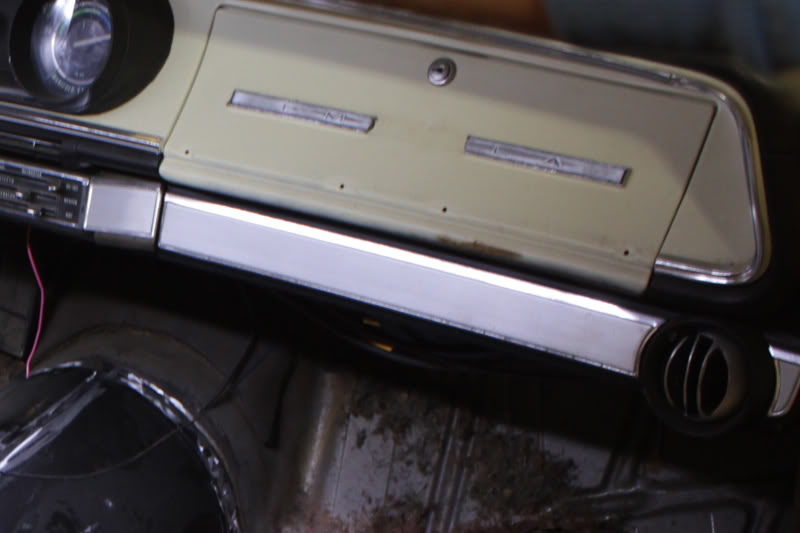
I stripped the dash of all the chrome trim and filled all the little holes. I took the dash apart in order to modify the gauge area to fit the new Speedhut gauges I have on order. I want the dash to look as modern as possible. After all, "stock" has been done. Like 50 years ago. Here is a shot of the glove compartment area
It's now welded shut and I did all the bodywork to smooth it out. The entire dash was painted with truck bedliner for a tough, textured appearance to mimick the more modern, plastic dashes. Spraying it was a nightmare with the windshield in place, so I ended up spraying a rag with it and then dabbing it on in several layers. I don't have pics of the parts of the dash that are still in the car, but these pictures show you the look of the paint

I have to wait for the gauges to arrive before I can fabricate the cluster area. I am using the stock plastic insert that came with the car, but I cut it apart and will fab up something more modern. I will post pics as soon as I get it started officially.
Unfortunately I didn't have my camera with me when we had the motor in place, but I will have photos of the fabrication and install next time.
I do have a few photos of some other progress though. Here's a few shots of us tearing out the Swiss cheese floors (they actually look a lot better in the photos than they did in real life) And the new floor pans installed
I stripped the dash of all the chrome trim and filled all the little holes. I took the dash apart in order to modify the gauge area to fit the new Speedhut gauges I have on order. I want the dash to look as modern as possible. After all, "stock" has been done. Like 50 years ago. Here is a shot of the glove compartment area
It's now welded shut and I did all the bodywork to smooth it out. The entire dash was painted with truck bedliner for a tough, textured appearance to mimick the more modern, plastic dashes. Spraying it was a nightmare with the windshield in place, so I ended up spraying a rag with it and then dabbing it on in several layers. I don't have pics of the parts of the dash that are still in the car, but these pictures show you the look of the paint
I have to wait for the gauges to arrive before I can fabricate the cluster area. I am using the stock plastic insert that came with the car, but I cut it apart and will fab up something more modern. I will post pics as soon as I get it started officially.
04-15-2012, 08:05 PM
#7
TECH Resident
Thread Starter
That's a cool car. I have to admit, it's unfamiliar to me. it seems to be one that slipped under the "cool" radar all these years, leaving you with a very rare (and cool) car that no one has. That's gonna be a great ride when you drop the LS in it.
Trending Topics
 04-18-2012, 09:16 PM
#9
TECH Resident
Thread Starter
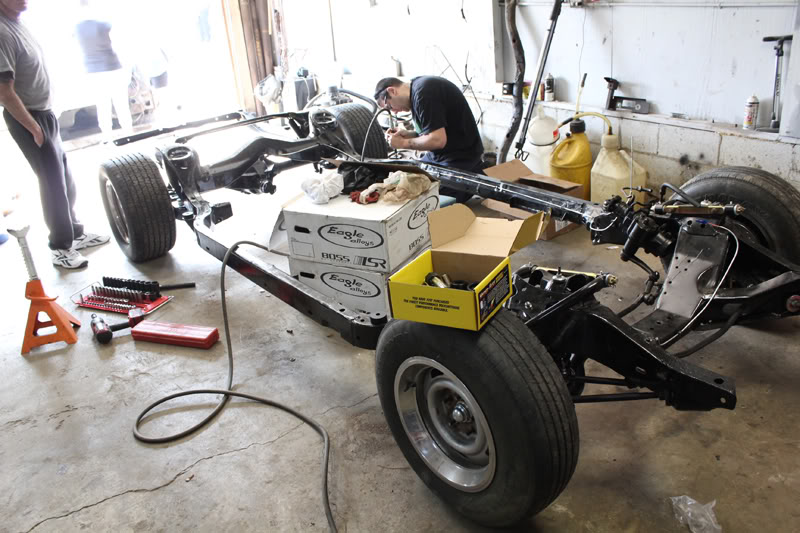
Got a little bit more done today. The oil pan hits the crossmember so we placed the engine in position (with the frameside motor mounts bolted to the engineside motor mounts). Once we got it in place and checked everything for clearance, we angled the frameside mounts so that the upper side would touch the frame. Then we tacked them into position, then carefully unbolted the engine and removed it
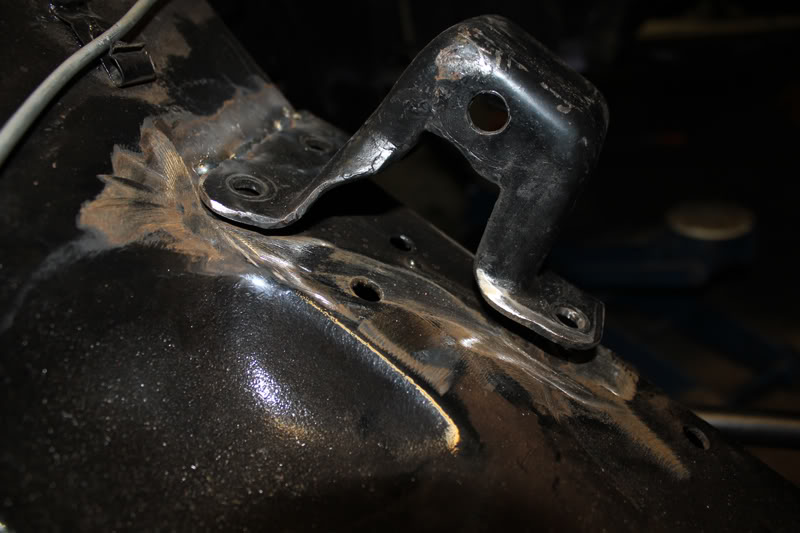
The next step was to box in the bottom where the space was created. I know the welds are a little ugly. I will hit them with a grinder tomorrow
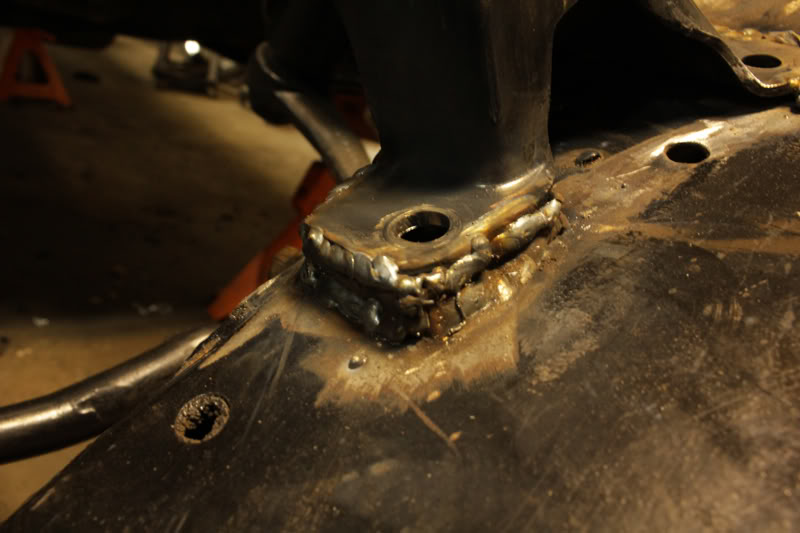
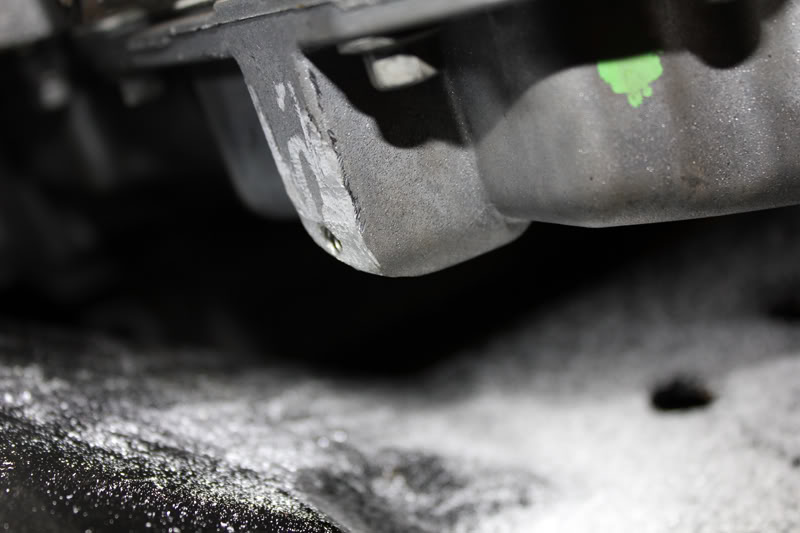
There was also this annoying protrusion sticking out at the front of the pan. It has a little threaded hole in it for somethingorother, not something I need. So I rounded it off to make sure it doesn't hit the crossmember. I still need to take a bit more off though
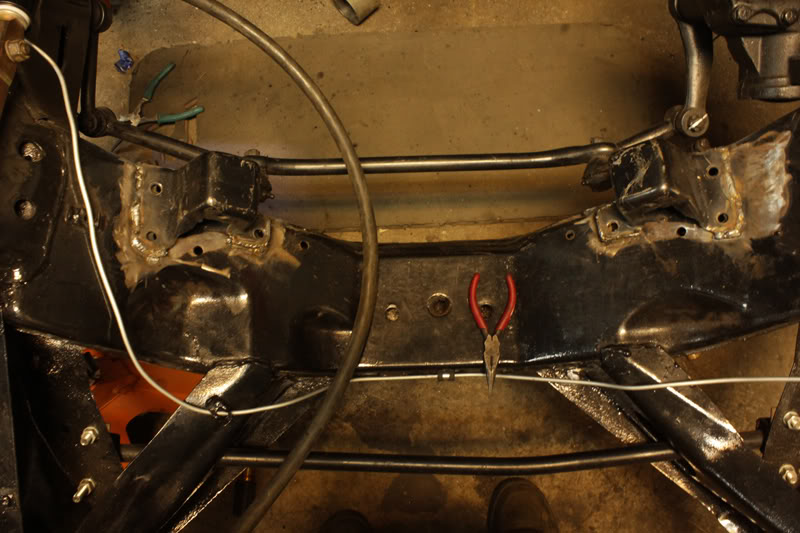
For the transmission crossmember, we decided to weld extensions onto the frame passed where the original bracket was. We did this when the body was off the frame, knowing it would be much easier. We made them way longer than necessary, but we thought it would be better to be too long than too short. Here my buddy Randy is cutting away the end of the extension because it was in the way and we couldn't get the crossmember in place
Transmission in proper position (I forgot to take a pic with the crossmember in, sorry)
My ugly truck motor in position. It will be pretty one day I swear.
And here we are cutting away the last of the bad spots in the floor. I made a panel to cover it and it's in place, just not officially welded in yet. Tomorrow that gets done, and I do the rest of the seam seal that I started today. Friday I paint everything under the car in Chassis Saver paint, and the interior floors too. Saturday we will have the engine and trans in place for the final time, and hopefully get the Camaro seats fitted and the shifter too.

That's it for now. More to come soon.
The next step was to box in the bottom where the space was created. I know the welds are a little ugly. I will hit them with a grinder tomorrow
There was also this annoying protrusion sticking out at the front of the pan. It has a little threaded hole in it for somethingorother, not something I need. So I rounded it off to make sure it doesn't hit the crossmember. I still need to take a bit more off though
For the transmission crossmember, we decided to weld extensions onto the frame passed where the original bracket was. We did this when the body was off the frame, knowing it would be much easier. We made them way longer than necessary, but we thought it would be better to be too long than too short. Here my buddy Randy is cutting away the end of the extension because it was in the way and we couldn't get the crossmember in place
Transmission in proper position (I forgot to take a pic with the crossmember in, sorry)
My ugly truck motor in position. It will be pretty one day I swear.
And here we are cutting away the last of the bad spots in the floor. I made a panel to cover it and it's in place, just not officially welded in yet. Tomorrow that gets done, and I do the rest of the seam seal that I started today. Friday I paint everything under the car in Chassis Saver paint, and the interior floors too. Saturday we will have the engine and trans in place for the final time, and hopefully get the Camaro seats fitted and the shifter too.
That's it for now. More to come soon.
04-21-2012, 05:51 PM
#10
TECH Resident
Thread Starter
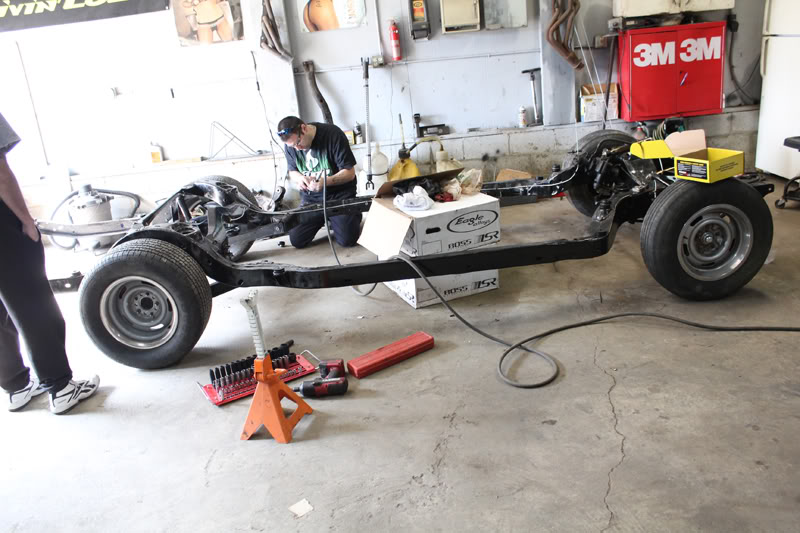
Very little got done today. The mounts we modified turned out to be too short with the full weight of the engine in the car (the rubber in the engineside mount crushes too much and we just weren't careful enough with our measuring). The oil pan was just way too close for comfort...needs to go up another 3/8" or so. At first we thought of cutting the frameside mounts off again and trying a second time, be I was afraid that we'd still end up in a similar position. We next considered making some kind of spacer between the LS mount and the engine to raise it, but that would change the geometry of the assembly and be too hard to get perfect.
What I decided to do is to raise the engine up to where we want it (on the cherrypicker). Then replace the rubber motor mounts with solid ones that we can weld to. using thick, heavy duty washers or spacers (something like 16ga) line up the hole with the hole in the frameside mount, and tack it onto the solid engineside mount. Do the same for the rear ot the mount, and do that for both sides of the engine. We will add any reenforcement needed, and then have taller motor mounts that will keep the engine high enough. I will post pics when we do this.
I did get the floors painted in the cabin and underneath. Under the car looks amazing, like a showroom finish, but my camera couldn't quite capture it. Next time I will have the garage doors open any see if I can get a good pic of it. The cabin floors look fine, but will be covered with carpet so I was less careful
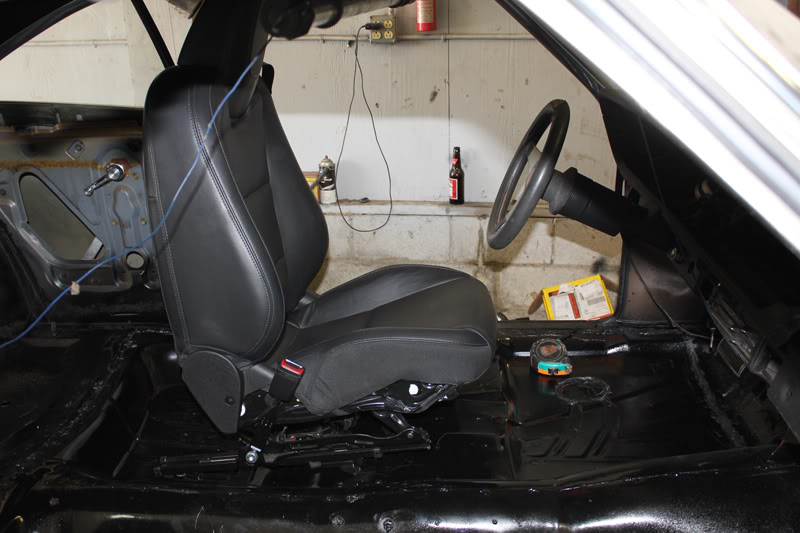
I also threw one of the leather Camaro seats in the car to get an idea of how to mount it. It's cocked forward and up as high as it will go, and I have to figure out how to get power to it to get it into a more neutral position to start from. I am going to try to fab up something that uses the stock Camaro slider brackets. If you look closely, the front doesn't bolt down, it's a hook instead, and there's only a single bolt for each slider.
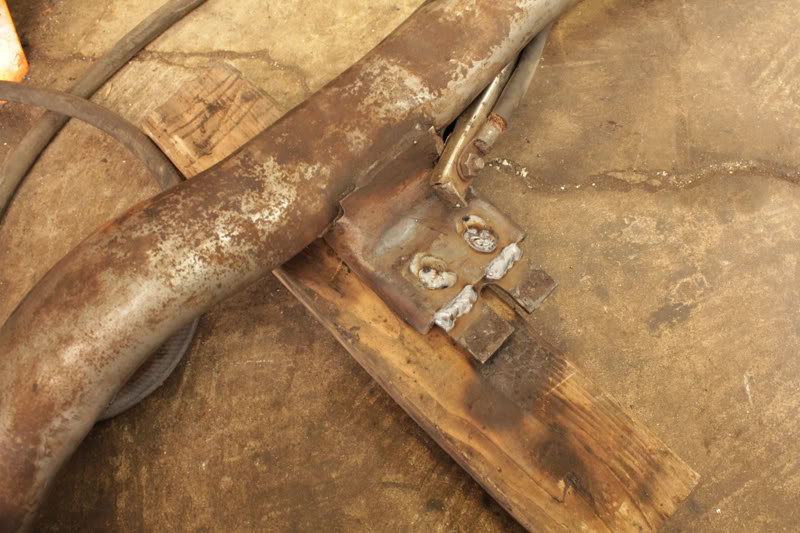
We also modified the transmission crossmember today to accept the 4L60e. The location where it fit the frame best just happened to be RIGHT behind the bracket which was stock on the car. As I mentioned before we extended those brackets on the frame, so it had little shelves to sit on. We pushed it as far forward as we could, and it was close, but we needed to weld on an extension. For ease of install and removal, we cut a U shaped notch in it instead of just drilling a hole. It slides tightly into position now, and the transmission isn't going anywhere, so this works fine.
I could only work on it for a few hours today so this is it for this update. I'll be getting the wheels and tires on it in a few days, which should up the cool factor by at least 10 points.
What I decided to do is to raise the engine up to where we want it (on the cherrypicker). Then replace the rubber motor mounts with solid ones that we can weld to. using thick, heavy duty washers or spacers (something like 16ga) line up the hole with the hole in the frameside mount, and tack it onto the solid engineside mount. Do the same for the rear ot the mount, and do that for both sides of the engine. We will add any reenforcement needed, and then have taller motor mounts that will keep the engine high enough. I will post pics when we do this.
I did get the floors painted in the cabin and underneath. Under the car looks amazing, like a showroom finish, but my camera couldn't quite capture it. Next time I will have the garage doors open any see if I can get a good pic of it. The cabin floors look fine, but will be covered with carpet so I was less careful
I also threw one of the leather Camaro seats in the car to get an idea of how to mount it. It's cocked forward and up as high as it will go, and I have to figure out how to get power to it to get it into a more neutral position to start from. I am going to try to fab up something that uses the stock Camaro slider brackets. If you look closely, the front doesn't bolt down, it's a hook instead, and there's only a single bolt for each slider.
We also modified the transmission crossmember today to accept the 4L60e. The location where it fit the frame best just happened to be RIGHT behind the bracket which was stock on the car. As I mentioned before we extended those brackets on the frame, so it had little shelves to sit on. We pushed it as far forward as we could, and it was close, but we needed to weld on an extension. For ease of install and removal, we cut a U shaped notch in it instead of just drilling a hole. It slides tightly into position now, and the transmission isn't going anywhere, so this works fine.
I could only work on it for a few hours today so this is it for this update. I'll be getting the wheels and tires on it in a few days, which should up the cool factor by at least 10 points.
 05-06-2012, 04:48 PM
#12
TECH Resident
Thread Starter
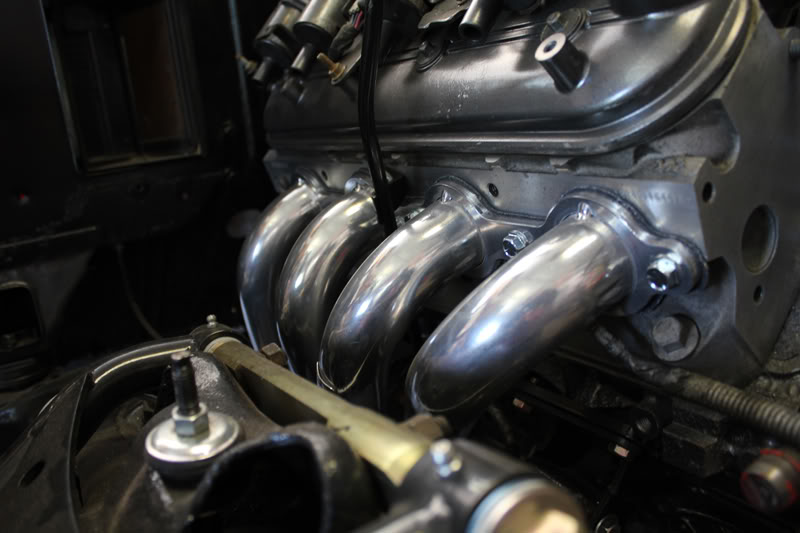
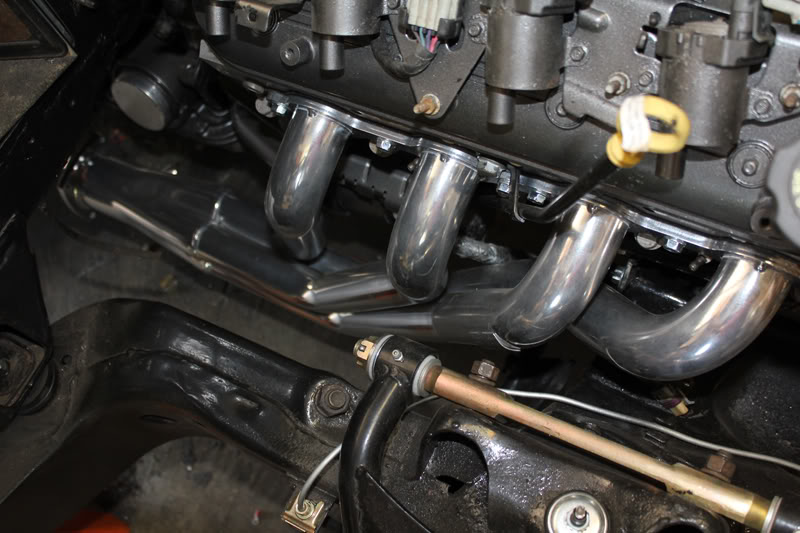
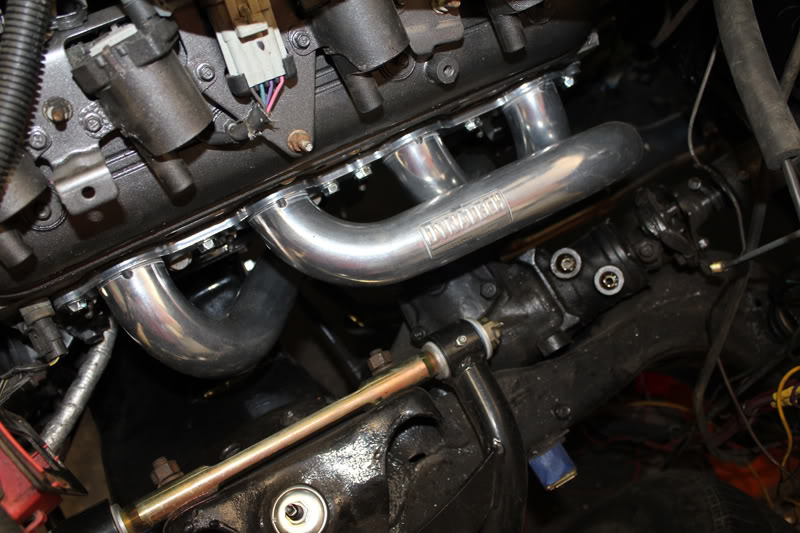
Over the weekend we got the motor permanently installed and put the headers on. But like an idiot I forgot my camera so I have no pics of that. We ended up using Dynatech LS swap headers for a 67-69 Camaro (thanks to my friend Rocky for figuring out which ones to use). They fit perfectly as if they are made for the car. Pretty too.
Anyway, I thought I would share some of the dash modification I did. As I said earlier, I wanted a nice, clean, modern dash, and not the ugly stock one. For reference, here is a stock 1965 Impala dash:

Woof. So anyway. here is the basic process I used to create a new look. First I hacked up the old plastic part of the dash tp get it down to a more basic shape.
Next I took some wooden shims and glued them together with wood glue:
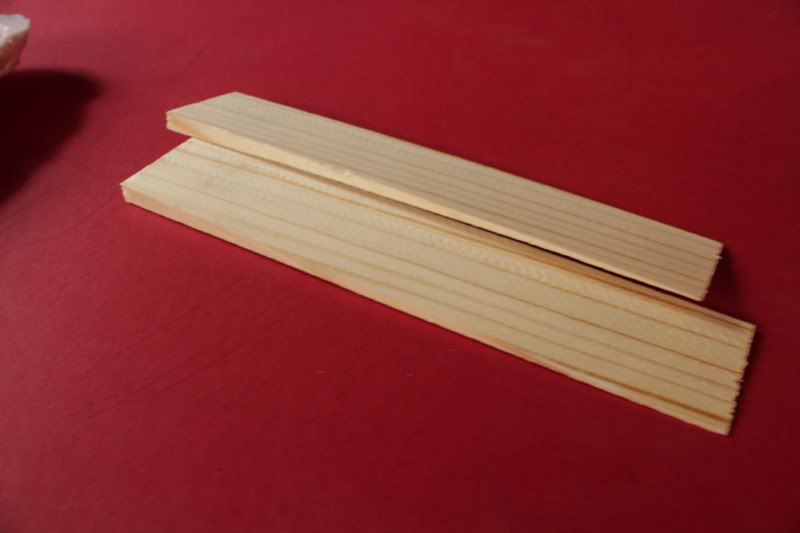

Then I glued them together into a longer row:
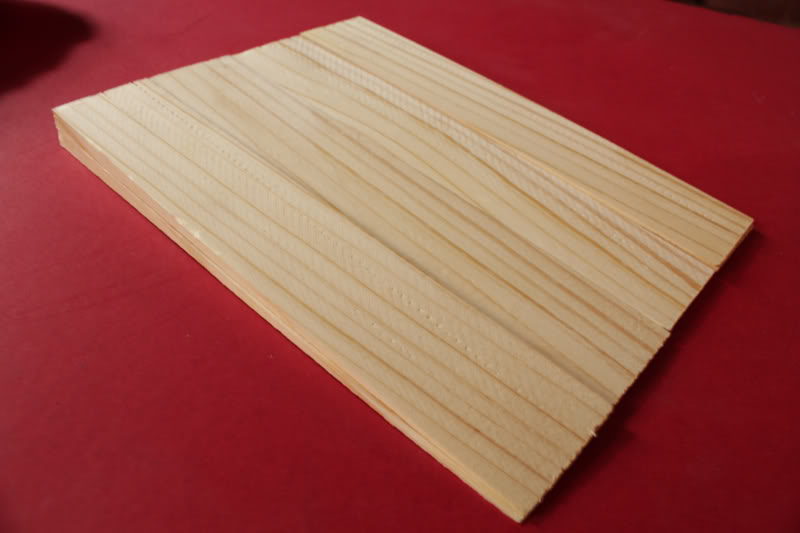
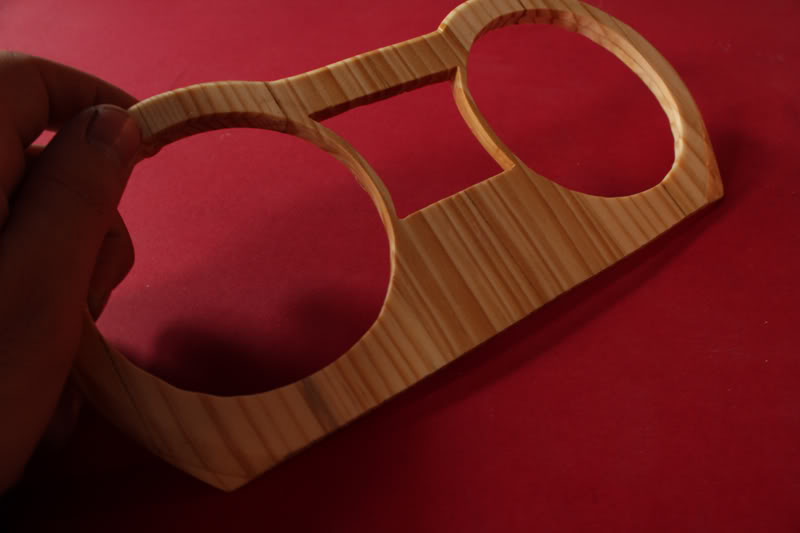
After careful measuring and thinking up a clean design, I traced it out onto the wood and then cut it out. Then came some sanding and some clear paint to seal the wood:
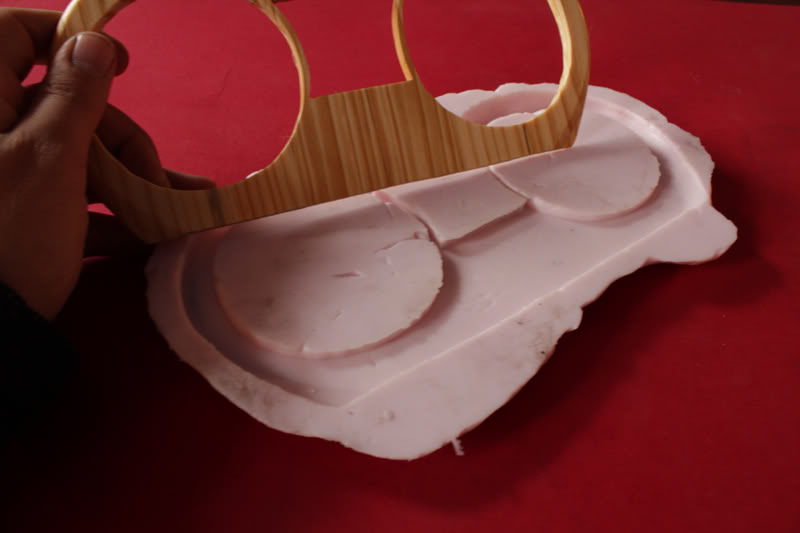
Next I made a kind of crude mold from the wood part. This stuff is called PoYo putty from Smooth-On, Inc. I would have prefered to use a pourable kind for mor accurate results, but this is all I had on hand. I just had to do some shaping to the plastic afterwards:
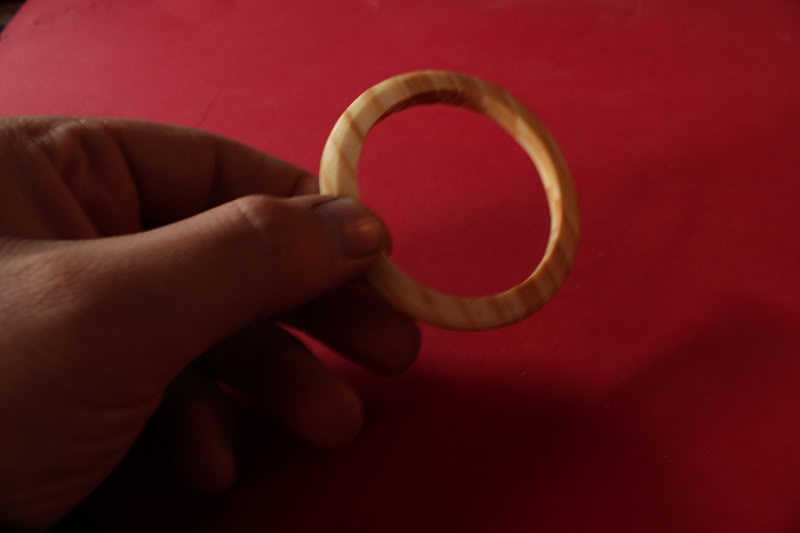
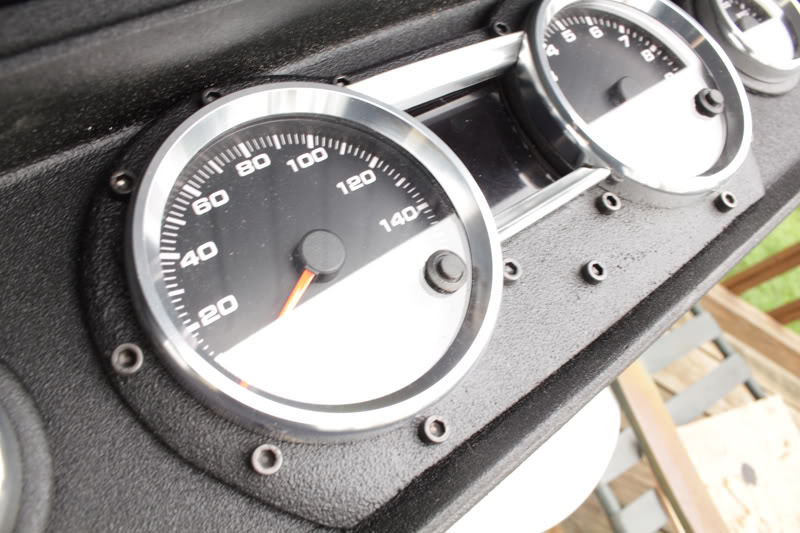
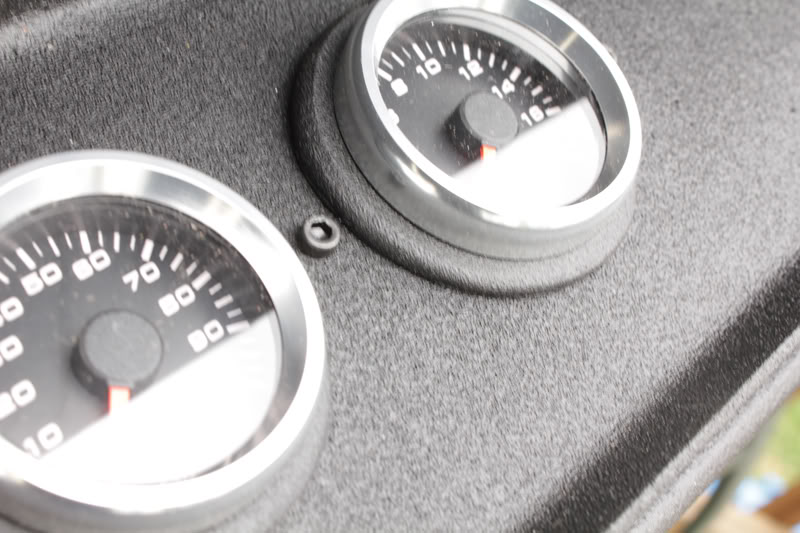
I also made some round trim rings to go around the smaller gauges. I didn't want to place the gauges directly onto a flat panel because it's too "racecar" and a bit boring for my taste. Note that the trim rings and the main cluster are thicker at the top and thinner at the bottom because of the shims I used to make them.
The center section between the two larger gauges required a mold to be made as well. This is just some random plastic I had, cut to shape, and then a mold was made. After that, it was cast in clear plastic and then window tint was applied to the back to darken it:

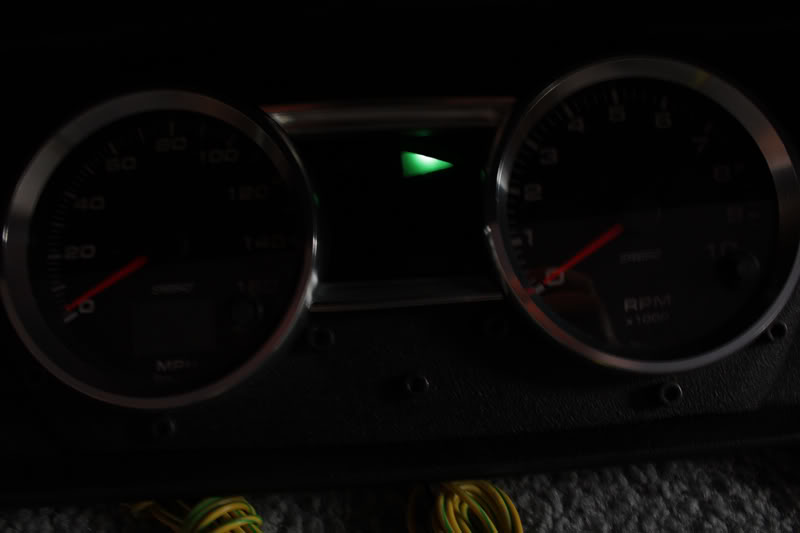
Once the pieces were cast and the fiberglass work was complete on the dash, I painted everything with truck bedliner for a modern "plastic" look and texture. I used a little bit of the old trim from the car to connect the two large gauges. Then I assembled everything and this is the result:
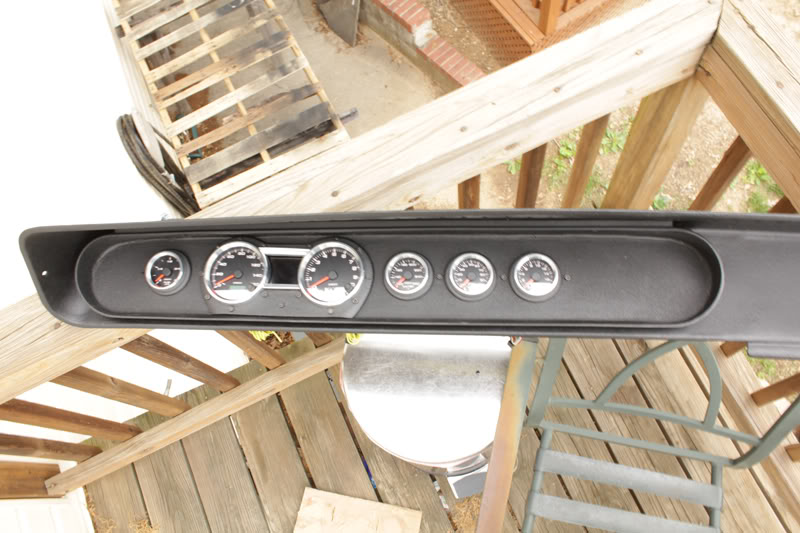

Oh and behind the clear plastic there are turn signal indicators and the highbeam indicator too. These utilize the stock bulbs and wiring already in the car:
I am hoping to start the car soon. I have a few other bugs to work out and I am waiting on fuel fittings to arrive.
Anyway, I thought I would share some of the dash modification I did. As I said earlier, I wanted a nice, clean, modern dash, and not the ugly stock one. For reference, here is a stock 1965 Impala dash:
Woof. So anyway. here is the basic process I used to create a new look. First I hacked up the old plastic part of the dash tp get it down to a more basic shape.
Next I took some wooden shims and glued them together with wood glue:
Then I glued them together into a longer row:
After careful measuring and thinking up a clean design, I traced it out onto the wood and then cut it out. Then came some sanding and some clear paint to seal the wood:
Next I made a kind of crude mold from the wood part. This stuff is called PoYo putty from Smooth-On, Inc. I would have prefered to use a pourable kind for mor accurate results, but this is all I had on hand. I just had to do some shaping to the plastic afterwards:
I also made some round trim rings to go around the smaller gauges. I didn't want to place the gauges directly onto a flat panel because it's too "racecar" and a bit boring for my taste. Note that the trim rings and the main cluster are thicker at the top and thinner at the bottom because of the shims I used to make them.
The center section between the two larger gauges required a mold to be made as well. This is just some random plastic I had, cut to shape, and then a mold was made. After that, it was cast in clear plastic and then window tint was applied to the back to darken it:
Once the pieces were cast and the fiberglass work was complete on the dash, I painted everything with truck bedliner for a modern "plastic" look and texture. I used a little bit of the old trim from the car to connect the two large gauges. Then I assembled everything and this is the result:
Oh and behind the clear plastic there are turn signal indicators and the highbeam indicator too. These utilize the stock bulbs and wiring already in the car:
I am hoping to start the car soon. I have a few other bugs to work out and I am waiting on fuel fittings to arrive.
Last edited by superdave84; 05-06-2012 at 04:55 PM.
05-06-2012, 05:09 PM
#13
TECH Apprentice

Join Date: Jul 2011
Posts: 393
Likes: 0
Received 0 Likes
on
0 Posts
I like your idea for the angled bezel rings. When I was doing my dash I was looking for something similar to that and found them to be $20 a piece, so I passed on that. Good job coming up with a DIY out of the box solution!
05-07-2012, 06:04 AM
#15

Very Creative!!........Looking Good!!!!
05-07-2012, 08:29 AM
#16

Cleaver solution !
05-12-2012, 09:30 PM
#17
TECH Resident
Thread Starter
Got a few odds and ends buttoned up today, but nothing worth taking pictures of. Got a few holes in the trunk welded up, got the trans crossmember painted and in the car. Plug wires, a few other things.
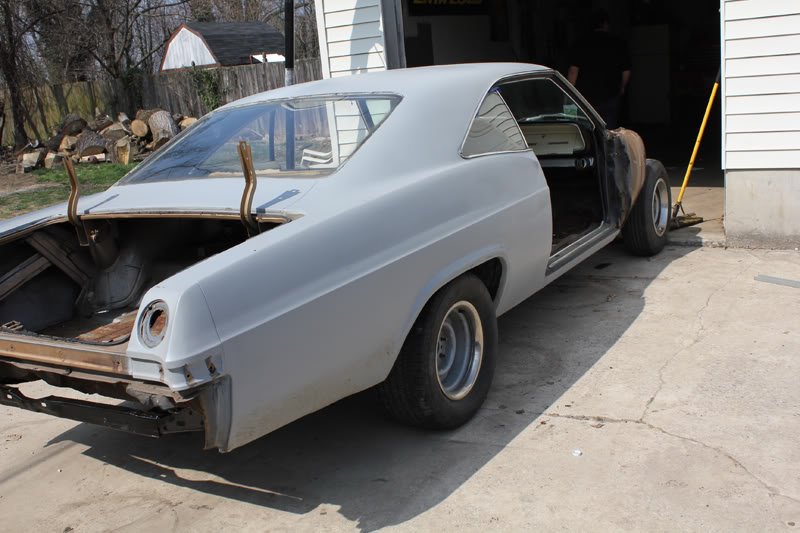
My main project for the week though was bodywork on the fenders. I am a total novice to bodywork, so this was my very first time. There are still a few flaws in them, but not terrible for my first attempt.
Here they are as UPS delivered them:

They are good, solid fenders, but there were still almost 50 years worth of dings and dents. One was a nasty one about the size of my fist, on a body line, and about 3/4 of an inch deep. Here is a pic after I banged it out with a hammer and dolly (I seem to have lost the pic BEFORE the hammering):

I used paint stripper to remove all the white (factory) paint, and it ate all the way down to the black coating (which the stipper did not remove). I sanded a lot of it off during a lot of the bodywork as I searched for tiny dings. I also welded up all the emblem holes and little holes for worthless trim that I don't want on my beautiful car. After days of working on them, here are the finished fenders:
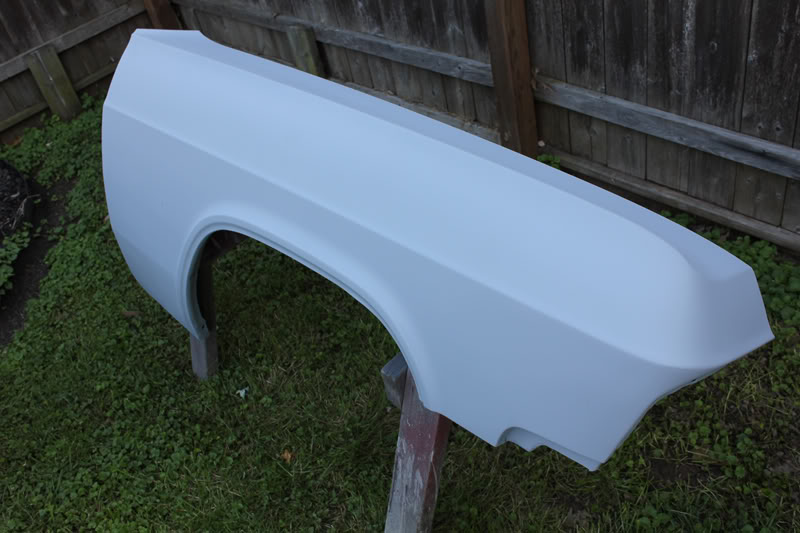

Perfect? No, but now they are gray like the rest of the car, and they came out ok. A real body an will be doing the fixing from here on out though. I would have bought repops, but they don't make them for a '65. I was stuck with finding originals. I found a set on ebay for $350 delivered off a '65 Biscayne. Other fenders in far worse condition have sold for more than twice that price, plus several hundred for shipping. I really lucked out and the ebay member sevenfallsago REALLY went out of their way to get these fenders to me. I cannot express how thankful I am.
Also, I thought I would share a few pictures of the headers. These are Dynatech LS Swap Headers for a '67-'69 Camaro. They fit perfectly. Any of you guys thinking of doing a '65-'70 B-body swap, these are the headers for your build. Again, thanks to my friend Rocky for figuring out which headers to use.
More to come
My main project for the week though was bodywork on the fenders. I am a total novice to bodywork, so this was my very first time. There are still a few flaws in them, but not terrible for my first attempt.
Here they are as UPS delivered them:
They are good, solid fenders, but there were still almost 50 years worth of dings and dents. One was a nasty one about the size of my fist, on a body line, and about 3/4 of an inch deep. Here is a pic after I banged it out with a hammer and dolly (I seem to have lost the pic BEFORE the hammering):
I used paint stripper to remove all the white (factory) paint, and it ate all the way down to the black coating (which the stipper did not remove). I sanded a lot of it off during a lot of the bodywork as I searched for tiny dings. I also welded up all the emblem holes and little holes for worthless trim that I don't want on my beautiful car. After days of working on them, here are the finished fenders:
Perfect? No, but now they are gray like the rest of the car, and they came out ok. A real body an will be doing the fixing from here on out though. I would have bought repops, but they don't make them for a '65. I was stuck with finding originals. I found a set on ebay for $350 delivered off a '65 Biscayne. Other fenders in far worse condition have sold for more than twice that price, plus several hundred for shipping. I really lucked out and the ebay member sevenfallsago REALLY went out of their way to get these fenders to me. I cannot express how thankful I am.
Also, I thought I would share a few pictures of the headers. These are Dynatech LS Swap Headers for a '67-'69 Camaro. They fit perfectly. Any of you guys thinking of doing a '65-'70 B-body swap, these are the headers for your build. Again, thanks to my friend Rocky for figuring out which headers to use.
More to come
The following users liked this post:
1966impala (11-18-2021)
 05-12-2012, 09:39 PM
#19
TECH Resident
Thread Starter
The following users liked this post:
1966impala (11-18-2021)
