
Altered Truck Oil Pan Capacity
 06-09-2012, 09:16 AM
#21
If you add a Oil Cooler, you need to make sure it has some type of thermostat in it. There have been reports of engines not getting hot enough to operate optimally. This id due to the oil never getting up to operating temperature, especially in colder weather.
If you take one from the Junk Yard. Make sure it has some thermostat type of setup and take it too. RX7 ones are pretty good ones from what I read.
Yeah. I know... on more thing to think about..LOL
If you take one from the Junk Yard. Make sure it has some thermostat type of setup and take it too. RX7 ones are pretty good ones from what I read.
Yeah. I know... on more thing to think about..LOL
Last edited by bczee; 06-10-2012 at 09:10 AM.
 01-31-2013, 08:59 AM
#22
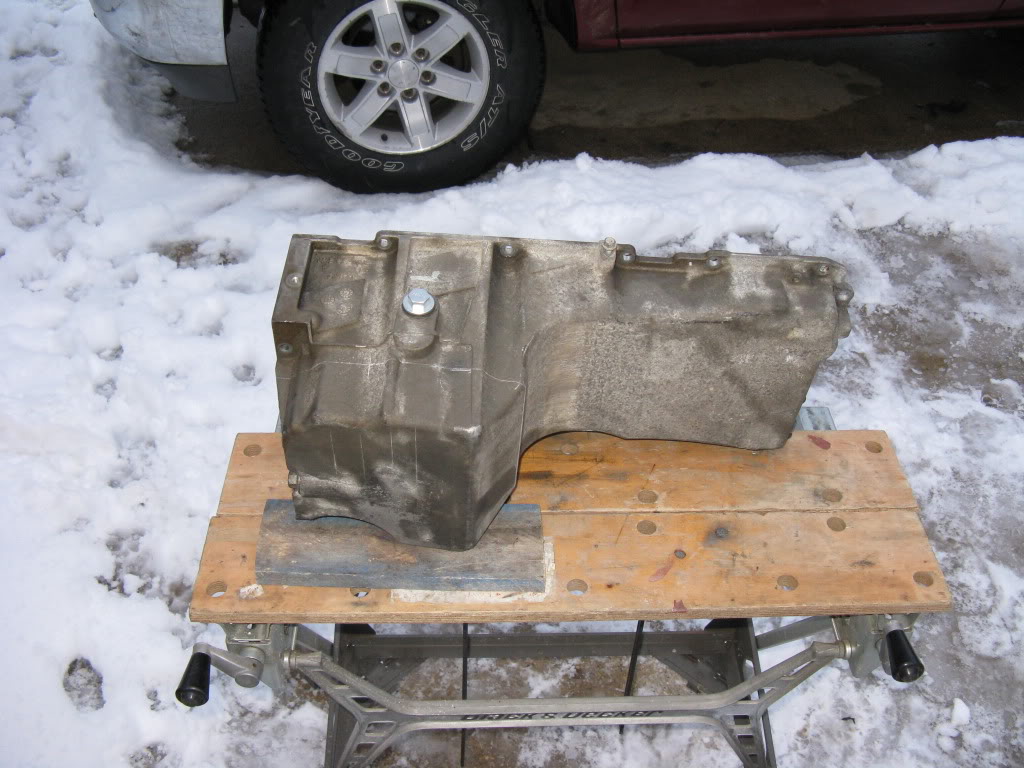
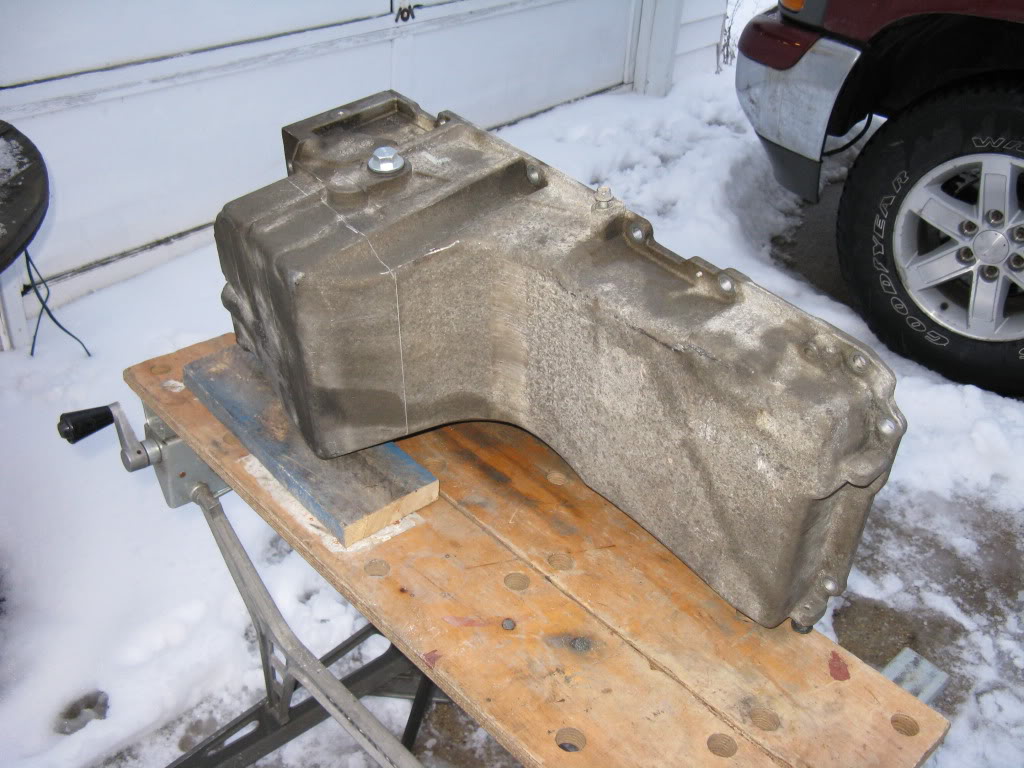
OK, update time. I finally got to cutting my truck pan down. To save a little time on my buddy's mill I cut the bottom off the pan myself...in the driveway...in the snow! I was afraid to throw aluminum all over the shop with the open engine and trans. good thing it was a toasty 28F!
I think I might have a small leak...yyyaaaa

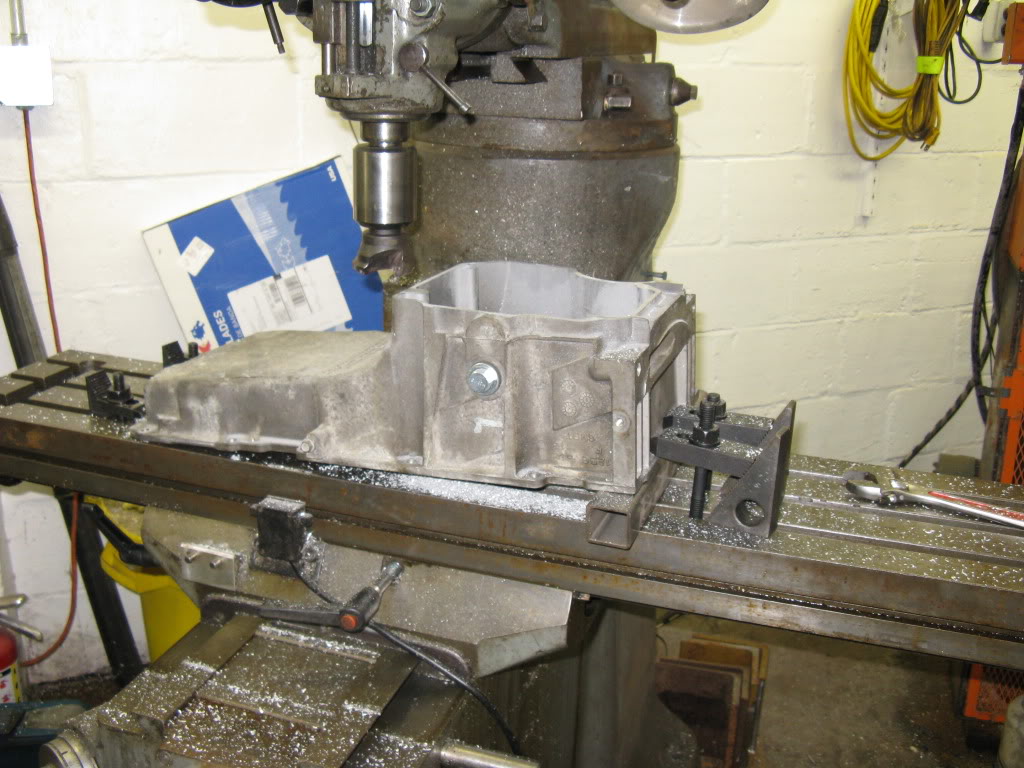
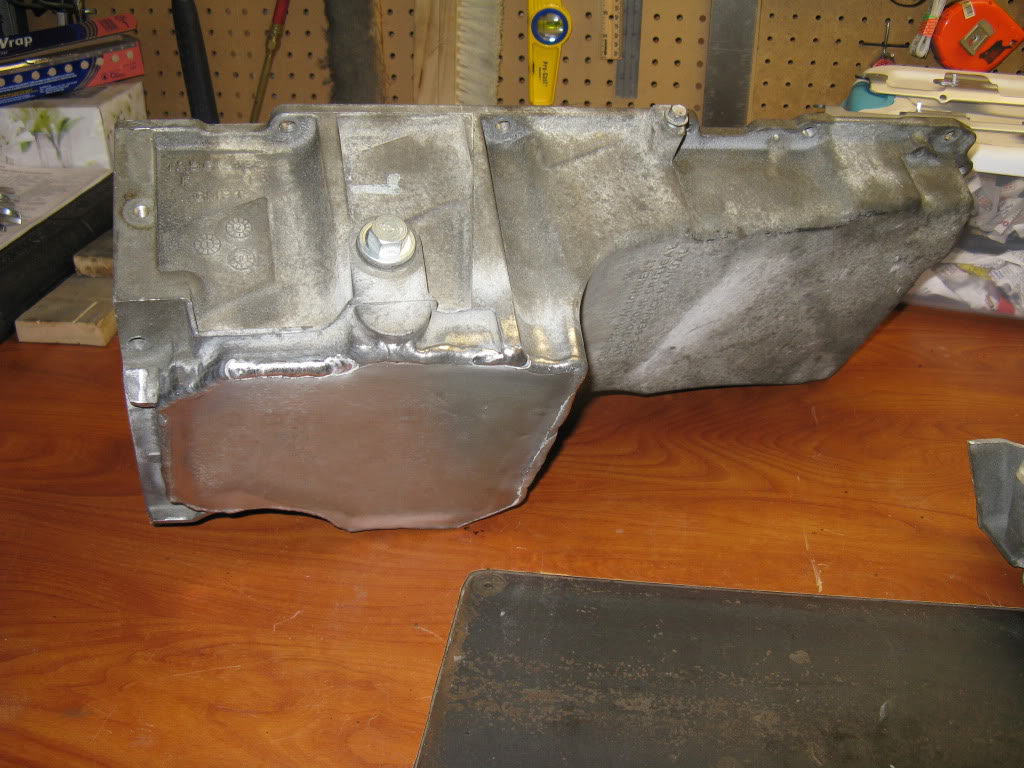
I little time on the Bridgeport and that flange was as flat as Wisconsin.
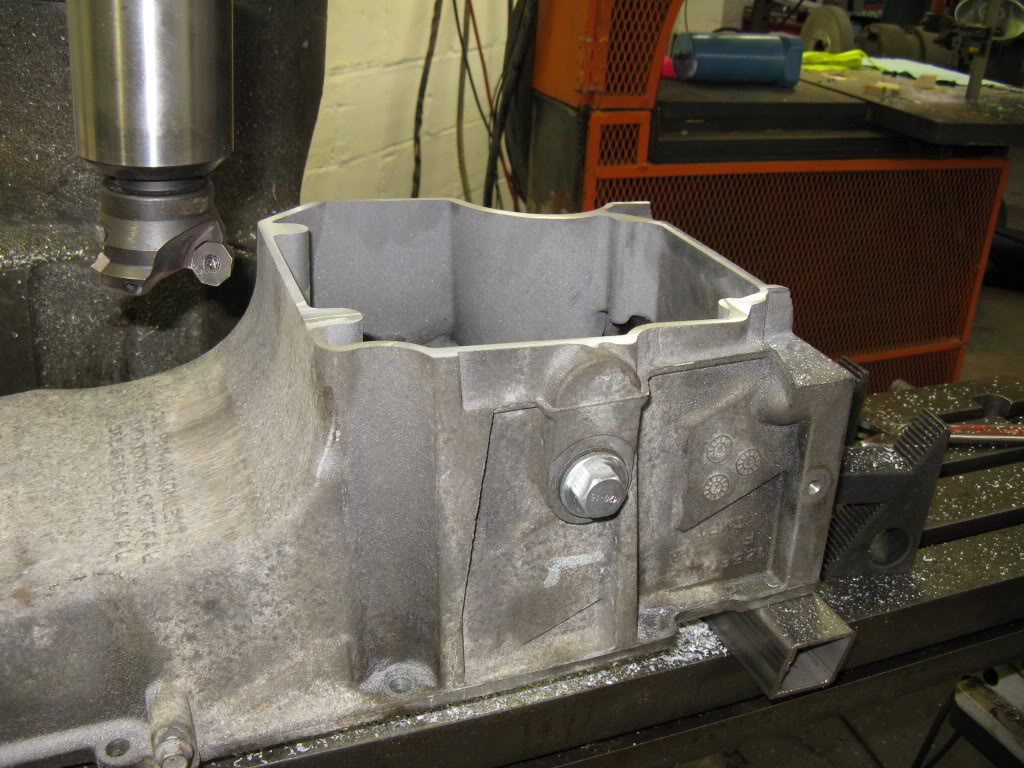
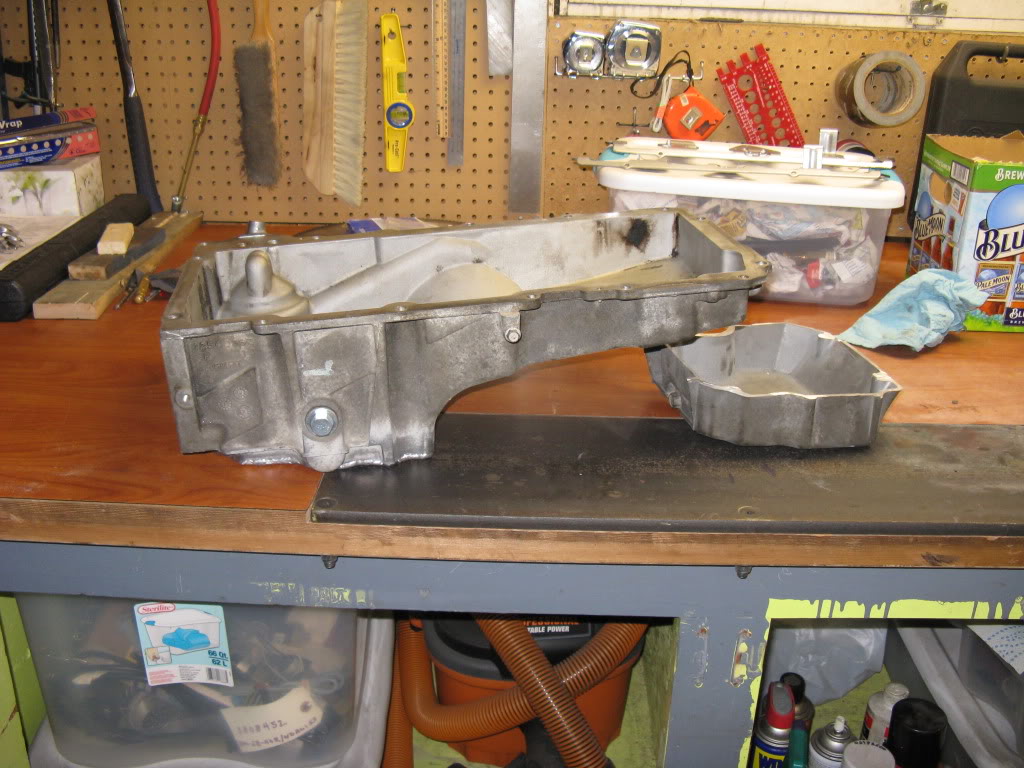
TADA! TIG welding and fab work later and I have a pan FINALLY suitable for the Nova.
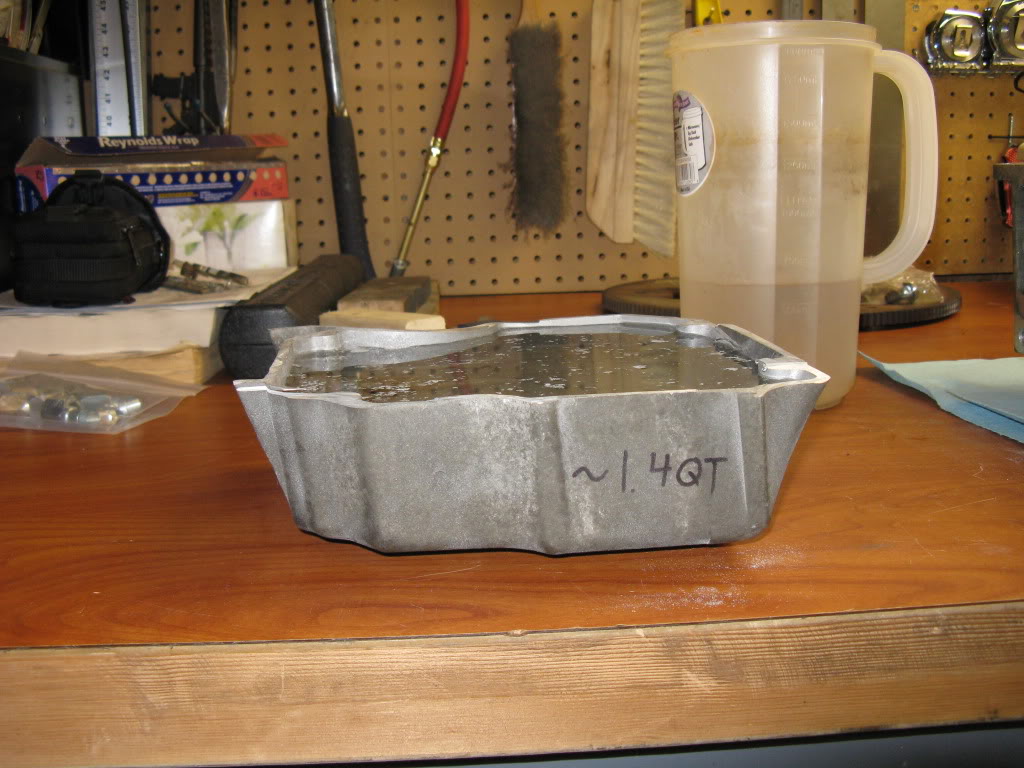
Looks like I lost about 1.5Qt of capacity, exactly as I was expecting. That should leave about 4.5Qt. A little short but with frequent changes I should be OK. Not like it�s a high dollar engine right??
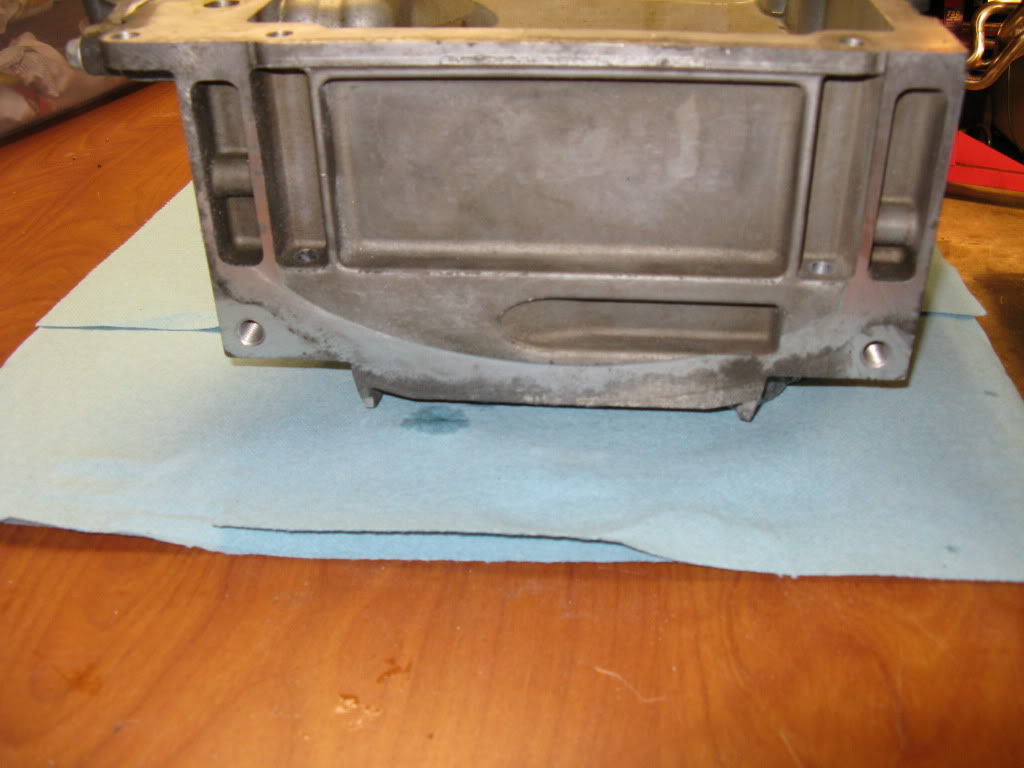
Leak check found a couple small leaks. Im going to meet up with my buddy soon to get them patched up
Next step is adding a drain plug. I had planned to simply drill and tap the pan in the thick casting right below the port for the oil level sensor. But a buddy pointed out that the stock drain plug is Heli-coiled to prevent stripping AL threads. So I started researching and found that it is still common for the heli-coil threads to pull out! This led me to consider installing a valve to avoid constant pug removal. Internet searching found this:
http://www.fumotousa.com/
Pretty slick product, and the locking handle feature is nice. To bad the price sucks! $30-$40 for a ball valve is Not happening! I'll be investing a little research into a similar, but more cost effective solution! Ideas are welcome!
I think I might have a small leak...yyyaaaa
I little time on the Bridgeport and that flange was as flat as Wisconsin.
TADA! TIG welding and fab work later and I have a pan FINALLY suitable for the Nova.
Looks like I lost about 1.5Qt of capacity, exactly as I was expecting. That should leave about 4.5Qt. A little short but with frequent changes I should be OK. Not like it�s a high dollar engine right??
Leak check found a couple small leaks. Im going to meet up with my buddy soon to get them patched up
Next step is adding a drain plug. I had planned to simply drill and tap the pan in the thick casting right below the port for the oil level sensor. But a buddy pointed out that the stock drain plug is Heli-coiled to prevent stripping AL threads. So I started researching and found that it is still common for the heli-coil threads to pull out! This led me to consider installing a valve to avoid constant pug removal. Internet searching found this:
http://www.fumotousa.com/
Pretty slick product, and the locking handle feature is nice. To bad the price sucks! $30-$40 for a ball valve is
Not happening! I'll be investing a little research into a similar, but more cost effective solution! Ideas are welcome!
01-31-2013, 10:12 AM
#23
On The Tree
iTrader: (3)

Join Date: Aug 2011
Location: WA
Posts: 125
Likes: 0
Received 0 Likes
on
0 Posts
OK, here is wat I am thinking. Stick with the truck pan, cut 2.75" off the bottom (an extra .25" to make up for plate thickness), incorporate a drain AND maybe look into welding a couple verticle walls inside the pan to help baffle and ensure oil feed to the pick up. To make up for the lost capacity add a cheap oil cooler. I will tap the stock oil cooler ports with NPT thread so I can run hose or hardline. Maybe I will try and find one of the stock 6.0 2500HD oil cooler pick up blocks...that would be slick. It may not be the best solution, but it fits my design, fabrication and finacial means.
Thoughts?
BTW, whatever route I choose I will post up my progress in here for for enjoy of all.
I believe there were also several oil filters used, pick through ones at the parts store to get another .25-.5 quart if you are truely worried about it. Seems like the external cooler lines, fittings, adapters ect people put on to same their motor usually leak or fail before oil aeration or starvation would occur.
01-31-2013, 11:03 AM
#25
Teching In

Join Date: Jan 2011
Location: Fort Worth, Texas
Posts: 19
Likes: 0
Received 0 Likes
on
0 Posts

I sectioned mine. took 1 1/2 inch out and brought the bottom portion back up to retain the drain plug. 1 1/2 " = a quart of oil. That plug you have where the oil level indicator was makes a great oil temp sender location, just hog out the inside and tap some 1/8 npt threads and your good.
02-01-2013, 01:02 PM
#26
Just chop the bottom of the truck pan. Dont worry about the oil capacity, you will have the same ~4 quarts as a Holley or Mast pan. I got as far as drawing the dashed lines on the truck pan to cut it but, in the end I got a deal on a Holley so I went with it.
I believe there were also several oil filters used, pick through ones at the parts store to get another .25-.5 quart if you are truely worried about it. Seems like the external cooler lines, fittings, adapters ect people put on to same their motor usually leak or fail before oil aeration or starvation would occur.
I believe there were also several oil filters used, pick through ones at the parts store to get another .25-.5 quart if you are truely worried about it. Seems like the external cooler lines, fittings, adapters ect people put on to same their motor usually leak or fail before oil aeration or starvation would occur.
I sectioned mine. took 1 1/2 inch out and brought the bottom portion back up to retain the drain plug. 1 1/2 " = a quart of oil. That plug you have where the oil level indicator was makes a great oil temp sender location, just hog out the inside and tap some 1/8 npt threads and your good.
So what kind of boats did/do you race?? Back in Washington I use to crew for a UL hydroplane team.
02-01-2013, 01:20 PM
#27
Teching In
Join Date: Jan 2011
Location: Fort Worth, Texas
Posts: 19
Likes: 0
Received 0 Likes
on
0 Posts
Used to race a 20ss hydro in the stock class and a RB hydro (methanol alcohol) in the pro class,both kneeldown boats back in region one when I lived in ct. Both APBA classes.
 02-01-2013, 03:36 PM
#30
TECH Fanatic

Join Date: Aug 2005
Posts: 1,004
Likes: 0
Received 0 Likes
on
0 Posts
The drain plug. I bought an aluminum bung and welded it to the bottom of the pan with a plug. DO NOT DO THIS. Put it in the side of the pan. Mine is on the bottom. Hangs a smidge lower than the crossmember. Well, as luck would have it i tagged something and kinda flattened the plug. My car is pretty low. Put the plug in the rear or side of the pan.
02-02-2013, 12:39 AM
#31
A bit late to mention it for this thread, but the Corvette batwing pan fits well in a second gen F-body, and from the pics it looks like it *might* work in a Nova. It holds 6.5 quarts, and doesn't even come close to hanging below the cross member. Below is a pic of a batwing in my Trans Am, with edelbrock musclecar headers and bolted to a TH350 which is in the factory stock position. Yellow arrow points to an oil drain I tapped because the original (red arrow) would spill onto the frame if I used it.

02-04-2013, 08:23 AM
#34
A bit late to mention it for this thread, but the Corvette batwing pan fits well in a second gen F-body, and from the pics it looks like it *might* work in a Nova. It holds 6.5 quarts, and doesn't even come close to hanging below the cross member. Below is a pic of a batwing in my Trans Am, with edelbrock musclecar headers and bolted to a TH350 which is in the factory stock position. Yellow arrow points to an oil drain I tapped because the original (red arrow) would spill onto the frame if I used it.
HAHA, at that point I may as well machine down to the flange and make an AL fabbed pan! I chose this route because it required a minimum of cast AL welding.
02-04-2013, 08:51 AM
#35
81' I had considered the vette' batwing pans. My concern was that the third gen X-body are both rear steer cars, so quite a bit of room is needed between the pan sump and the crossmember. I searched and searched and could not find an LS/third gen X-body swap with a batwing pan. So I chickened out of being the first!! I do wonder though, did you just tap the aluminum for your drain plug? I am scared of stripping! Thanks!
02-04-2013, 09:19 AM
#36
 02-04-2013, 10:12 AM
#37

just wondering if anyone else has cut there 6.0 pan an will it realy work good. as im I need of a shorter pan an this sound $400 cheaper than buying a pan. please let me know how this turns out
02-04-2013, 10:23 AM
#38
http://www.digitalcorvettes.com/foru...ad.php?t=53336
https://ls1tech.com/forums/10044185-post2.html
https://ls1tech.com/forums/conversio...-question.html
Good luck!