71 Pontiac Lemans
#21
Staging Lane
Thread Starter
The donor car sat outside for a time while I got the frame ready. I ran stainless steel fuel and brake lines along the frame, I also used stainless vinyl covered clamps and fasteners for the lines to avoid future rust issues. I found these at McMaster, an online hardware store that has an extensive inventory.
In preparation for the swap I removed most of the front sheet metal from the GTO donor so it wouldn't get damaged. I took me a few days to drain fluids, disconnect things like the driveshaft, fluid hoses and lines, the electrical harness, and the mounts. I also removed the radiator and AC gear in the front so they wouldn't get damaged and I could use them in the Lemans. I couldn't find a hoist to borrow so I bought a 2-ton one at Tractor Supply for $200. It's a cheap Chinese one but it worked well for me. I also bought a engine lifting chain from Summit, part number SUM-G1027. The GTO's motor already had heavy sheet metal lifting brackets on the front of the driver's head and the back of the passenger head so I didn't have to bolt the chain to the engine. I used 3/4" grade 8 bolts with thick fender washers to attached the lifting chain to the lifting brackets on the motor. Lifting the motor was pretty uneventful.
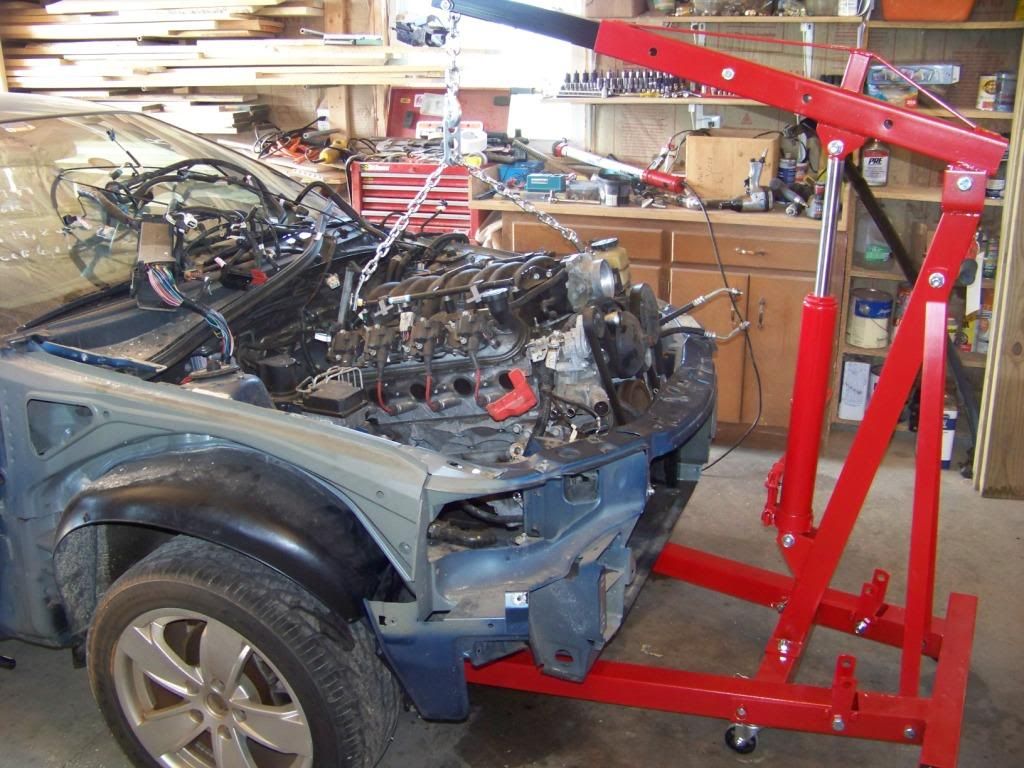
Once the motor was in the air some things had to be done before it could be moved to it's new home. Since the GTO donor has a front sump oil pan, that had to be replaced. I did quite a bit of research into all the options and went with the Holley 302-1 LS Retro-fit oil pan. It's a nicely made and good looking part, it's too bad it won't be noticed where it's going. I paid about $370 at Amazon, no tax or shipping. The pan comes with a new oil pickup tube. I also replaced the windage tray (GM 12611129) and used a new gasket (GM 12612350). This picture shows my son and his friend removing the original oil pan.
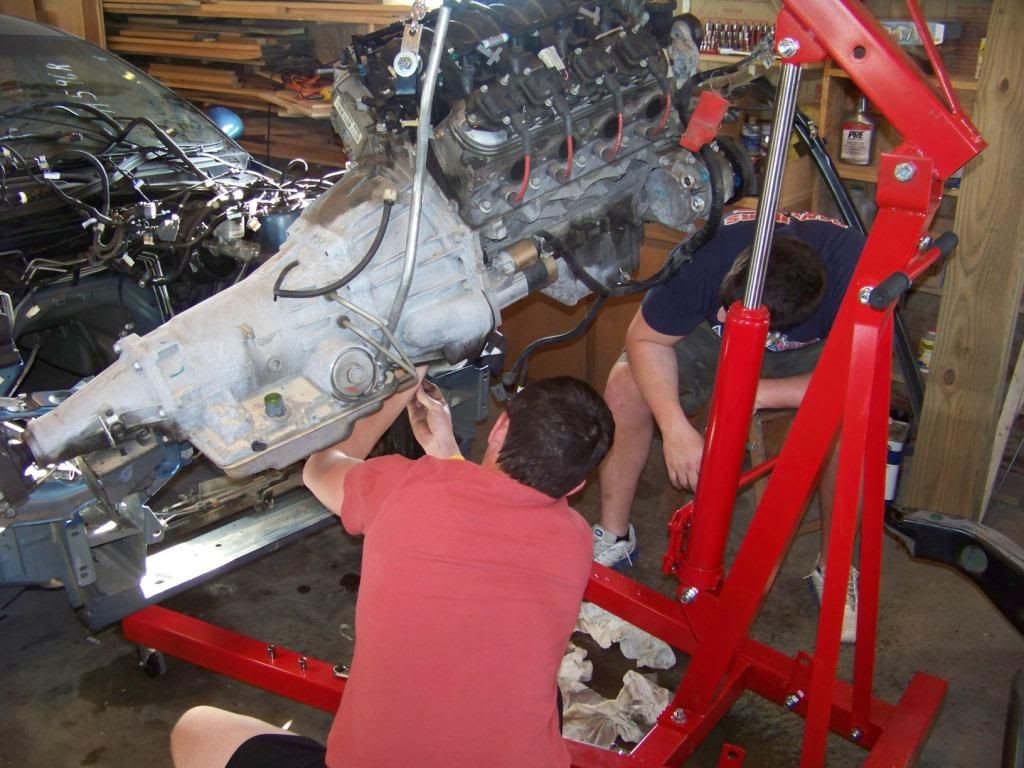
One minor unfortunate thing happened during this process, the bolt hole in the block for the pickup tube somehow got stripped, I drilled it out slightly larger and tapped it for a larger bolt.
Another issue with using GTO engines is that the dipstick goes into a hole in the oil pan instead of the side of the block like most other LS applications. A small sheet metal plug in the bottom passenger side of the block needs to be punched out from the inside to allow the installation of a dipstick there. This should be done while the oil pan is off the engine. I installed a dispstick tube (GM 12625031) and dipstick (GM 12634547) after the headers were installed. All of these part numbers are in the instructions that came with the Holley oil pan. Another thing I found was that the Holley oil pan uses a different oil filter than what the GTO requires - a PF48 instead of a PF46. I believe they differ in the thread size and pitch.
Next, motor mounts.
In preparation for the swap I removed most of the front sheet metal from the GTO donor so it wouldn't get damaged. I took me a few days to drain fluids, disconnect things like the driveshaft, fluid hoses and lines, the electrical harness, and the mounts. I also removed the radiator and AC gear in the front so they wouldn't get damaged and I could use them in the Lemans. I couldn't find a hoist to borrow so I bought a 2-ton one at Tractor Supply for $200. It's a cheap Chinese one but it worked well for me. I also bought a engine lifting chain from Summit, part number SUM-G1027. The GTO's motor already had heavy sheet metal lifting brackets on the front of the driver's head and the back of the passenger head so I didn't have to bolt the chain to the engine. I used 3/4" grade 8 bolts with thick fender washers to attached the lifting chain to the lifting brackets on the motor. Lifting the motor was pretty uneventful.

Once the motor was in the air some things had to be done before it could be moved to it's new home. Since the GTO donor has a front sump oil pan, that had to be replaced. I did quite a bit of research into all the options and went with the Holley 302-1 LS Retro-fit oil pan. It's a nicely made and good looking part, it's too bad it won't be noticed where it's going. I paid about $370 at Amazon, no tax or shipping. The pan comes with a new oil pickup tube. I also replaced the windage tray (GM 12611129) and used a new gasket (GM 12612350). This picture shows my son and his friend removing the original oil pan.

One minor unfortunate thing happened during this process, the bolt hole in the block for the pickup tube somehow got stripped, I drilled it out slightly larger and tapped it for a larger bolt.
Another issue with using GTO engines is that the dipstick goes into a hole in the oil pan instead of the side of the block like most other LS applications. A small sheet metal plug in the bottom passenger side of the block needs to be punched out from the inside to allow the installation of a dipstick there. This should be done while the oil pan is off the engine. I installed a dispstick tube (GM 12625031) and dipstick (GM 12634547) after the headers were installed. All of these part numbers are in the instructions that came with the Holley oil pan. Another thing I found was that the Holley oil pan uses a different oil filter than what the GTO requires - a PF48 instead of a PF46. I believe they differ in the thread size and pitch.
Next, motor mounts.
Last edited by fsdproject; 08-08-2012 at 06:47 PM. Reason: Correct Part Number
#22
Staging Lane
Thread Starter
In researching motor mounts and adapter plates it seems like the two choices are normal and one inch setback. I got the impression the one inch setback plates are useful to avoid interference issues with the crossmember and to allow the engine to bolt to an existing transmission. I didn't have either of those issues, and I didn't like having the motor closer to the firewall and making access to the sensors and connections on the back of the motor more difficult. So I went with the normal adapter plates.
For adapter plates and motor mounts I went with the 3-1148G Motor Conversion Set from Energy Suspension. This set includes the adapter plates, short and wide poly engine mounts and all necessary fasteners needed. The parts are well made but the instructions were basically a parts list and torque diagram. I had a couple of issues with them.
The first issue was one of interference of the adapter plates with brackets on the engine that support accessories. The front lower corner of the adapter plate on the driver side interfered with the bracket for the alternator. The front upper corner of the adapter plate on the passenger side interfered with the bracket for the AC compressor. I called tech support for Energy Suspension and was told to just grind the edges of the plate as necessary to gain the needed clearance. Their tech support was very good, I got a person on the phone right away and he was very helpful. The pictures below (driver's side first, then passenger) show the installed plates with grinding done.
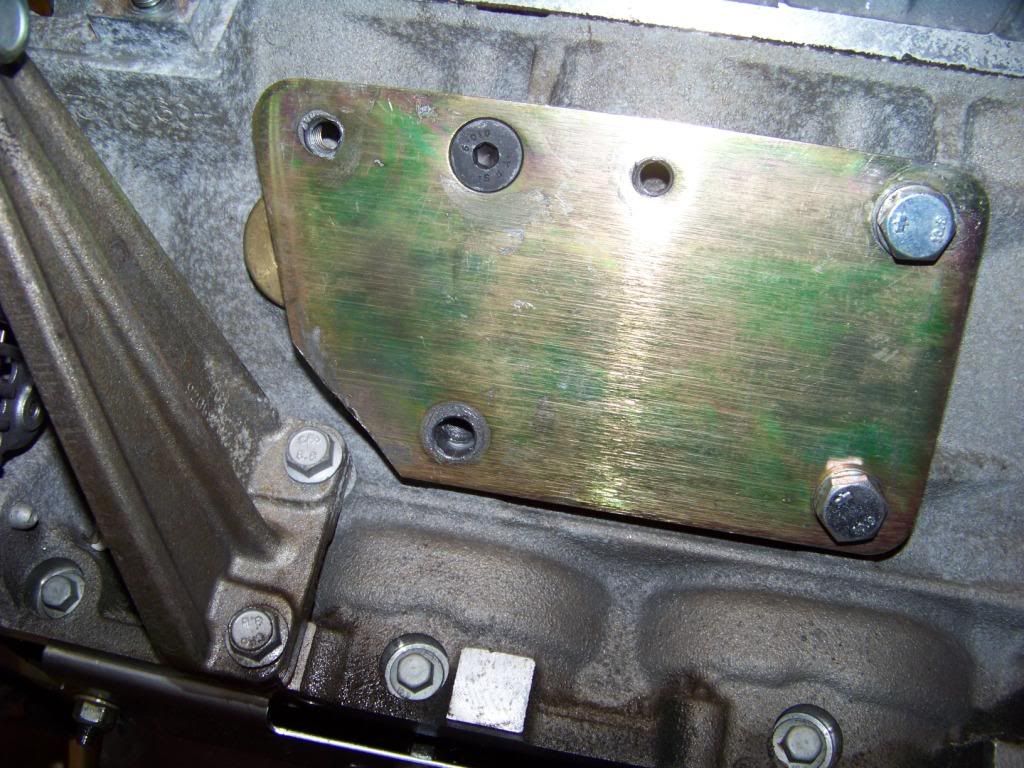
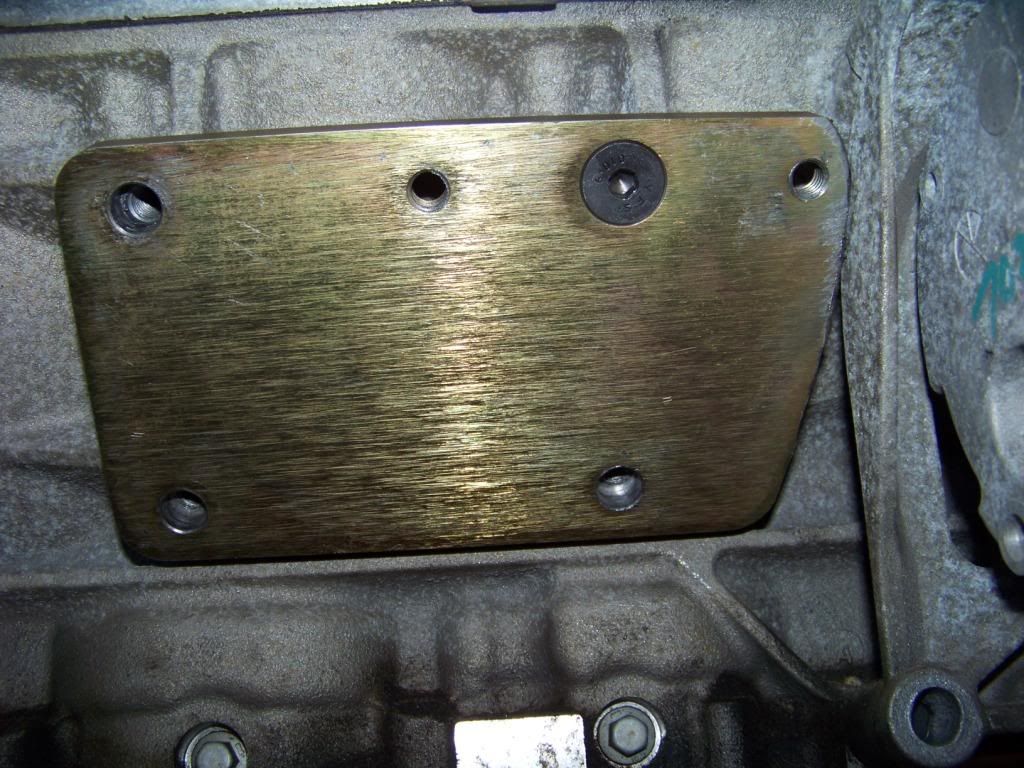
After I got the plates figured out I sandblasted them, primed and painted them so they wouldn't rust and installed them permanently.
The other issue came when I installed the motor mounts onto the adapter plate. On the "back" or upper surface of the mount there is a ridge in the poly that prevents the mount from sitting flush on the plate. When I called and asked about that I was told this area would get compressed when the bolts were tightened and that develops a necessary preload into the mount.
For the frame mounts I went with the Car Shop CSP2380 A Body frame mounts BOP to Chevy. These were attached to the crossmember with a stainless fastener kit from Totally Stainless.
Once all these were in place it was time to lower the engine onto the Lemans' frame.
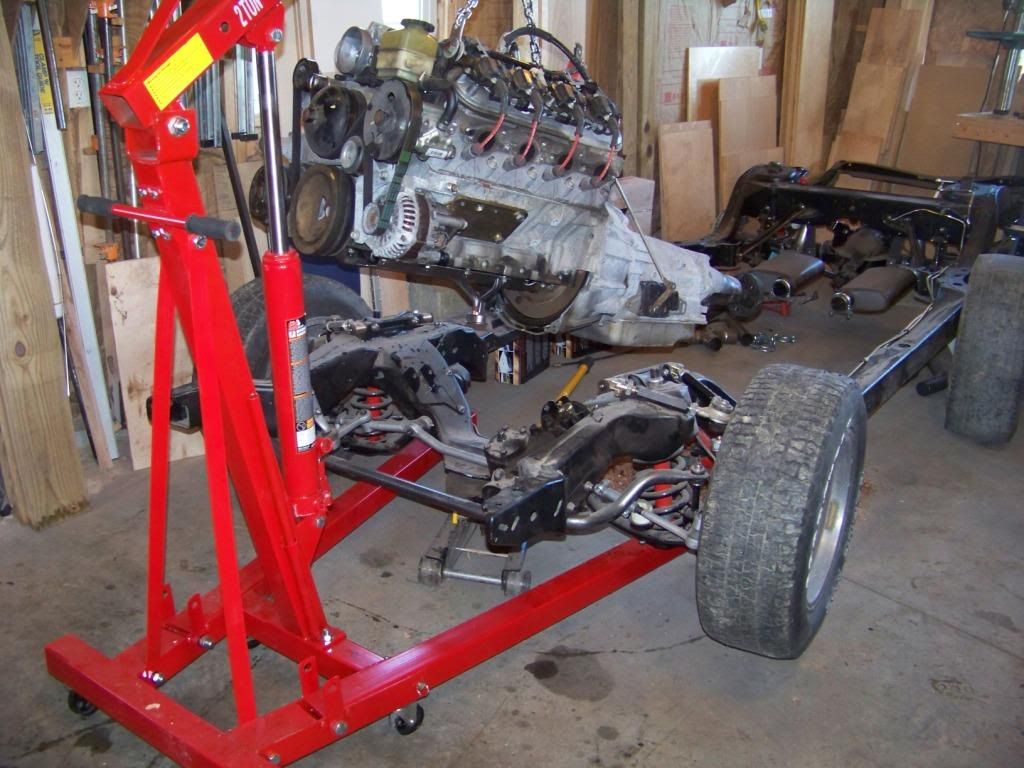
The only interference issue I ran into fitting the engine was between the alternator and steering box. It was pretty much preventing the engine from being bolted in on that side. I knew from my research that was a possible issue so was not surprised. I removed the alternator and it's supporting bracket from the engine to allow me to continue. I know I could have possibly trimmed the steering box, put spacers under the frame mounts, or used the smaller Camaro alternator, but wasn't really interested in any of those options. Plus, it appeared like the alternator would have been very hard to replace in the future if I left it in it's original location. I figured I would look into alternator relocation in the future.
I left the fasteners for the motor and frame mounts loose to help put the cross bolts through the mating holes in both mounts. With a little bit of shoving and pushing I got all the bolts in and tightened everything.
Next, headers and exhaust.
For adapter plates and motor mounts I went with the 3-1148G Motor Conversion Set from Energy Suspension. This set includes the adapter plates, short and wide poly engine mounts and all necessary fasteners needed. The parts are well made but the instructions were basically a parts list and torque diagram. I had a couple of issues with them.
The first issue was one of interference of the adapter plates with brackets on the engine that support accessories. The front lower corner of the adapter plate on the driver side interfered with the bracket for the alternator. The front upper corner of the adapter plate on the passenger side interfered with the bracket for the AC compressor. I called tech support for Energy Suspension and was told to just grind the edges of the plate as necessary to gain the needed clearance. Their tech support was very good, I got a person on the phone right away and he was very helpful. The pictures below (driver's side first, then passenger) show the installed plates with grinding done.


After I got the plates figured out I sandblasted them, primed and painted them so they wouldn't rust and installed them permanently.
The other issue came when I installed the motor mounts onto the adapter plate. On the "back" or upper surface of the mount there is a ridge in the poly that prevents the mount from sitting flush on the plate. When I called and asked about that I was told this area would get compressed when the bolts were tightened and that develops a necessary preload into the mount.
For the frame mounts I went with the Car Shop CSP2380 A Body frame mounts BOP to Chevy. These were attached to the crossmember with a stainless fastener kit from Totally Stainless.
Once all these were in place it was time to lower the engine onto the Lemans' frame.

The only interference issue I ran into fitting the engine was between the alternator and steering box. It was pretty much preventing the engine from being bolted in on that side. I knew from my research that was a possible issue so was not surprised. I removed the alternator and it's supporting bracket from the engine to allow me to continue. I know I could have possibly trimmed the steering box, put spacers under the frame mounts, or used the smaller Camaro alternator, but wasn't really interested in any of those options. Plus, it appeared like the alternator would have been very hard to replace in the future if I left it in it's original location. I figured I would look into alternator relocation in the future.
I left the fasteners for the motor and frame mounts loose to help put the cross bolts through the mating holes in both mounts. With a little bit of shoving and pushing I got all the bolts in and tightened everything.
Next, headers and exhaust.
#23
 i would just like to thank you for the heads up to the place you got the gto from. went and got myself one also for a pretty good deal. though it's a 04 5.7 i'm happy with my purchase. now i have 2 ls motors, kinda put the cart b4 the horse lol. gotta pickup another classic for this motor now

#24
Staging Lane
iTrader: (1)
Join Date: Jan 2012
Location: New Bern, NC (From Fridley, MN)
Posts: 82
Likes: 0
Received 0 Likes
on
0 Posts
I'll be keeping an eye on this. I might be picking up a 71 LeMans Sport and I am thinking about swapping out the 400 with an LS1 or LS2.
Good progress, hope everything turns out the way you want it!
Good progress, hope everything turns out the way you want it!
#26
TECH Fanatic
Looks great so far. I love the idea of using the GTO interior parts. I am half looking for a red interior for my car when I do the body and paint.
We just moved to Lexington Ky and the car is in short term storage until I can find a place here.
Keep it up, you will be driving before you know it.
We just moved to Lexington Ky and the car is in short term storage until I can find a place here.
Keep it up, you will be driving before you know it.
#27
Staging Lane
Thread Starter
Thanks for all the feedback and comments, it's nice to know my efforts in documenting this are appreciated. I hope to get back to updating this soon.
#28
Staging Lane
Thread Starter
This post will document the transmission crossmember I made. I first tried to modify the Pontiac cross member but found it wouldn't have been feasible. I also considered buying a Chevelle cross member and doing the easy typical mod of flipping and re-welding the tab on, but didn't want to spend the money for a new one or spend time looking for a used one.
I was getting more comfortable with my welding skills so I decided to give this a go. I used metal angles and straps I found at Lowes. I decided to make it in three pieces, two small brackets that sit on top of the frame and the main cross member part. Height adjustments for driveline angles will be done between the frame brackets and main cross member.
The brackets are in the shape of a "Z", I tried to add strengthening braces to all parts as much as I could.
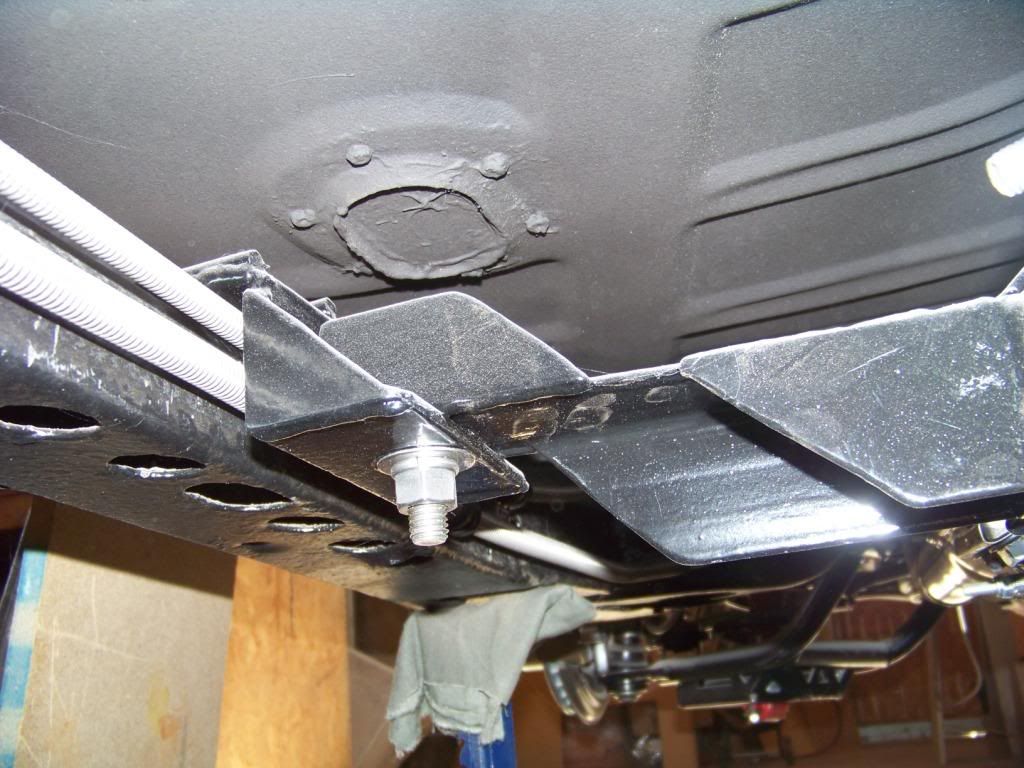
The main cross member was made of several pieces, here are views looking forward and aft:
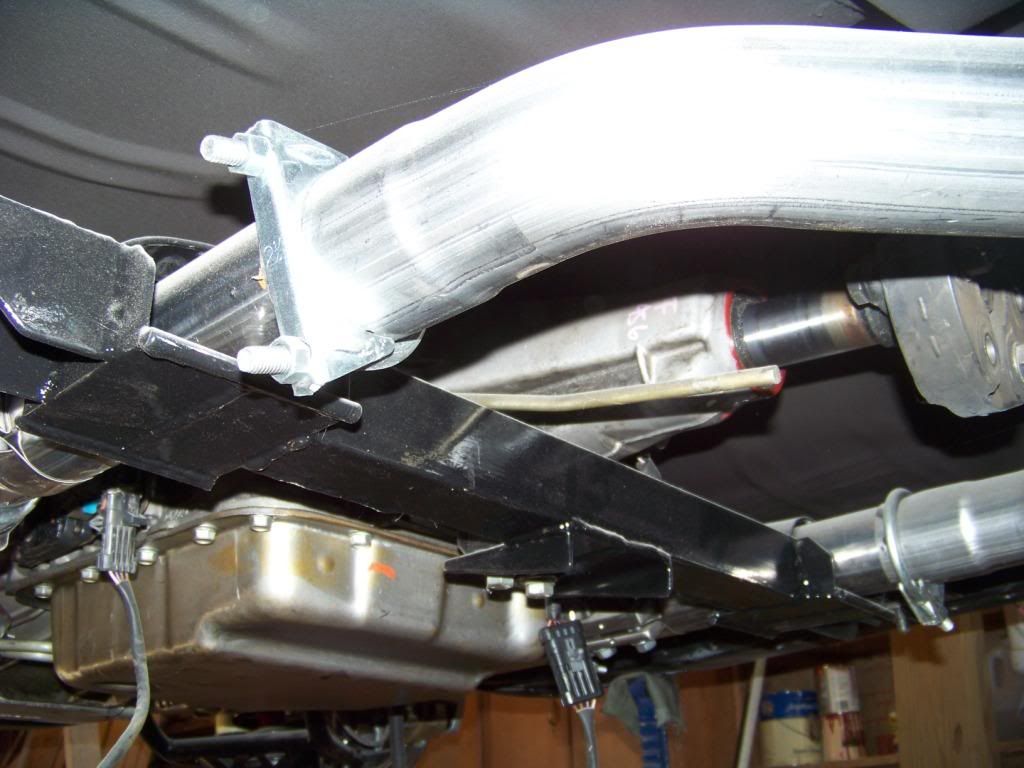
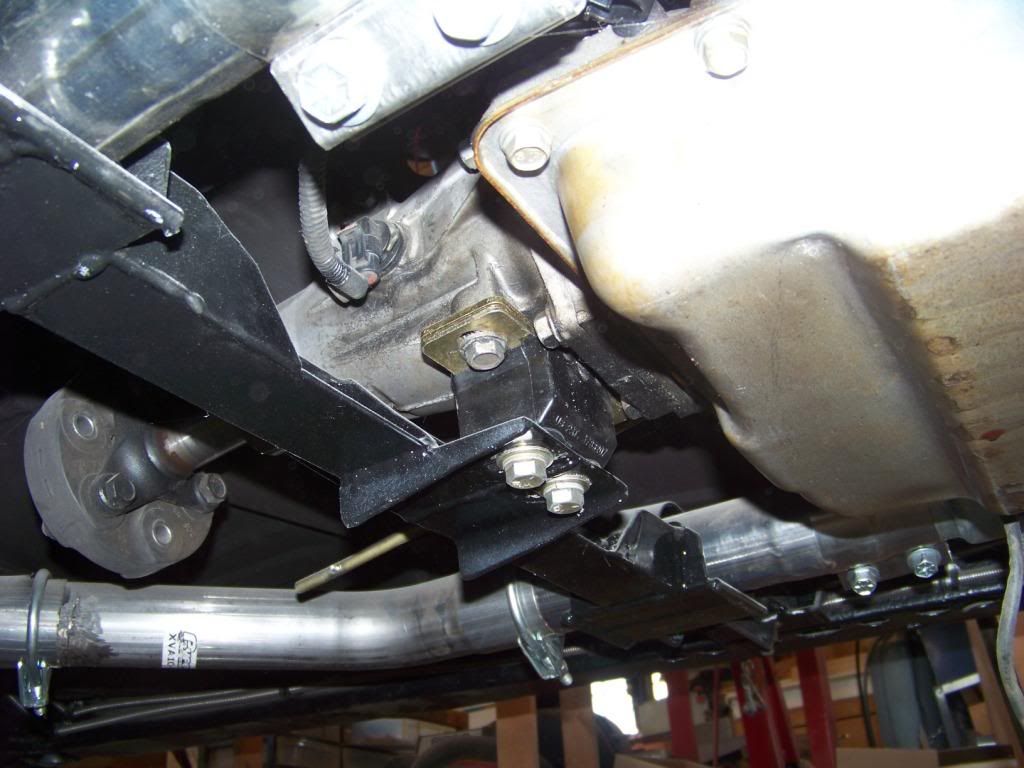
Not the prettiest thing in the world, but hopefully it works for awhile. Someday I will probably make another one that looks better.
Now next will be headers and exhaust.
I was getting more comfortable with my welding skills so I decided to give this a go. I used metal angles and straps I found at Lowes. I decided to make it in three pieces, two small brackets that sit on top of the frame and the main cross member part. Height adjustments for driveline angles will be done between the frame brackets and main cross member.
The brackets are in the shape of a "Z", I tried to add strengthening braces to all parts as much as I could.

The main cross member was made of several pieces, here are views looking forward and aft:


Not the prettiest thing in the world, but hopefully it works for awhile. Someday I will probably make another one that looks better.
Now next will be headers and exhaust.
#29
Staging Lane
Thread Starter
As promised some info on the headers and exhaust:
After doing my usual "exhaustive" research I decided on Doug's LS1 swap Headers for A-bodies. I bought part number D3338, the ceramic coated ones. Amazon actually caries these, so I got a pretty good deal and free shipping. Inside the package was the headers, gaskets, bolts, 3" to 2 1/2" reducers, two clamps, and two O2 sensor extension harnesses. The headers have O2 bungs welded on the outside of each collector. They come wrapped in bubble wrap which I left on during installation to avoid scratches and dings. I installed these before the body went back on so they went on pretty easy.
These fit great in my situation, I have plenty of clearance everywhere. I should mention that I did move the brake distribution block from it's normal position on the inside of the frame to the top of the frame below the master cylinder, you can see that in the driver's side picture below. I knew from my research that this was a possible issue and it didn't really bother me too much as I was running new lines anyway and also adding an adjustable proportioning valve nearby.
One issue that I did have to deal with is that the O2 extension harnesses supplied by Dougs would not work with the engine wiring harness from the 04 GTO, apparently they use different connectors (square gray) than the F-body LS1 harnesses (square black). I did call Dougs about it and was just told to go buy the correct ones. I found and ordered the correct ones on ebay, they seem to work fine.
Another issue I had was that the original GM spark plug wires didn't fit very well around the header tubes in some cases. I decided to get a set of MSD -32813 spark plug wires, these have bendable spark plug boots so you can position the boot wires away from the headers as needed. These are also shown in the pictures below.
Here are pictures of the headers: Excuse the dust, been busy making cabinets lately and the dust goes everywhere.
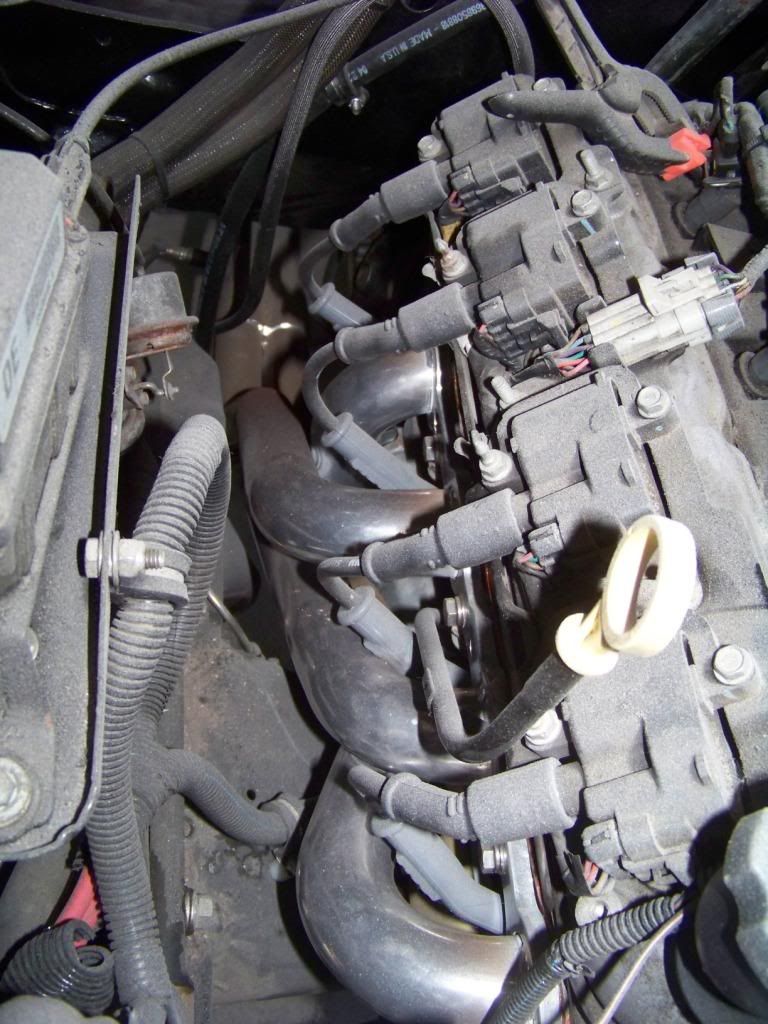
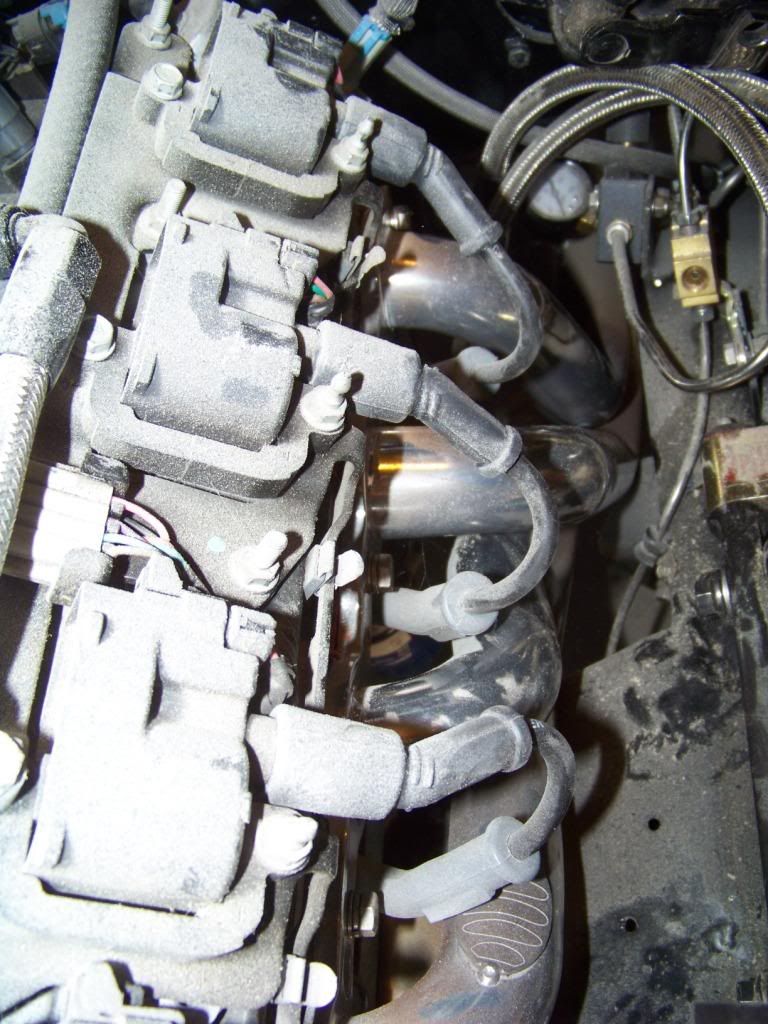
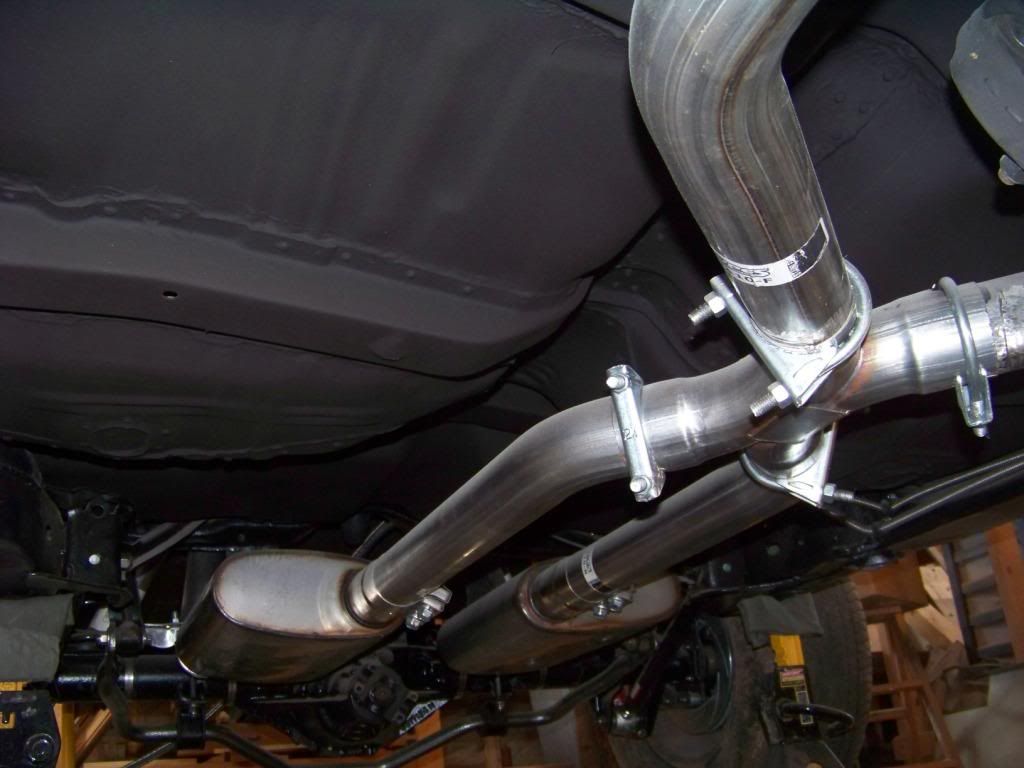
For exhaust I decided to go with the Pypes 2 1/2" system with x-pipe, part number PYE-SGA12S. I chose these because they seemed to have a fairly good reputation and are stainless steel for a reasonable price. The system comes with stainless hangers that are the same design as the original GM hangers. This system did require some mods to install, I end up trimming the four pipes forward and aft of the x-pipe as necessary to get everything to fit.
The Pypes kit comes with standard u-bolt style clamps, I did end up replacing some of these with stainless band clamps I got from Summit, part number WLK-33226.
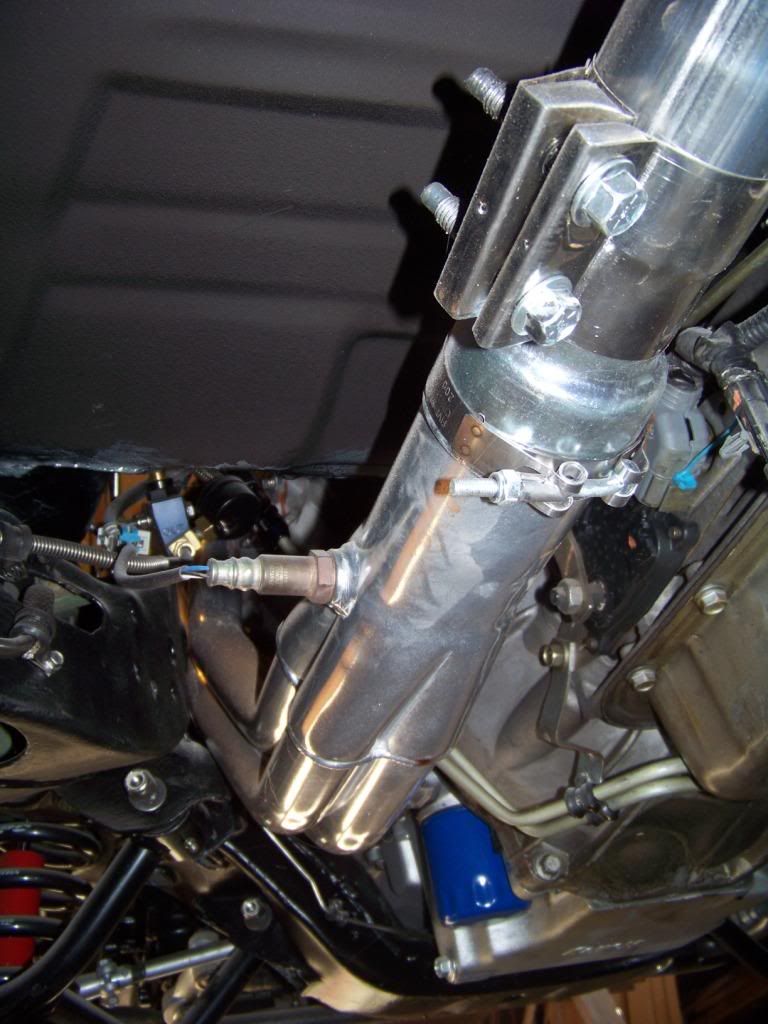
This picture shows the driver's side header from underneath the car. You can see there is plenty of clearance between the header and floor, frame, and other parts. Also plenty of room to install the O2 sensor. The Pypes clamp was used to attach the reducer to the header collector and the band clamp I bought was used to attach the reducer to the exhaust. You can also see the Holley LS1 swap oil pan in this picture and how well it fits flush with the bottom on the engine crossmember.
The picture below shows the x-pipe and mufflers installed. I positioned the clamps in such a way to avoid damage from speed bumps and to make the bolts accessible in the future.
Now that I have installed as much as I can on the frame I can put the body back on, that will be the next update (the above pictures were taken after that).
After doing my usual "exhaustive" research I decided on Doug's LS1 swap Headers for A-bodies. I bought part number D3338, the ceramic coated ones. Amazon actually caries these, so I got a pretty good deal and free shipping. Inside the package was the headers, gaskets, bolts, 3" to 2 1/2" reducers, two clamps, and two O2 sensor extension harnesses. The headers have O2 bungs welded on the outside of each collector. They come wrapped in bubble wrap which I left on during installation to avoid scratches and dings. I installed these before the body went back on so they went on pretty easy.
These fit great in my situation, I have plenty of clearance everywhere. I should mention that I did move the brake distribution block from it's normal position on the inside of the frame to the top of the frame below the master cylinder, you can see that in the driver's side picture below. I knew from my research that this was a possible issue and it didn't really bother me too much as I was running new lines anyway and also adding an adjustable proportioning valve nearby.
One issue that I did have to deal with is that the O2 extension harnesses supplied by Dougs would not work with the engine wiring harness from the 04 GTO, apparently they use different connectors (square gray) than the F-body LS1 harnesses (square black). I did call Dougs about it and was just told to go buy the correct ones. I found and ordered the correct ones on ebay, they seem to work fine.
Another issue I had was that the original GM spark plug wires didn't fit very well around the header tubes in some cases. I decided to get a set of MSD -32813 spark plug wires, these have bendable spark plug boots so you can position the boot wires away from the headers as needed. These are also shown in the pictures below.
Here are pictures of the headers: Excuse the dust, been busy making cabinets lately and the dust goes everywhere.


For exhaust I decided to go with the Pypes 2 1/2" system with x-pipe, part number PYE-SGA12S. I chose these because they seemed to have a fairly good reputation and are stainless steel for a reasonable price. The system comes with stainless hangers that are the same design as the original GM hangers. This system did require some mods to install, I end up trimming the four pipes forward and aft of the x-pipe as necessary to get everything to fit.
The Pypes kit comes with standard u-bolt style clamps, I did end up replacing some of these with stainless band clamps I got from Summit, part number WLK-33226.
This picture shows the driver's side header from underneath the car. You can see there is plenty of clearance between the header and floor, frame, and other parts. Also plenty of room to install the O2 sensor. The Pypes clamp was used to attach the reducer to the header collector and the band clamp I bought was used to attach the reducer to the exhaust. You can also see the Holley LS1 swap oil pan in this picture and how well it fits flush with the bottom on the engine crossmember.

The picture below shows the x-pipe and mufflers installed. I positioned the clamps in such a way to avoid damage from speed bumps and to make the bolts accessible in the future.

Now that I have installed as much as I can on the frame I can put the body back on, that will be the next update (the above pictures were taken after that).
#32
Staging Lane
Thread Starter
1989GTA: I assume you are referring to the length of the mufflers? I measured the existing mufflers and they are 14 inches long. Another 8 inches forward to 22 inches would bring the front edges of the mufflers pretty close to the curve of the seat pan where it kicks up under the rear seat area. Not impossible, just would be close. I don't think you could move the mufflers back much due to the fact that the pipes immediately go up to go over the rear axle.
chuck71d: Thanks for the comment. I have been closely following your build and it has been an inspiration to me. I admire your perseverance pushing through all the problems you have experienced. Yes, I am using as much as I can from the 04 GTO donor including most of the under hood components and the dash, steering column, seats, entire wiring harness, etc. I currently have the GTO dash mounted and engine and dash wiring installed, and the engine is running and the gauges are working. It was actually fairly easy to do this as I essentially moved everything over to the Lemans and plugged it back together. I hope to eventually get this thread caught up to the actual progress on my build.
chuck71d: Thanks for the comment. I have been closely following your build and it has been an inspiration to me. I admire your perseverance pushing through all the problems you have experienced. Yes, I am using as much as I can from the 04 GTO donor including most of the under hood components and the dash, steering column, seats, entire wiring harness, etc. I currently have the GTO dash mounted and engine and dash wiring installed, and the engine is running and the gauges are working. It was actually fairly easy to do this as I essentially moved everything over to the Lemans and plugged it back together. I hope to eventually get this thread caught up to the actual progress on my build.
#35
"I assume you are referring to the length of the mufflers? I measured the existing mufflers and they are 14 inches long. Another 8 inches forward to 22 inches would bring the front edges of the mufflers pretty close to the curve of the seat pan where it kicks up under the rear seat area. Not impossible, just would be close. I don't think you could move the mufflers back much due to the fact that the pipes immediately go up to go over the rear axle."
Yes. Thank you for taking the time to take the measurements.
Yes. Thank you for taking the time to take the measurements.
#36
TECH Fanatic
Looks great! I also used the Dougs headers, after rebuilding the wiring harness I did not need the O2 extensions. I did modify the original crossmember, but I plan to make a better one in the future. If I do go with the 6L80 that will be imperative.
#39
LS1Tech Sponsor
iTrader: (16)
Very nice build you are doing! It was good to see the frame was not rotted out, which is very typical with the convertibles and their boxed frames. Bob
__________________
ATI ProCharger and Moser Sales 260 672-2076
PM's disabled, please e-mail me
E-mail: brutespeed@gmail.comob@brutespeed.com
https://brutespeed.com/ Link to website

ATI ProCharger and Moser Sales 260 672-2076
PM's disabled, please e-mail me
E-mail: brutespeed@gmail.comob@brutespeed.com
https://brutespeed.com/ Link to website

#40
Staging Lane
Thread Starter
Thanks for all the compliments and comments.
Yes, I was lucky the frame wasn't too rusted, mostly surface rust and some around some of the body bolt holes where I welded in repair washers.
Hope to soon be documenting the part of the build showing how I incorporated the parts from the donor GTO into the Lemans and to show my alternator relocation.


