


Bending Ebay headers
Thread Starter
TECH Enthusiast
iTrader: (8)
Joined: Oct 2011
Posts: 539
Likes: 1
From: Mt. Vernon, WA.
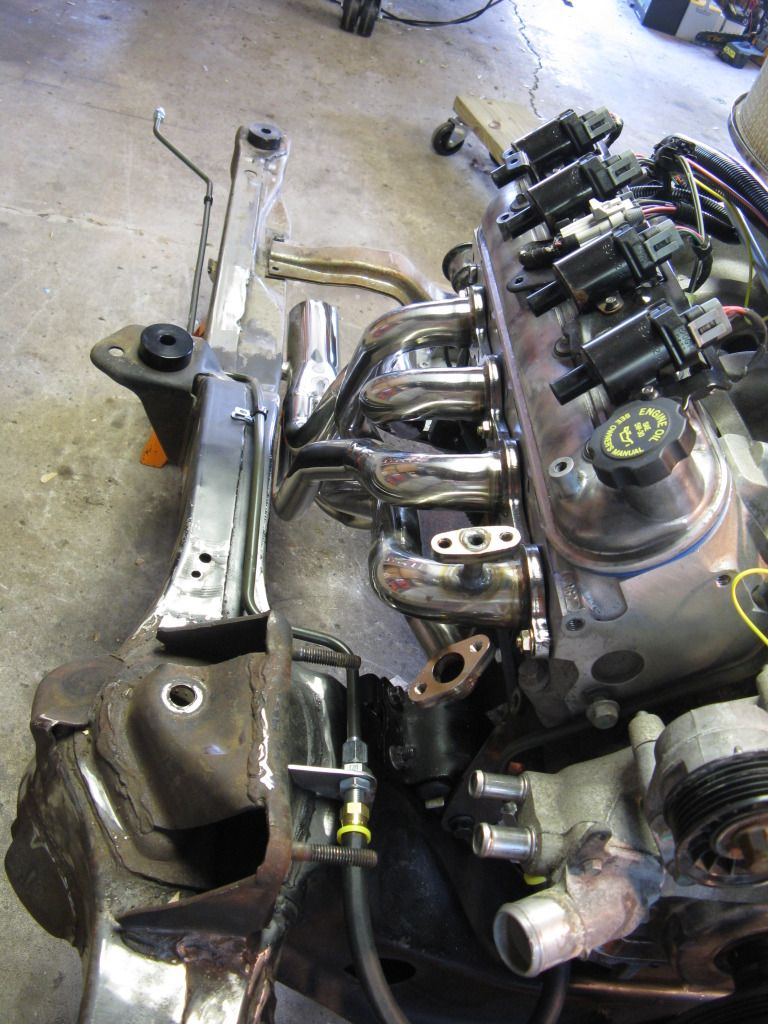
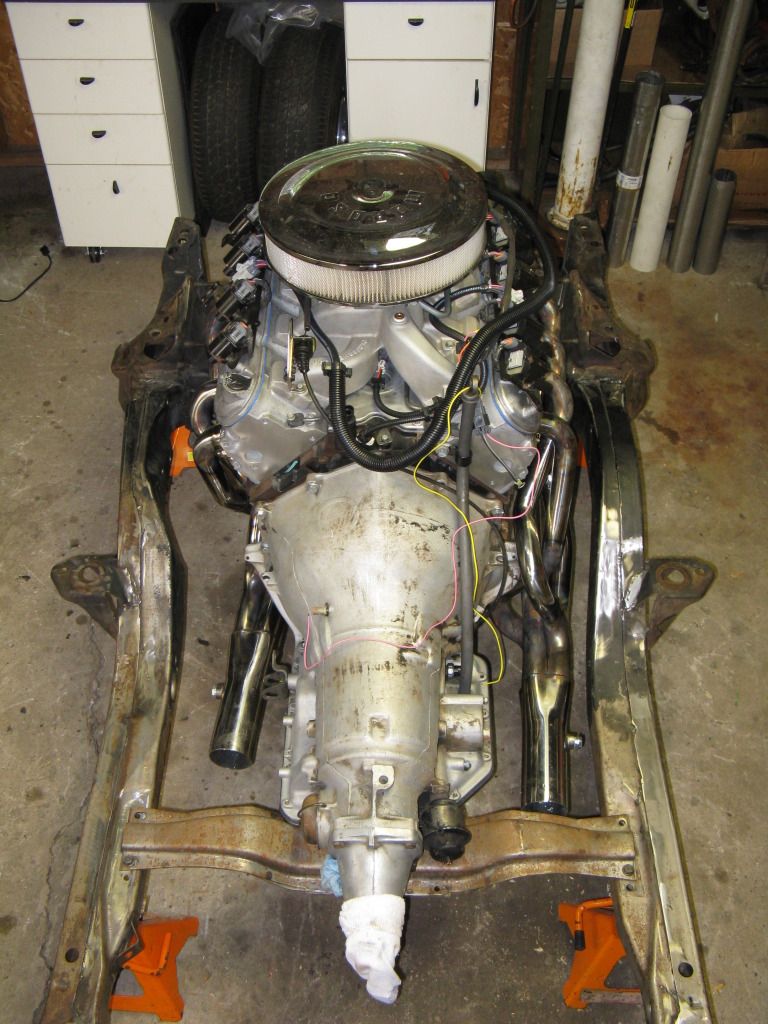
Hey guys, so after many hours of researching swap headers and just a few minutes staring at my near empty bank account  I came to the decision that I was going to try and persuade a set of 4th gen SS Ebay headers into duty for my swap!
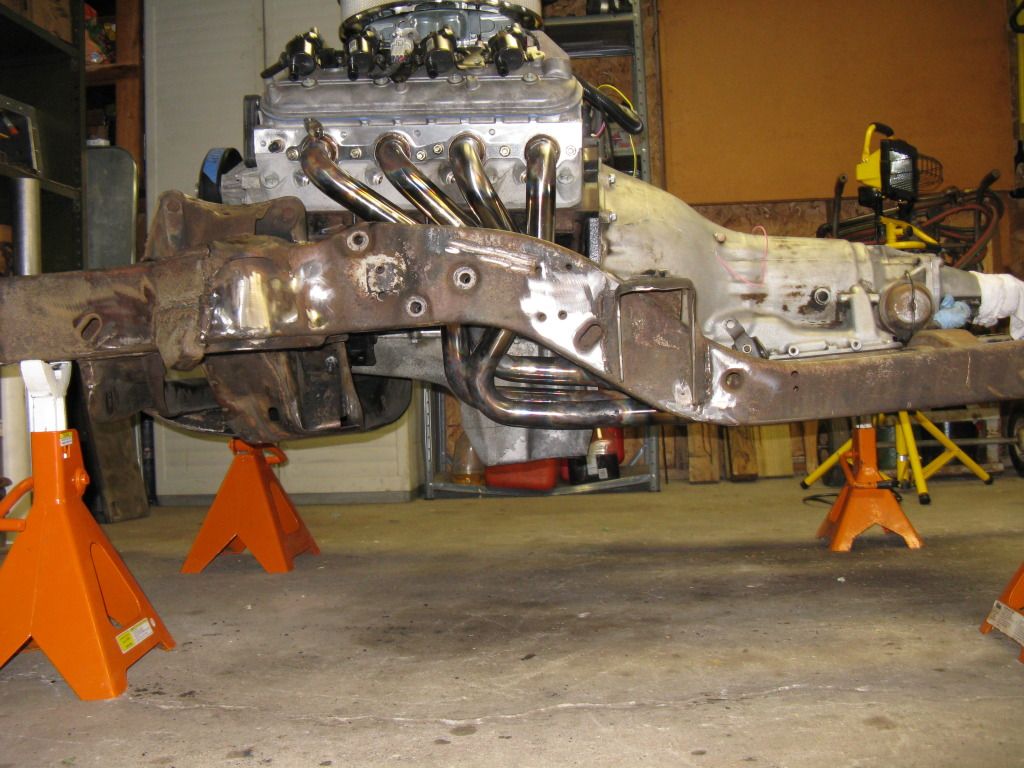
While it took a lot of planning and work, the final product came out pretty nice. So here is a quick run down of what it took to make them work for my application. Sorry for the lack of in-process pictures, but once we had developed a plan and the torch was burning we did not want to stop and have to re-heat everything. So I will do my best to describe the process step by step.
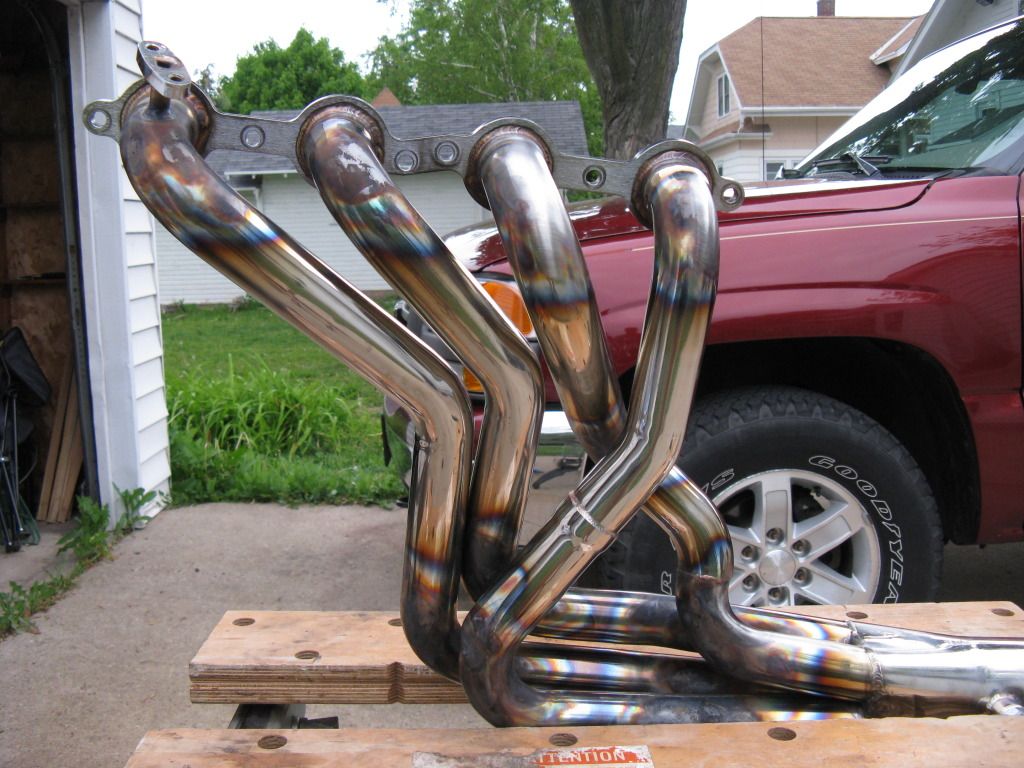
lets start with before pictures:
Overhead
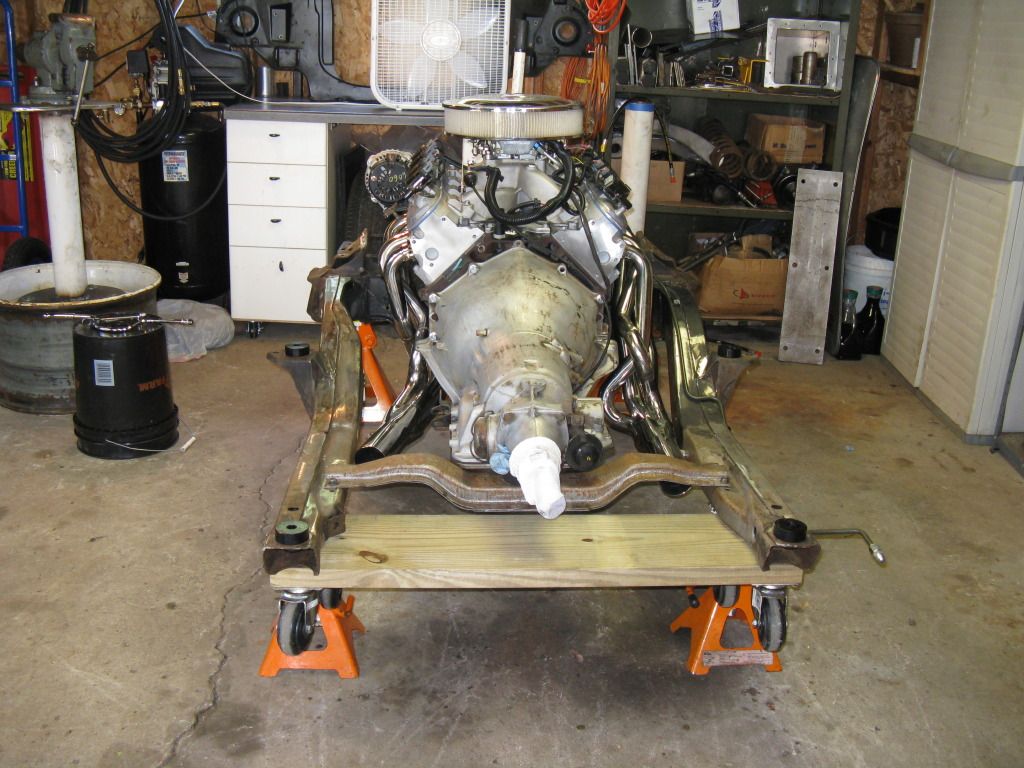
Under Low
RH low
RH High
RH Front
LH Low
LH High
LH Side
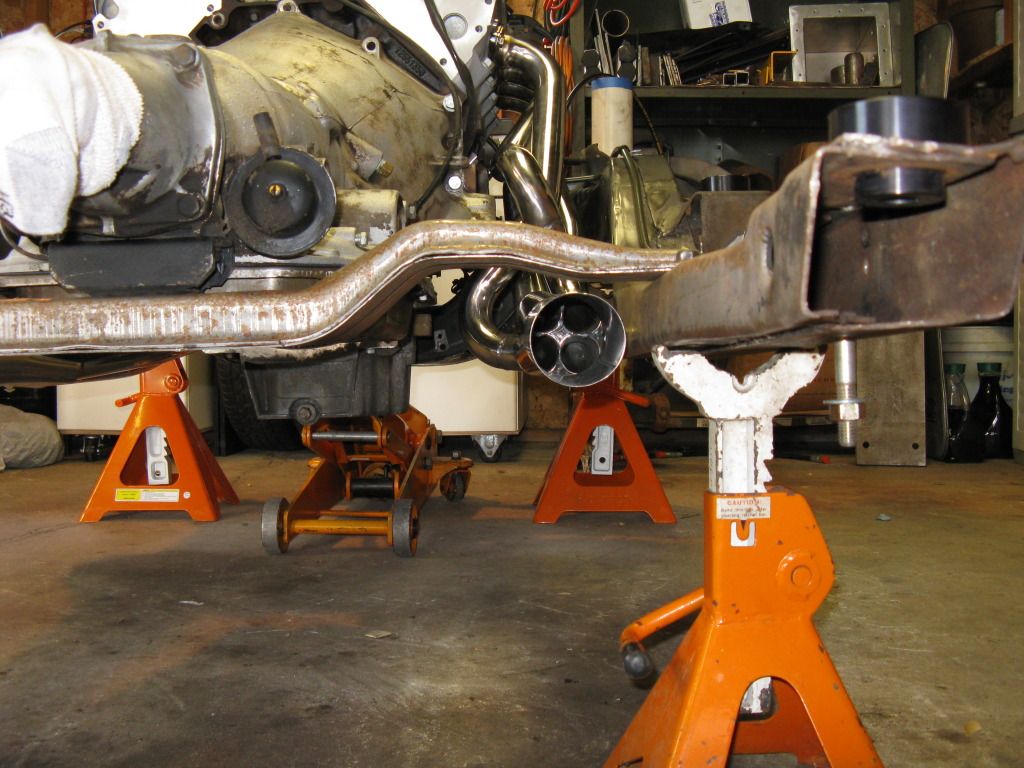
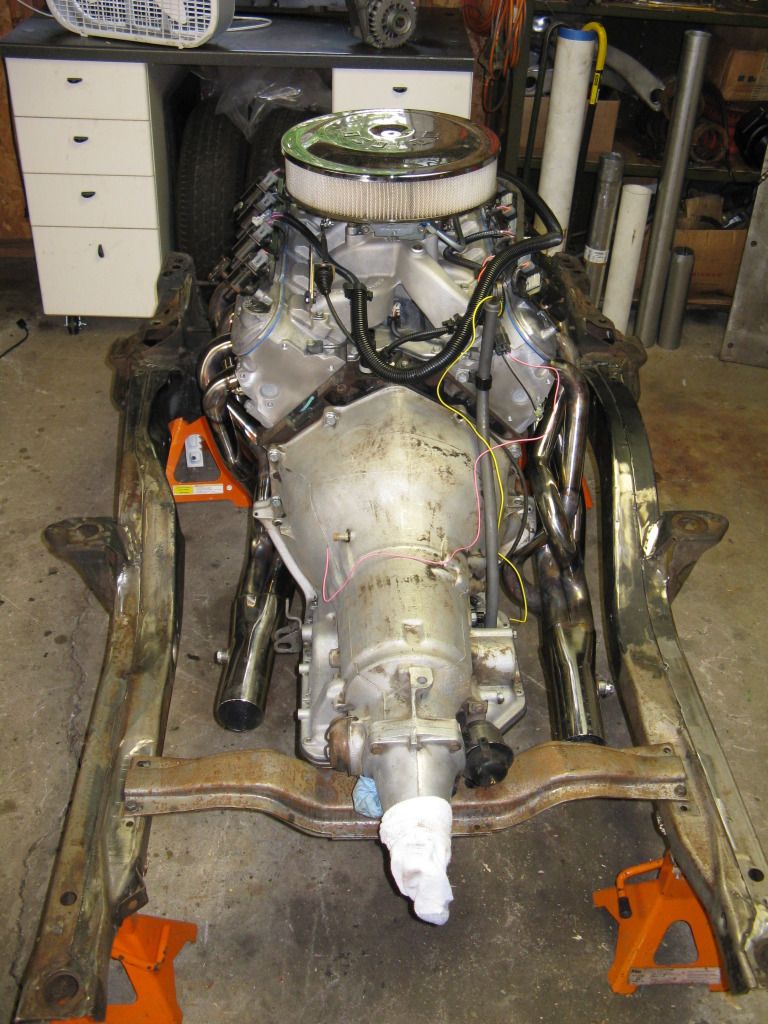
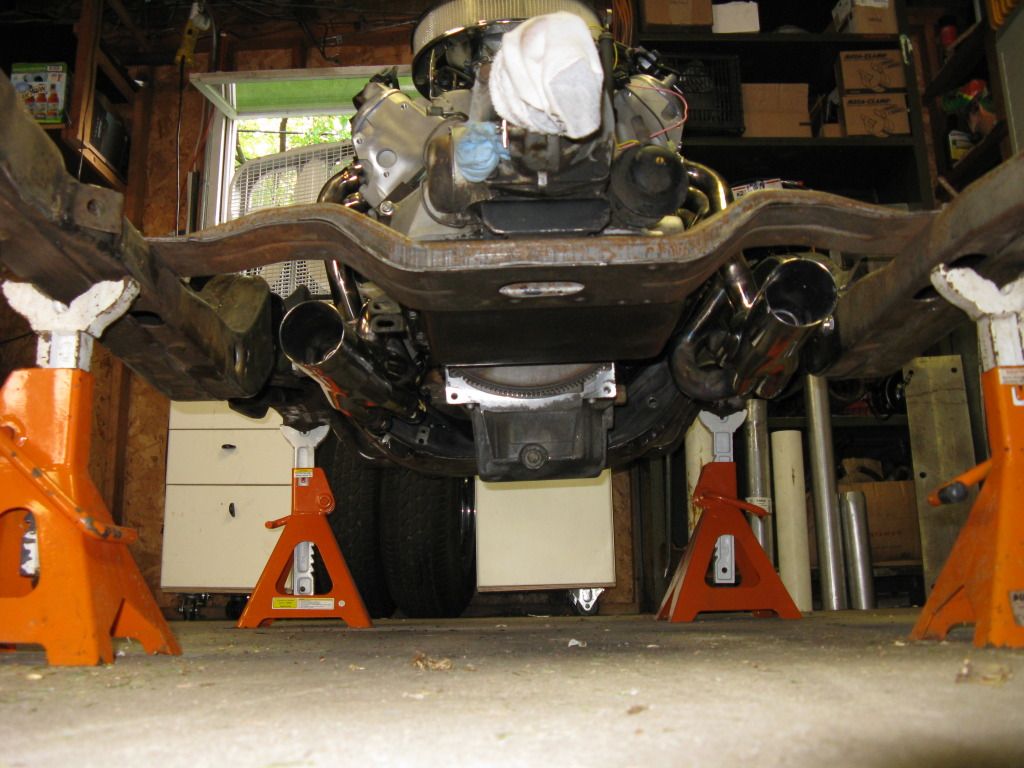
-We bolted one header at a time onto the engine to see how it aligned and found that both collectors pointed towards the frame rail instead of straight back like like our cars require.
-Using a ratchet strap looped around the collector, under the tranny and to the frame rail on the opposite side we pulled the collector closer to pointing straight back.
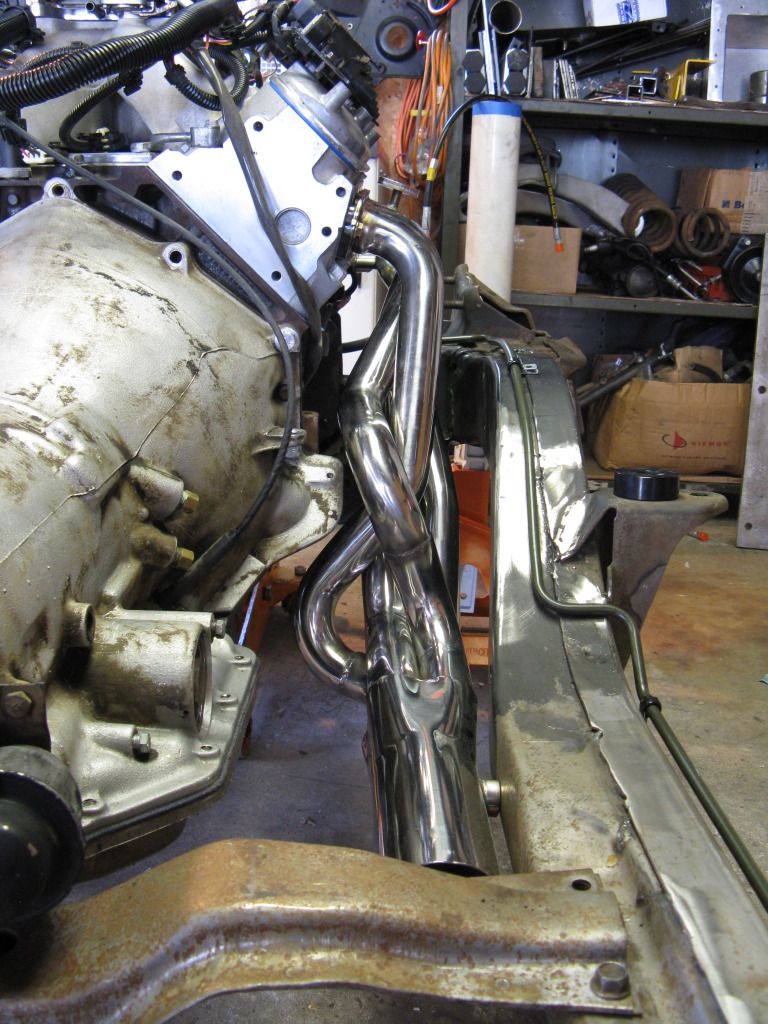
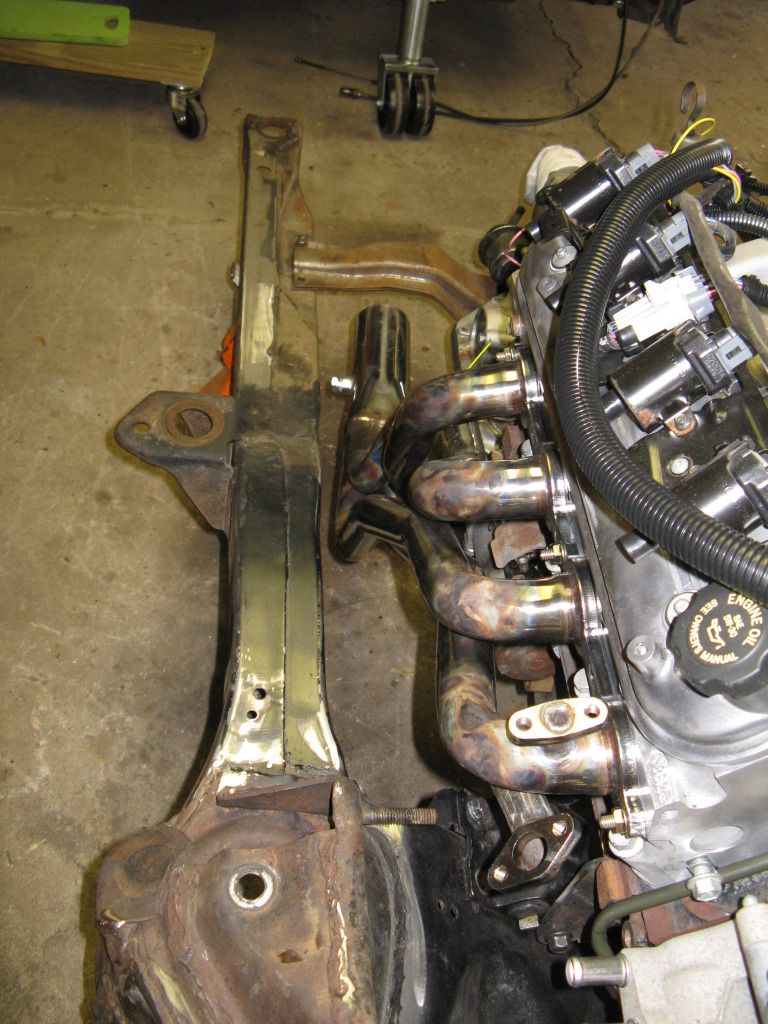
-We then used a pry bar between the frame and collector. Slowly prying the collector into the desired position and releasing allowed us to see where the header was most flexable. We could then focus on heating and re-forming those areas to get the change we needed. For both sides we found that the 1st bend right next to the flange, and the final bend before the collector contributed the most to the flexing. From the pictures it is pretty obvious where the torch was focused.
-Heating was a slow process as the SS headers dissapate heat quickly, and the heads acting like 30lb heat sinks did not help our case! It is important to try and keep all four primaries hot. the best we could do was to keep them just on the cool side of cherry.
-While my buddy manned the torch I used a combination of several tools to apply force to the headers. A 4' pry bar between the frame and collector. The ratchet strap mentioned earlier, and a 6' long X 3" exhaust pipe flared to fit over the collector with a band clamp made a great lever. As the engine/frame/tranny combo was out of the car and on stands, we had to be careful to apply equal and opposite forces to the header and frame to avoid pulling the whole mess over. I found that sitting on the floor, feet against the frame rail and "rowing" the 6' pipe lever towards me was effective.
-Sometimes while applying force I would cycle between releasing and pulling, other times it was just constant pulling. Progress felt slow, but be patient and avoid going hercules on it. We wrinkled one of the primary tubes a bit from bending it too fast causing it to twist...You can see the wrinkle on the #7 primary after I brushed the header. Live and learn right? Oh well I am over it.
-Once we started to see some real movment we became concerned about the headers contacting the starter on the RH side or the oil filter on the LH side. So we used sacrificial blocks on wood to ensure adequate clearance. I say sacrificial because one of them caught on fire...we ended up using a spray bottle to keep the wood from flaring up! But had an extinguisher near by for safety.
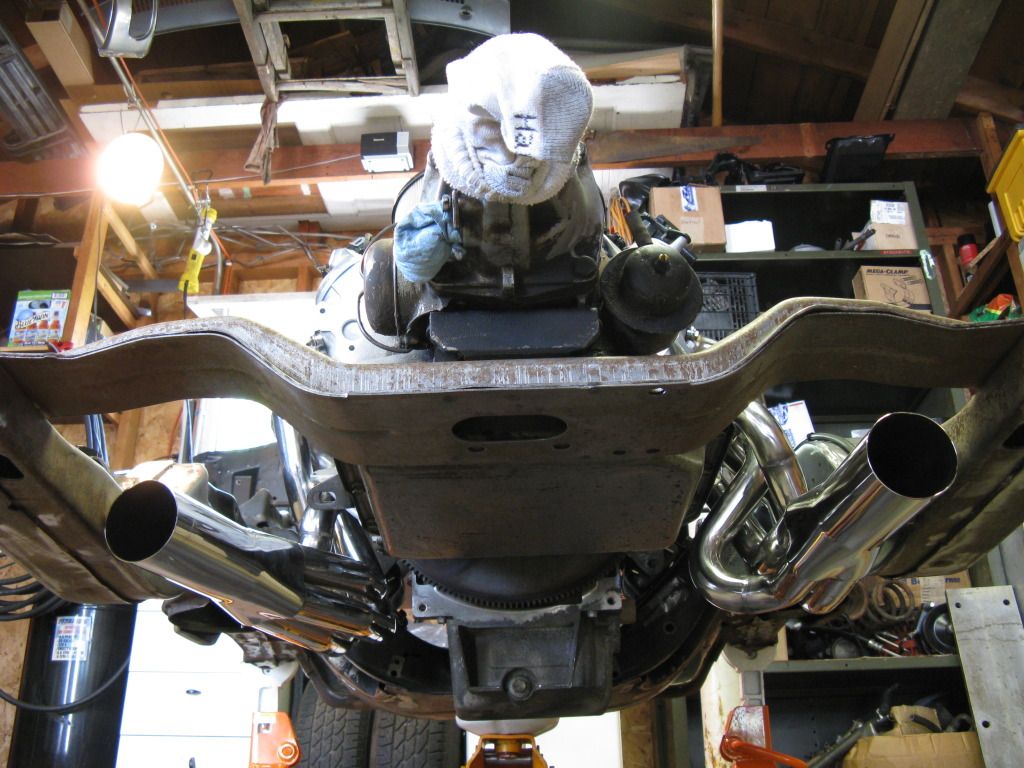
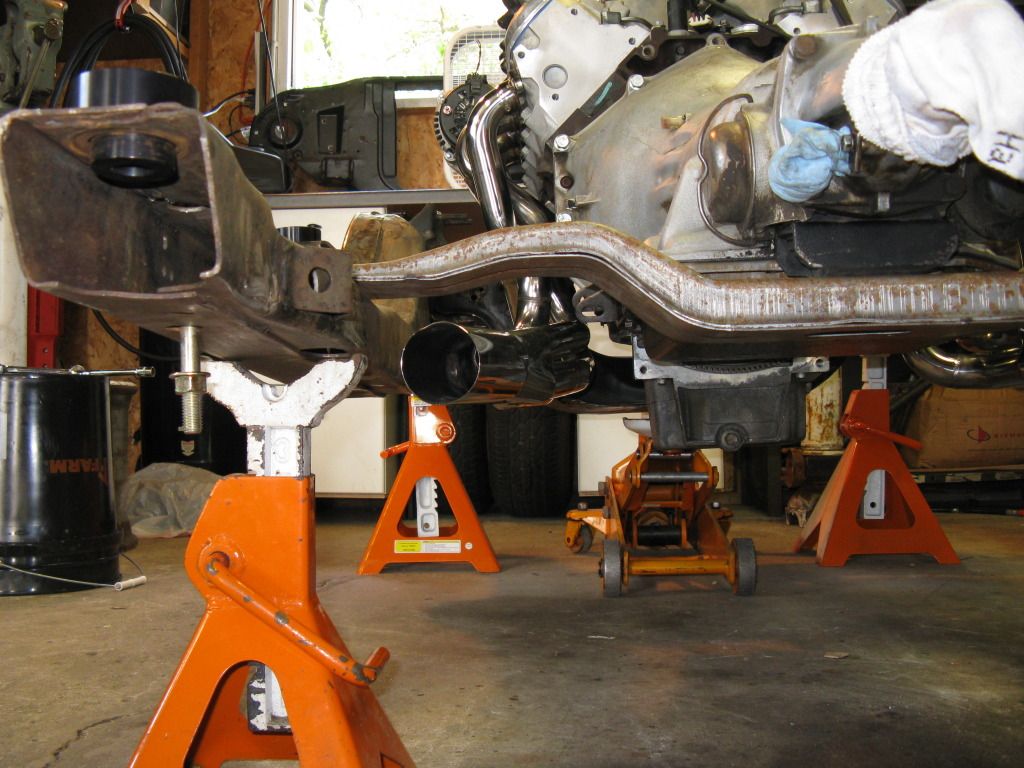
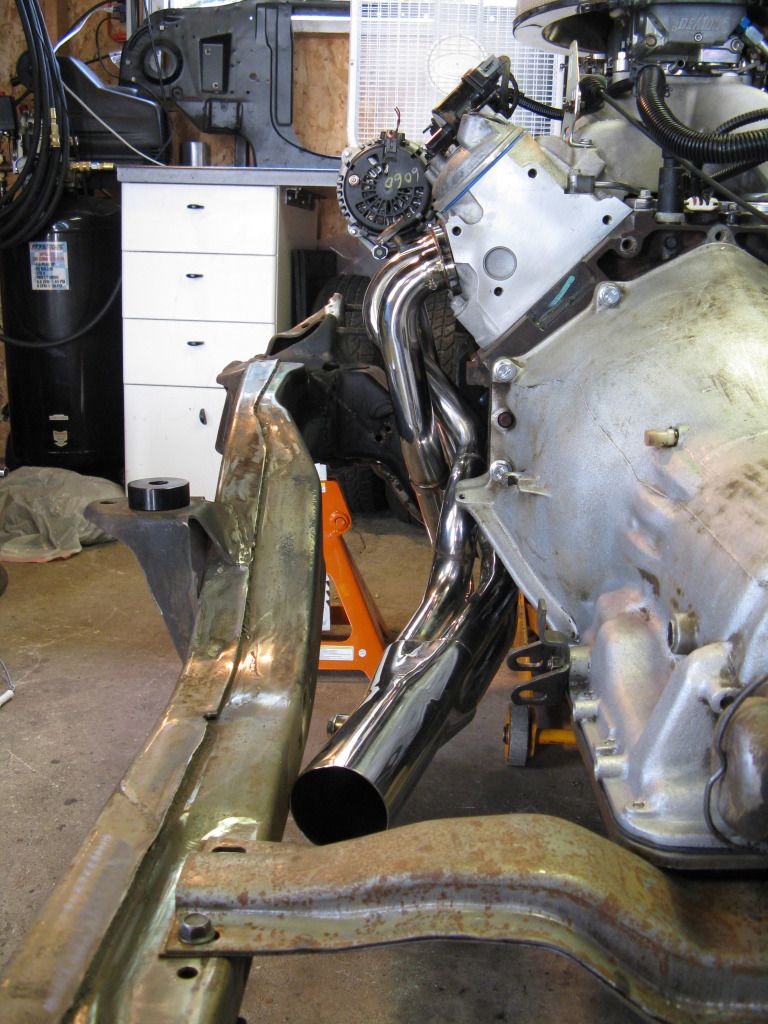
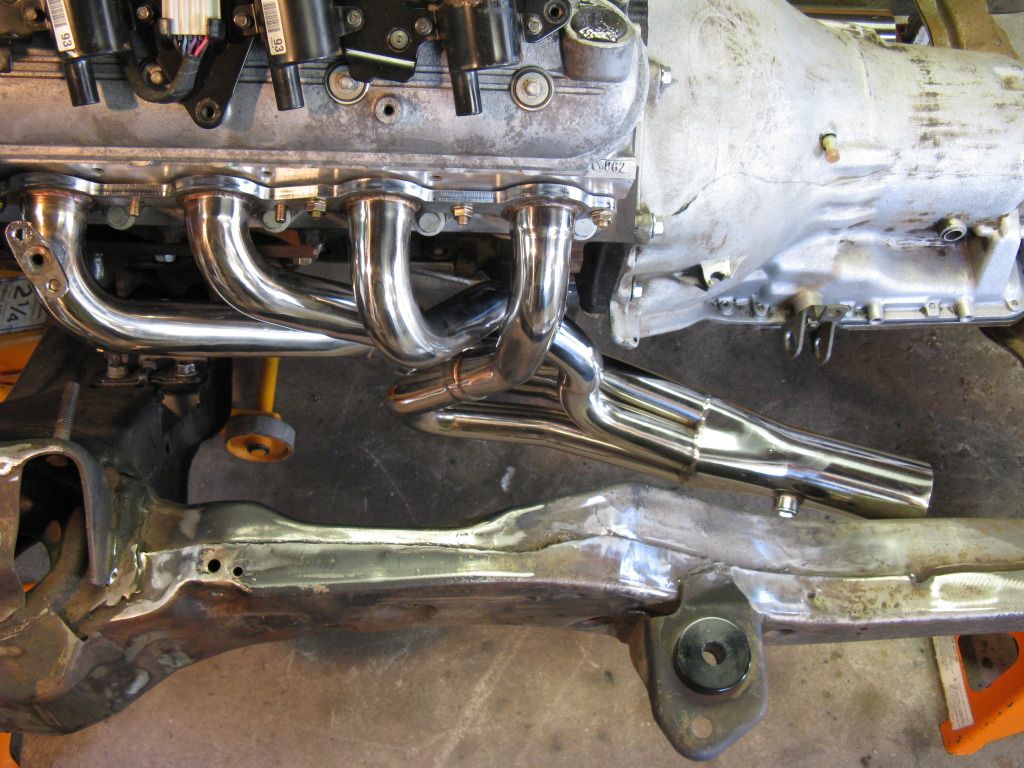
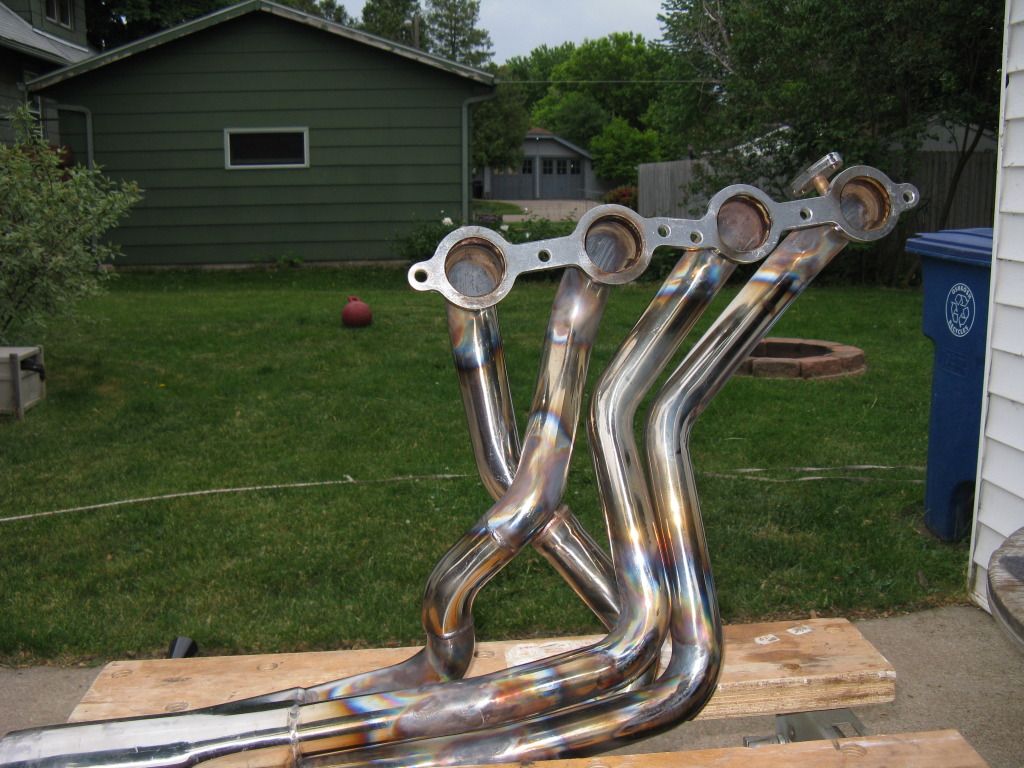
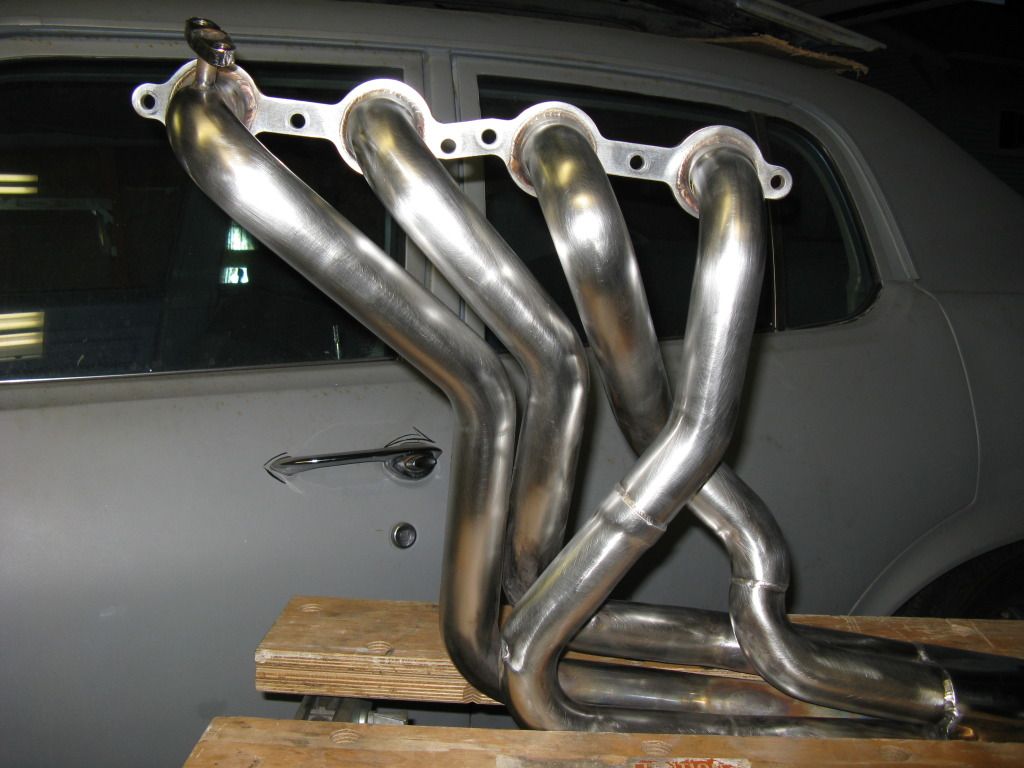
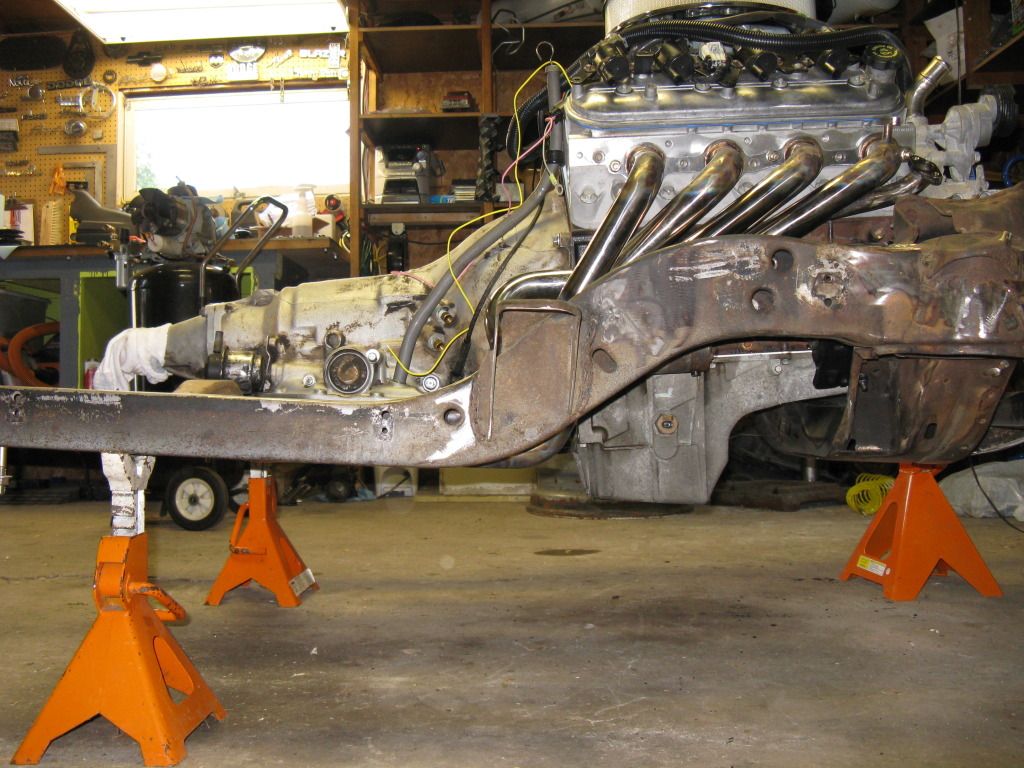
Here are the after bending pictures:
Overhead
Overhead 2
Under
RH Front
RH Side
LH Side
There ya go, it can be done with a few hours of hardwork, a 6 pack and a good buddy!
I came to the decision that I was going to try and persuade a set of 4th gen SS Ebay headers into duty for my swap!While it took a lot of planning and work, the final product came out pretty nice. So here is a quick run down of what it took to make them work for my application. Sorry for the lack of in-process pictures, but once we had developed a plan and the torch was burning we did not want to stop and have to re-heat everything. So I will do my best to describe the process step by step.
lets start with before pictures:
Overhead
Under Low
RH low
RH High
RH Front
LH Low
LH High
LH Side
-We bolted one header at a time onto the engine to see how it aligned and found that both collectors pointed towards the frame rail instead of straight back like like our cars require.
-Using a ratchet strap looped around the collector, under the tranny and to the frame rail on the opposite side we pulled the collector closer to pointing straight back.
-We then used a pry bar between the frame and collector. Slowly prying the collector into the desired position and releasing allowed us to see where the header was most flexable. We could then focus on heating and re-forming those areas to get the change we needed. For both sides we found that the 1st bend right next to the flange, and the final bend before the collector contributed the most to the flexing. From the pictures it is pretty obvious where the torch was focused.
-Heating was a slow process as the SS headers dissapate heat quickly, and the heads acting like 30lb heat sinks did not help our case! It is important to try and keep all four primaries hot. the best we could do was to keep them just on the cool side of cherry.
-While my buddy manned the torch I used a combination of several tools to apply force to the headers. A 4' pry bar between the frame and collector. The ratchet strap mentioned earlier, and a 6' long X 3" exhaust pipe flared to fit over the collector with a band clamp made a great lever. As the engine/frame/tranny combo was out of the car and on stands, we had to be careful to apply equal and opposite forces to the header and frame to avoid pulling the whole mess over. I found that sitting on the floor, feet against the frame rail and "rowing" the 6' pipe lever towards me was effective.
-Sometimes while applying force I would cycle between releasing and pulling, other times it was just constant pulling. Progress felt slow, but be patient and avoid going hercules on it. We wrinkled one of the primary tubes a bit from bending it too fast causing it to twist...You can see the wrinkle on the #7 primary after I brushed the header. Live and learn right? Oh well I am over it.
-Once we started to see some real movment we became concerned about the headers contacting the starter on the RH side or the oil filter on the LH side. So we used sacrificial blocks on wood to ensure adequate clearance. I say sacrificial because one of them caught on fire...we ended up using a spray bottle to keep the wood from flaring up! But had an extinguisher near by for safety.
Here are the after bending pictures:
Overhead
Overhead 2
Under
RH Front
RH Side
LH Side
There ya go, it can be done with a few hours of hardwork, a 6 pack and a good buddy!
Nice writeup, thanks for taking the time to put this together. I've got a set of 5th gen camaro headers that I'm going to massage until they fit my mustang. I'm sure I'll apply some of the methods you used.
Thread Starter
TECH Enthusiast
iTrader: (8)
Joined: Oct 2011
Posts: 539
Likes: 1
From: Mt. Vernon, WA.
Thanks BoxChev! It can be done! Another member on here named Marktanium bent up a set of painted steel 4th gen headers to fit into his 2nd gen camaro. He has a few good pics in his build thread. Be sure to throw some pics up on this thread when you do. Build a little library for the next guy.
TECH Fanatic
Joined: Oct 2011
Posts: 1,356
Likes: 2
From: Felton Pa
Thanks BoxChev! It can be done! Another member on here named Marktanium bent up a set of painted steel 4th gen headers to fit into his 2nd gen camaro. He has a few good pics in his build thread. Be sure to throw some pics up on this thread when you do. Build a little library for the next guy.
Thread Starter
TECH Enthusiast
iTrader: (8)
Joined: Oct 2011
Posts: 539
Likes: 1
From: Mt. Vernon, WA.
Good eye 99' I am running into some fittment issues with the steering gear, so I am trading my power steering gear with another Nova guy for his manual. I enjoy the extra feedback and force. I feel more connected to the road. Plus it drops about 35+ lb off front of the car! But I do not have the manual gear yet to confirm fit. I will post a response in here when I get the gear and can stick it in.
TECH Fanatic
Joined: Oct 2011
Posts: 1,356
Likes: 2
From: Felton Pa
Good eye 99' I am running into some fittment issues with the steering gear, so I am trading my power steering gear with another Nova guy for his manual. I enjoy the extra feedback and force. I feel more connected to the road. Plus it drops about 35+ lb off front of the car! But I do not have the manual gear yet to confirm fit. I will post a response in here when I get the gear and can stick it in.
Trending Topics
I've been looking at those Ebay SS headers myself wondering if I could make a set fit my 57 chevy or my 65 Olds F85 with an LS.
It was amazing seeing how far you could move the collector over.
I keep seeing 4th and 5th gen SS headers on ebay and they look pretty much the same to me.
Anyone know which would fit the drivers side tubes closer to the engine?
Thanks
Jarhead
It was amazing seeing how far you could move the collector over.
I keep seeing 4th and 5th gen SS headers on ebay and they look pretty much the same to me.
Anyone know which would fit the drivers side tubes closer to the engine?
Thanks
Jarhead
LS1 Tech Stories
The Best V8 Stories One Small Block at Time

6 Gifts Neither Your Dad Nor Grad Will Shove Into the 'Trinket Drawer'
Brett Foote
Topdon ONE vs. Artidiag 800 BT2: Which is the Diagnostic Tablet For You?
Pouria Savadkouei
Gas Monkey Built a 6-Wheel Ferrari Testarossa With a Corvette LT4 Engine
Verdad Gallardo
7 Most Reliable High-Performance Engines GM Has Ever Built
Verdad Gallardo
Amazing '71 Camaro Restomod Is Modern Muscle Car Under the Skin
Verdad Gallardo
6 Common C5 Corvette Failures and What's Involved In Repairing Them
Pouria Savadkouei
Retro Modern Bandit Pontiac Trans AM Comes With Burt Reynolds' Autograph
Verdad Gallardo
Top 10 Greatest Cadillac V Series Performance Models Ever, Ranked
Pouria Savadkouei