


Project CutLS
Gary: No, I have Doug's Headers. I think I'll buy an exhaust kit and mufflers and if I have to modify, I will.
Raidmagic: Thanks man.
JetMech442: I haven't checked the angle yet. I gotta get an angle gauge still. At the moment or at least when I was able to mount it, the output flange was almost perpendicular to the ground so it must be pretty close to being in spec. I think with the exhaust, if we can cut the sides off of part where the crossmember archs from front to back and welded a brace on top, it should allow the headers to clear. Other wise the next option is to look at how BRP has their crossmember and make one like that but have the mounting surface lower.
Yesterday I installed my engine frame mount spacers for good. Bolted it down. Hopefully its the last time I have to adjust them. Got my engine harness almost complete except the wires to the fuse block. Installed my coil packs and harness. Bolted in Alternator and today I'll do my harmonic balancer.


I got my A/C lines crimped last week and got my HVAC housing all bolted in. All my engine harness wires are ran into the interior so now I can begin reinstalling my dash. I also test fitted my A/C compressor with the Kwik bracket. I think I need a different pulley than the one they provided because it looks like it won't run the belt straight. I sold my bucket seats to a member of ClassicOldsmobile the other day so now I can start to modify new seat brackets/adapters for a pair of seats I'm getting from a buddy. If they don't work out, I think I'll go with more of a race style seat.


I got my A/C lines crimped last week and got my HVAC housing all bolted in. All my engine harness wires are ran into the interior so now I can begin reinstalling my dash. I also test fitted my A/C compressor with the Kwik bracket. I think I need a different pulley than the one they provided because it looks like it won't run the belt straight. I sold my bucket seats to a member of ClassicOldsmobile the other day so now I can start to modify new seat brackets/adapters for a pair of seats I'm getting from a buddy. If they don't work out, I think I'll go with more of a race style seat.
I was thinking about a few things while being thankful for the the people who gave their life trying to save the people from the towers and those who were fortunate enough to make it out safe. It was a year ago today that I purchased my motor and trans combo. Kind of disappointed that I don't have it up and running. I kept putting it off because I wanted to get the majority of the things I need so I could do it all at once. I keep getting tripped up on a few things since I'm installing a new interior wiring kit and an engine management wiring kit and harness. It feels like I'm building a new vehicle(which I am basically). I have the rear half of my car wired up and I have my pcm mounted.
I got the majority of my dash wired up. I went through a lot of solder and heat shrink tubing. I'm putting a connecter in-line of a few of my wires on my dash and gauges that don't have a connector so if I ever have to remove the dash again, I won't have to re-solder the wires together. I have to install a switch for my rear defogger on my dash and then I should be pretty close to installing the dash. I wanted to have the dash installed this weekend but I got side tracked. Hopefully this week for sure. Tomorrow I think I'm going to start ordering a few more things I need like fuel connectors, radiator hoses, power steering hoses, rag joint and trans cooler lines. I think I am going to go the route of braided tranny lines since I have to run it to the left side of the car with this Griffin radiator.
TECH Fanatic

Joined: May 2010
Posts: 1,081
Likes: 8
From: Atlanta, Ga
Just when it looks like you will never see the end of the project you turn a corner and the end is right there. I have experienced this in all of my builds. Keep up the quality work. You are closer than you think.
Never got a chance to work on the car yesterday because while on my way to work, I hit a young buck with my daily driver('93 Cutlass Supreme). Not much damage to my car other than needing to get a headlamp and side marker assembly from the local salvage yard. I don't think I'll get any wiring done tonight but I'm going to drill my holes for my defogger switch and both CEL and Brake warning light.
I've been pretty busy the past few days on the car because I had a deadline set. I got a free photo book from Shutterfly last month and I decided to do it about the car. The deadline snuck up fast and it was due today before midnight. I finished wiring the interior and got my dash back in. 
I'm installing my battery in my trunk and decided to install a battery cut-off switch. I made a bezel and installed a bracket so it fits in where the ashtray used to be, that way you can cover the switch at car shows.
Got my air duct hoses installed. You have to cut them to length and either they gave the wrong measurement or I cut it too short but one of my dash vent hoses is stretched tight and fell off twice while trying to install other ones. I think it will fall off and I'll have to cap it off or get more duct hose. I got my new gauges installed. They look really clean in there.
Got my power steering lines ordered and installed my new rag joint. My plan was to have the car close to done by now, but that didn't happen, so I just placed my console and seats in the car and took a picture and tried to cover up the unfinished parts on the engine.(Notice that I forgot to put the belt over the Alt before taking the picture.) Got make or buy new radiator support brackets for the radiator because it is deeper that the stock one.

Here's a link to the photo book if you would like to see how it turned out. http://share.shutterfly.com/action/w...d=SFLYOCWIDGET
I'm installing my battery in my trunk and decided to install a battery cut-off switch. I made a bezel and installed a bracket so it fits in where the ashtray used to be, that way you can cover the switch at car shows.
Got my air duct hoses installed. You have to cut them to length and either they gave the wrong measurement or I cut it too short but one of my dash vent hoses is stretched tight and fell off twice while trying to install other ones. I think it will fall off and I'll have to cap it off or get more duct hose. I got my new gauges installed. They look really clean in there.
Got my power steering lines ordered and installed my new rag joint. My plan was to have the car close to done by now, but that didn't happen, so I just placed my console and seats in the car and took a picture and tried to cover up the unfinished parts on the engine.(Notice that I forgot to put the belt over the Alt before taking the picture.) Got make or buy new radiator support brackets for the radiator because it is deeper that the stock one.
Here's a link to the photo book if you would like to see how it turned out. http://share.shutterfly.com/action/w...d=SFLYOCWIDGET
LS1 Tech Stories
The Best V8 Stories One Small Block at Time

Topdon ONE vs. Artidiag 800 BT2: Which is the Diagnostic Tablet For You?
Pouria Savadkouei
Gas Monkey Built a 6-Wheel Ferrari Testarossa With a Corvette LT4 Engine
Verdad Gallardo
7 Most Reliable High-Performance Engines GM Has Ever Built
Verdad Gallardo
Amazing '71 Camaro Restomod Is Modern Muscle Car Under the Skin
Verdad Gallardo
6 Common C5 Corvette Failures and What's Involved In Repairing Them
Pouria Savadkouei
Retro Modern Bandit Pontiac Trans AM Comes With Burt Reynolds' Autograph
Verdad Gallardo
Top 10 Greatest Cadillac V Series Performance Models Ever, Ranked
Pouria Savadkouei
Top 10 Most Powerful Chevy Trucks Ever Made!

Hennessey's New Supercharged Silverado ZR2 Has 700 HP
Verdad GallardoOn The Tree
Joined: Nov 2011
Posts: 159
Likes: 0
From: South east Wisconsin
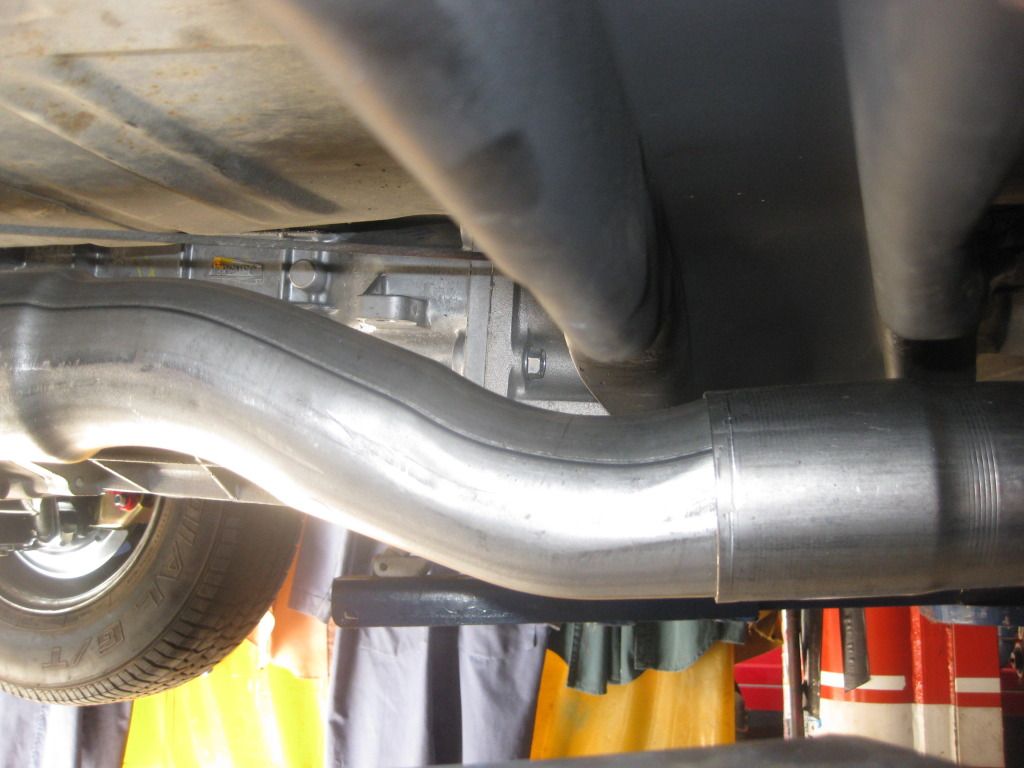
So today I tried to try out my modified trans crossmember. The mount bolted up fine and I almost got a few of the stock holes in the frame to line up so I would be able to use them, but then I looked at the headers. The header pipes will basically need to go through the crossmember. What have you guys done about this? I'm guessing regular manifold exit in about the same location to. I'm going to have to get my cousin's husband to help me custom make one now.
Got my center counsel installed. Painted it the same color as my dash over the wood grain. And then painted the trim silver. I also moved my left horn over slightly and am installing a power steering cooler.


It's been a while since I've updated. I was out for a week with a bad back and it's getting colder which is slowing my motivation to work in the garage. My Parker A-LOK fittings came finally. It only took 2 weeks. I finally got the fuel line by the motor cut and I finally installed the fitting. I sure hope they seal well.

Wow it's been a long time since I have posted anything about my Project CutLS. It's been a long winter and was too cold to work in the garage. I got my power steering cooler and lines all mounted up. It took me awhile to figure out how I wanted to go about running my trans cooler lines but I ended up buying -6an stainless steel braided line from Summit and their 45deg swivel fittings. I ran into a few problems with them. They came close to my trans tunnel so I had to cut a hole in the floor to allow them to not hit the floor. I got them installed and started filling through one of the cooler lines since my Corvette trans doesn't have a dipstick. The next day I looked under the car and saw a huge puddle. One of the swivel fittings was leaking. I replaced it and from then on I pressure tested my lines. My plan was to use a junk yard trans cooler and a small fan from a Pathfinder but I decided to go with a cleaner look and purchased a Perma-Cool trans cooler with a fan. Brought my driveshaft to a local drive line shop and they shortened it for me, balanced, painted it and installed new U-Joints. Fabricated radiator and fan mounts. Installed my A/C lines and heater hoses. Mounted my engine fuse block on the side of my radiator core support. Went the smart route and used straight fittings for my fuel lines reduce the chance of a leak. Installed my fuel pump in my tank and cut a hole in my trunk to allow access to the fittings and wiring top of the tank. Installed my Corvette regulator filter in front of my trunk above my differential.


I wanted to turn over my engine to prime it a little since it's sat for awhile. I jumpered a battery to my car and jumped the starter. To my surprise, it kept turning over when I removed the jumper wire. I had to disconnect the battery. I thought it was weird but didn't think much about it. I got my battery installed in my trunk. Turned the key and and the stater started turning over right away and wouldn't stop even with the key off. I had to turn my kill switch on my dash off. A smaller wire running to my alternator from my interior fuse block was getting real hot and the fuse block got real hot and started to melt a little from the wire. I had something wired wrong. I went through my wiring diagrams for my two fuse blocks. I found out I spliced a cranking signal relay wire to my purple starter wire. What I was supposed to do was wire it straight to the wire for it to give positive battery power to the relay. The reason that wire got hot was that I forgot my Alternator is wired hot all the time even when the kill switch is off, and I had that fuse block wire running to it so it was drawing power from that smaller gauge wire. I moved that wire to my remote power distribution block on my firewall. I wasn't getting power at the stater wire. I decided to bypass my Park Neutral switch which I wasn't getting any power from. Went to test fire my engine and it would only run for a couple seconds at a time. I started to get a TAC module code. I didn't want it to run long since I didn't have coolant in it yet. A coworker has a coolant vacuum fill device that pulls a vacuum to in the cooling system to remove air and check for leaks. You then install a hose in your coolant jug and when you release the vacuum it pulls in the coolant leaving your system without air in it. I hooked it up to my system and pulled a vacuum. It wouldn't hold. Turns out my left rear steam tube gasket was leaking. I would have never found out about it until I filled my system and saw it leaking. I hadn't done my intake gaskets and cleaned out my intake yet so this allowed me to do them now. Once that was all done I attempted to start my car. It didn't want to run long. It would crank and fire and die. I got the TAC code again. I cleared it, turned off my kill switch, turned it back on and tried again. Success. It started up and stayed running. I let it run for almost 2 mins. I turned it off and let it sit. I tried once more later on and it started and died. I'm a lot closer to getting it figured out. I wanted to get it running so I could get it over to my cousin's house to get my tans crossmember made to clear my exhaust.
The videos audio is a bit distorted because I had my hood latch holding it and I have open long tube headers right now. I still need to fabricate my intake system up.

The videos audio is a bit distorted because I had my hood latch holding it and I have open long tube headers right now. I still need to fabricate my intake system up.

Today I got my power wires all finished up and my heater control valve wired in. 
I went to look moving my battery wire to my starter, away from my headers and to add ground straps to the engine, when I noticed the back of my water pump and T-Stat gasket, forming a drip. I really don't want to fix it but now would be the time to do it before I get it out on the road. I still haven't looked into my Tach not working. Maybe it's a programming issue with my gauge. I'll have to look into it later.

I went to look moving my battery wire to my starter, away from my headers and to add ground straps to the engine, when I noticed the back of my water pump and T-Stat gasket, forming a drip. I really don't want to fix it but now would be the time to do it before I get it out on the road. I still haven't looked into my Tach not working. Maybe it's a programming issue with my gauge. I'll have to look into it later.


https://ls1tech.com/forums/conversio...l#post17415382
HTH.