06 Lexus IS250 LS1 Build
 07-08-2013, 12:59 AM
#41
Staging Lane
Thread Starter
iTrader: (4)

Join Date: Oct 2011
Location: Jupiter, FL
Posts: 98
Likes: 0
Received 0 Likes
on
0 Posts
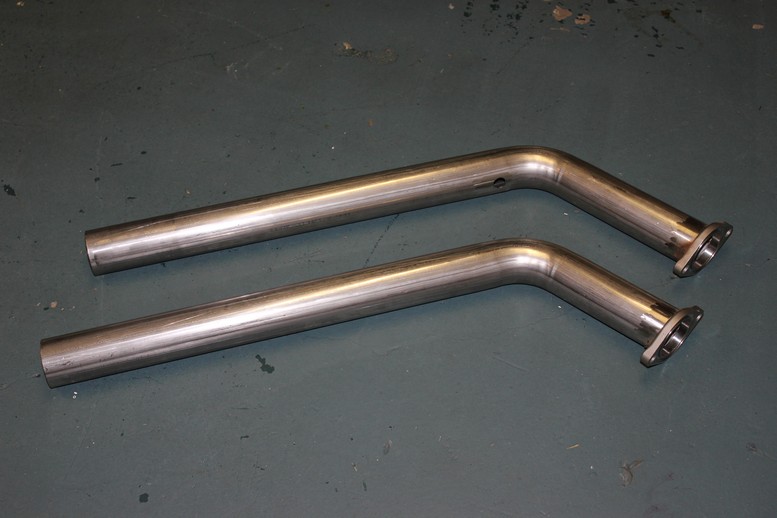
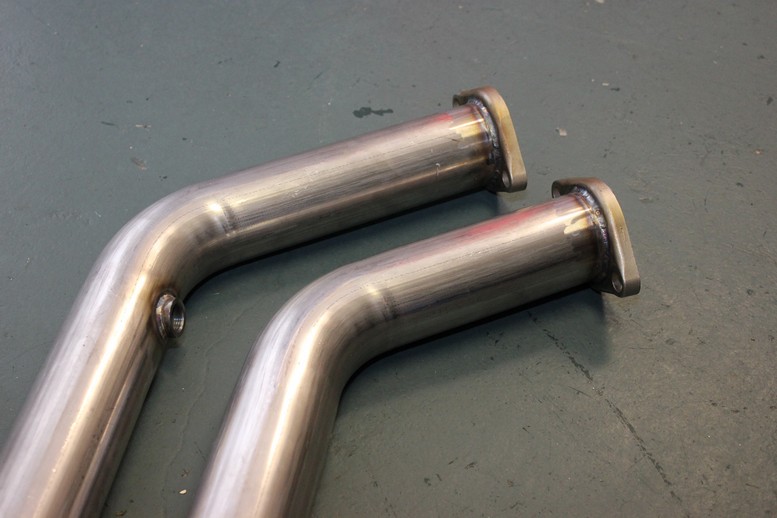
I started the long weekend out with cutting, fitting and tacking my downpipes.
Back from the welder.
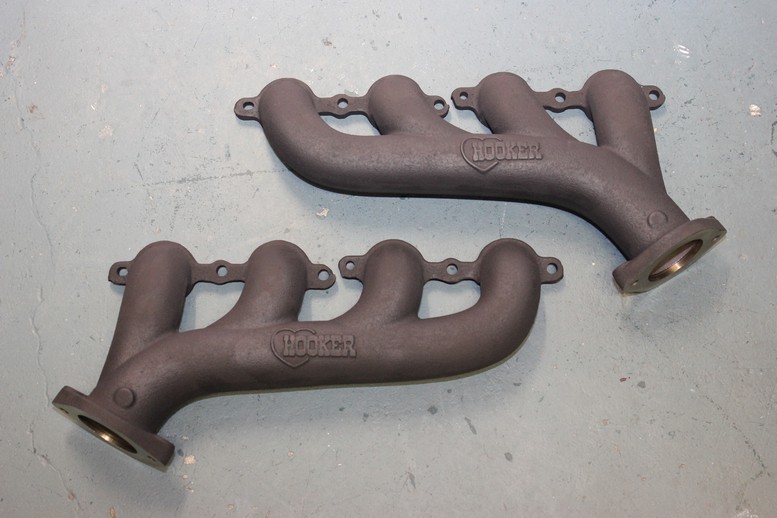
I also threw some VHT flame proof flat black spray paint on the exhaust manifolds. Luckily I have some industrial ovens at work and I was able to use them for the curing cycles because it is definitely not something you want to do in your home oven. In retrospect I should have just spent the extra $100 on the ceramic coated manifolds but as you can imagine this project is sucking me dry so at this point I am saving wherever possible. They don't look great but it will keep them from rusting and once they are installed you will barely see them (at least that's my story until I get over the fact that I didn't get the ceramic ones)
Next on the list was the PCV system. LS1's are notorious for consuming oil (at least that's what I have heard) so I took 2 steps to resolve the problem. The first step was to upgrade to the LS6 valley cover which has a better baffle than the LS1. I also installed an air oil separator so if some oil does get out through the PCV valve I don't start coating the inside of the intake manifold. Again I opted for the baseline separator even though I was really tempted to go with the tig welded stainless steel version.
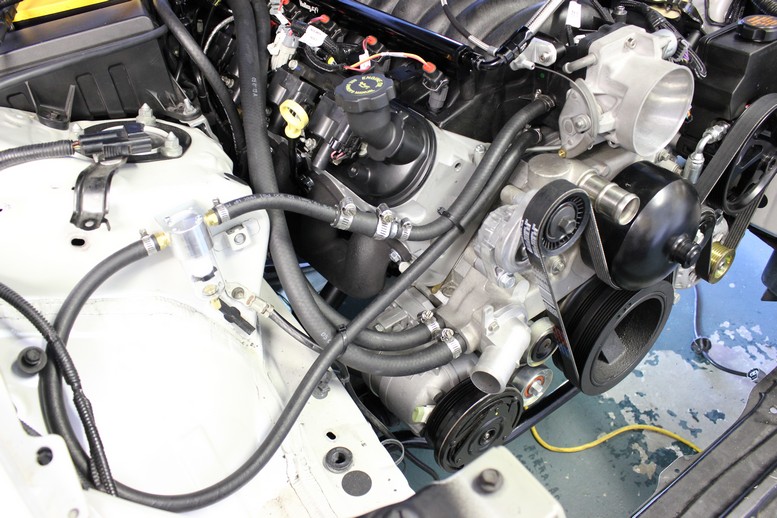
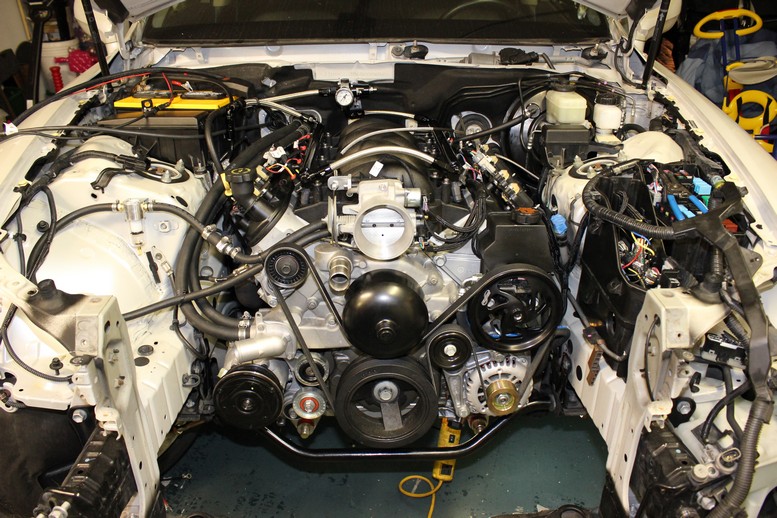
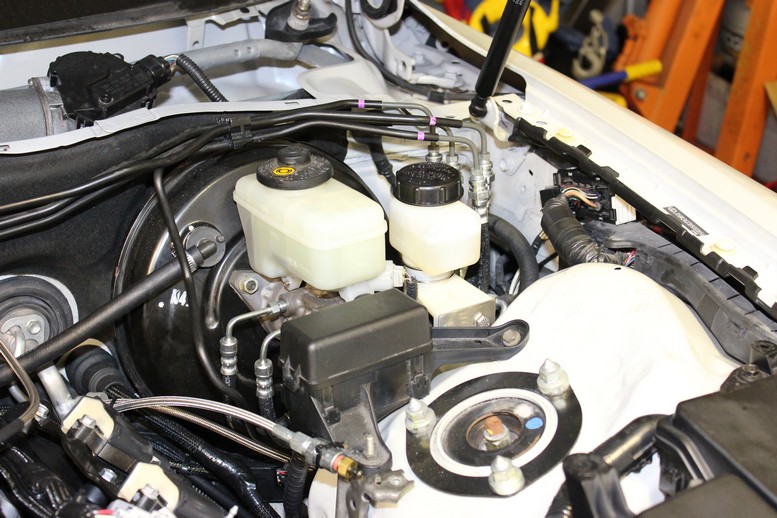
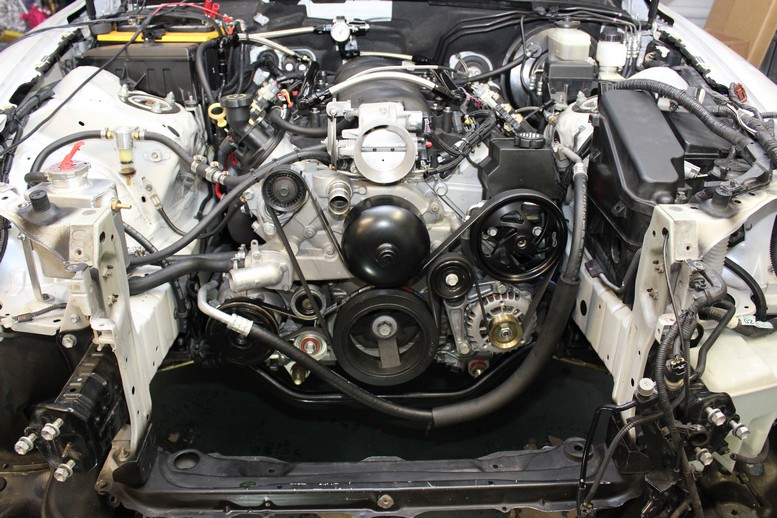
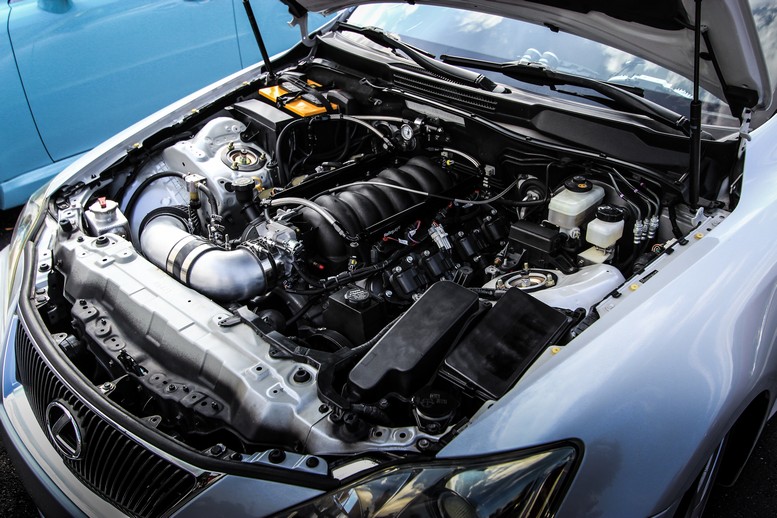
This was a shot of the engine bay after installing the belt and before I installed the radiator. I tried to get everything on that would be harder once the radiator was in.
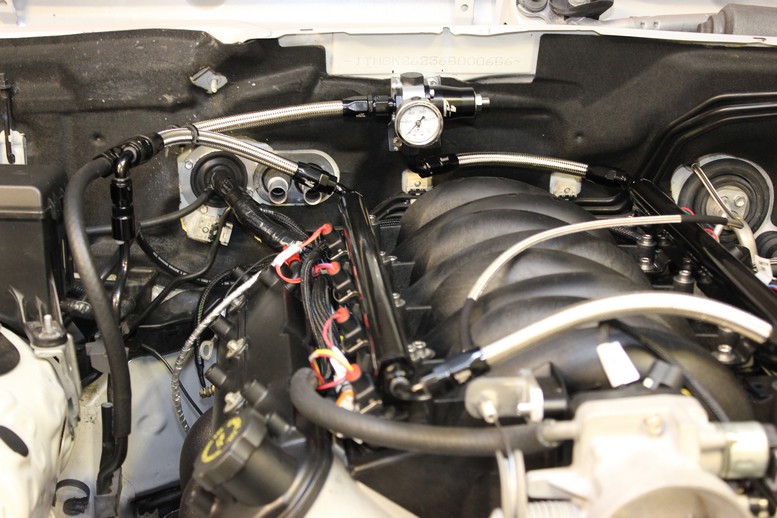
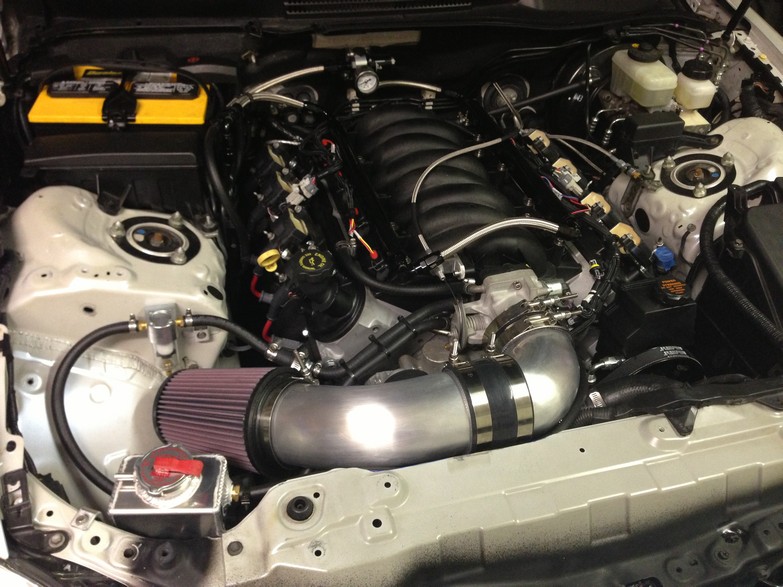
Here's a shot of the completed fuel system. You can follow the flow from the hard line on the left hand side of the engine bay, through the fuel rails, through the fuel pressure regulator, and back to the return line with some basic fuel hose. I set the pressure at 60 psi.
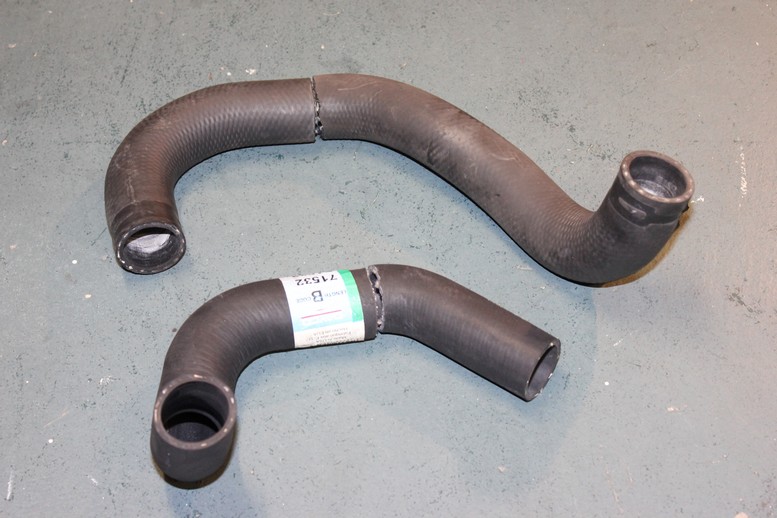
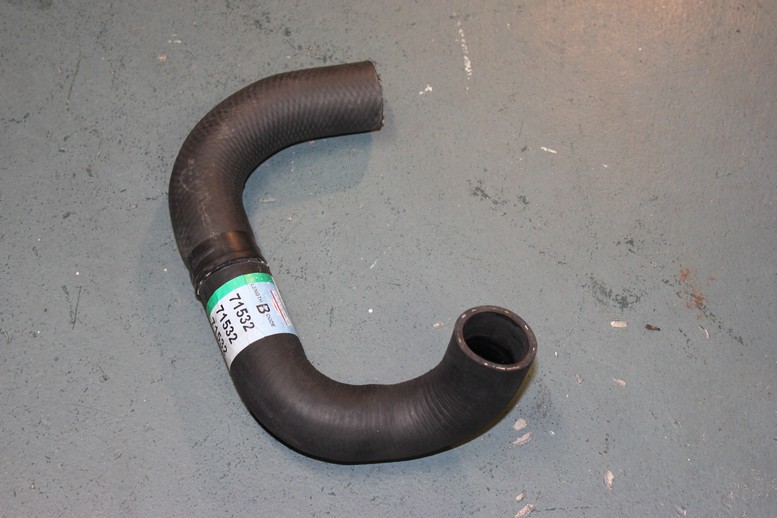
The guys at my Advanced Auto Parts were nice enough to let me browse through all the radiator hoses in the back. I ended up buying 3 hoses that I was going to use along with the stock hoses to make up the upper and lower hoses.
Here is the lower Lexus hose along with one of the new ones that I cut and will splice together to make the new lower hose.
Here it is together pieced together and it fits like a glove, more pictures to come.
So now is when things got a little crazy. I had a work marathon on Friday night and worked almost through the night but was really bad about taking pictures. I ended getting the engine completely ready to start with the exception of adding fluids and programming the ECU.
On Saturday morning I filled the fluids, programmed the ECU, and attempted to start (with video running). I got the engine to turn over a few times without fuel or spark to get the oil flowing but my battery was just not cutting it. After hooking up an additional battery and attempting a few more starts I still wasn't having any luck. I finally realized that I had not hooked up the ground wire to the ECU. By now I had completely depleted the charge in the battery and I was mentally defeated. So after a night out with some friends and some sleep I returned on Sunday morning and finally had a successful start. Grabbing the video camera each time I attempted was a PITA but was eventually worth it. Here's the video:
As you may have noticed the engine was idling very high. Somewhere around 2500 rpm. I probably should not have let it run as long as I did but I was so overwhelmed that I wasn't thinking straight. Lucking this should be pretty easy to trouble shoot. I think I either have a bad IAC valve or one of the several hoses going to the intake manifold is letting air by (possibly the brake booster or the PCV setup). Either way I should have this resolved shortly and then I'll go back and take some pictures of the progress that I missed as well as a new video.
Sorry for shaky video but between my nerves and the loud as hell exhaust in my garage it was very challenging to keep a steady hand.
BTW, I still have not finished the steering but I have the pieces cut that just barely clear the exhaust manifold and I should have them fabbed up by Wednesday or so. I also have to replace an o-ring on the steering pump reservoir because I have a small leak which I'll take considering there were no other fluid leaks.
Back from the welder.
I also threw some VHT flame proof flat black spray paint on the exhaust manifolds. Luckily I have some industrial ovens at work and I was able to use them for the curing cycles because it is definitely not something you want to do in your home oven. In retrospect I should have just spent the extra $100 on the ceramic coated manifolds but as you can imagine this project is sucking me dry so at this point I am saving wherever possible. They don't look great but it will keep them from rusting and once they are installed you will barely see them (at least that's my story until I get over the fact that I didn't get the ceramic ones)
Next on the list was the PCV system. LS1's are notorious for consuming oil (at least that's what I have heard) so I took 2 steps to resolve the problem. The first step was to upgrade to the LS6 valley cover which has a better baffle than the LS1. I also installed an air oil separator so if some oil does get out through the PCV valve I don't start coating the inside of the intake manifold. Again I opted for the baseline separator even though I was really tempted to go with the tig welded stainless steel version.
This was a shot of the engine bay after installing the belt and before I installed the radiator. I tried to get everything on that would be harder once the radiator was in.
Here's a shot of the completed fuel system. You can follow the flow from the hard line on the left hand side of the engine bay, through the fuel rails, through the fuel pressure regulator, and back to the return line with some basic fuel hose. I set the pressure at 60 psi.
The guys at my Advanced Auto Parts were nice enough to let me browse through all the radiator hoses in the back. I ended up buying 3 hoses that I was going to use along with the stock hoses to make up the upper and lower hoses.
Here is the lower Lexus hose along with one of the new ones that I cut and will splice together to make the new lower hose.
Here it is together pieced together and it fits like a glove, more pictures to come.
So now is when things got a little crazy. I had a work marathon on Friday night and worked almost through the night but was really bad about taking pictures. I ended getting the engine completely ready to start with the exception of adding fluids and programming the ECU.
On Saturday morning I filled the fluids, programmed the ECU, and attempted to start (with video running). I got the engine to turn over a few times without fuel or spark to get the oil flowing but my battery was just not cutting it. After hooking up an additional battery and attempting a few more starts I still wasn't having any luck. I finally realized that I had not hooked up the ground wire to the ECU. By now I had completely depleted the charge in the battery and I was mentally defeated. So after a night out with some friends and some sleep I returned on Sunday morning and finally had a successful start. Grabbing the video camera each time I attempted was a PITA but was eventually worth it. Here's the video:
As you may have noticed the engine was idling very high. Somewhere around 2500 rpm. I probably should not have let it run as long as I did but I was so overwhelmed that I wasn't thinking straight. Lucking this should be pretty easy to trouble shoot. I think I either have a bad IAC valve or one of the several hoses going to the intake manifold is letting air by (possibly the brake booster or the PCV setup). Either way I should have this resolved shortly and then I'll go back and take some pictures of the progress that I missed as well as a new video.
Sorry for shaky video but between my nerves and the loud as hell exhaust in my garage it was very challenging to keep a steady hand.
BTW, I still have not finished the steering but I have the pieces cut that just barely clear the exhaust manifold and I should have them fabbed up by Wednesday or so. I also have to replace an o-ring on the steering pump reservoir because I have a small leak which I'll take considering there were no other fluid leaks.


 07-10-2013, 06:48 PM
#43
Staging Lane
Thread Starter
iTrader: (4)
Join Date: Oct 2011
Location: Jupiter, FL
Posts: 98
Likes: 0
Received 0 Likes
on
0 Posts
so I have a few pics of the work that I didn't document from a few nights ago. First of all here is the top radiator hose.
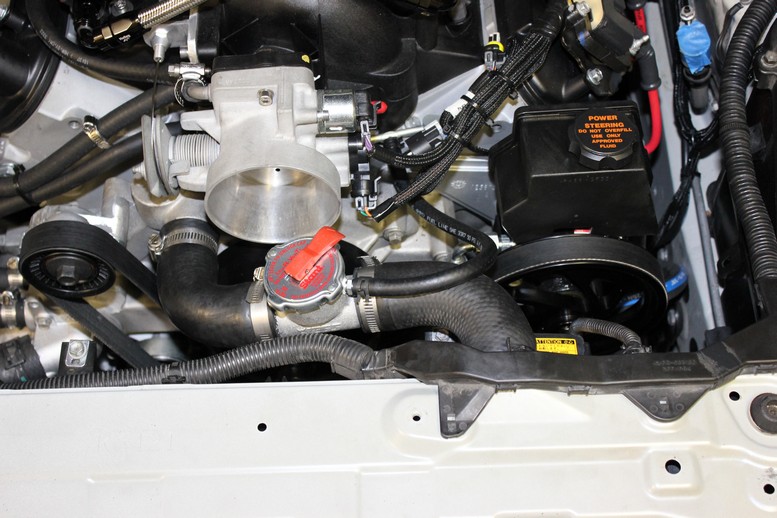
This is the first item on the list to redo once I get the car running. The fill neck completely gets in the way of where the intake elbow needs to go. My plan is to run a remote fill neck that will sit further to the drivers side of the engine bay and out of the way. This will be done very soon so I can get a filter on.
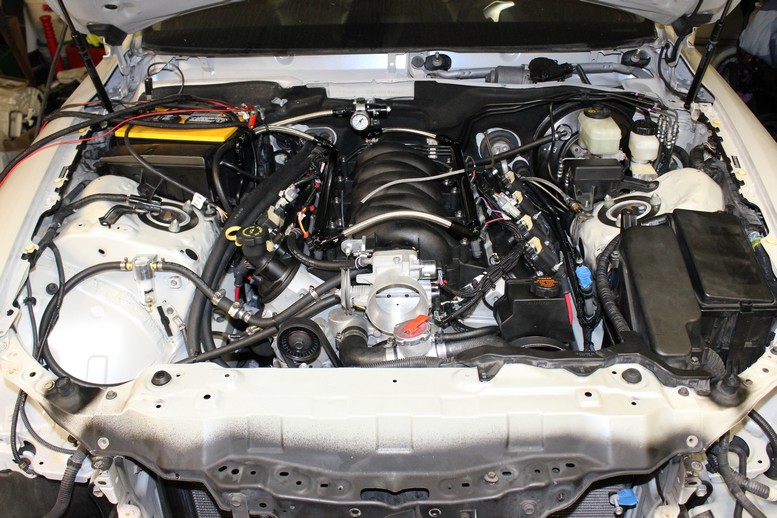
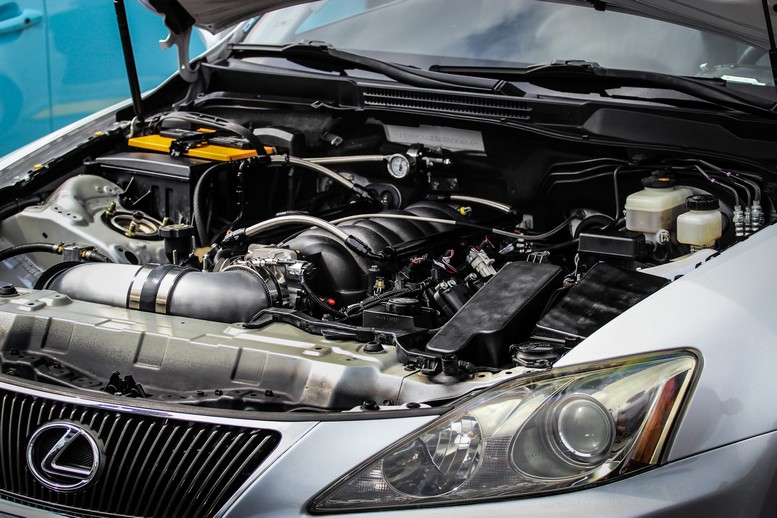
Here is a shot of the engine right before the first fire.
I'm guessing you all saw the first start video. Well it turns out I had a bad IAC valve and once I replaced it the engine idled at a normal RPM. Actually, it was probably a little low but I'll fix that with the computer. Here is the new video:
I'm still waiting on my steering parts form the machine shop so in the mean time I decided to work on a few other tasks that need to be completed before my first drive. I had some brake cables made for the ABS bypass. I tried to make something with off the shelf parts but it is hard to find a good selection of 10mm inverted flare brake fittings. So a hose and tube shop in town made these up for me that convert the 10mm to a 3/16" which then splits with a tee and then convert back to 10mm. they fit perfect so hopefully they wont spring any leaks.
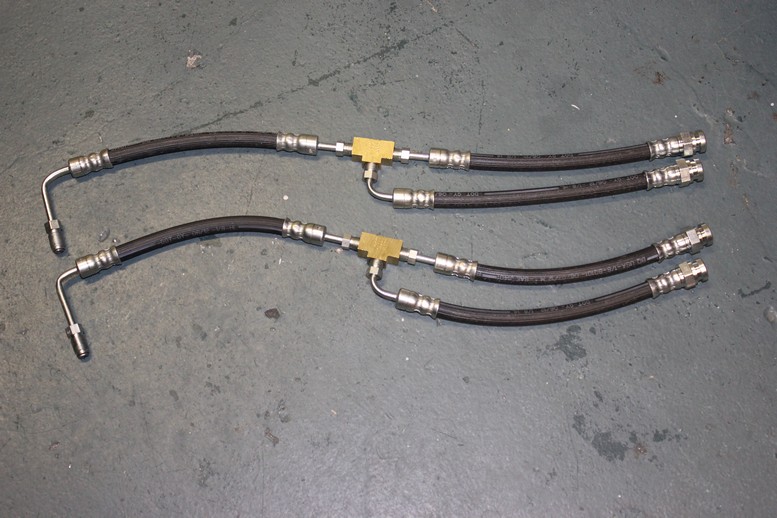
Here's a shot of them installed. I still need to come up with a bracket to keep all the brake lines secured.
That's it for right now. Hopefully I'll get my steering parts back tomorrow and have a drivable car by this weekend.
This is the first item on the list to redo once I get the car running. The fill neck completely gets in the way of where the intake elbow needs to go. My plan is to run a remote fill neck that will sit further to the drivers side of the engine bay and out of the way. This will be done very soon so I can get a filter on.
Here is a shot of the engine right before the first fire.
I'm guessing you all saw the first start video. Well it turns out I had a bad IAC valve and once I replaced it the engine idled at a normal RPM. Actually, it was probably a little low but I'll fix that with the computer. Here is the new video:
I'm still waiting on my steering parts form the machine shop so in the mean time I decided to work on a few other tasks that need to be completed before my first drive. I had some brake cables made for the ABS bypass. I tried to make something with off the shelf parts but it is hard to find a good selection of 10mm inverted flare brake fittings. So a hose and tube shop in town made these up for me that convert the 10mm to a 3/16" which then splits with a tee and then convert back to 10mm. they fit perfect so hopefully they wont spring any leaks.
Here's a shot of them installed. I still need to come up with a bracket to keep all the brake lines secured.
That's it for right now. Hopefully I'll get my steering parts back tomorrow and have a drivable car by this weekend.
07-10-2013, 10:13 PM
#44
Teching In

Join Date: Dec 2012
Location: Fort Worth, TX
Posts: 5
Likes: 0
Received 0 Likes
on
0 Posts
so I have a few pics of the work that I didn't document from a few nights ago. First of all here is the top radiator hose.

This is the first item on the list to redo once I get the car running. The fill neck completely gets in the way of where the intake elbow needs to go. My plan is to run a remote fill neck that will sit further to the drivers side of the engine bay and out of the way. This will be done very soon so I can get a filter on.
Here is a shot of the engine right before the first fire.

I'm guessing you all saw the first start video. Well it turns out I had a bad IAC valve and once I replaced it the engine idled at a normal RPM. Actually, it was probably a little low but I'll fix that with the computer. Here is the new video:
http://youtu.be/Z4VXOnt9_D8
I'm still waiting on my steering parts form the machine shop so in the mean time I decided to work on a few other tasks that need to be completed before my first drive. I had some brake cables made for the ABS bypass. I tried to make something with off the shelf parts but it is hard to find a good selection of 10mm inverted flare brake fittings. So a hose and tube shop in town made these up for me that convert the 10mm to a 3/16" which then splits with a tee and then convert back to 10mm. they fit perfect so hopefully they wont spring any leaks.

Here's a shot of them installed. I still need to come up with a bracket to keep all the brake lines secured.

That's it for right now. Hopefully I'll get my steering parts back tomorrow and have a drivable car by this weekend.
This is the first item on the list to redo once I get the car running. The fill neck completely gets in the way of where the intake elbow needs to go. My plan is to run a remote fill neck that will sit further to the drivers side of the engine bay and out of the way. This will be done very soon so I can get a filter on.
Here is a shot of the engine right before the first fire.
I'm guessing you all saw the first start video. Well it turns out I had a bad IAC valve and once I replaced it the engine idled at a normal RPM. Actually, it was probably a little low but I'll fix that with the computer. Here is the new video:
http://youtu.be/Z4VXOnt9_D8
I'm still waiting on my steering parts form the machine shop so in the mean time I decided to work on a few other tasks that need to be completed before my first drive. I had some brake cables made for the ABS bypass. I tried to make something with off the shelf parts but it is hard to find a good selection of 10mm inverted flare brake fittings. So a hose and tube shop in town made these up for me that convert the 10mm to a 3/16" which then splits with a tee and then convert back to 10mm. they fit perfect so hopefully they wont spring any leaks.
Here's a shot of them installed. I still need to come up with a bracket to keep all the brake lines secured.
That's it for right now. Hopefully I'll get my steering parts back tomorrow and have a drivable car by this weekend.
Where did you get the nylon loom covering the harness, thats so much cleaner than the plastic stuff.
07-11-2013, 12:37 AM
#45

 07-11-2013, 11:53 PM
#47
Staging Lane
Thread Starter
iTrader: (4)
Join Date: Oct 2011
Location: Jupiter, FL
Posts: 98
Likes: 0
Received 0 Likes
on
0 Posts
The Holley harness came with that style loom and I got more from Summit for the rest of the wiring. They call it braided wire wrap. I agree, much cleaner look than the plastic stuff. The plastic stuff has been around forever, it's about time they came out with something a little nicer.
07-22-2013, 10:23 PM
#48
Staging Lane
Thread Starter
iTrader: (4)
Join Date: Oct 2011
Location: Jupiter, FL
Posts: 98
Likes: 0
Received 0 Likes
on
0 Posts
LOTS of activity lately, sorry I haven't been great about posting it all. After my initial test drive a little over a week ago, I decided that I needed to do a little work on the steering, cooling system, and air intake before I took the car on any more drives. My camera is in my car at my friends warehouse right now so unfortunately I don't have all the pictures to post. I do however have some cell pics and some movies.
I'm not going to get into the steering issues right now since I don't have the pics but I will say that I ended up splicing together 2 outer tie rods to make a longer tie rod with a standard thread. I'll get to that later.
The biggest difference you'll see is that I installed a coolant expansion tank that would act as a reservoir as well as a fill port that doesn't block the throttle body. This allowed me to install my air intake. I fabricated the intake using a 4" cast short radius elbow (yes it is cast aluminum), a 12" long 45 degree bent tube, 2 silicone connectors with stainless t-clamps, and a 7" K&N filter.
Here's a shot of the Moroso expansion tank.
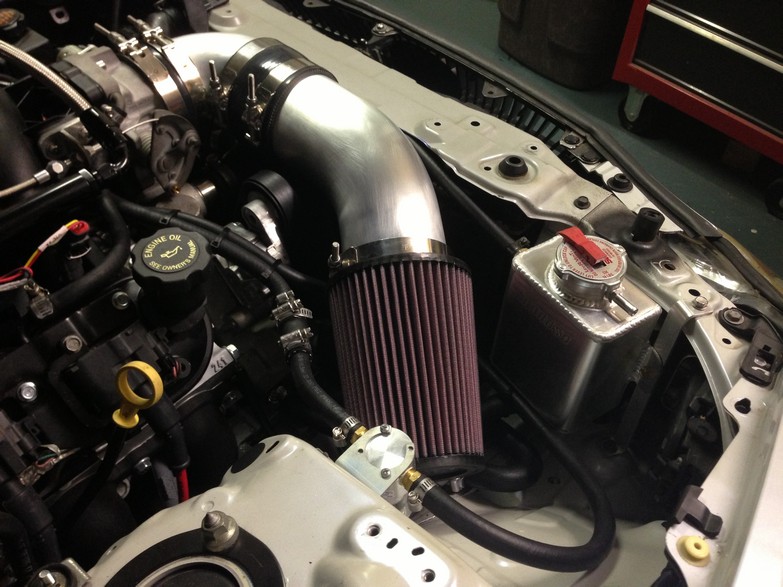
I actually disconnected my heater core and ran the heater core output, through a tee fitting that is connected to the expansion tank, and then back into the heater core return. I live in Florida so I don't think I'll miss that heater and if I decide I want to hook it up it would only take about a half hour. For now I like the clean look without the hoses running across the top of the engine.
Here is another shot of the intake and the expansion tank
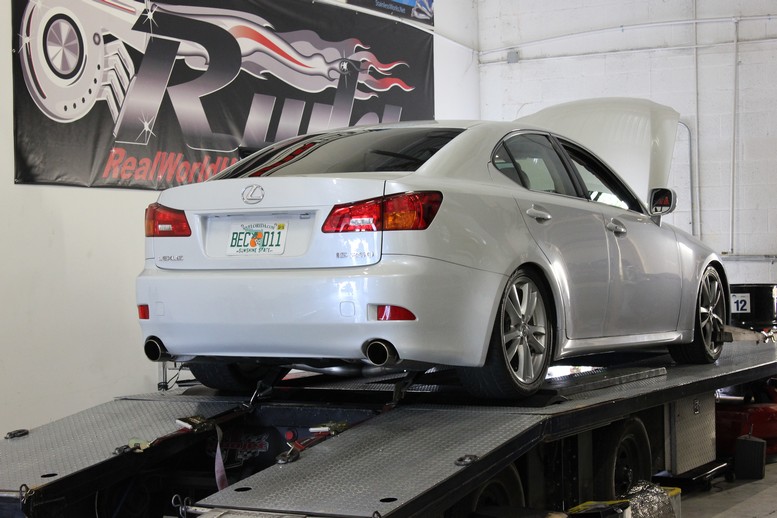
So now on to the current. I hooked back up the steering and drove the car about 20 minutes south to my buddies warehouse. Up to this point I have done this entire swap in my garage with a set of $30 Harbor Freight jack stands and a $30 floor jack. When my friend offered up his lift to fab the exhaust I couldn't turn it down. I'll post pics of the exhaust build in a few days but for the time being I'll leave you with 2 video of the car on the road, still exhaust-less and sounding like a beast. You have no idea what kind of confusion you see in peoples faces when they realize the noise that they hear must be coming from the Lexus because there is no other cars around. If it wasn't unbearably load in the car, I would be inclined to keep it as is for a little while just to mess with people.
Here are the videos. I should have another post later this week.
Now one with a little more juice
I'm not going to get into the steering issues right now since I don't have the pics but I will say that I ended up splicing together 2 outer tie rods to make a longer tie rod with a standard thread. I'll get to that later.
The biggest difference you'll see is that I installed a coolant expansion tank that would act as a reservoir as well as a fill port that doesn't block the throttle body. This allowed me to install my air intake. I fabricated the intake using a 4" cast short radius elbow (yes it is cast aluminum), a 12" long 45 degree bent tube, 2 silicone connectors with stainless t-clamps, and a 7" K&N filter.
Here's a shot of the Moroso expansion tank.
I actually disconnected my heater core and ran the heater core output, through a tee fitting that is connected to the expansion tank, and then back into the heater core return. I live in Florida so I don't think I'll miss that heater and if I decide I want to hook it up it would only take about a half hour. For now I like the clean look without the hoses running across the top of the engine.
Here is another shot of the intake and the expansion tank
So now on to the current. I hooked back up the steering and drove the car about 20 minutes south to my buddies warehouse. Up to this point I have done this entire swap in my garage with a set of $30 Harbor Freight jack stands and a $30 floor jack. When my friend offered up his lift to fab the exhaust I couldn't turn it down. I'll post pics of the exhaust build in a few days but for the time being I'll leave you with 2 video of the car on the road, still exhaust-less and sounding like a beast. You have no idea what kind of confusion you see in peoples faces when they realize the noise that they hear must be coming from the Lexus because there is no other cars around. If it wasn't unbearably load in the car, I would be inclined to keep it as is for a little while just to mess with people.
Here are the videos. I should have another post later this week.
Now one with a little more juice

 07-23-2013, 12:43 PM
#51
Staging Lane
Thread Starter
iTrader: (4)
Join Date: Oct 2011
Location: Jupiter, FL
Posts: 98
Likes: 0
Received 0 Likes
on
0 Posts
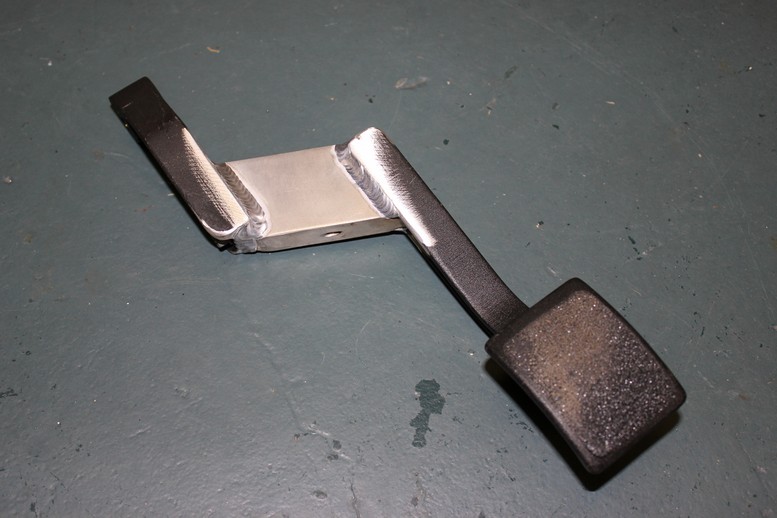
I used a Wilwood pedal that I had to cut and modify with a 3" jog. There is a manual option for the IS250 but they are not common. The oem pedal assembly is really pricey so I decided to go with the Wilwood that I knew was compatible with the Wilwood master cylinder.
 11-07-2013, 07:15 PM
#57
Staging Lane
Thread Starter
iTrader: (4)
Join Date: Oct 2011
Location: Jupiter, FL
Posts: 98
Likes: 0
Received 0 Likes
on
0 Posts
It's been a while since I have posted so thanks to all the new guys who have come up to speed on the project. I have been driving the car but only locally because the T-56 I installed was in really bad shape and uncomfortably loud and hard to shift.
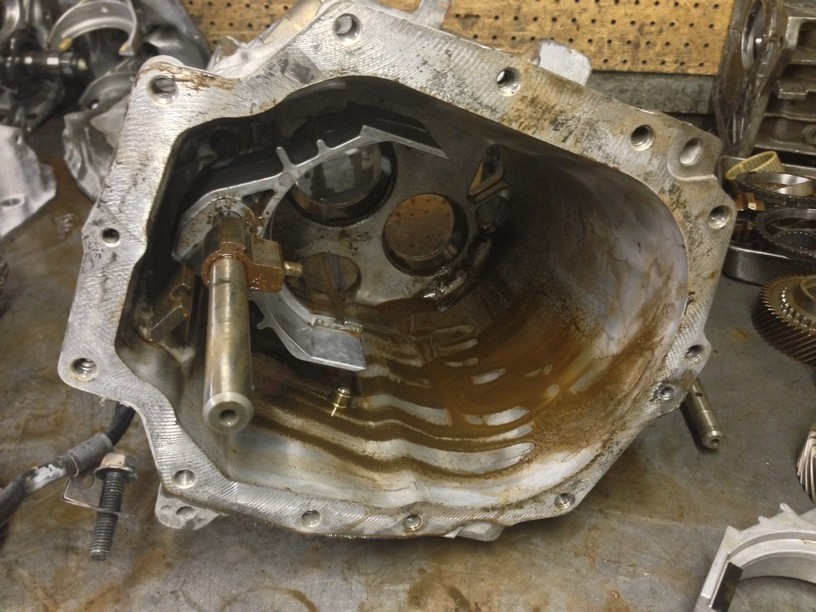
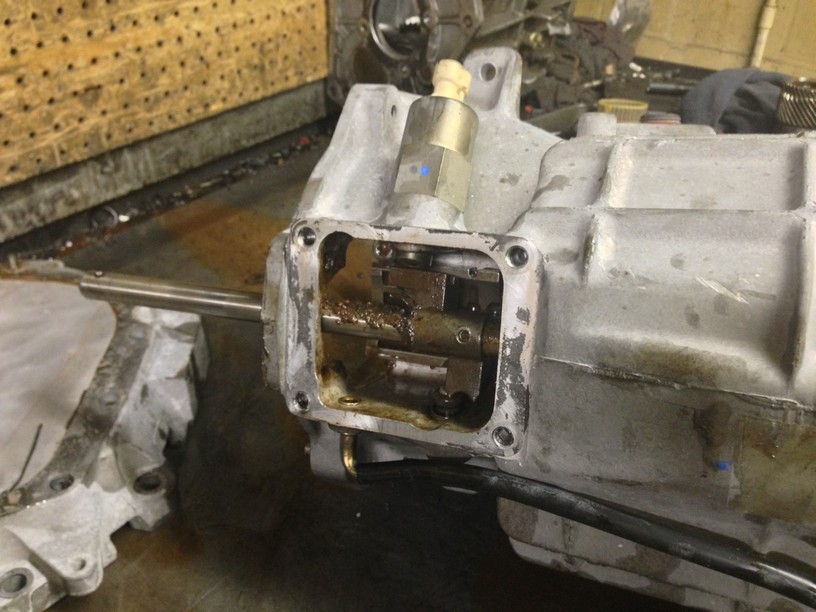
Well that all changed today. I pulled the engine for hopefully the last time on Saturday night and today I drove the transmission up to a shop called Astro Performance just north of Orlando for a full rebuild. They specialize in Tremec transmission and were great to work with. Hopefully the result is as good as the service.
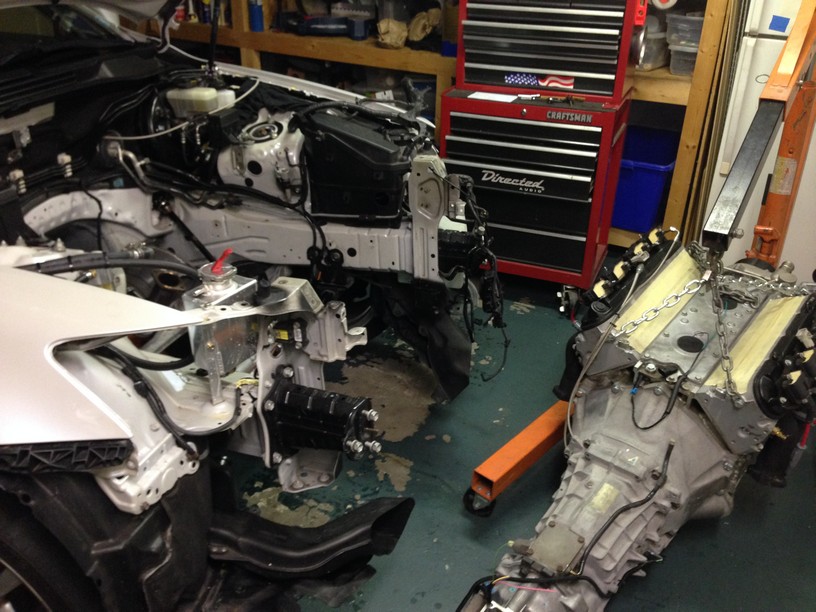
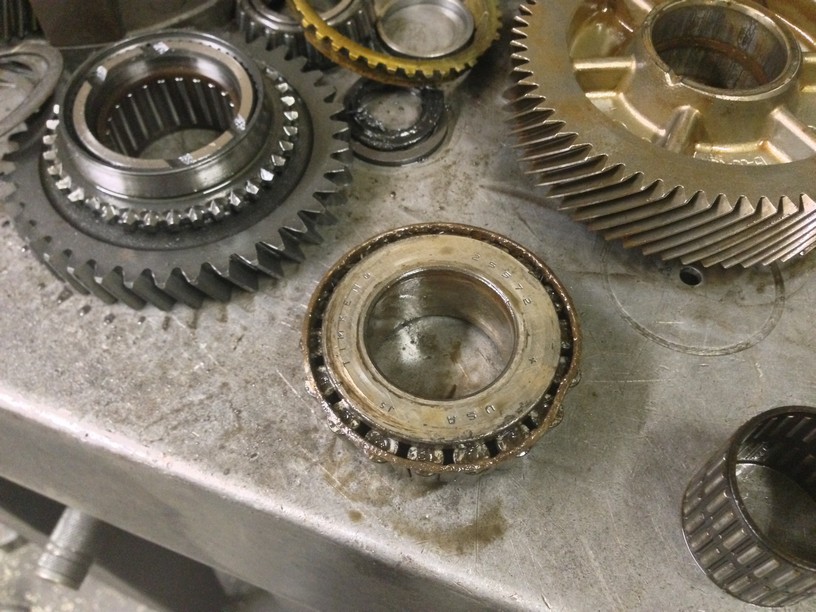
I snapped a few pics of the transmission once they got it all disassembled. They found water in the case and some pretty significant rust damage. I would say about half the parts were re-usable but I ended up with a new output shaft, 1st/2nd, 3rd/4th, and reverse slider assembly, 1st main shaft gear, 6th counter shaft gear, 6th needle bearing, counter shaft extension, bearing and sync ring kit, and finally while they were in there we put in and upgraded steel 3/4 fork and syncro keys and springs.

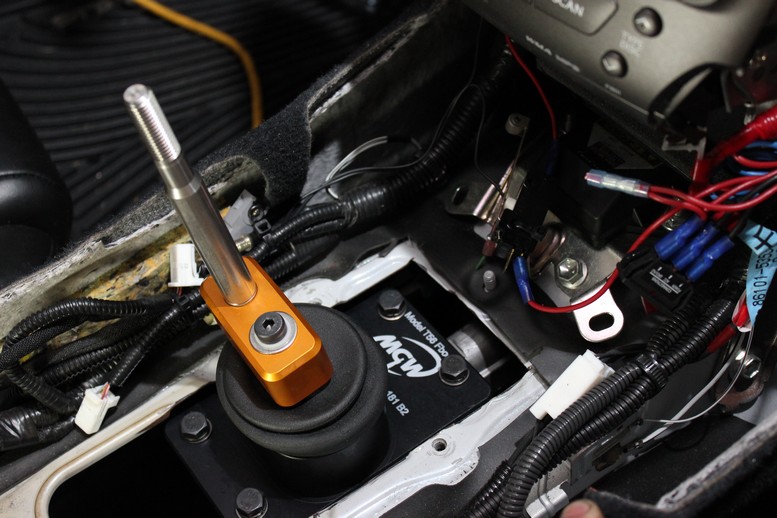
I also bought a MGW shifter which looks like a piece of art (pictures to follow). Hopefully all the effort will be worth it and the transmission will drive like new.
Well that all changed today. I pulled the engine for hopefully the last time on Saturday night and today I drove the transmission up to a shop called Astro Performance just north of Orlando for a full rebuild. They specialize in Tremec transmission and were great to work with. Hopefully the result is as good as the service.
I snapped a few pics of the transmission once they got it all disassembled. They found water in the case and some pretty significant rust damage. I would say about half the parts were re-usable but I ended up with a new output shaft, 1st/2nd, 3rd/4th, and reverse slider assembly, 1st main shaft gear, 6th counter shaft gear, 6th needle bearing, counter shaft extension, bearing and sync ring kit, and finally while they were in there we put in and upgraded steel 3/4 fork and syncro keys and springs.
I also bought a MGW shifter which looks like a piece of art (pictures to follow). Hopefully all the effort will be worth it and the transmission will drive like new.
11-07-2013, 07:16 PM
#58
Staging Lane
Thread Starter
iTrader: (4)
Join Date: Oct 2011
Location: Jupiter, FL
Posts: 98
Likes: 0
Received 0 Likes
on
0 Posts
Sorry guys, it's been a while since I posted but that doesn't mean stuff hasn't been getting done. I left off my last post with the transmission getting rebuilt which turned out great. But before I reinstalled the engine I took the liberty to knock out a few other items that were much easier with the engine out.
First was to dive back into the never ending saga of the steering system. I had the steering working but I had very little clearance between the steering shaft and the exhaust manifold. So little that I actually had to keep the steering wheel tilt at one position to avoid hitting. I knew there had to be a better way unfortunately the best solution I came up with involved cutting a hole in the frame in the engine bay to allow for clearance of the steering knuckle.
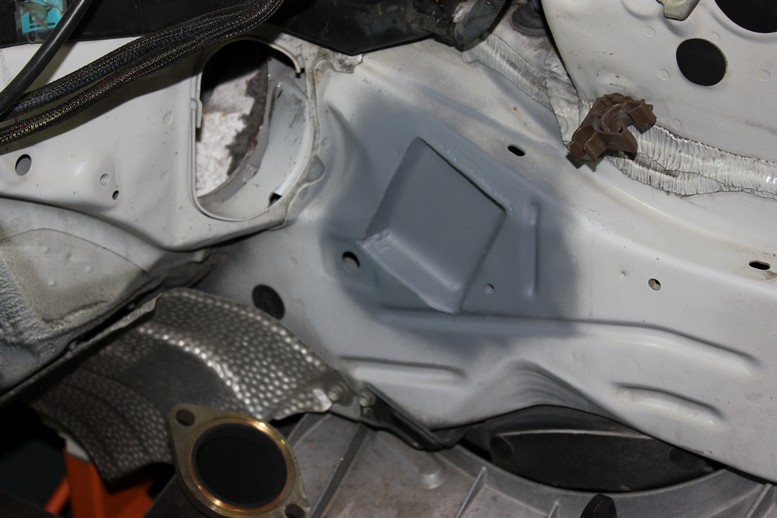
I didn't get any pictures of the hole without the pocket or the sheet metal pocket that I bent from some .090 steel sheet. But I did get one of the welded in pocket before painting.
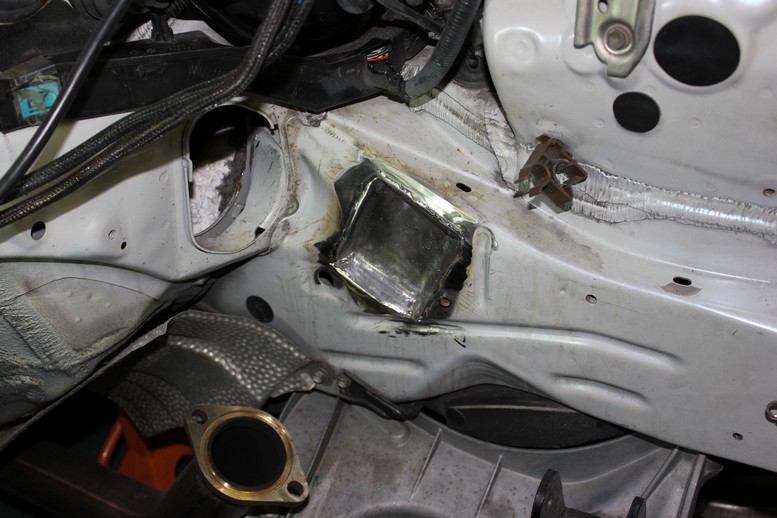
They weren't the prettiest welds in the world but it wasn't anything that a grinder couldn't clean up. Here's a shot of the pocket with primer, it was the best picture to see the shape of the cutout and the pocket.
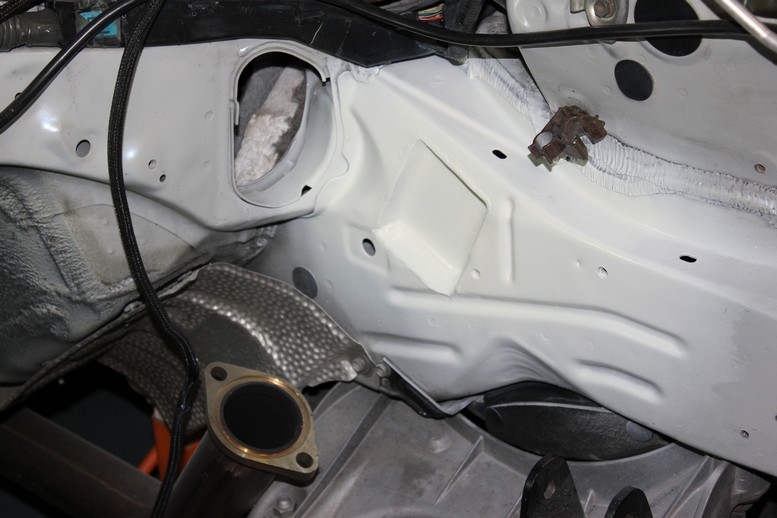
I threw a few coats of off-white paint on and you would have thought that it came from the factory like that.
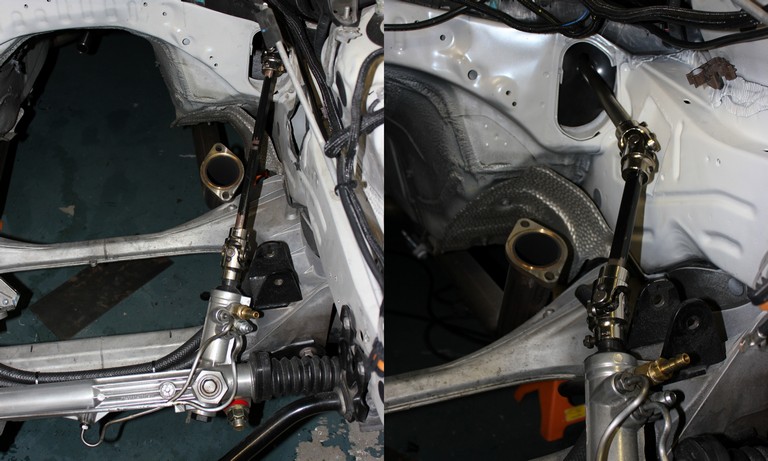
And finally one with the steering shaft installed.

Here is one last picture that shows the different in clearance to the manifold area. I also now have full adjustability of the steering wheel tilt.
Hopefully this is the last that I will ever have to post about the steering system. I really hope that my trials and tribulations make it a lot easier on the next guy. Earlier in the project someone had asked if I was nervous about the modified clutch pedal being only bolted together. I wasn't overly concerned but I decided that in the down time I would have it welded together.
Last but not least I decided to finally tackle the A/C system. I took the compressor side of the F-body hoses and the condenser and expansion valve side of the Lexus hoses along with some templates to a local hose shop and they brazed/spliced them together. The best part is that they only charged me $40 for the whole deal. I pulled a favor with a buddy of mine who got me charged up for free and viola, ice cold A/C. Due to the complex electronics of the Lexus A/C system I currently have a separate switch for the compressor clutch magnetic coil but I'll fix that eventually. Here's a picture of the low pressure hose which eventually was secured to the radiator fan shroud.
The engine was installed back into the car for probably the 5th time and I finally was able to install my MGW shifter. This thing is like a piece of art and has amazing mechanics. I would definitely recommend their products to anyone in their application range.
I was almost ready to head to the Showdown in O-town meet to mingle with some fellow Lexus enthusiasts but first I had to get my car sitting properly. I don't have any pictures of the install but the BC coilovers went in very easily. About 3 hours for the entire process and thanks to SargeISF they were set up perfectly so I didn't have to make any adjustments. Here a shot just after the install.
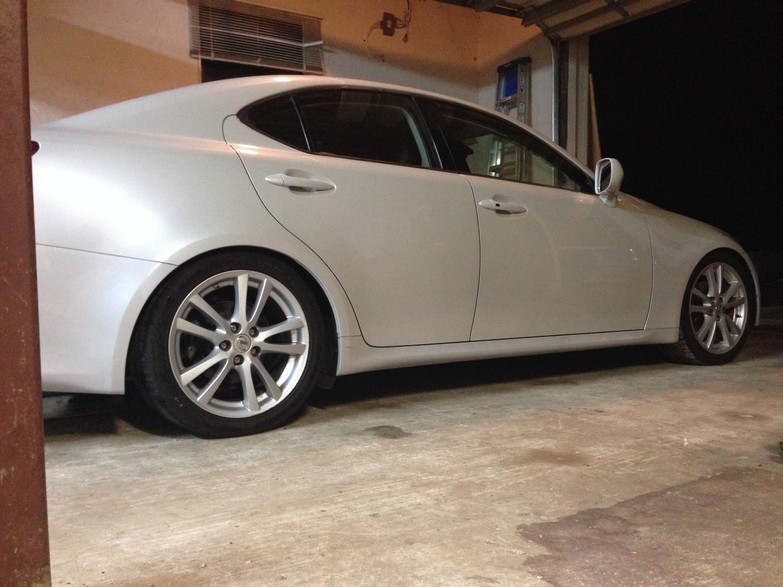
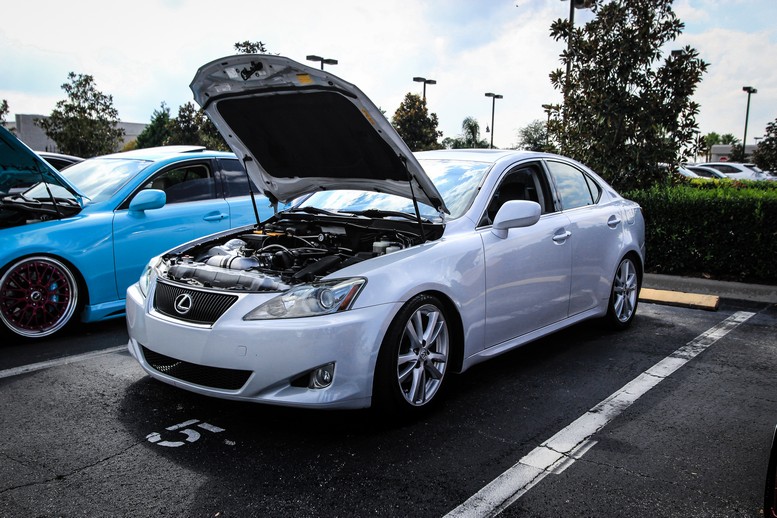
Thanks also to ccdan who took some great pictures of my car in Orlando. Here are a few of his shots.

After the meet weekend I decided to dive into the dash modifications, yes, I still don't have a dash in my car. I have done a lot of work so I think I am going to break my dashboard restoration into another thread. Here's the link:
IS250 Dashboard/Door Panel Restoration with Custom Gauge Pod
And here is a teaser on the current state of the project
LAST BIG NEWS OF THE POST
Car is at the tuner right now. He worked on some drivability tweaking today and he'll do performance tuning on the dyno tomorrow. Which also means that either tomorrow night or Friday night I should have dyno numbers and videos. Stay Tuned.
First was to dive back into the never ending saga of the steering system. I had the steering working but I had very little clearance between the steering shaft and the exhaust manifold. So little that I actually had to keep the steering wheel tilt at one position to avoid hitting. I knew there had to be a better way unfortunately the best solution I came up with involved cutting a hole in the frame in the engine bay to allow for clearance of the steering knuckle.
I didn't get any pictures of the hole without the pocket or the sheet metal pocket that I bent from some .090 steel sheet. But I did get one of the welded in pocket before painting.
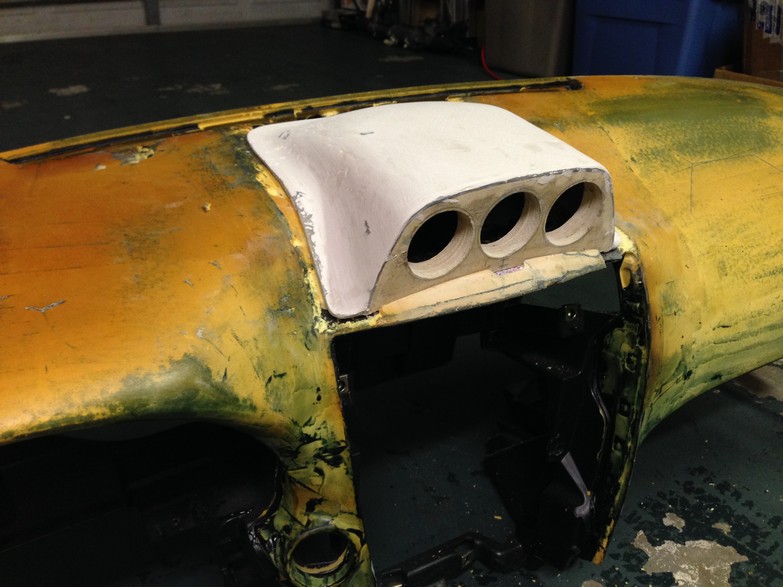
They weren't the prettiest welds in the world but it wasn't anything that a grinder couldn't clean up. Here's a shot of the pocket with primer, it was the best picture to see the shape of the cutout and the pocket.
I threw a few coats of off-white paint on and you would have thought that it came from the factory like that.
And finally one with the steering shaft installed.
Here is one last picture that shows the different in clearance to the manifold area. I also now have full adjustability of the steering wheel tilt.
Hopefully this is the last that I will ever have to post about the steering system. I really hope that my trials and tribulations make it a lot easier on the next guy. Earlier in the project someone had asked if I was nervous about the modified clutch pedal being only bolted together. I wasn't overly concerned but I decided that in the down time I would have it welded together.
Last but not least I decided to finally tackle the A/C system. I took the compressor side of the F-body hoses and the condenser and expansion valve side of the Lexus hoses along with some templates to a local hose shop and they brazed/spliced them together. The best part is that they only charged me $40 for the whole deal. I pulled a favor with a buddy of mine who got me charged up for free and viola, ice cold A/C. Due to the complex electronics of the Lexus A/C system I currently have a separate switch for the compressor clutch magnetic coil but I'll fix that eventually. Here's a picture of the low pressure hose which eventually was secured to the radiator fan shroud.
The engine was installed back into the car for probably the 5th time and I finally was able to install my MGW shifter. This thing is like a piece of art and has amazing mechanics. I would definitely recommend their products to anyone in their application range.
I was almost ready to head to the Showdown in O-town meet to mingle with some fellow Lexus enthusiasts but first I had to get my car sitting properly. I don't have any pictures of the install but the BC coilovers went in very easily. About 3 hours for the entire process and thanks to SargeISF they were set up perfectly so I didn't have to make any adjustments. Here a shot just after the install.
Thanks also to ccdan who took some great pictures of my car in Orlando. Here are a few of his shots.
After the meet weekend I decided to dive into the dash modifications, yes, I still don't have a dash in my car. I have done a lot of work so I think I am going to break my dashboard restoration into another thread. Here's the link:
IS250 Dashboard/Door Panel Restoration with Custom Gauge Pod
And here is a teaser on the current state of the project
LAST BIG NEWS OF THE POST
Car is at the tuner right now. He worked on some drivability tweaking today and he'll do performance tuning on the dyno tomorrow. Which also means that either tomorrow night or Friday night I should have dyno numbers and videos. Stay Tuned.
11-07-2013, 07:17 PM
#59
Staging Lane
Thread Starter
iTrader: (4)
Join Date: Oct 2011
Location: Jupiter, FL
Posts: 98
Likes: 0
Received 0 Likes
on
0 Posts
The car is still at the tuner. I saw a few dyno pulls today but I don't have any max power numbers yet. Mid tune numbers were decent but of course they are always lower than you want, I'll post results tomorrow. Here is a picture and a video of the car during one of the pulls.