


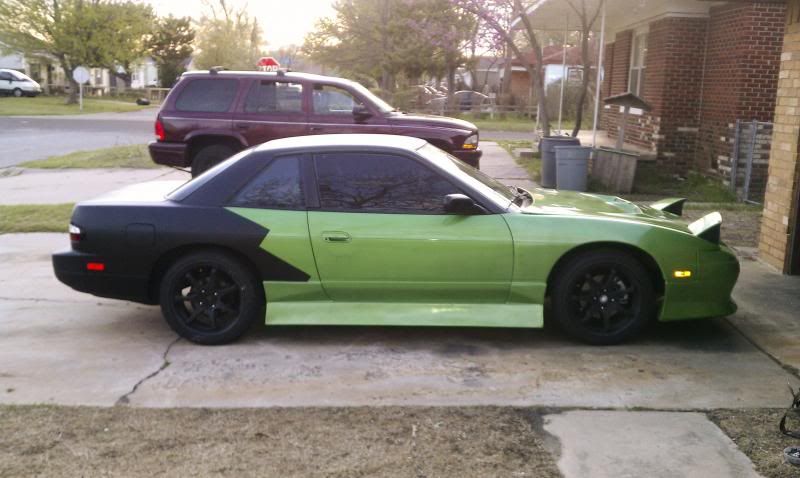
An s13 Ls2 grip-n-slide build.

The one I had was cracked all over the place, so I ditched it forever ago. Since then I ran for half a season without one and it wasn't too bad at all... and now with my custom gauges, I figure I'll keep running without one. I MIGHT do a half-dash custom thing to keep the gauges shaded when I'm driving, but I've not decided yet. I'd have to move my MSD power box if I ran a stock one again. Plus their heavy... and I've convinced myself that I have to make my car as light as possible... because racecar. (that I don't actually competitively race... hahaha)
Lol I was gonna say a lot of sanctioning bodies require a dashboard. 
As someone that just pulled his dash for wiring/flocking, the dash isn't THAT heavy. There's a lot more you can do besides. You're on an LS. Power/weight is already much better than stock lol.
Could always get the fiberglass/cf dashes.
Put something in there. Classy racecar ftw.
As someone that just pulled his dash for wiring/flocking, the dash isn't THAT heavy. There's a lot more you can do
besides. You're on an LS. Power/weight is already much better than stock lol. Could always get the fiberglass/cf dashes.
Put something in there. Classy racecar ftw.
Dash was all cracked up on mine as well, meaured the opening and its 55", found that a frp dash from a cobalt or 67 vette, is 55", I choose the cobalt

There's a metal plate behind the dash where the gauges go to keep gauges sturdy
There's a metal plate behind the dash where the gauges go to keep gauges sturdy
Lol I was gonna say a lot of sanctioning bodies require a dashboard.
As someone that just pulled his dash for wiring/flocking, the dash isn't THAT heavy. There's a lot more you can do besides. You're on an LS. Power/weight is already much better than stock lol.
Could always get the fiberglass/cf dashes.
Put something in there. Classy racecar ftw.
As someone that just pulled his dash for wiring/flocking, the dash isn't THAT heavy. There's a lot more you can do
besides. You're on an LS. Power/weight is already much better than stock lol. Could always get the fiberglass/cf dashes.
Put something in there. Classy racecar ftw.
How hard is it to strip and flock a dash?
That's awesome! I would have never thought to try that... Take much customization?
my glass was cracked so it is easier with glass out
And the flocking covers up all your messed up cracks and stuff? Or would it be good to strip the cracked vinyl first?
That's awesome. Mad props to that! I still have my glass in, so I'm sure it'd be quite a bit more challenging.
More measuring than fabriction, measure how far you want dash come out, trim, then measure where gauges are, cut a plate the same shape as dash, I used 4 zoot fittings or however you say it, to mount dash, putting gauges on a plate instead of the dash itself makes it easier to remove dash, about 10sec
my glass was cracked so it is easier with glass out
my glass was cracked so it is easier with glass out
LS1 Tech Stories
The Best V8 Stories One Small Block at Time

Retro Modern Bandit Pontiac Trans AM Comes With Burt Reynolds' Autograph
Verdad Gallardo
Top 10 Greatest Cadillac V Series Performance Models Ever, Ranked
Pouria Savadkouei
Top 10 Most Powerful Chevy Trucks Ever Made!

Hennessey's New Supercharged Silverado ZR2 Has 700 HP
Verdad Gallardo
Coachbuilt N2A Anteros Is an LS2-Powered C6 Corvette In Italian Clothes
Verdad Gallardo
Awesome K5 Blazer Restomod Comes With C7 Corvette Power
Verdad Gallardo
10 Camaros You Should Never Buy

10 LS Engine Myths That Refuse to Die
Verdad Gallardo
Five Reasons the Camaro Was the Most Pivotal Player in the Pony Car Wars 2.0
Brett Foote I've never done dash repair... any tips on what all is involved or where to start? It doesn't need to be perfect. I've literally run it without a dash at all and been perfectly happy with it for 6 months... but if I'm going to go through the trouble of spending time and money, I'd rather it not look ghetto.
Might be easier to just snag a used dash  Can't say I've got any firsthand at it, got an S14. There should be some good links for zilvia or somewhere out there with all the cracked 13 dashes though.
Can't say I've got any firsthand at it, got an S14. There should be some good links for zilvia or somewhere out there with all the cracked 13 dashes though. Looks like I'm getting a dash delivered tonight. $40... 2 cracks. It'll be good enough in my book... and I'll probably flock it later when I get a little more money. I also got my Sikky trans bushing back from warranty replacement. Hope this one goes good... this'll be my third one! I also need to put the transmission back in. Pulling the bellhousing was a mega-b*tch with the engine still in the car, so I'm going to try and take it out this time part of the way to get me some more clearance. Hope to have a new update tomorrow!
This update is brought to you by blurry pictures and the most minimal f*cks given. Having to remove both headers and nearly pull a motor just to fit a bellhousing is beyond ridiculous... and doing it by yourself in a 1 car garage had me wanting to push the thing outside and set it on fire.
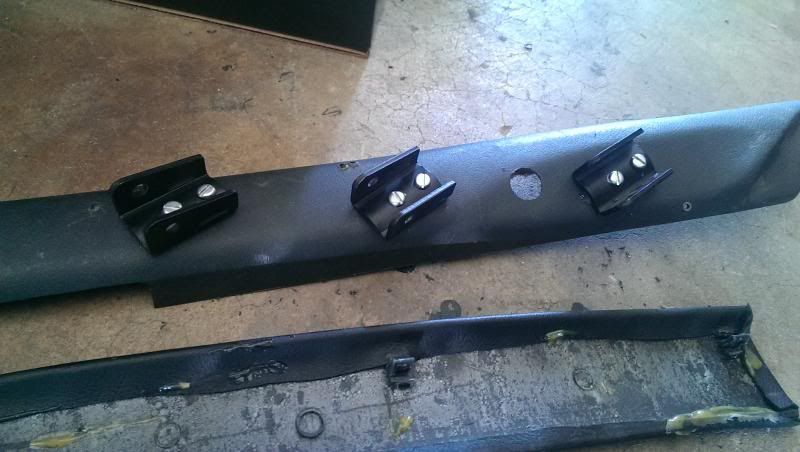
Buuuuuuuttttt..... anyway. Here we go. Started out a few days ago with fitting up a set of gauges and gauge pods. This went pretty well. I don't have the fittings yet to make use of the oil ones, but I'm sure I will soon. Drilled my holes, mounted my brackets, then wired and assembled everything. Drilled holes to hide/run the wires under the pillars, turned out pretty good for being a used pillar I got our of some junk car.
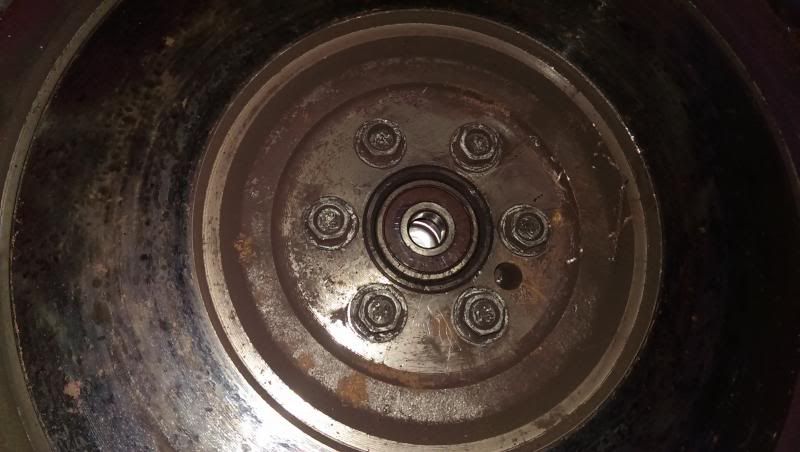
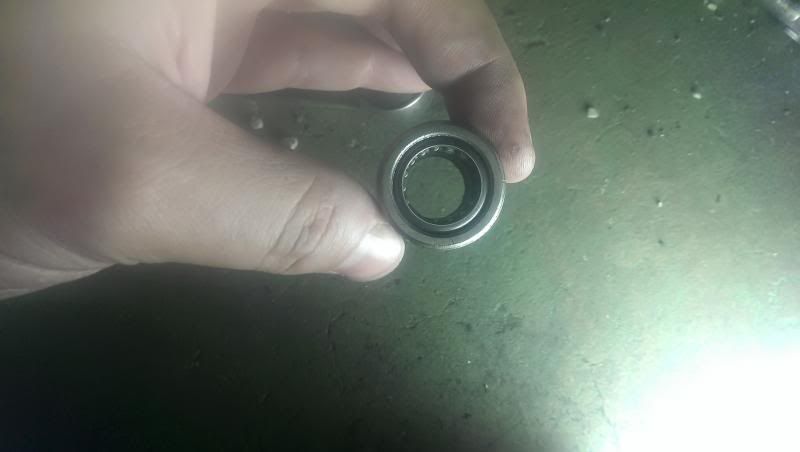
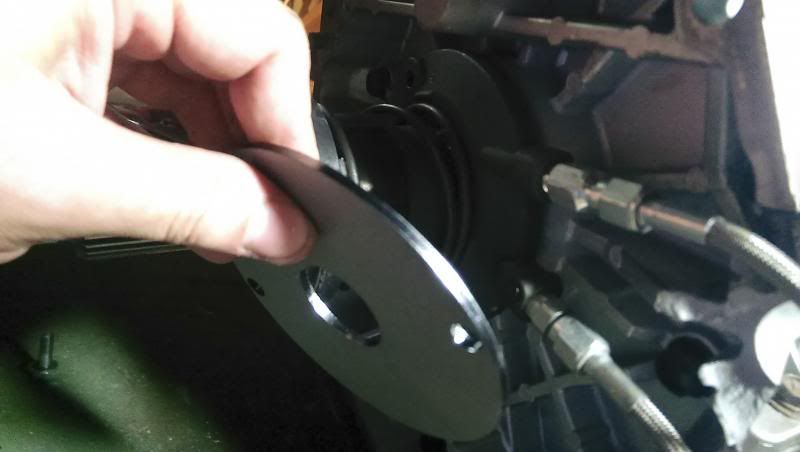
Next up was time to tackle the pilot bearing. I had the "large" style one, which doesn't work with my application, so it had to go.
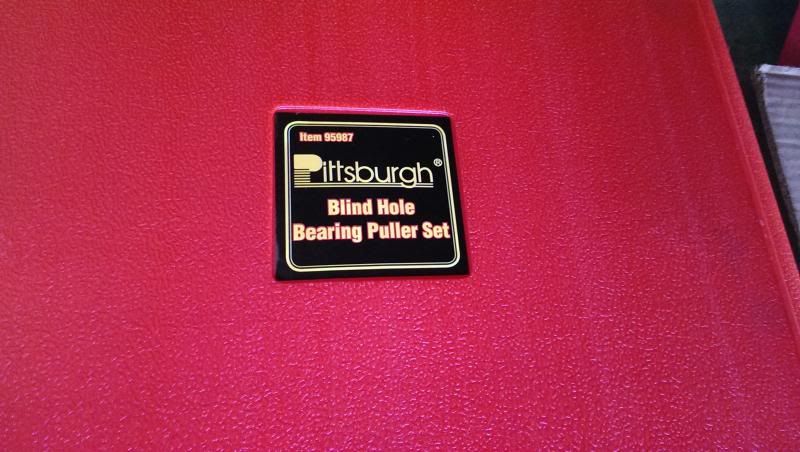
Picked up a blind-hole puller from Harbor Freight with a 25% off coupon, ended up being around $50. Considering Autozone wanted like, $140 or something to rent theirs (though you get it all back when you're done), I like owning my tools... so this works for me. Worked like a charm (though took a little massaging to get it in the hole at first.... that's what she said).
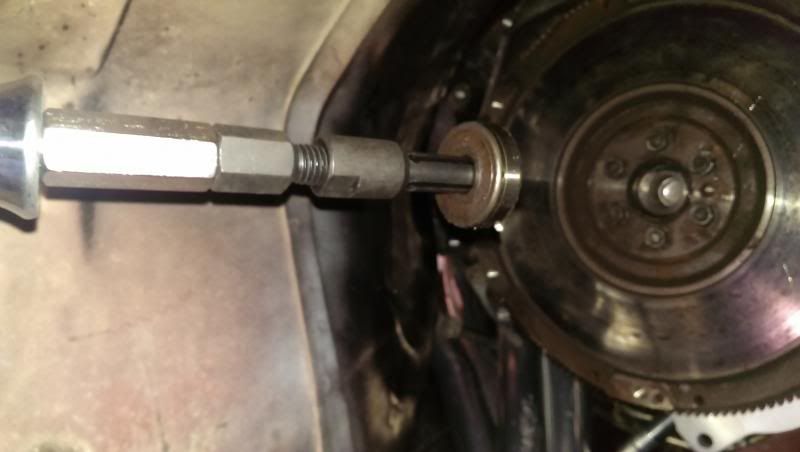
Here's the new "smaller" bearing. Whacked it in with a deadblow that was on the last of it's legs... and the hammer lost. Spilled little metal beads everywhere. Got it knocked in eventually though.
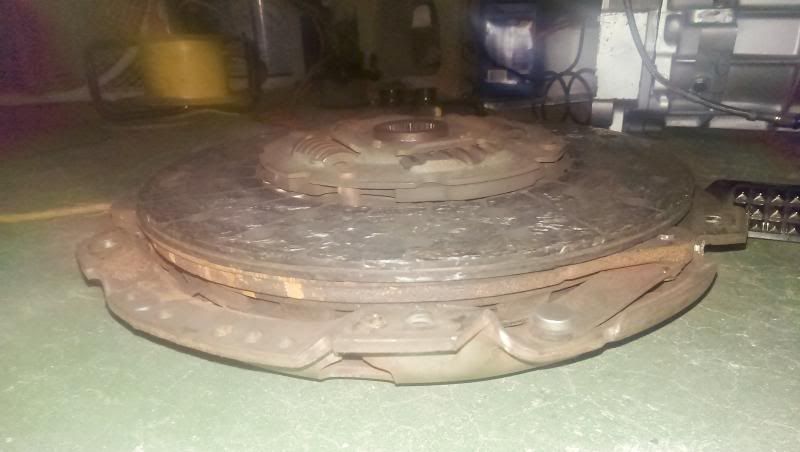
Next, I double checked my clutch before putting it back in. Someone said my issue may have been that it was installed wrong... but now that I'm looking at it, it wouldn't be possible to mount it incorrectly. It's too "tall" to fit wrong. The clutch will NOT fit in the way I have it in this picture.
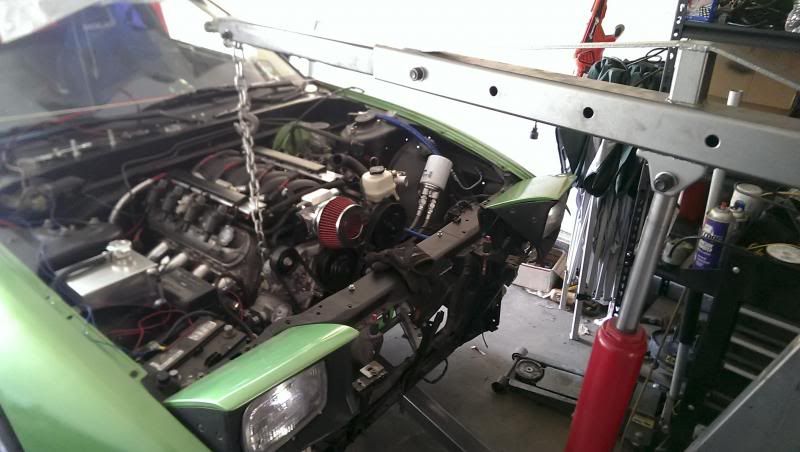
Time to pull the engine to put the transmission on....
Once I had everything out... swapped the bellhousings, and re-stabbed the transmission. THEN I remember I still needed to measure everything. Ugh... so I pulled it back out, made my measurements, and ended up needing the "middle" shim in my Tick Performance 3 piece shim pack. I think it's like... 0.114".
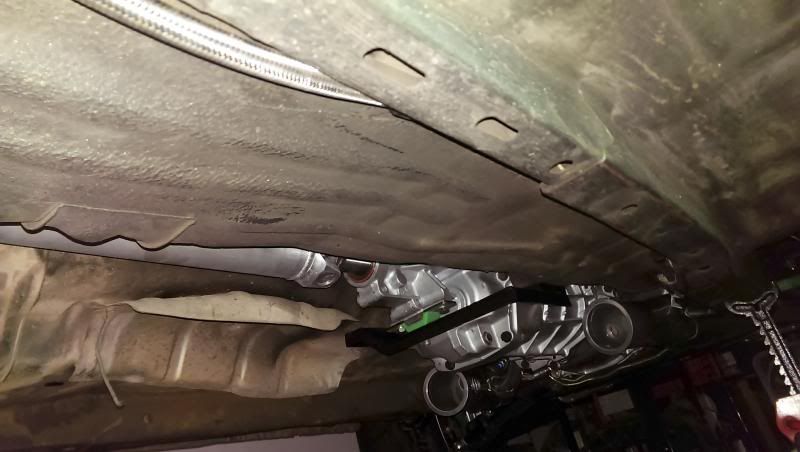
LOTS of cussing and frustration later... got all the trans components back together. May have crushed one of my Sikky remote oil lines... so I'll need to keep an eye on that when it's running for a while, and I scraped the crap out of my nicely painted brake booster. Whatever... racecar. The good news is, it shifts much easier and much better this time around in the car, and I can rotate the driveshaft by hand when it's in neutral. All big improvements over before. Still need to bleed the clutch though... but it got to be 3am and I had work the next morning.
Buuuuuuuttttt..... anyway. Here we go. Started out a few days ago with fitting up a set of gauges and gauge pods. This went pretty well. I don't have the fittings yet to make use of the oil ones, but I'm sure I will soon. Drilled my holes, mounted my brackets, then wired and assembled everything. Drilled holes to hide/run the wires under the pillars, turned out pretty good for being a used pillar I got our of some junk car.
Next up was time to tackle the pilot bearing. I had the "large" style one, which doesn't work with my application, so it had to go.
Picked up a blind-hole puller from Harbor Freight with a 25% off coupon, ended up being around $50. Considering Autozone wanted like, $140 or something to rent theirs (though you get it all back when you're done), I like owning my tools... so this works for me. Worked like a charm (though took a little massaging to get it in the hole at first.... that's what she said).
Here's the new "smaller" bearing. Whacked it in with a deadblow that was on the last of it's legs... and the hammer lost. Spilled little metal beads everywhere. Got it knocked in eventually though.
Next, I double checked my clutch before putting it back in. Someone said my issue may have been that it was installed wrong... but now that I'm looking at it, it wouldn't be possible to mount it incorrectly. It's too "tall" to fit wrong. The clutch will NOT fit in the way I have it in this picture.
Time to pull the engine to put the transmission on....
Once I had everything out... swapped the bellhousings, and re-stabbed the transmission. THEN I remember I still needed to measure everything. Ugh... so I pulled it back out, made my measurements, and ended up needing the "middle" shim in my Tick Performance 3 piece shim pack. I think it's like... 0.114".
LOTS of cussing and frustration later... got all the trans components back together. May have crushed one of my Sikky remote oil lines... so I'll need to keep an eye on that when it's running for a while, and I scraped the crap out of my nicely painted brake booster. Whatever... racecar. The good news is, it shifts much easier and much better this time around in the car, and I can rotate the driveshaft by hand when it's in neutral. All big improvements over before. Still need to bleed the clutch though... but it got to be 3am and I had work the next morning.
Last edited by Lrn2Go; Sep 12, 2013 at 09:48 AM.
So me and a friend of mine put in some extra hours trying to prep the car for the track day last Saturday... but it didn't make it. However... it almost did... so that's at least something! Lots of little things... bled the clutch, hooked up the radiator, made a lower radiator hose out of a new lower hose for a KA24DE motor, some electrical, and so on. We actually fastened the car up to where I could limp it to the exhaust shop on Friday under it's own power, which, granted, is only about half a mile away... but running open headers for very long is just asking for a visit with a local police officer. Anyway... backed it out...
Drove it up to the exhaust shop to get a quote...
So I tell the guy, "I'd like 3.5" down to a single, then 3.5" out the back." He tells me no exhaust shops do that around here. I call another place to verify... they didn't either. They can't bend it they say. Fine. So then I ask what it'll cost me to reduce it to 3" pipe and run that all the way back. The guy quotes me "about $600... $340 in parts and $260 in labor" (remember... this is WITHOUT a muffler of any kind). Uhh... no. And so that ended my track day dreams. I had to get to work and had run out of time. So I drove it home. Discovered I still have an oil leak at the Sikky oil filter re-locator, still had no power steering, and no power brakes... plus my Sikky Sway bar was sitting on my Nismo power brace, so that's not right.
-Fast forward a couple days-
Time to fabricate a brake-booster vacuum line! Ran to ACE hardware (because I wanted to get this done now and not wait), and bought a 1/4" to 3/8 (thread) and a 1/2" to 3/8 (thread) adapter and mated them together. I'd read that some of you used like, 5/8" adapters, but the end coming off my ls2 intake was only a half inch, so that's what I used.
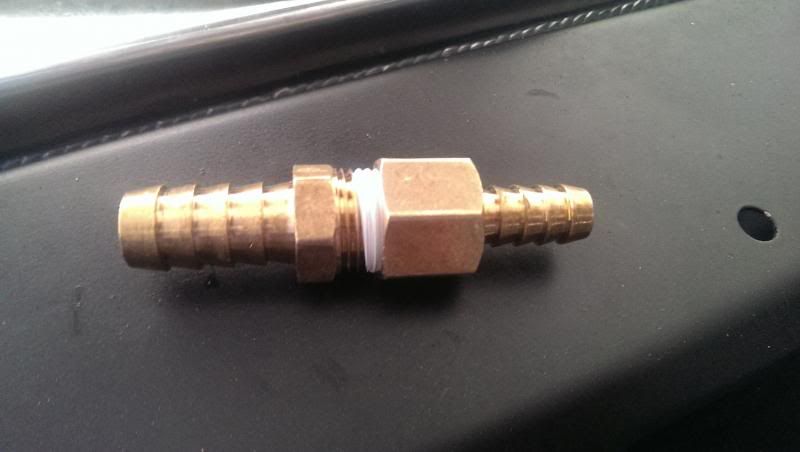
Next, I had a 300zx brake booster with the vacuum line still attached. I liked the route of that line better than the s13 one, so I grabbed it, flipped it over, attached my check valve and some more hose. After that I hooked up the adapter and some 1/2" hose and she was good to go.
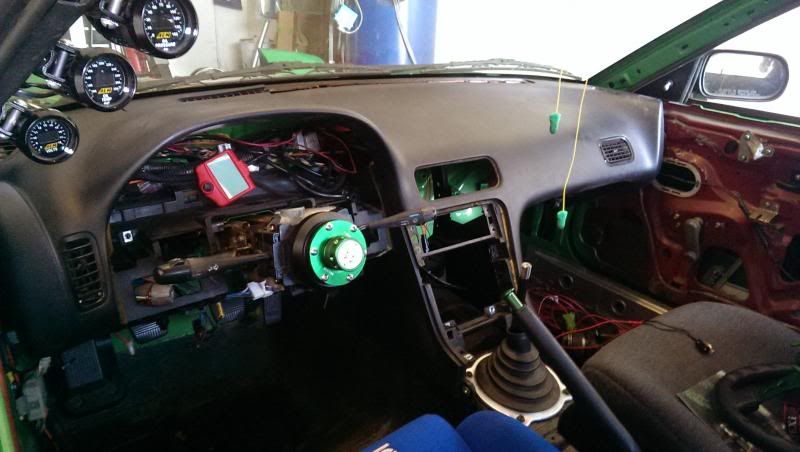
Bought a dash with a few cracks for $40 delivered and threw that in the car. Had plans to run my new Autometer gauges in a steering column pod, but they're too small (that's what I get for not paying attention), so now I needed a spot to put them, so that's in the works now too.
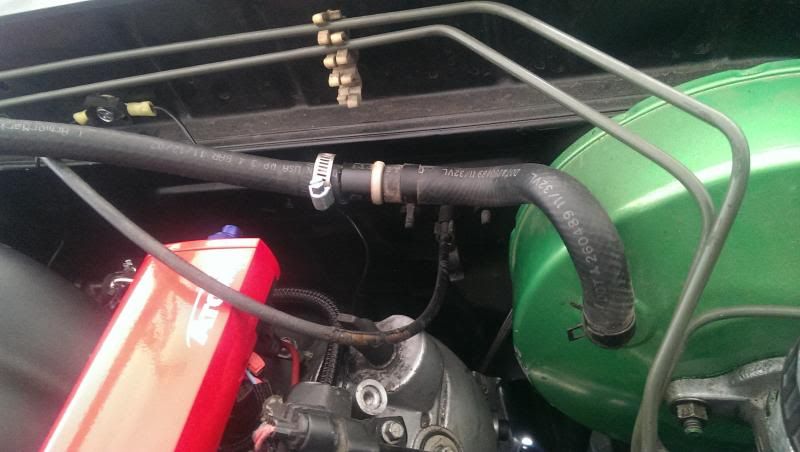
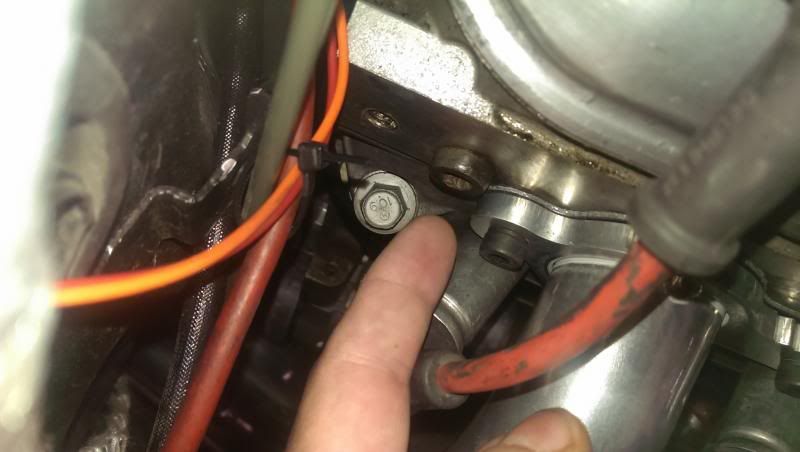
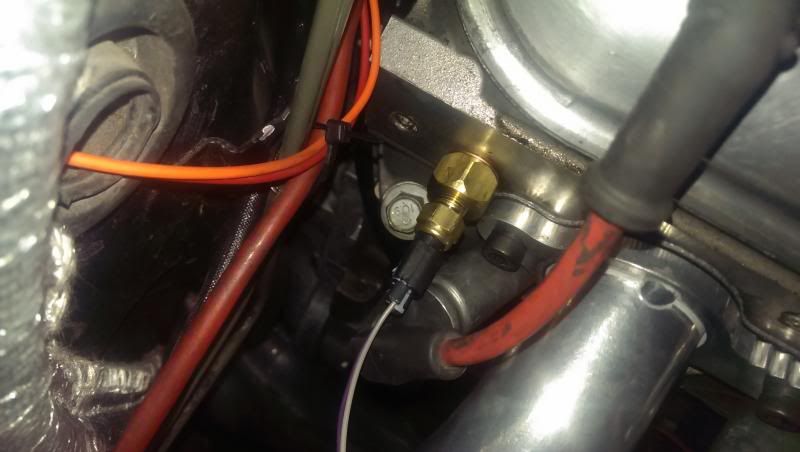
And I started pluming my engine coolant temp sensor for my gauge. Here's the adapter you need to run the sensor in the head...
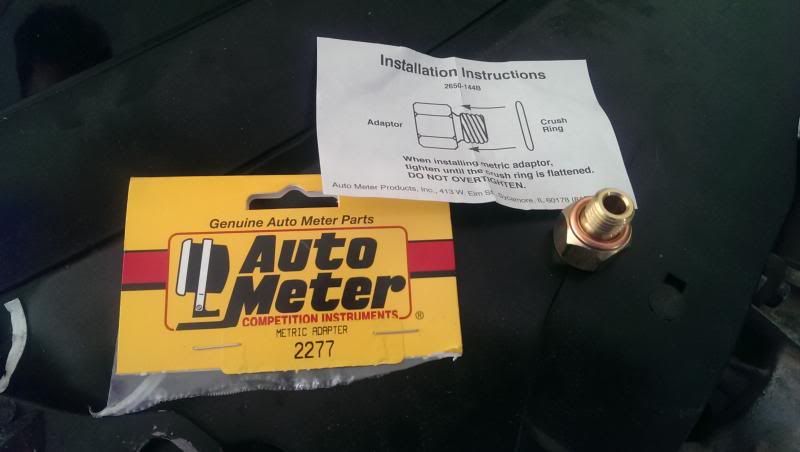
Here's the spot on the passenger head that everybody talks about. You remove the plug with a large allen wrench (metric), and be ready because coolant will spill out. Don't over-tighten your brass fittings! I heard about 11 ft/lbs is all you want... Autometer says only until the crush sleeve is crushed.
Drove it up to the exhaust shop to get a quote...
So I tell the guy, "I'd like 3.5" down to a single, then 3.5" out the back." He tells me no exhaust shops do that around here. I call another place to verify... they didn't either. They can't bend it they say. Fine. So then I ask what it'll cost me to reduce it to 3" pipe and run that all the way back. The guy quotes me "about $600... $340 in parts and $260 in labor" (remember... this is WITHOUT a muffler of any kind). Uhh... no. And so that ended my track day dreams. I had to get to work and had run out of time. So I drove it home. Discovered I still have an oil leak at the Sikky oil filter re-locator, still had no power steering, and no power brakes... plus my Sikky Sway bar was sitting on my Nismo power brace, so that's not right.
-Fast forward a couple days-
Time to fabricate a brake-booster vacuum line! Ran to ACE hardware (because I wanted to get this done now and not wait), and bought a 1/4" to 3/8 (thread) and a 1/2" to 3/8 (thread) adapter and mated them together. I'd read that some of you used like, 5/8" adapters, but the end coming off my ls2 intake was only a half inch, so that's what I used.
Next, I had a 300zx brake booster with the vacuum line still attached. I liked the route of that line better than the s13 one, so I grabbed it, flipped it over, attached my check valve and some more hose. After that I hooked up the adapter and some 1/2" hose and she was good to go.
Bought a dash with a few cracks for $40 delivered and threw that in the car. Had plans to run my new Autometer gauges in a steering column pod, but they're too small (that's what I get for not paying attention), so now I needed a spot to put them, so that's in the works now too.
And I started pluming my engine coolant temp sensor for my gauge. Here's the adapter you need to run the sensor in the head...
Here's the spot on the passenger head that everybody talks about. You remove the plug with a large allen wrench (metric), and be ready because coolant will spill out. Don't over-tighten your brass fittings! I heard about 11 ft/lbs is all you want... Autometer says only until the crush sleeve is crushed.

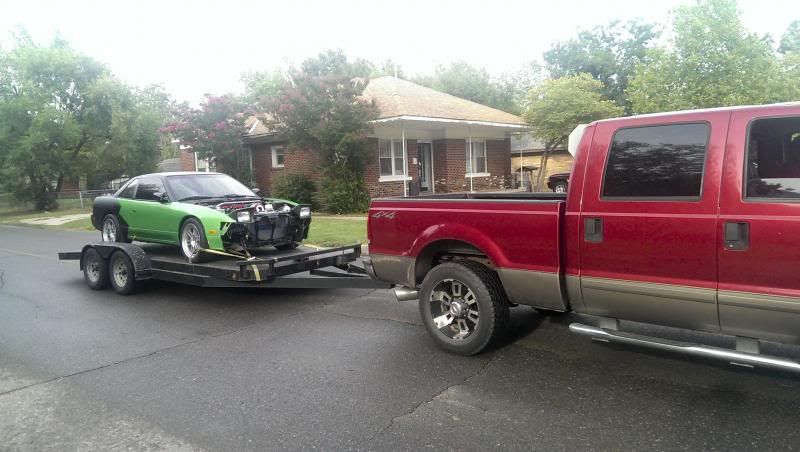
So! Not quite as many updates as I'd have liked... a few things still in the works (that I'll post up when they're done), but the good news is... it runs and drives!
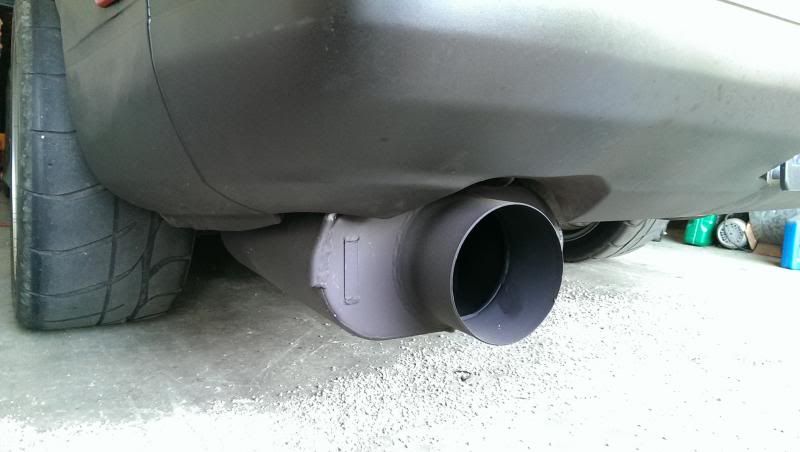
I went ahead and had it loaded up on a trailer to make the trip out to get it's exhaust work done (thanks Gary!). Ended up running dual 3" into a custom 4.5" Y, flared up to a 5" pipe back to a Flowmaster 5 series muffler. Thing sounds much more mild than with open headers, but it's still really loud and mean sounding. I'm not convinced I can stick with this setup though, as it seems to drag and get caught often, and my car will be dropping at least another inch in the future... so I've got to figure something out. But for now, I like it.
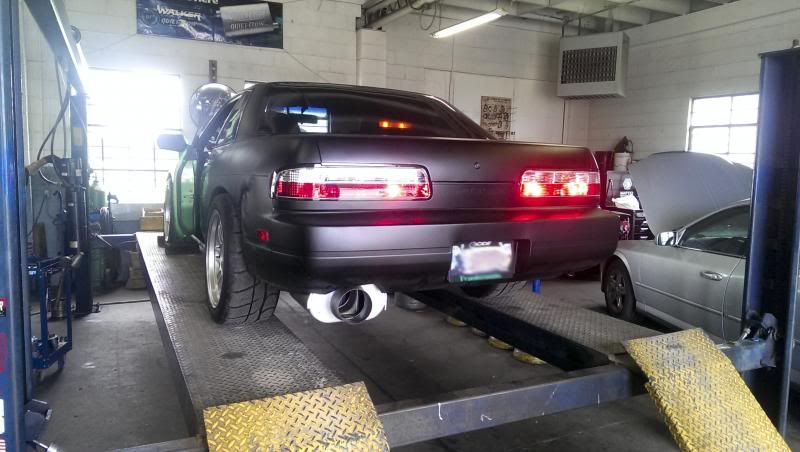
And don't worry... I painted the muffler a flat black with high-temp header paint.
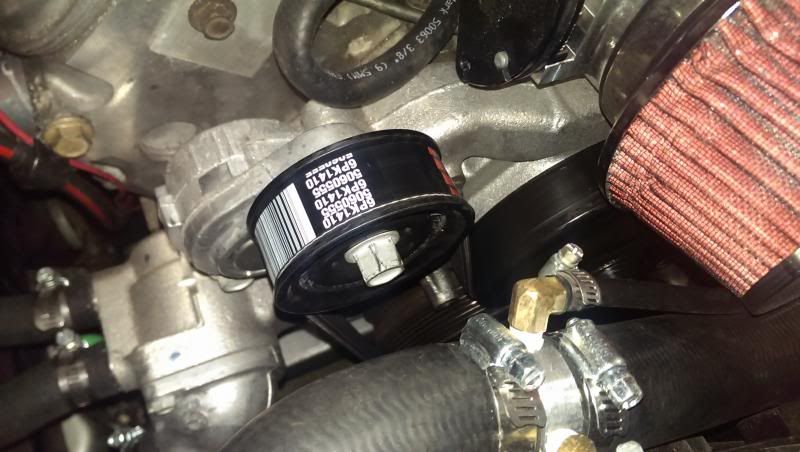
Next up... I was burning up my power steering pump running it while not hooked up (hopefully I didn't damage it too bad!) so it was time for a Power Steering delete. I did some research and found a guy running a different pulley for one of the idlers (a ribbed one instead of smooth) and a shorter belt. The part number he gave for the pulley worked, but the belt wouldn't fit for the life of me (seriously, I even did a little grinding on the tensioner for more space, it's simply an inch too short with the CTS-V setup). So, after another trip to Autozone to swap that out for a longer belt, it worked just fine!
Part #'s for CTS V accessories with PS Delete:
- Dayco 6 rib idler pulley – 89015
- 1/8" Spacer (I used a couple washers)
- Dayce Belt - 5060555
Now... your "smooth" pulley you remove has a metal spacer ring in side it that makes up the gap from the larger bearing hole in the pulley, to the relatively small bolt. You'll need to drive this spacer out, and then hammer it into your new pulley. I did this in the dark, so I don't have a picture. The new pulley isn't as "thick", so the spacer will stick out some on the sides. This is fine. I kept all the little metal shields and stuff on there, and put my spacers/washers on the back side. Ultimately I was just eye-balling it with the power steering pump to make sure it was lined up and then routed my belt no problem. Driven on it for a couple days with some hard runs (giving friends and family some rides) and it's worked like a champ. No issues.

Next... I adjusted my Sikky sway bar endlinks out as much as I could, and though they don't mention anything on their website about this... if you run on lowering springs with an LS motor, you're not going to have the clearance you need. This was the best that I could do with only about 3 threads still in the end links adjuster deal, and the first time I really got on it, the sway bar lifted with the front end, dug into my crank pulley, and my first accessory belt exploded all over the highway. So... I'm going to try a few things and see if I can come up with a solution until I get coilovers.
Last edited by Lrn2Go; Sep 25, 2013 at 10:31 AM.
Well... I got an email back from Sikky and even though it contradicts what the guy said on the phone... here is their supposedly "official" stance.
"(...) Based off your pics it looks to me like you have a S13, is that correct? If so our sway bar will NOT clear the power brace. (...)
-Justin
Sikky MFG
-Justin
Sikky MFG
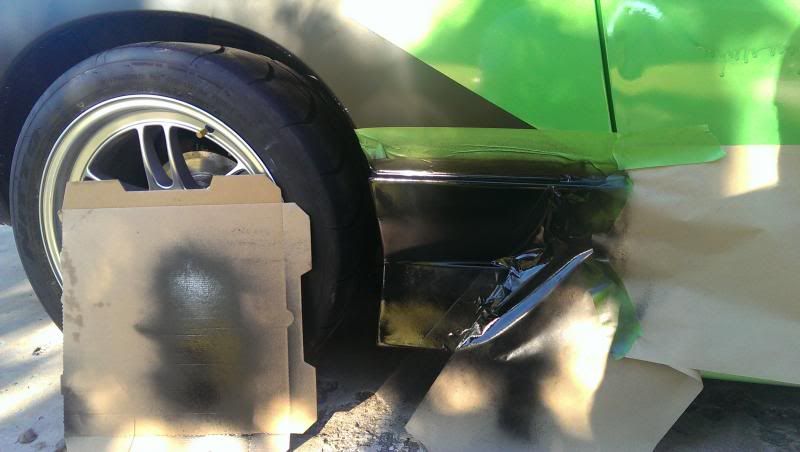
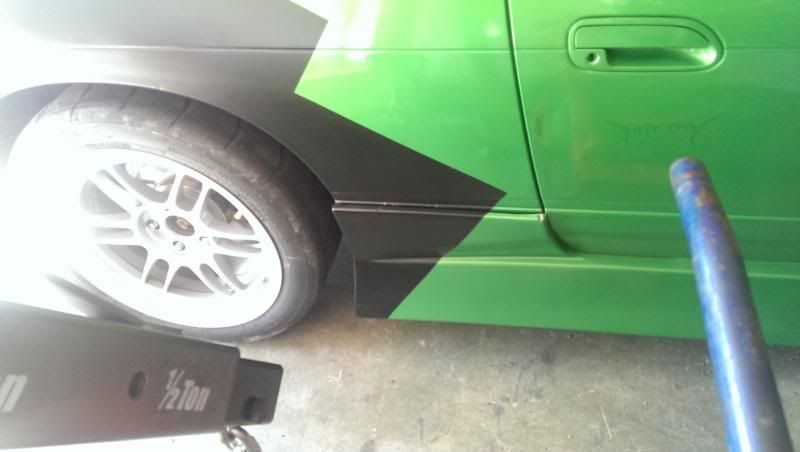
As some of you who've gone through this thread (or had seen my car in person a while back), you probably noticed I hadn't gotten around to painting the side-skirts to flow with the rest of the black part of the paint job. That was long overdue, so before a photoshoot one morning, I finished that up.
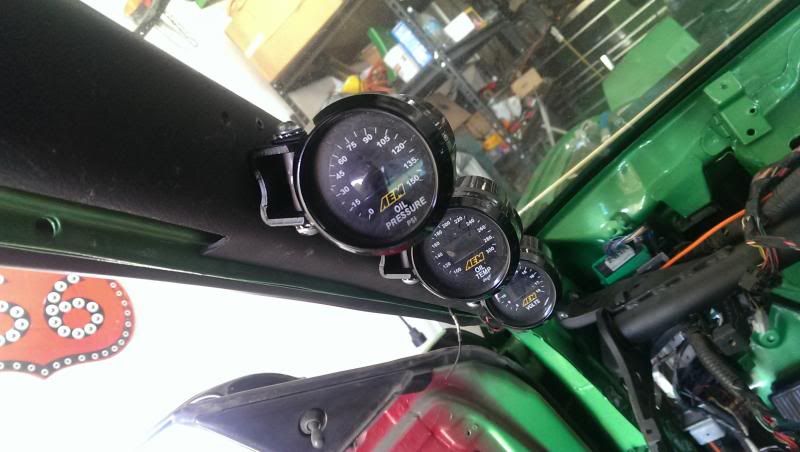
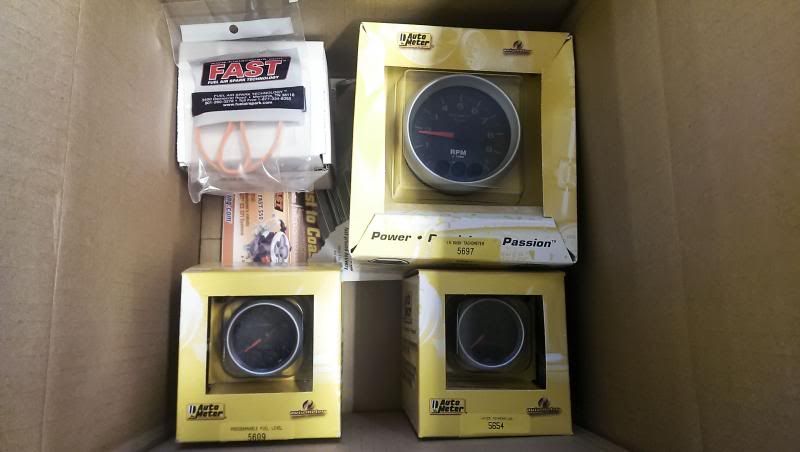
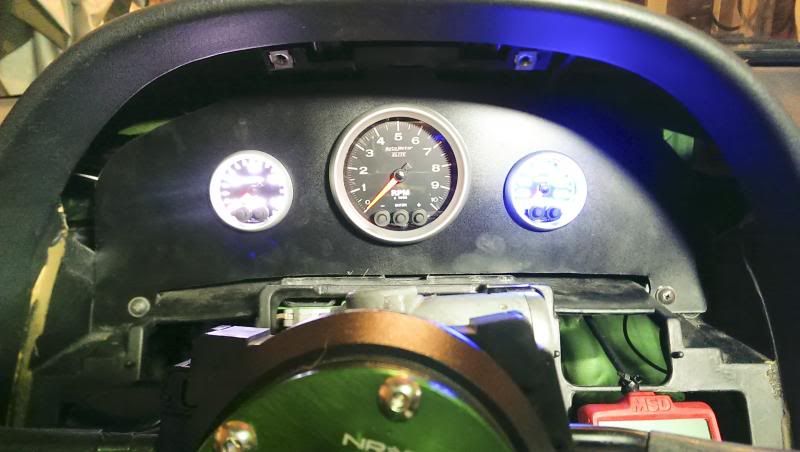
Then my major project was getting some kind of gauge cluster in working order. I've had a set of Autometer Elite Tach, Water, and programmable Fuel gauge just staring at me in my garage for months now.
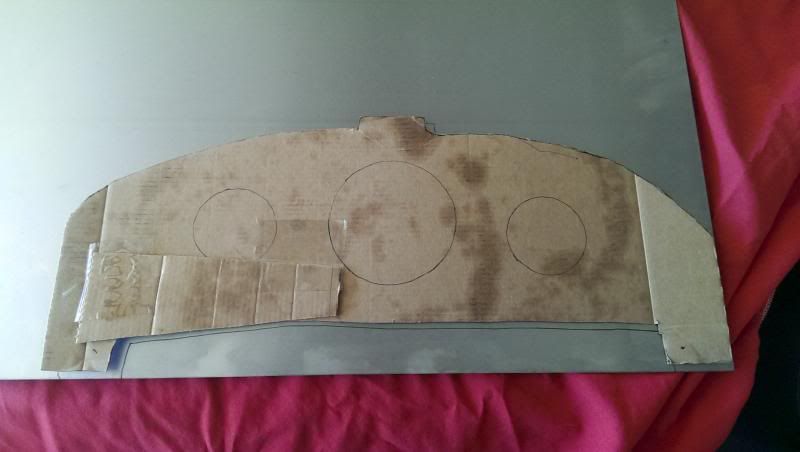
I started mocking up the space I needed to fill, using some cardboard from a cereal box. Yum.
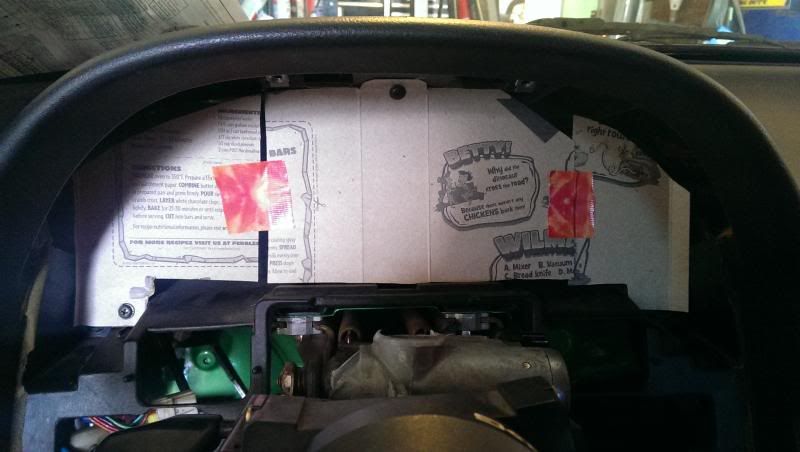
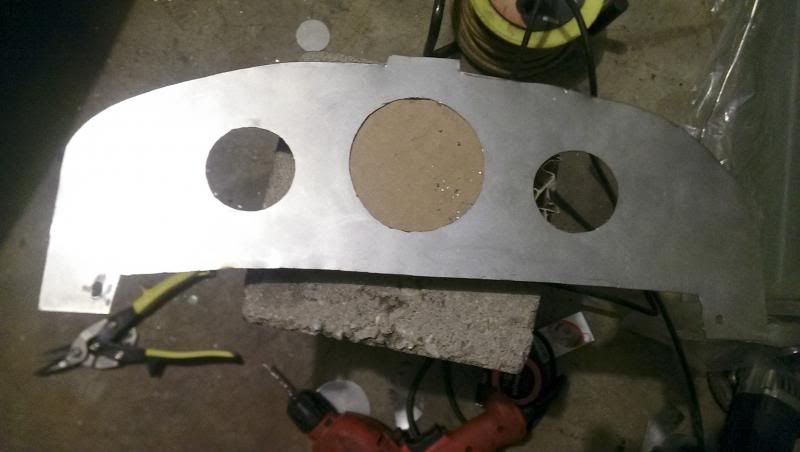
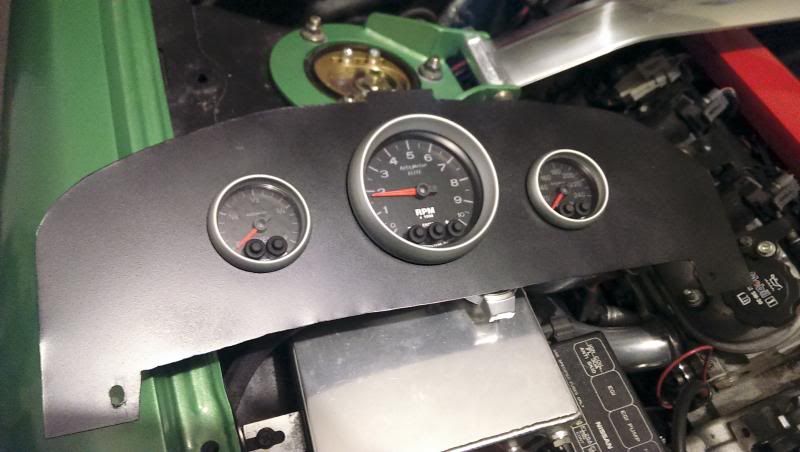
Transferred that to a pizza box (cardboard and food go hand in hand eh?), then to a sheet of 22 gauge sheet metal. I ended up using a set of tin sheers to do the main cutting, then a dremel to cut out the holes (I was too cheap to go buy expensive hole saws). Hit it with a layer of satin black paint when I was done. Probably should have used some self-etching primer... we'll see how it holds up.
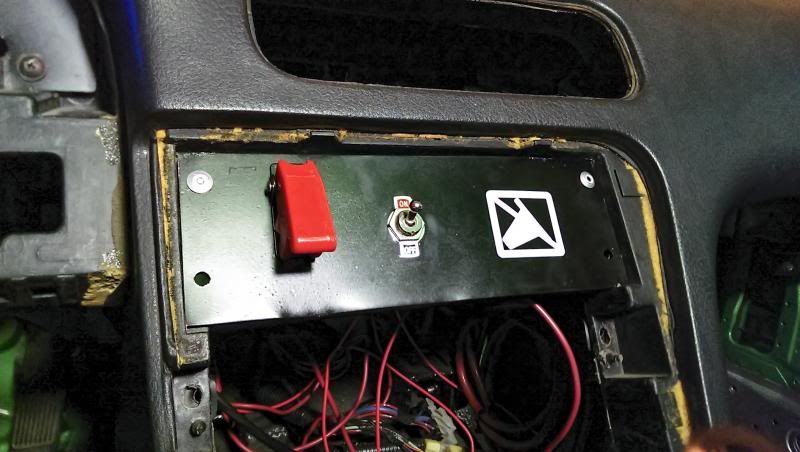
So up until now... I didn't have any of those gauges and was totally relying on the MSD's hand-held and it's little gauges. It did fine, just not real easy to see at speed (though it DOES have a speedometer, so that was handy!). Plus... on top of that, my wiring was more "just see if it works", with a turn-on switch just kinda hanging there, no fuses, etc. So... I tackled my wiring.
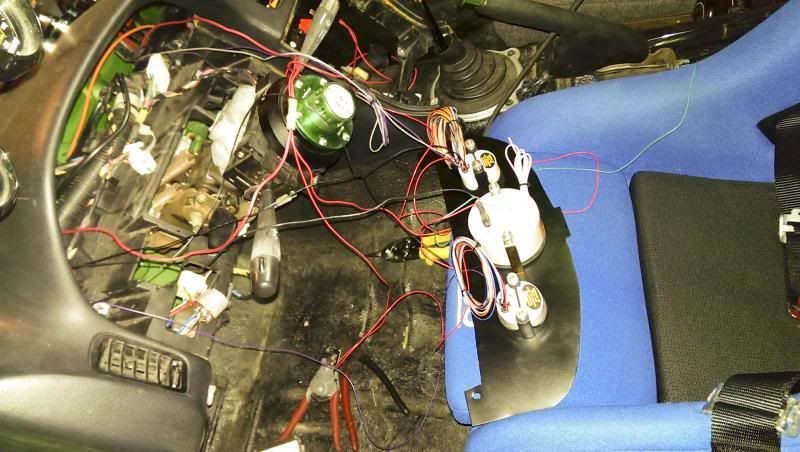
When I was finished... turned out pretty nice I think! Spent some time setting up my gauges and getting the switch panel how I liked it. I changed the colors after these pictures, and I still need to set up my fuel gauge, but over all, I'm pleased with how it came out.
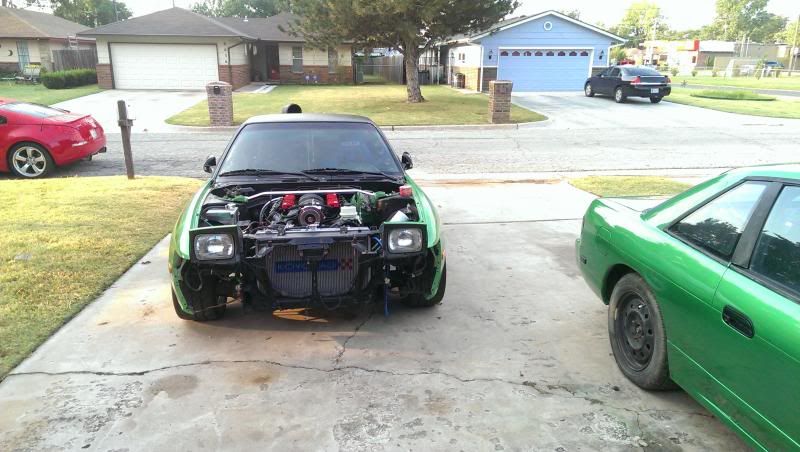
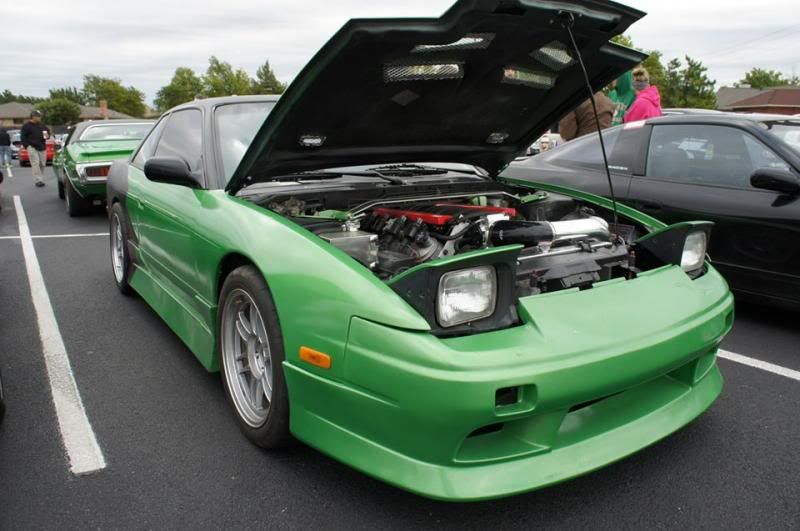
Okay, so the car's been running great, but as with most any and every car, there's always more to do! The next autocross day is coming up next weekend, so I've got to put some more finishing touches on 'ole Frankenstein here so I can pass tech and really get a chance to shake the car down properly. Part of that means I need to be able to fit a hood on! As much fun as it was driving around without a hood... being paranoid every time I was in a store or something with it sitting outside... plus the extra attention of the local PD I'm sure it would draw... it was time for me to get it back on.
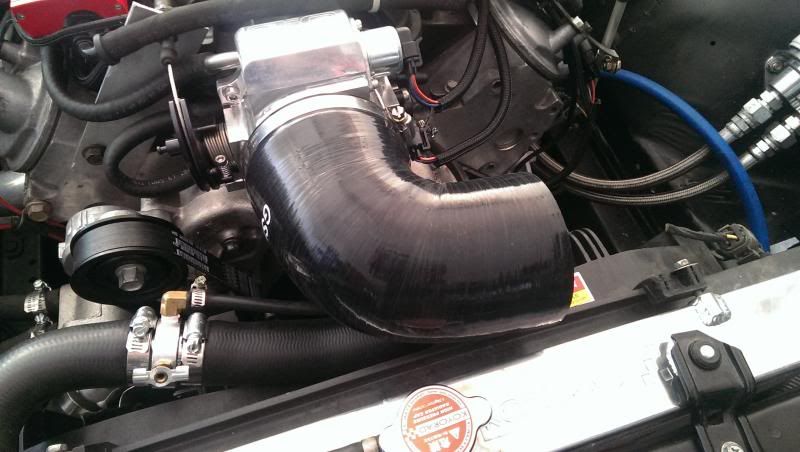
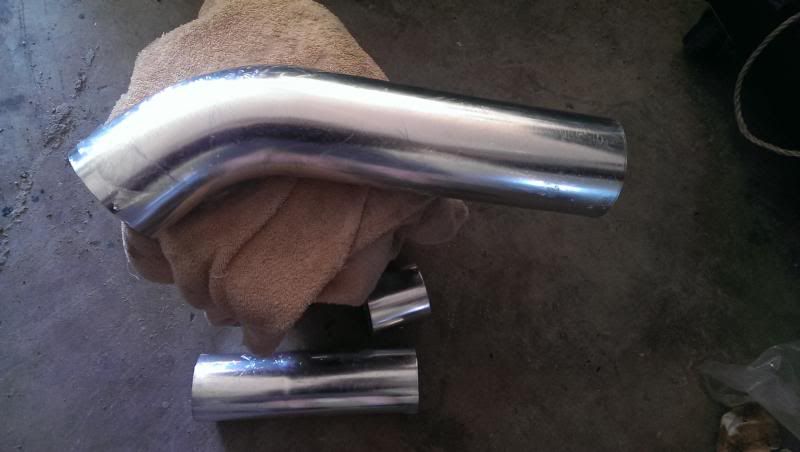
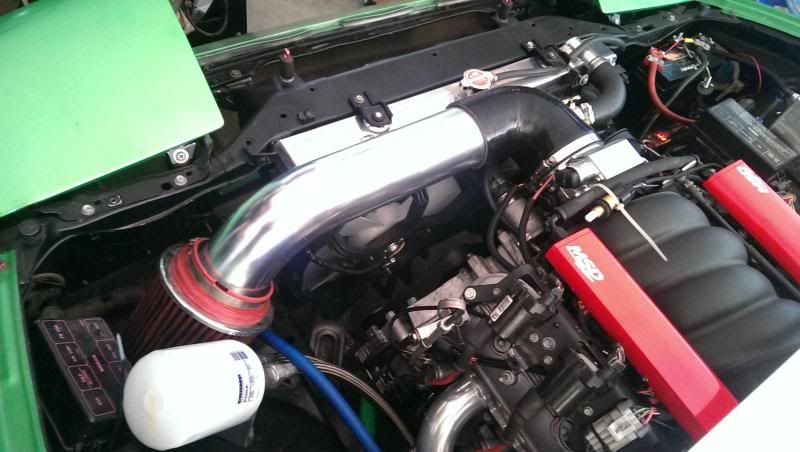
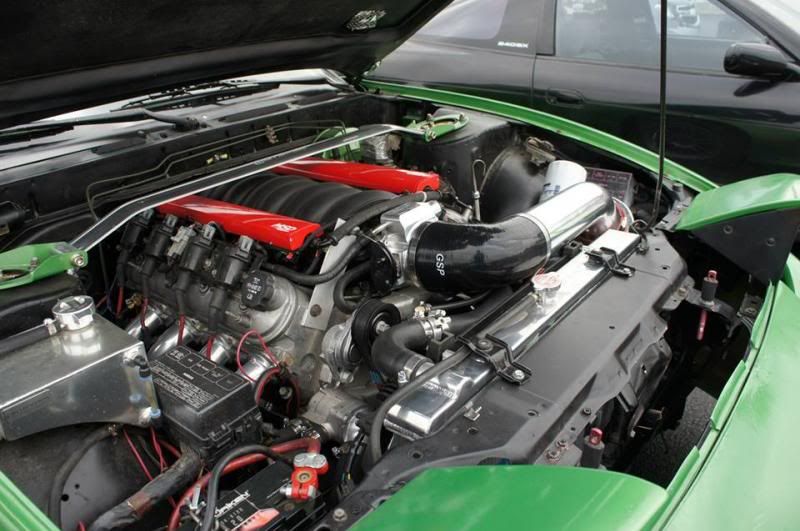
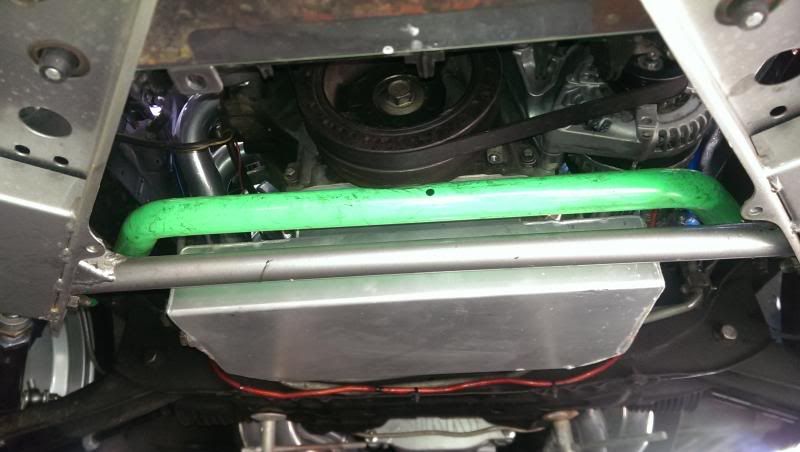
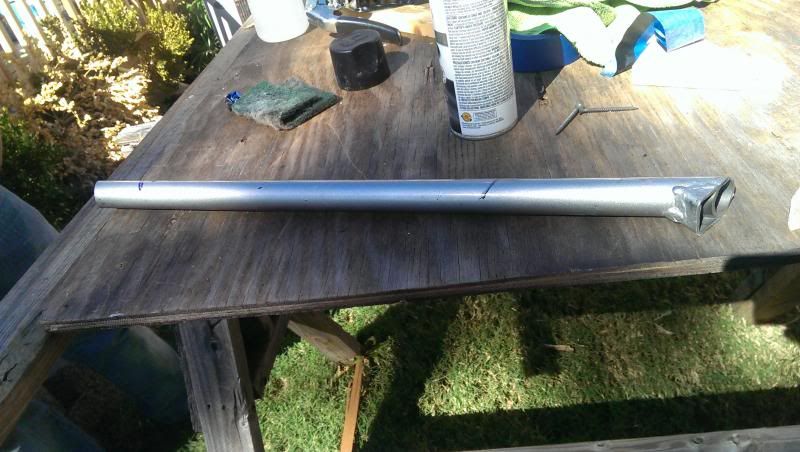
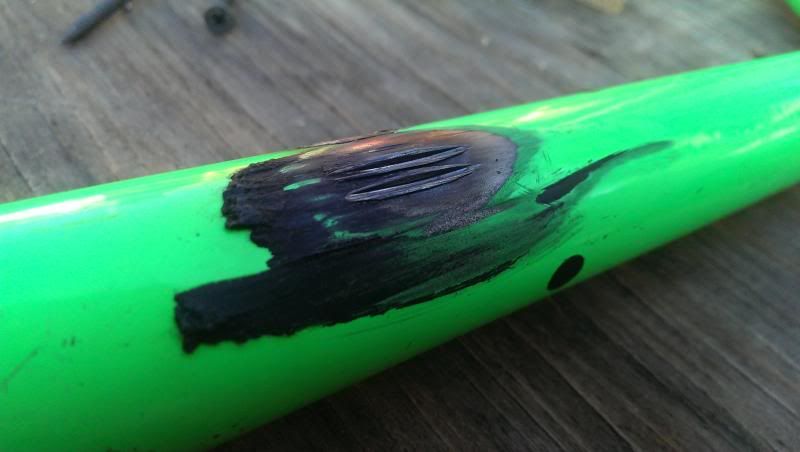
I ordered a cheap 4" to 3.5" silicone 90 degree elbow and a length of 45 degree 3.5" aluminum pipe (which I eye-balled and chopped down) to replace my existing "air-filter on throttle-body" setup, crossing my fingers that it would fit with my Altima fan setup. It allowed me to run a larger filter too, so I'm hoping that that helped reduce resistance on the intake side.
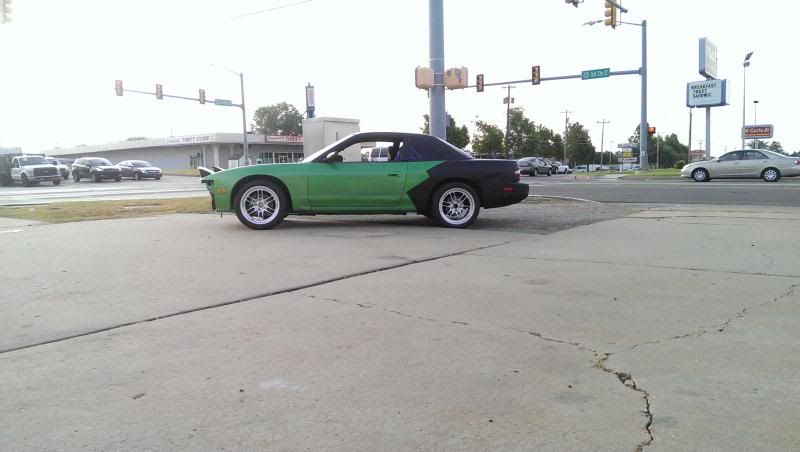
Turned out pretty nice I think! Literally fitted my hood back on around 7am the morning before a monthly car show/gathering at 8. (Photos courtesy of... somebody at the event)
Went home and rolled my rear fenders and tried to do a slight pull. This will hopefully cut down on the highway-bump rub. Haven't had a chance to try it out yet... and I think I'll still need to install my over-fenders I've had waiting on me... but I didn't notice any rubbing later that evening at the local car-meet spots, so that's an improvement!
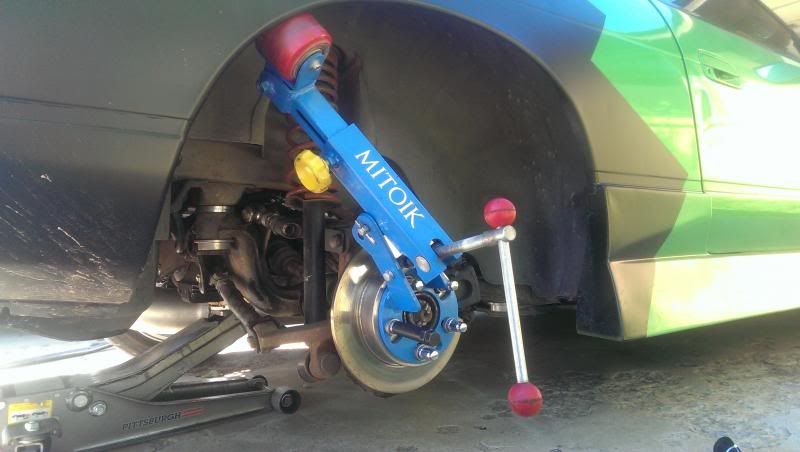
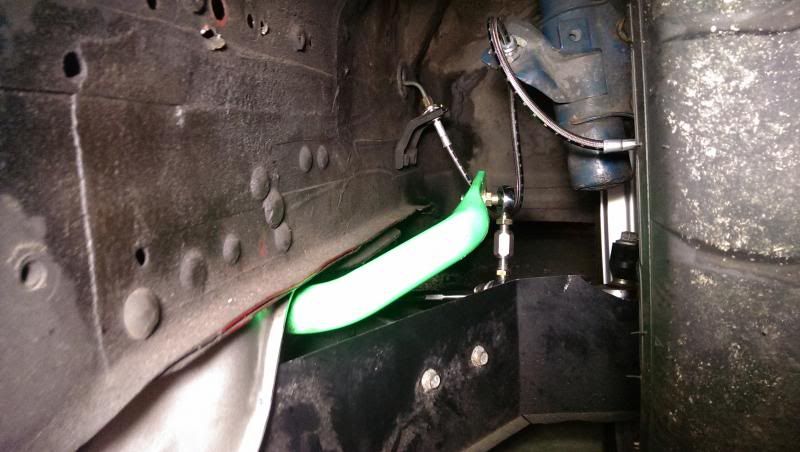
Last but not least... it was time to tackle the Sikky Sway Bar and Nismo Power Brace conflict. I'd noticed the car wasn't nearly as "tight" feeling up front, especially at higher speeds, as I'd been used too, which was to be expected since after I'd had my belts explode thanks to the clearance issues, I'd disconnected my front sway bar. I never really had a chance to feel any difference from stock to Sikky yet. So I had a couple options. Ditch the Power Brace, don't run a front sway bar (lolz), get suspension with less than 1 inch travel in either direction... or modify my Power Brace to work. I chose the last option! Here's how it sits, disconnected, with clearance issues (more photos were posted earlier in my build).
So I got the grinder out, slapped on a cut-off wheel, and cut that bad-boy out! I wasn't expecting the car to be so thick, metal wise. It was around 14-ish gauge I think.
I removed my Sikky sway bar (which apparently I'd installed upside down to get the clearance I did from the bar), and surveyed the damage. Not good... but not horrible. Cleaned it up and covered the metal with some black paint I had around. Lesson learned... Nismo Power Brace on an S13 just isn't gonna work with a Sikky sway bar. Here's proof for ya!
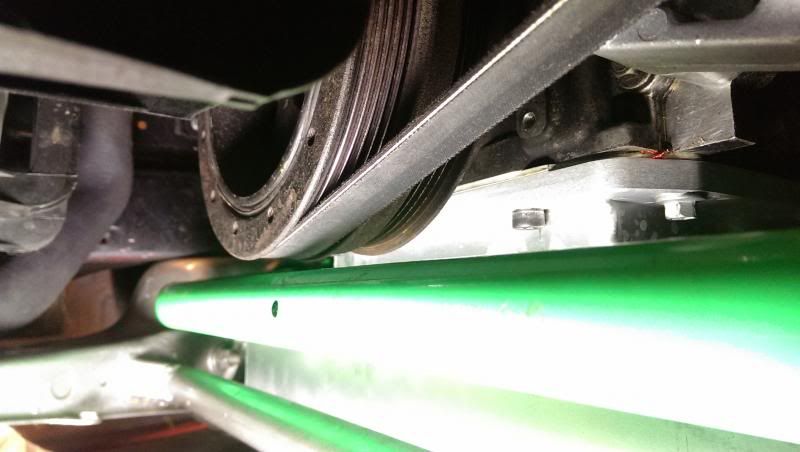
Measured, cut, and welded the brace back on a little further forward. It's still in the "boxed in" section, so I'm sure the strength is still pretty good, and now I've got plenty of clearance for my properly installed Sikky sway bar. I took lots of photos so you all can see how I did it and what clearance if gave me.
Passenger side (with some of the remaining strengthening brace still in tact):
Driver:
From up top:
Didn't get to do much driving with it after that yet, but it already feels more solid up front again.
I ordered a cheap 4" to 3.5" silicone 90 degree elbow and a length of 45 degree 3.5" aluminum pipe (which I eye-balled and chopped down) to replace my existing "air-filter on throttle-body" setup, crossing my fingers that it would fit with my Altima fan setup. It allowed me to run a larger filter too, so I'm hoping that that helped reduce resistance on the intake side.
Turned out pretty nice I think! Literally fitted my hood back on around 7am the morning before a monthly car show/gathering at 8. (Photos courtesy of... somebody at the event)
Went home and rolled my rear fenders and tried to do a slight pull. This will hopefully cut down on the highway-bump rub. Haven't had a chance to try it out yet... and I think I'll still need to install my over-fenders I've had waiting on me... but I didn't notice any rubbing later that evening at the local car-meet spots, so that's an improvement!
Last but not least... it was time to tackle the Sikky Sway Bar and Nismo Power Brace conflict. I'd noticed the car wasn't nearly as "tight" feeling up front, especially at higher speeds, as I'd been used too, which was to be expected since after I'd had my belts explode thanks to the clearance issues, I'd disconnected my front sway bar. I never really had a chance to feel any difference from stock to Sikky yet. So I had a couple options. Ditch the Power Brace, don't run a front sway bar (lolz), get suspension with less than 1 inch travel in either direction... or modify my Power Brace to work. I chose the last option! Here's how it sits, disconnected, with clearance issues (more photos were posted earlier in my build).
So I got the grinder out, slapped on a cut-off wheel, and cut that bad-boy out! I wasn't expecting the car to be so thick, metal wise. It was around 14-ish gauge I think.
I removed my Sikky sway bar (which apparently I'd installed upside down to get the clearance I did from the bar), and surveyed the damage. Not good... but not horrible. Cleaned it up and covered the metal with some black paint I had around. Lesson learned... Nismo Power Brace on an S13 just isn't gonna work with a Sikky sway bar. Here's proof for ya!
Measured, cut, and welded the brace back on a little further forward. It's still in the "boxed in" section, so I'm sure the strength is still pretty good, and now I've got plenty of clearance for my properly installed Sikky sway bar. I took lots of photos so you all can see how I did it and what clearance if gave me.
Passenger side (with some of the remaining strengthening brace still in tact):
Driver:
From up top:
Didn't get to do much driving with it after that yet, but it already feels more solid up front again.