When you click on links to various merchants on this site and make a purchase, this can result in this site earning a commission. Affiliate programs and affiliations include, but are not limited to, the eBay Partner Network.
careful getting that old fitting out....its damn tight....I had to clamp the pump to the platform on my upright drill press. When it finally let go, the wrench slipped off and I knocked my head pretty good on the drill press...small price to pay for finally getting the plumbing squared away.
careful getting that old fitting out....its damn tight....I had to clamp the pump to the platform on my upright drill press. When it finally let go, the wrench slipped off and I knocked my head pretty good on the drill press...small price to pay for finally getting the plumbing squared away.
OUCH! Those are the best, when a second before it happens you think to yourself "Wow, when this nut/bolt/fitting lets loose I'm really going to..." BAM PAIN.
I shot you a PM about that OEM fitting you removed...
mounted the carb today.....anyone know, or have a recommendation as to what throttle cable bracket/return spring I need? It seems like there is about a dozen option for the Holley 4150. I was just going to go with the Summit Racing bracket for $69 unless someone has a cheaper and simpler solution....
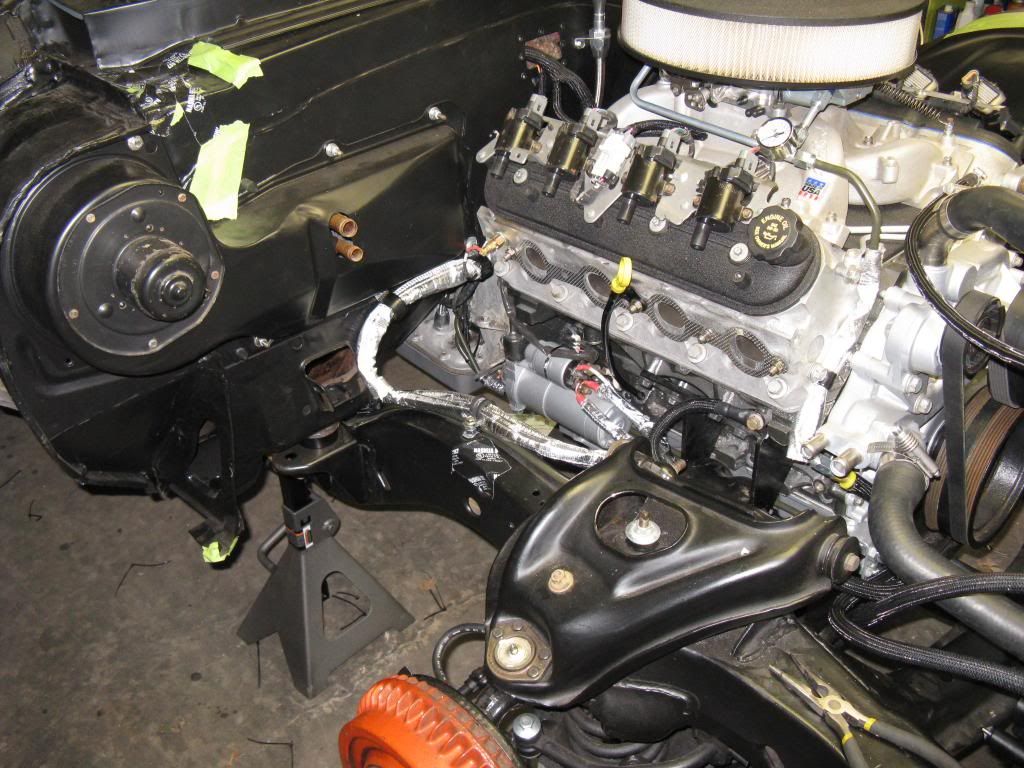
Some small progress. Finally got all the A/C lines cut and routed along with the heater hoses. Got the accessory drive belt on and the carb mounted. Then ran the fuel line from the firewall regulator to the carb. I flipped the hard line around which required a little bending to get to fit. Im also going to have to use the port on the regulator for the fuel pressure gage because the port on the hard line is now pointed directly at the intake.
You can see in the second pic that I still need to cut the plug wires and install the boots so that they mount on the coils which are mounted low on the radiator support.
Got all the wires cut and routed....that took far more time than it should have, but short of the bright red wires, Im pleased with the results. Unfortunately, red is the only color available in the cut to fit wires so Ill have to live with it. For anyone who hasnt had the pleasure, the cut to fit wires are a pain in the ***!!! Crimping the end so that it properly fits into the coil is definitely something that takes practice. It took the better part of 3 hours to get both sides routed and cut. Its probably unnecessary, but I like my LS engine bays clean.....the second picture below is my old Z06 as a comparison. Tomorrow is my last day off so I hope to make some good progress on the painless wiring harness
So Im now down to running wires....TONS of wires....
Two questions:
1. You guys running carbs, what did you do in terms of ground the motor? I remember my Z06 being very susceptible to inadequate grounding.
2. Guys running the MSD box, which "pill" did you use for the initial start up? Factory LS1 rotating assembly, LS6 heads milled to 61cc (about 10.8:1 compression), and a 216/224 585/585 cam.
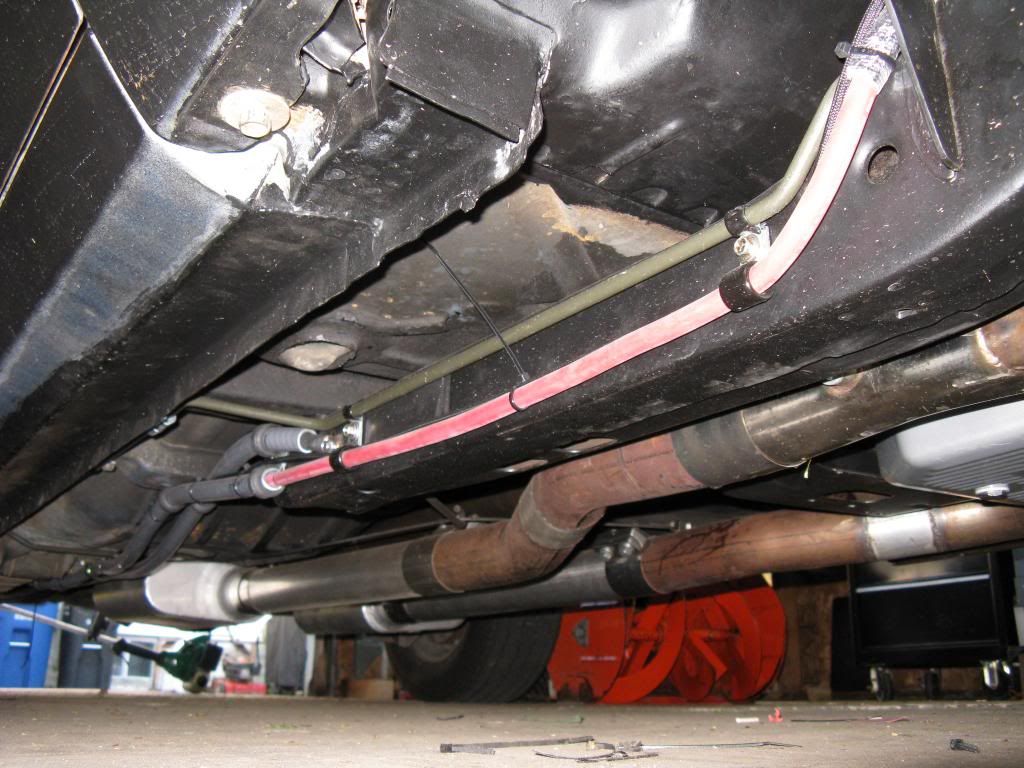
Here is what I did for my carb 5.3 swap. From the battery in the trunk I ran the 1Ga cables under the car. I used liquid-tite conduit to prevent damage to the cables. At the end of the subframe I grounded the negative to the frame with a large SS self-tapping bolt (see the first pic). At the engine I made a short 8� jumper cable and bolted directly from the block to the frame using SS bolts on each end.
I also made sure to have good grounds at all other points in the system. The engine and interior fuse panels are both grounded to the frame and I ran a separate ground wire to the core support. All large draw items have their own frame grounds. 2500 miles and this system has worked flawlessly. With one small exception, The body of the alternator was not grounding to the engine through my painted brackets, So I had to remove it, grind off the paint and BAM! 14.4V at all points in the system. Gotta keep that MSD box happy! Shoot me an PM if I can offer any help!
awesome, thanks very much! As a side note, would I be correct that my alternator and A/C compressor should be adequately grounded just by being bolted to the unpainted brackets? Lastly, at the moment, the MSD box is grounded to a bolt on the back side of the passenger side cylinder head....any issues with this as long as the engine is adequately grounded to the frame?
awesome, thanks very much! As a side note, would I be correct that my alternator and A/C compressor should be adequately grounded just by being bolted to the unpainted brackets? Lastly, at the moment, the MSD box is grounded to a bolt on the back side of the passenger side cylinder head....any issues with this as long as the engine is adequately grounded to the frame?
I believe that you are correct with grounding of the accessories. I contemplated using a grounding wire on the alt (I don�t have AC) but then realized the OEM relies on grounding through the alt case and brackets. Plus, a grounding wire for the alt case would have technically have to be sized to ground equivalent to the alternator output (100 to 160A) That�s a big wire!
As far as grounding the MSD. I see no reason why not to ground to a head bolt. Especially if you use a SS bolt and washer. As long as your engine is well grounded of course.
Just a heads up for anyone following this thread, Ill be out of the country until late spring/early summer so the build is temporarily on hold. All thats left to do is finish up the wiring and stereo, cut the driveshaft cut and installed, and bolt up the exhaust. Hope to have it done and back on the road shortly after I get home.
yea, as most projects, it snowballed a bit, but Im still into the entire vehicle for well under 20K and by the time Im done, every system in the truck will be new. Can't wait to get home and get it on the road!
hahaha....Im spending all of my down time reading everyone else's build threads and coming up with new (expensive) ideas for this '68 Corvette build when I get back....if I can find the right car
Man I have been delinquent in updating this guy! So here goes the Cliffs notes version of the story along with some pics....cause thats all anybody wants anyway! I got home from deployment in June of 2014 and scrambled to get the truck together in time for the drive to Texas for my wedding in September. Anyone who's rewired an entire car knows that its slow going, especially trying to cleanly incorporate the painless chassis harness along with the MSD harness, FAST ES TCU harness, electric fan harness, etc. I eventually got it all together and got the truck started in mid August. I troubleshot numerous little leaks for a few days without actually driving it and one afternoon, noticed that my oil pressure read zero after idling for about 10 minutes. Its a direct wet line gauge so I assumed my pump was bad. I ended up lifting the motor off the engine mounts enough to drop the oil pan and change the pump with the motor still in the car (not recommended). When I pulled the pump, I found that the bypass valve had jammed in the bypass position so oil was just being diverted back to the intake. (Remanufactured LS6 pump for the record). I ordered a Melling pump, bolted it back together and was off the the races. The last item was to drive it down to the local hot rod shop to have the exhaust system welded up and get the carb tuned. After getting the exhaust installed and the car quieted down, there was a definitive knock from the bottom end of the car. Having dealt with many an LS motor, I was 99% certain it was a spun rod bearing....probably the #1 during the 10 minutes it was idling with no oil.
And thats where the car sat as I headed off to my wedding in a mini cooper.....
When I got home, I decided to suck it up and ordered a Thompson Motorsports 6.0L long block. It came with ported and polished 317 heads, a custom cam, and forged piston upgrade. After waiting a few weeks, I had the truck on the road by the end of October. Thats more or less where it sits right now. I did dynamat the inside and replaced all of the exterior lights with LEDs. I had the truck dyno tuned where it made 300 rwhp and 330 rwtq....thats through a 4L60E and Dana 60 with 34" tires so I guess thats not too bad.
Ive got just over 4,000 miles since the build up and the only problems Ive had is a bad ground in the MSD harness and the time it took to get the EZ TCU set up to where it was shifting where I wanted it to under part throttle and when it was down shifting. Not really a problem, it just took a decent amount of street driving to get it running properly.
First motor complete....5.7L LS1
Floors
Floors stripped for Dyna mat install
Thanksgiving road trip to Ohio
Copilots
Thanksgiving road trip to Ohio
Chevy riding in his Chevy
Road trip to Pennsylvania to pick up vinyl hard top for '69 Corvette

 11-26-2013, 09:25 PM


 ) ideas for this '68 Corvette build when I get back....if I can find the right car