
Hacksters 68 F100 LQ4/S475/4l80E
 11-05-2013, 10:25 AM
#1
Launching!
Thread Starter

Join Date: Mar 2012
Posts: 214
Likes: 0
Received 0 Likes
on
0 Posts
Second of my own LS Swaps, first one is an LM7/t56 into an 81 Volvo 242, its my daily driver now and a great car.
Wanting to build something to go to some old car cruise's and maybe some muscle car events like the LS Fest, Power Tour or drag week with my Dad over the next few summers and nothing in my current fleet will do.
Posted the build thread up on a Ford board but seems they are not the biggest fan of the GM Motor in the old ford....
The first few posts are a cut and paste from there bringing us up to speed.
So the journey begins.
We loaded up the trailer and headed from home here in Portland down to Grants pass. Truck was exactly what he said so we paid the man, loaded it up on the trailer and headed for the house.
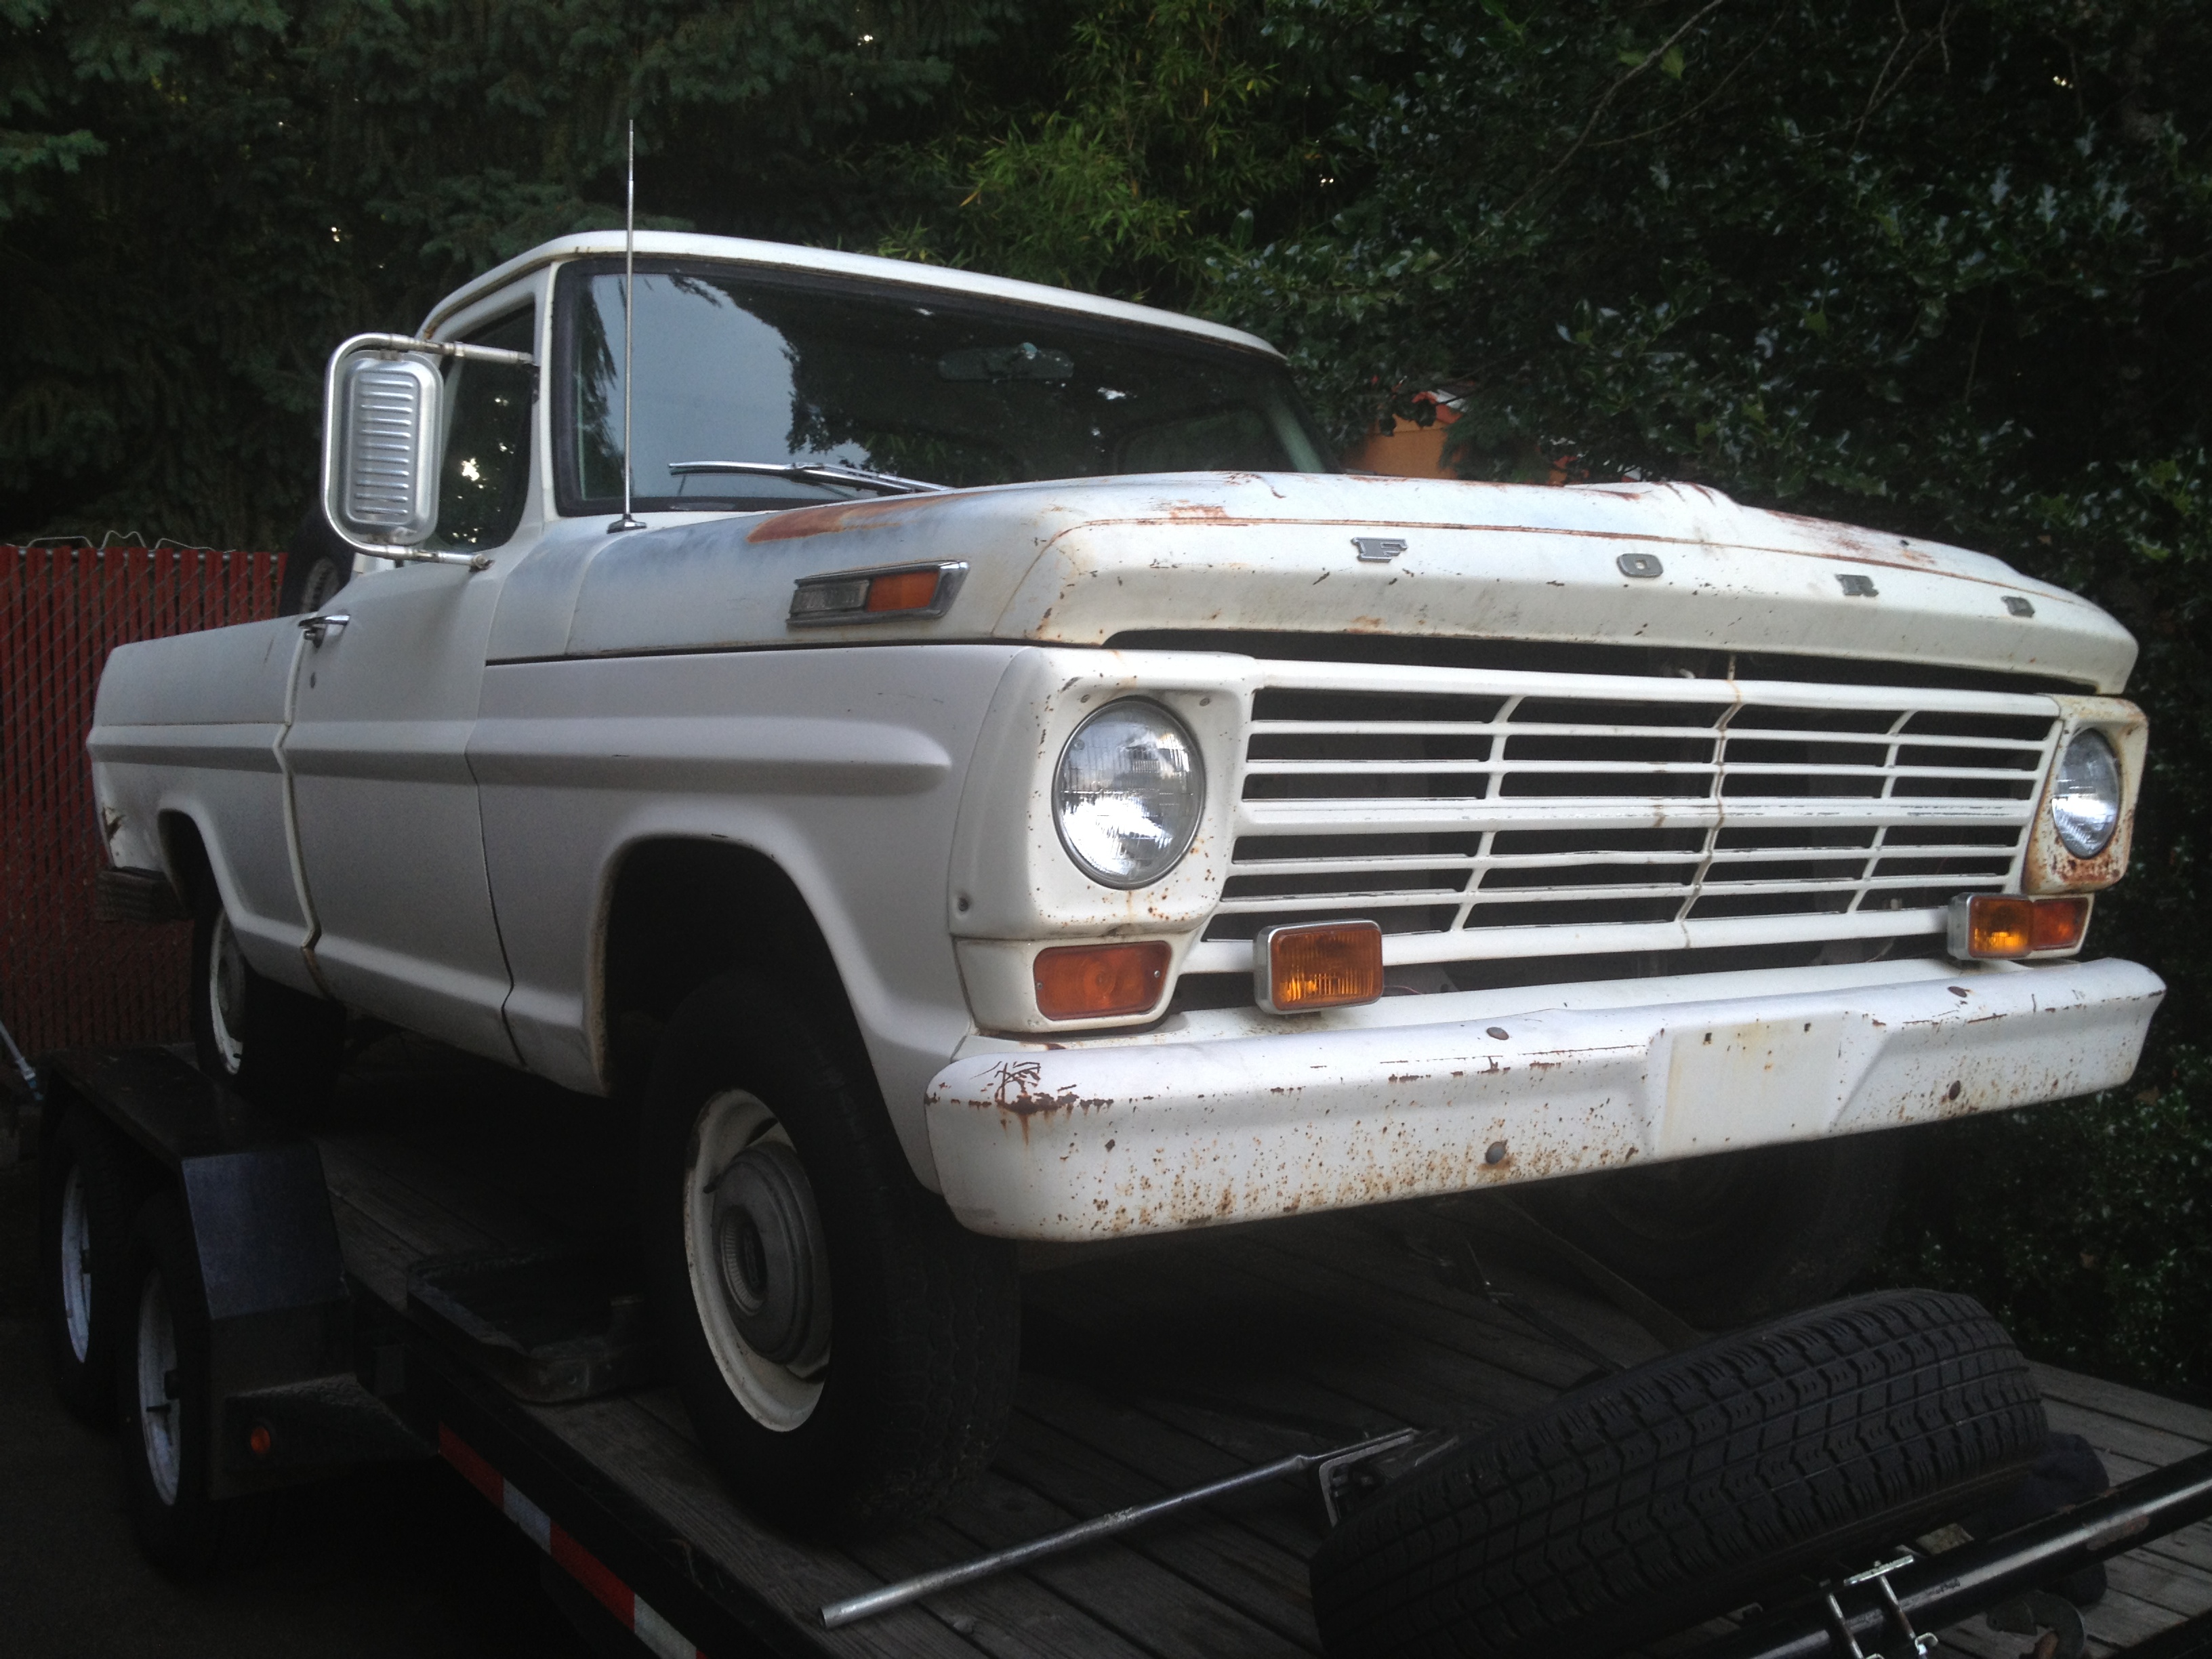
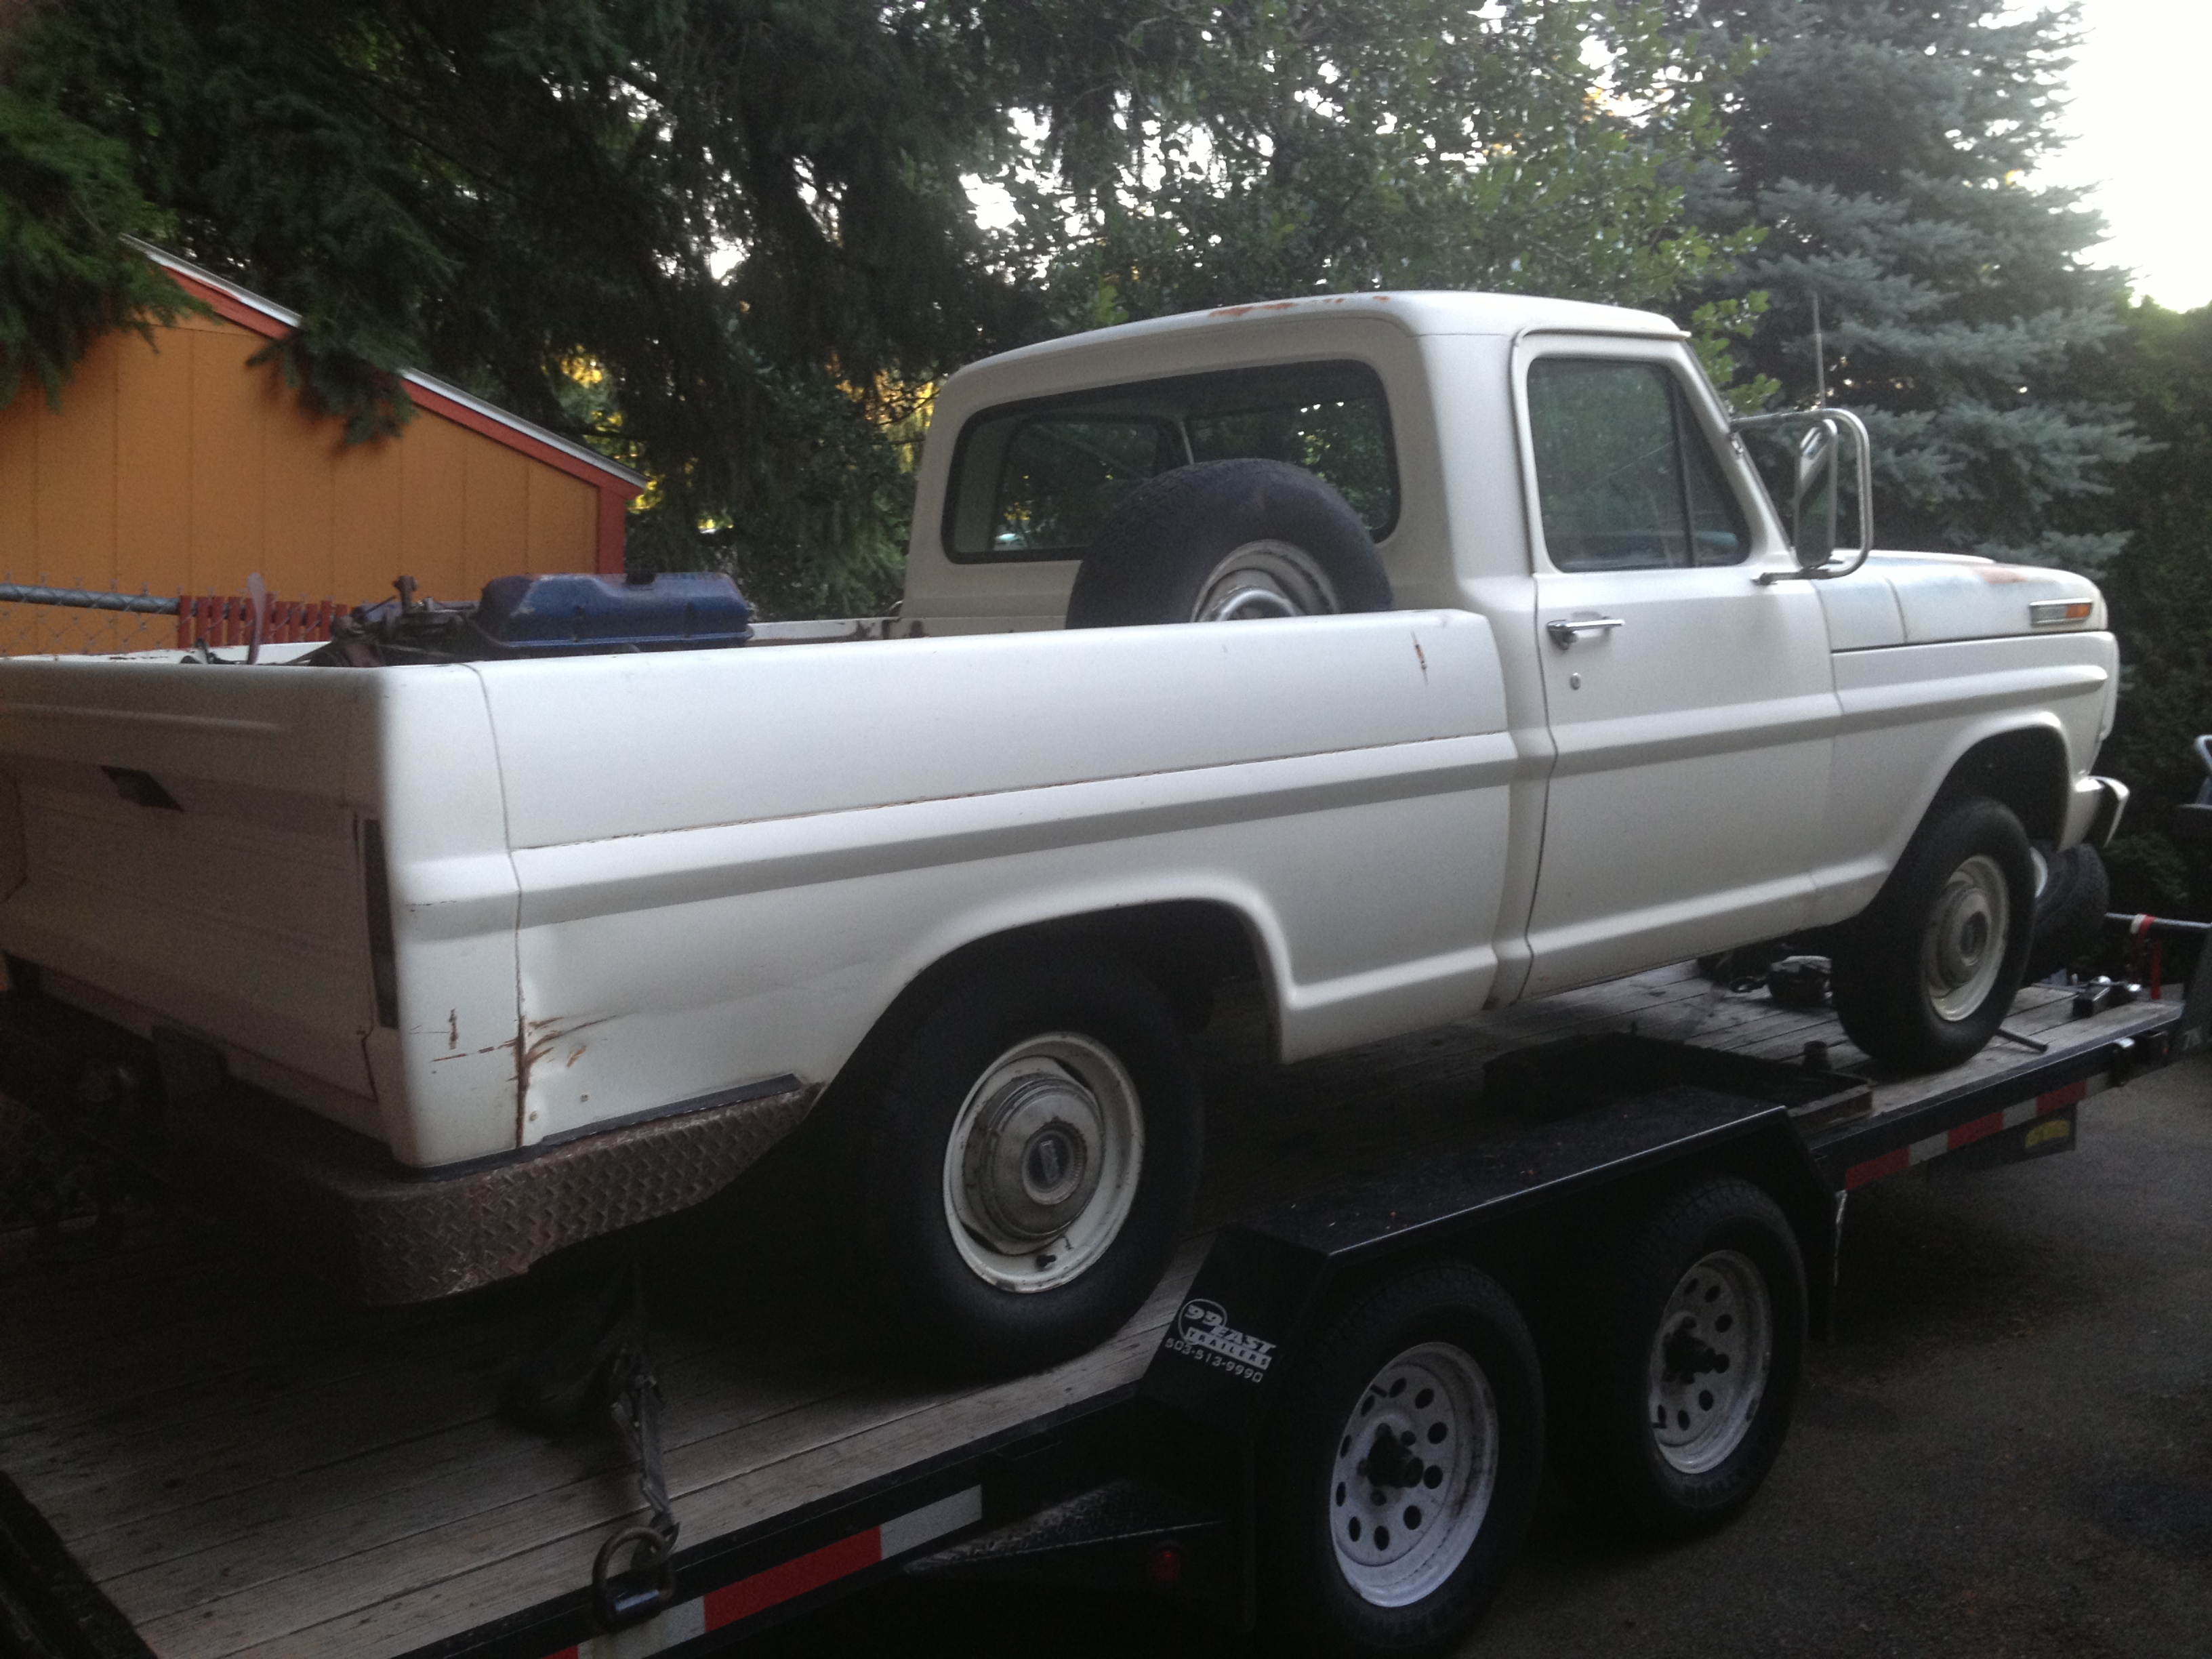
Finally got it in the garage after our big Alaska adventure and got to work. Pulled off the front sheetmetal, got it up on stands and proceeded to chop the frontend out from under it.
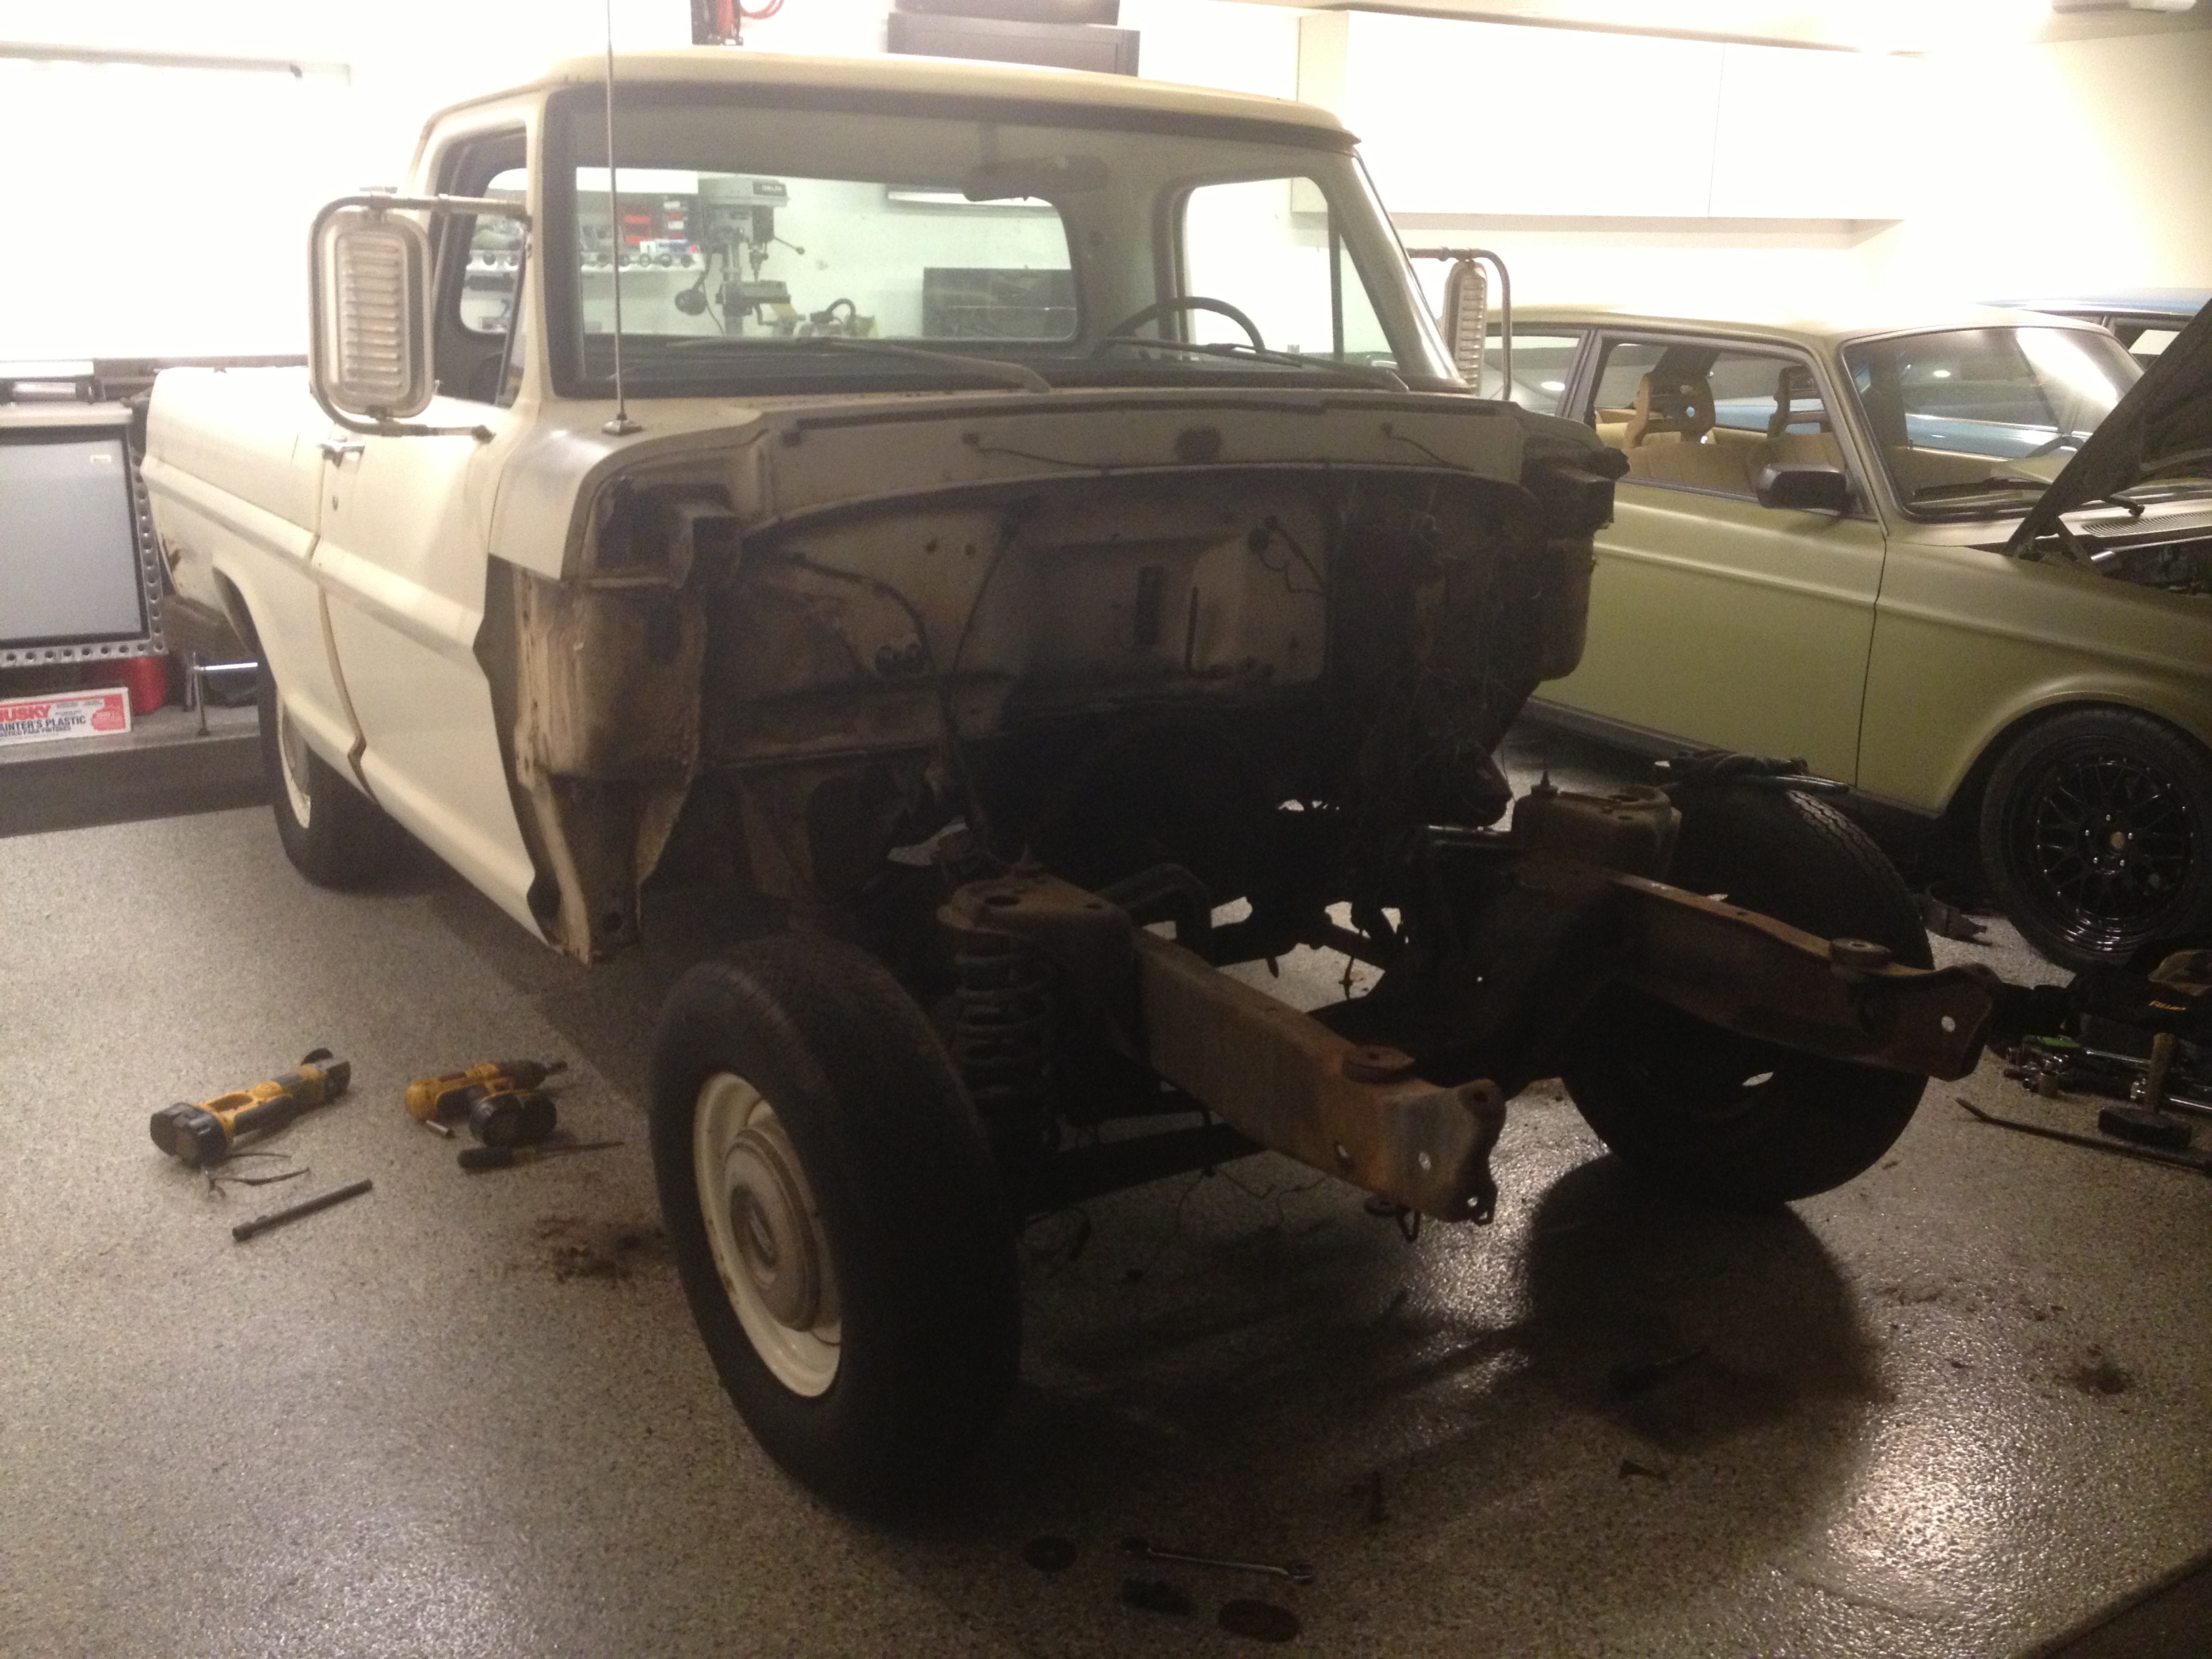
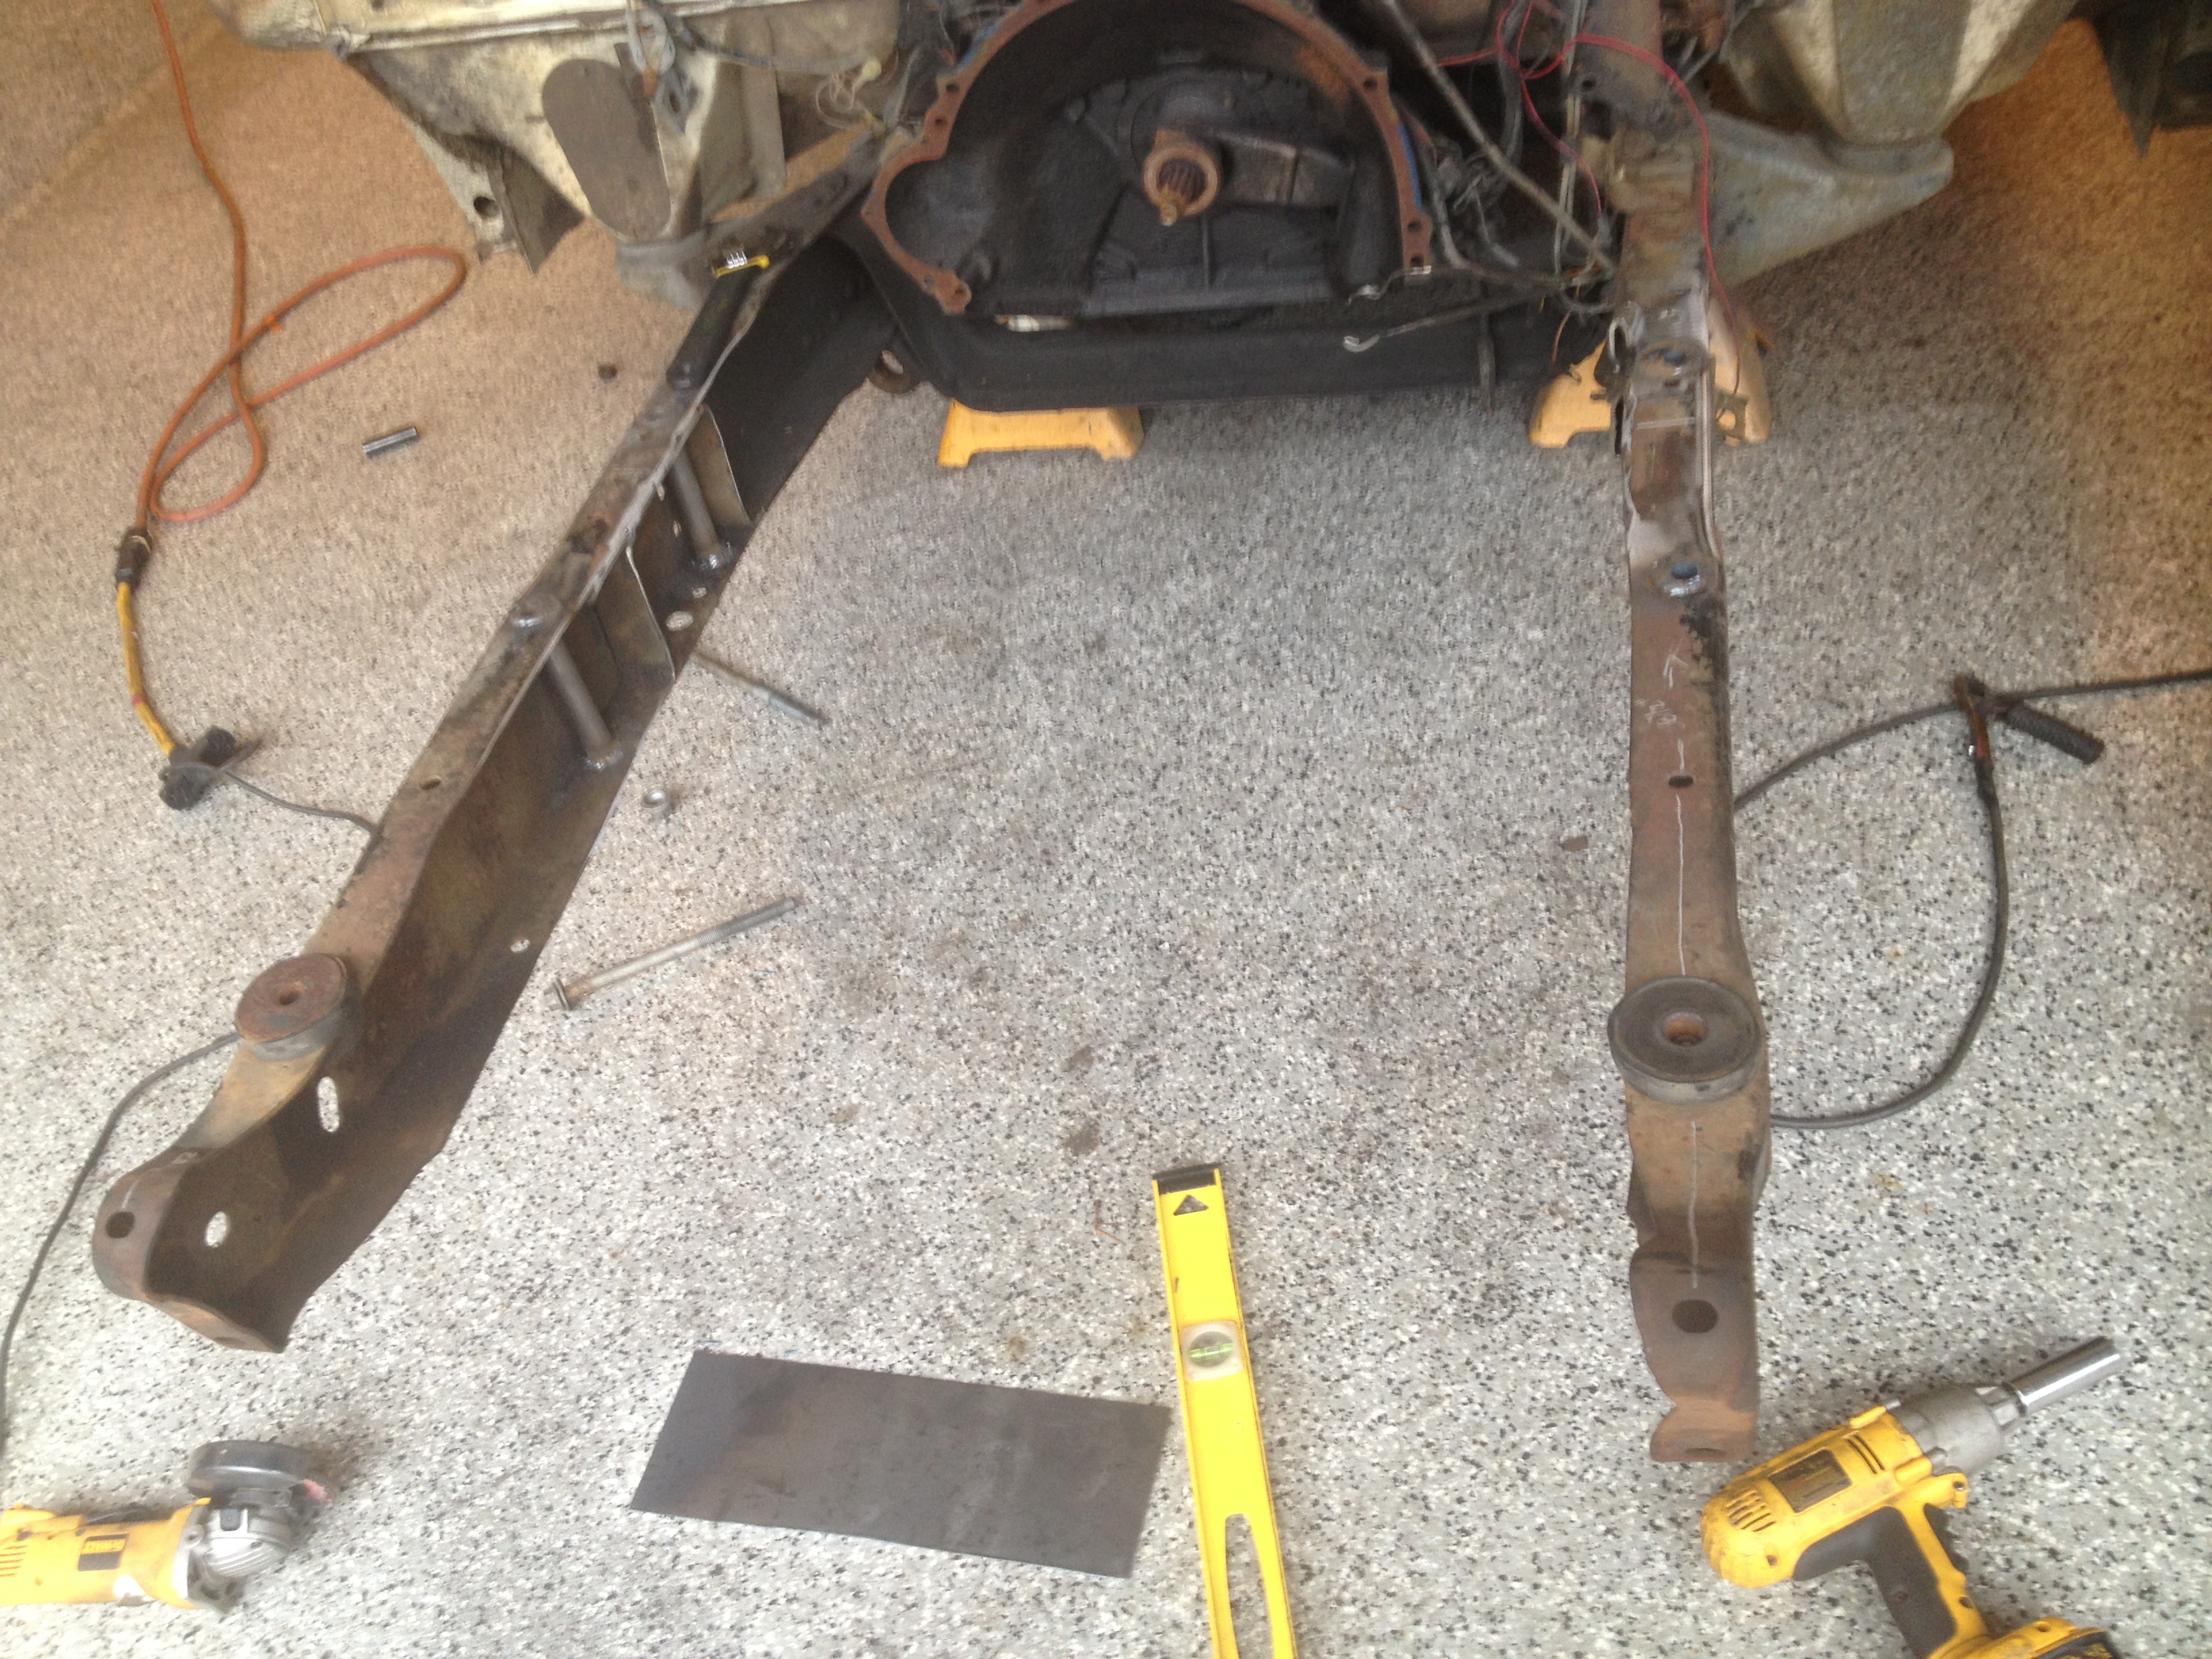
Once I was down to some framerails I started to mockup the 2003 crown vic stuff I picked up in Seattle, pretty easy stuff really, ran some .25 wall tubing through the framerails and burned in the mounts.
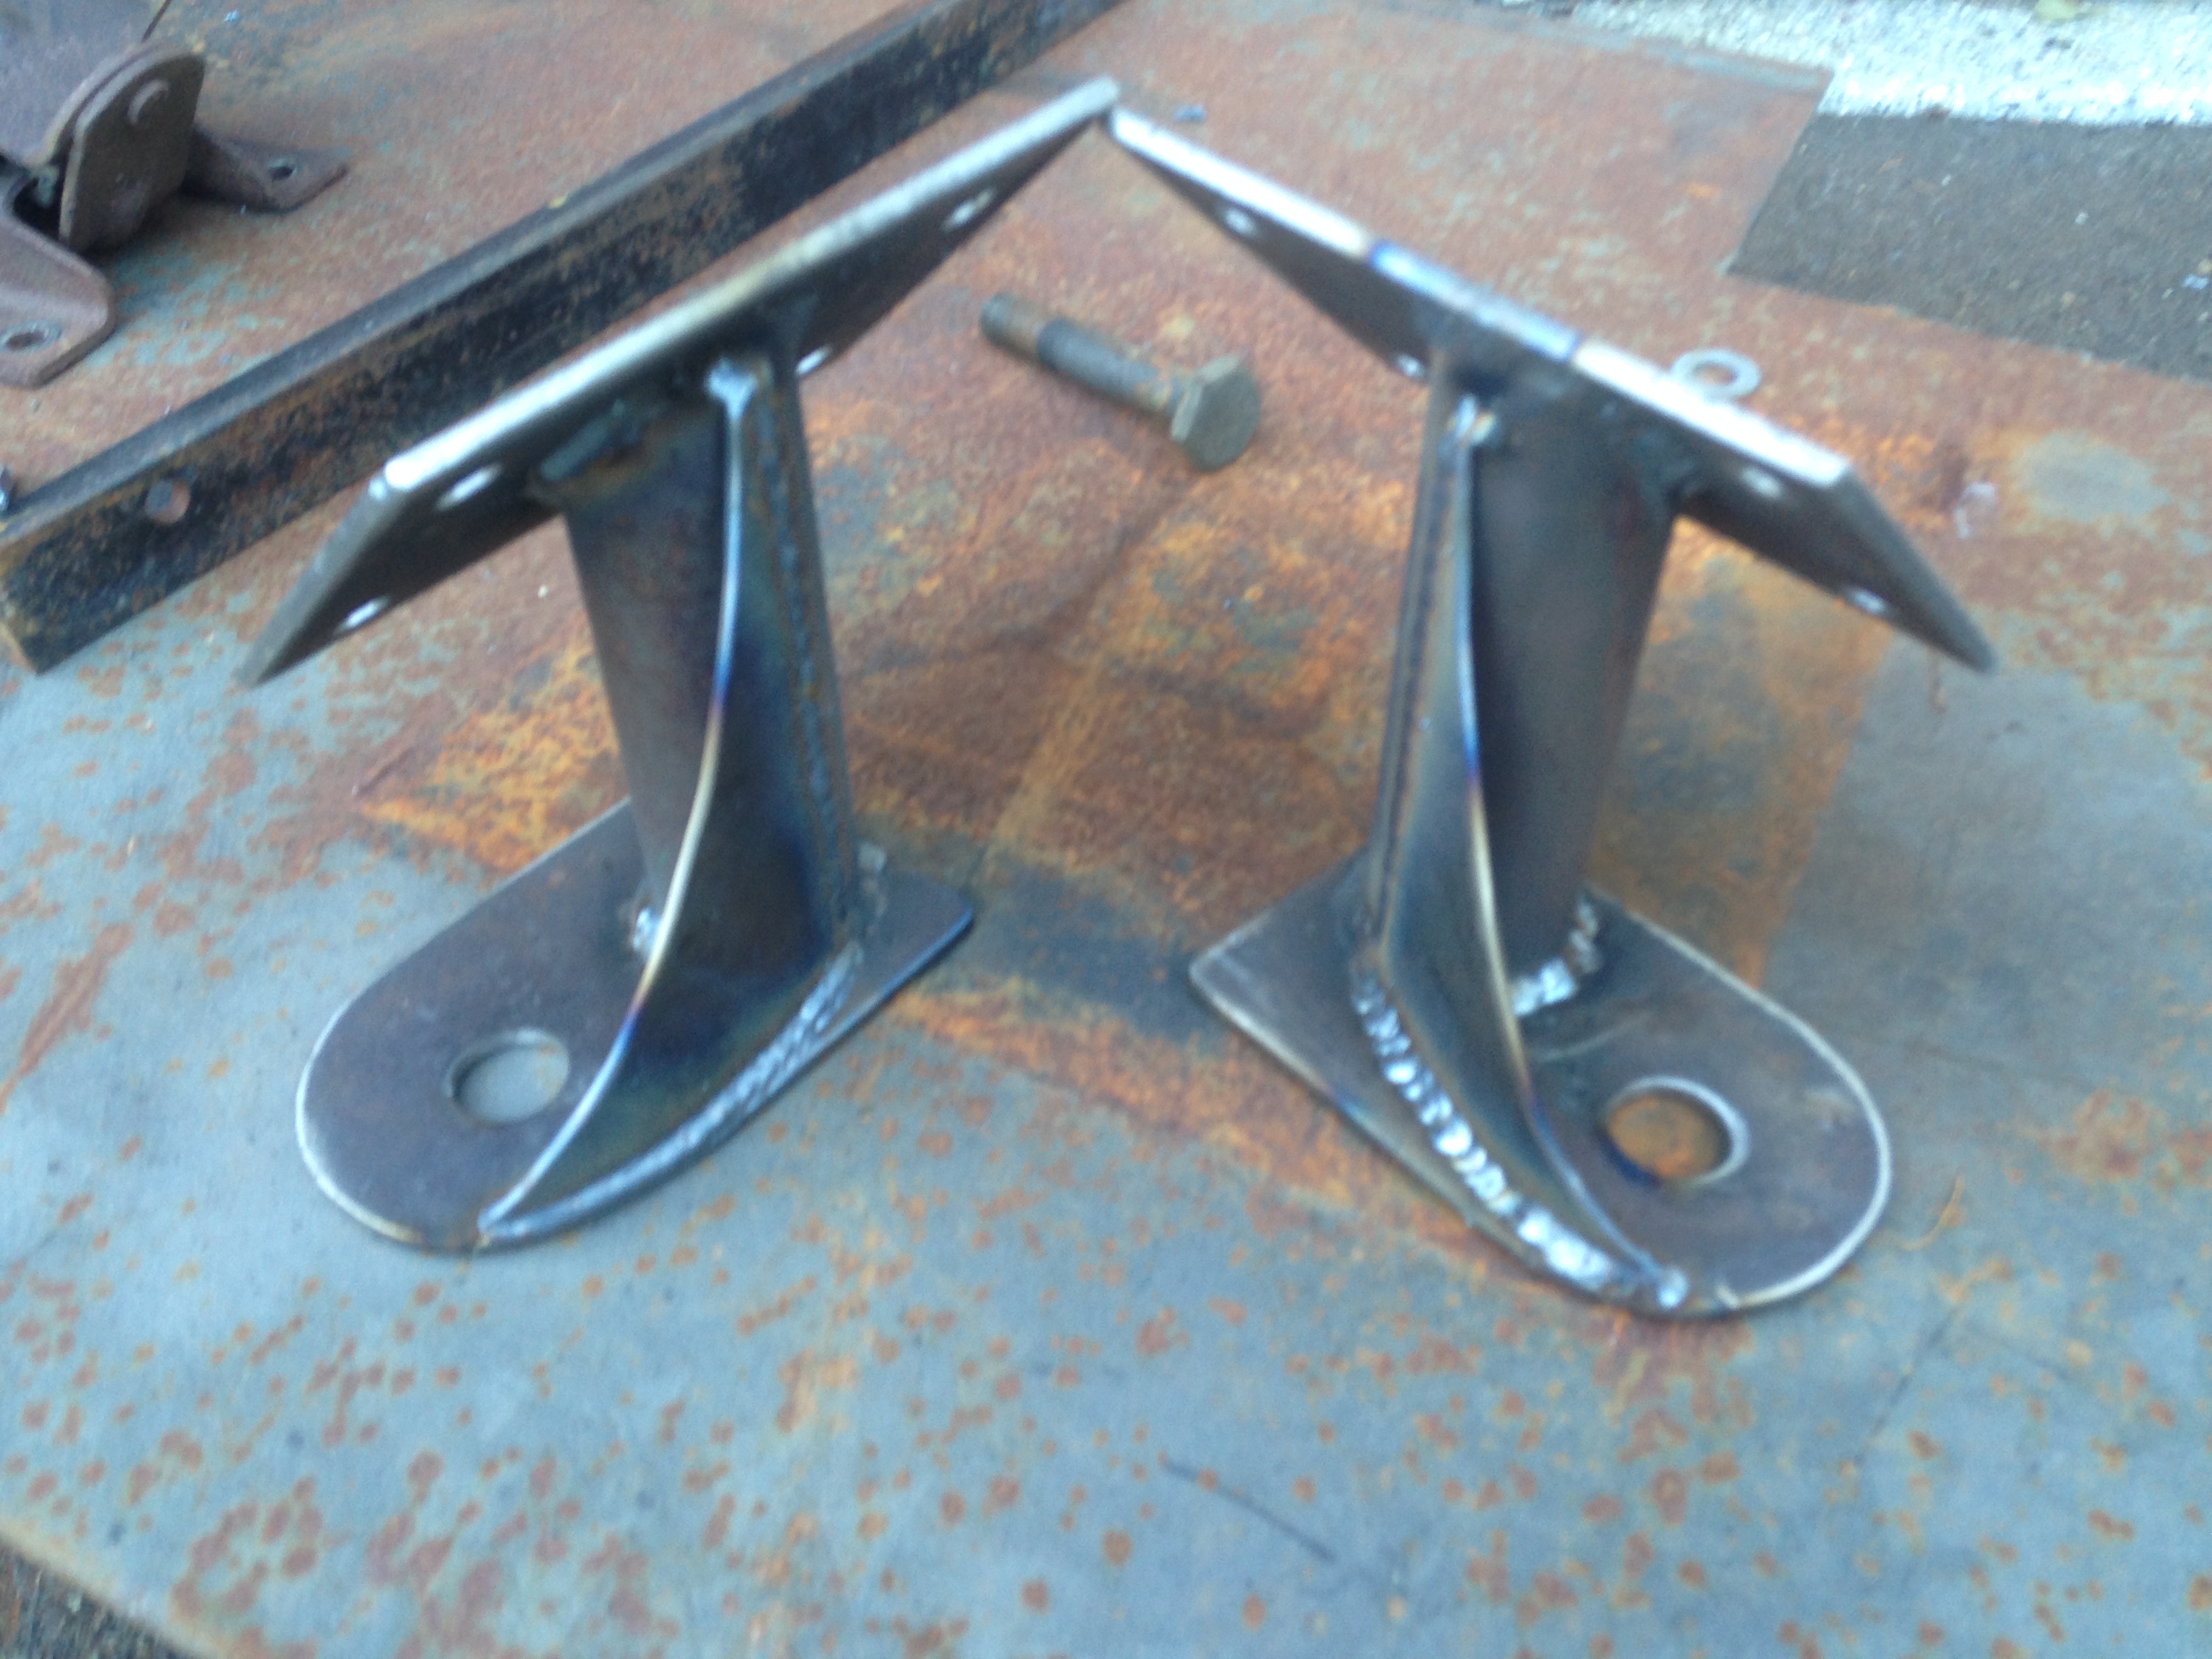
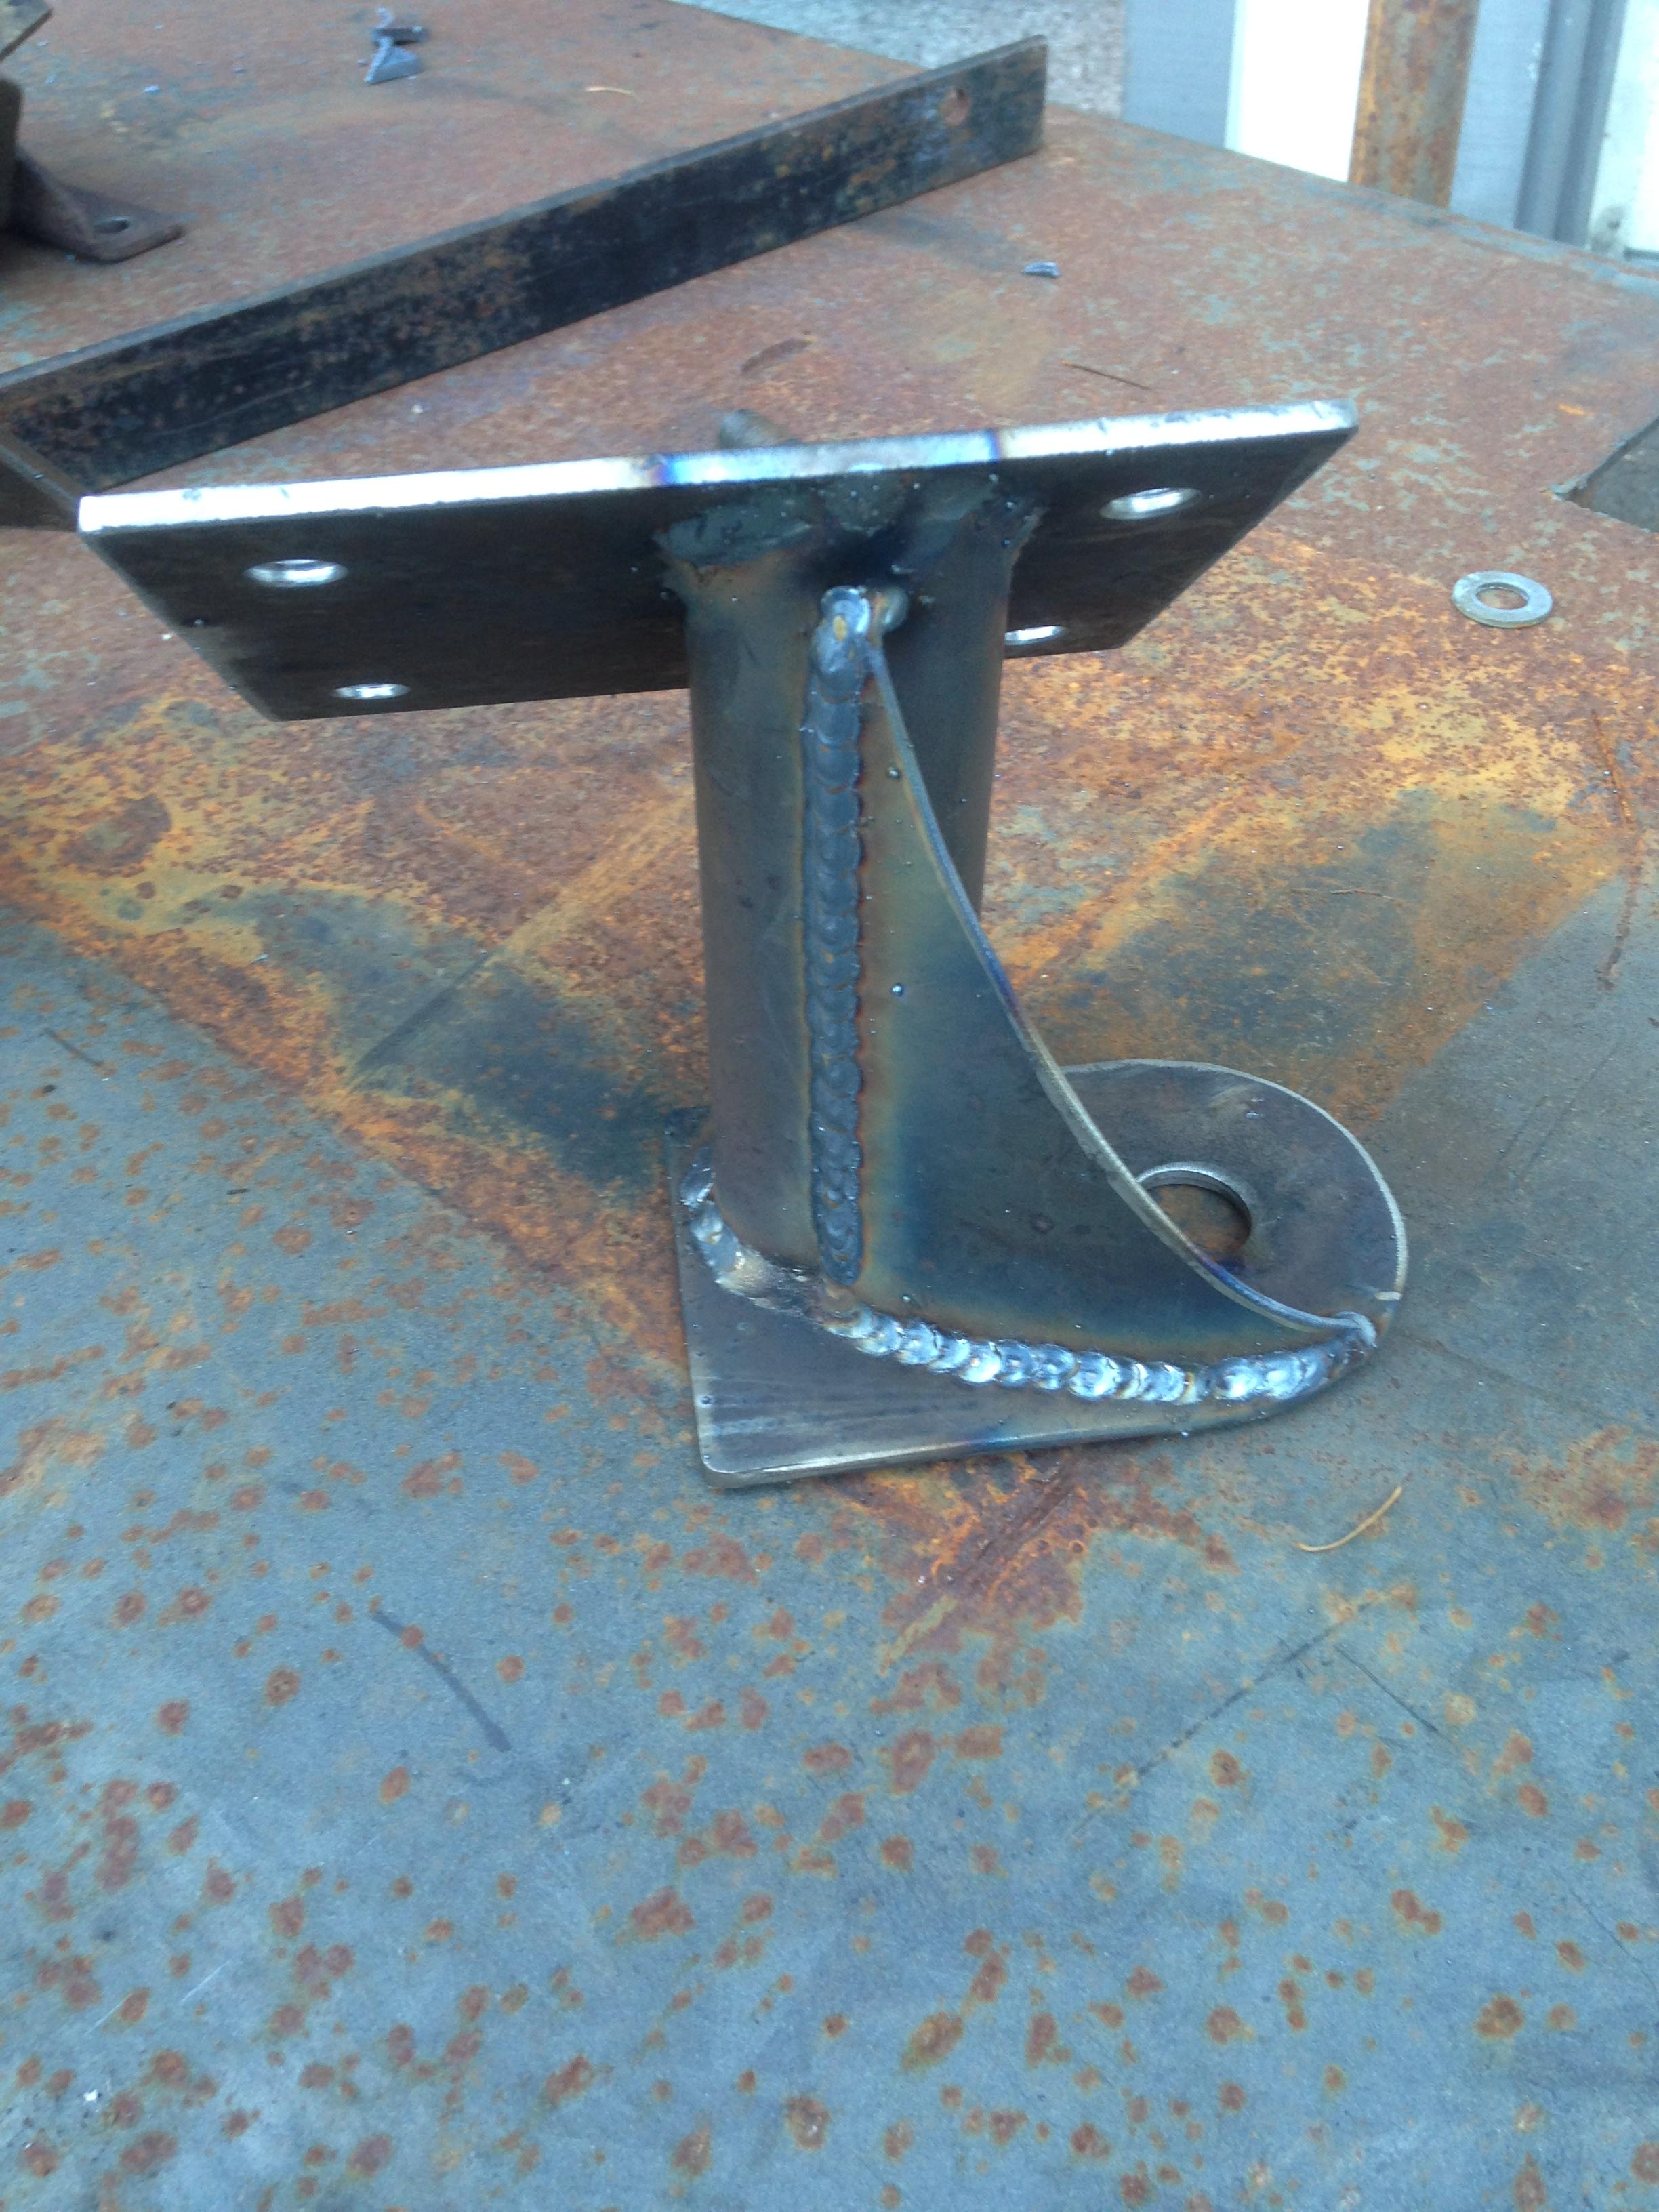
Got the frontend hung under there and built some tabs for the rear trailing arms and got those burned on there as well.
Truck is getting a 6.0 from an 03 hummer lq4 and a built 4l80E.
Power will be assisted with a Borg Warner s480 turbo, 80 lb injectors, circle d triple disc full billet converter and a HD-2 shift kit. Looking for somewhere in the 700-800 WHP range.
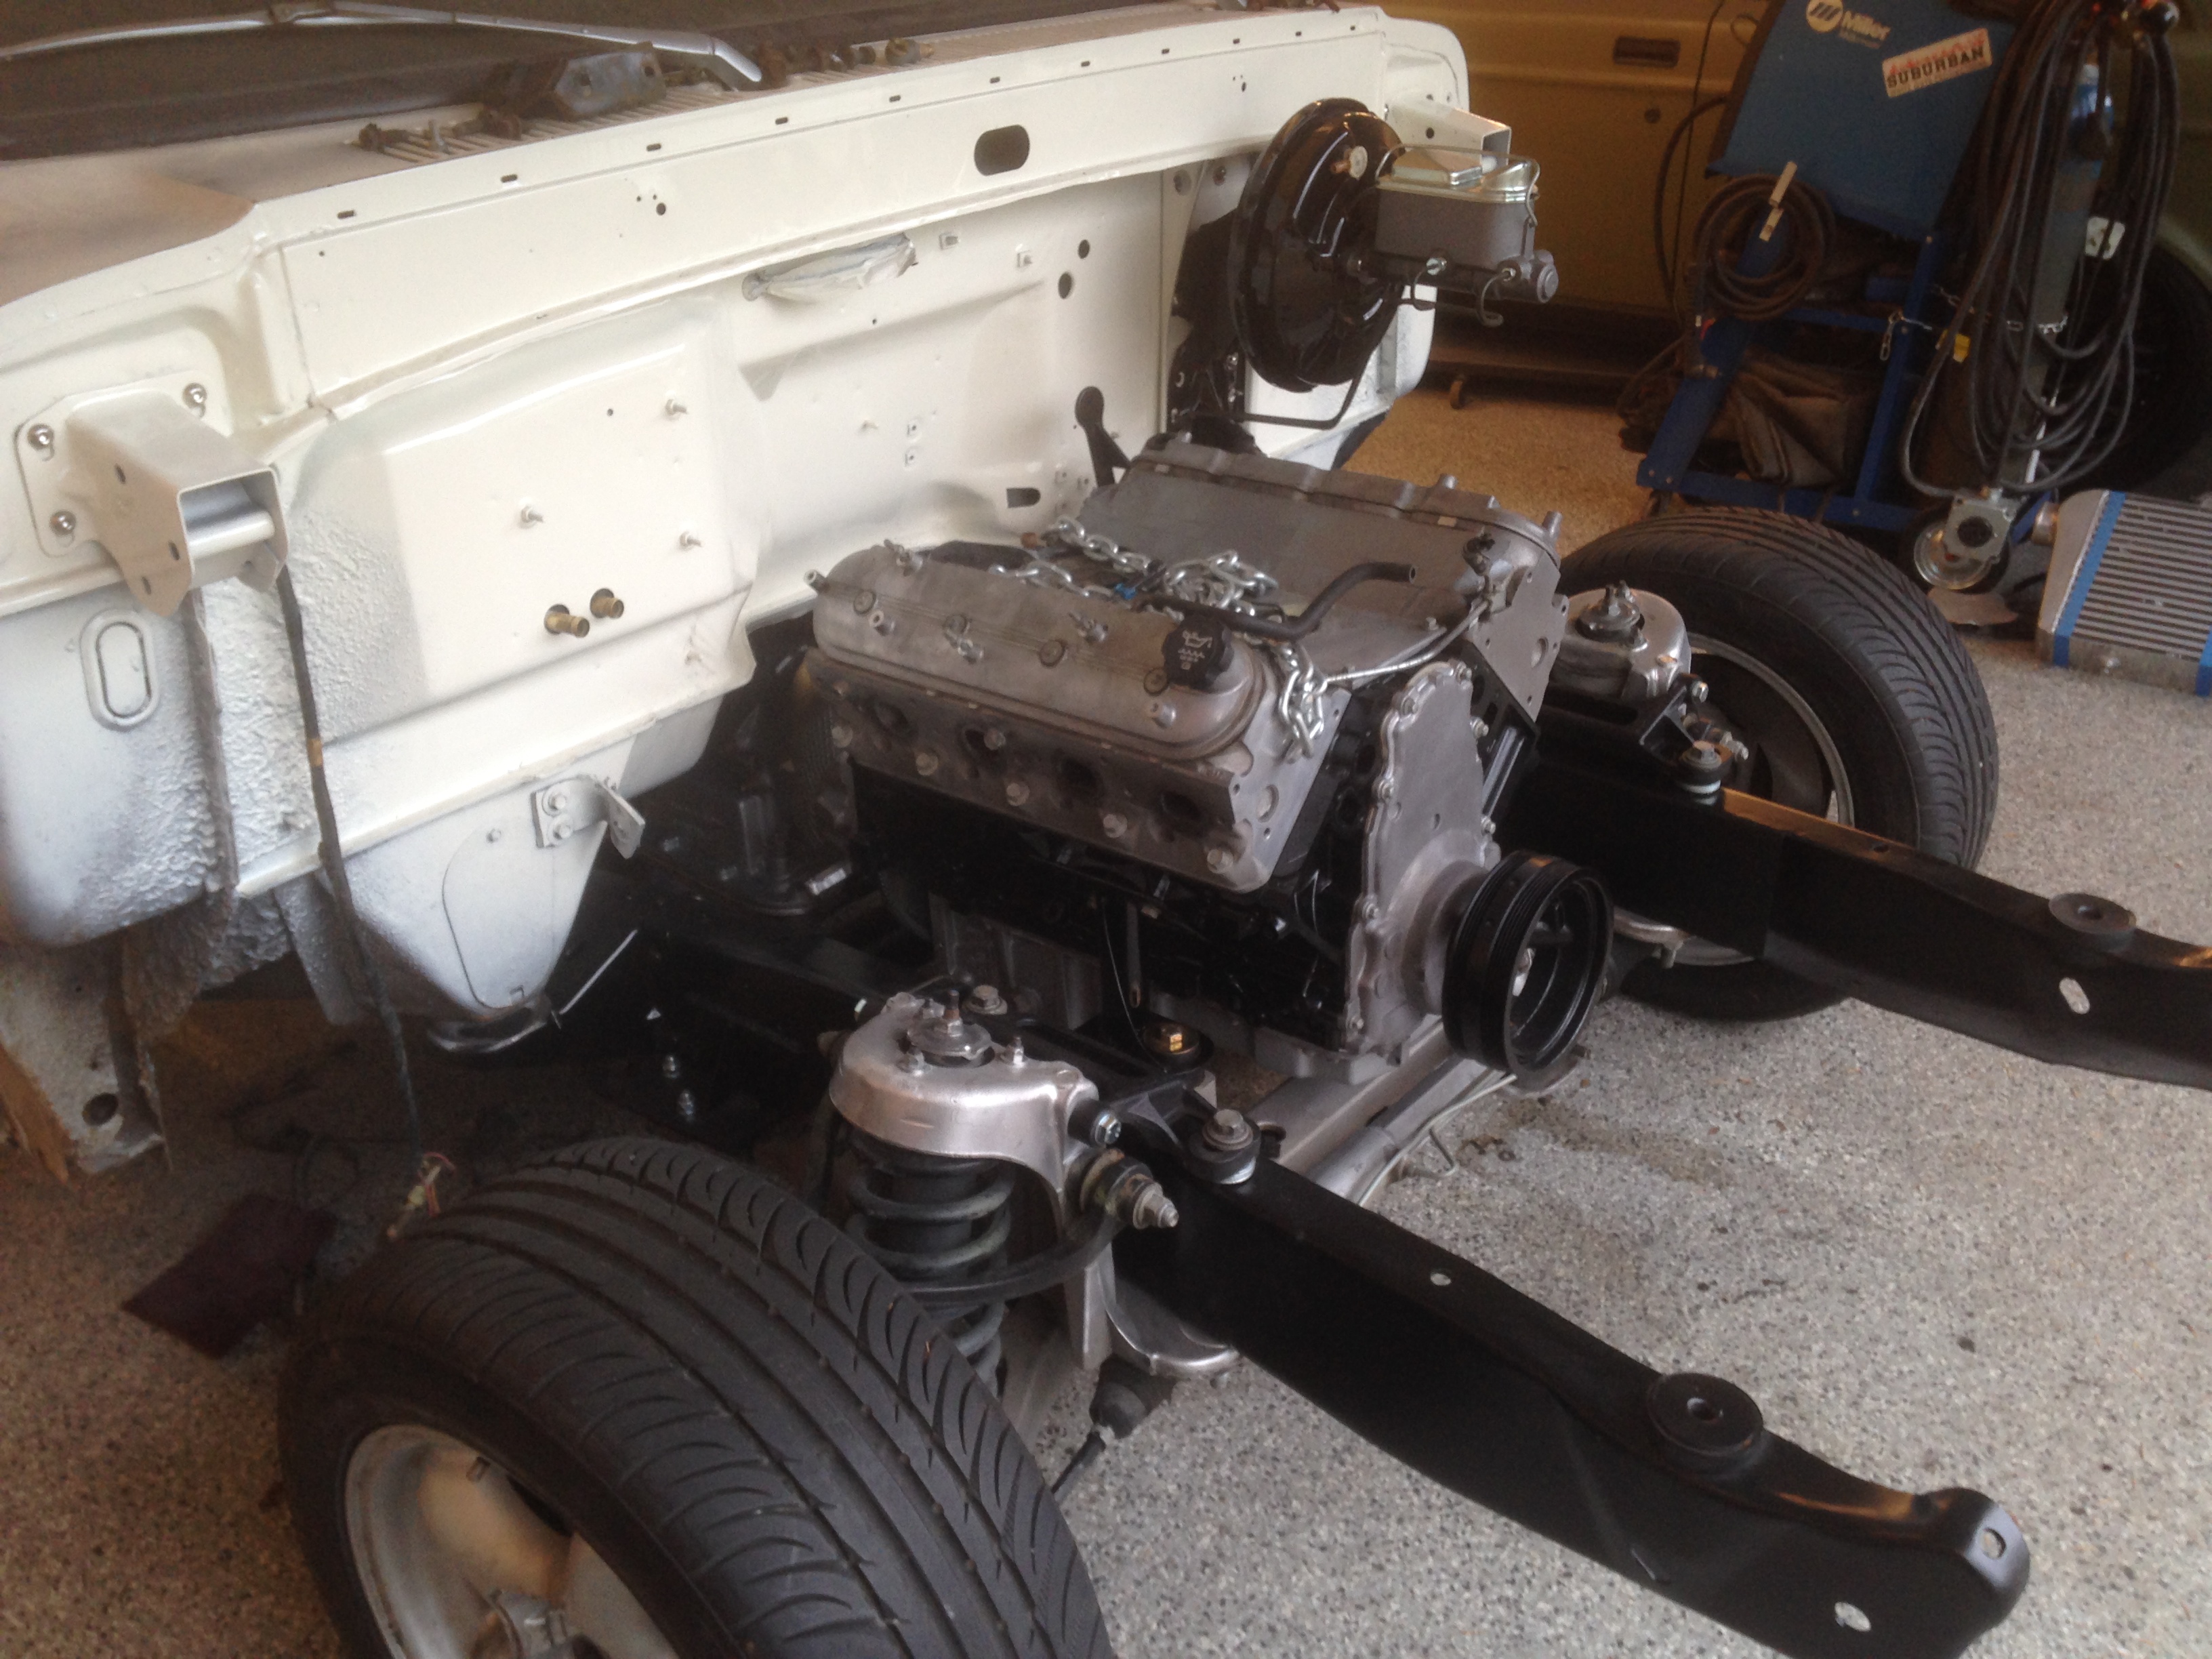
So, I got to work getting the engine in place and building some motor mounts.

Engine is nice and low in the engine bay, tranny should work out nicely and the engine is staggered to the passenger side to assist with steering rack, booster and exhaust clearance.
Here are the engine mounts all finished up and ready to go for powder coating. I am using the OEM locations on the front K member with some poly bushings sandwiched in there, trying to leave some room for the 4" downpipe.
So, I got the brake booster and brackets from a 75 and swapped the pedal into my 68 assembly, pulled everything I could from the firewall and dropped all that stuff off at the powder coater on Monday and that gets us up to speed for the weekend.
Hope to finish any work on the firewall and get that shot with some paint so things can start going back together.
Hope at least a few of you folks follow along, should be a fun little winter project.
Sean
Wanting to build something to go to some old car cruise's and maybe some muscle car events like the LS Fest, Power Tour or drag week with my Dad over the next few summers and nothing in my current fleet will do.
Posted the build thread up on a Ford board but seems they are not the biggest fan of the GM Motor in the old ford....
The first few posts are a cut and paste from there bringing us up to speed.
So the journey begins.
We loaded up the trailer and headed from home here in Portland down to Grants pass. Truck was exactly what he said so we paid the man, loaded it up on the trailer and headed for the house.


Finally got it in the garage after our big Alaska adventure and got to work. Pulled off the front sheetmetal, got it up on stands and proceeded to chop the frontend out from under it.


Once I was down to some framerails I started to mockup the 2003 crown vic stuff I picked up in Seattle, pretty easy stuff really, ran some .25 wall tubing through the framerails and burned in the mounts.


Got the frontend hung under there and built some tabs for the rear trailing arms and got those burned on there as well.
Truck is getting a 6.0 from an 03 hummer lq4 and a built 4l80E.
Power will be assisted with a Borg Warner s480 turbo, 80 lb injectors, circle d triple disc full billet converter and a HD-2 shift kit. Looking for somewhere in the 700-800 WHP range.
So, I got to work getting the engine in place and building some motor mounts.


Engine is nice and low in the engine bay, tranny should work out nicely and the engine is staggered to the passenger side to assist with steering rack, booster and exhaust clearance.
Here are the engine mounts all finished up and ready to go for powder coating. I am using the OEM locations on the front K member with some poly bushings sandwiched in there, trying to leave some room for the 4" downpipe.


So, I got the brake booster and brackets from a 75 and swapped the pedal into my 68 assembly, pulled everything I could from the firewall and dropped all that stuff off at the powder coater on Monday and that gets us up to speed for the weekend.
Hope to finish any work on the firewall and get that shot with some paint so things can start going back together.
Hope at least a few of you folks follow along, should be a fun little winter project.
Sean
 11-05-2013, 10:27 AM
#2
Launching!
Thread Starter
Join Date: Mar 2012
Posts: 214
Likes: 0
Received 0 Likes
on
0 Posts
Had an epic weekend.
Saturday morning my buddy Asher and I loaded up the tools and headed out to the yard for some digging.
I came up with exactly what I was looking for, 1981 ford F100. 9" axle, 65" wide, 31 spline and 5x4.5 lug pattern. The axle that we found was missing some hardware on one axle end, but it was complete other than that.
By the time we got home it was about 1 pm. We got busy getting to work.
Pulled the motor back out and set it aside, stripped off everything from the firewall that was left. Sanded, sanded and sanded some more, little work with the wire wheel to clean it up where there was some rust and hit it with two coats of epoxy primer.
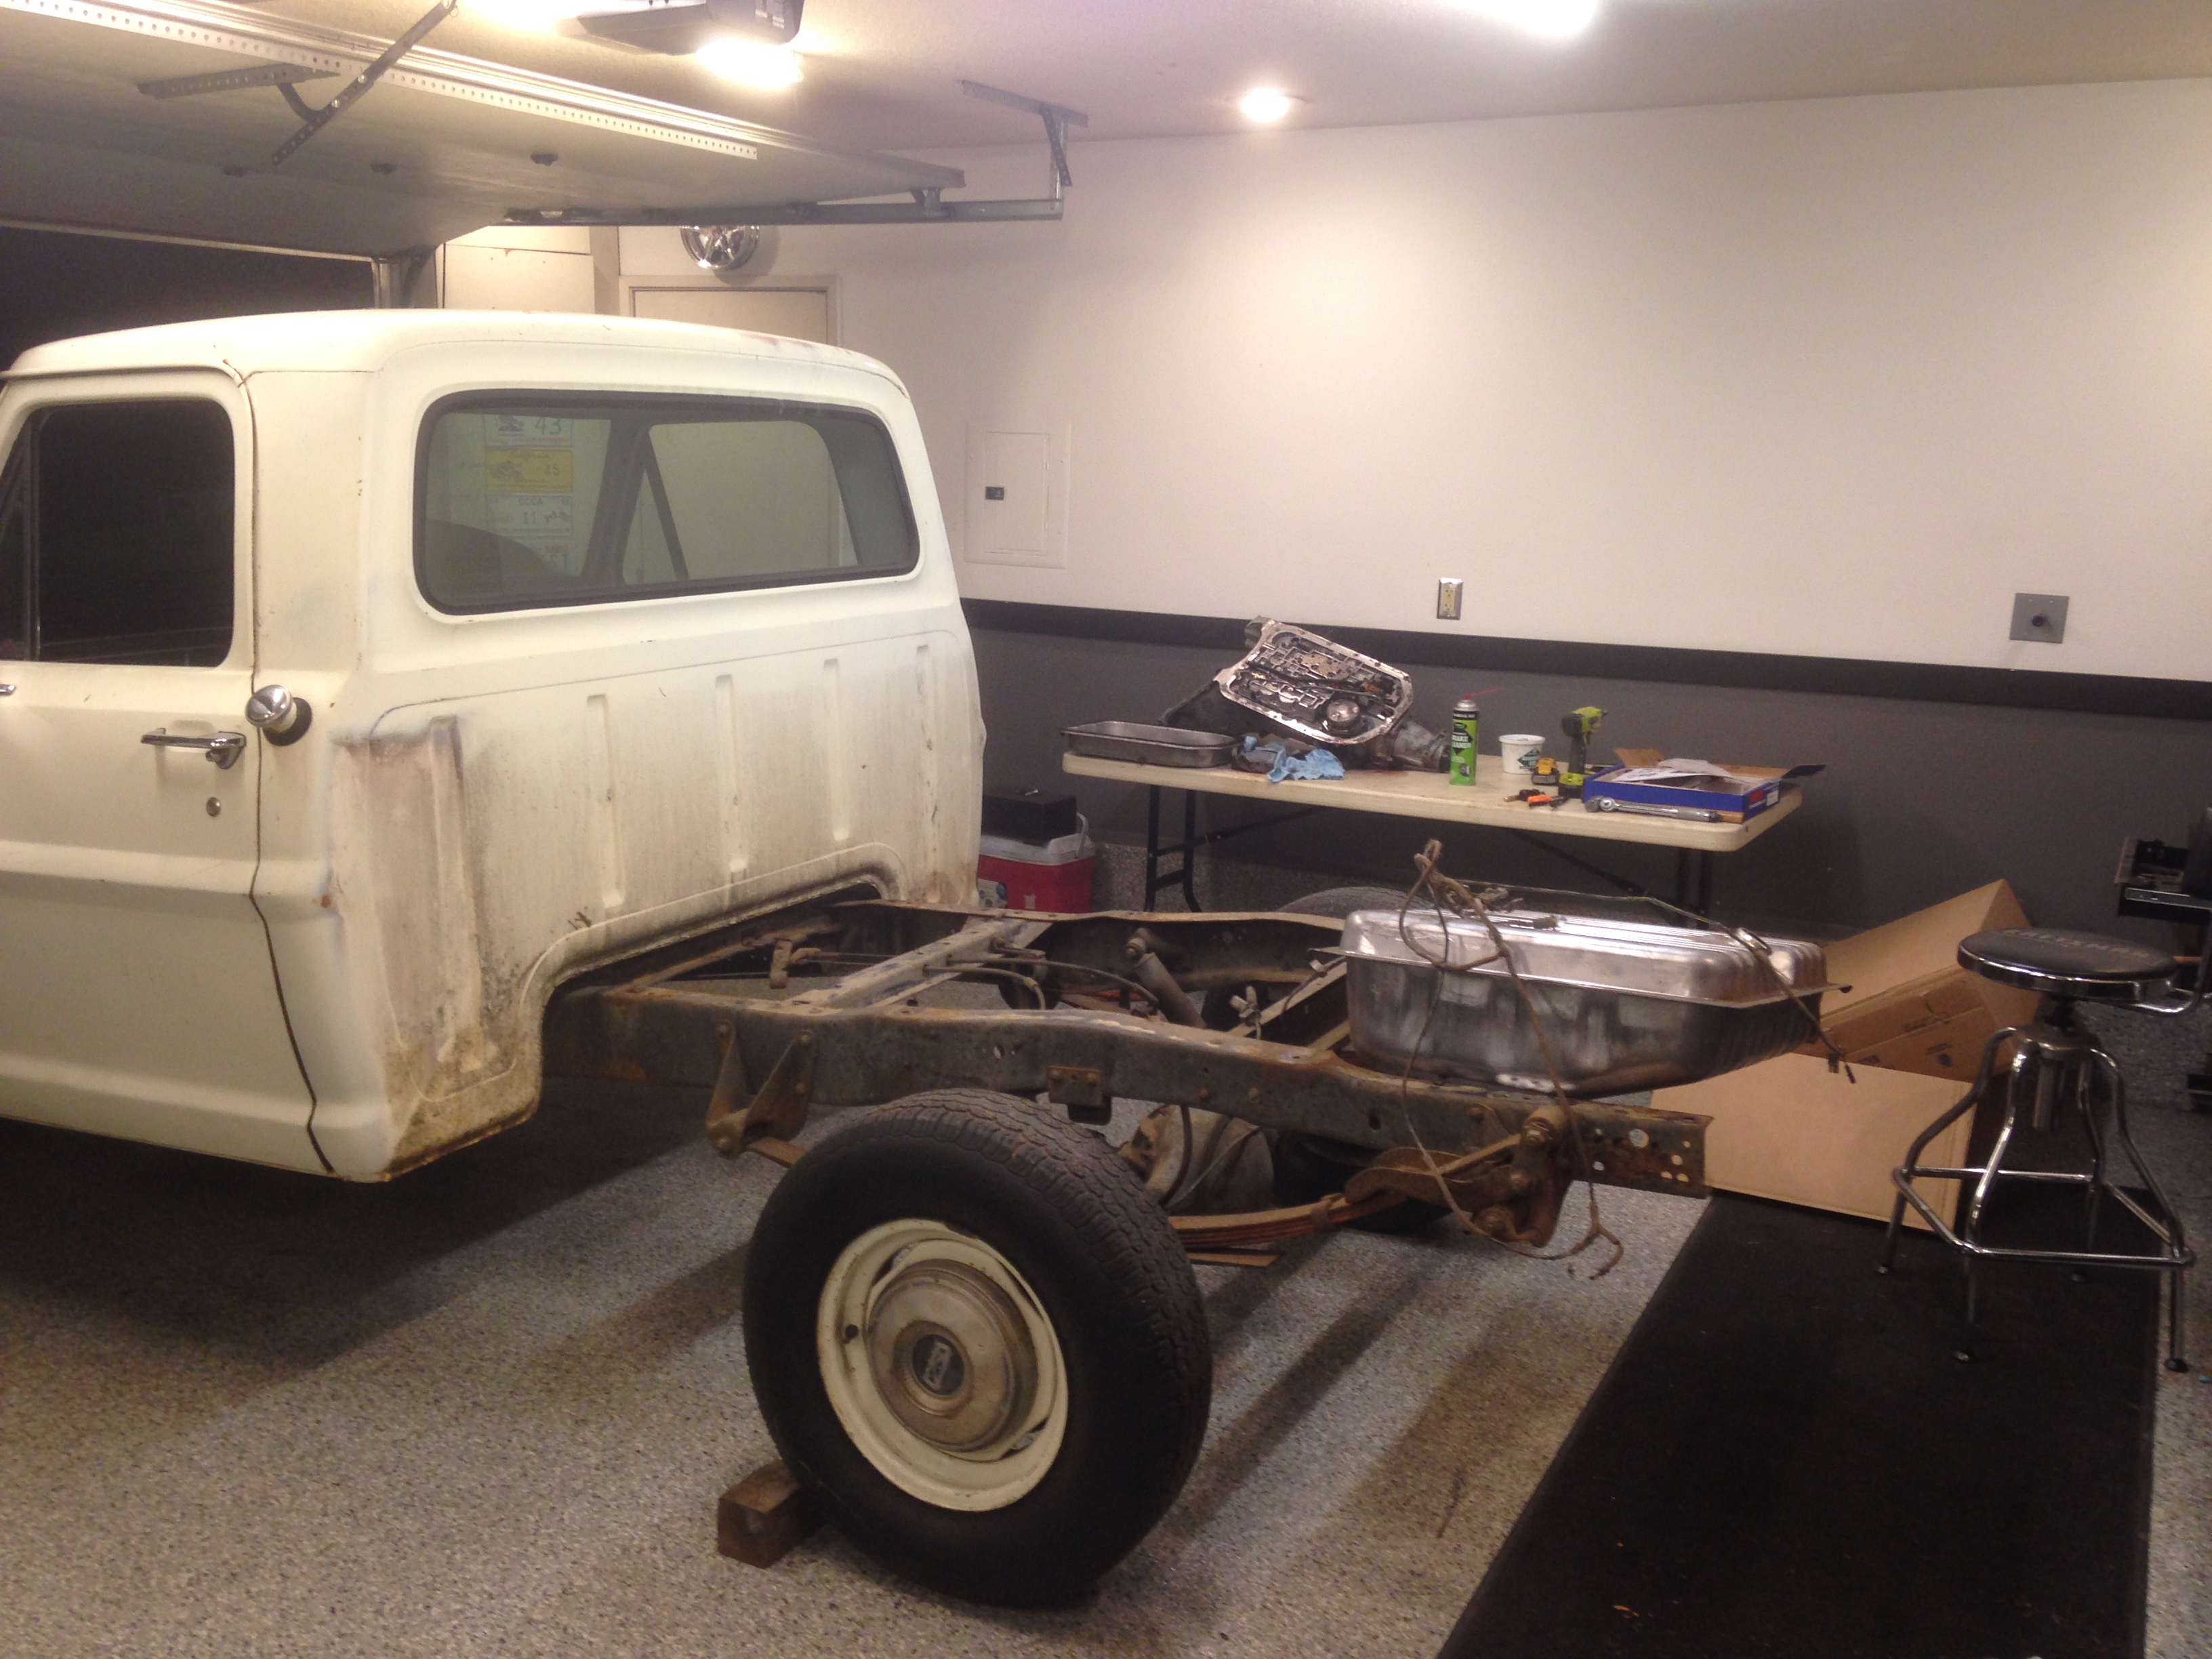
As that was drying, we got with the program and unloaded everything I was storing in the bed and got that sweet bumper pulled off, unbolted the bed and got that set aside.
Oh what fun, more rivets to get off for the rear crossmember. I have a pretty good method though. Grind off the head with a flap disc, then drill out just a little bit of the rivet and it pops right out.
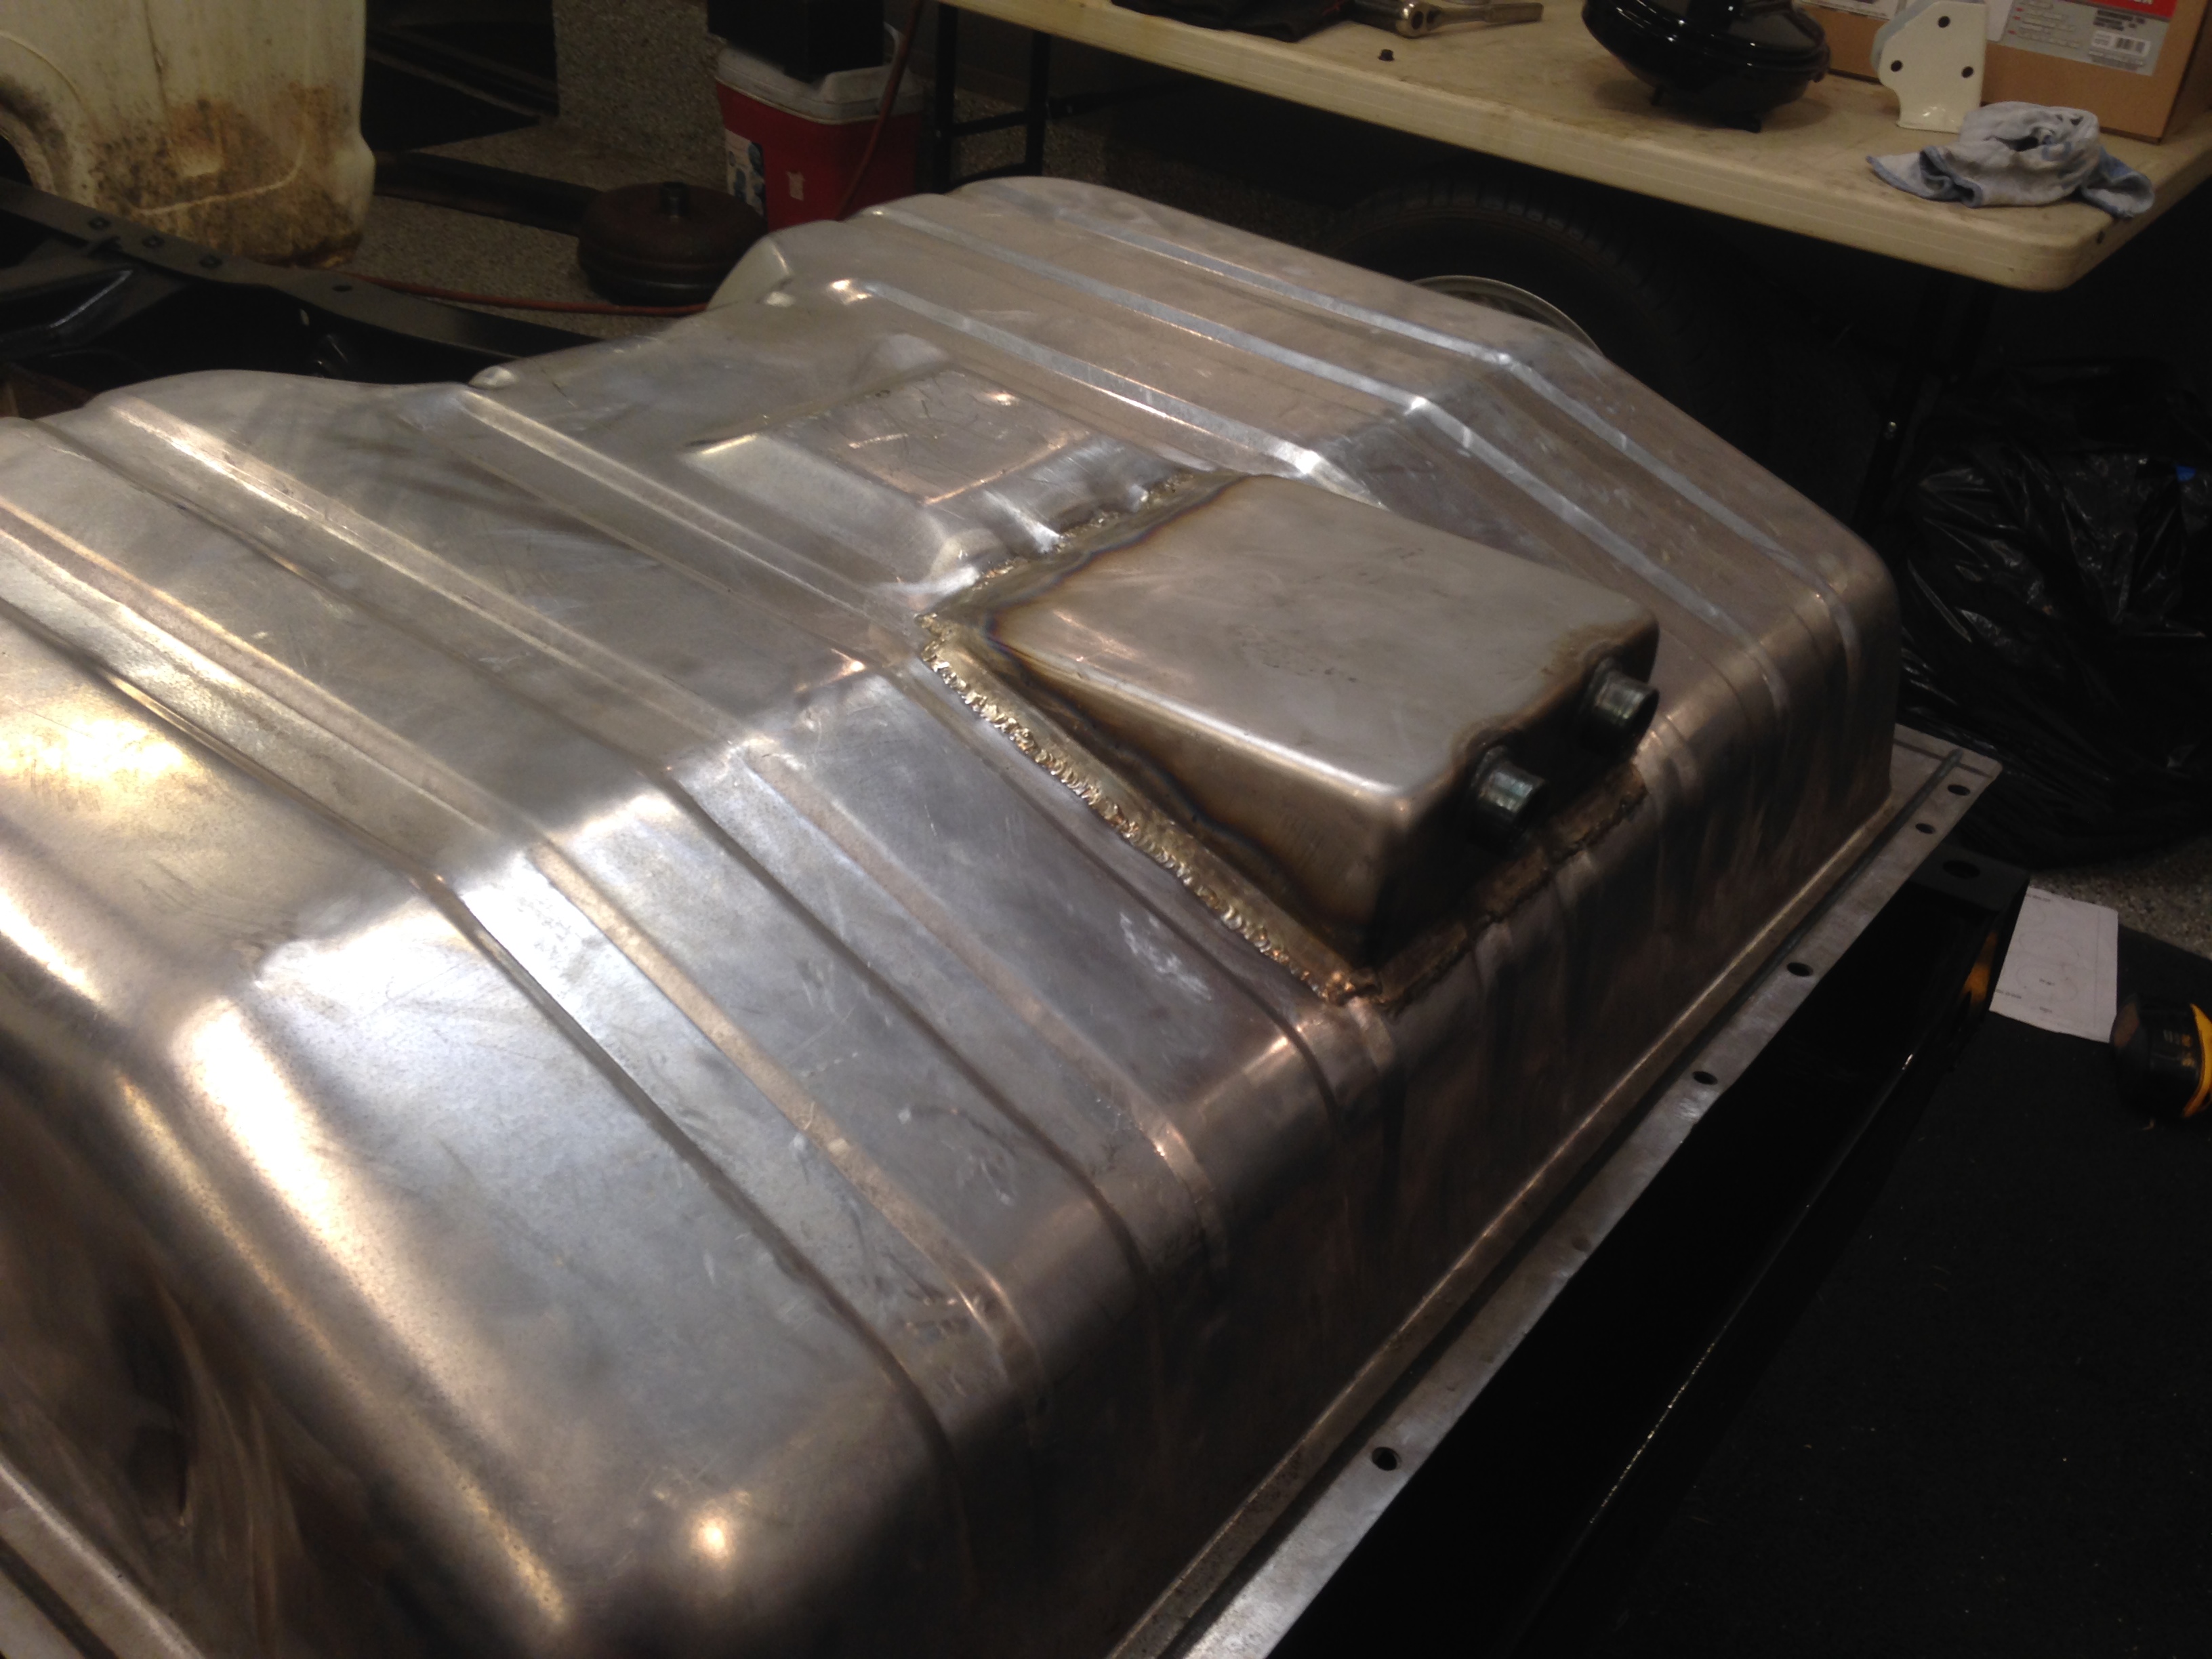
So with a little time I was mocking up the fuel tank and see what I was going to do back here.
My buddy Dan came by in the evening and was awesome enough to tackle the Trans GO HD-2 shift kit installation in the 4l80E tranny. He got it all finished up with the exception of a pan gasket and a filter.
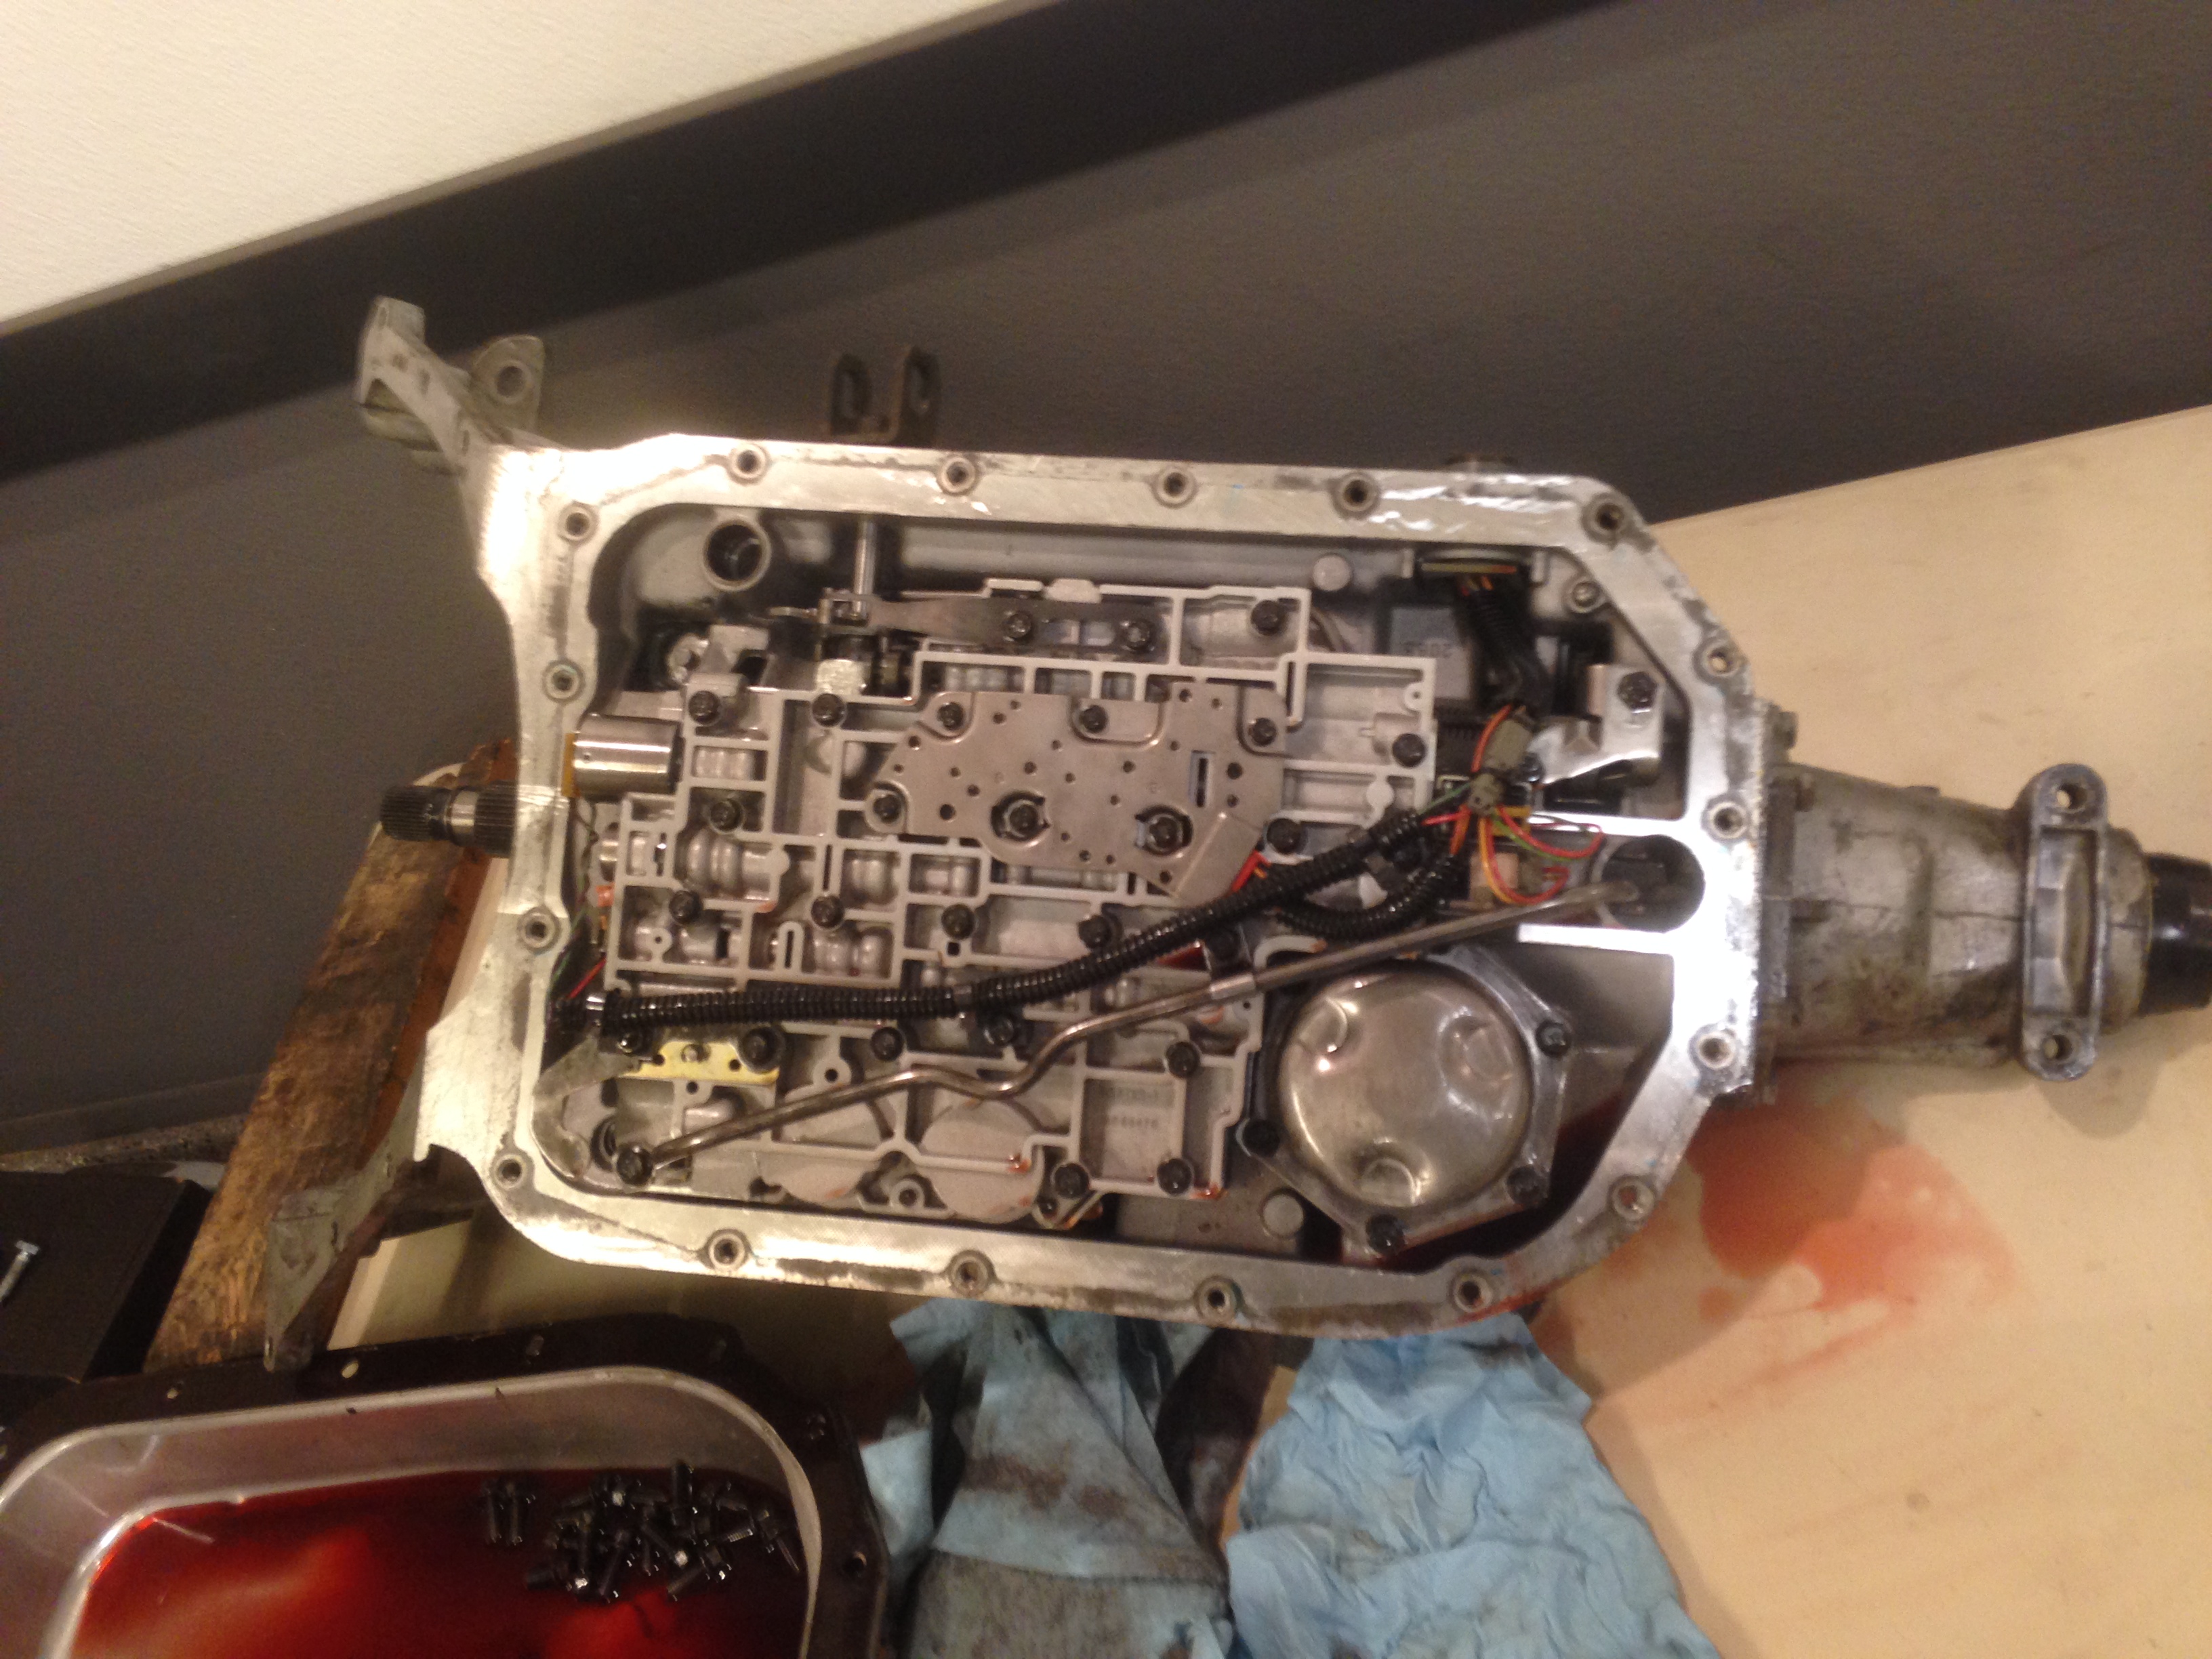
Although not a terrible task, I was able to keep working and knew that it was in capable hands with Dan on the tranny.
Pretty much see what I left in the garage on Saturday night.
Sunday morning was clean up time, we left it a mess on Saturday.
Saturday started by buttoning up the tranny so that I could get back to some dirty work.
Picked up parts and got that done early.
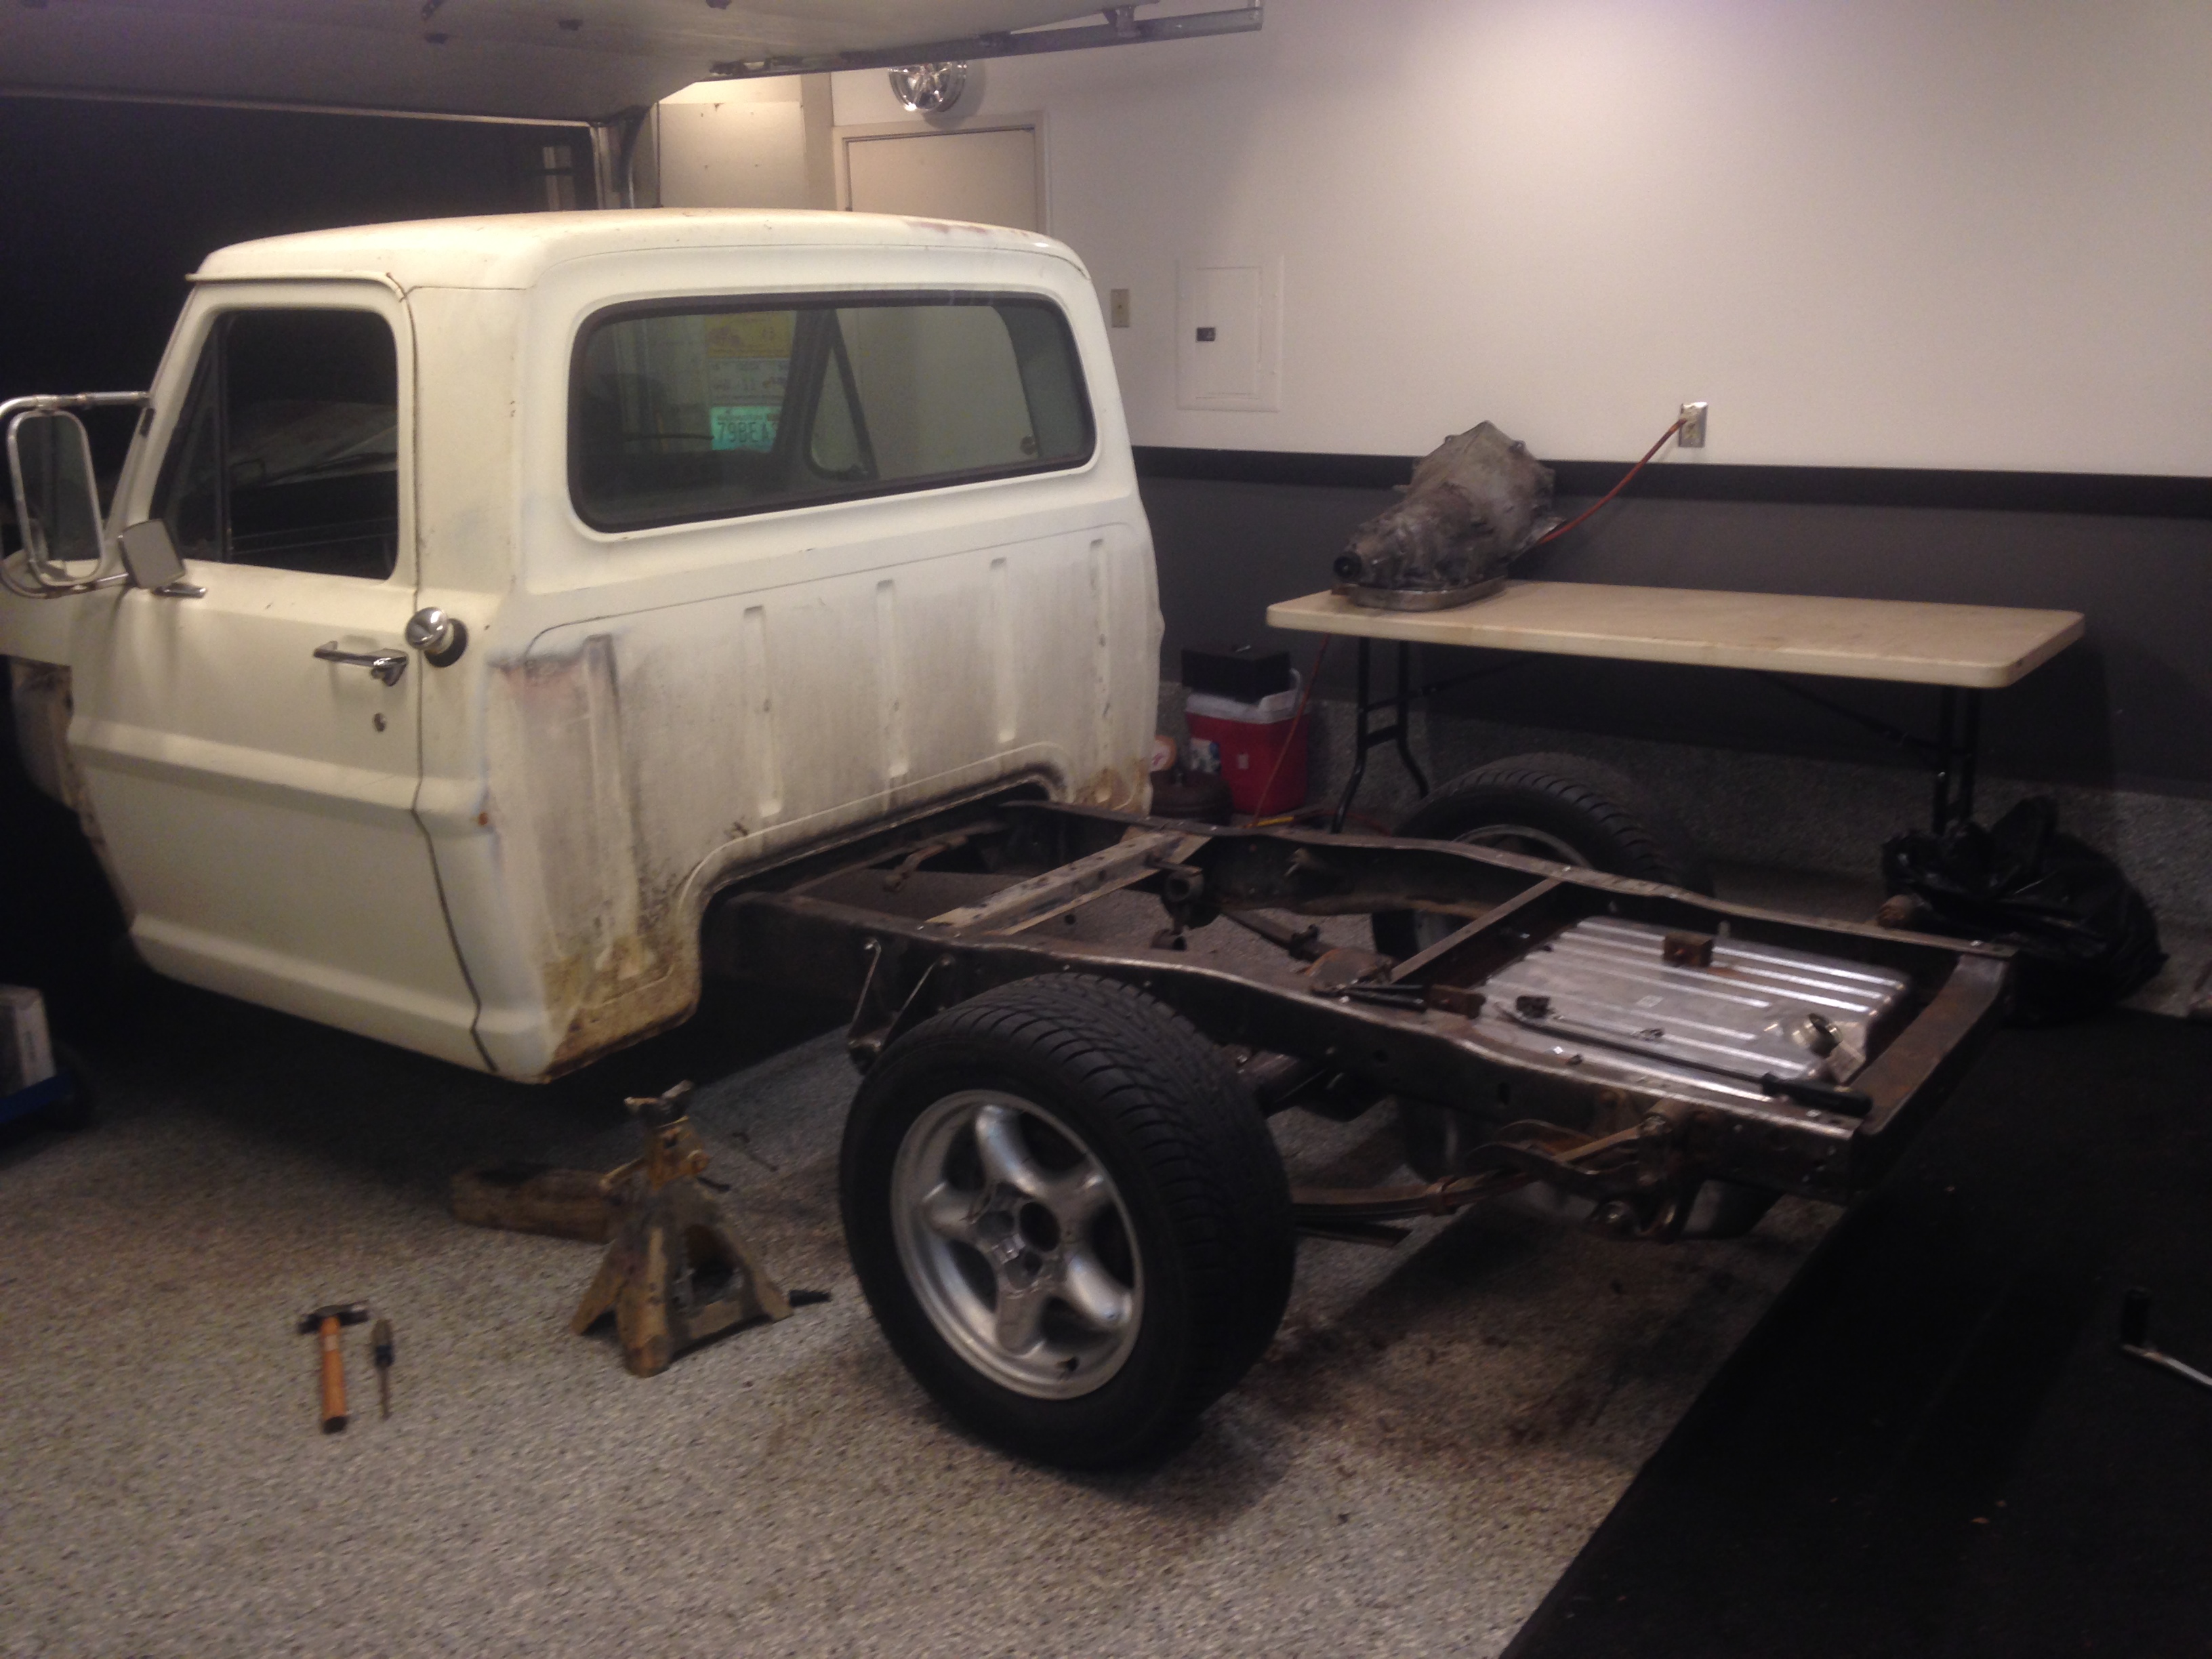
I have seen a couple folks build the frame and set the fuel tank inside the framerails. While I like the idea of gaining some clearance in the rear, the idea of having to pull the bumper, the bed and the rear crossmember to get the tank out was not for me. So I went a little different route.
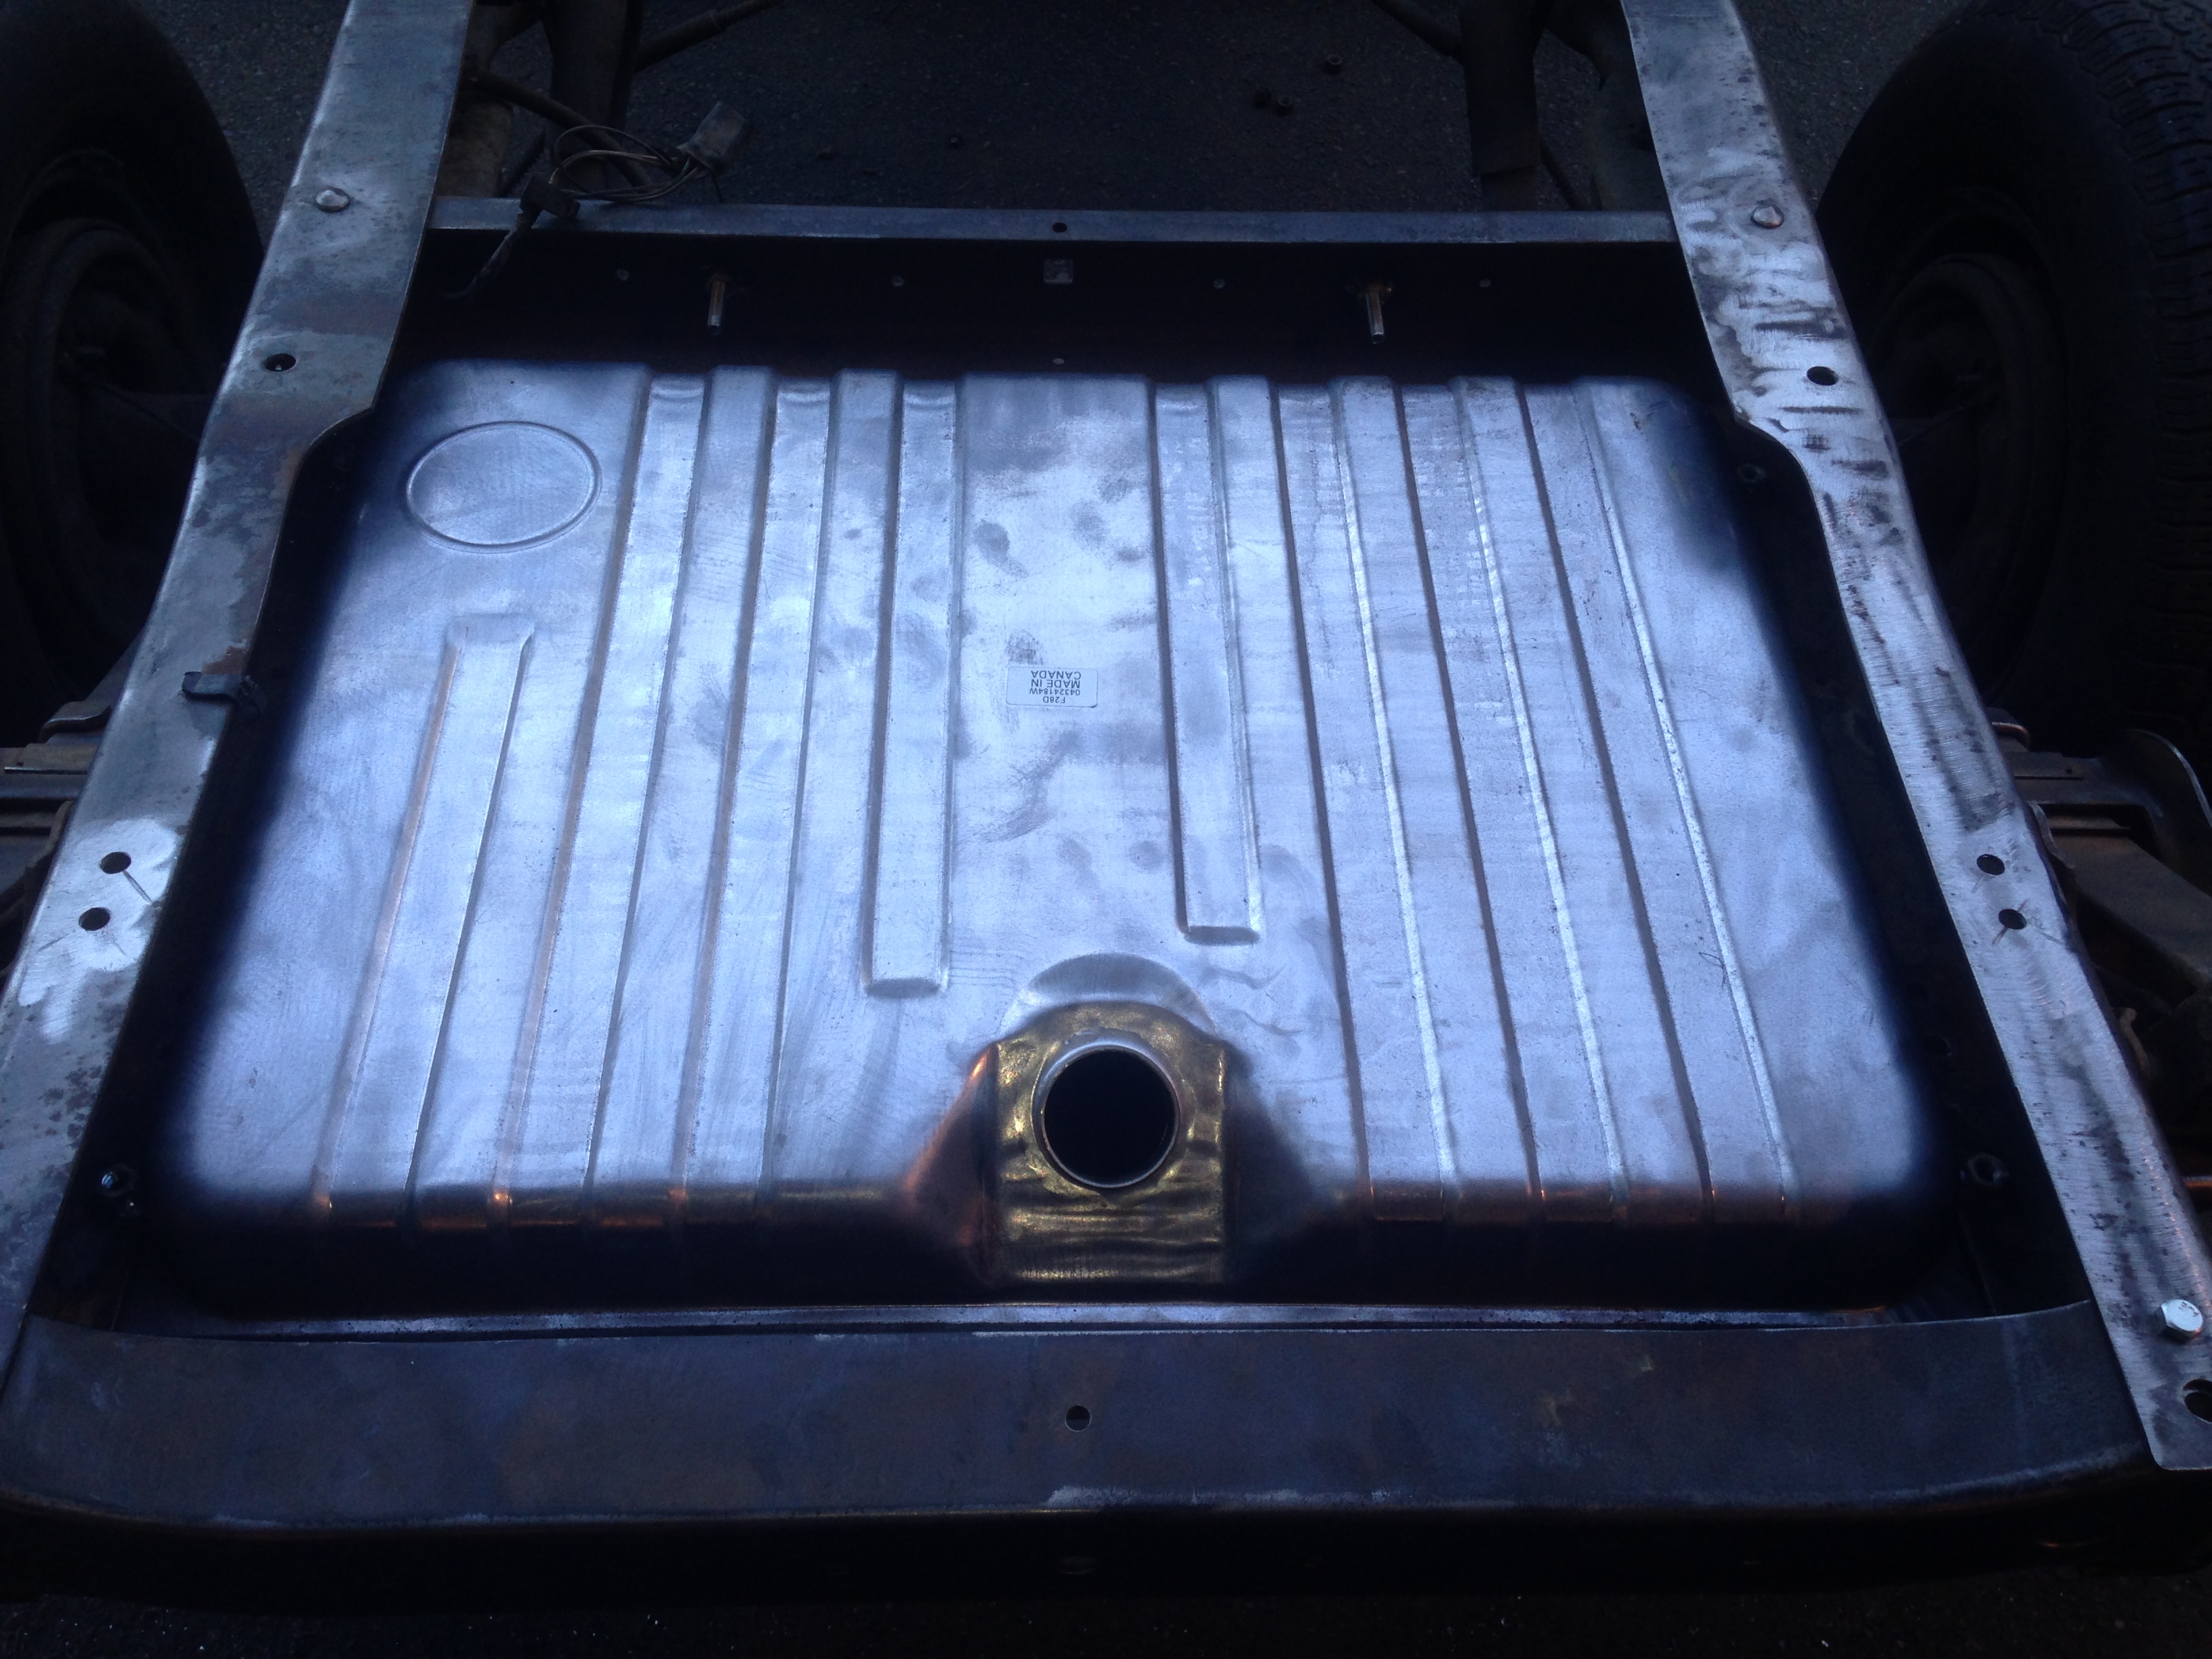
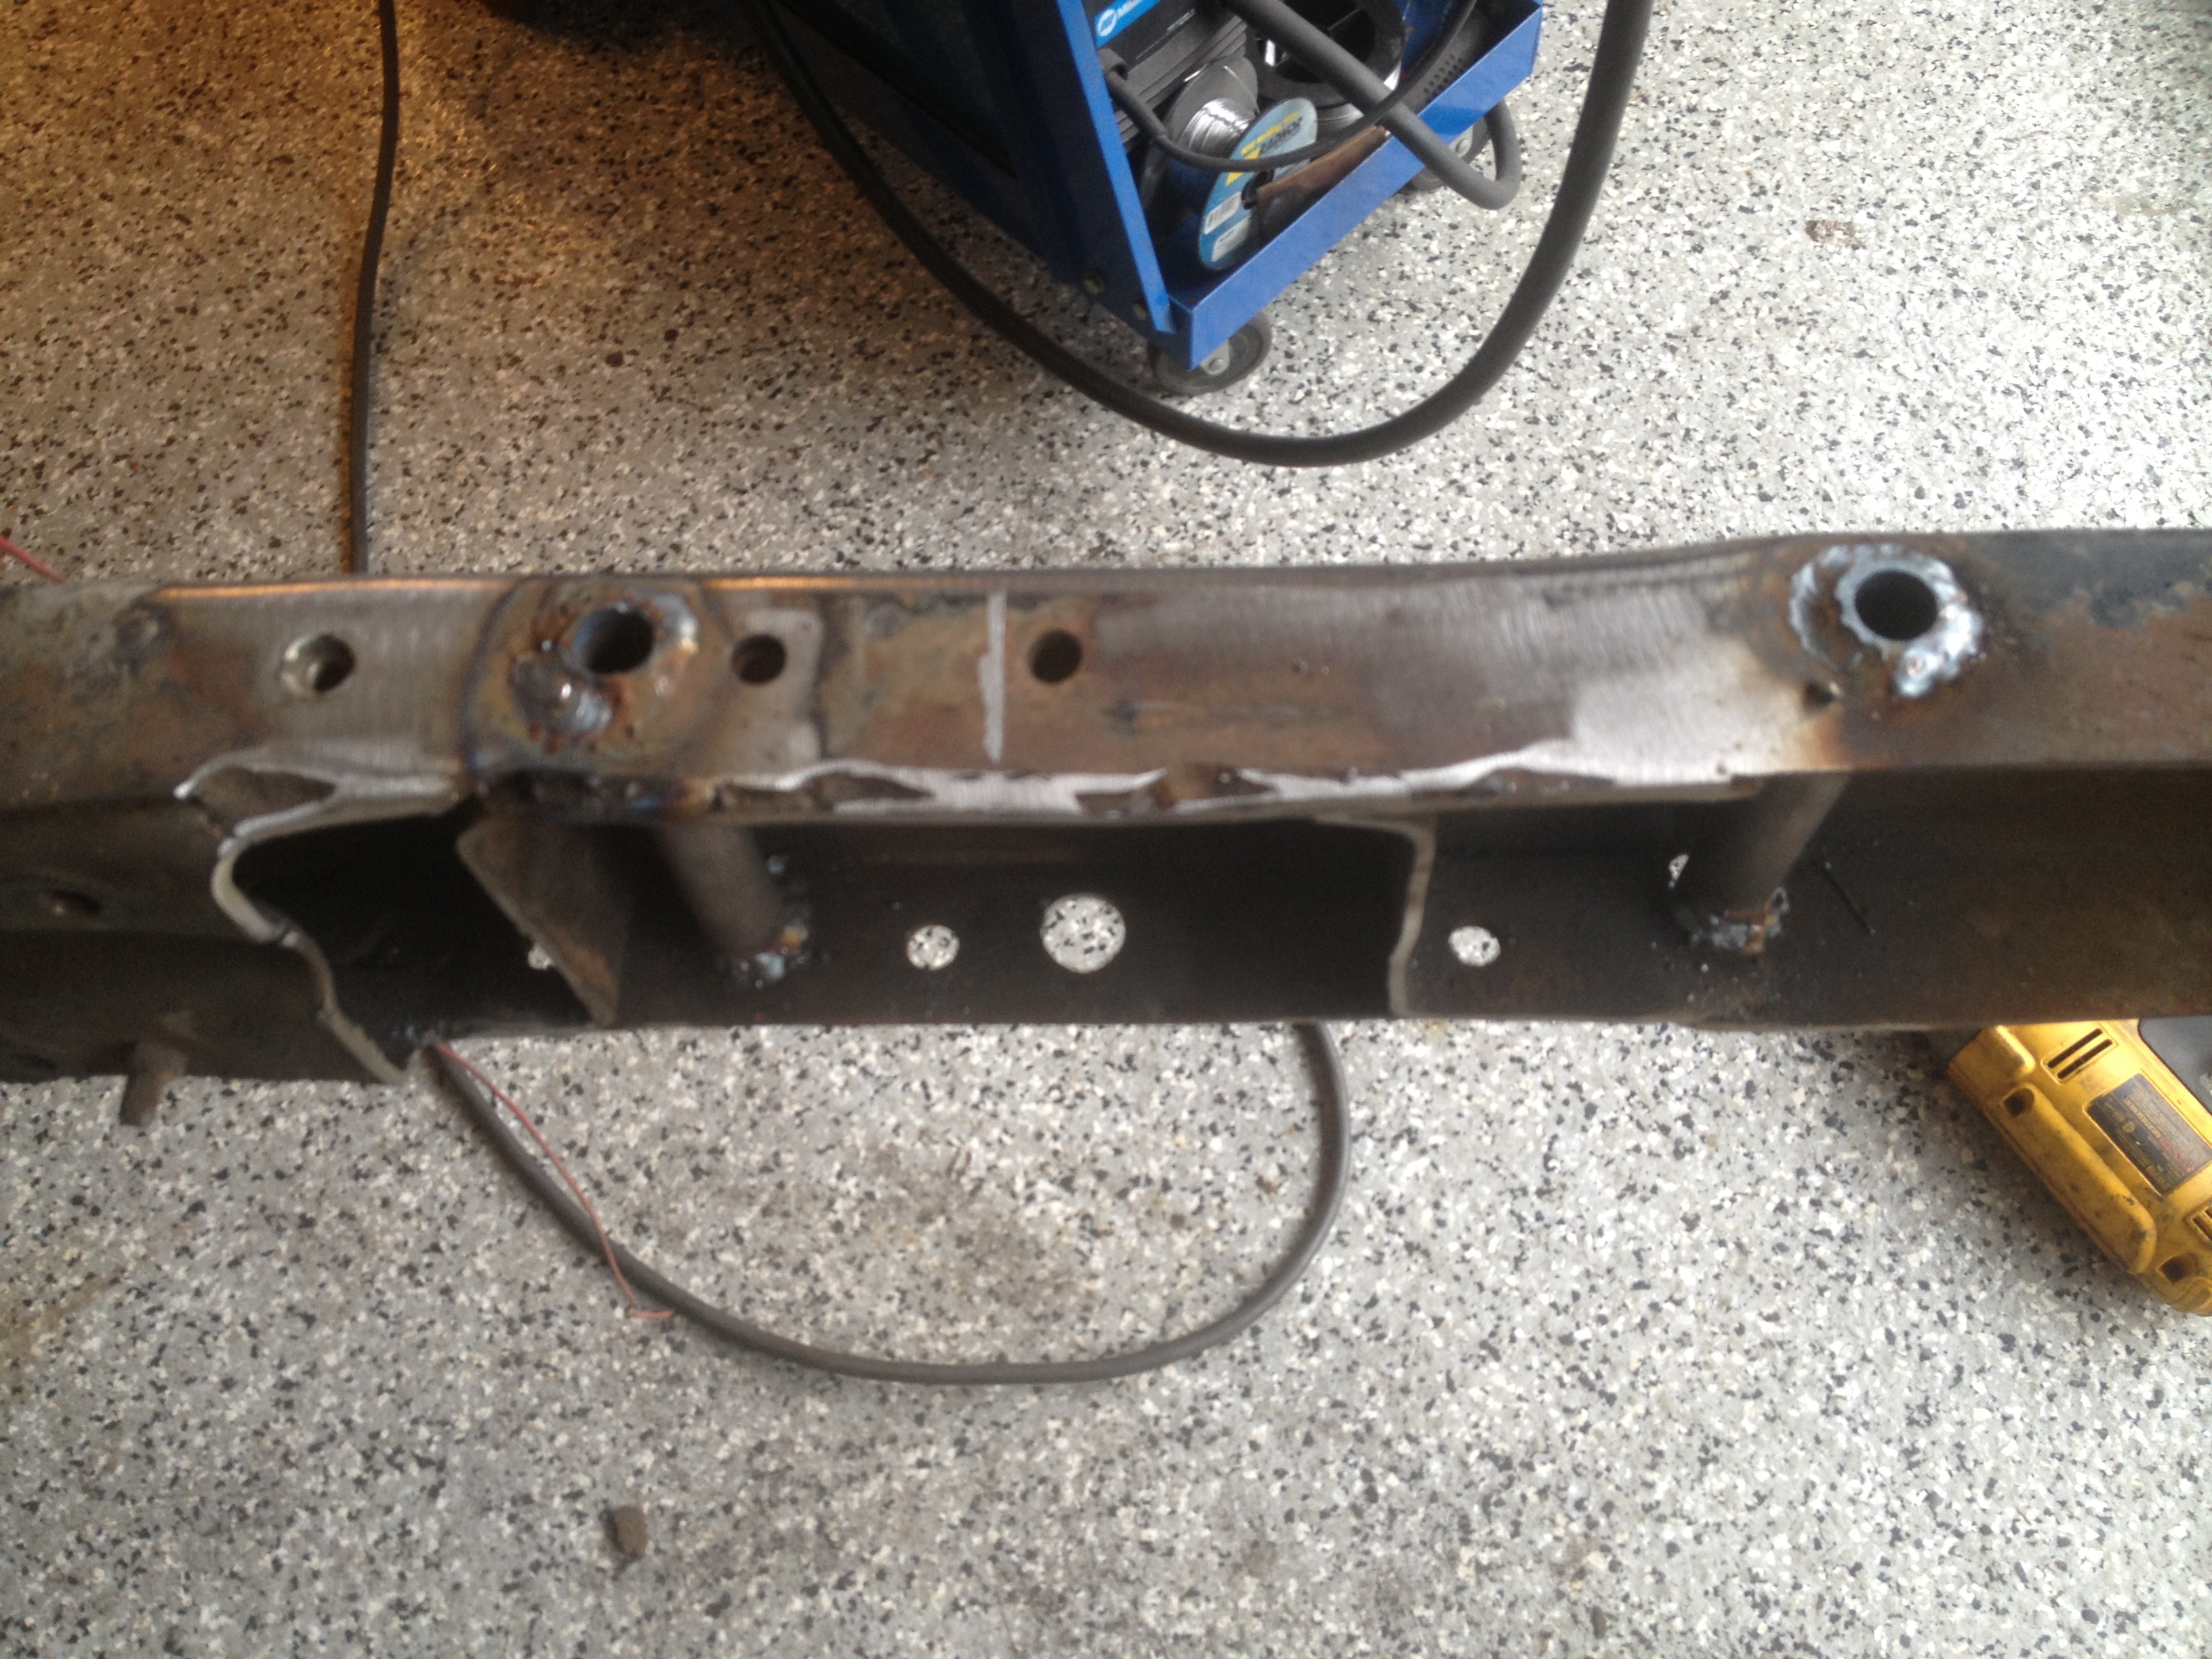
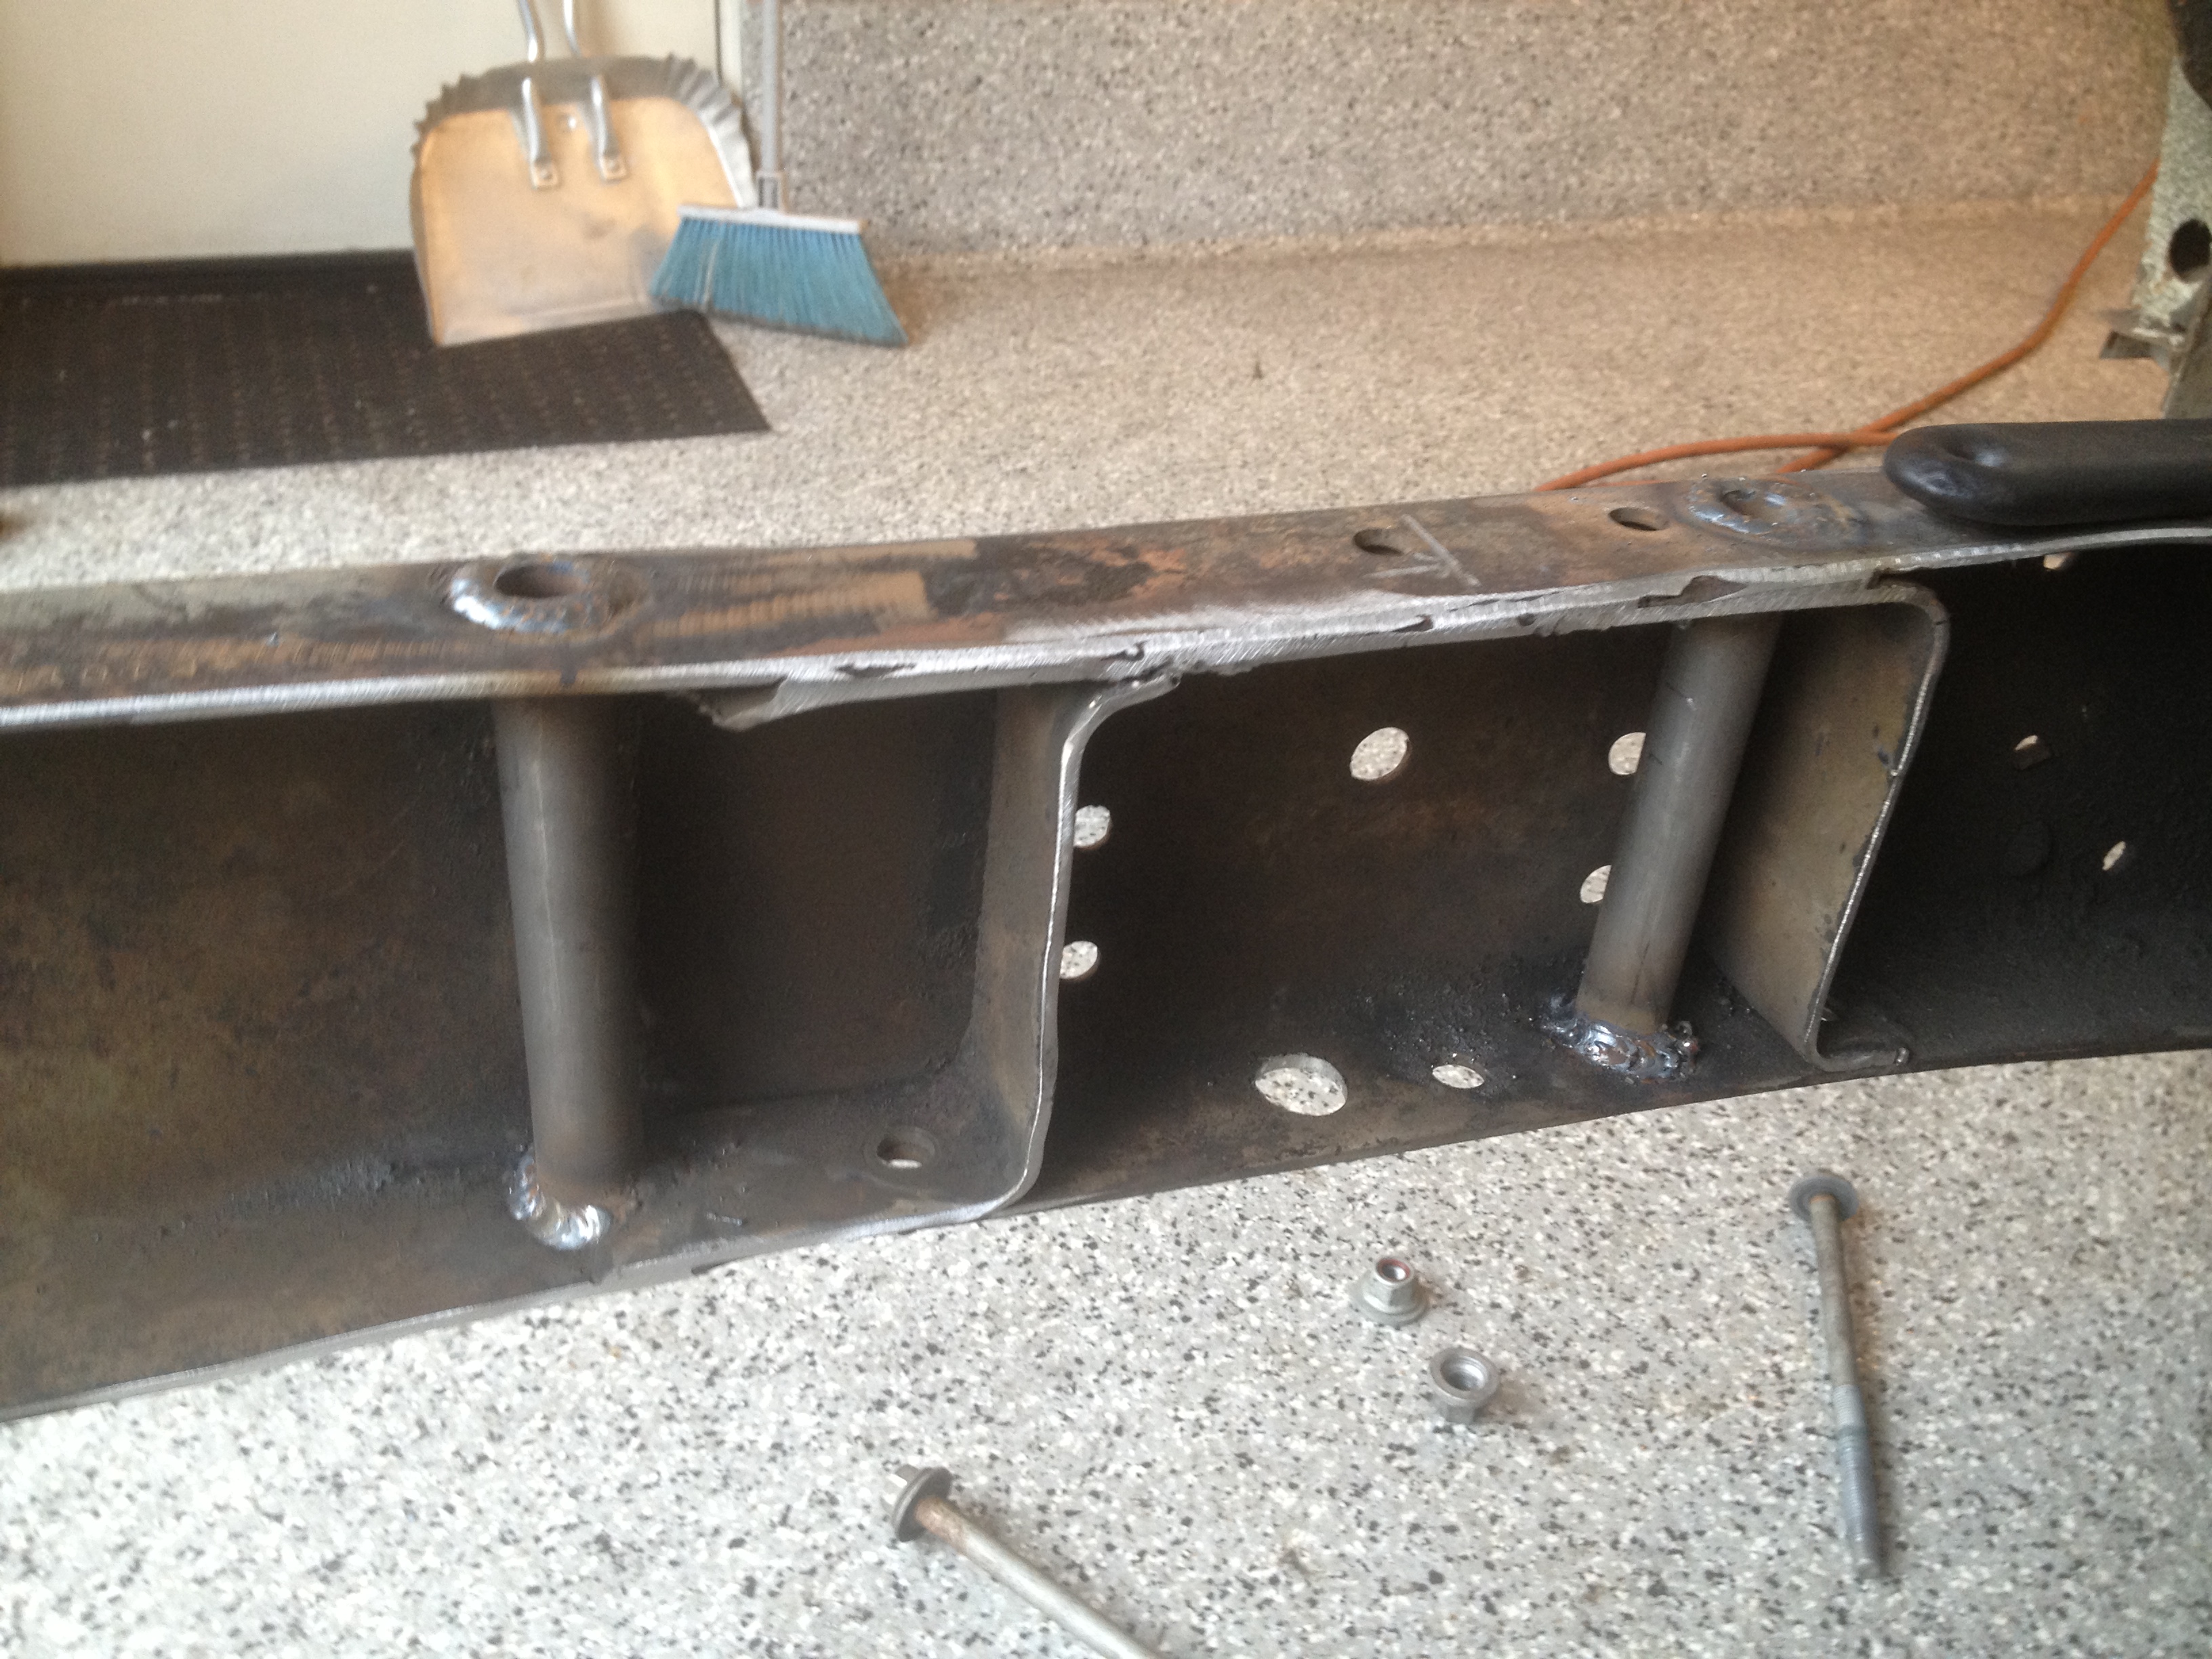
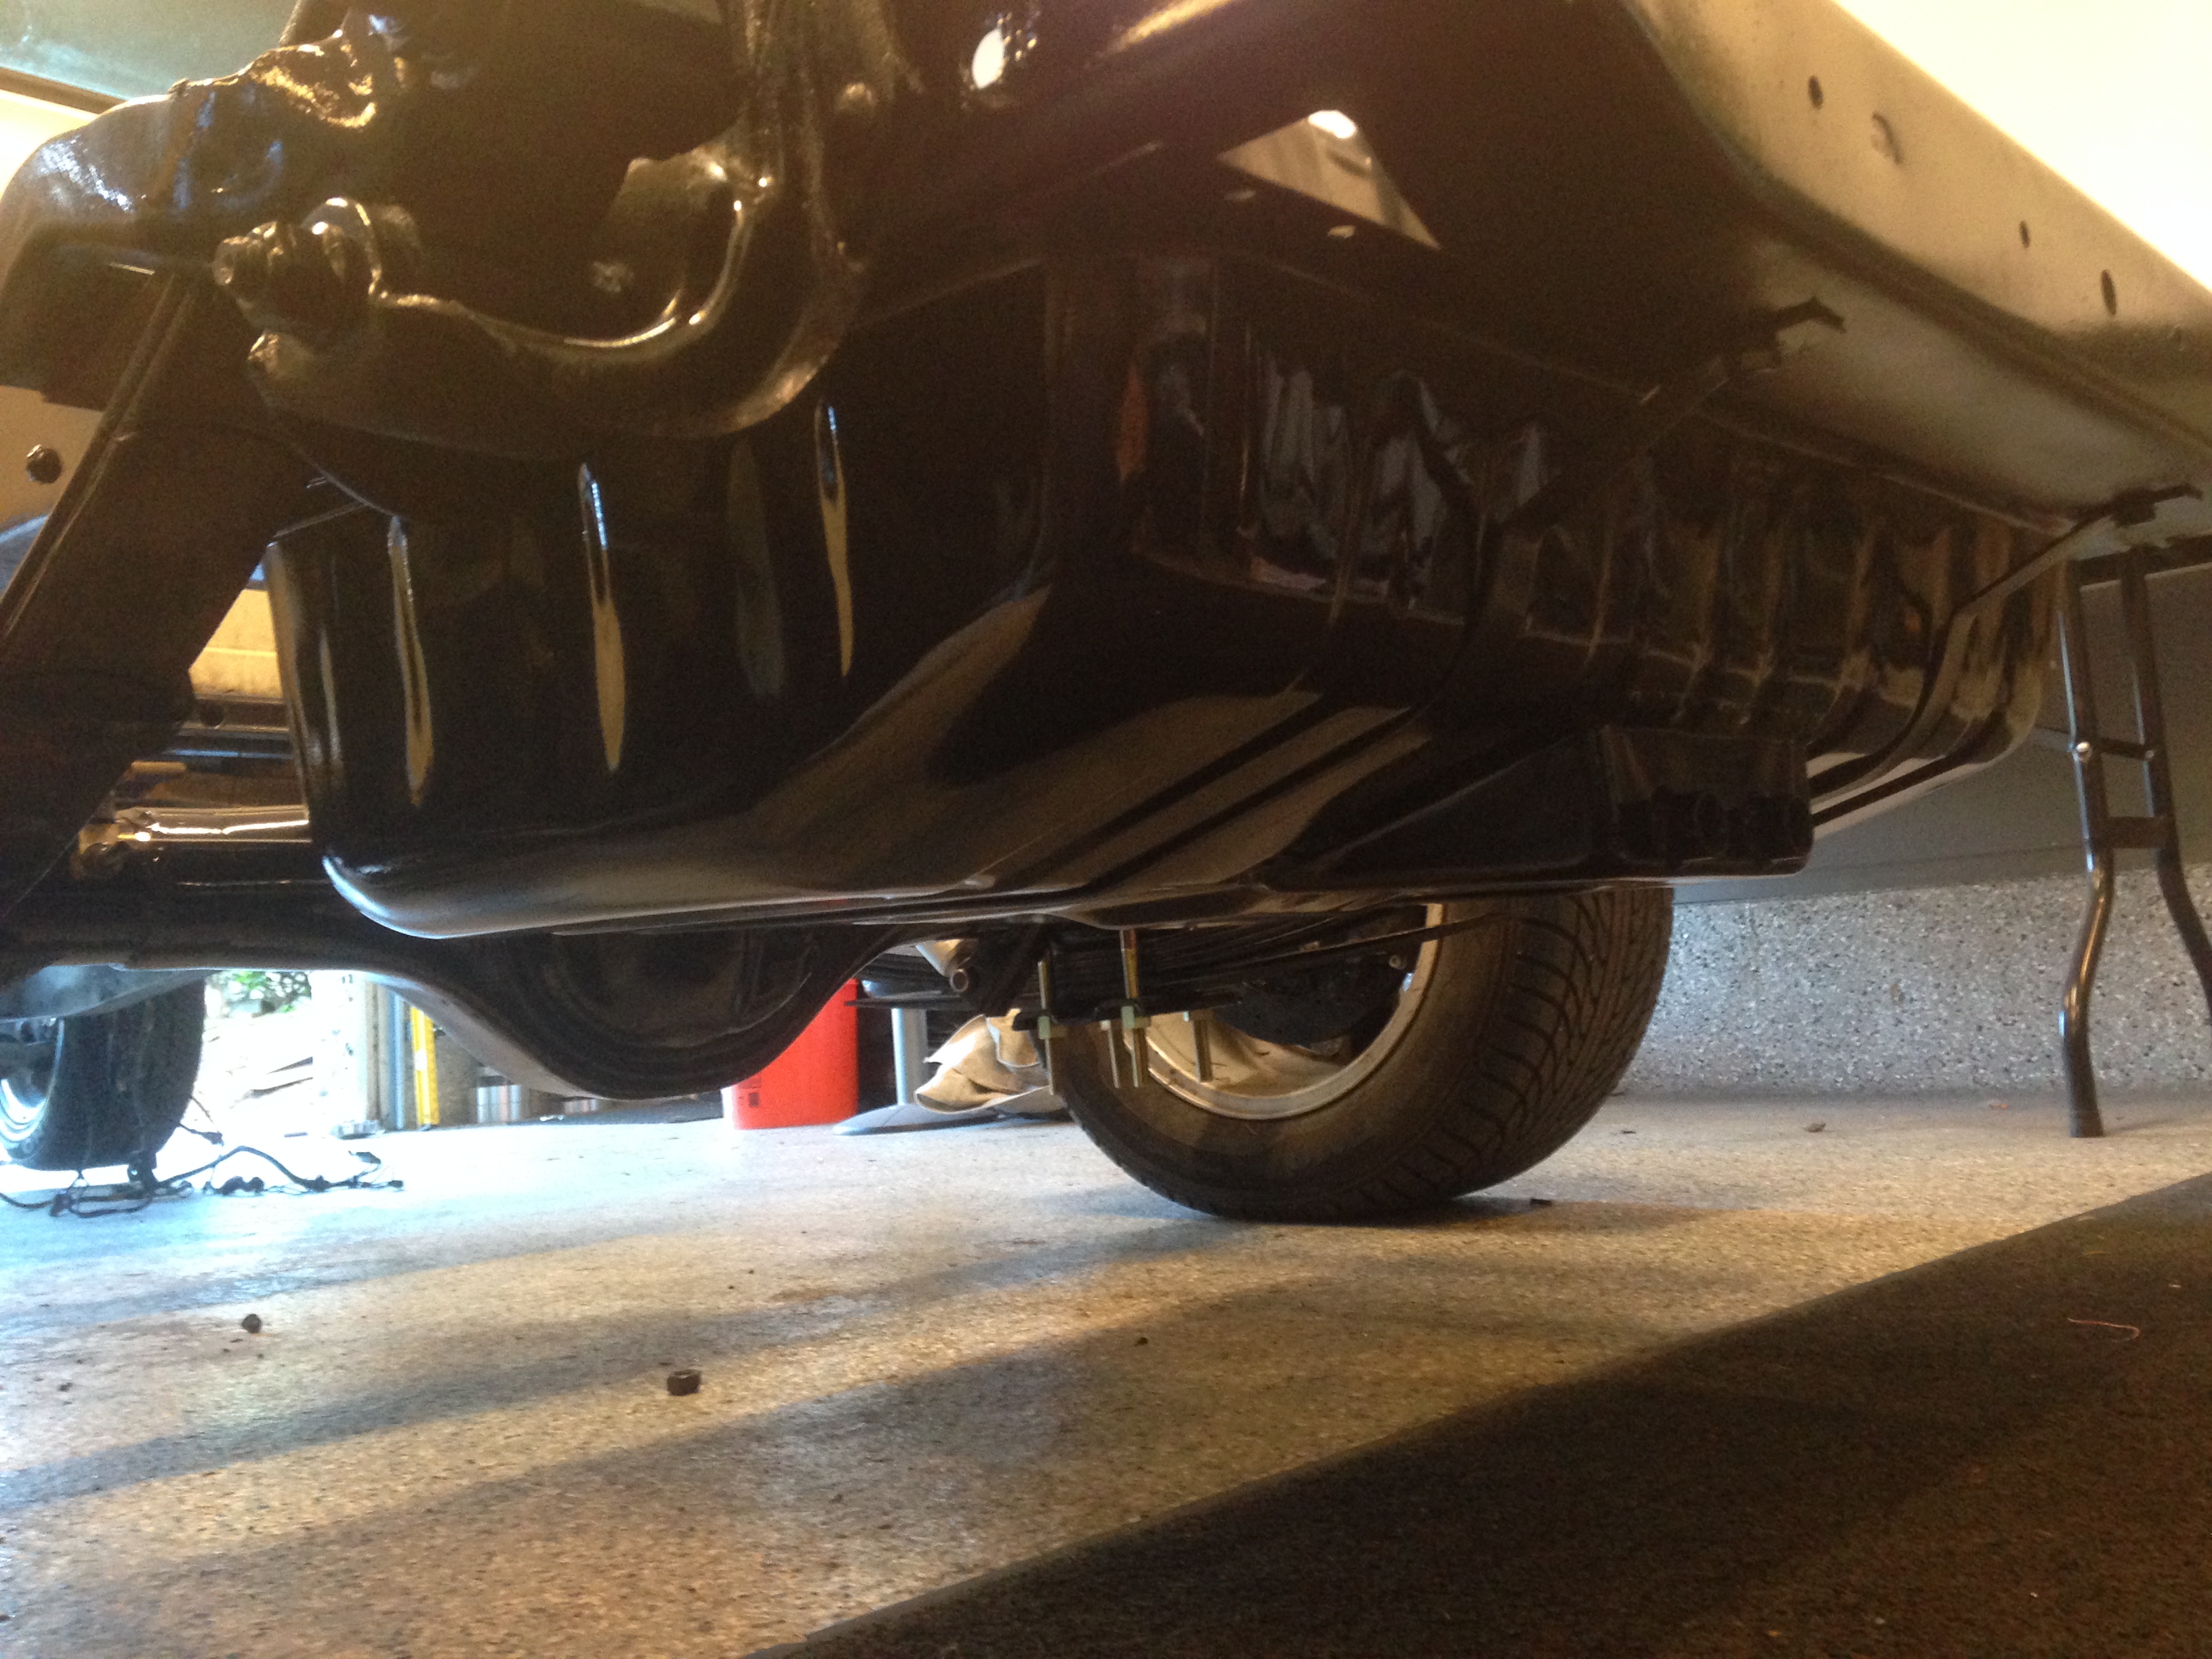
Its going to reside between the rear crossmember and the next crossmember forward. I am hanging it under the frame and holding it in place with two straps.
I got the tank where it needed to go, marked it out and bet up some straps. Welded some nuts to the inside of the crossmembers and got the tank hung.
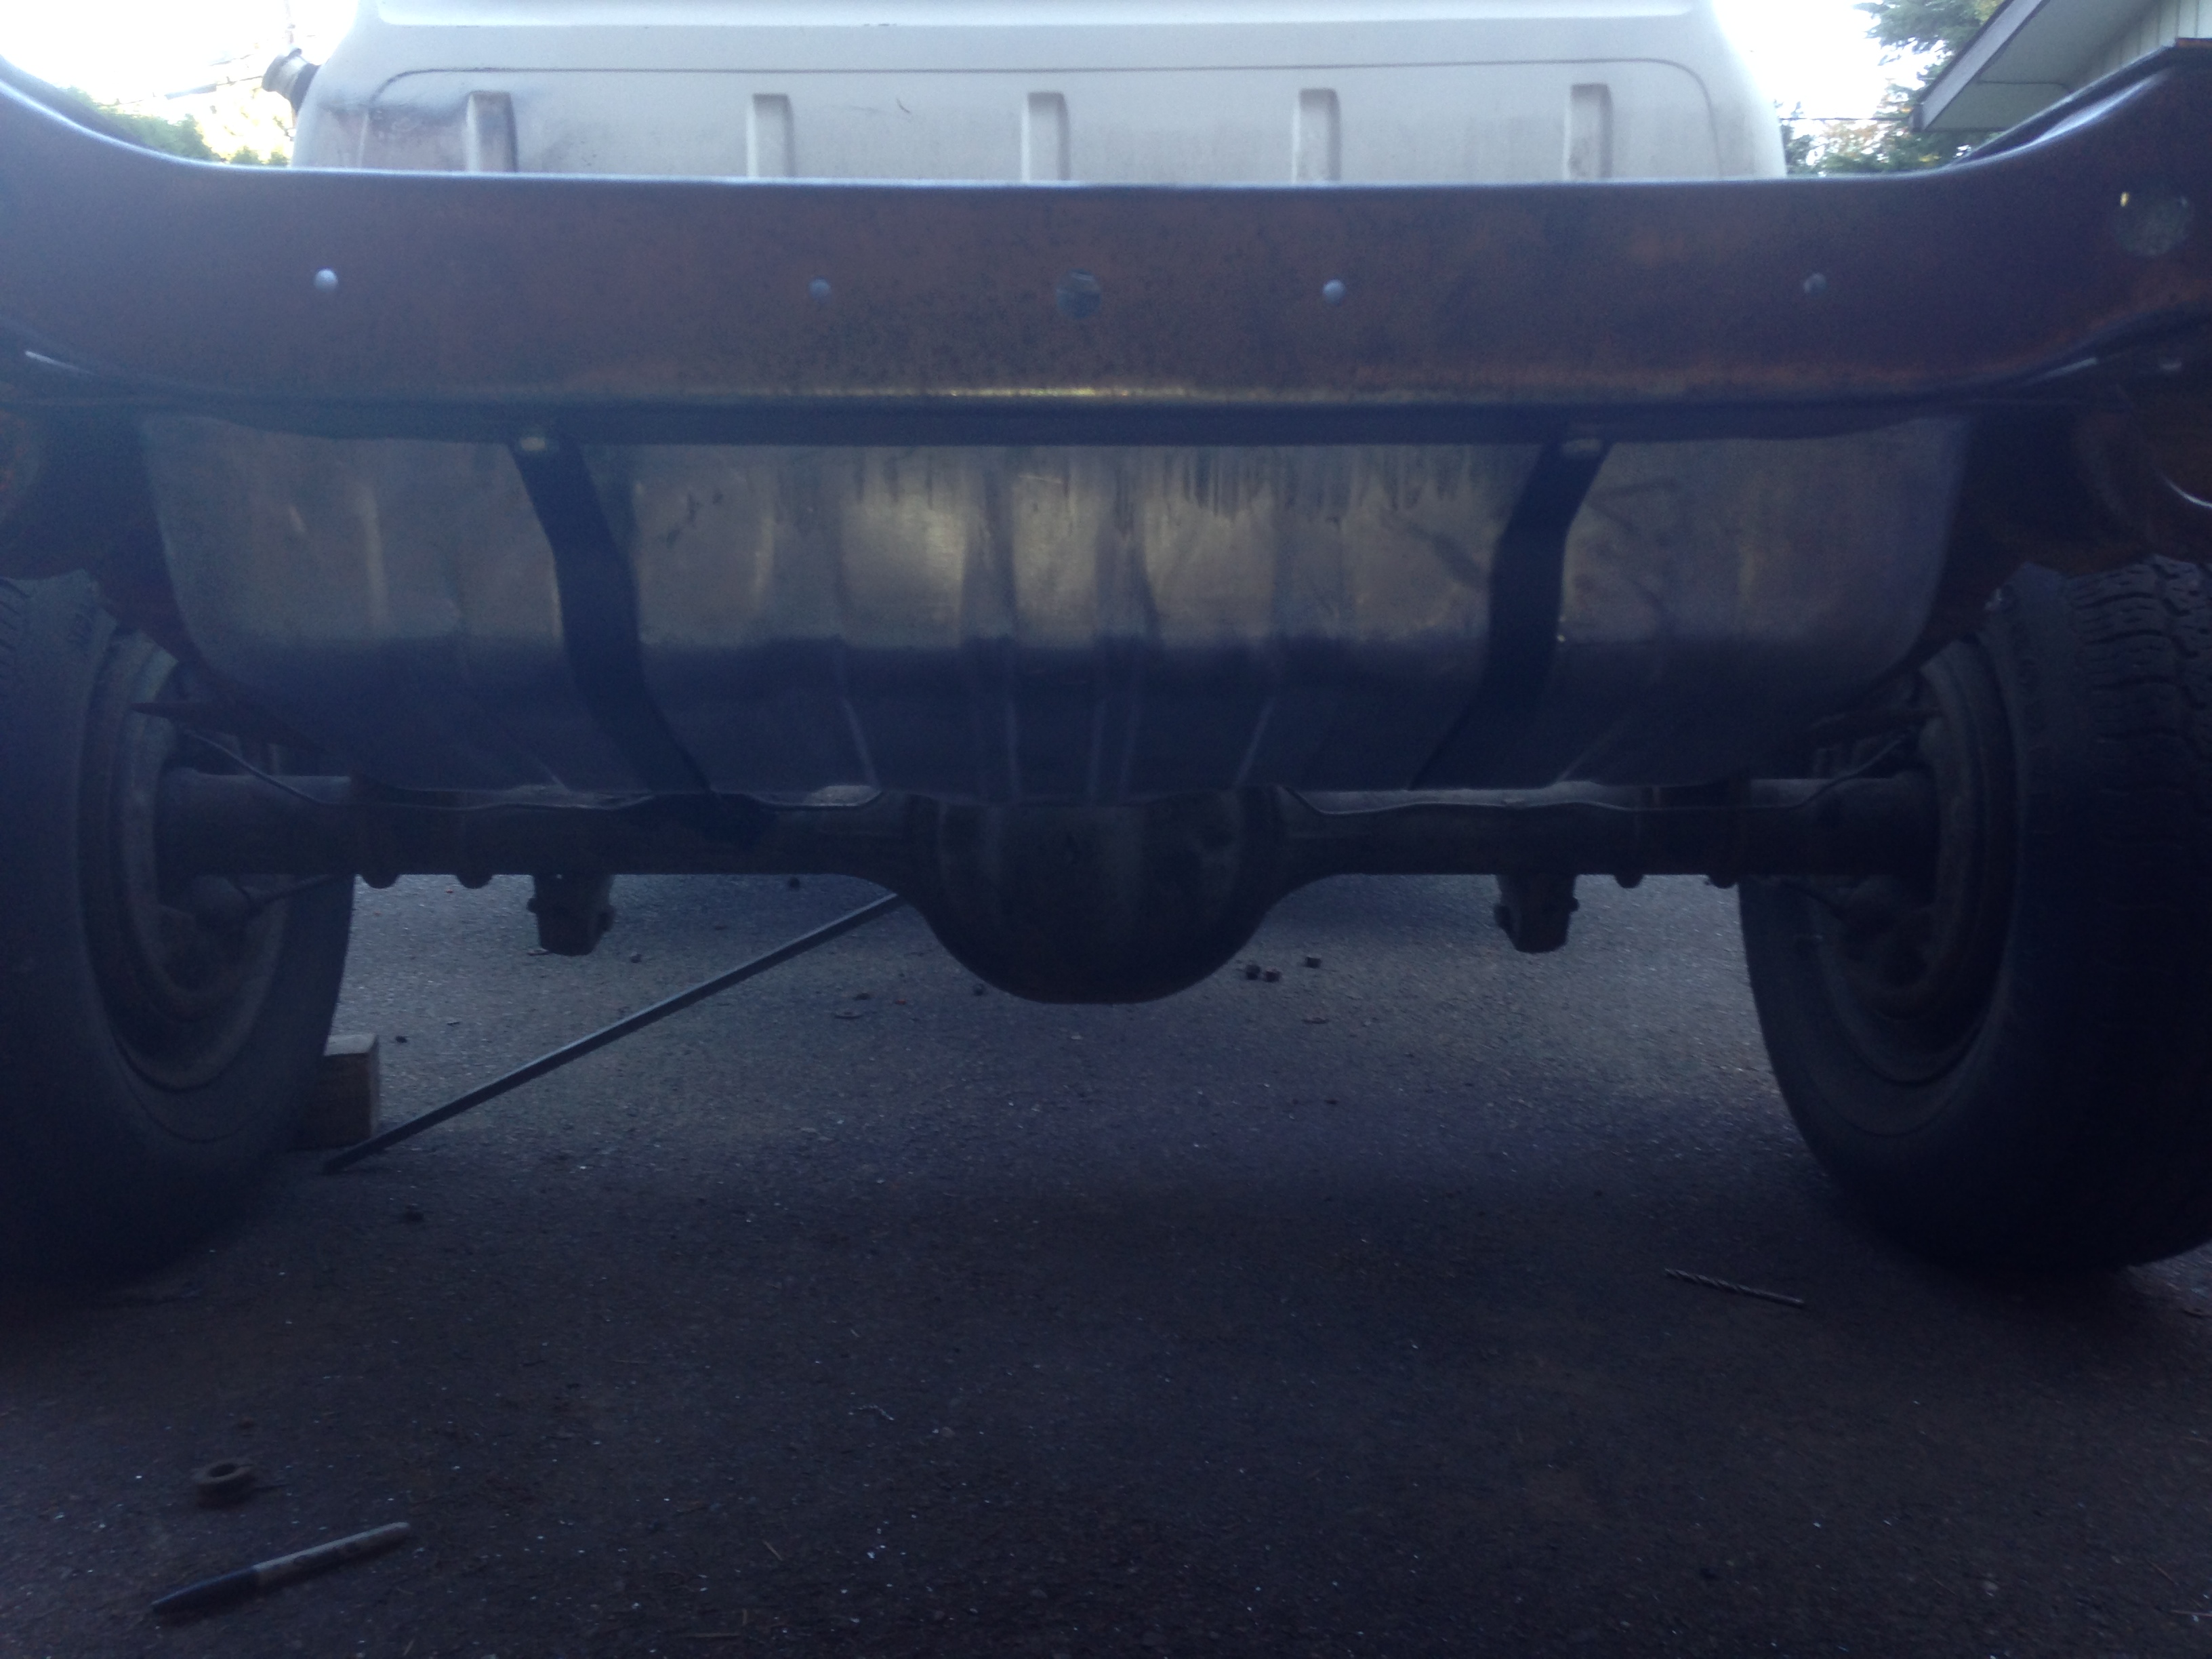
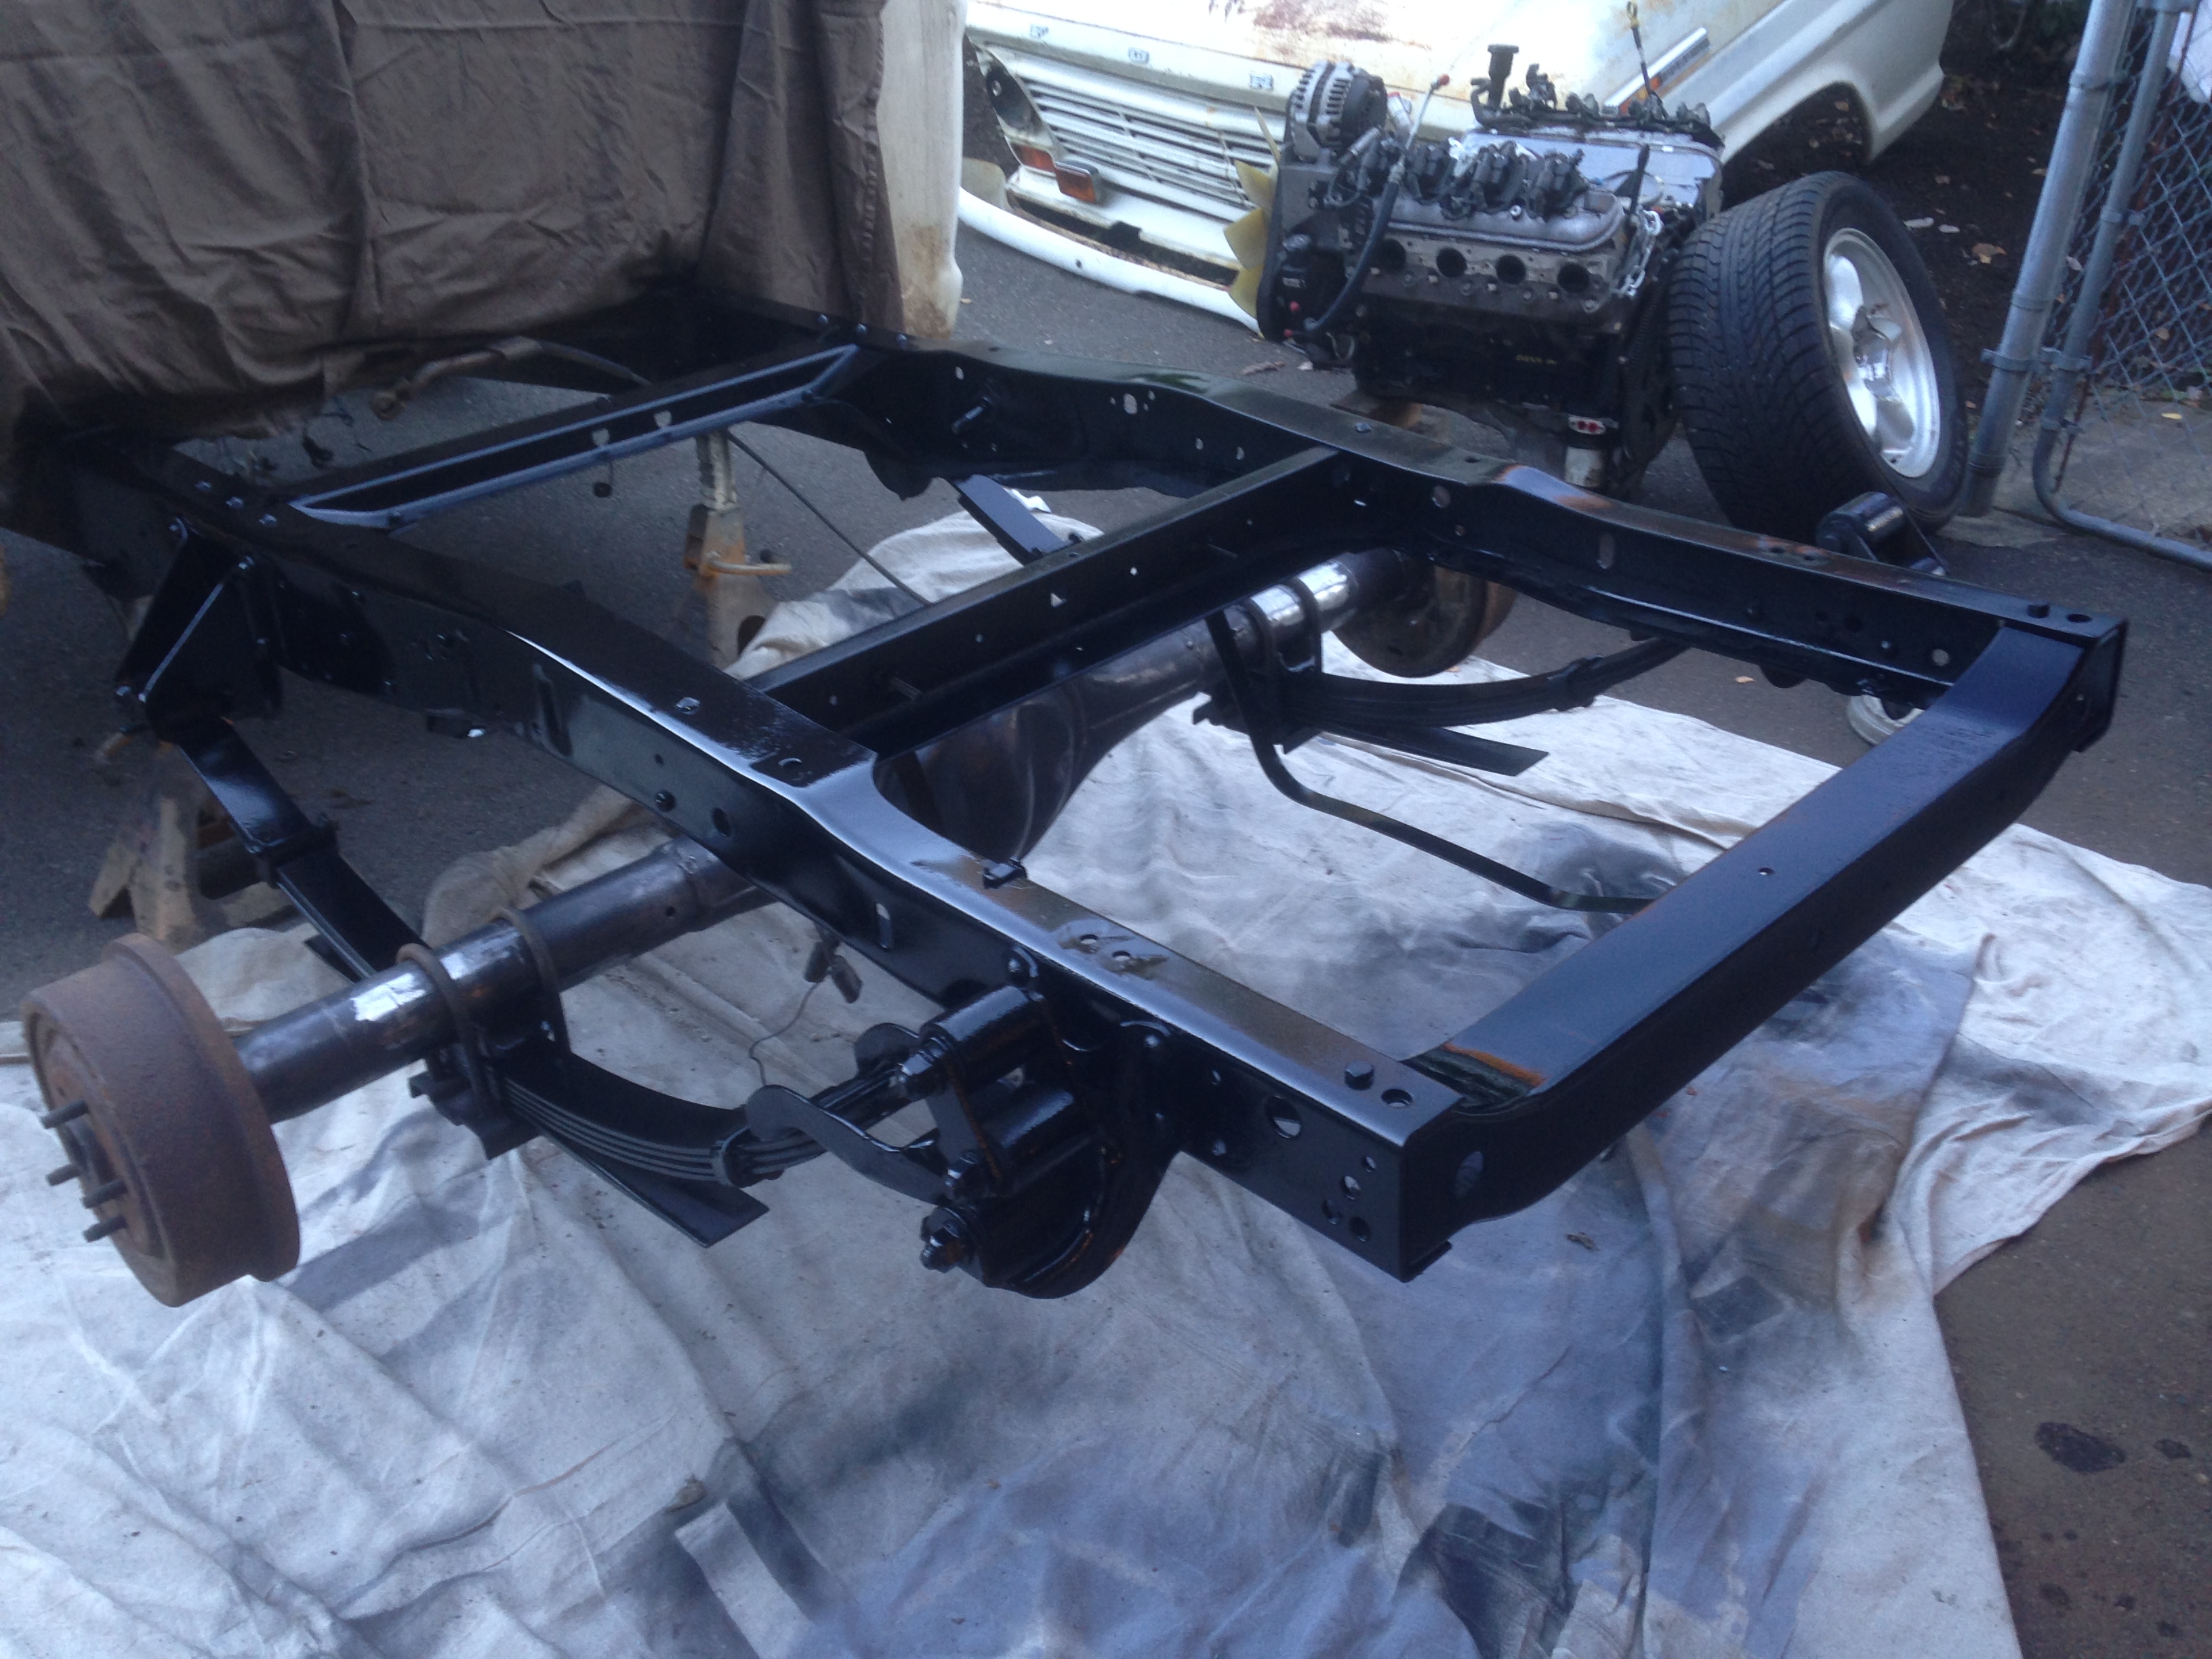
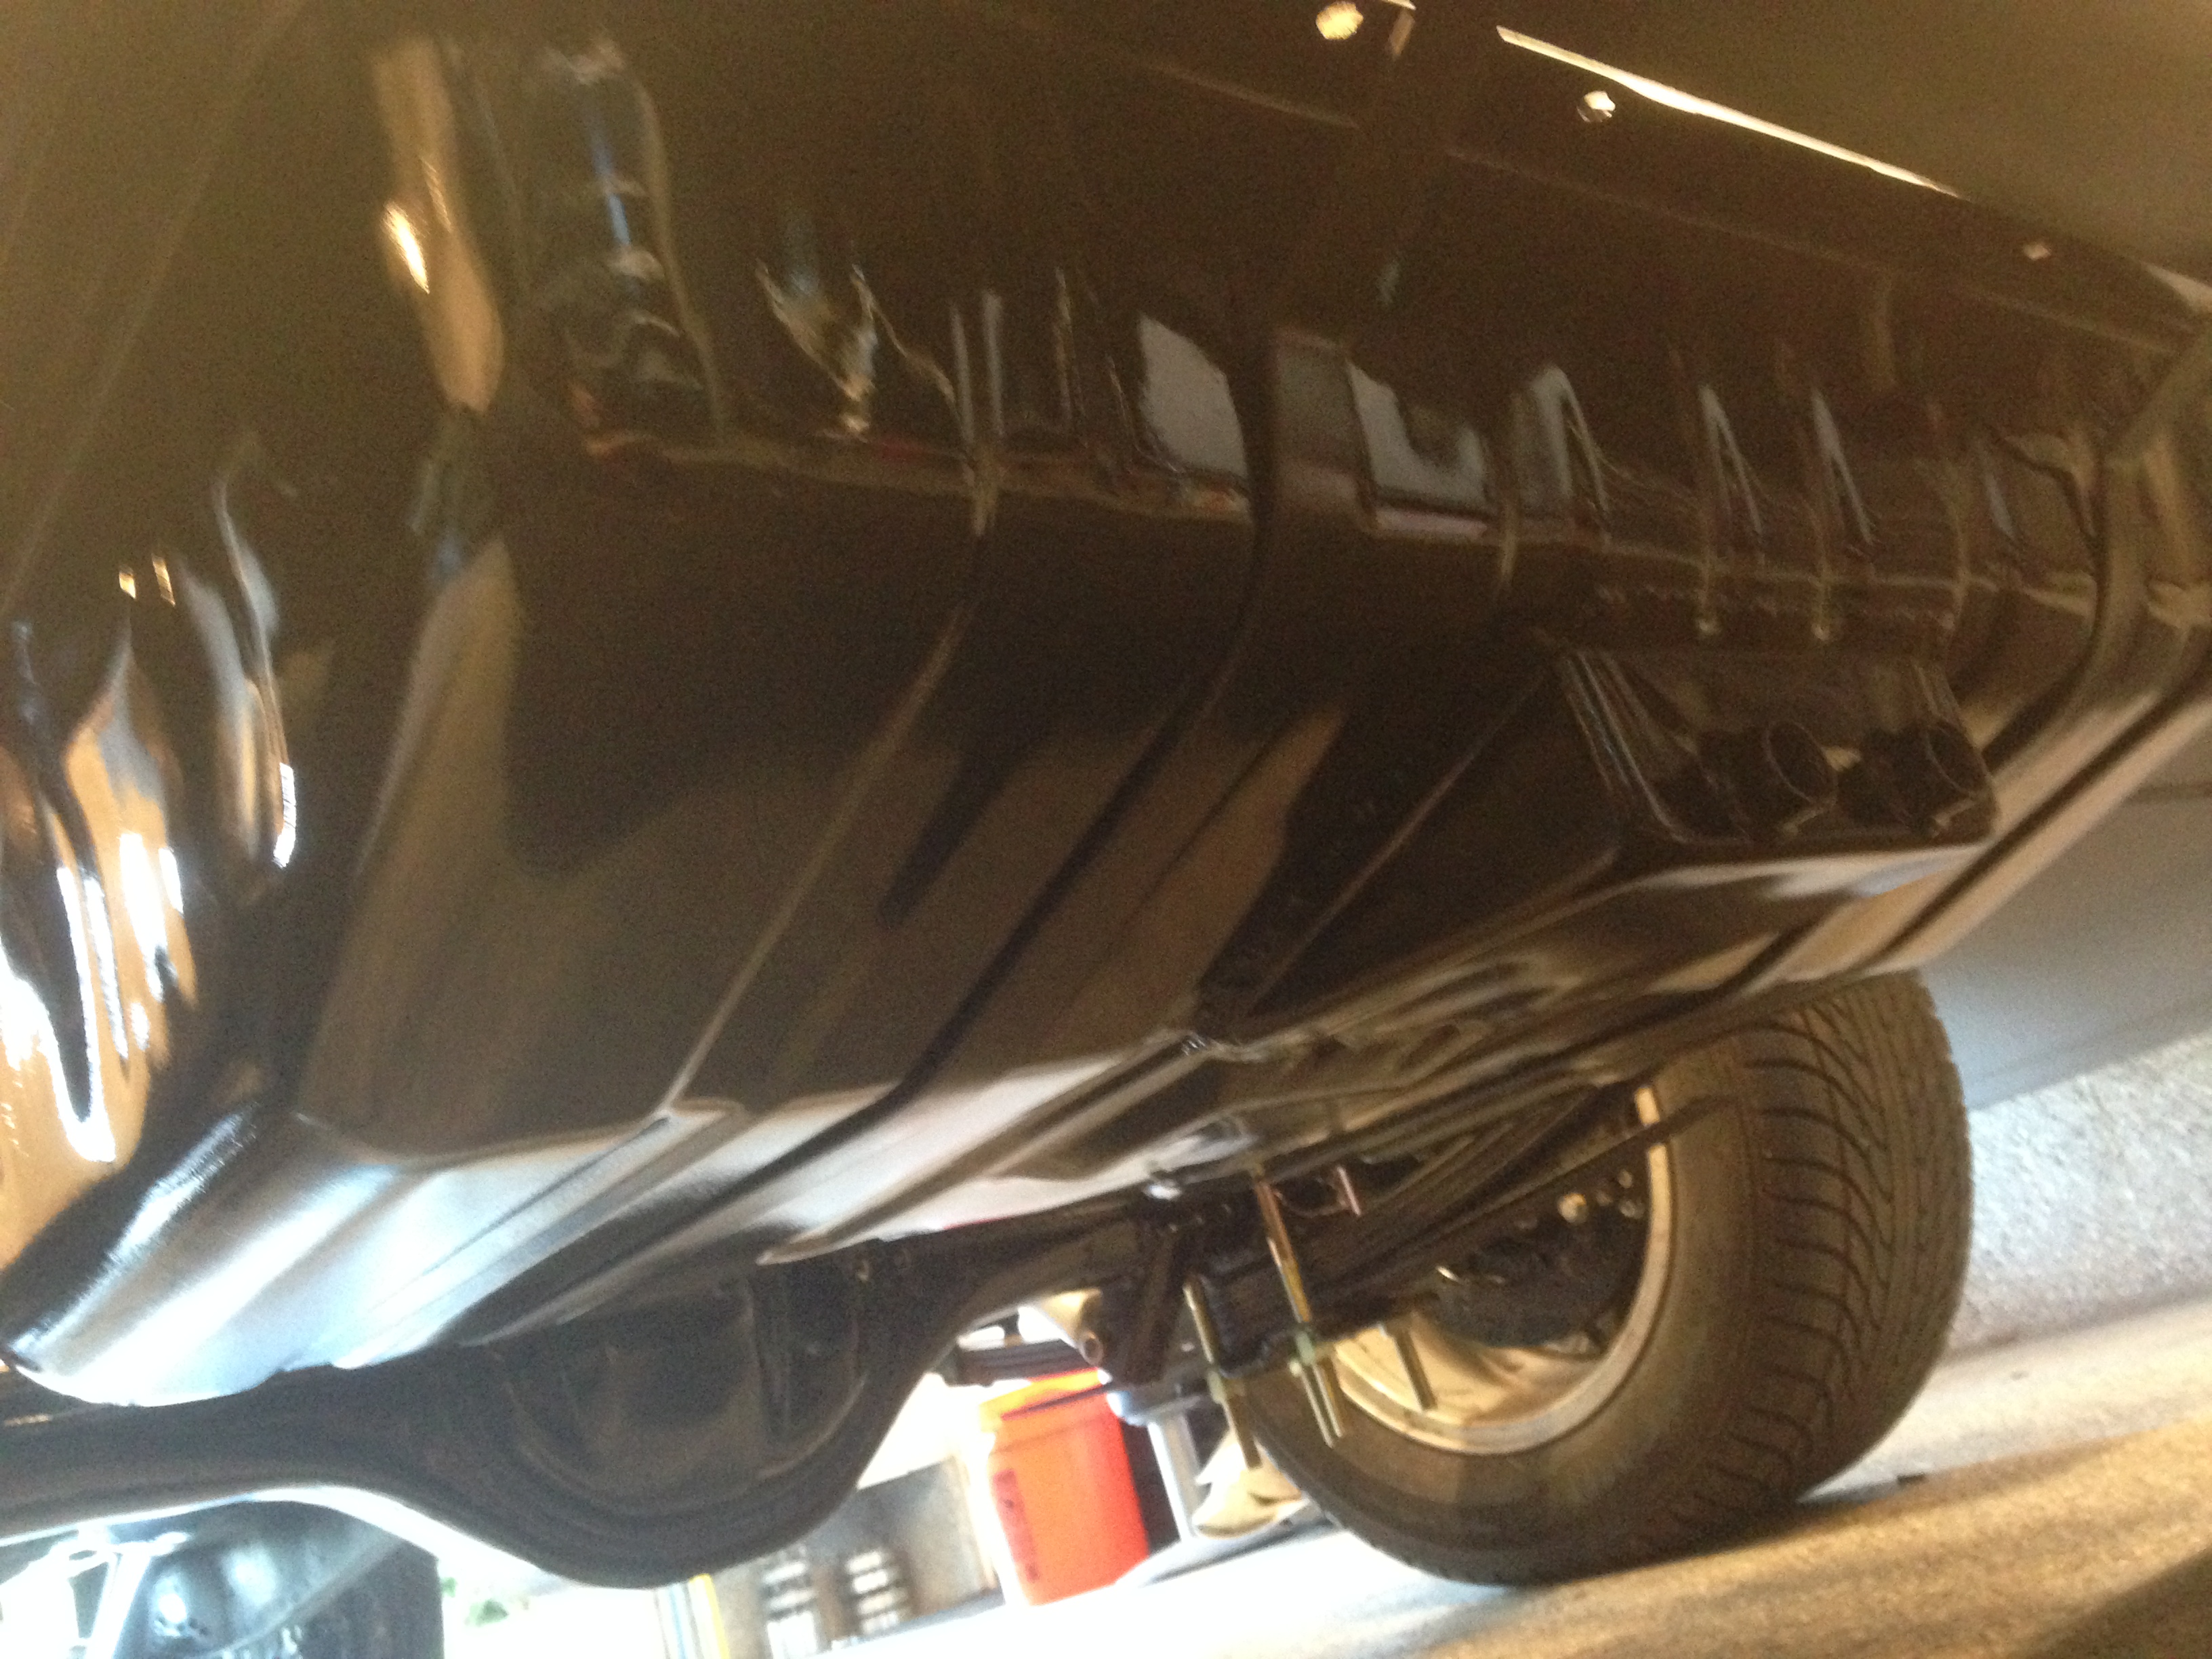
Also went to town on the rear frame with a wire wheel and lots of elbow grease. The frame is in perfect shape though and I have still yet to find a single spot of rust on the entire truck. Body mounts, cab corners everything is in great shape metal wise.
So with the tank all mounted, the weather looking good I hit the firewall with some scotchbrite and knocked down a couple of little flaws, mixed up some paint and tacked off the firewall....Here is the end result of my driveway reshoot on the frontend. Aside from a run or two, the paint turned out great and should allow me to get to putting stuff back together this week.
I dont know how, but it was still only 1 pm at this time.
We headed over to Daves place who runs Old School EFI here locally in vancouver. I took him my ls harness a couple weeks ago. He set it up for stand alone operation, added in relays for fan 1, fan 2, fuel pump, starter and all the works. Literally a three wire hookup and it runs. He did an awesome job on the harness and reprogram.
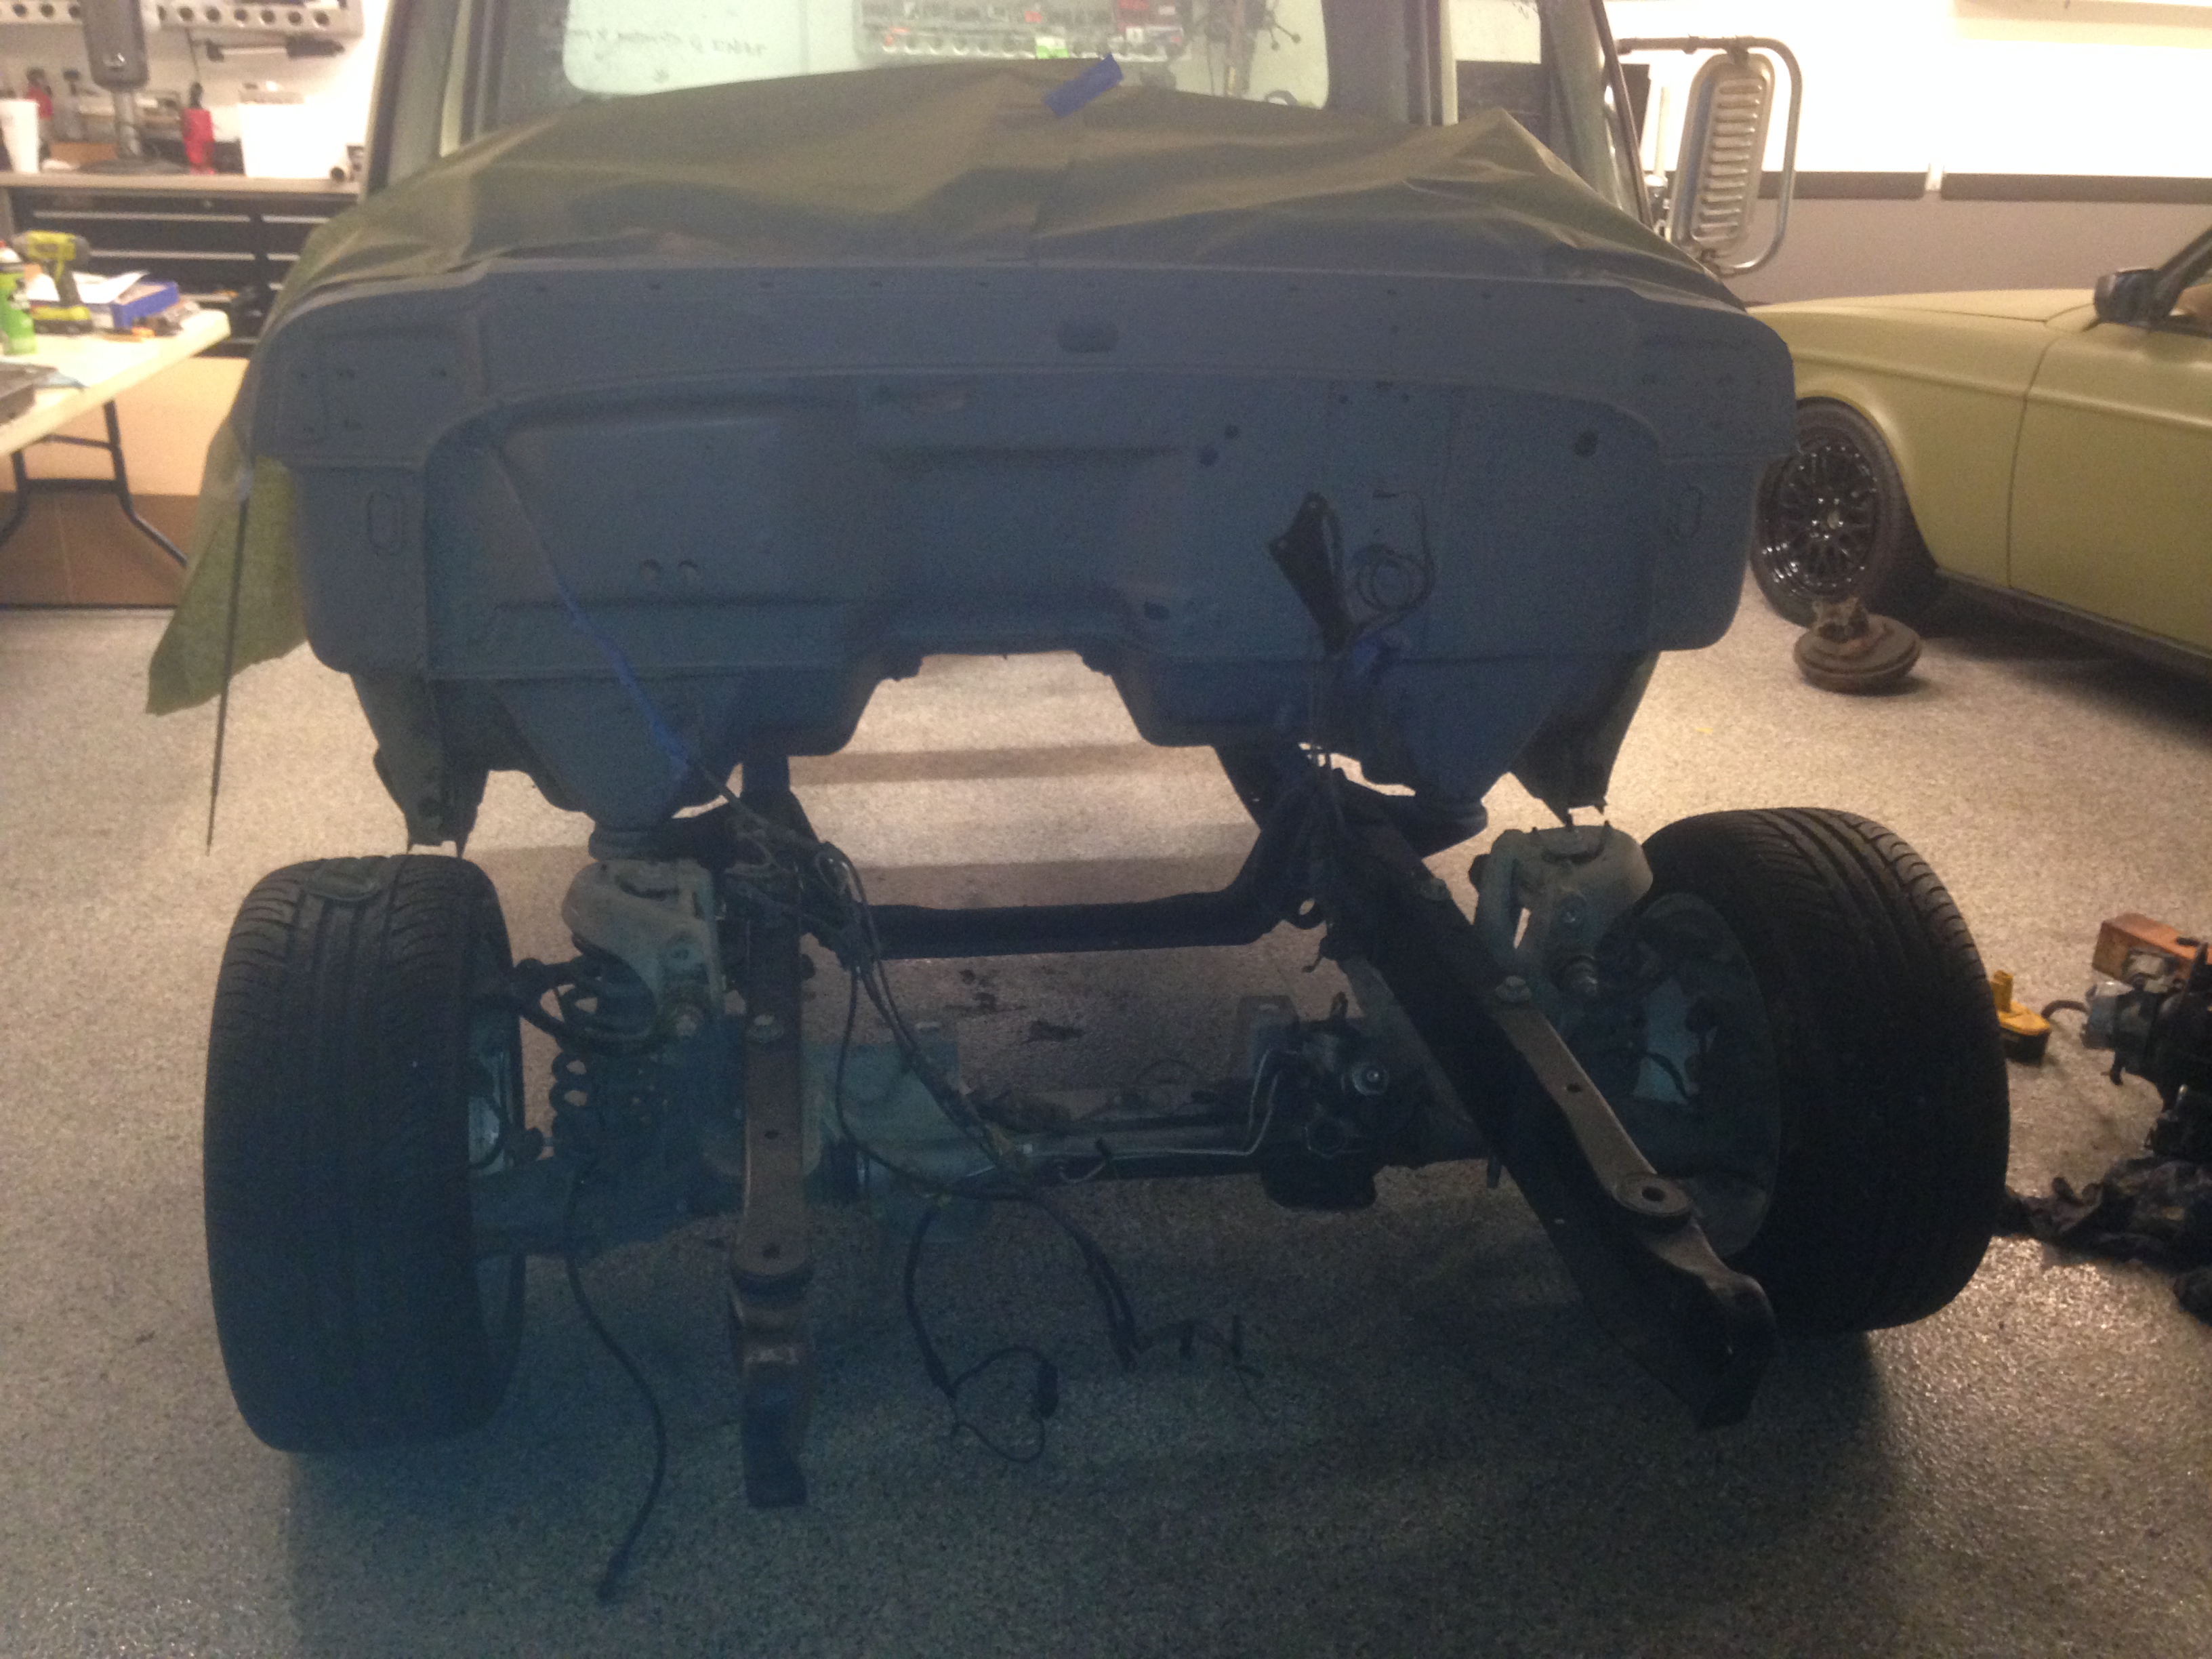
Got back and went to work on the rearend. Cut off all the brackets off the new 9" ground everything down after Asher got after it with the wire wheel. It was looking good. Took some measurements on the old rearend and got everything tacked up. Doing a spring under swap on the rearend.
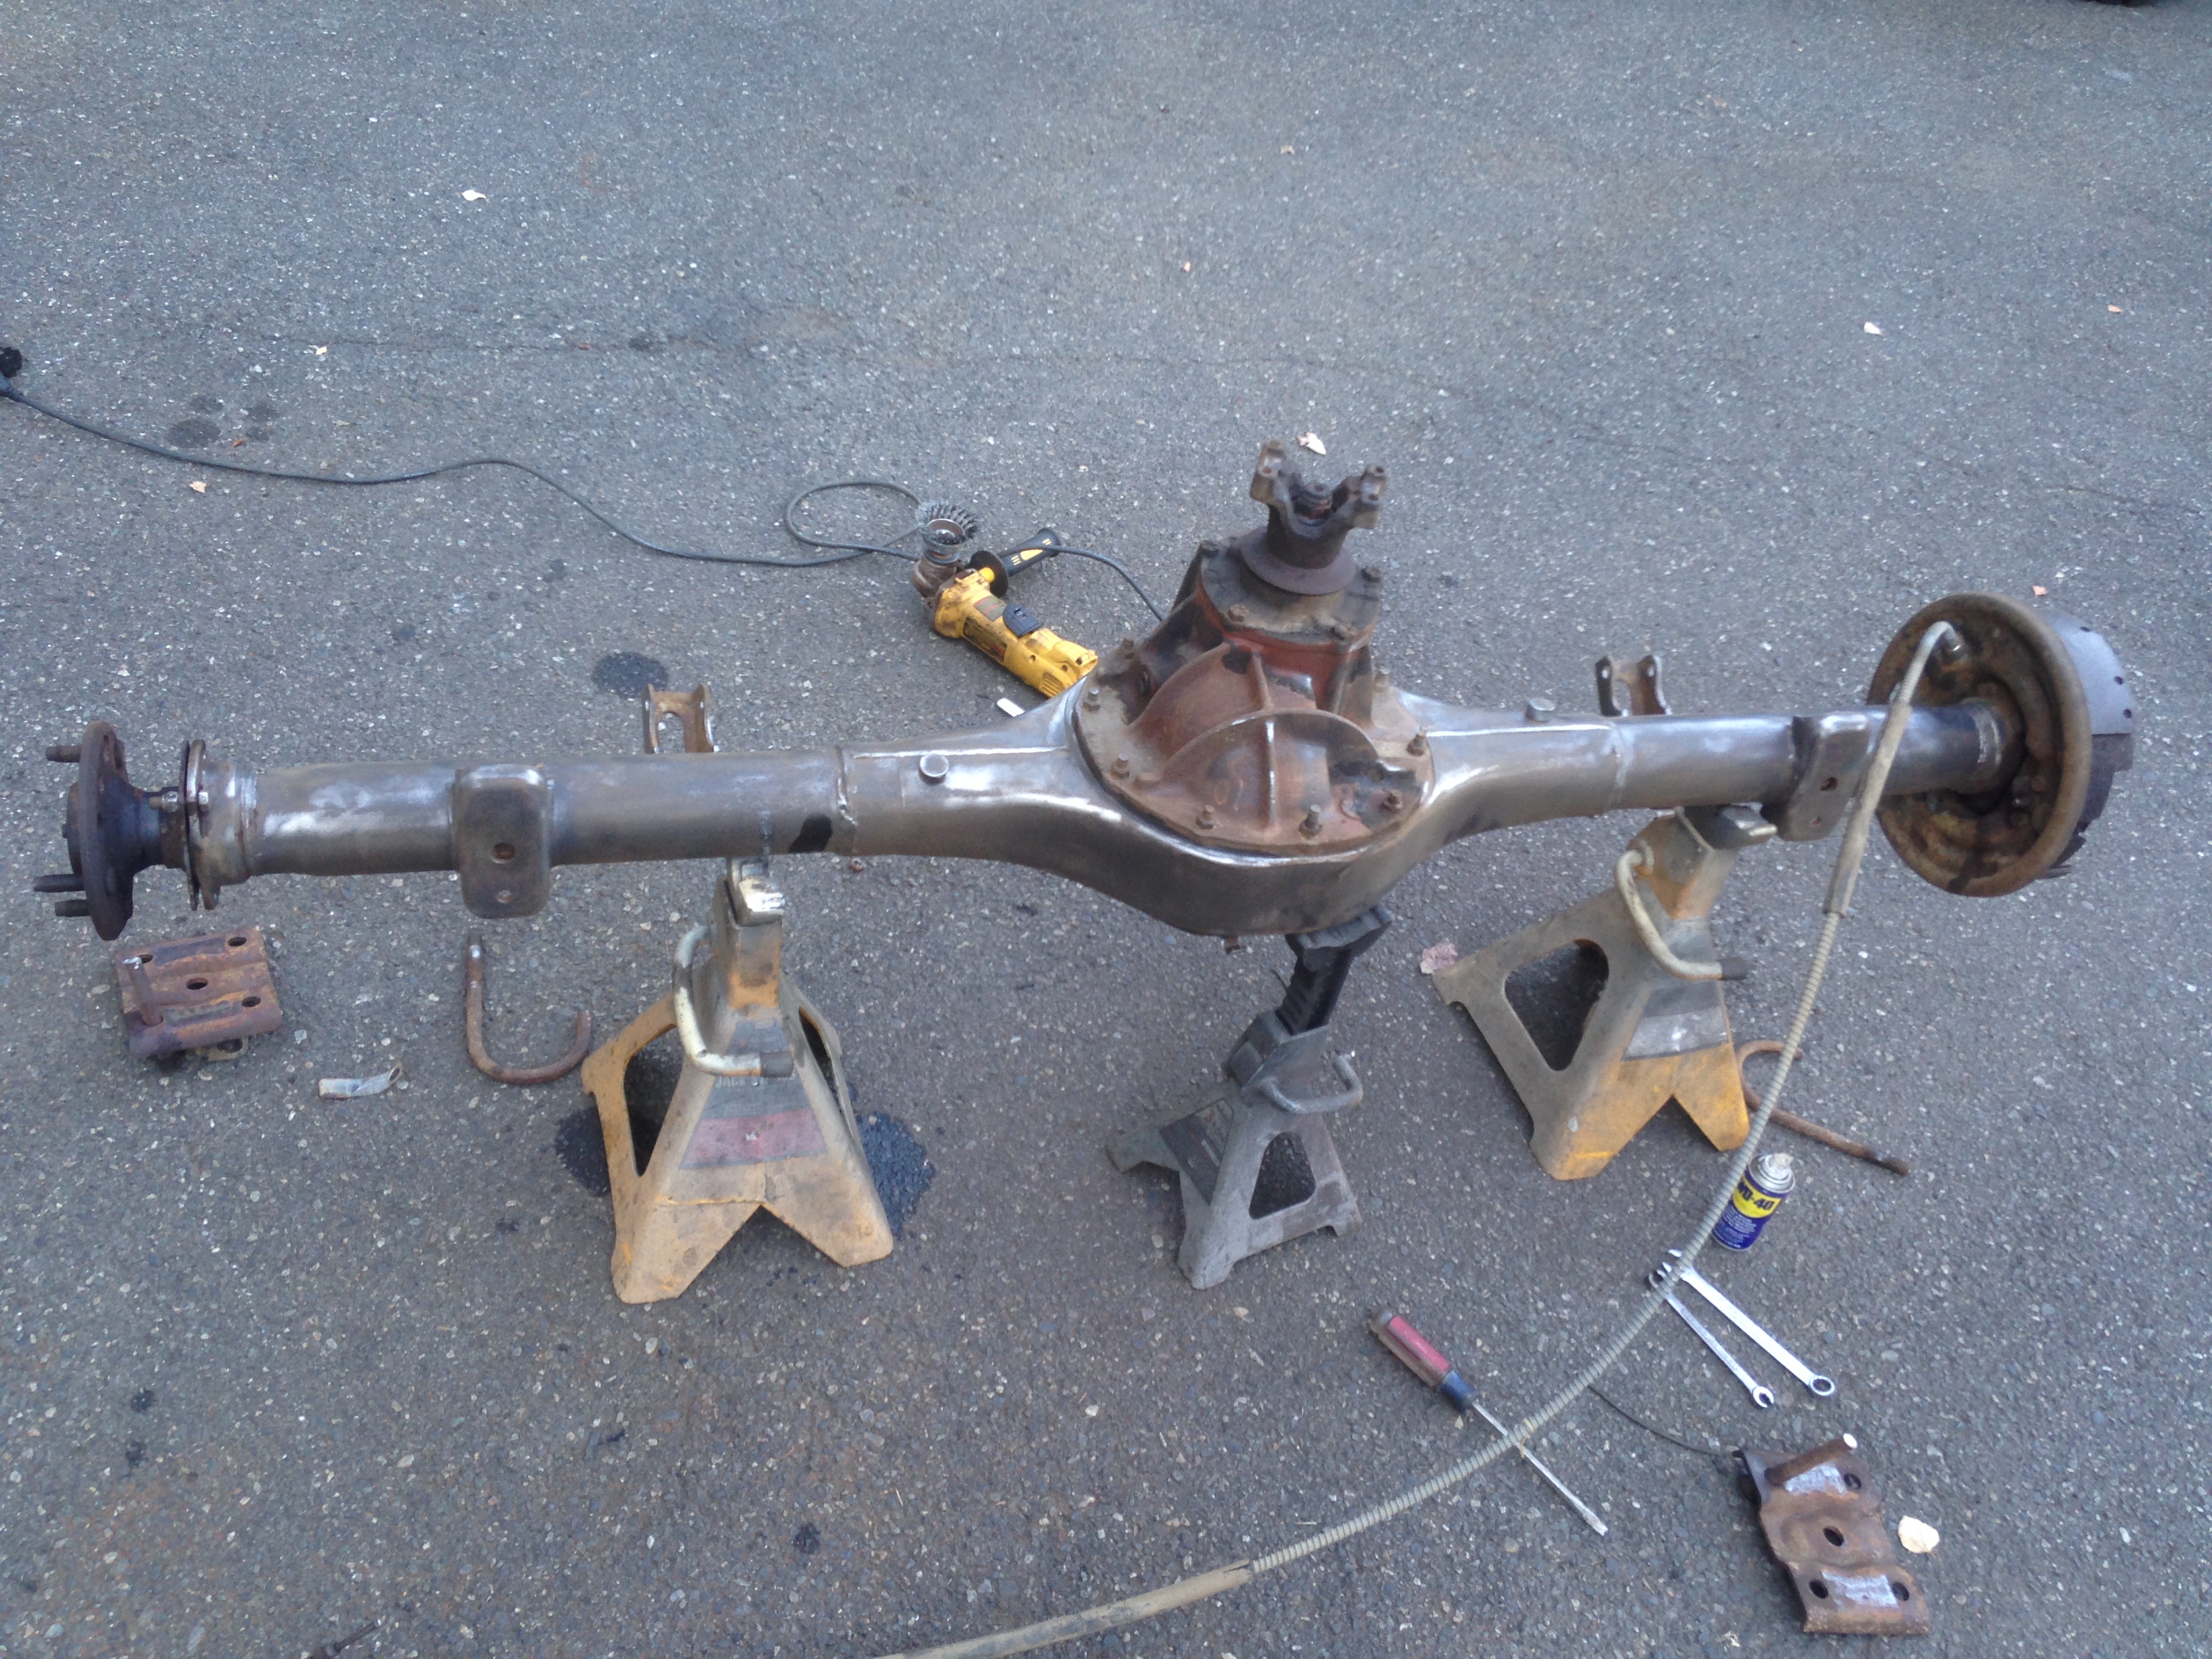
Pulled the old rearend and amazingly every bolt came off without any major problems. Rolled in the new rearend and lightly bolted it in.
Oh what a difference the stance of a project makes. Looks a lot better, front end might need to come down a little bit but its a heck of a lot better.
Pretty much where I left it off this evening.
Hope to get brakes plumbed and start on the firewall reassembly this week.
Sean
Saturday morning my buddy Asher and I loaded up the tools and headed out to the yard for some digging.
I came up with exactly what I was looking for, 1981 ford F100. 9" axle, 65" wide, 31 spline and 5x4.5 lug pattern. The axle that we found was missing some hardware on one axle end, but it was complete other than that.
By the time we got home it was about 1 pm. We got busy getting to work.
Pulled the motor back out and set it aside, stripped off everything from the firewall that was left. Sanded, sanded and sanded some more, little work with the wire wheel to clean it up where there was some rust and hit it with two coats of epoxy primer.

As that was drying, we got with the program and unloaded everything I was storing in the bed and got that sweet bumper pulled off, unbolted the bed and got that set aside.
Oh what fun, more rivets to get off for the rear crossmember. I have a pretty good method though. Grind off the head with a flap disc, then drill out just a little bit of the rivet and it pops right out.

So with a little time I was mocking up the fuel tank and see what I was going to do back here.
My buddy Dan came by in the evening and was awesome enough to tackle the Trans GO HD-2 shift kit installation in the 4l80E tranny. He got it all finished up with the exception of a pan gasket and a filter.

Although not a terrible task, I was able to keep working and knew that it was in capable hands with Dan on the tranny.
Pretty much see what I left in the garage on Saturday night.
Sunday morning was clean up time, we left it a mess on Saturday.
Saturday started by buttoning up the tranny so that I could get back to some dirty work.
Picked up parts and got that done early.
I have seen a couple folks build the frame and set the fuel tank inside the framerails. While I like the idea of gaining some clearance in the rear, the idea of having to pull the bumper, the bed and the rear crossmember to get the tank out was not for me. So I went a little different route.

Its going to reside between the rear crossmember and the next crossmember forward. I am hanging it under the frame and holding it in place with two straps.
I got the tank where it needed to go, marked it out and bet up some straps. Welded some nuts to the inside of the crossmembers and got the tank hung.

Also went to town on the rear frame with a wire wheel and lots of elbow grease. The frame is in perfect shape though and I have still yet to find a single spot of rust on the entire truck. Body mounts, cab corners everything is in great shape metal wise.
So with the tank all mounted, the weather looking good I hit the firewall with some scotchbrite and knocked down a couple of little flaws, mixed up some paint and tacked off the firewall....Here is the end result of my driveway reshoot on the frontend. Aside from a run or two, the paint turned out great and should allow me to get to putting stuff back together this week.

I dont know how, but it was still only 1 pm at this time.
We headed over to Daves place who runs Old School EFI here locally in vancouver. I took him my ls harness a couple weeks ago. He set it up for stand alone operation, added in relays for fan 1, fan 2, fuel pump, starter and all the works. Literally a three wire hookup and it runs. He did an awesome job on the harness and reprogram.
Got back and went to work on the rearend. Cut off all the brackets off the new 9" ground everything down after Asher got after it with the wire wheel. It was looking good. Took some measurements on the old rearend and got everything tacked up. Doing a spring under swap on the rearend.

Pulled the old rearend and amazingly every bolt came off without any major problems. Rolled in the new rearend and lightly bolted it in.


Oh what a difference the stance of a project makes. Looks a lot better, front end might need to come down a little bit but its a heck of a lot better.
Pretty much where I left it off this evening.
Hope to get brakes plumbed and start on the firewall reassembly this week.
Sean
11-05-2013, 10:28 AM
#3
Launching!
Thread Starter
Join Date: Mar 2012
Posts: 214
Likes: 0
Received 0 Likes
on
0 Posts
Got home a little bit early today. =)
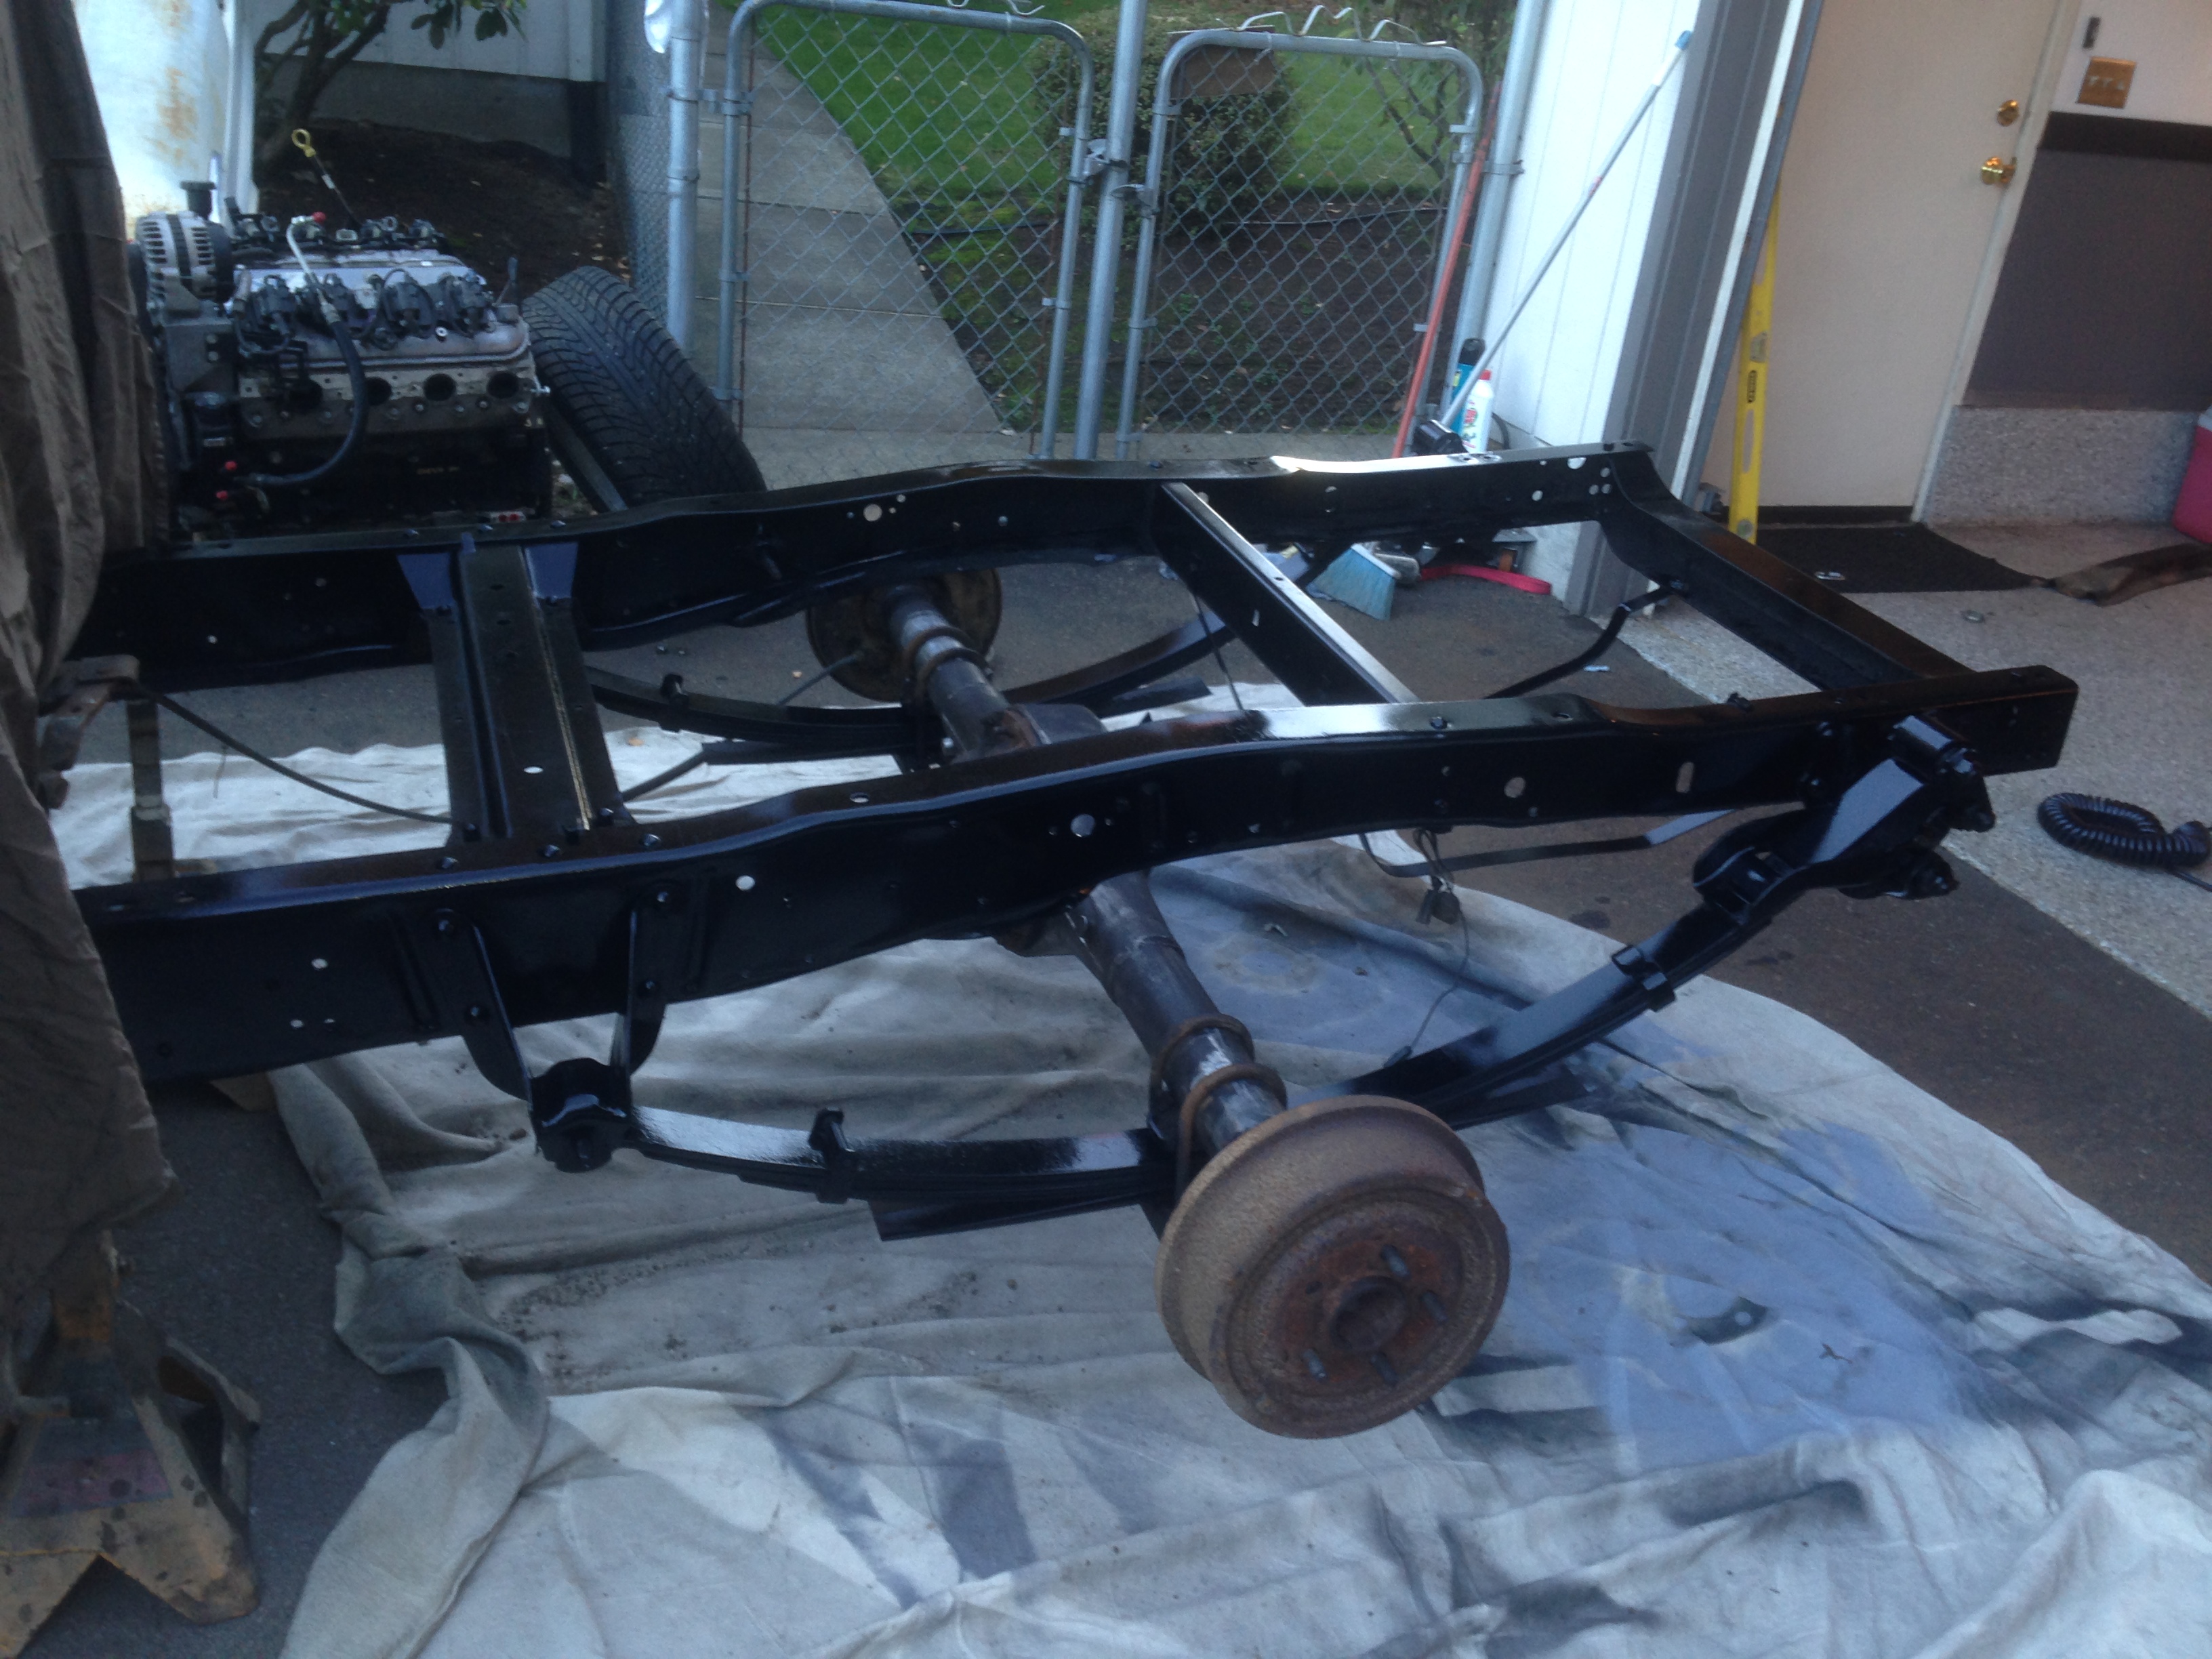
Went to work on a little cleanup in the garage and rolled the truck out in the driveway. On the jackstands once again and prepped the rearend for some paint work. One light coat of primer to help with adhesion and some flat alk200 with some catalyst added in to add a little bit of hardening and shine. Turned out a little glossier than I anticipated but looks pretty damn good for just hitting it with a wire wheel.
Also ordered my torque converter from Chris at Circle D. Most money I have ever spent on a converter. Tripple disc, full billet 4l80E converter. He said it should hold up to 1000 hp no problem. Good thing I am only shooting for somewhere between 700-800 whp.
Sean
Went to work on a little cleanup in the garage and rolled the truck out in the driveway. On the jackstands once again and prepped the rearend for some paint work. One light coat of primer to help with adhesion and some flat alk200 with some catalyst added in to add a little bit of hardening and shine. Turned out a little glossier than I anticipated but looks pretty damn good for just hitting it with a wire wheel.


Also ordered my torque converter from Chris at Circle D. Most money I have ever spent on a converter. Tripple disc, full billet 4l80E converter. He said it should hold up to 1000 hp no problem. Good thing I am only shooting for somewhere between 700-800 whp.
Sean
11-05-2013, 10:29 AM
#4
Launching!
Thread Starter
Join Date: Mar 2012
Posts: 214
Likes: 0
Received 0 Likes
on
0 Posts
Made a little progress on the truck the past few days.
Ordered in a weld on sump from Summit and it showed up a lot bigger than I imagined. Trimmed it down and rebent all the flanges to fit the back of the 70 mustang tank. Took it over to a buddies shop and got the tig machine out and welded it all up. Put the tank on a water test and all checked out ok. Need to order a sender for it.
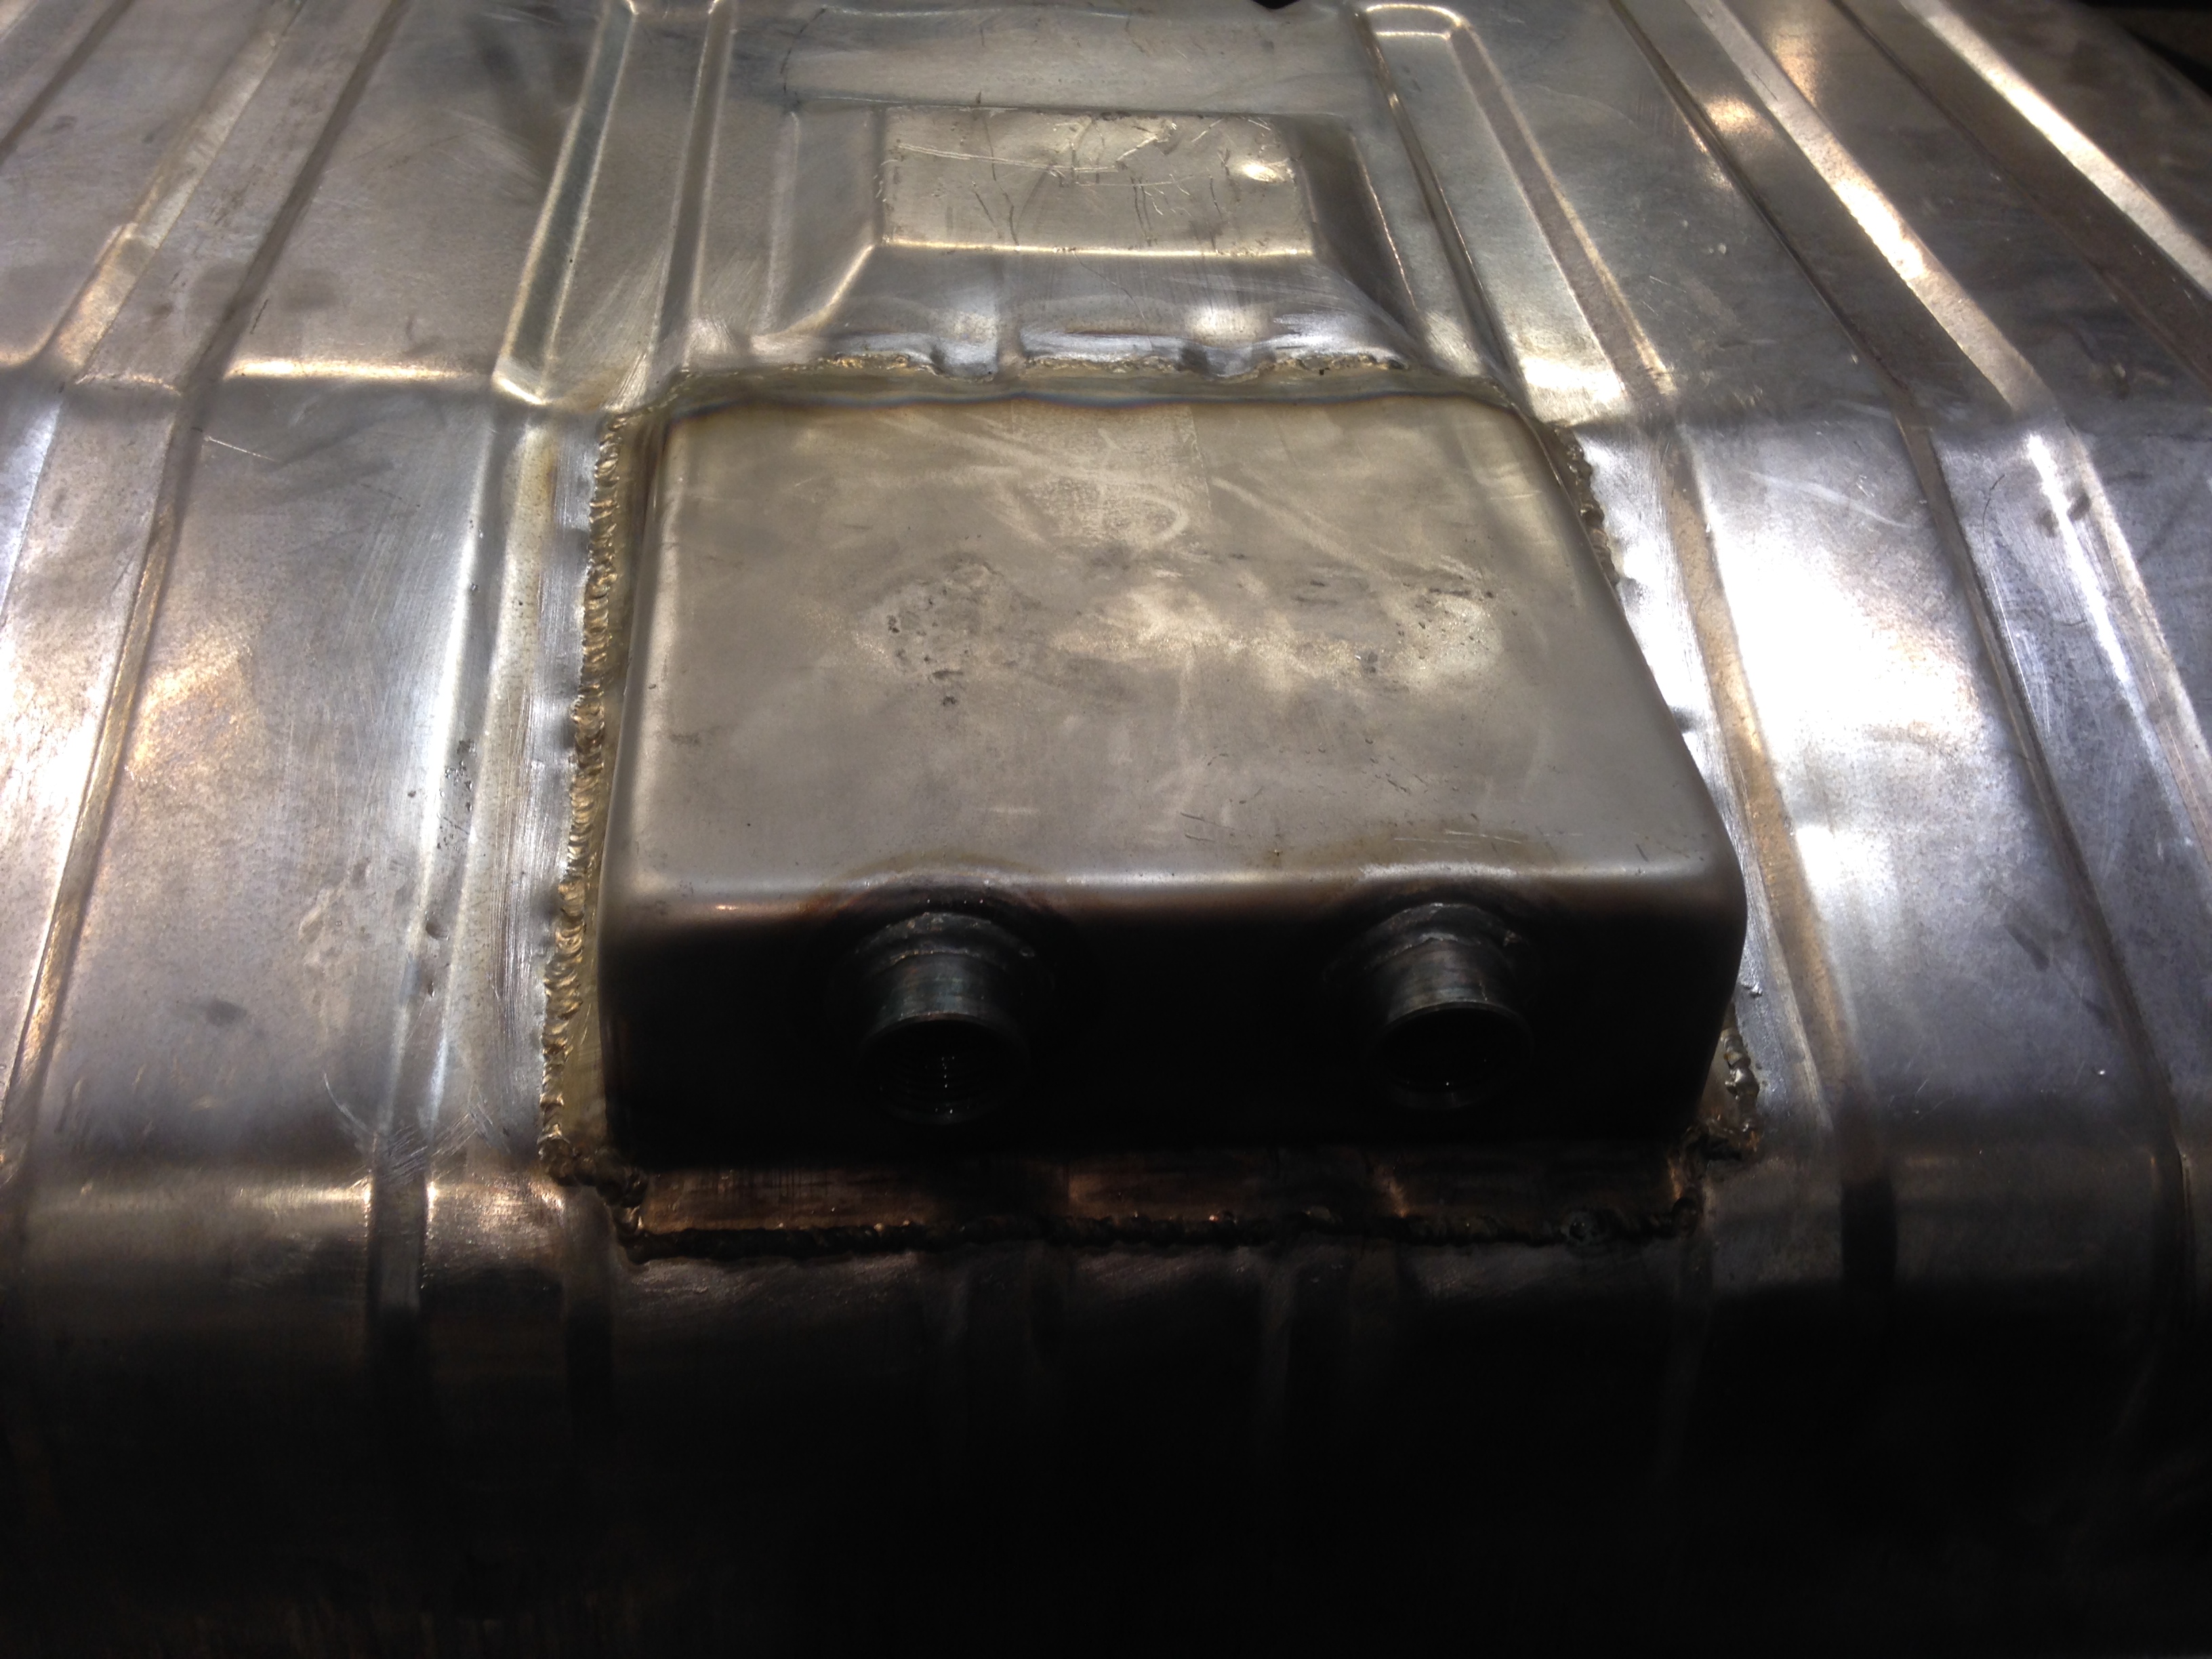
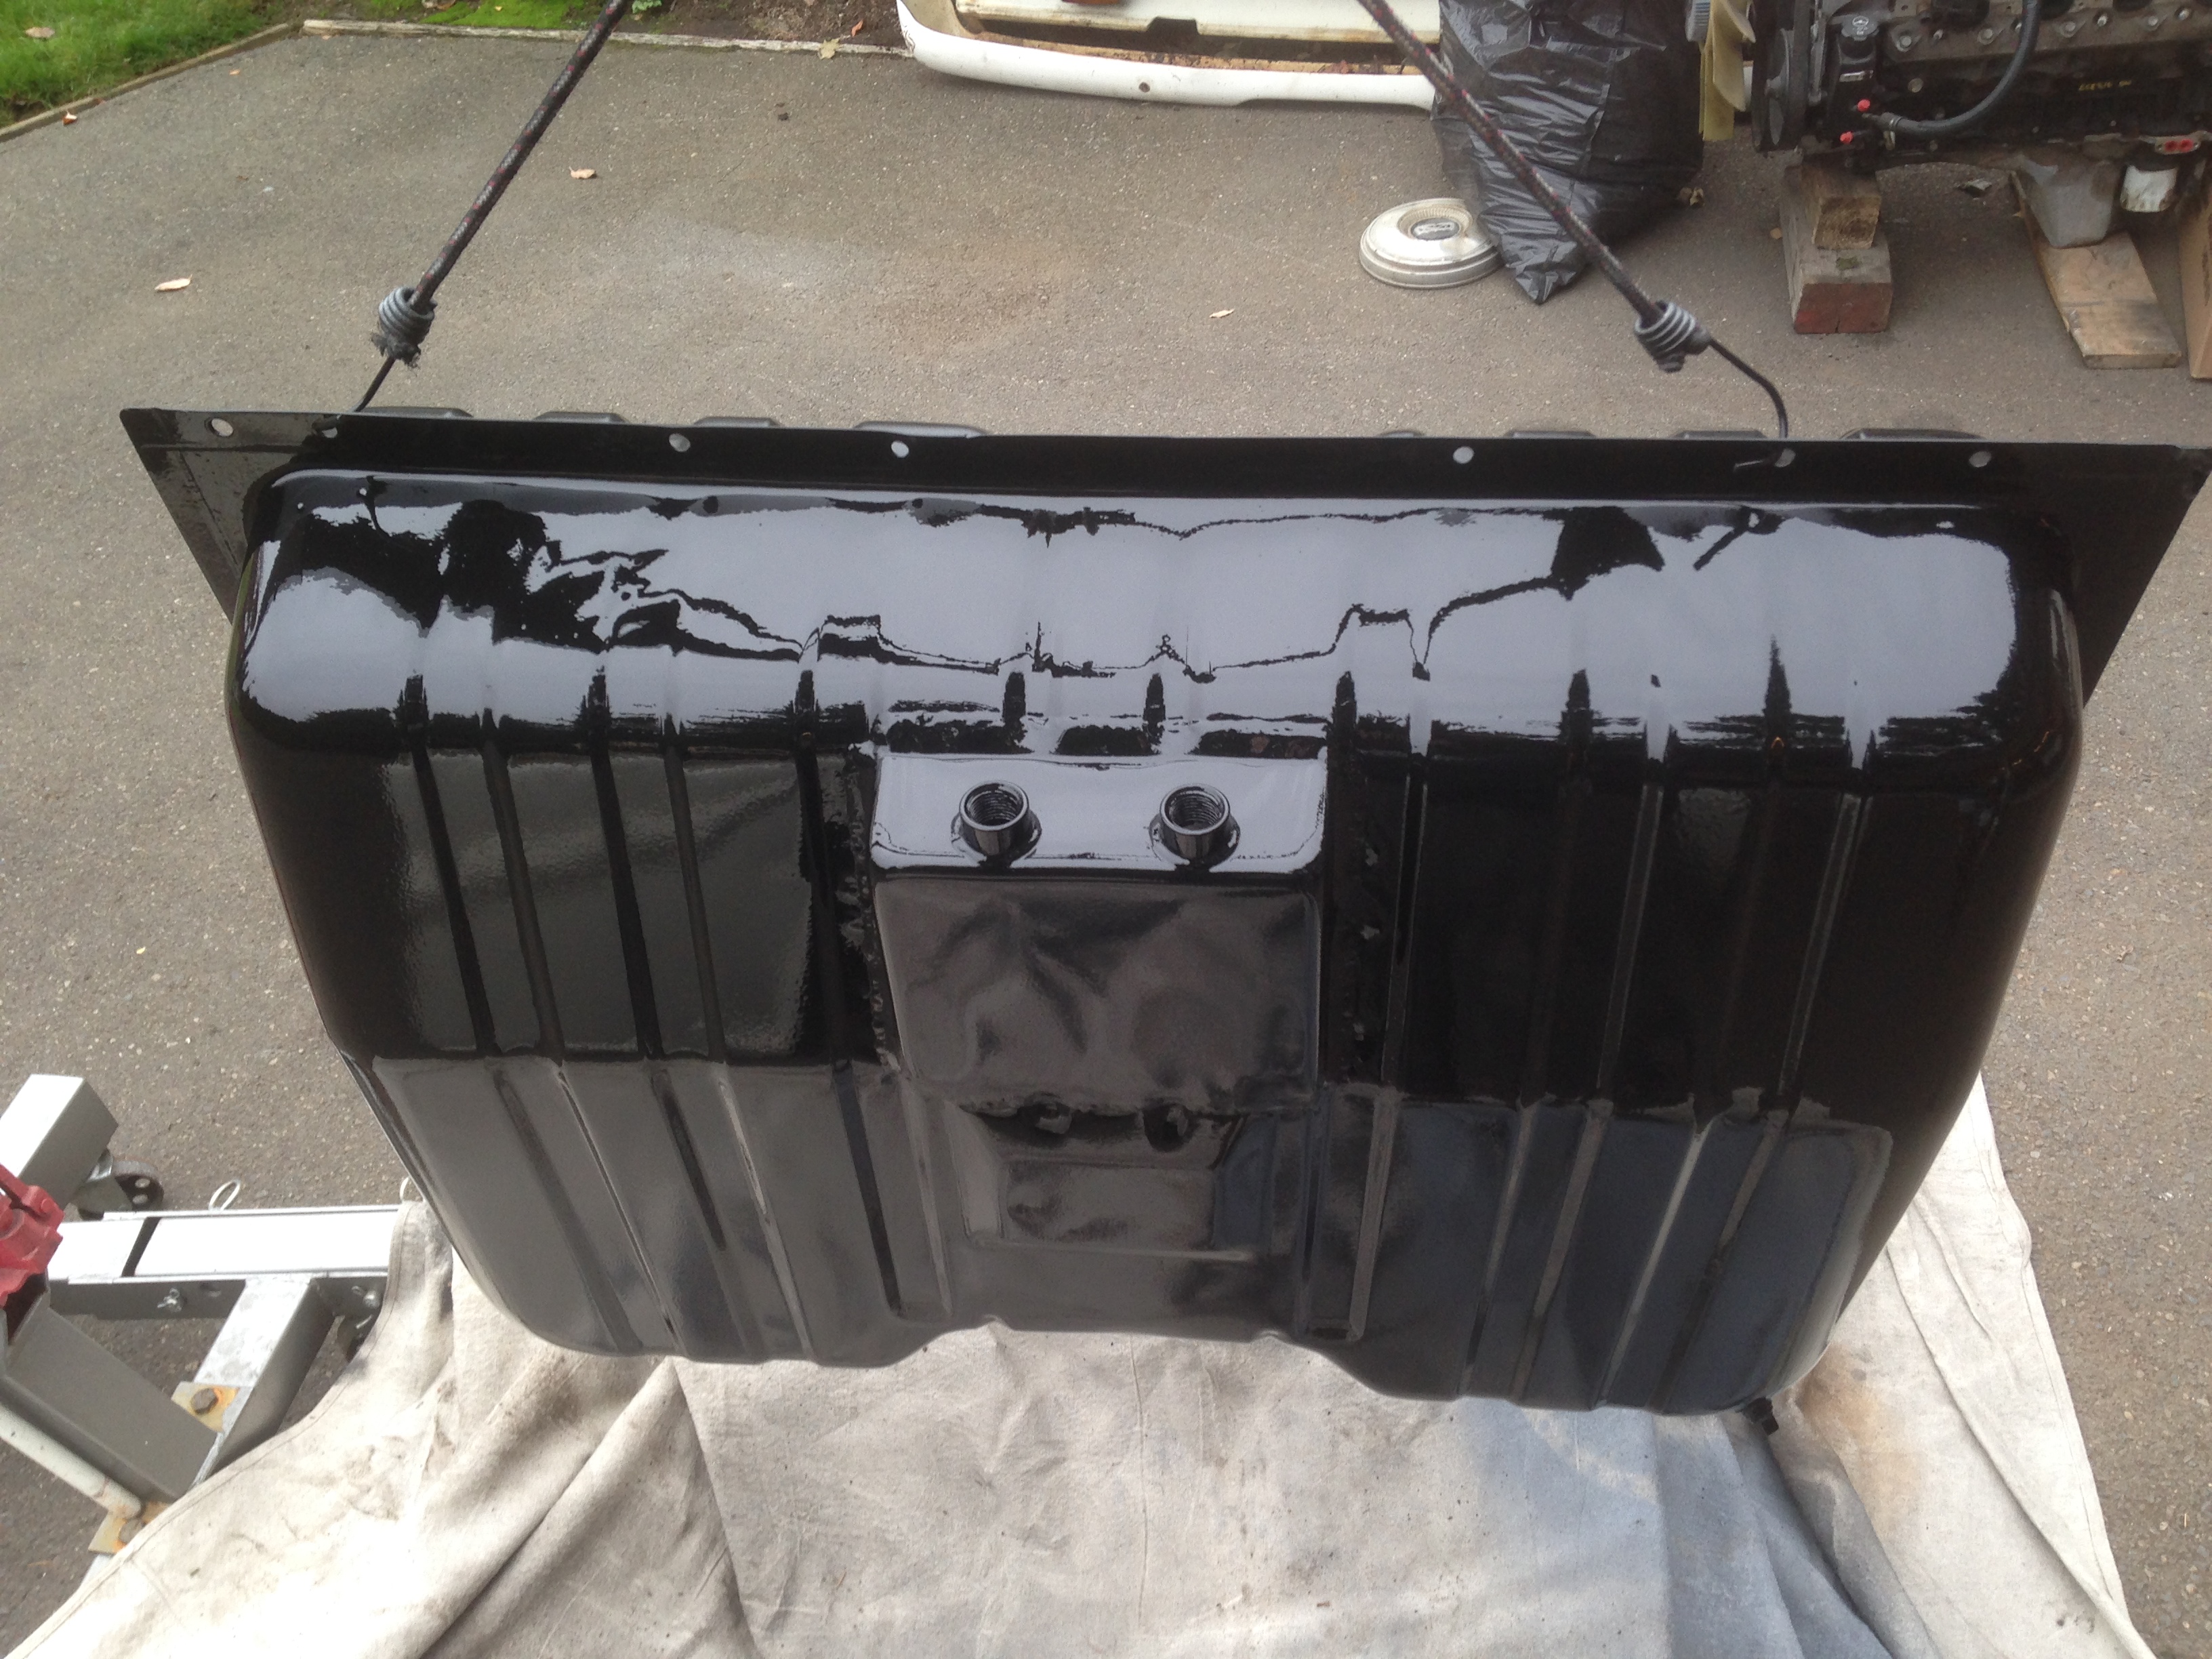
So I got busy, self etch then some high build, got the tank pretty flat and shot on some single stage gloss black. Turned out descent enough for a gas tank hanging out under the back of this truck.
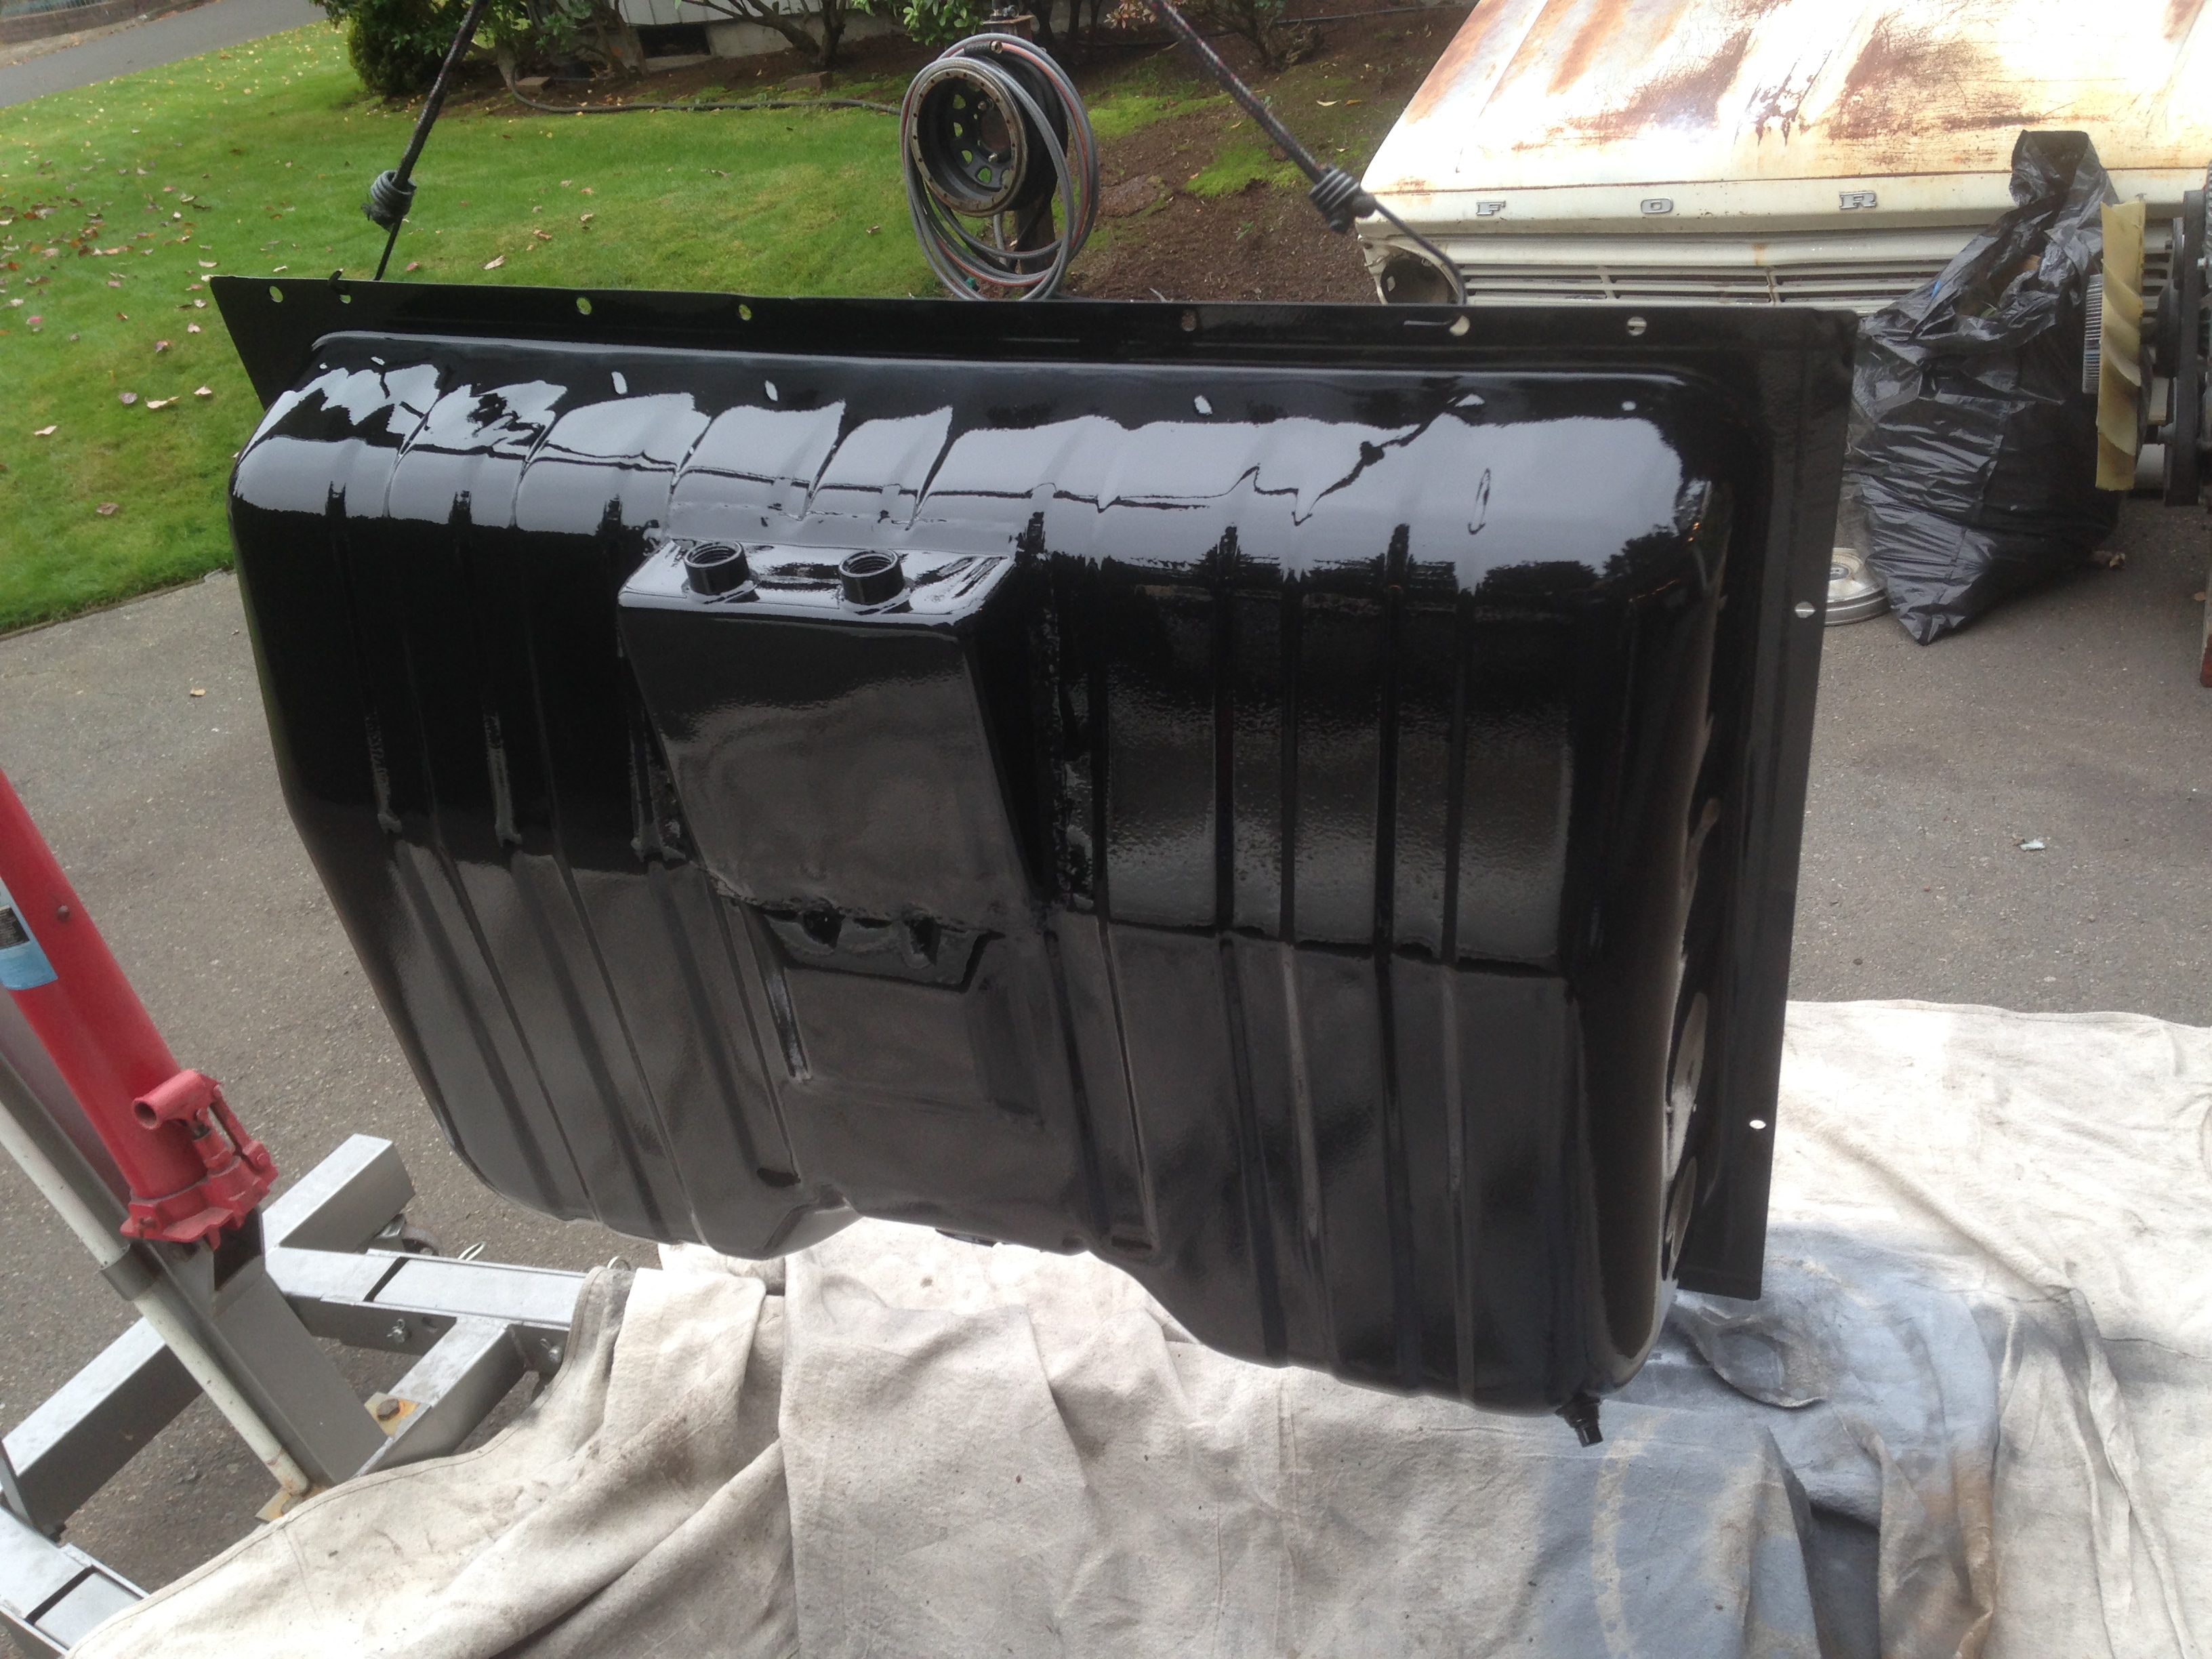
Rear brakes also showed up, Wilwood dynalite pro setup with the two piece rotors.
Assembled those with some help again from Asher, he did all the safety wire on the two piece hats while I put the rest together.
We bolted those onto the fully painted and assembled rearend.
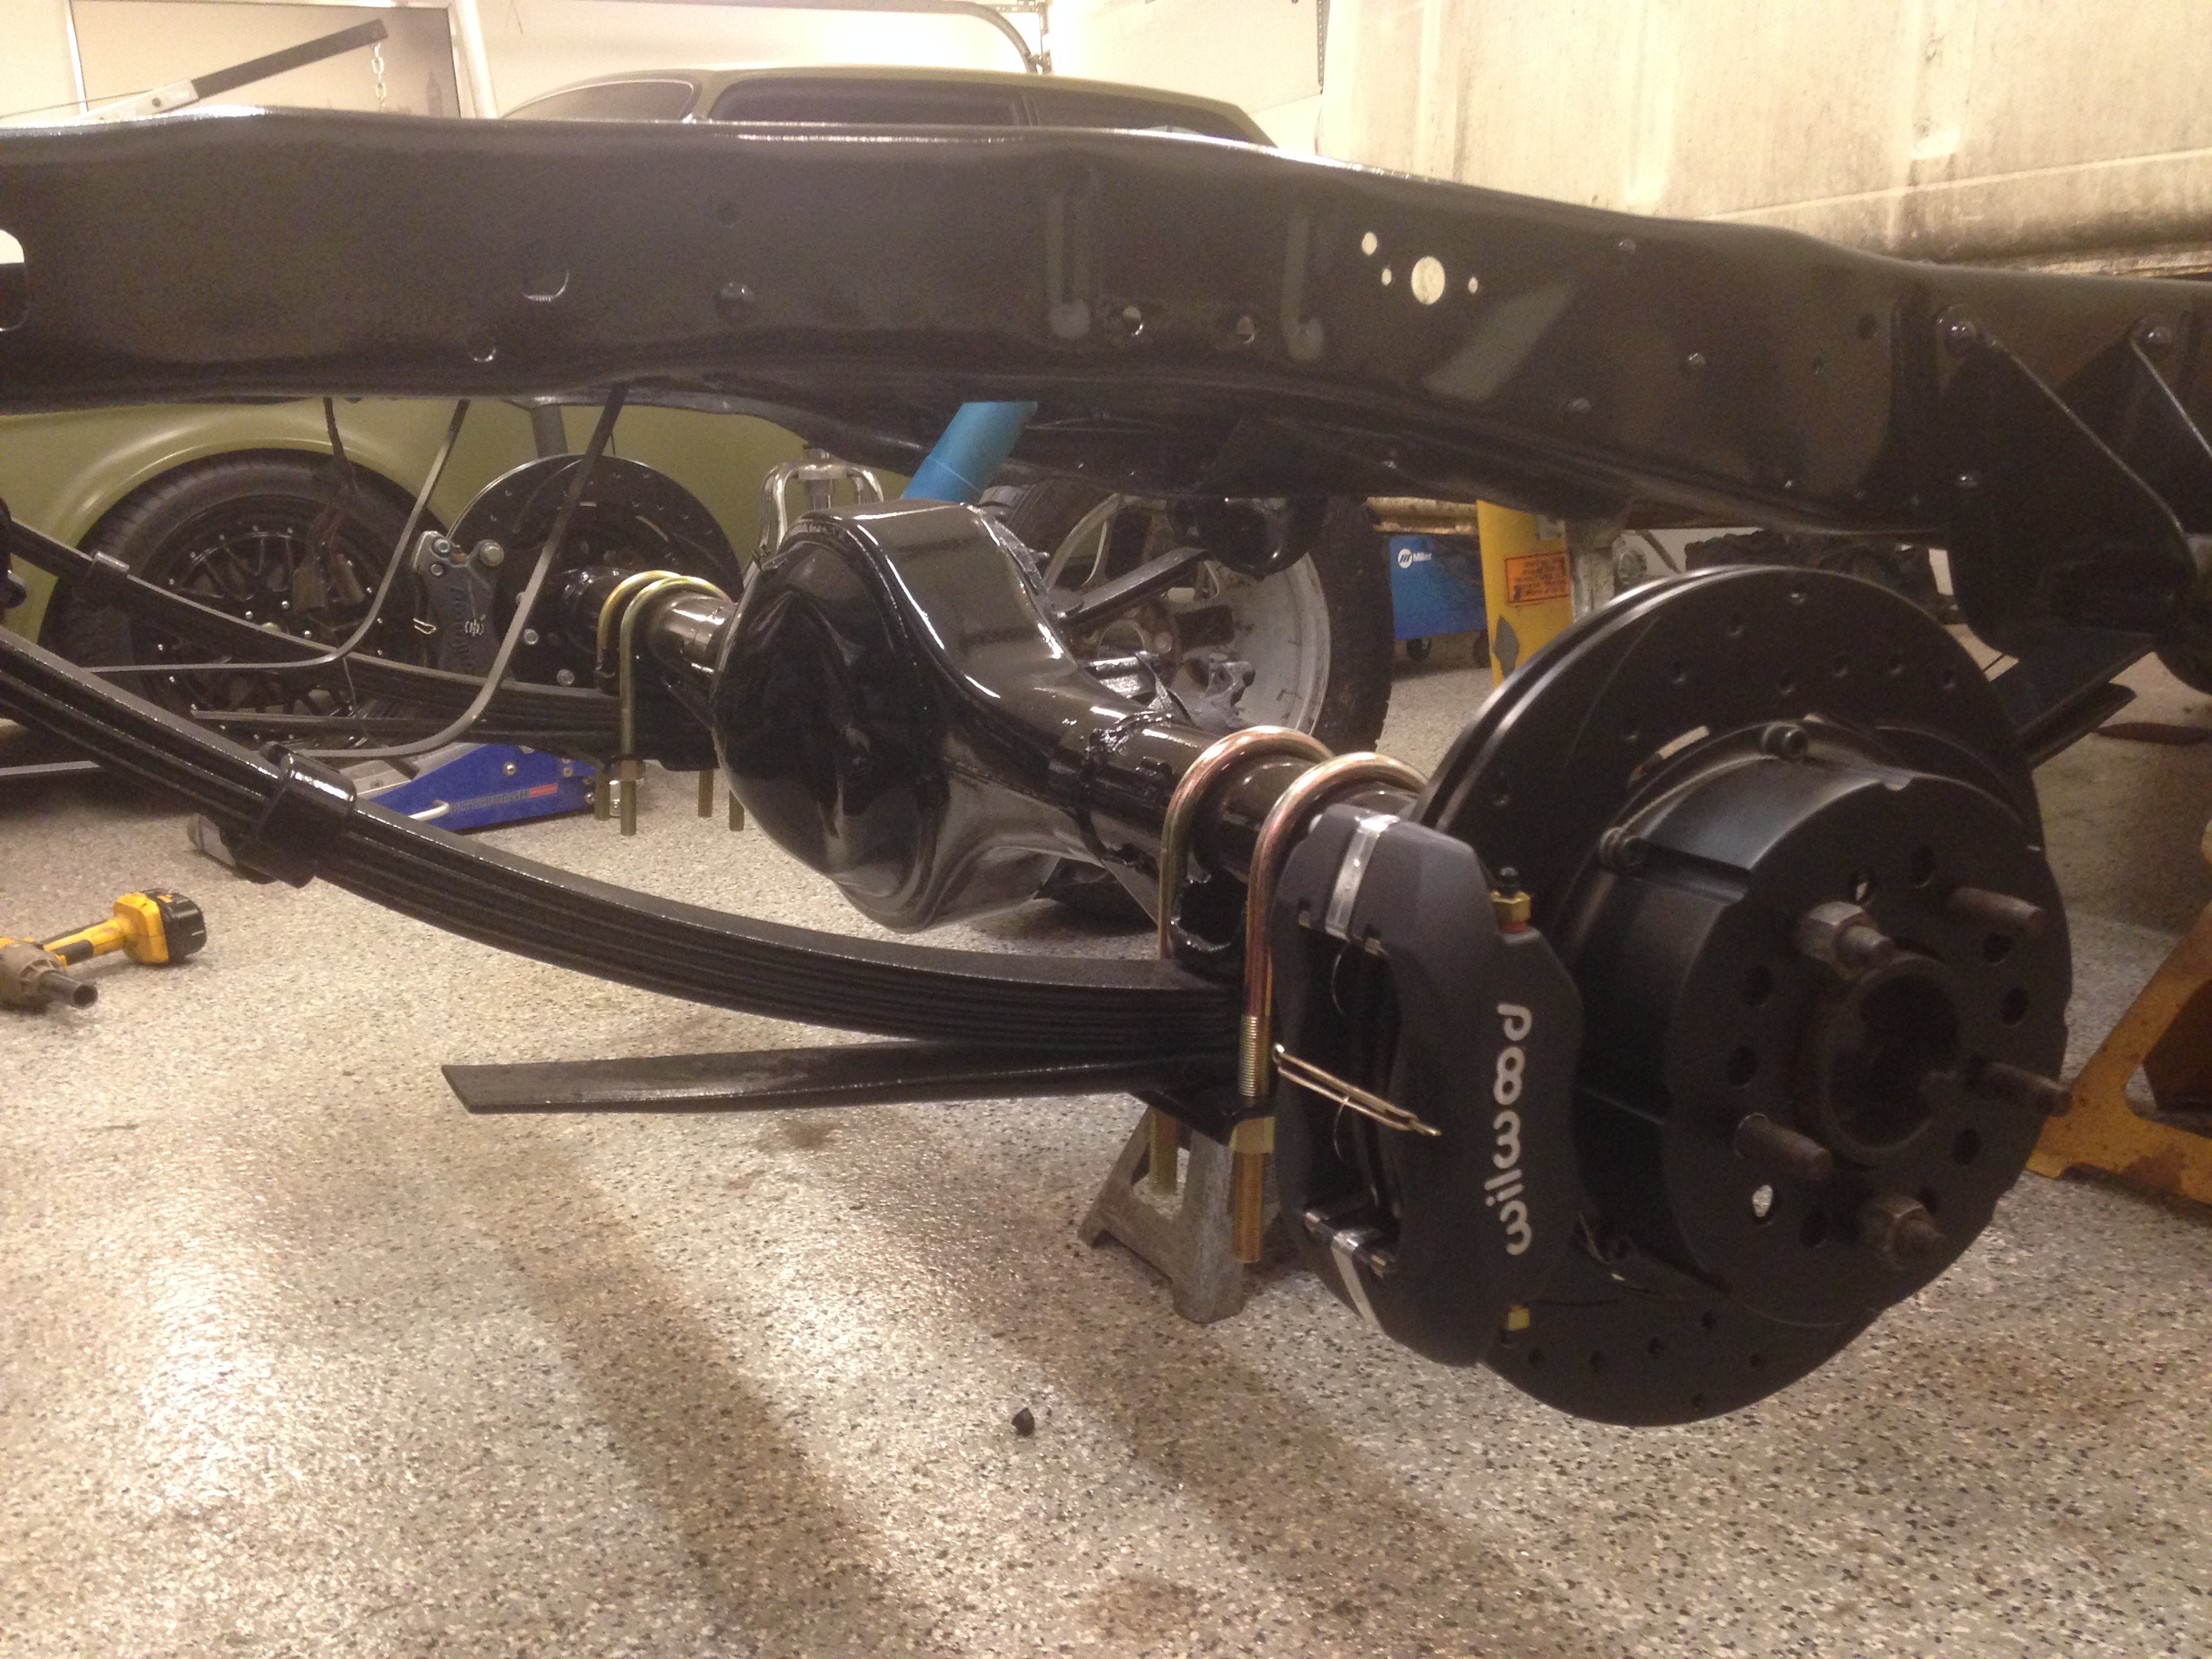

Pretty happy with how the rearend turned out. Also got some shocks on the rear, s10 something or others, but they should do just fine.
Ordered in a weld on sump from Summit and it showed up a lot bigger than I imagined. Trimmed it down and rebent all the flanges to fit the back of the 70 mustang tank. Took it over to a buddies shop and got the tig machine out and welded it all up. Put the tank on a water test and all checked out ok. Need to order a sender for it.


So I got busy, self etch then some high build, got the tank pretty flat and shot on some single stage gloss black. Turned out descent enough for a gas tank hanging out under the back of this truck.


Rear brakes also showed up, Wilwood dynalite pro setup with the two piece rotors.
Assembled those with some help again from Asher, he did all the safety wire on the two piece hats while I put the rest together.
We bolted those onto the fully painted and assembled rearend.


Pretty happy with how the rearend turned out. Also got some shocks on the rear, s10 something or others, but they should do just fine.
11-05-2013, 10:30 AM
#5
Launching!
Thread Starter
Join Date: Mar 2012
Posts: 214
Likes: 0
Received 0 Likes
on
0 Posts
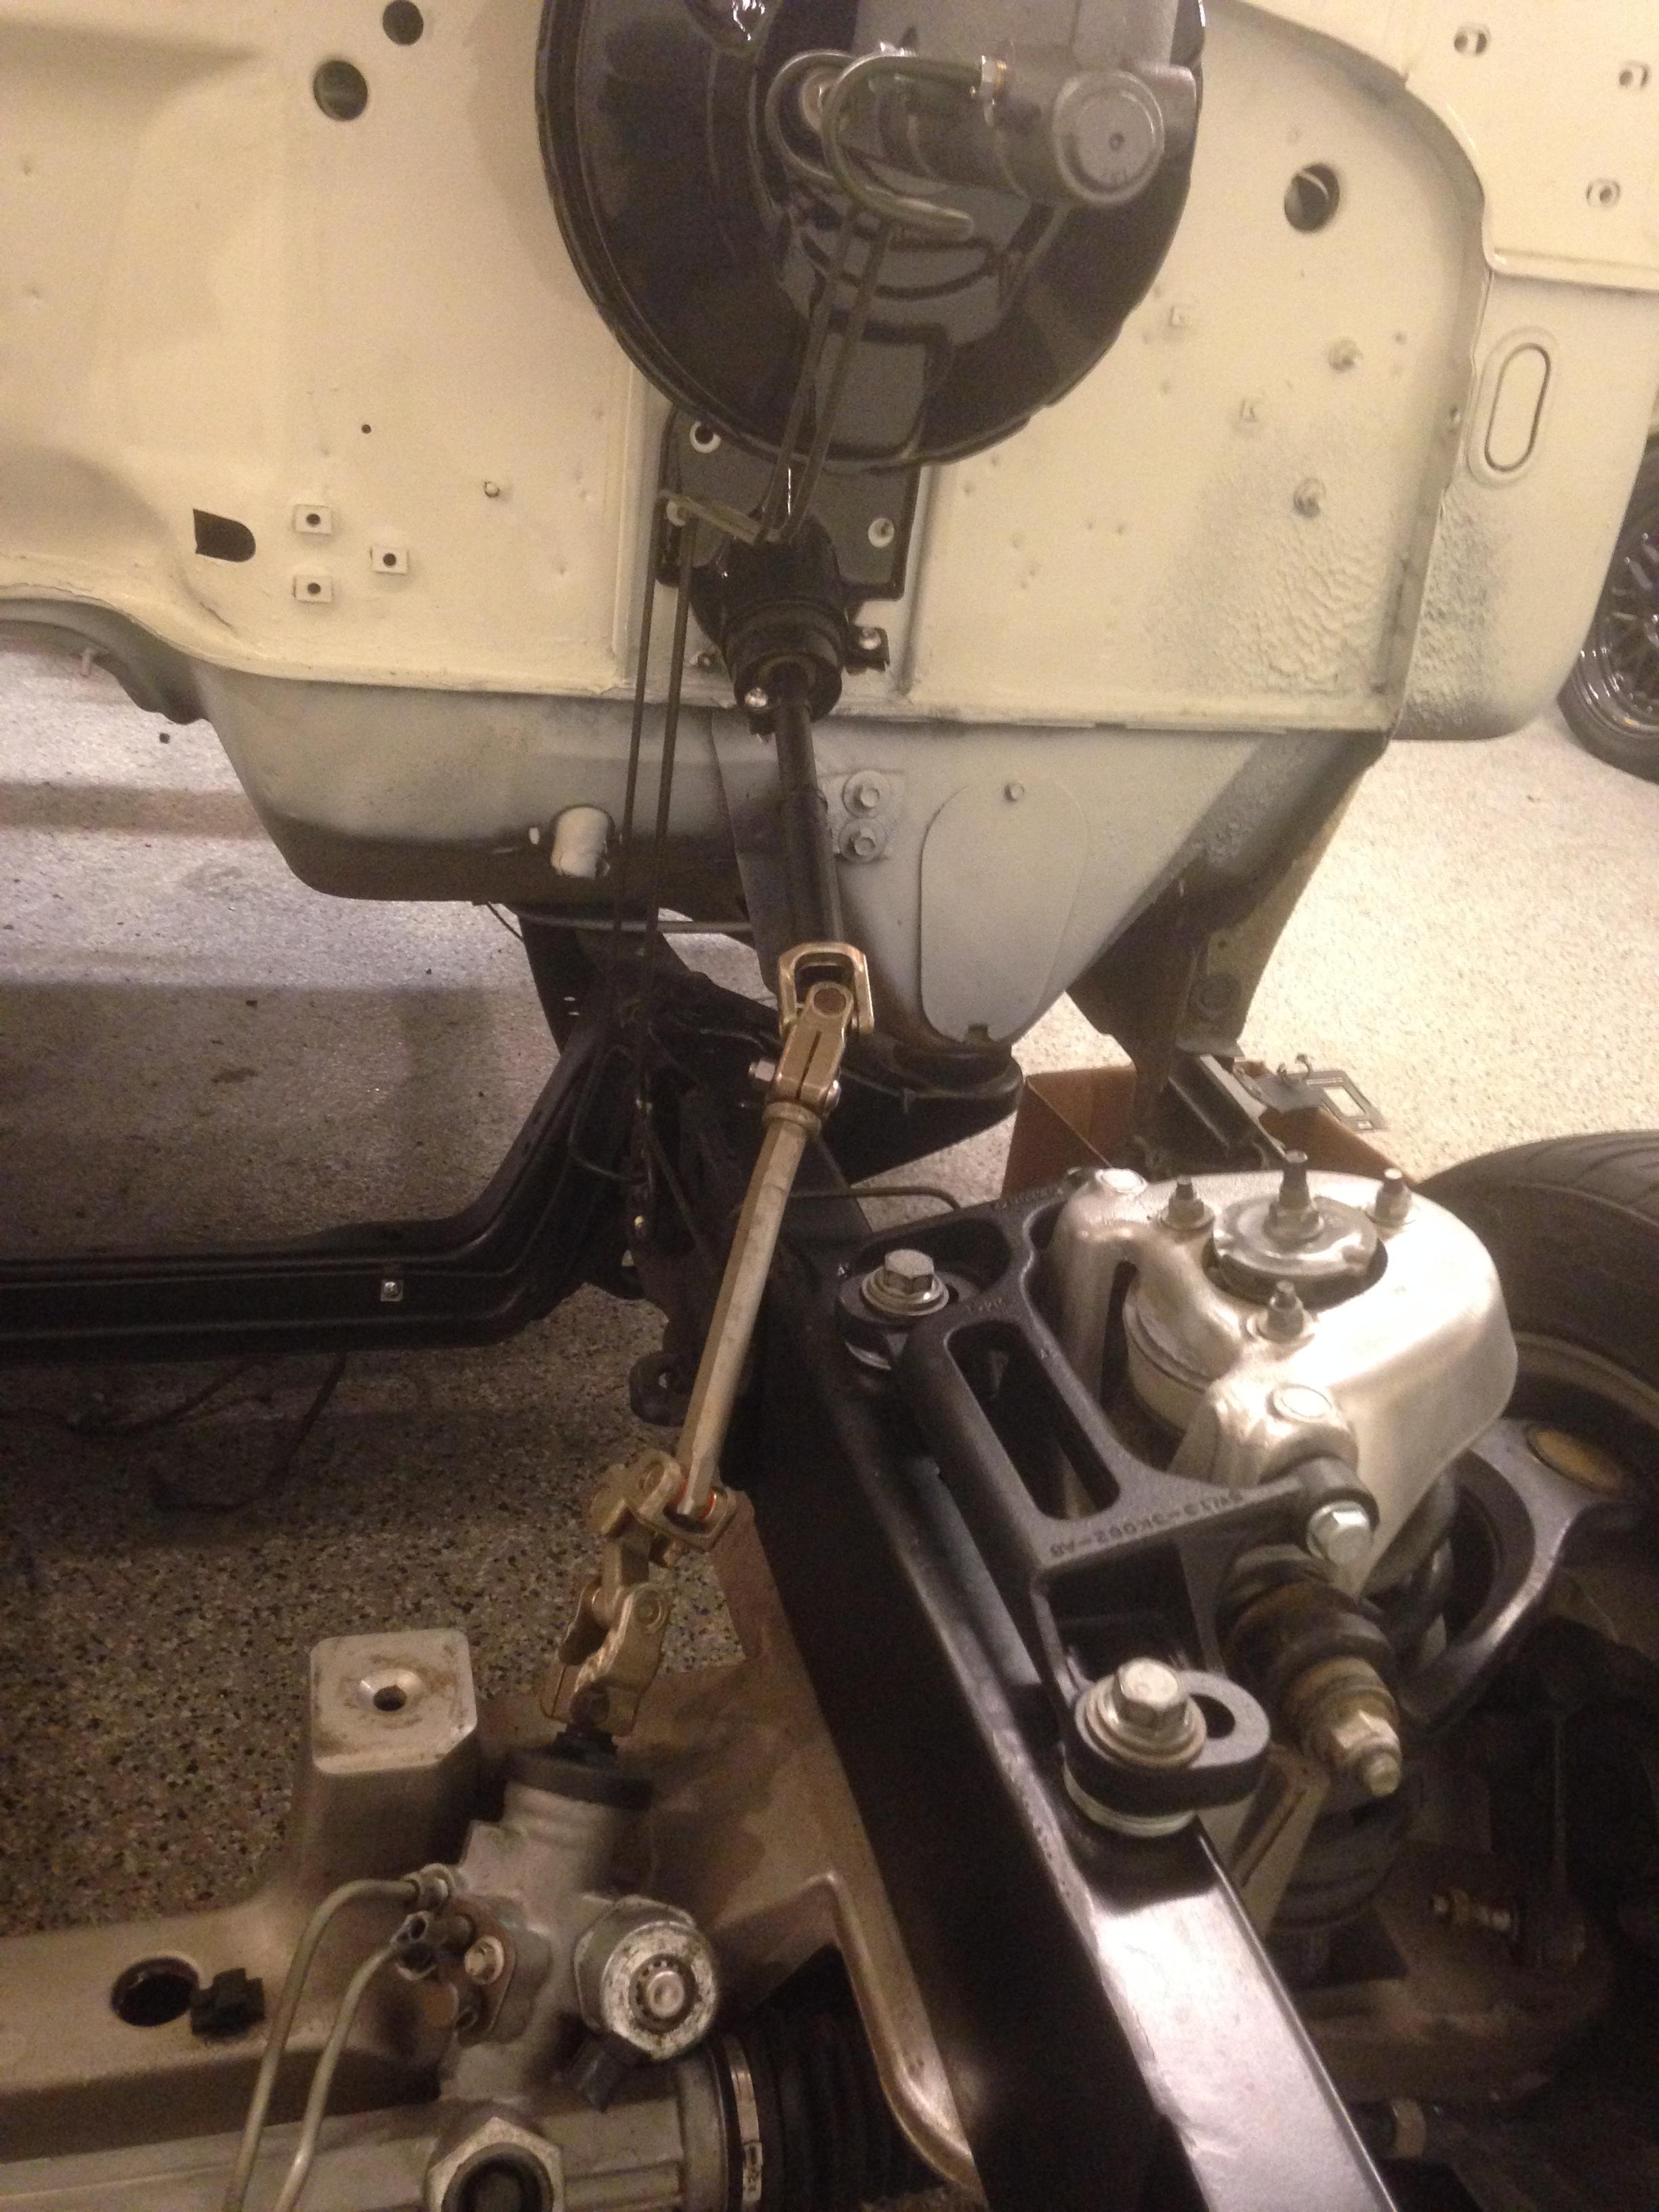
Assembled the master cylinder, booster and powdercoated brackets and got to work on plumbing all the brakes. Had a couple of wrong fittings but all in all I think it turned out nice. Here a couple shots of the whole mess on the firewall.
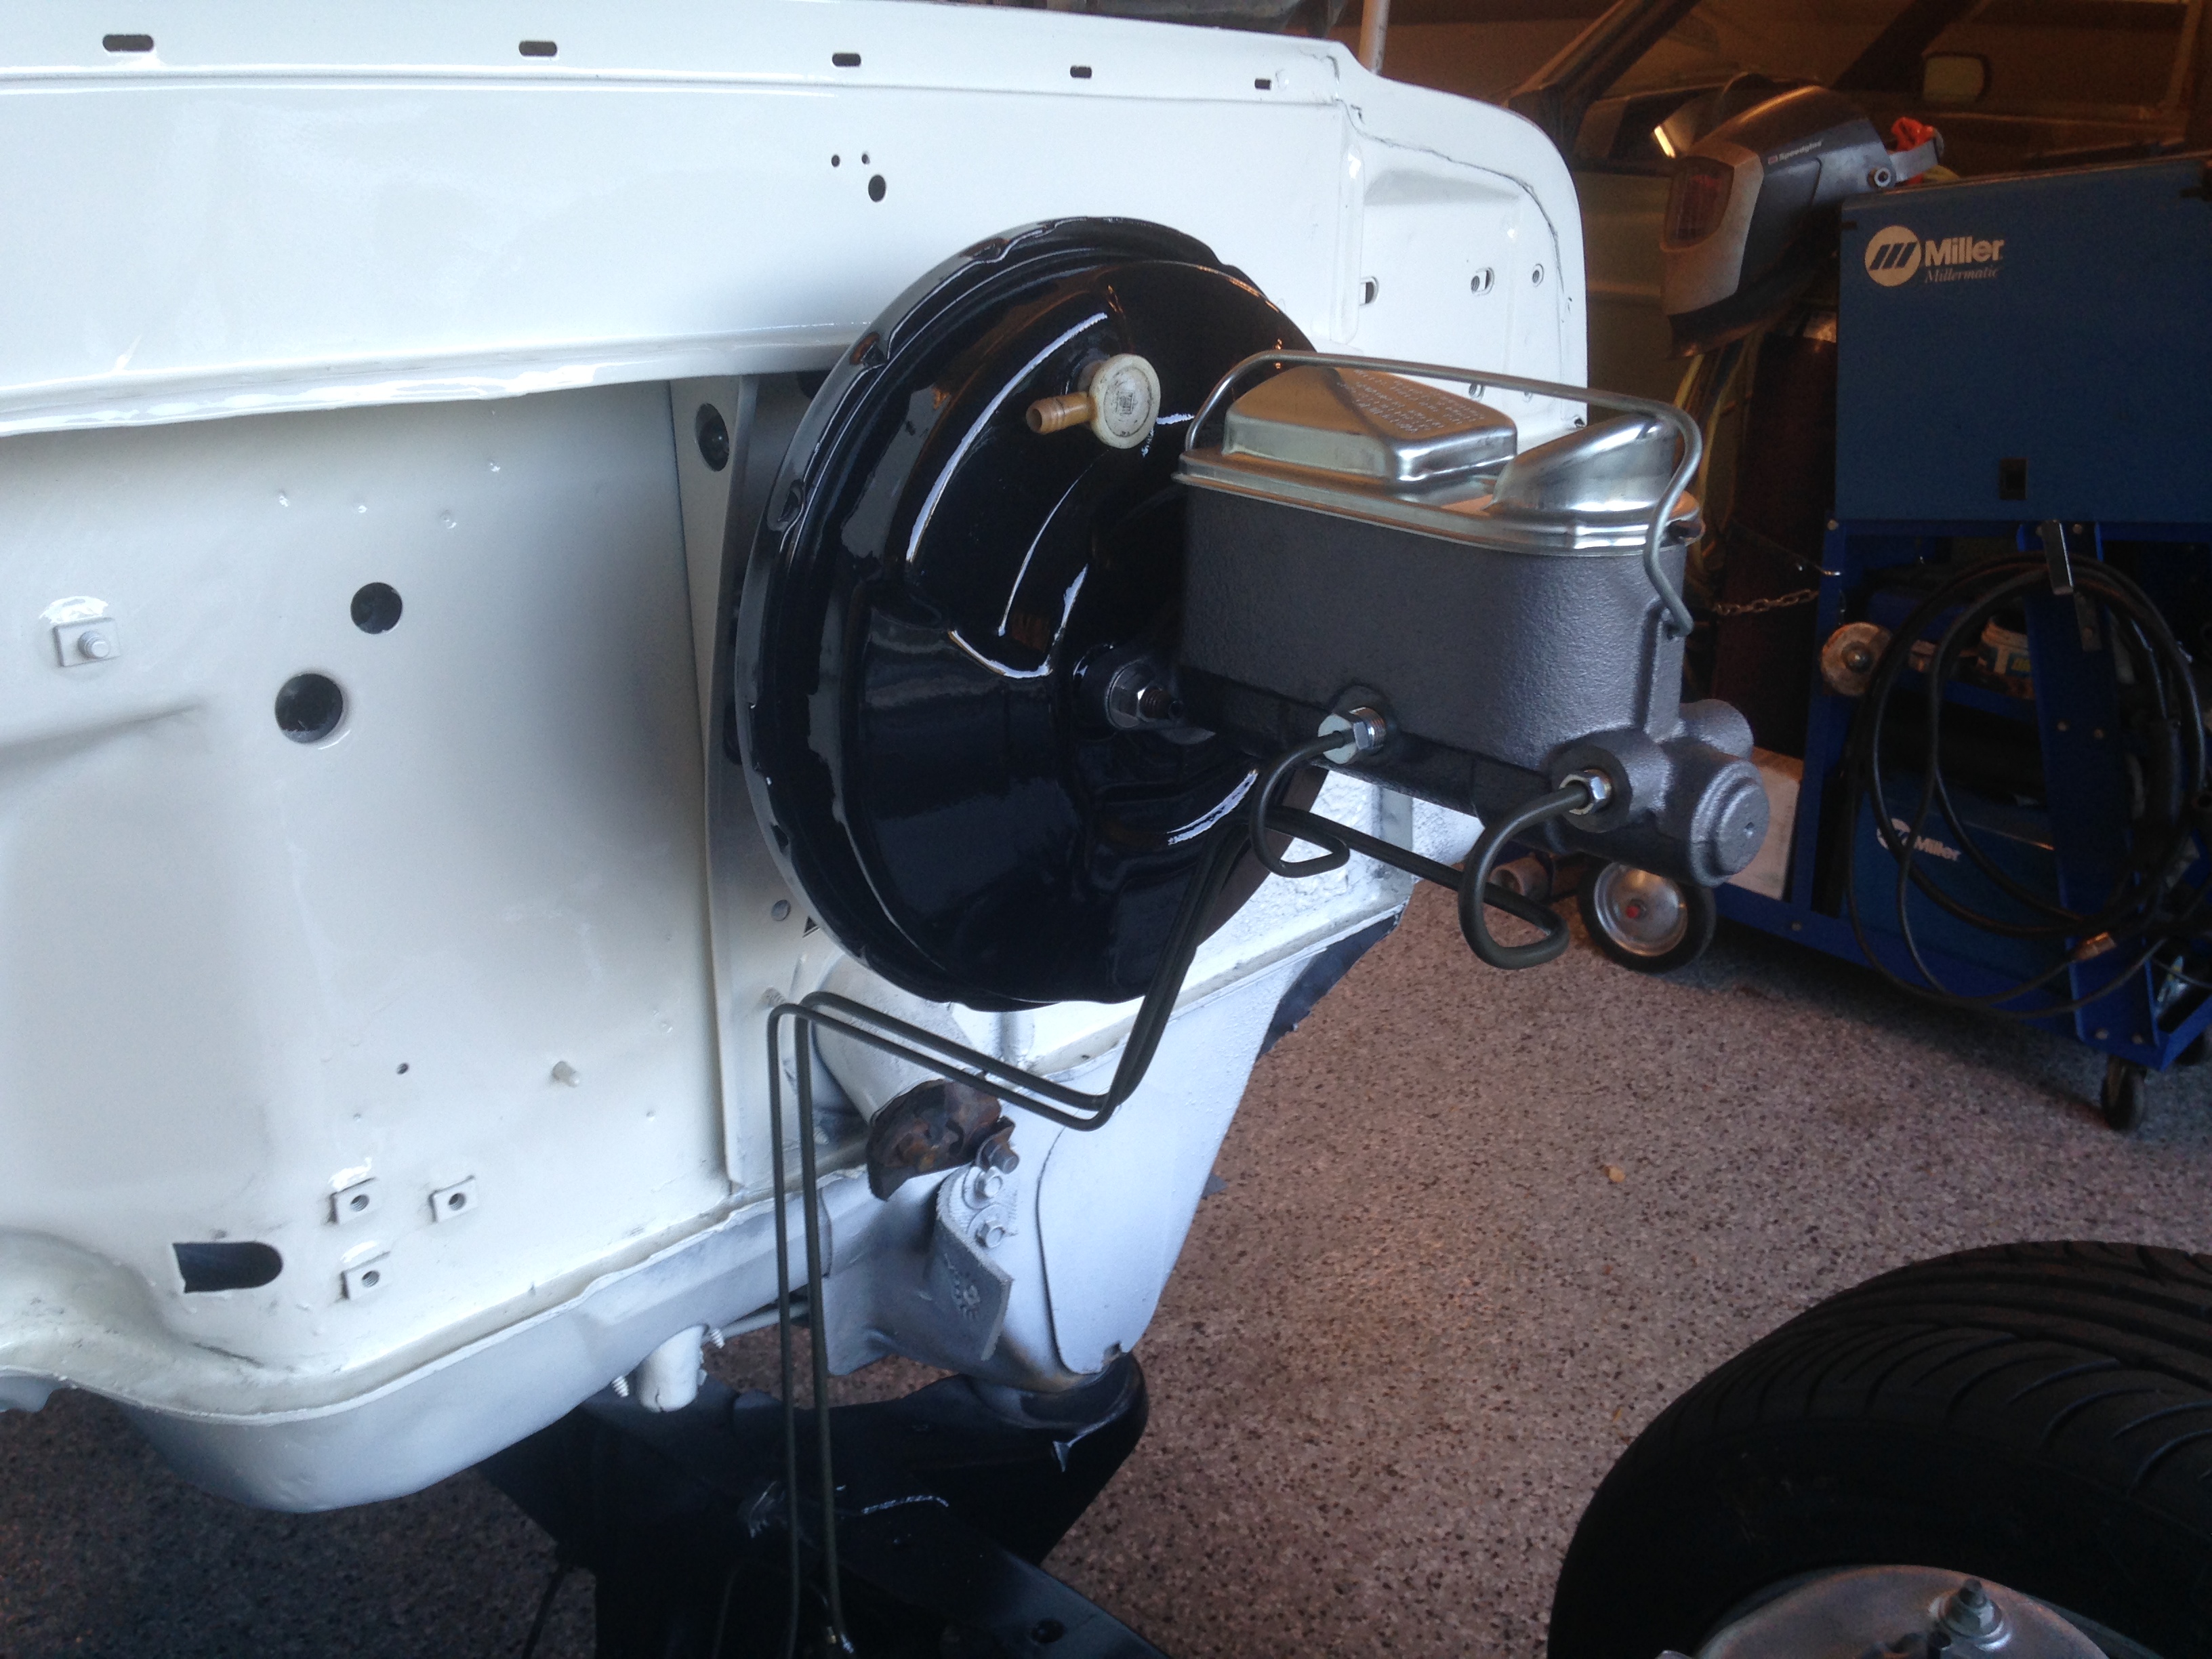
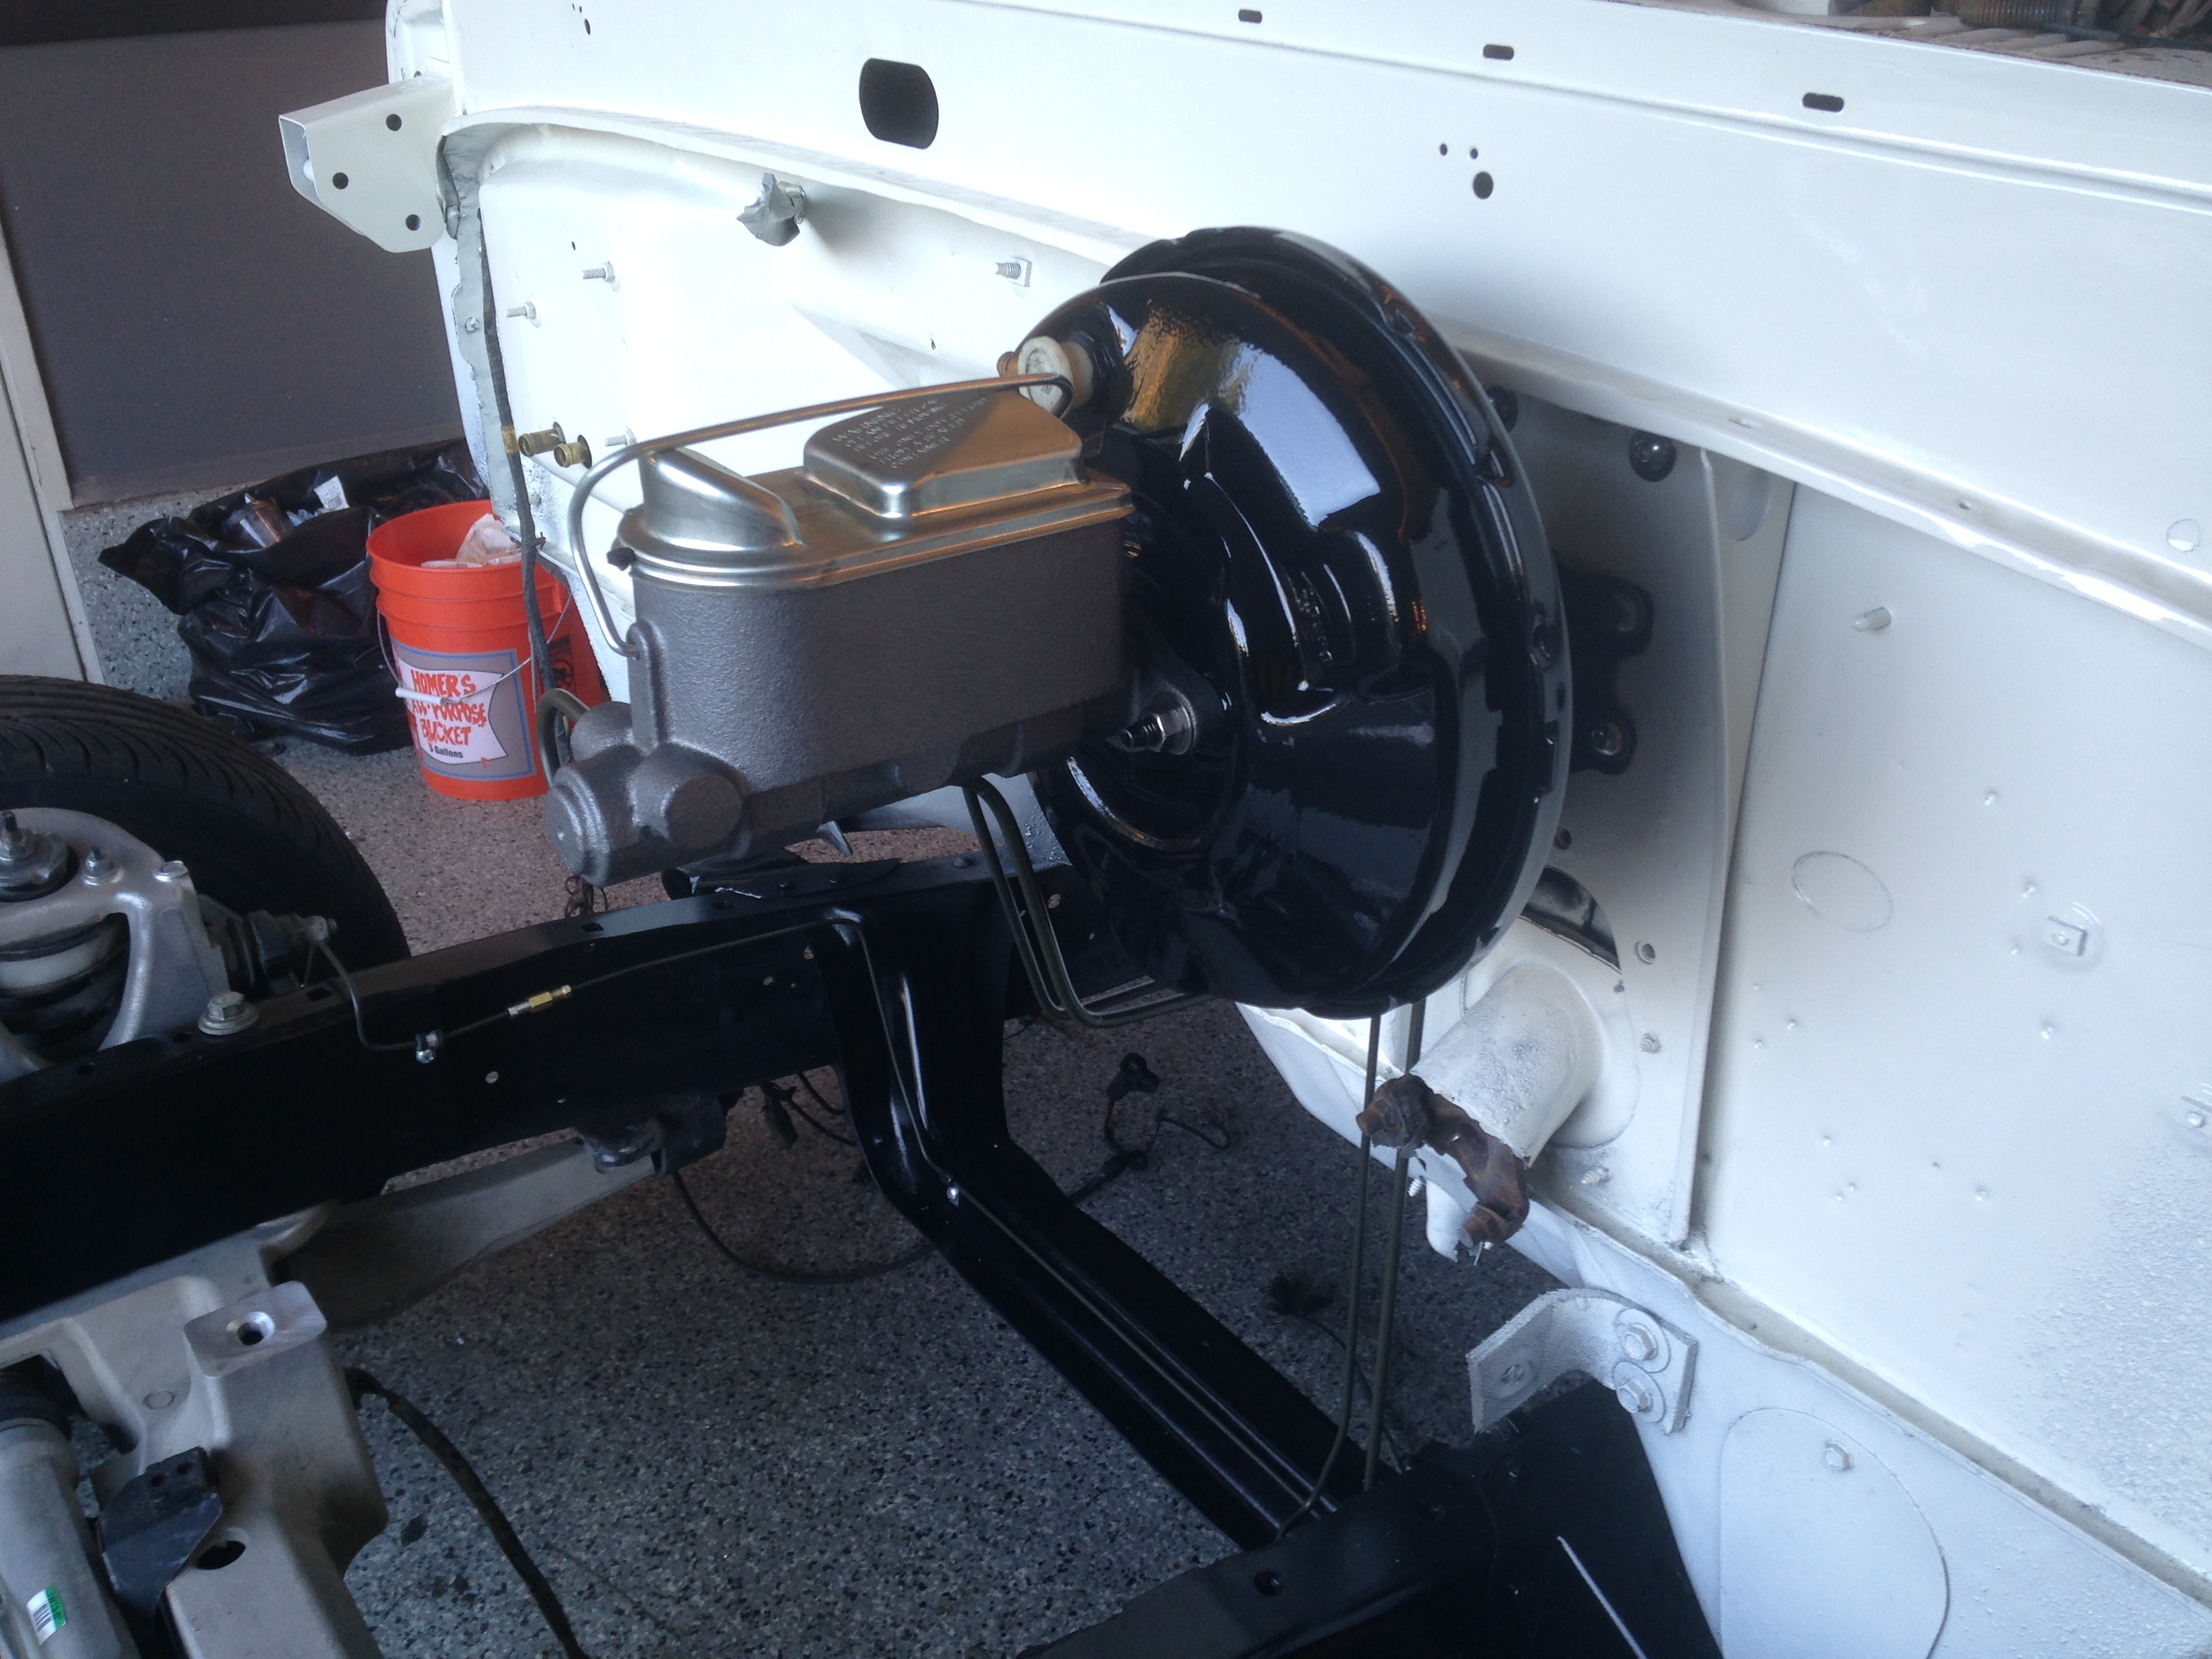

Really happy with the lines we ran. They all look great and are tucked up and out of the way. Master cylinder is painted with a coat of rustoleum hammered gray. I like the look of the raw master but know it would rust. This is the closest thing I have found to keeping it looking cast.
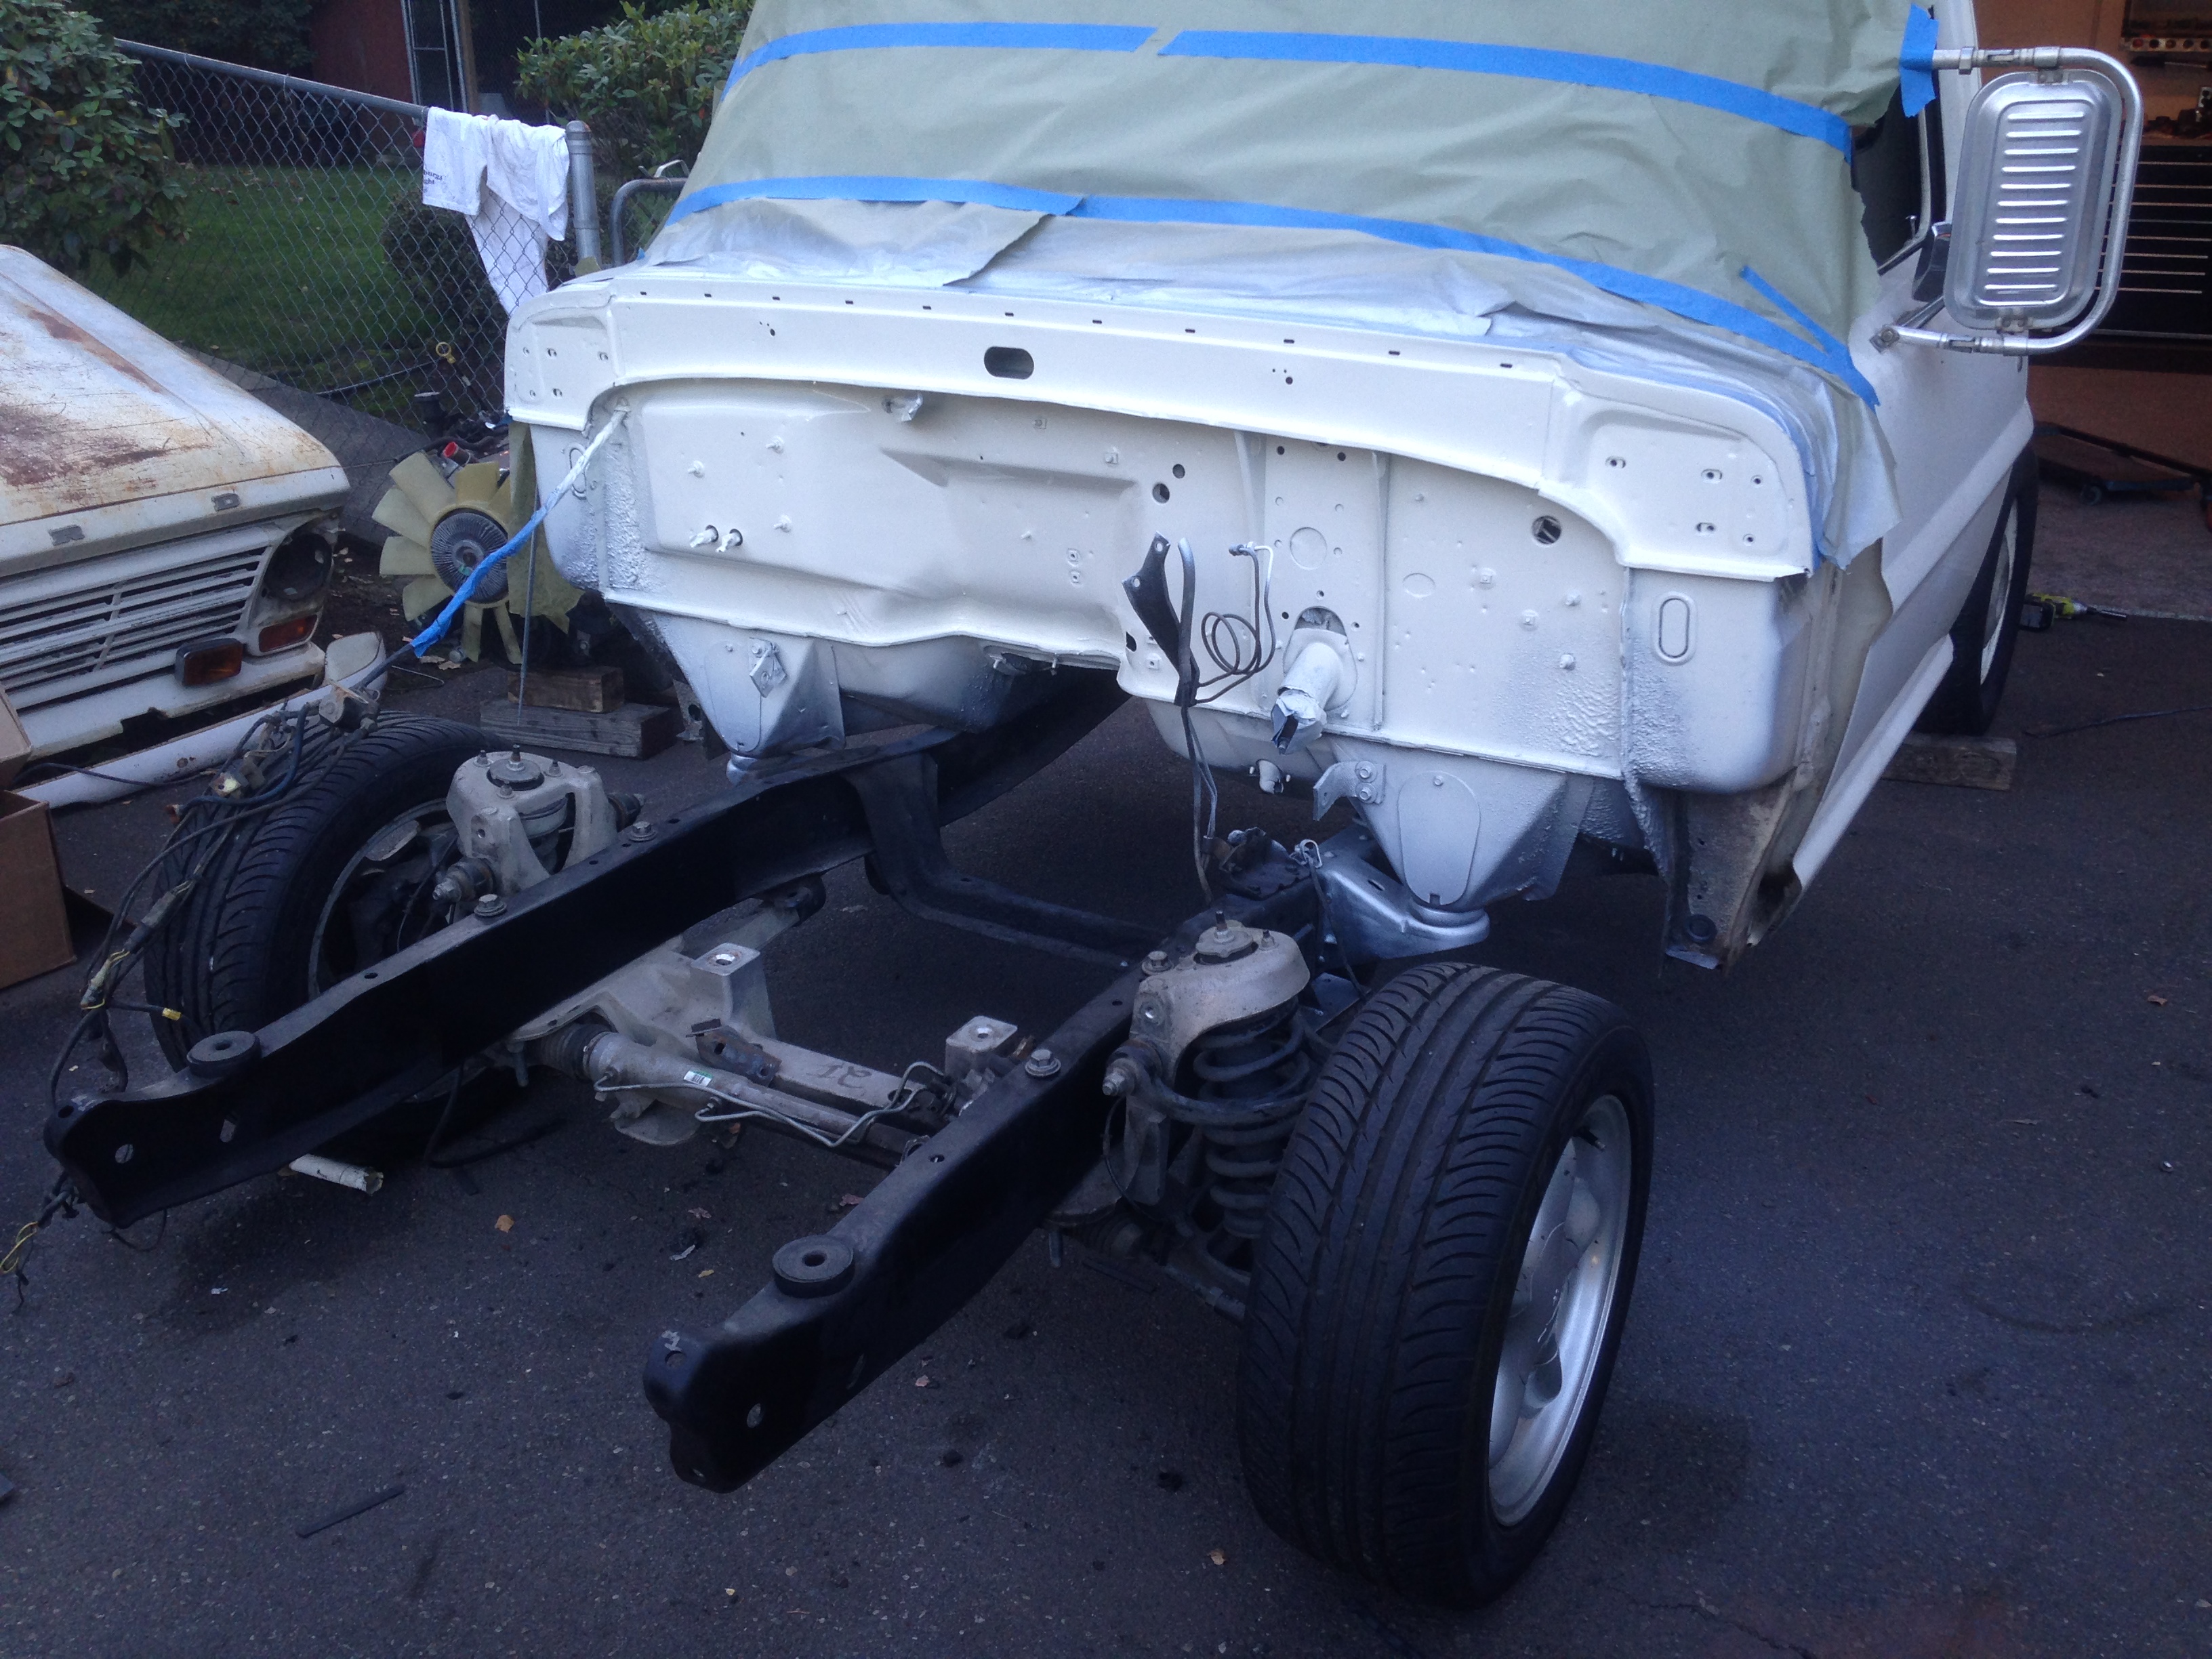
Not really worth pics but the front suspension all got pulled back off, front framerails all wire wheeled down to bare metal and metal etch primed, primered and shot with the same alk200 I shot the rear frame with.
Front brakes all got cleaned up, painted and installed along with new rotors.....Not wilwoods but 12.5" brakes look big on an old ford pickup.
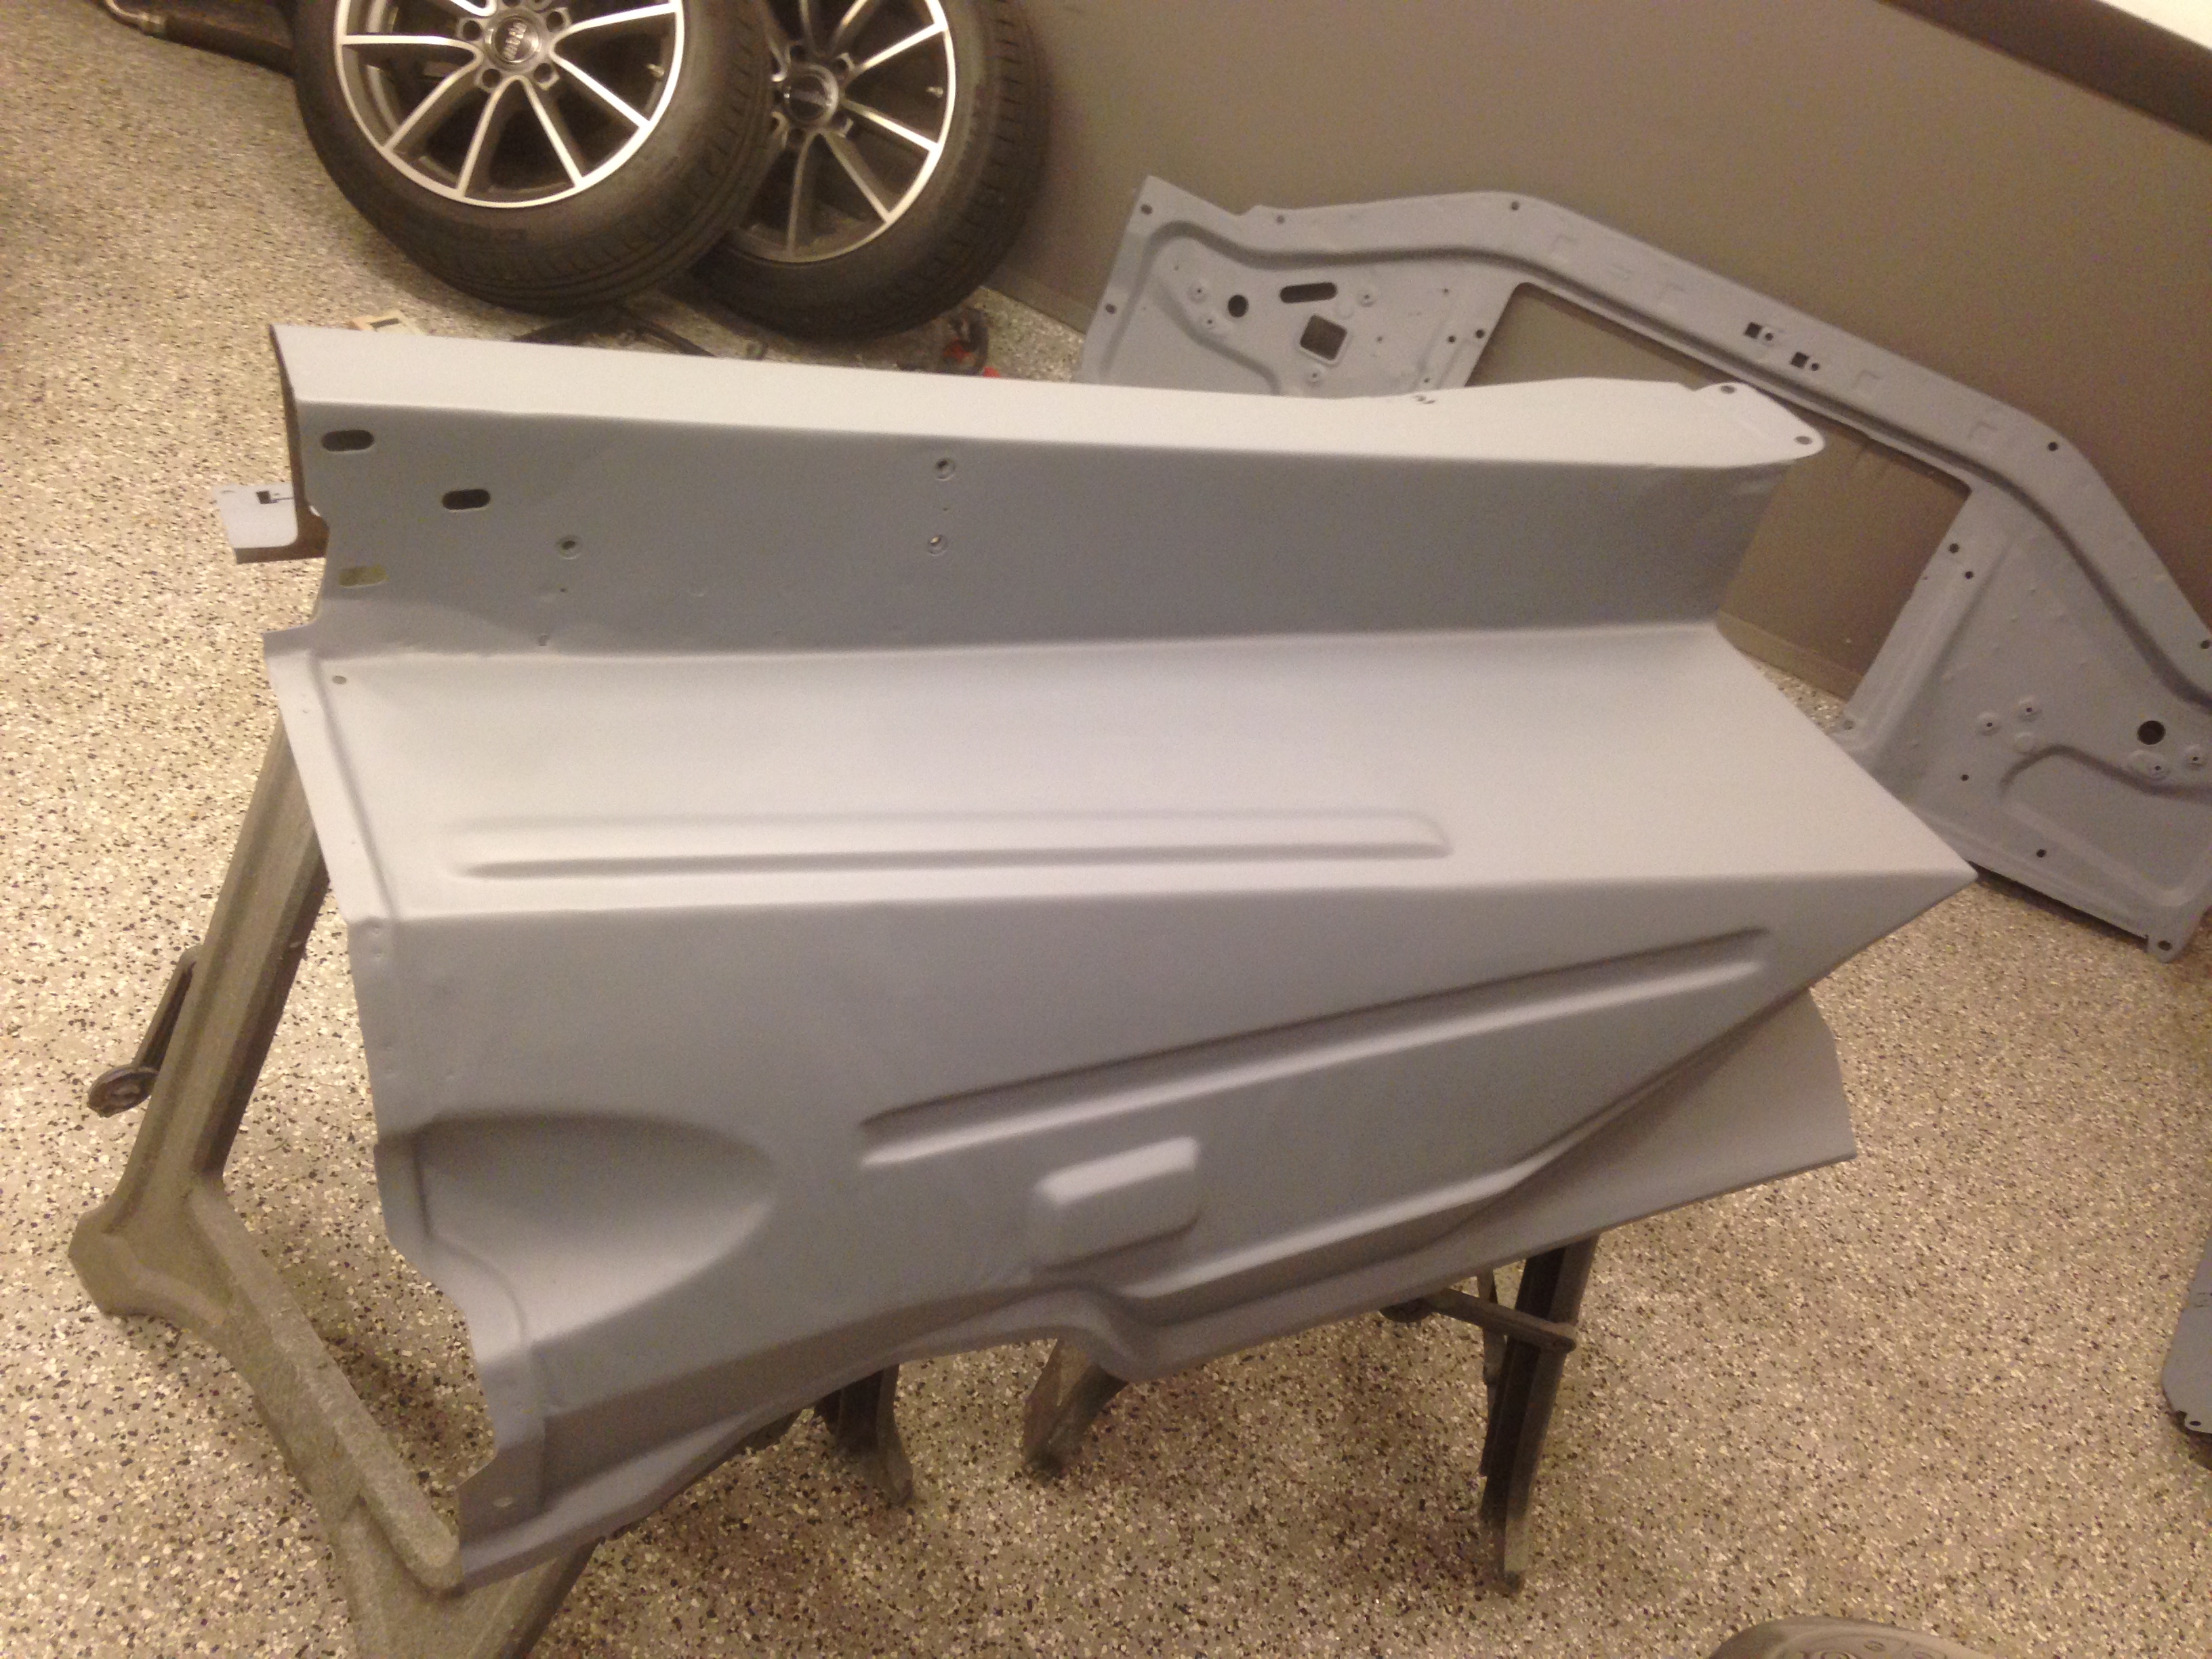
Front sheetmetal is all pulled apart and bumper got straightened out and ready to head out to powdercoat along with the grille and headlight bezel.
The first rust I have found is on the inner fender underneath the battery tray. Need to do a little patch work on that. Should be good work for this week.
Sean


Really happy with the lines we ran. They all look great and are tucked up and out of the way. Master cylinder is painted with a coat of rustoleum hammered gray. I like the look of the raw master but know it would rust. This is the closest thing I have found to keeping it looking cast.
Not really worth pics but the front suspension all got pulled back off, front framerails all wire wheeled down to bare metal and metal etch primed, primered and shot with the same alk200 I shot the rear frame with.
Front brakes all got cleaned up, painted and installed along with new rotors.....Not wilwoods but 12.5" brakes look big on an old ford pickup.
Front sheetmetal is all pulled apart and bumper got straightened out and ready to head out to powdercoat along with the grille and headlight bezel.
The first rust I have found is on the inner fender underneath the battery tray. Need to do a little patch work on that. Should be good work for this week.
Sean
11-05-2013, 10:31 AM
#6
Launching!
Thread Starter
Join Date: Mar 2012
Posts: 214
Likes: 0
Received 0 Likes
on
0 Posts
Well, did not get much done last night other than make a big mess of the garage.
I did get the entire steering column torn down prepped and painted in hopes of getting it installed today.
Today I got some help from a friend, more productive after lunch =) (Thanks for the hand and the company Ole)
Managed to get the column all rebuilt today, new bearings and all new hardware, all brackets were powdercoated gloss black, inside and outside. Stainless hardware installed on this as well as new rubber boot.
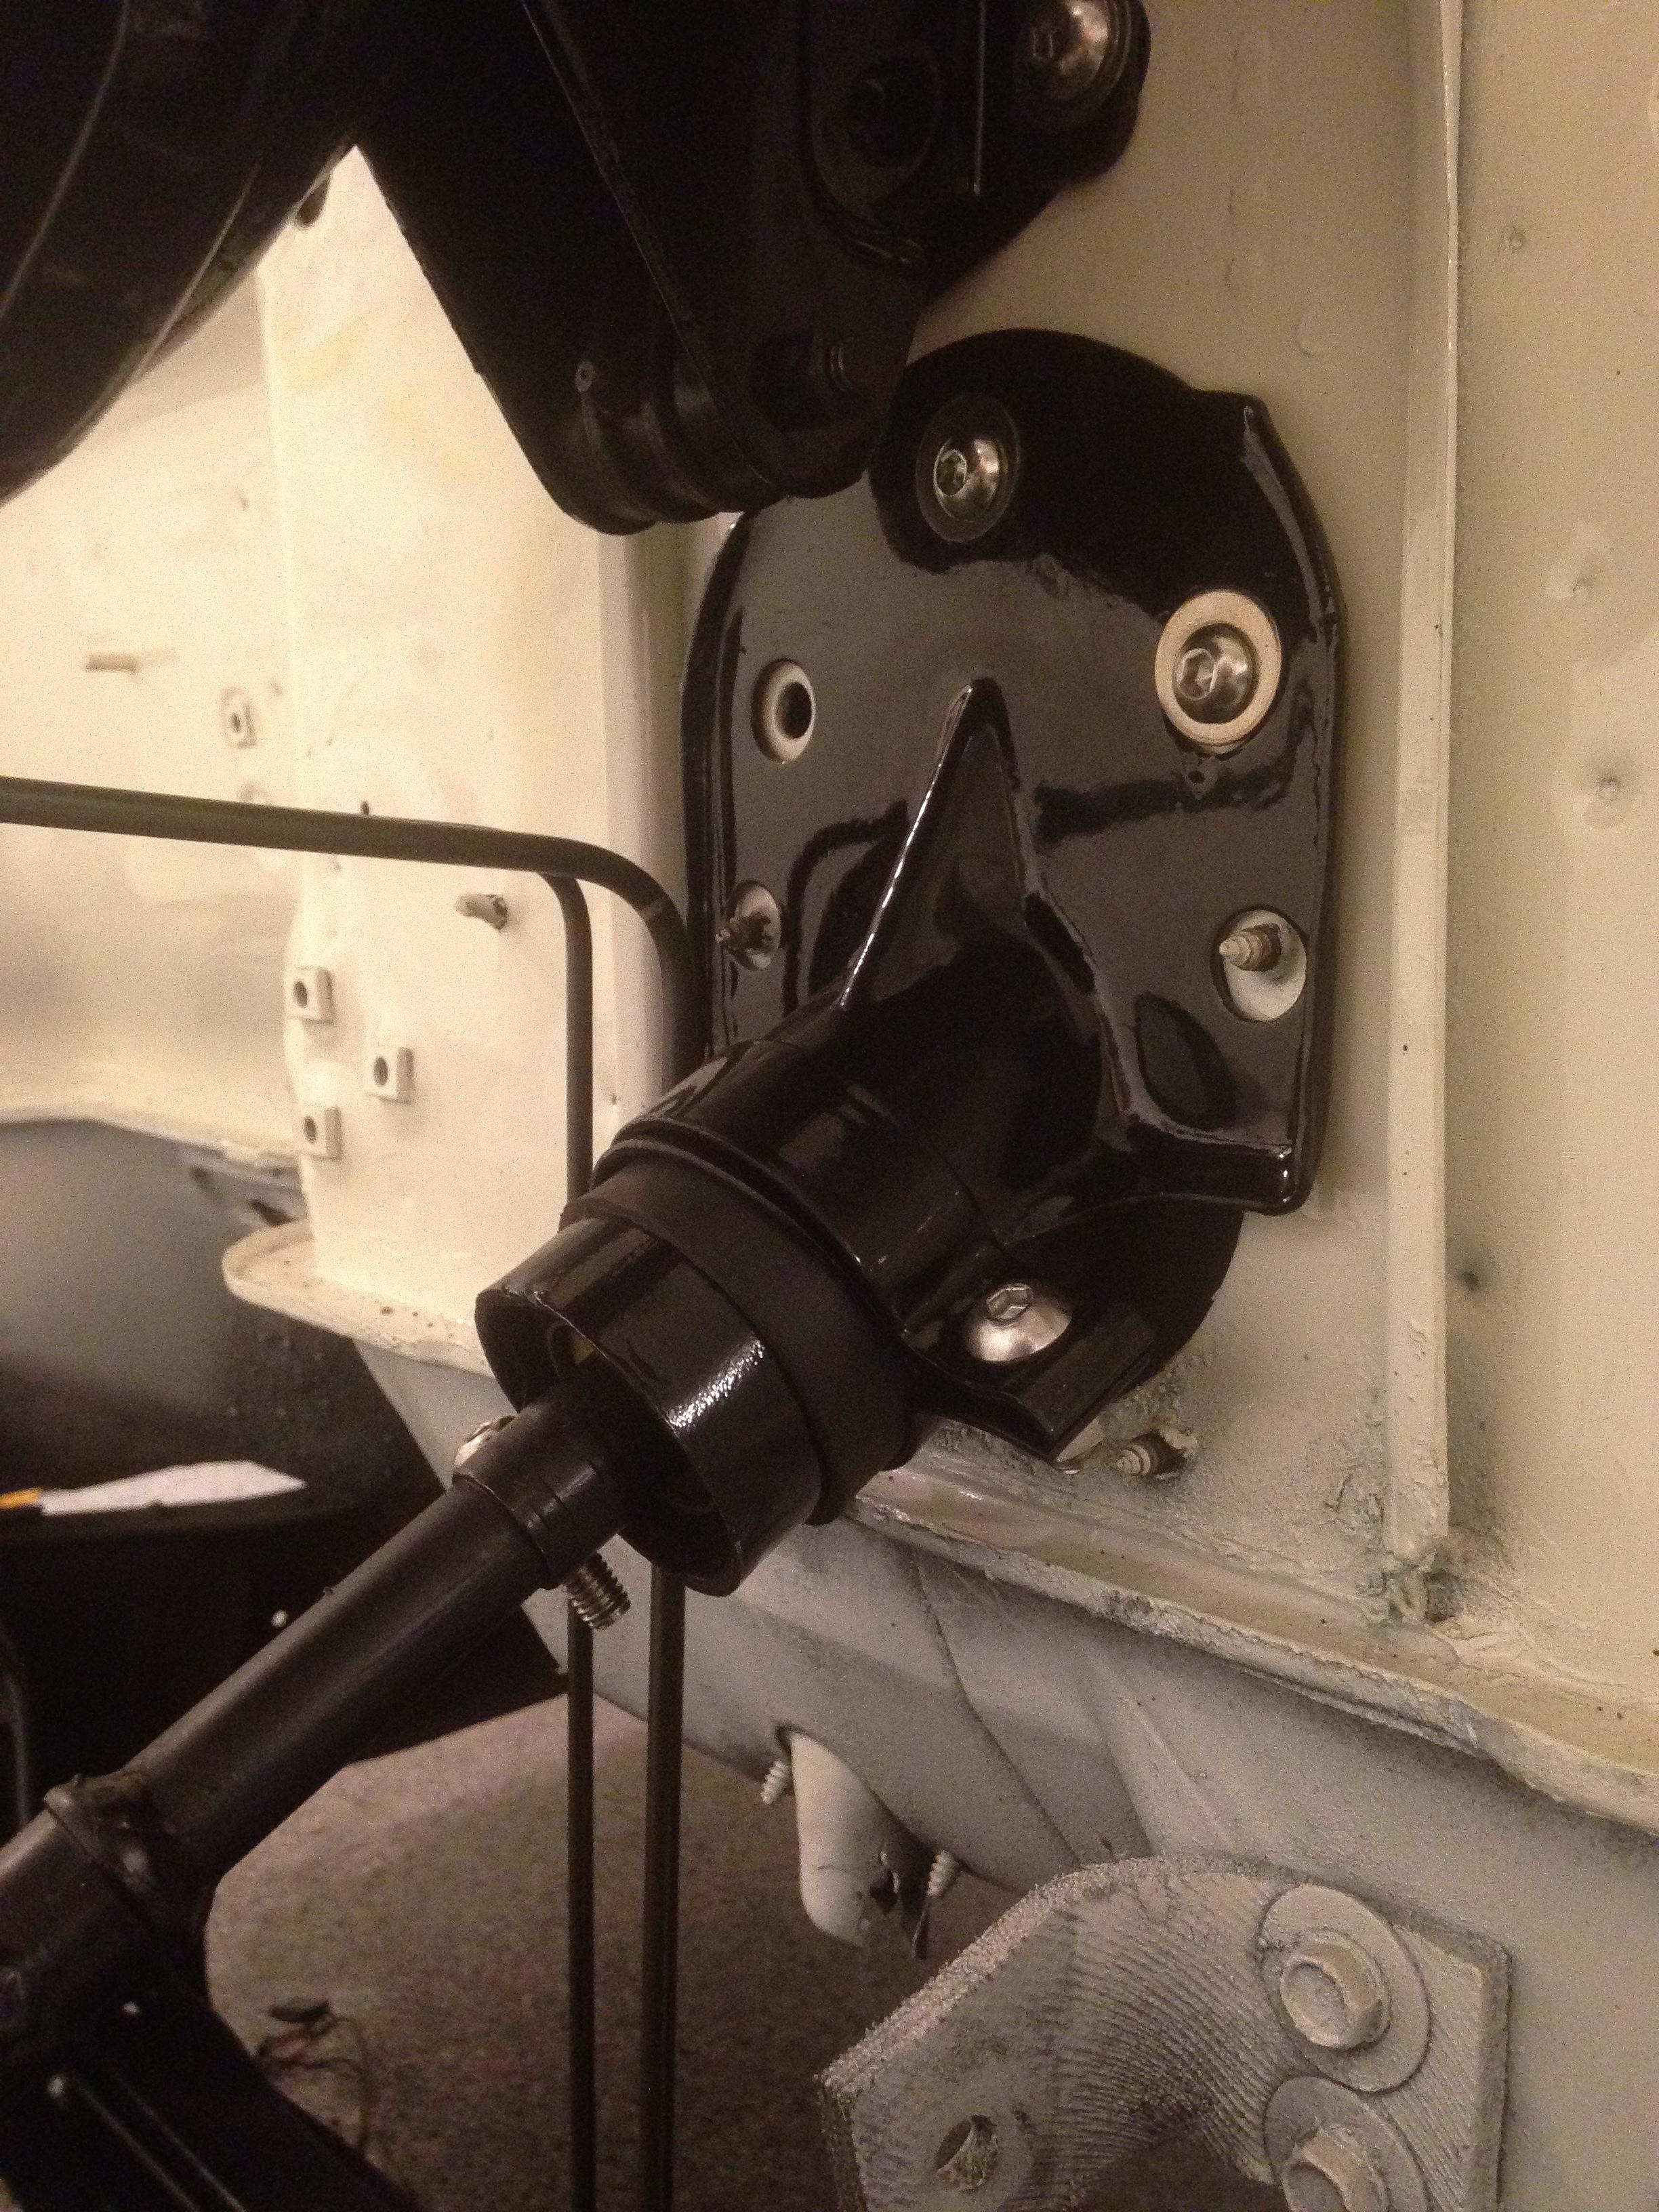
Looks like a tiny bit of progress, but it was a suprising amount of work to get it all nice, much better than it came from the factory.
Very happy with how this area has turned out so far, hope I can keep up this theme with the rest of the engine bay.
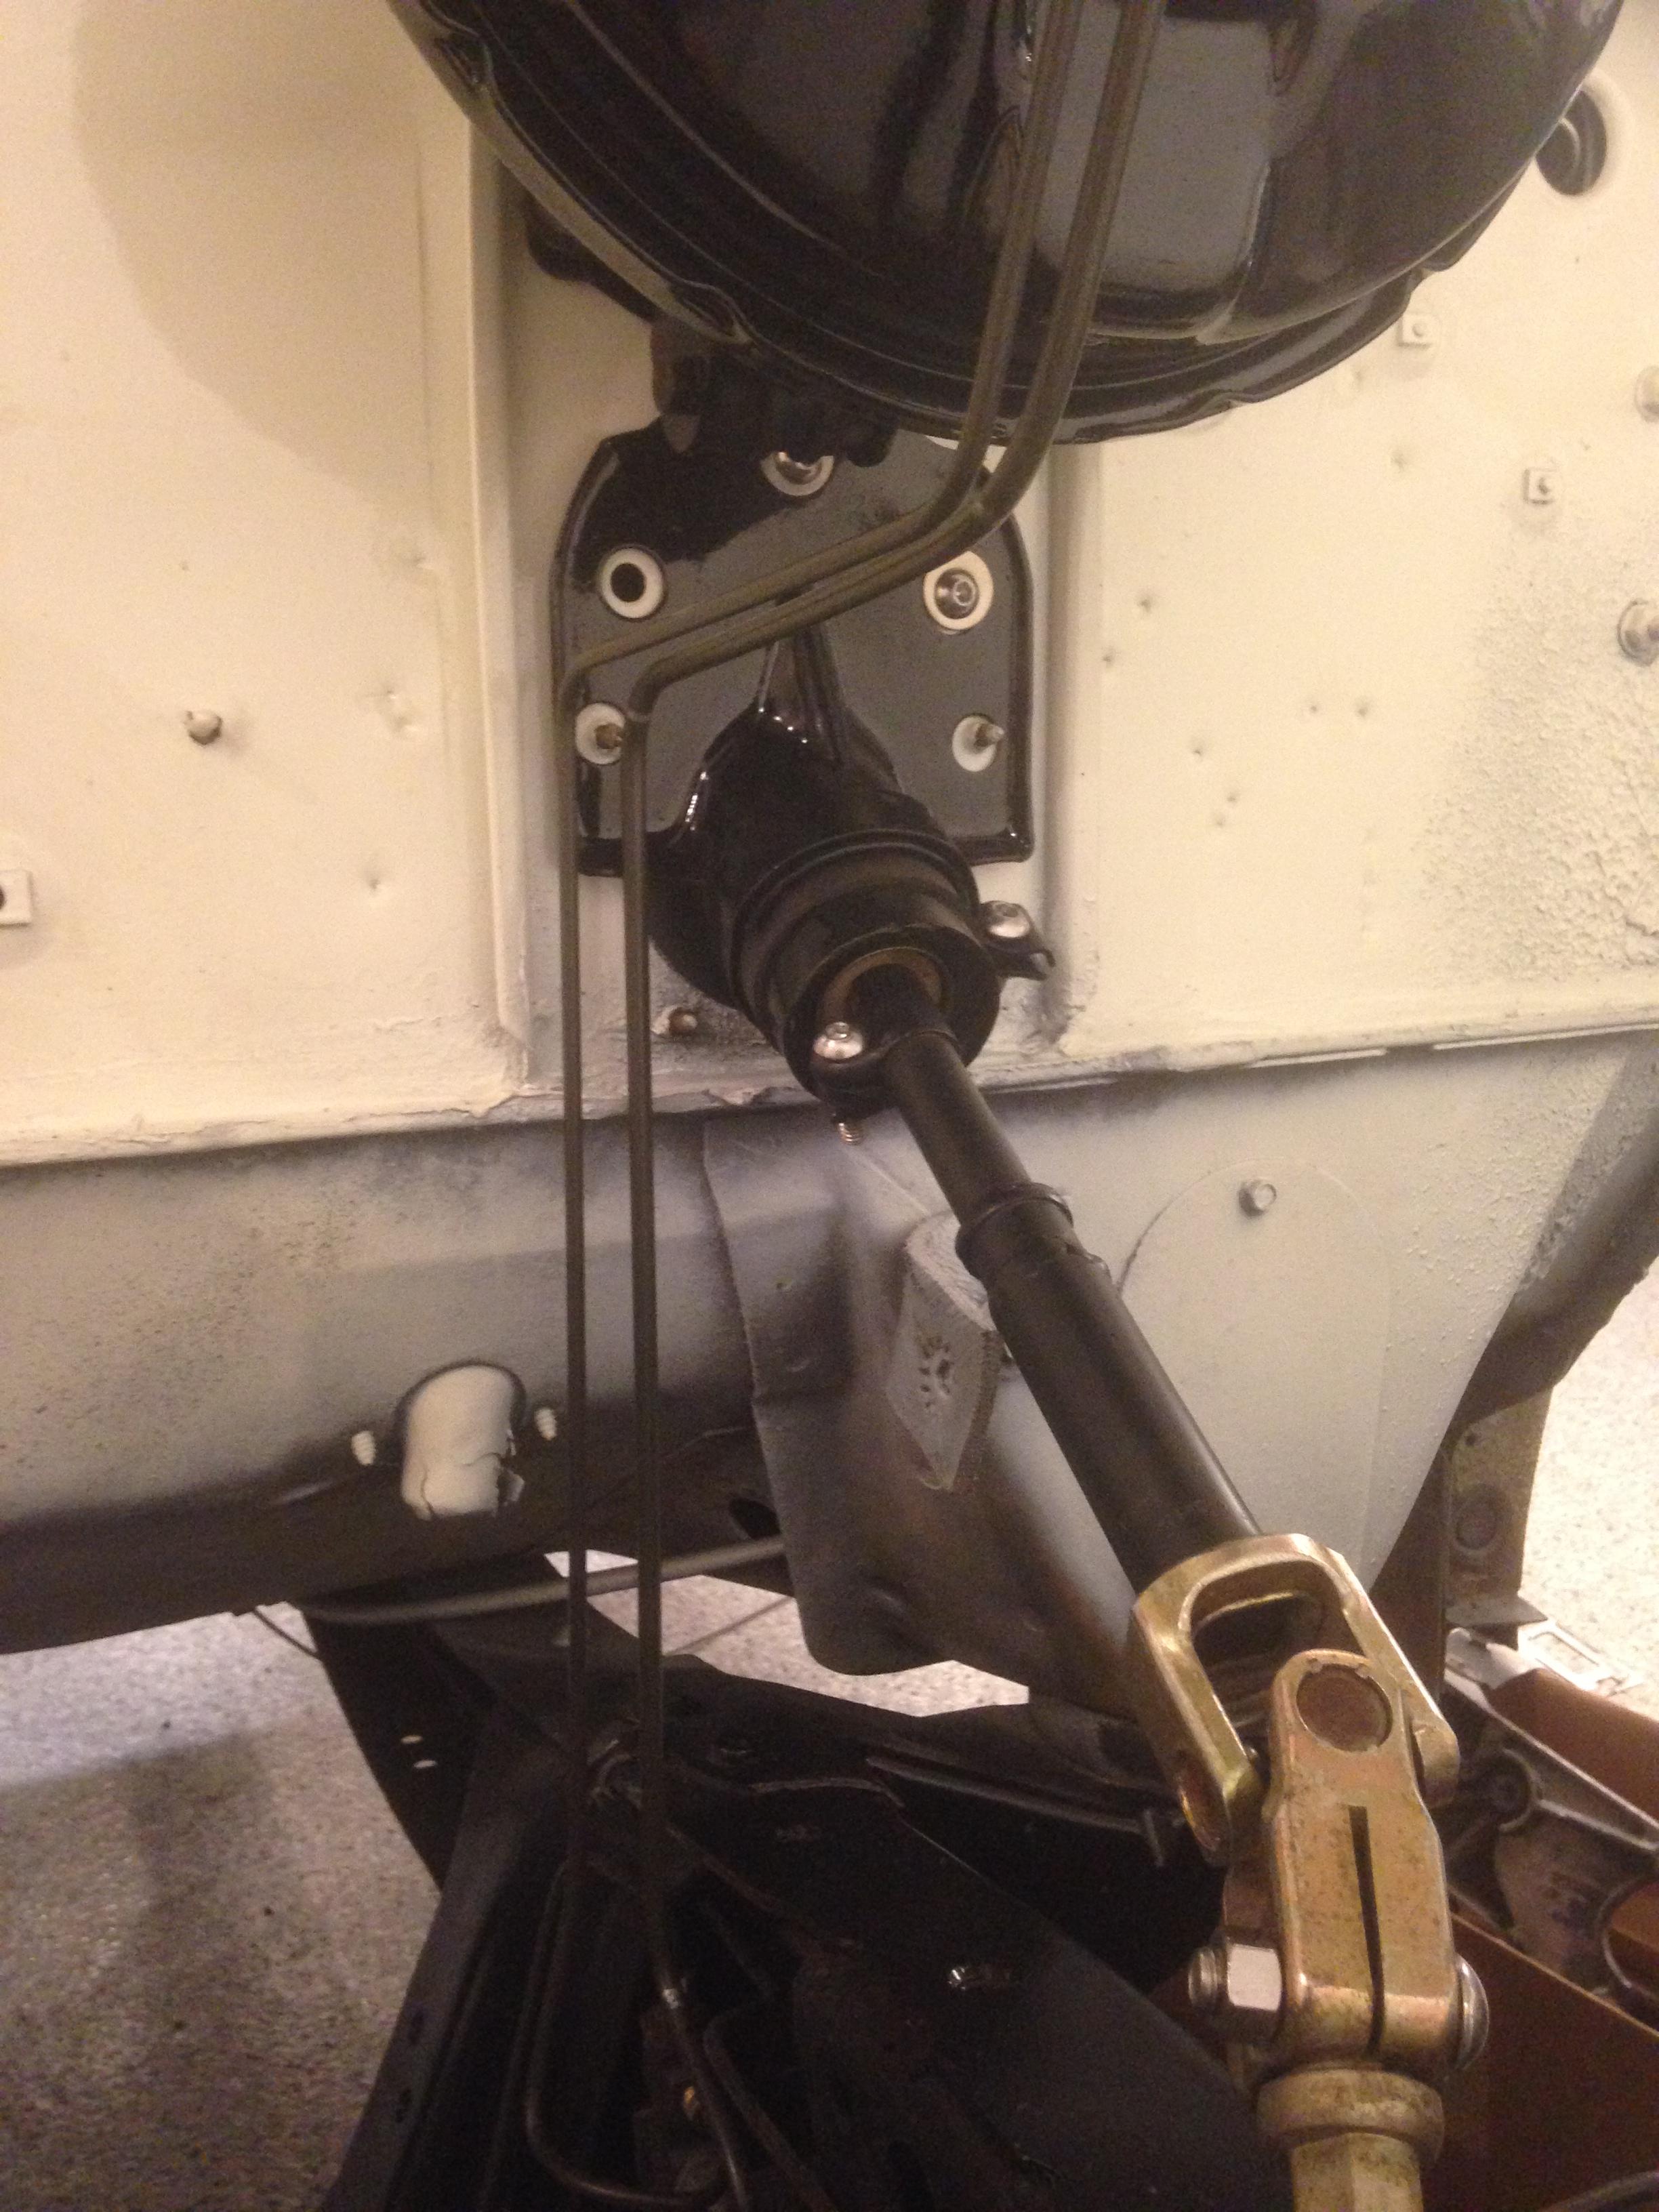
With the column finally back together and in the rig, I could layout the final steering linkage from the rack to the column. I had picked up all the linkage from a 05 crown vic earlier in the week and cut off the bottom of the steering column so I had lots to work with.
I machined down a little spacer with what I have here to work with to mate the crown vic stub to the 68 steering column. Welded the crown vic stub to the spacer then welded the spacer to the shaft. They were both an interference fit, hammered together and then welded. I know its not flaming river pretty, but it looks pretty descent and did not dig into the wallet, not even a dollar.
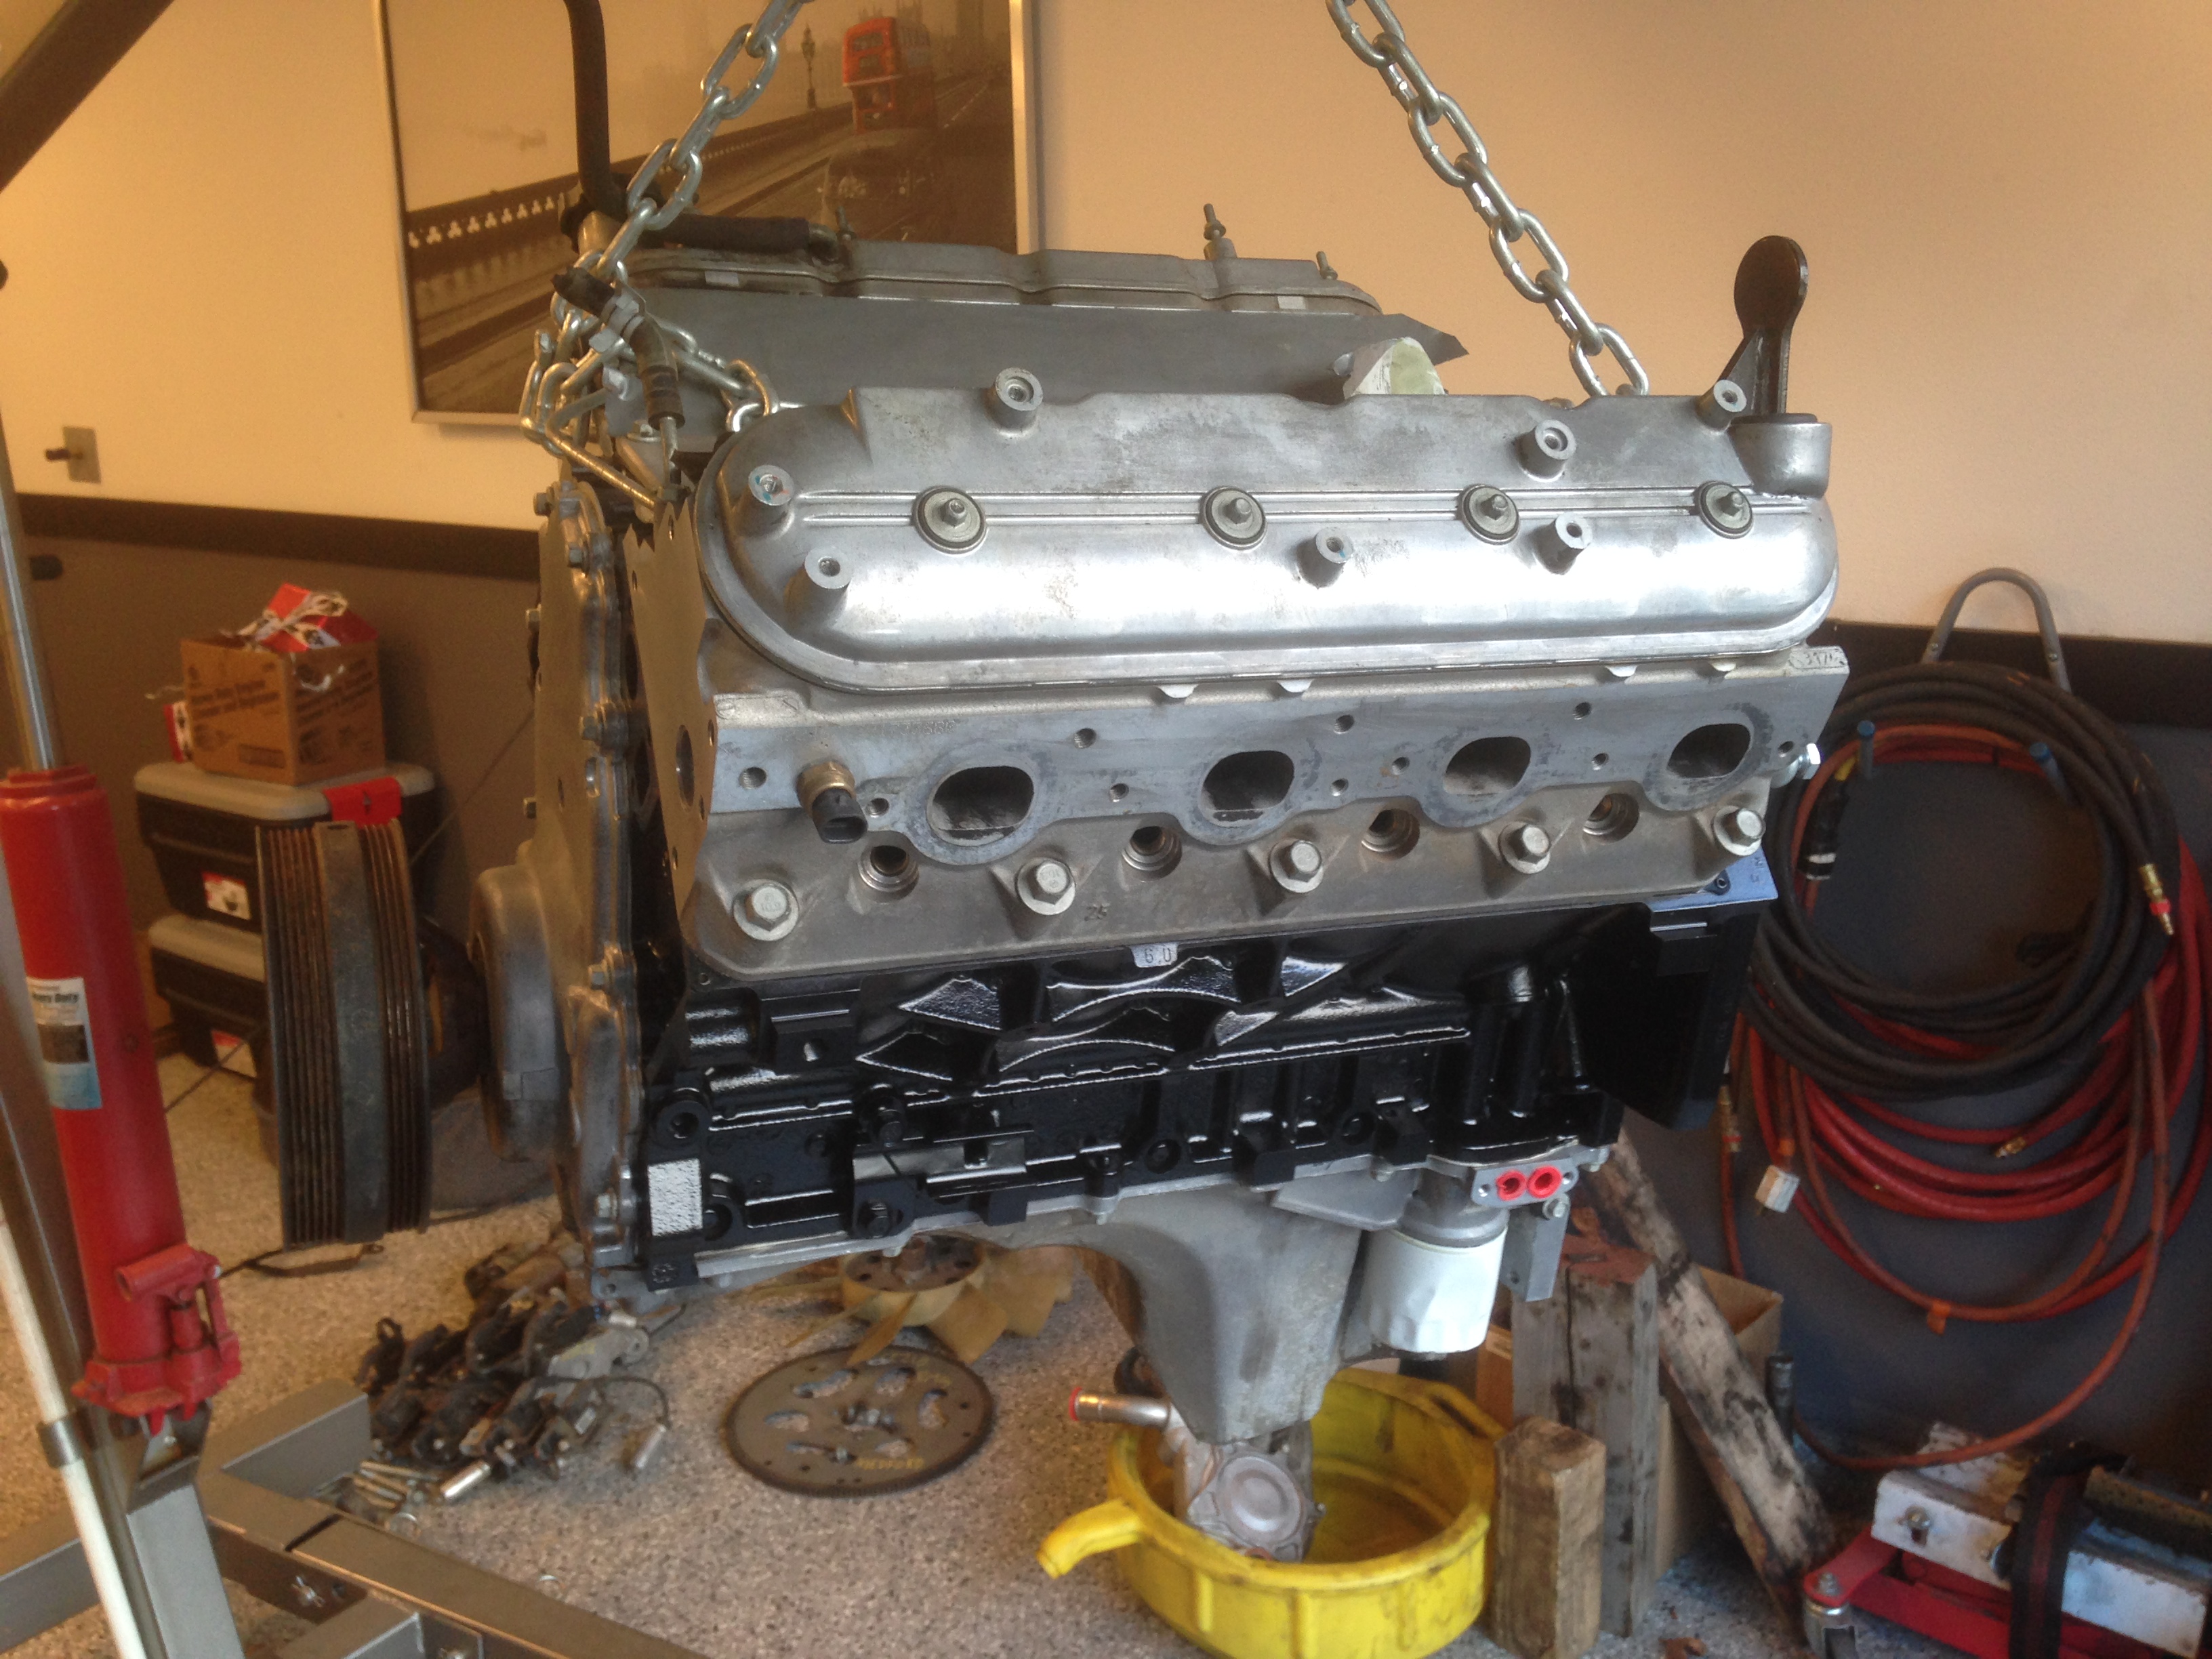
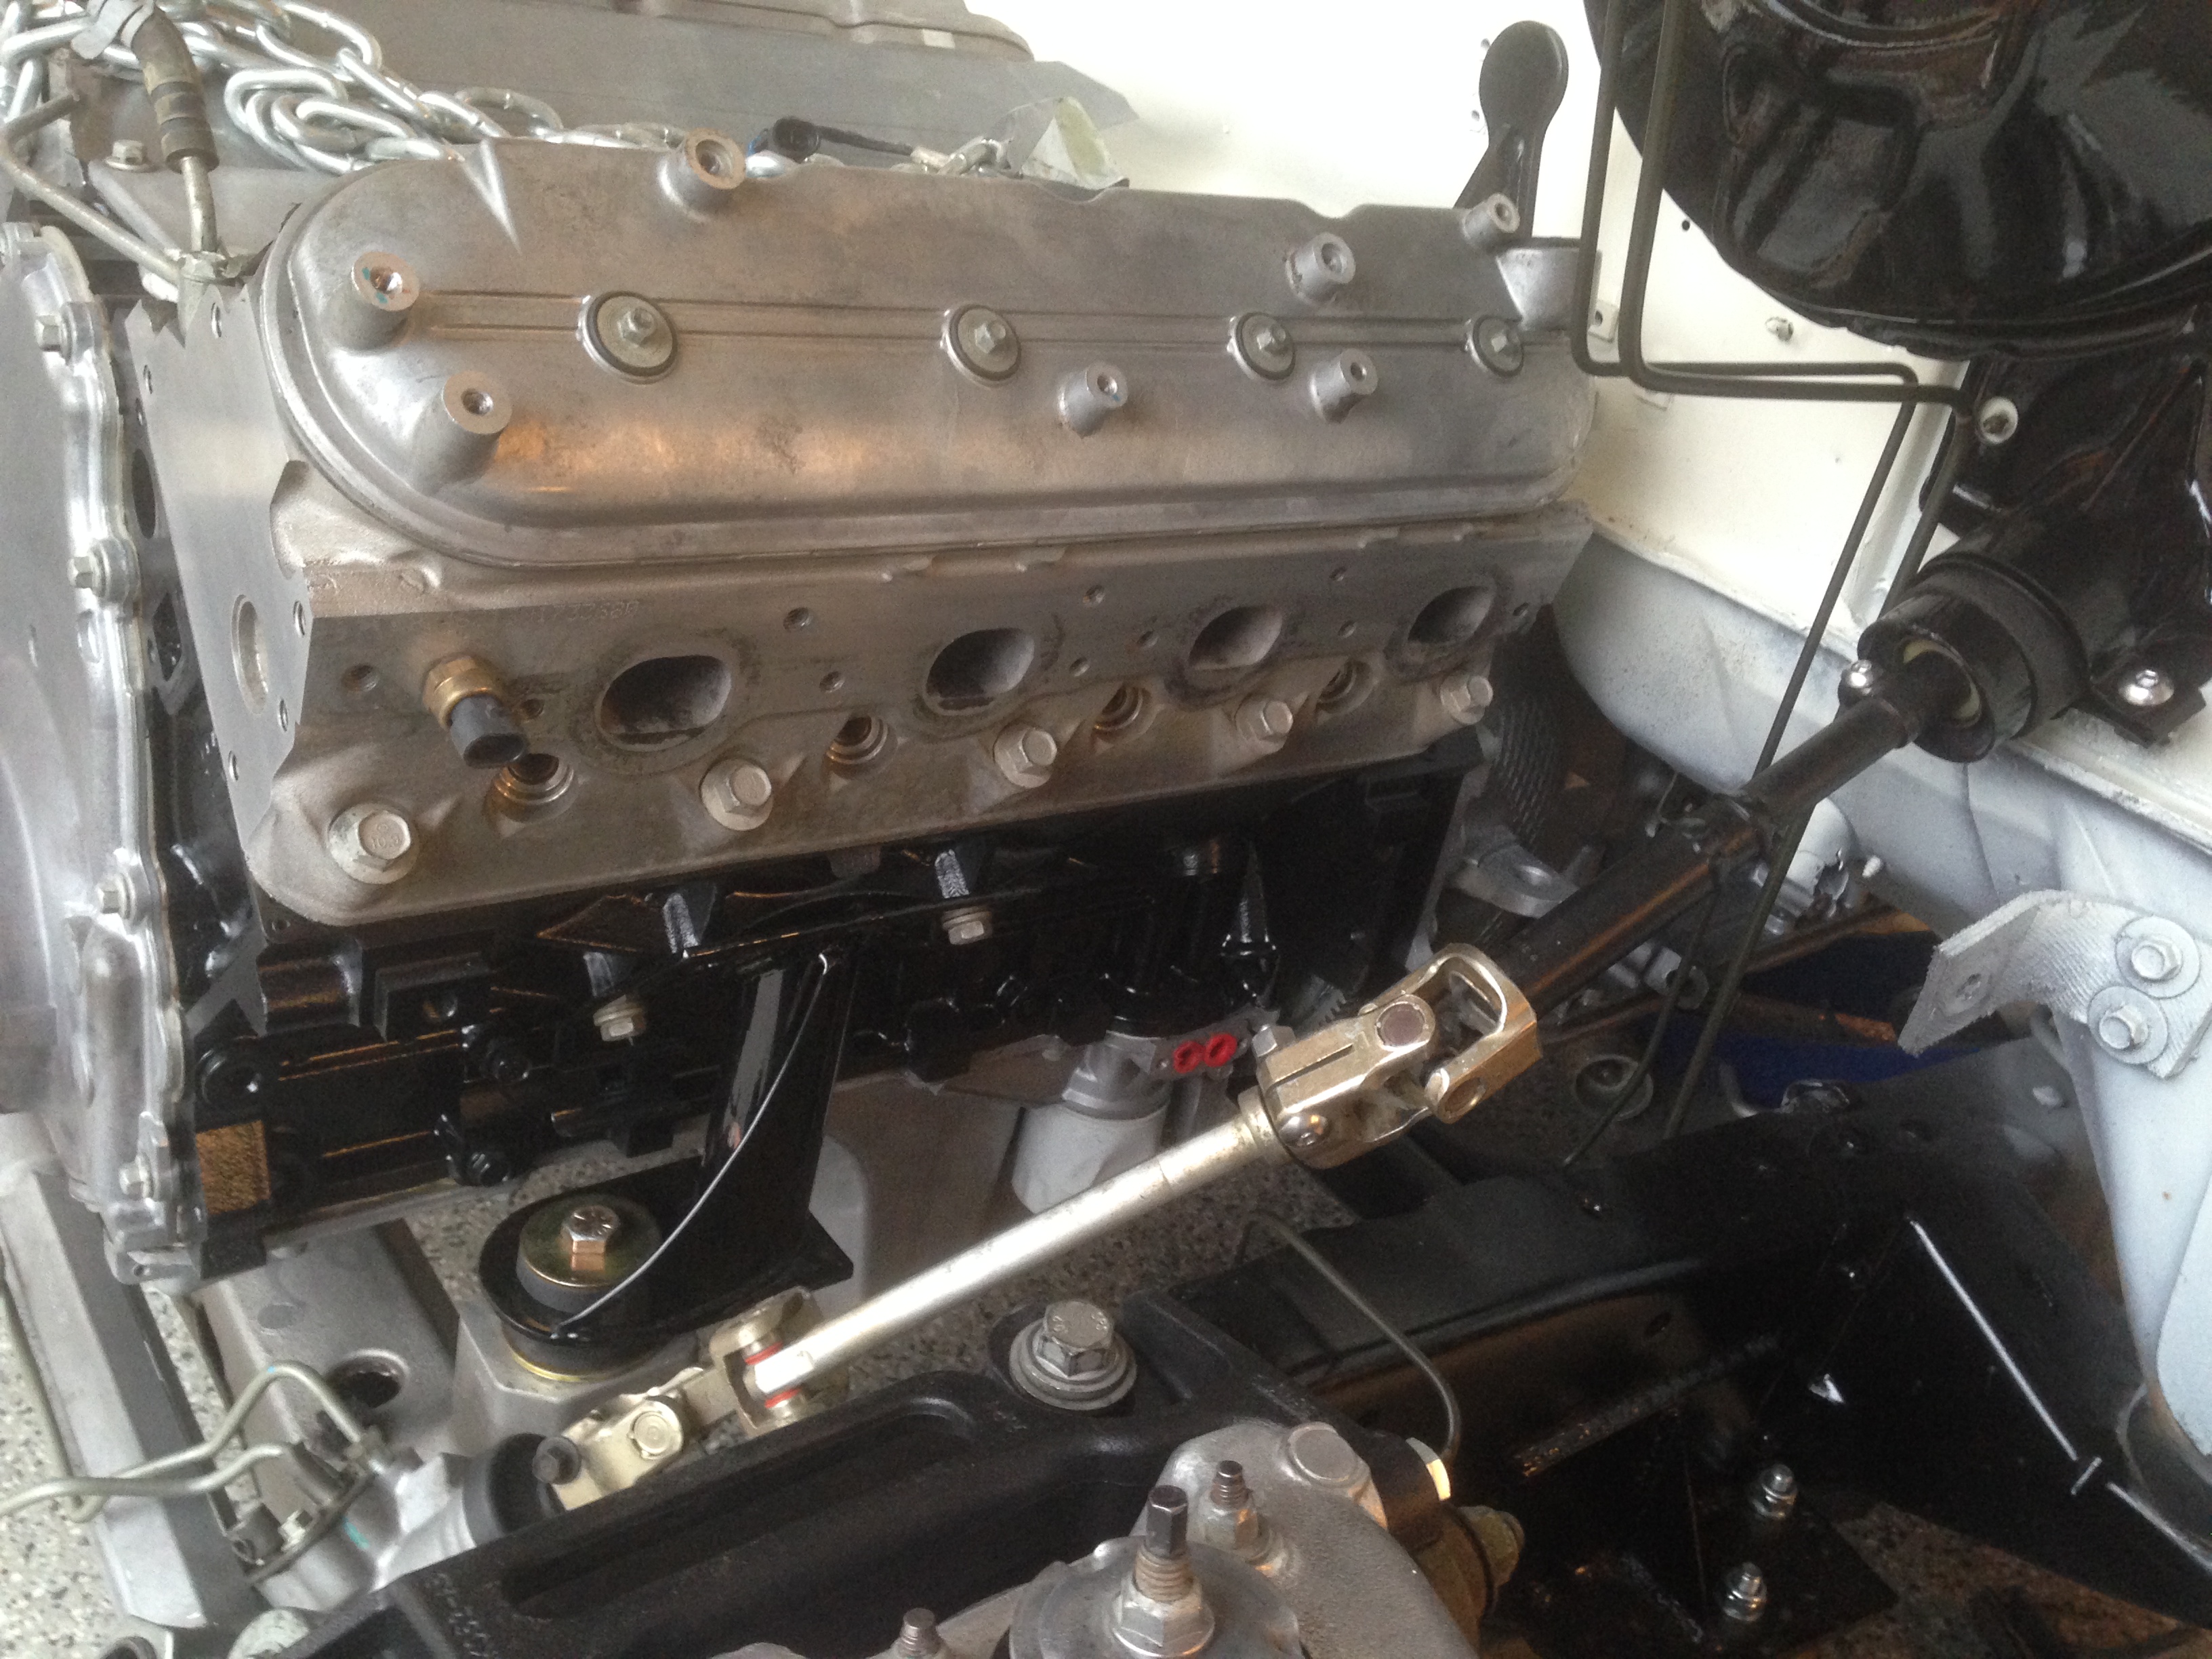
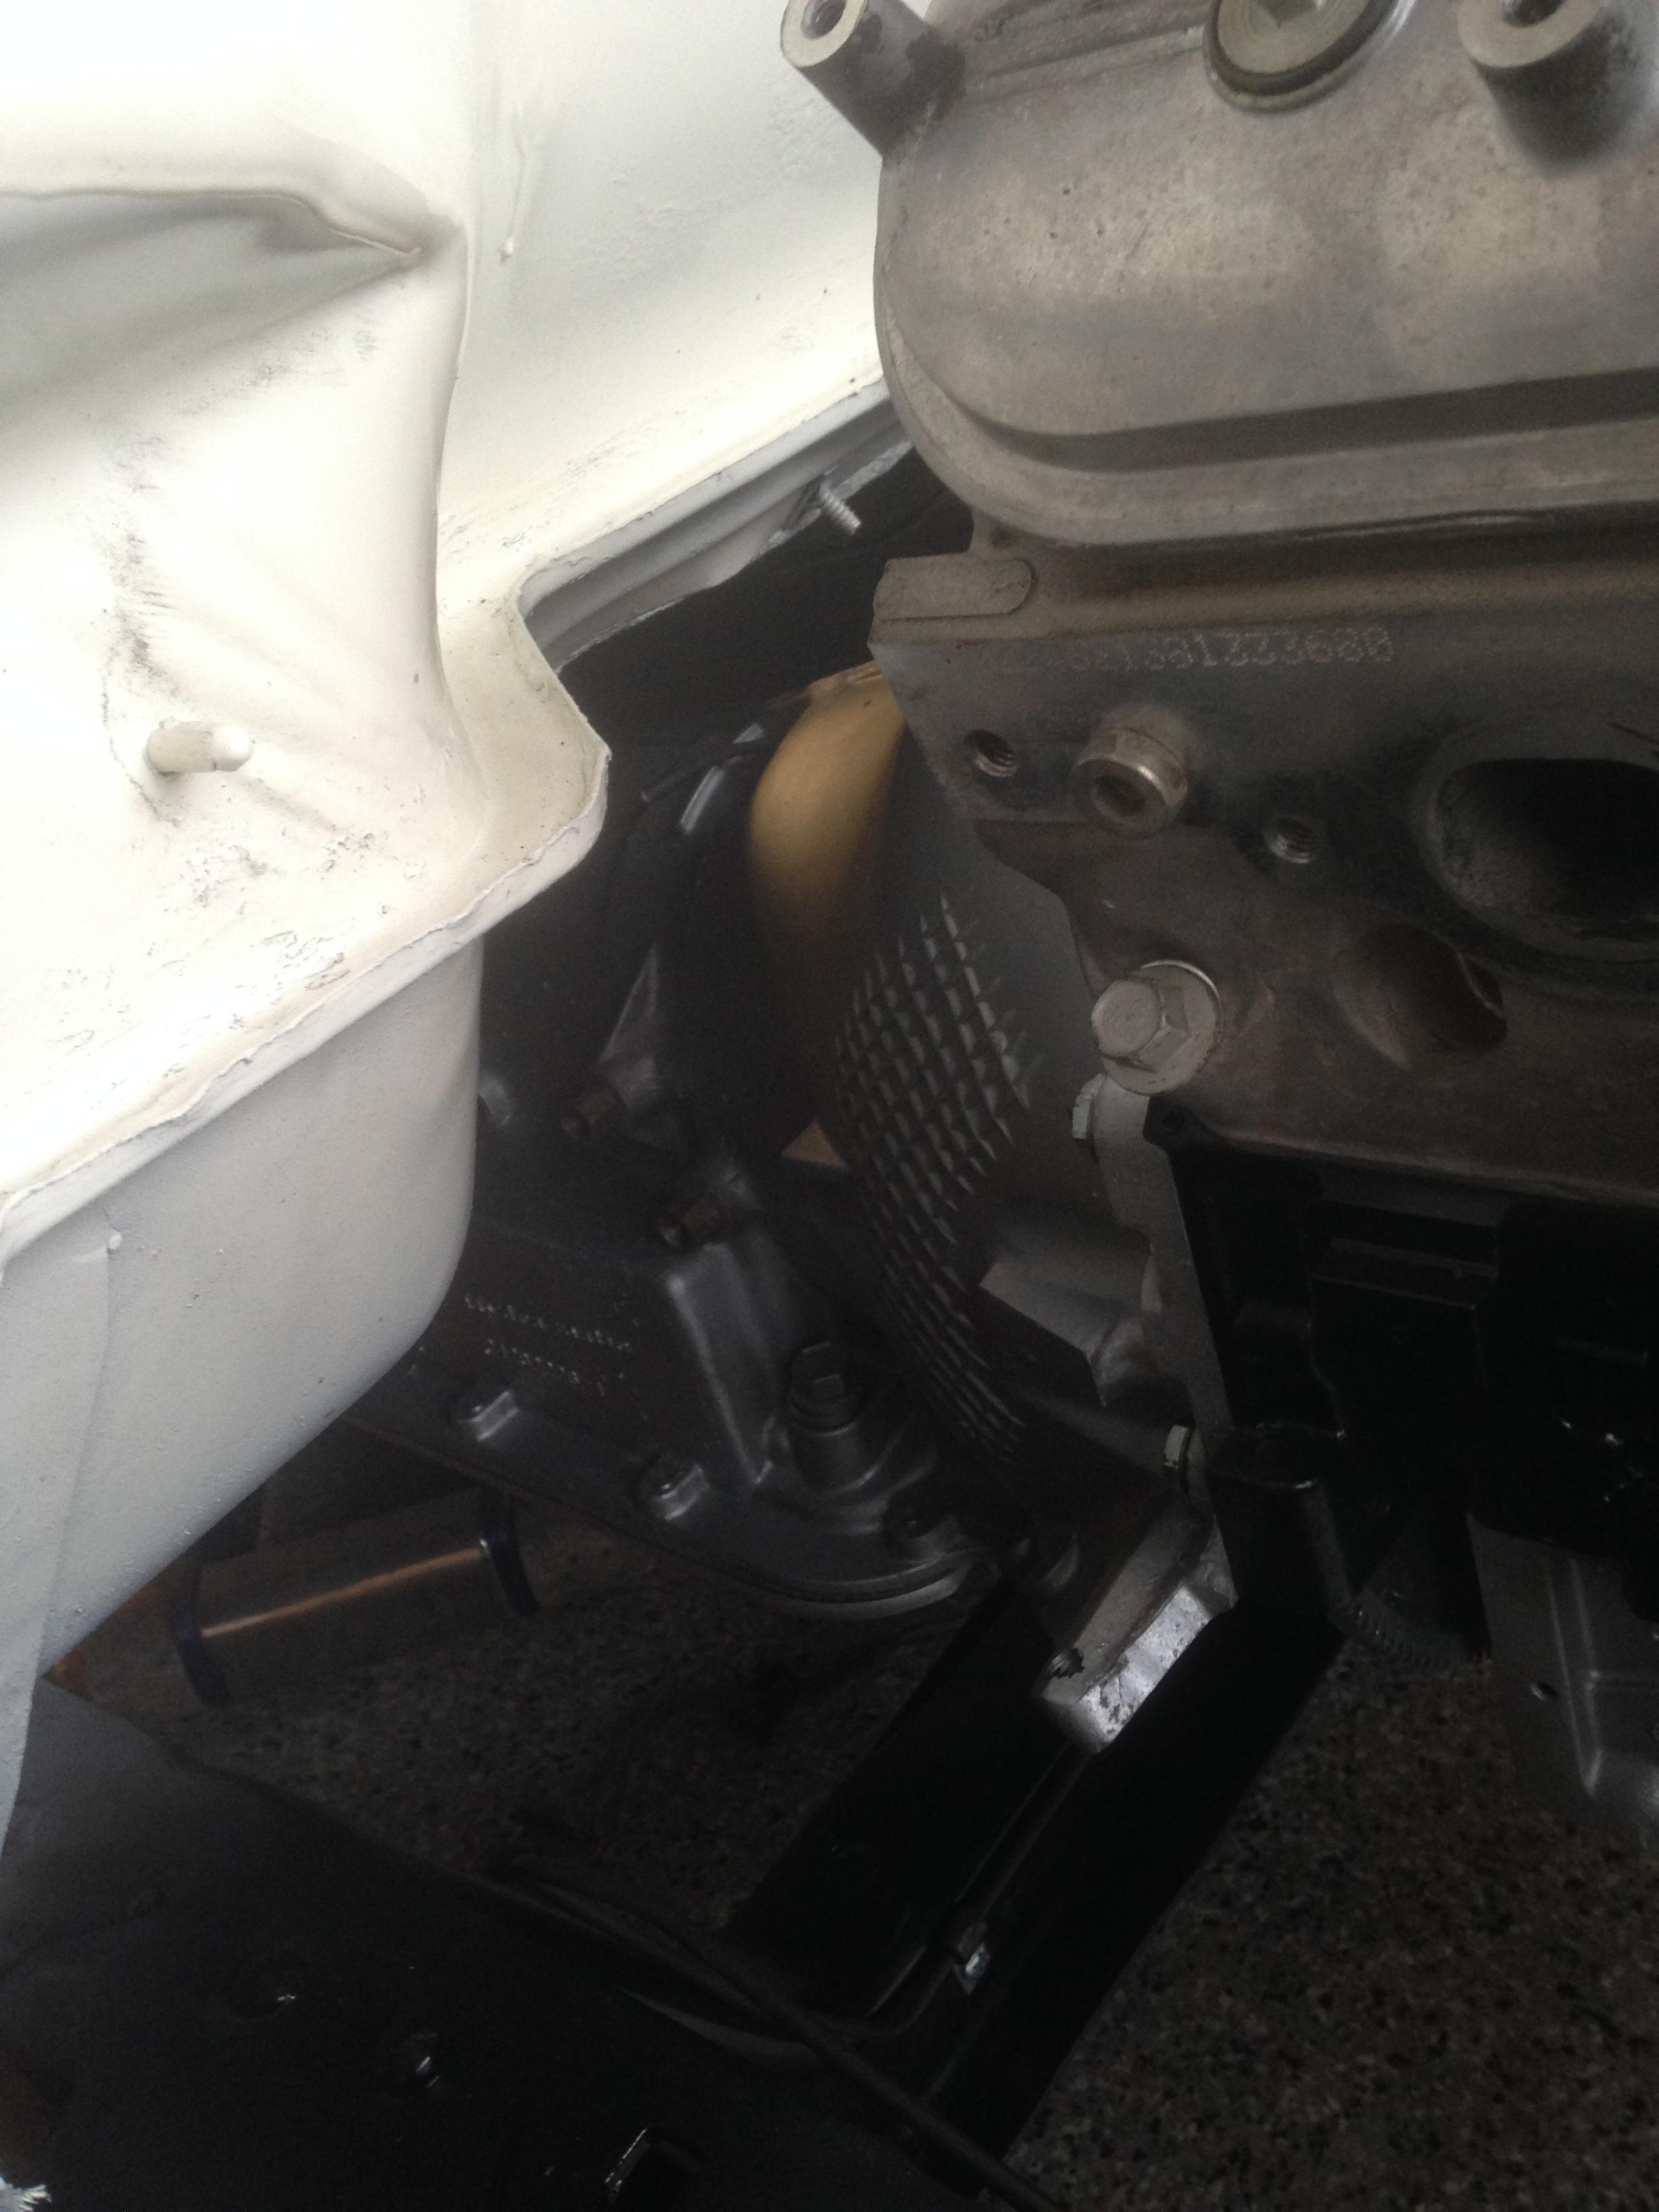
Got the 6.0 torn down to just a long block with covers and a pan, cleaned up everything and prepped it for paint. Shot it with several coats of gloss black. Planning on doing the Holley black valve covers with the coil mounts on them directly, should look pretty descent. Happy so far with the little engine clean up.
Another round of blocking and sanding and a couple rounds of real eopxy primer laid down on them, a well as the freshly sandblated nice straight core support.
Not really worth taking pics of but I also got the final upper braces for the frontend painted and installed with the proper spacers under them and measure for the tranny, its gonna be close if it clear the crossmember at the pan or not. Hope to find out tomorrow.
Sean
I did get the entire steering column torn down prepped and painted in hopes of getting it installed today.
Today I got some help from a friend, more productive after lunch =) (Thanks for the hand and the company Ole)
Managed to get the column all rebuilt today, new bearings and all new hardware, all brackets were powdercoated gloss black, inside and outside. Stainless hardware installed on this as well as new rubber boot.

Looks like a tiny bit of progress, but it was a suprising amount of work to get it all nice, much better than it came from the factory.
Very happy with how this area has turned out so far, hope I can keep up this theme with the rest of the engine bay.

With the column finally back together and in the rig, I could layout the final steering linkage from the rack to the column. I had picked up all the linkage from a 05 crown vic earlier in the week and cut off the bottom of the steering column so I had lots to work with.
I machined down a little spacer with what I have here to work with to mate the crown vic stub to the 68 steering column. Welded the crown vic stub to the spacer then welded the spacer to the shaft. They were both an interference fit, hammered together and then welded. I know its not flaming river pretty, but it looks pretty descent and did not dig into the wallet, not even a dollar.

Got the 6.0 torn down to just a long block with covers and a pan, cleaned up everything and prepped it for paint. Shot it with several coats of gloss black. Planning on doing the Holley black valve covers with the coil mounts on them directly, should look pretty descent. Happy so far with the little engine clean up.

Another round of blocking and sanding and a couple rounds of real eopxy primer laid down on them, a well as the freshly sandblated nice straight core support.

Not really worth taking pics of but I also got the final upper braces for the frontend painted and installed with the proper spacers under them and measure for the tranny, its gonna be close if it clear the crossmember at the pan or not. Hope to find out tomorrow.
Sean
11-05-2013, 10:32 AM
#7
Launching!
Thread Starter
Join Date: Mar 2012
Posts: 214
Likes: 0
Received 0 Likes
on
0 Posts
Not the best day of work in the garage for me, but I did manage to get more sanding on the inner fenders, they are at this point done and ready for paint... Tired of taking pictures of them though.
Got the tranny all cleaned up and put a nice dusting of aluminum paint on it to freshen up my freshened up tranny before it went into its new home.
Asher came over and we bolted up my new SFI approved flex plate, filled up the amazing circle d triple full billet converter and stabbed it in the tranny. Holy crap this tranny is a big heavy girl, but up to the task of holding big power for the long haul.
Keep in mind, never even a test fit on the tranny into the hole and over the crossmember....and into the truck we go.

I took lots and lots of measurements and was pretty sure that it was going to be close on the tunnel and at the crossmember.
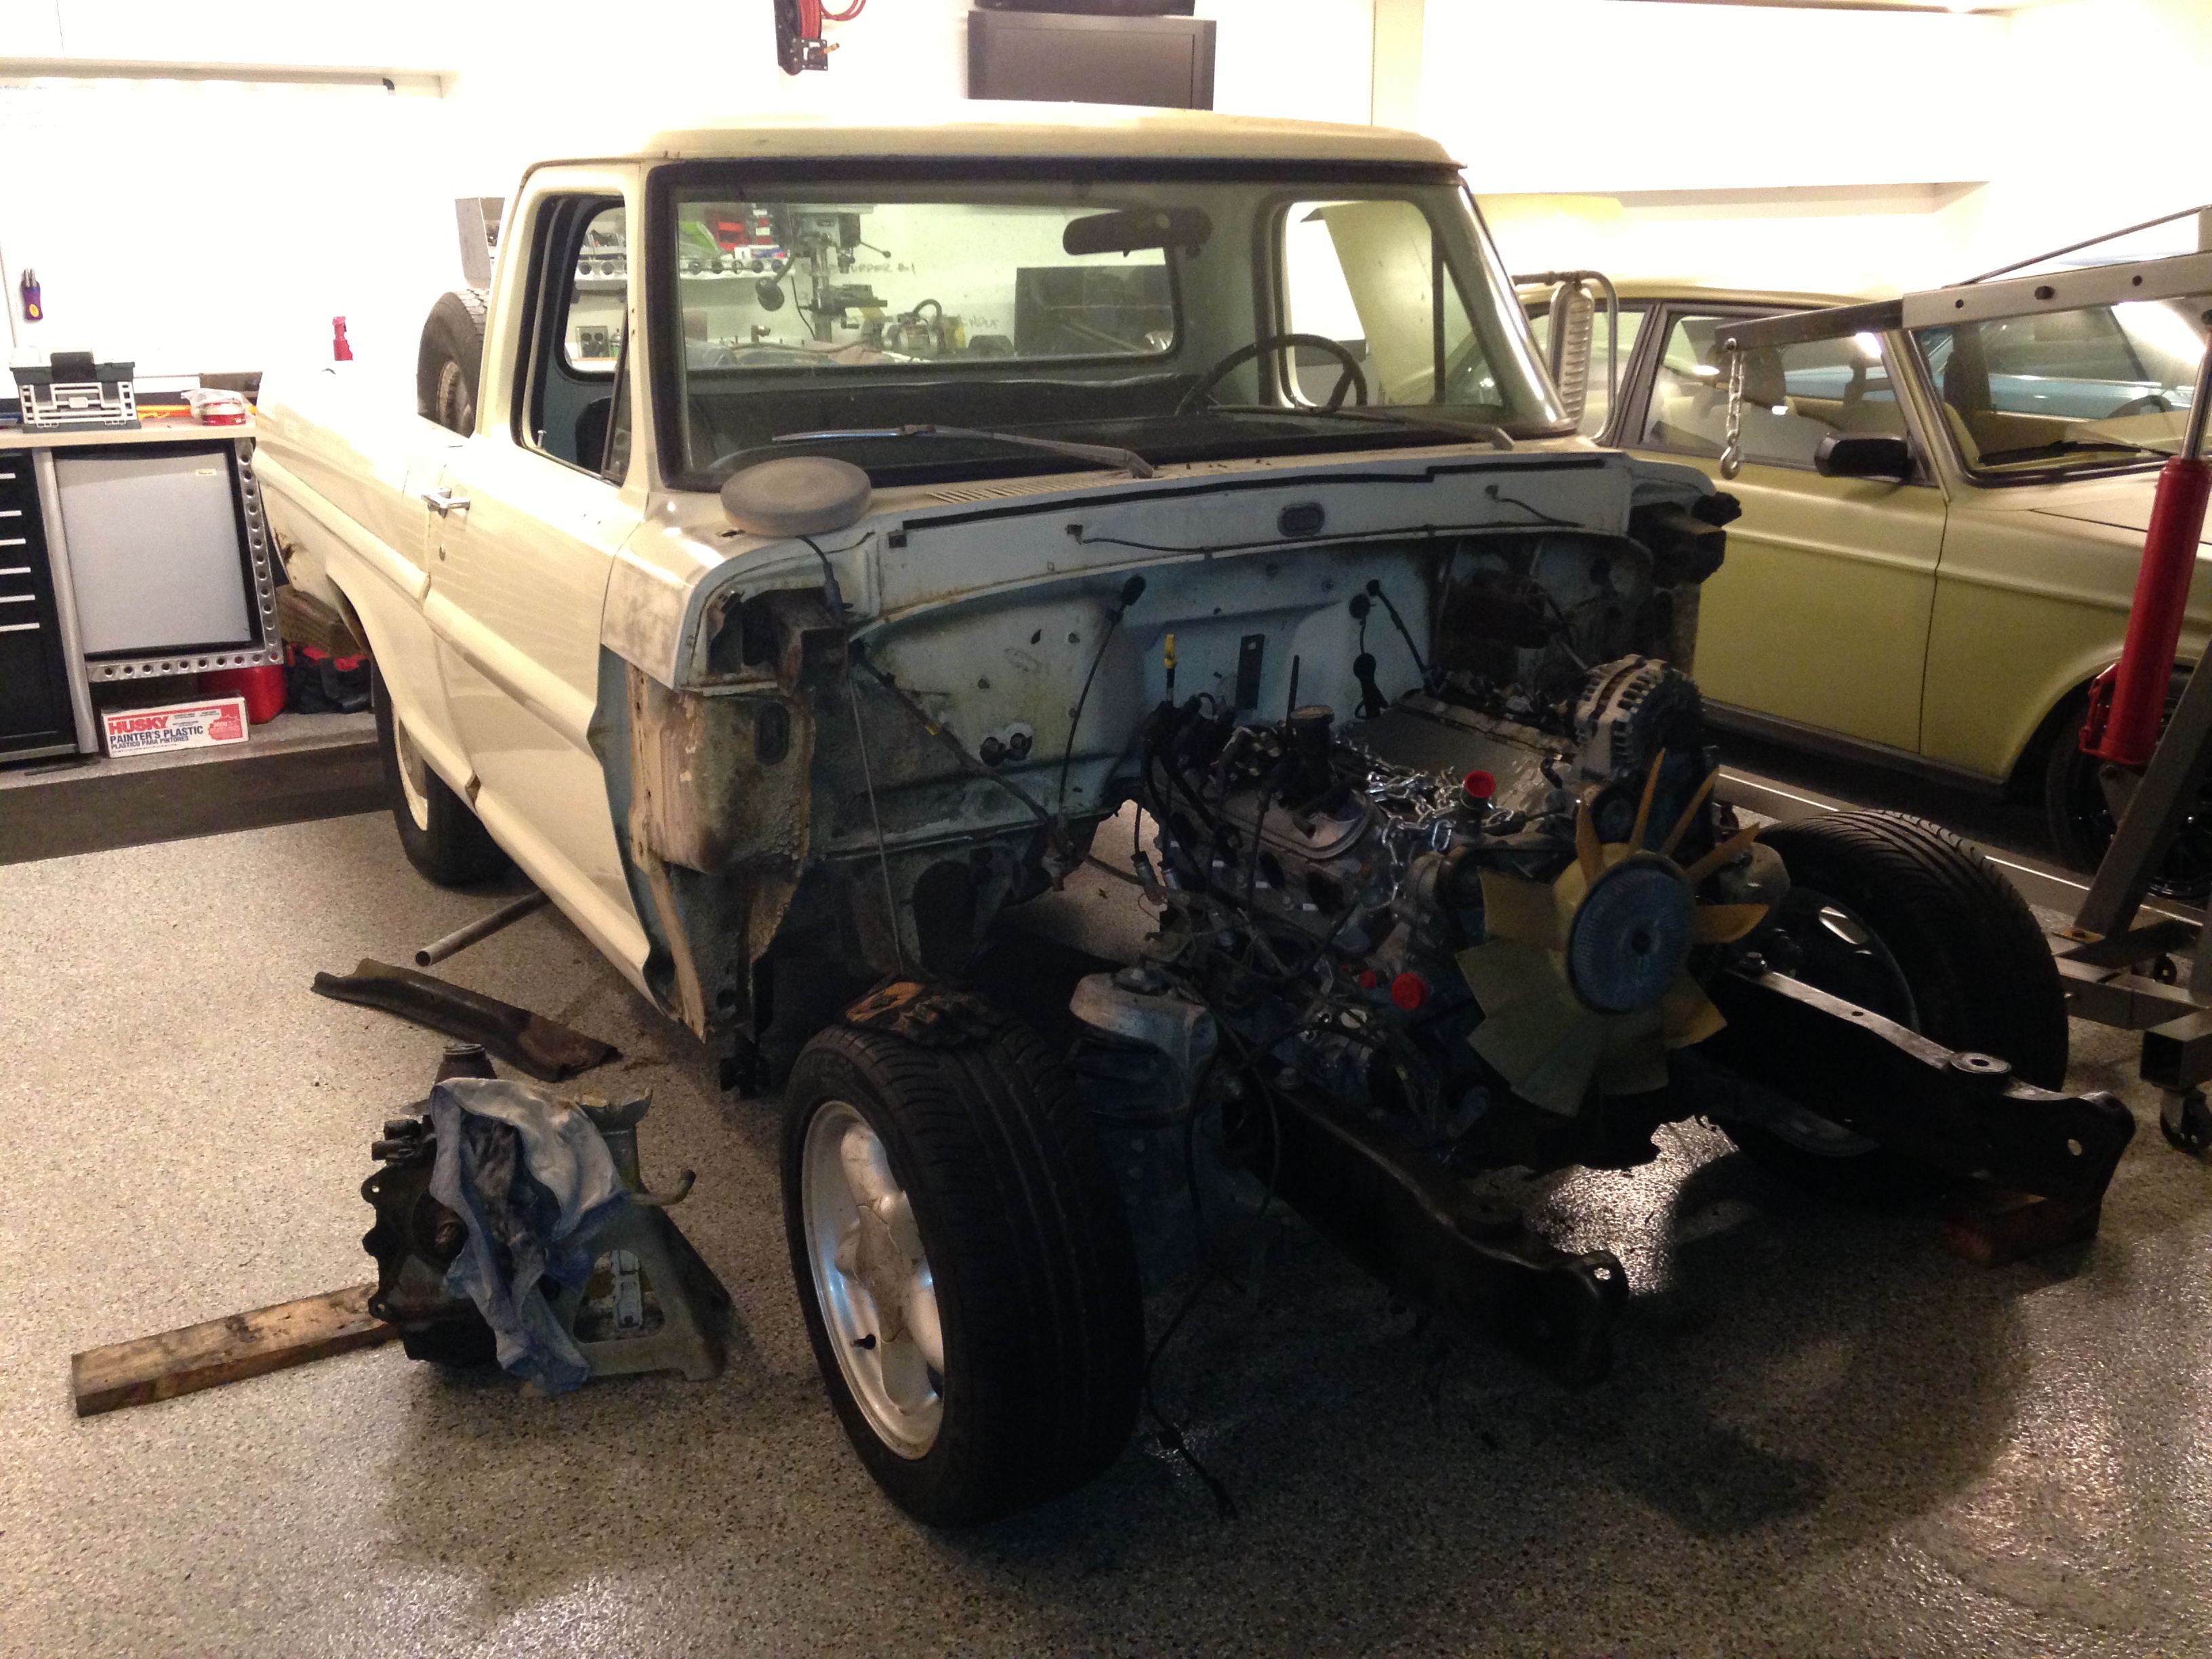
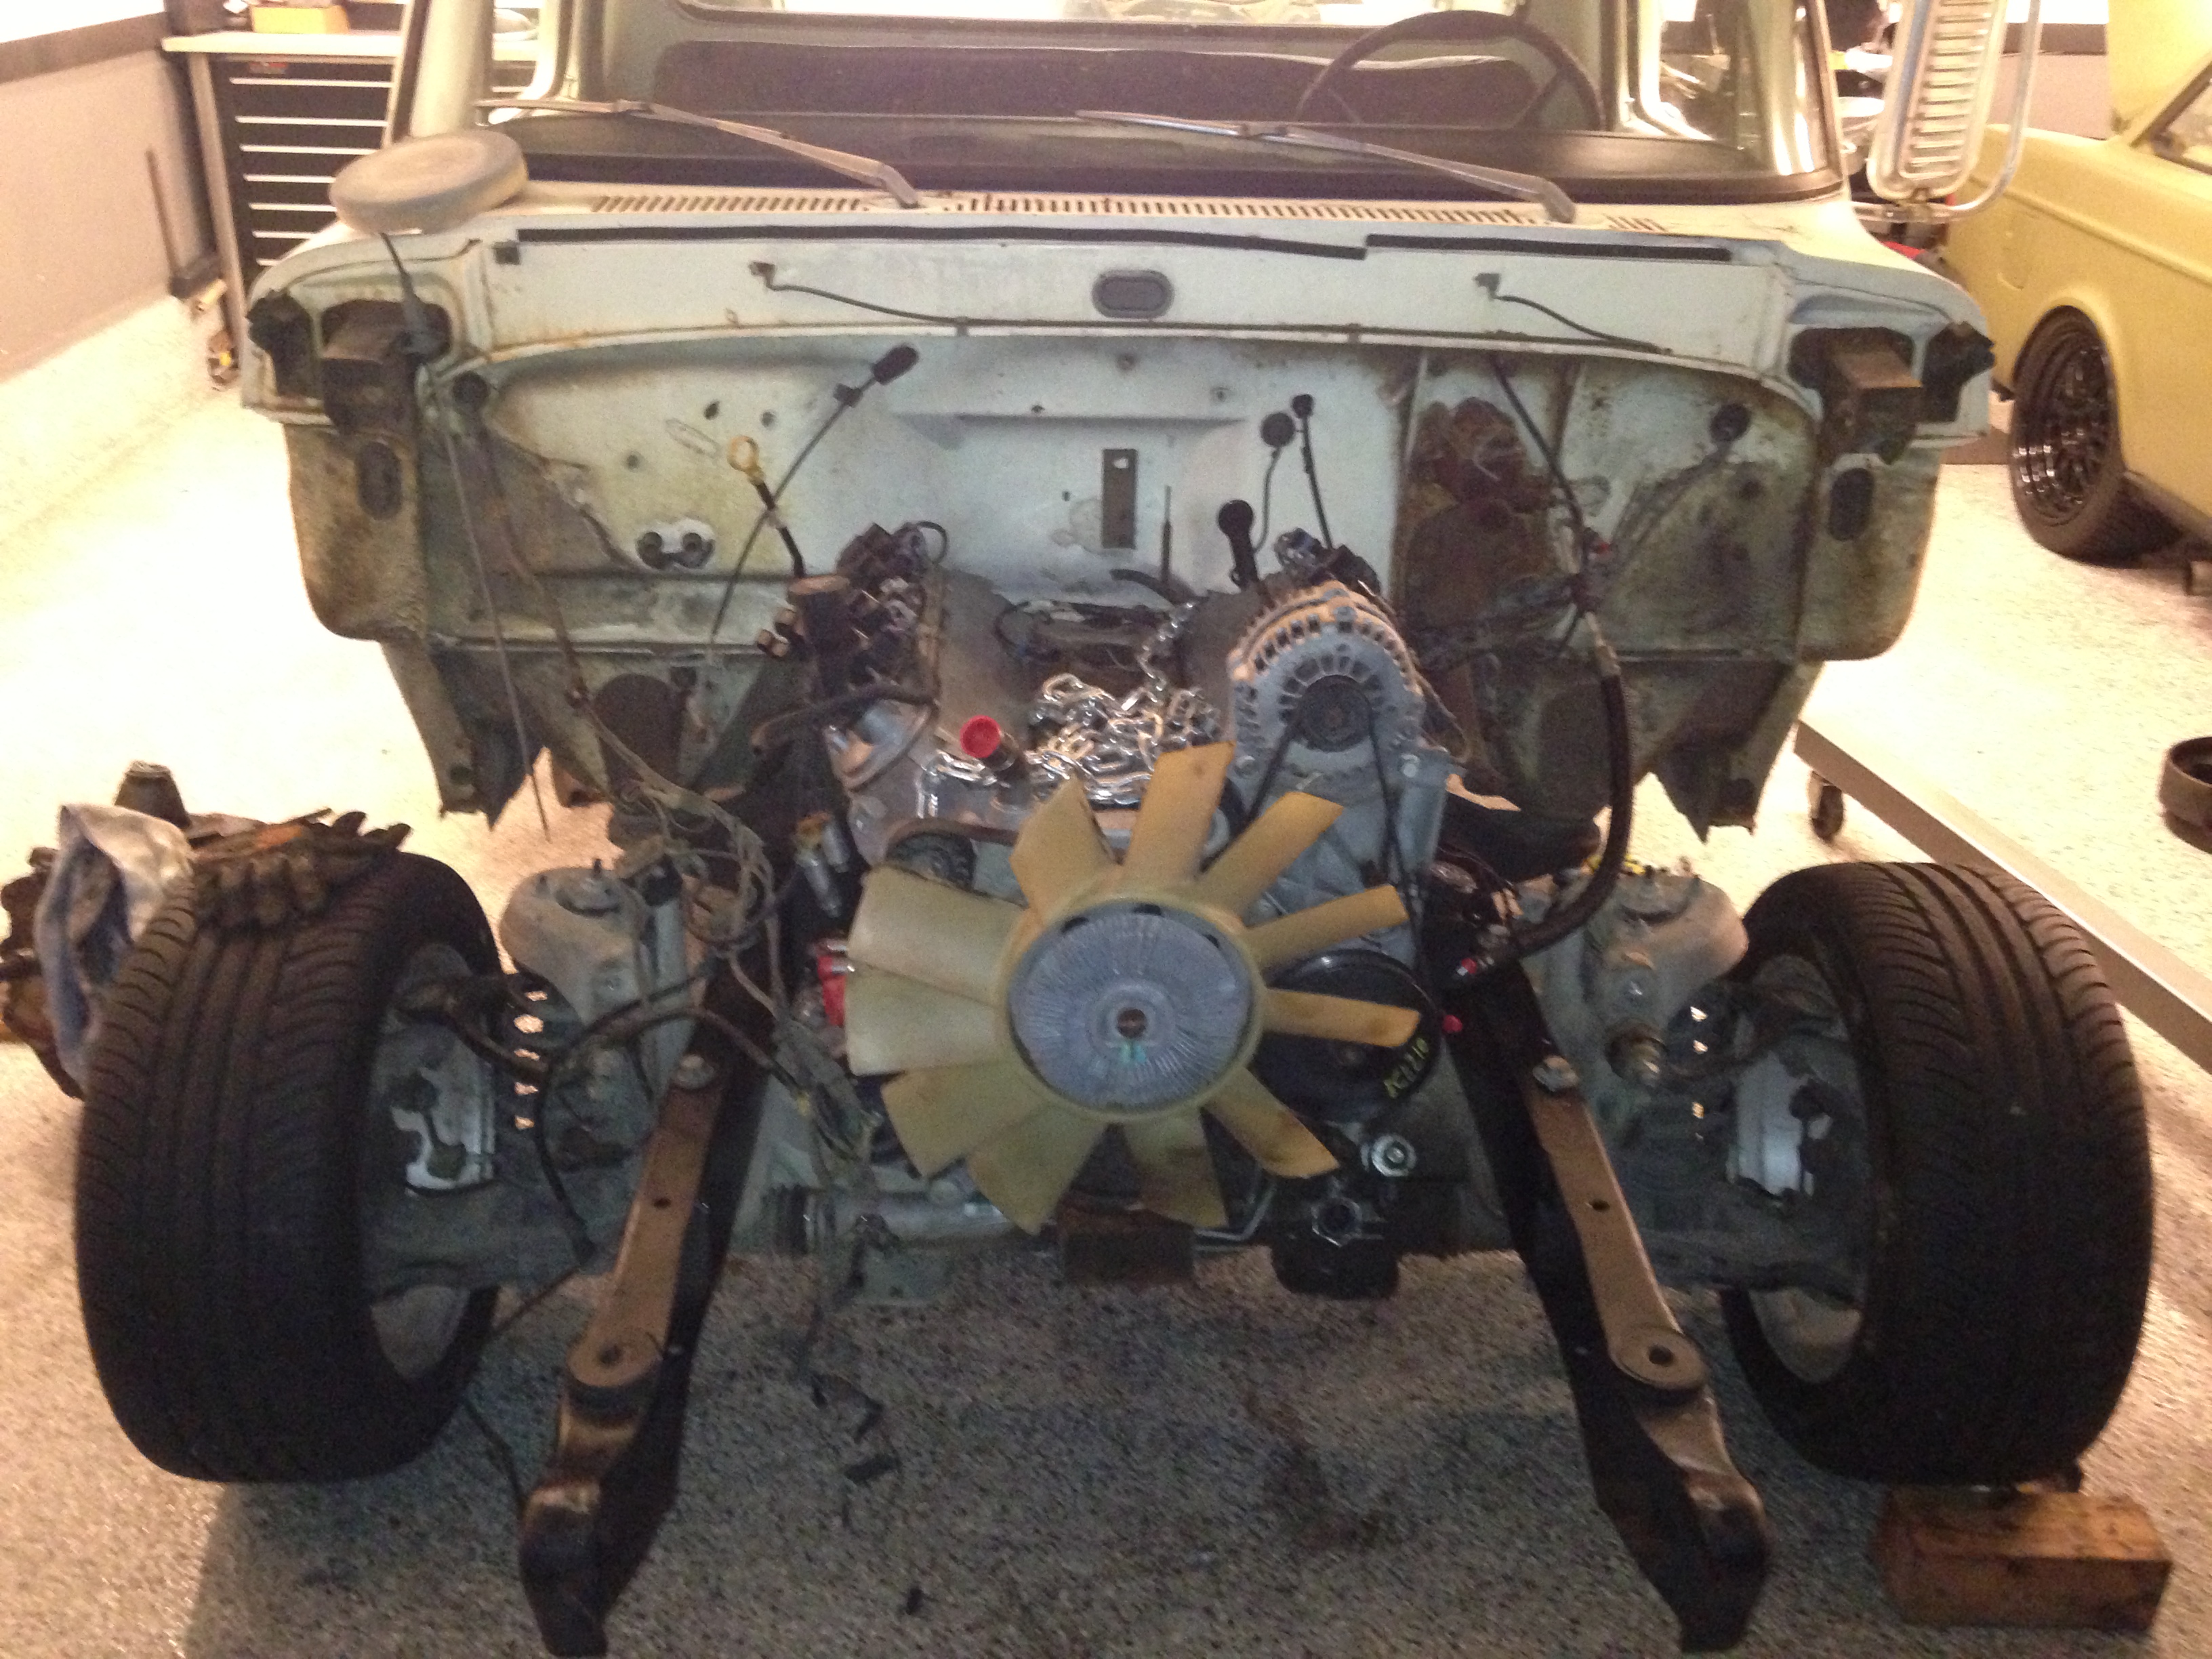
It fit like a glove, plenty of clearance all around the big girl and the motor sits nice and low in the chassis, looks good in there.
So now my big debate is to go turbo now or finish the build na and go turbo later. Going to take a lot more $$$ and time for the turbo setup but it sure would be nice to do it all now before it goes in for paint.
Sean
Got the tranny all cleaned up and put a nice dusting of aluminum paint on it to freshen up my freshened up tranny before it went into its new home.
Asher came over and we bolted up my new SFI approved flex plate, filled up the amazing circle d triple full billet converter and stabbed it in the tranny. Holy crap this tranny is a big heavy girl, but up to the task of holding big power for the long haul.
Keep in mind, never even a test fit on the tranny into the hole and over the crossmember....and into the truck we go.


I took lots and lots of measurements and was pretty sure that it was going to be close on the tunnel and at the crossmember.
It fit like a glove, plenty of clearance all around the big girl and the motor sits nice and low in the chassis, looks good in there.
So now my big debate is to go turbo now or finish the build na and go turbo later. Going to take a lot more $$$ and time for the turbo setup but it sure would be nice to do it all now before it goes in for paint.
Sean
Trending Topics
 11-05-2013, 12:35 PM
#9
Launching!
Thread Starter
Join Date: Mar 2012
Posts: 214
Likes: 0
Received 0 Likes
on
0 Posts


 11-06-2013, 09:49 PM
#13
Second of my own LS Swaps, first one is an LM7/t56 into an 81 Volvo 242, its my daily driver now and a great car.
Wanting to build something to go to some old car cruise's and maybe some muscle car events like the LS Fest, Power Tour or drag week with my Dad over the next few summers and nothing in my current fleet will do.
Wanting to build something to go to some old car cruise's and maybe some muscle car events like the LS Fest, Power Tour or drag week with my Dad over the next few summers and nothing in my current fleet will do.
 I dig the truck though, keep up the good work, should be bad *** when done!
11-10-2013, 09:32 AM
I dig the truck though, keep up the good work, should be bad *** when done!
11-10-2013, 09:32 AM
#16
Launching!
Thread Starter
Join Date: Mar 2012
Posts: 214
Likes: 0
Received 0 Likes
on
0 Posts
I try to learn from my builds and am always trying to take things to the next level.
That, is exactly what I am shooting for when its done.
Been out of town all week for work so nothing great got done. Had to do some maintenance and honey do's when I got back yesterday but managed to get a tranny crossmember all built, stripped down and painted yesterday. Got the oil feed plate and bolted it on, front of motor is going together as well.
Hope to make some descent progress today, still waiting on a turbo to show up though so nothing exciting.
Sean
11-10-2013, 09:59 AM
#17

...as you should.
 11-10-2013, 10:52 PM
#19
Launching!
Thread Starter
Join Date: Mar 2012
Posts: 214
Likes: 0
Received 0 Likes
on
0 Posts
Thanks for the kind words.
So, got the tranny x member buttoned up and installed, turned out pretty good too. New poly tranny mount too.
With the weather here descent for a day, I figured it was bout the last opportunity to shoot the inner fenders and core support, so I setup my "Paint Booth".....aka driveway mixed up some paint and finally after too many hours of cutting, welding, sanding, priming, sanding, priming, wipe down clean and then some more of all that above, I shot some paint on them and the core support.


Pulled them inside to dry after they had setup for a few minutes. Bodywork looks awesome for my skillset and background. Paint turned out pretty descent as well, little orange peely on one and some specs in the other but keep in mind that I shot these in my driveway.
Inner fenders will have nothing mounted on them, all the holes were filled along with the battery tray on both inner fenders totally deleted. Should be a good look, nice and smooth.
Worked a little bit on the front of the motor, got the dirty dingo idler relocation bracket bolted onto the freshly blasted and painted accessory bracket. Looks descent.
Moved the steam port a little to make room for the ls1 intake, moved the electric throttle body from the truck over to the ls intake and got it set in place. Water pump installed, power steering pump back in place and got the power steering lines all figured out. Good Progress.


Needed to get the bed mounted up to figure out where to cut out for the gas filler door. So we moved the bed from my driveway over onto the frame to see how she looked for the first time.


Rear stance is pretty descent, According to my preliminary measurements, should tuck wheel in the rear on the 20x11 rears =)
Sean
