

Help me finish planning my LS1 swap into 1954 Chevy car
 01-05-2015, 03:47 PM
#61
Staging Lane
Thread Starter

Join Date: Apr 2013
Posts: 87
Likes: 0
Received 0 Likes
on
0 Posts
I have a '54, but it's a Ford... I had the same lower rad hose problem and here's how I fixed it.
I got a CSR straight thermostat housing from Summit and a few radiator hoses with useful bends from Autozone. I also got a short piece of stainless tubing from I don't remember where. Cut the hoses up, clamped them together, and voila.
Obviously, I did the same thing for the top hose.
I got a CSR straight thermostat housing from Summit and a few radiator hoses with useful bends from Autozone. I also got a short piece of stainless tubing from I don't remember where. Cut the hoses up, clamped them together, and voila.
Obviously, I did the same thing for the top hose.
http://www.summitracing.com/parts/cs...make/chevrolet
 01-05-2015, 03:59 PM
#62
Staging Lane
Thread Starter
Join Date: Apr 2013
Posts: 87
Likes: 0
Received 0 Likes
on
0 Posts
You cheated! just kidding. you made your own mounts so it looks like you had a bit more flexibility.
What radiator did you use?
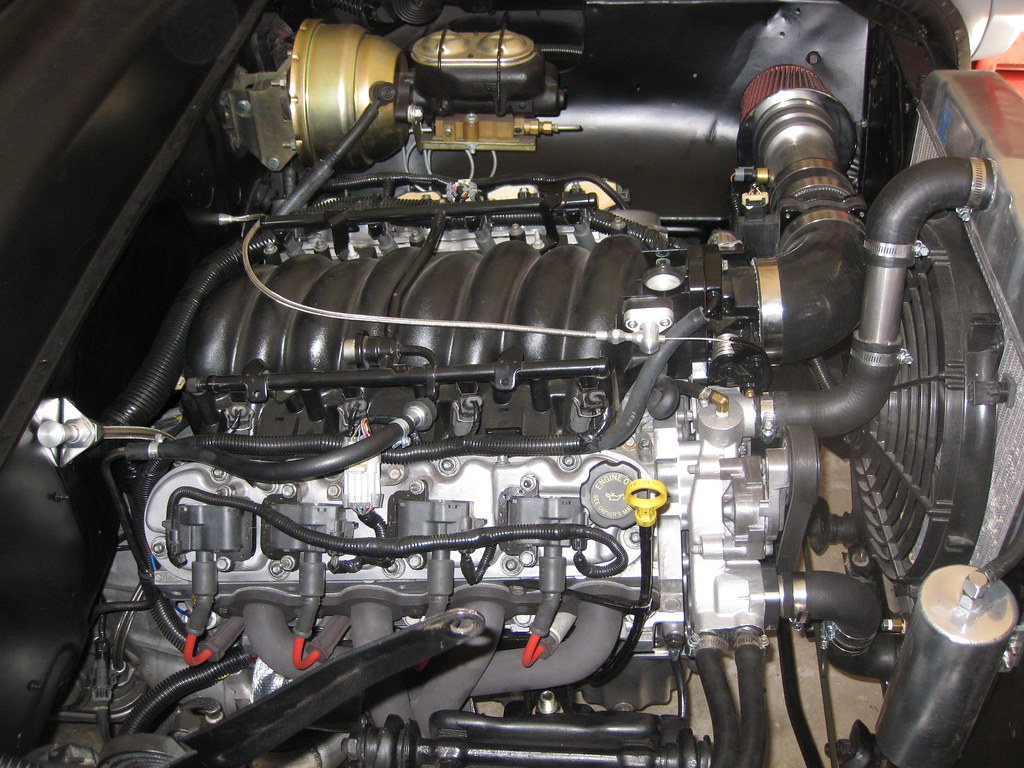
I've been in the street rod community for some time and one of the biggest topics is overheating. If you look at a car that has overheating problems nothing jumps out as a big solution. Usually the solution is 5 degrees here and 5 degrees there. Everything from a bent rear end to air lock in the engine copartment. One problem to eliminate early on is the radiator. Bite the bullet and order a custom one for your application, including bib size/location and trans cooler...etc. A cleaned up Crosley radiator will never work. I've always had problems with the upper and lower hoses. Bend a coat hanger and go to the local parts store. Know the I.D. of the hose and start looking at their stock. It will take some imigination and usually requires cutting up hoses with hard couplers. I've never likes the universal hose because it can cause turbulance and introduce air into the system thereby reducing the cooling capacity. Sorry for the rant, just trying to pass along years of problem solving.
I bought a 3 core radiator. As large as i can fit. I have a dual fan setup that will pull over 2,000 cfm.
01-06-2015, 03:13 PM
#63


Is this the part you used?
http://www.summitracing.com/parts/cs...make/chevrolet
http://www.summitracing.com/parts/cs...make/chevrolet
Then again, if the Windstar one that was mentioned above works and is cheaper, there's no point in tracking down a CSR housing. When I did my swap back in 2011 I didn't know about the Windstar part.


 01-13-2015, 06:29 PM
#66
Staging Lane
Thread Starter
Join Date: Apr 2013
Posts: 87
Likes: 0
Received 0 Likes
on
0 Posts
01-13-2015, 06:31 PM
#67
Staging Lane
Thread Starter
Join Date: Apr 2013
Posts: 87
Likes: 0
Received 0 Likes
on
0 Posts
I'm really regretting buying the radiator i did. I bought it because it fit in the factory radiator core but i wasn't even able to mount the radiator inside the core.
01-14-2015, 12:22 PM
#68
The top hose is a silicone 120 degree bend hose I got on eBay. I couldn't find a hose at the local parts store with that tight of a bend. The bottom part was from a hose I got at the parts store.
09-07-2015, 01:25 PM
#69
Staging Lane
Thread Starter
Join Date: Apr 2013
Posts: 87
Likes: 0
Received 0 Likes
on
0 Posts
Hey guys
I'm really struggling with getting my steering setup completed. I dont know what to do anymore. I'm looking for some advice. I have over 10hrs into trying different setups.
I have a knuckle mounted directly to the Mustand II rack, than 3/4 D" stock to a double joint Knuckle to 3/4" d to the steering column. I had a rod end to support the lower section of "d" stock but in testing the system, there was soo much bind and in frustration i forced things to turn and destroyed the rod end.
The frame is even notched to make this current setup work.

I think my overall problem is the motor mounts are too low to the ground. This made my header choices limited and has got me in the situation you see now.
 09-07-2015, 05:19 PM
#71
WC,
These are the best I could get, it's pretty busy down there.


I would shorten the shaft from the steering column to eliminate the angle and bind you'll put the universal in. You can salvage the bearing reuse it in the end of the steering tube. As you can see mine come out of the fire wall only 4"-6" then turns down. The lower universal only has a small amount of angle. You can go to the big box store and get wooden rods and cut to the length you may need and play around with the angles and clearance issues. I had to cope out an area on my shock mount.
Good Luck, Sorry I couldn't be more help.
09-07-2015, 07:32 PM
#72

Sorry about missing the return question regarding the hood springs. When I did a '50 Chevy the hood springs gave me fits until I figured out how to attach them to the factory mounts. The trick is to stretch them BEFORE mounting. Use an engine hoist to stretch the spring, then use a piece of angle iron with plates welded top and bottom to jam into the coil and hold it there with a radiator clamp or two. Now the spring is held in the stretched position. Put it into the factory hooks on the hood and body, then release the radiator clamps and remove the angle iron.
As far as the steering goes, looks like I had more room in the 33 ****** and '39 Chevy than you do. Using wooden rods as mentioned will help lots. May be necessary to move the column.
As far as the steering goes, looks like I had more room in the 33 ****** and '39 Chevy than you do. Using wooden rods as mentioned will help lots. May be necessary to move the column.
 09-09-2015, 06:10 PM
#74
7". I remember the measurement, but verified and took another measurement you might use. From the firewall to the center of the first universal=5 1/2". My steering shaft runs through the motor mount or in your case between the motor mount and frame.
09-09-2015, 07:22 PM
#75
Looks to me like you will have to shorten the column, bring the shaft out toward the wheel (around the header) then take your best shot to the rack output shaft. Consider a double universal joint in the center, regular joints top and bottom. No joint should be over about 30 degrees, and you will need an idler support in there too. When using universals make sure the double D shaft does not stick into the joint to far. If the shaft is in to far it will bind the joint. If you can't make this work then the only other solution I can think of is (gulp) a custom header where you can get the shaft behind.
09-10-2015, 09:40 AM
#76
Staging Lane
Thread Starter
Join Date: Apr 2013
Posts: 87
Likes: 0
Received 0 Likes
on
0 Posts
Looks to me like you will have to shorten the column, bring the shaft out toward the wheel (around the header) then take your best shot to the rack output shaft. Consider a double universal joint in the center, regular joints top and bottom. No joint should be over about 30 degrees, and you will need an idler support in there too. When using universals make sure the double D shaft does not stick into the joint to far. If the shaft is in to far it will bind the joint. If you can't make this work then the only other solution I can think of is (gulp) a custom header where you can get the shaft behind.
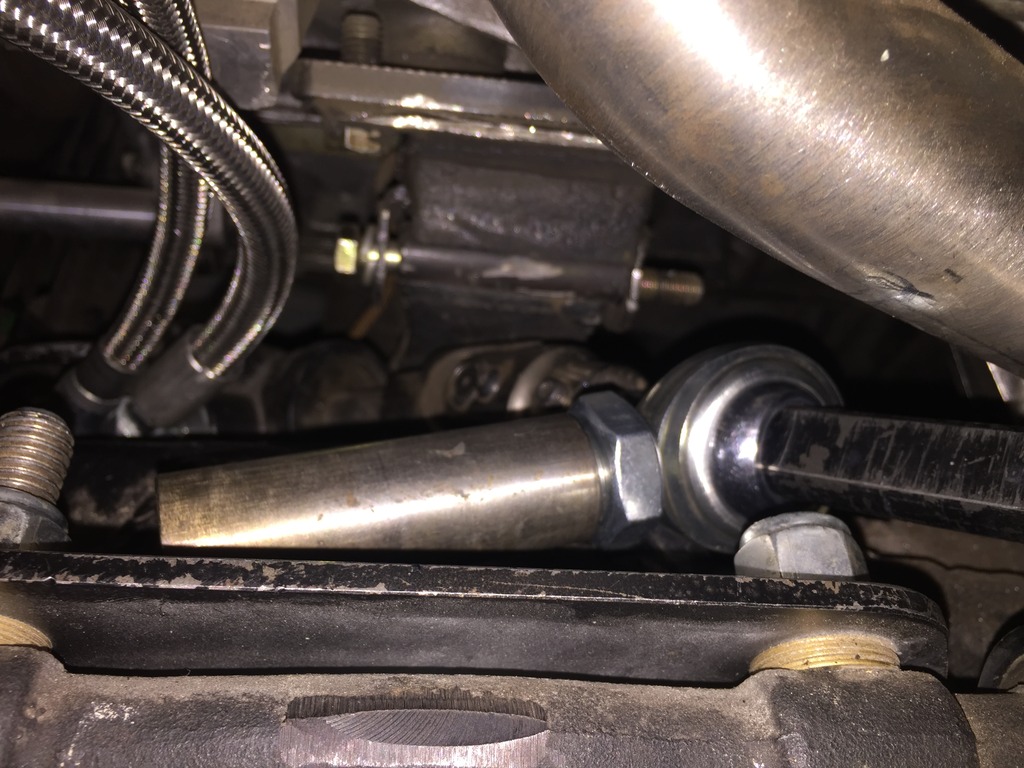
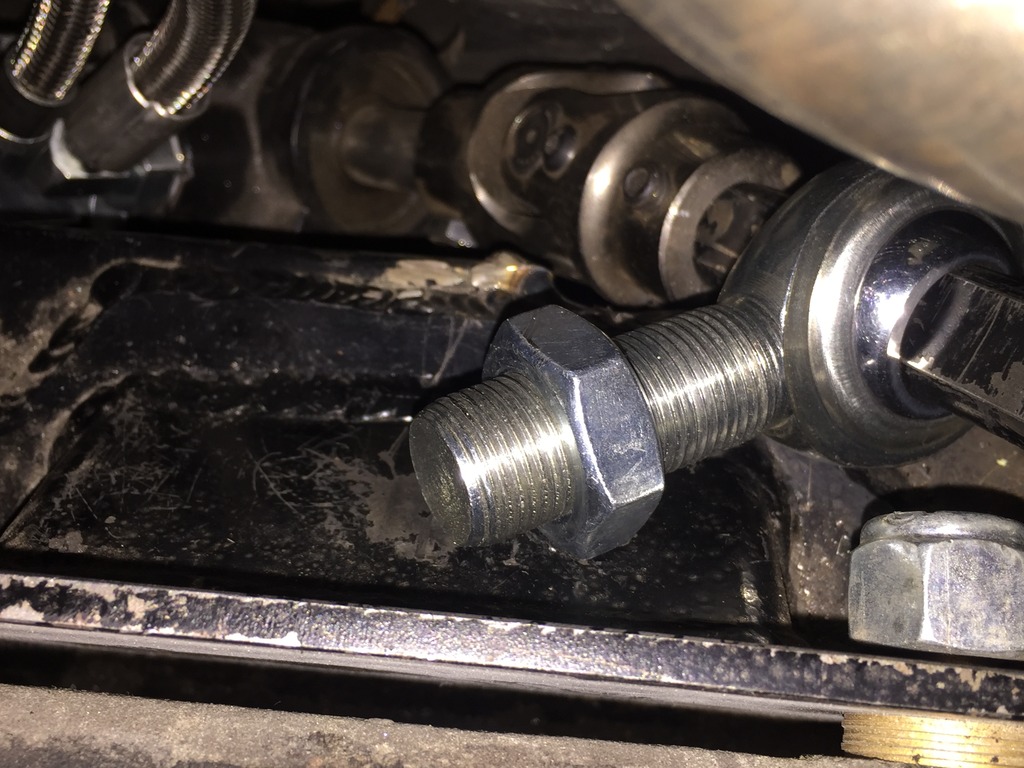
The difficulty with this was welding the rod end somewhere that could support it.
I have the shock mount and the top airbag hat welded to the frame in that same location. I had made a support tube to screw the rod end into. I was real excited because i thought for sure this would solve it. But i was getting binding while turning the wheels. I forced it one time and ruined the rod end.
I will look up my measurement for the motor mount. That is on my computer at home.
Before custom headers, I might try notching the frame area more to push the D shaft closest tot he rack further away from the engine. The problem with this is where i need the Double U joint to bring the angle back towards the steering column.
What a cluster F____
09-10-2015, 06:48 PM
#77
I cut & welded my stock 6.0 T-stat housing so it points down then I only needed a 90 deg bend in a hose. The 6.0 has a separate t-stat from the housing, Not built in like the 5.3 - Not sure how the LS1 is just throwing out ideas.


Last edited by Alwhite00; 09-14-2015 at 02:54 PM.
09-12-2015, 07:14 AM
#78

I just found this thread. I did the same swap on my 53 belair. I used a 80s steering column and headers from speed and performance. We had to mod the headers a bit to clear the column but it wasnt to big of a deal.


 09-14-2015, 12:25 PM
#79
Staging Lane
Thread Starter
Join Date: Apr 2013
Posts: 87
Likes: 0
Received 0 Likes
on
0 Posts
I didn't post pictures of the setup i was trying to run at the time of my post. I was just too pissed and annoyed. This picture shows the rod end screwed into a bushing i machined. I was going to weld the bushing to the upper control arm support.
Played with things some more yesterday. Here is how the whole idea started.
I tried a similar setup. Except i ran a Single U joint on the rack and ONLY the double U joint bringing the steering column lower into the engine bay.
[URL=http://s1184.photobucket.com/user/deeddude/media/DSC00725_zpsl4wsrxbp.jpg.html]
OR eliminate my machined bushing and weld 1 or 2 nuts to the upper control arm support
Then i looked at DeeDude's picture and realized. Crud! I don't have a steering column bracket. I only have that U bolt on the interior holding the column. This has to be one problem with my layout. I need to hold the hsaft so that it isn't putting pressure onto the Double U joint. I think that will help alot.
http://api.viglink.com/api/click?for...20LS1TECH&txt=

Played with things some more yesterday. Here is how the whole idea started.

I tried a similar setup. Except i ran a Single U joint on the rack and ONLY the double U joint bringing the steering column lower into the engine bay.
[URL=http://s1184.photobucket.com/user/deeddude/media/DSC00725_zpsl4wsrxbp.jpg.html]
OR eliminate my machined bushing and weld 1 or 2 nuts to the upper control arm support

Then i looked at DeeDude's picture and realized. Crud! I don't have a steering column bracket. I only have that U bolt on the interior holding the column. This has to be one problem with my layout. I need to hold the hsaft so that it isn't putting pressure onto the Double U joint. I think that will help alot.
http://api.viglink.com/api/click?for...20LS1TECH&txt=
Last edited by WCRiot; 09-14-2015 at 12:43 PM.
12-23-2015, 10:33 AM
#80
Staging Lane
Thread Starter
Join Date: Apr 2013
Posts: 87
Likes: 0
Received 0 Likes
on
0 Posts
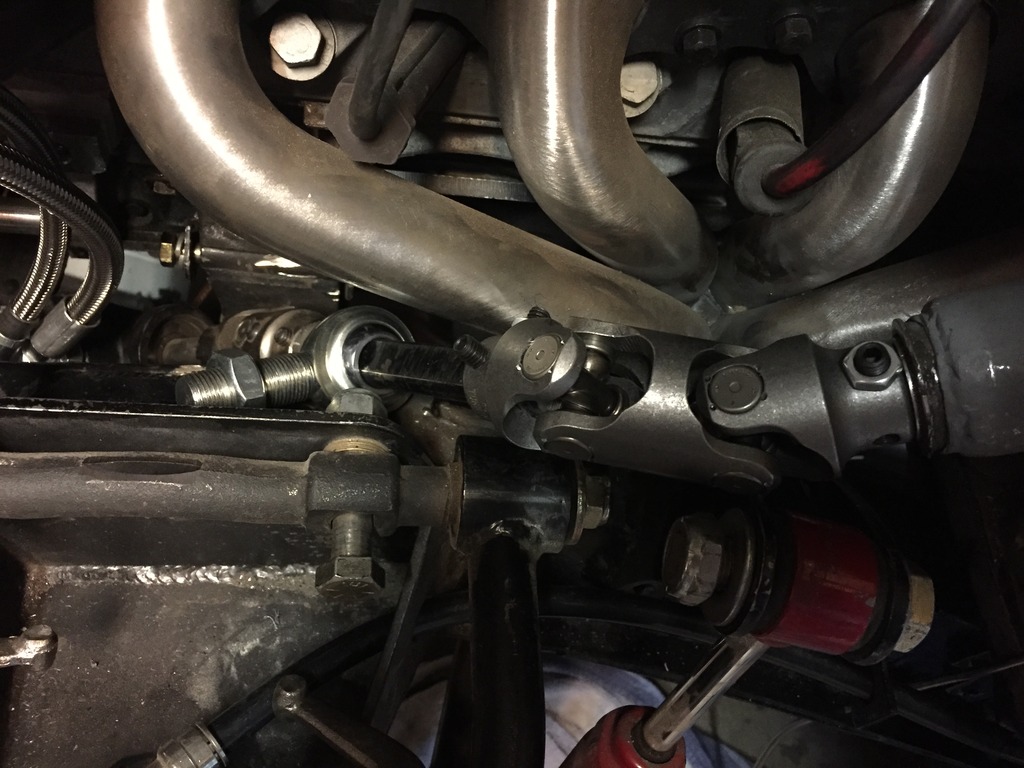
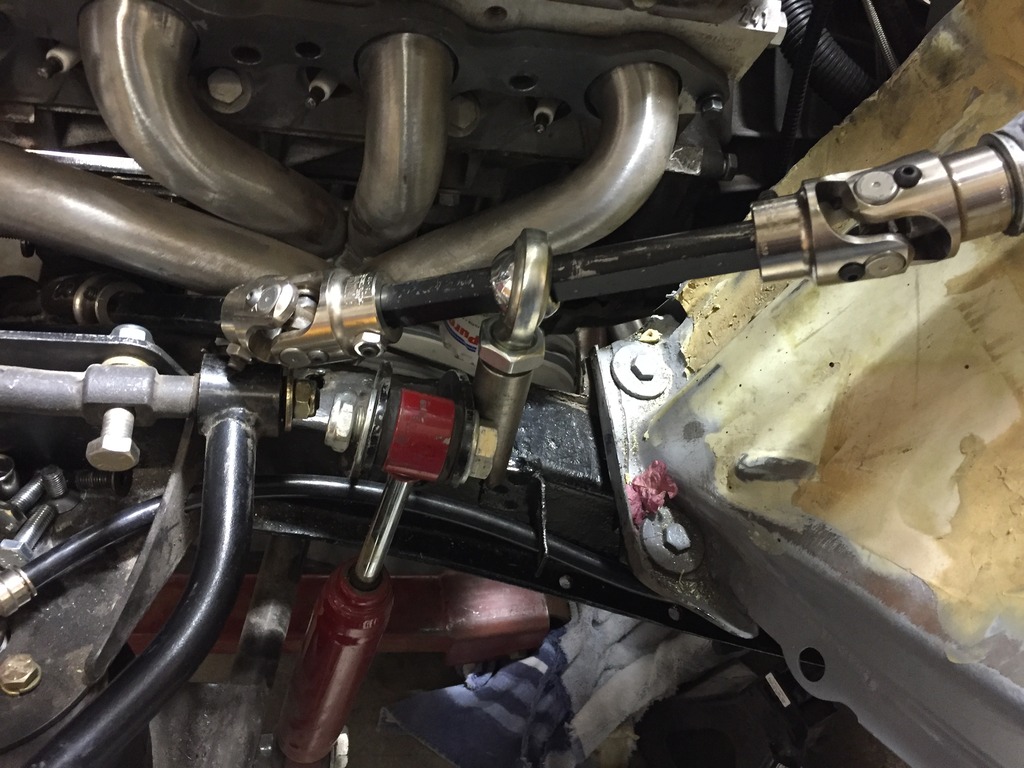
hey guys
Sorry fro not updating in a while. I ended up keeping the motor mounts and adapter plates i originally had, even though i went out and bought adjustable motor mounts and a different pair of headers.
I just had to grind into a notch that i already had in the frame. The extra material was hitting the shaft, not allowing me to bring the shaft away from the engine enough.
The other big change i did was based on a picture one of you posted. I used the 3 U joint i had purchased and mounted that directly on the steering column.
Below are some crappy pictures of the setup. U joint on the rack. U joint on the column. U joint about 40% the way up from the first joint. Support bushing welded to back of the Upper control arm mount. OH, another big help was tack welding the column towards the top of the slot int he firewall for the steering column. I will machine or buy a mount once i decide what is my final steering column choice. The column position was very important with my setup to avoid binding.
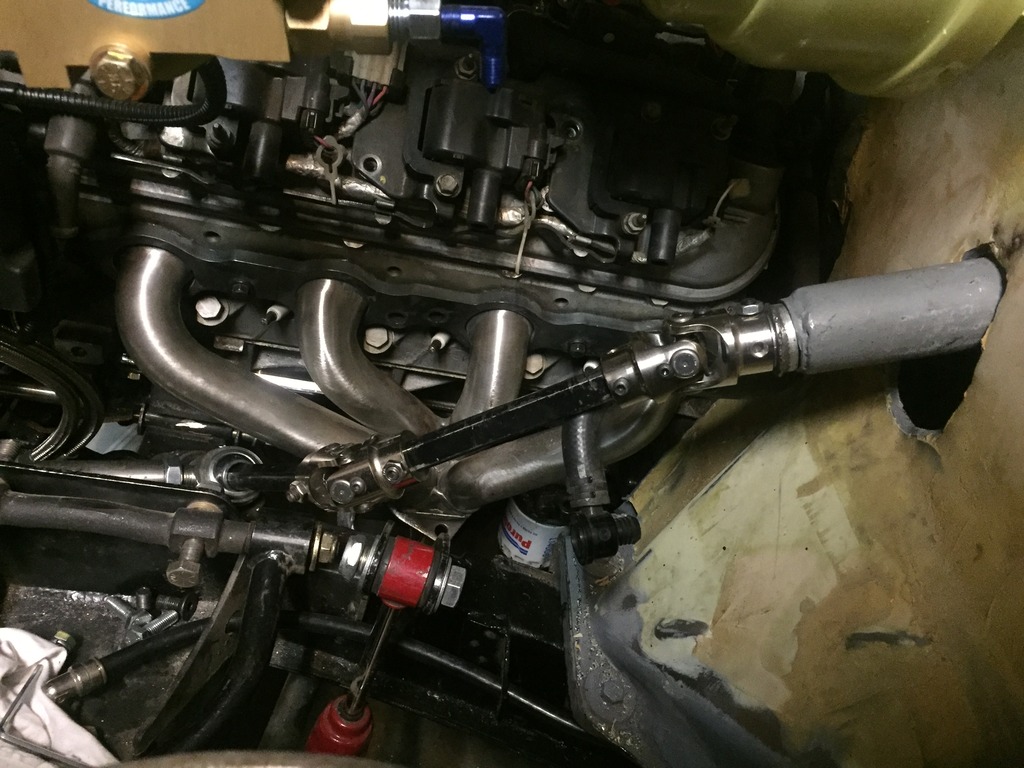
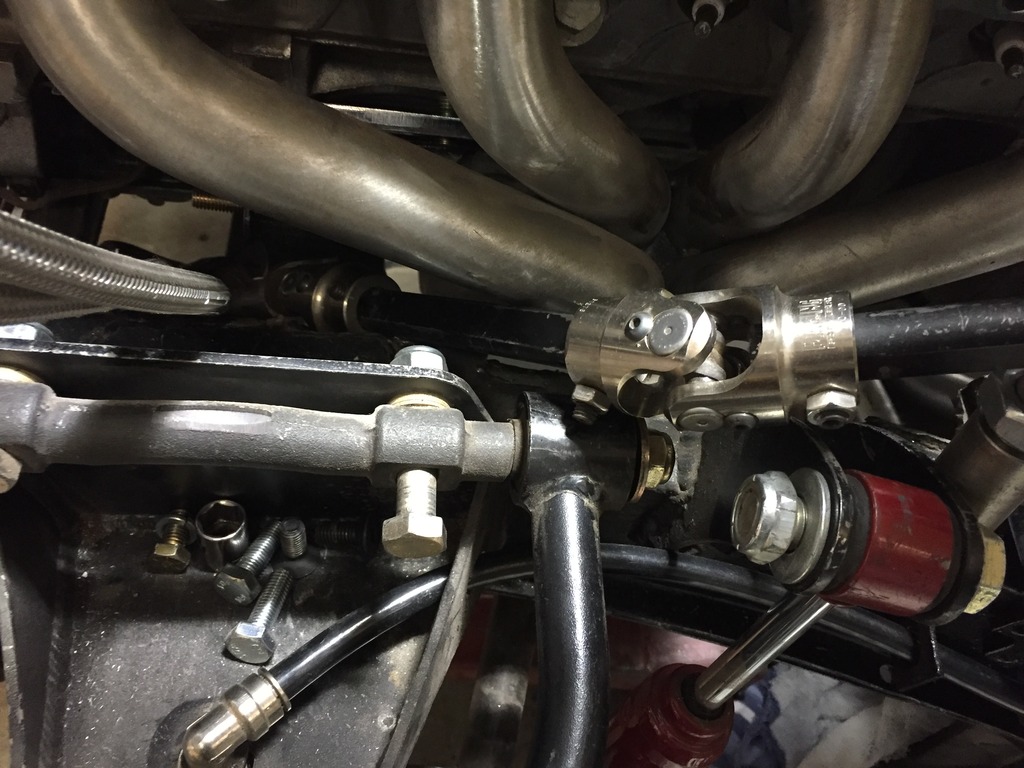

I think i am going to add another support bushing for additional support. Something like this:
-------------------------------------------------------------------------------------------------------------------------------------------------------------------------------------------------------------------
I will be posting some more updates over the next week or two. I have a bunch of questions for finishing all of my connections to the engine.
I knwo this isn't the most descriptive picture. But what is this vacuum hose that is dangling? This hose was always like this from my donor engine.

Sorry fro not updating in a while. I ended up keeping the motor mounts and adapter plates i originally had, even though i went out and bought adjustable motor mounts and a different pair of headers.
I just had to grind into a notch that i already had in the frame. The extra material was hitting the shaft, not allowing me to bring the shaft away from the engine enough.
The other big change i did was based on a picture one of you posted. I used the 3 U joint i had purchased and mounted that directly on the steering column.
Below are some crappy pictures of the setup. U joint on the rack. U joint on the column. U joint about 40% the way up from the first joint. Support bushing welded to back of the Upper control arm mount. OH, another big help was tack welding the column towards the top of the slot int he firewall for the steering column. I will machine or buy a mount once i decide what is my final steering column choice. The column position was very important with my setup to avoid binding.


I think i am going to add another support bushing for additional support. Something like this:

-------------------------------------------------------------------------------------------------------------------------------------------------------------------------------------------------------------------
I will be posting some more updates over the next week or two. I have a bunch of questions for finishing all of my connections to the engine.
I knwo this isn't the most descriptive picture. But what is this vacuum hose that is dangling? This hose was always like this from my donor engine.

Last edited by WCRiot; 12-23-2015 at 10:39 AM.