
99 E36 M3 LSx Build
 06-16-2014, 05:49 PM
#21
So this post should bring us up to date with where I am now. Progress is slow but it's getting there.
Since the last post I've done more powdercoating, chassis seam welding, subframe reinforcements, and finished putting together the differential.
--
Suspension stuff:
Got the fcabs installed, not that it was much of a job. Went with the Treehouse parts to correct my caster for the pre-'96 front control arms I'm running and to hopefully provide me with a little more exhaust collector clearance when the time comes. I switched to the pre-96' arms because I've got TRM coilovers going on that require arm-mounted swaybar endlinks - which means I also need to swap over the sway bar from my old 325i.

On to the rtas...in general they went together with much less of a fight than I was expecting, though it did require some sorcery to get the rtabs in.

Cobbled together a tool to install the rta ball joints as there really wasn't a way to do this in the press. Just some 7/16" rod, 36mm socket, 46 mm socket, and a thrust bearing. Worked great.

Installed without boots because pinched / torn boots are a $60 mistake

Aside from that, just continuing to work through the powdercoating. Got the front spindle assembles put together


Rebuilt my half shafts and rear wheel bearings with Redline CV2 grease

I also put my coilovers back together. Figured it was worth mentioning because it took a little while to do. I installed torrington bearings on the lower perch on the front springs to ease preloading / alleviate bind issues under compression.

--
Differential Build
Also did some work on the diff. I drilled and tapped the front mounting hole for M14x2.0 for use with the AKG front differential bushing that's drilled for M14. Should be stout.

Prepped the case, covers, and flanges for paint and just did them up in some flat black rustoleum.

Pre assembly diff group shot. 3.73 gears, 4-clutch, 1.65mm dogplates, M12 high offset carrier, machined carrier cap for clearance.

I got the carrier and bearing races all assembled and went to check my carrier bearing preload - then realized I had no means of accurately doing so. The most precise tool I had was a 1/4" Park flex beam wrench but it doesn't have nearly enough resolution for me to measure down at the levels I'm trying to measure. So I had to order a dial type torque wrench...no more assembly on this guy until that comes in.

Got a dial type torque wrench so I could check my carrier preload. With the standard 1.58 and 1.70mm shims that the case was assembled with I was at ~5-6 in-lbs (without seals). Not enough, from what I've read I need to be around 14-16 in-lbs rolling resistance, which means I need thinner shims. Need to pick some of those up before I can continue.


I got a set of carrier and pinion shims in to set it up. I set my carrier preload up for 15 in-lbs which required about .125" of total shim. When trying to mockup backlash, however, there was no combination of shims that gave me sufficient backlash once I started snugging the caps down. In fact I was getting 0 backlash. I threw in the original pinion shim as a starting point but I think it might be too thick (setting the pinion too far inboard). In the process I found the TIS for diff rebuilding and also got a PDF from one of my local dealers that contains basically the same info - but has better pictures. Here's a link: https://drive.google.com/file/d/0B_a...it?usp=sharing. I hope to spend some more time on it this weekend.

Initially I was having a problem where there was no backlash before with the original pinion shim once I tightened everything down. It was too thick and was positioning the pinion too far into the case. As a proof of concept I took the thinnest shim that came in the set and installed it to see if it fixed the problem. The original shim was .140" thick, the one I tried was .127". The thinner shim fixed my problem - I assembled everything and I still had backlash once the caps were snug.
To help with this process I needed to make a couple of special tools. The front pinion bearing needs to be pressed on each time you want to remove / install the pinion, which is a major PITA when you're going to be assembling / disassembling several times to get the setup right. So I took an old bearing and honed out the ID until it slid nicely over the pinion shoulder - no press tools required for install makes it great for mockup.

Then in order to remove the rear bearing race in the case to change out the shim, I needed to modify a driver to fit down in the bore. The flats give me enough clearance to fit down through the forward bearing and press it out without much effort.

Finished diff layout
Drive pattern:

Coast:

Backlash:

Backlash - .0045"
Pinion preload - 21 in-lbs
Carrier shims - .127" total for 15 in-lbs carrier preload (.066"/.061")
Pinion shim - .137"

--
Chassis Work
I also pulled out the carpet and started stripping the tar paper off the floor / away from the spot weld seams on the tunnel so I can stitch weld. In this picture there's still some remaining but I have since gotten it all off. Need to get it to bare metal before welding but other than that it's ready to go.

I also finally got started on the seam welding. Engine bay / strut towers are pretty much complete and I started wire wheeling the rest of the seams along the transmissions tunnel and floor. Not going to be a very ideal thing rolling around on the ground, being showered in undercoating and welding sparks for hours on end but gotta get it done. Hoping to get most of the remaining welding on the chassis done this weekend.


--
Subframe Reinforcements
Since my mig machine is 115v and fitup of all this stuff wasn't tight enough to use tig, all the tricks in the book were thrown at trying to burn everything in nice......preheat with a torch, welding uphill, short arc, etc. Pictured below is the mounting ears that the motor mounts bolt onto....an area on this car that is sensitive to cracking when high(er) loads are put on it....like those from a fire breathing V8.


Rear subframe reinformements. Boxed in the diff mounting ears, along with all of the subframe mounting sleeves. Since I won't be using a rear swaybar I elected to shave the mounting ears to get them out of my way.

I left a gap here to give me access for corrosion protection.


All of the sleeves were reinforced thusly, welded top and bottom. From here I still need to blast everything and powdercoat it.

I've also been spending some time to practice tig welding. Still suck lol. Hoping that I'll be good enough when it comes time to fab exhaust and mounts

This brings me to where I am now. Hopefully more progress to come soon.
-Chuck
Since the last post I've done more powdercoating, chassis seam welding, subframe reinforcements, and finished putting together the differential.
--
Suspension stuff:
Got the fcabs installed, not that it was much of a job. Went with the Treehouse parts to correct my caster for the pre-'96 front control arms I'm running and to hopefully provide me with a little more exhaust collector clearance when the time comes. I switched to the pre-96' arms because I've got TRM coilovers going on that require arm-mounted swaybar endlinks - which means I also need to swap over the sway bar from my old 325i.
On to the rtas...in general they went together with much less of a fight than I was expecting, though it did require some sorcery to get the rtabs in.
Cobbled together a tool to install the rta ball joints as there really wasn't a way to do this in the press. Just some 7/16" rod, 36mm socket, 46 mm socket, and a thrust bearing. Worked great.
Installed without boots because pinched / torn boots are a $60 mistake
Aside from that, just continuing to work through the powdercoating. Got the front spindle assembles put together
Rebuilt my half shafts and rear wheel bearings with Redline CV2 grease
I also put my coilovers back together. Figured it was worth mentioning because it took a little while to do. I installed torrington bearings on the lower perch on the front springs to ease preloading / alleviate bind issues under compression.
--
Differential Build
Also did some work on the diff. I drilled and tapped the front mounting hole for M14x2.0 for use with the AKG front differential bushing that's drilled for M14. Should be stout.
Prepped the case, covers, and flanges for paint and just did them up in some flat black rustoleum.
Pre assembly diff group shot. 3.73 gears, 4-clutch, 1.65mm dogplates, M12 high offset carrier, machined carrier cap for clearance.
I got the carrier and bearing races all assembled and went to check my carrier bearing preload - then realized I had no means of accurately doing so. The most precise tool I had was a 1/4" Park flex beam wrench but it doesn't have nearly enough resolution for me to measure down at the levels I'm trying to measure. So I had to order a dial type torque wrench...no more assembly on this guy until that comes in.
Got a dial type torque wrench so I could check my carrier preload. With the standard 1.58 and 1.70mm shims that the case was assembled with I was at ~5-6 in-lbs (without seals). Not enough, from what I've read I need to be around 14-16 in-lbs rolling resistance, which means I need thinner shims. Need to pick some of those up before I can continue.
I got a set of carrier and pinion shims in to set it up. I set my carrier preload up for 15 in-lbs which required about .125" of total shim. When trying to mockup backlash, however, there was no combination of shims that gave me sufficient backlash once I started snugging the caps down. In fact I was getting 0 backlash. I threw in the original pinion shim as a starting point but I think it might be too thick (setting the pinion too far inboard). In the process I found the TIS for diff rebuilding and also got a PDF from one of my local dealers that contains basically the same info - but has better pictures. Here's a link: https://drive.google.com/file/d/0B_a...it?usp=sharing. I hope to spend some more time on it this weekend.
Initially I was having a problem where there was no backlash before with the original pinion shim once I tightened everything down. It was too thick and was positioning the pinion too far into the case. As a proof of concept I took the thinnest shim that came in the set and installed it to see if it fixed the problem. The original shim was .140" thick, the one I tried was .127". The thinner shim fixed my problem - I assembled everything and I still had backlash once the caps were snug.
To help with this process I needed to make a couple of special tools. The front pinion bearing needs to be pressed on each time you want to remove / install the pinion, which is a major PITA when you're going to be assembling / disassembling several times to get the setup right. So I took an old bearing and honed out the ID until it slid nicely over the pinion shoulder - no press tools required for install makes it great for mockup.
Then in order to remove the rear bearing race in the case to change out the shim, I needed to modify a driver to fit down in the bore. The flats give me enough clearance to fit down through the forward bearing and press it out without much effort.
Finished diff layout
Drive pattern:
Coast:
Backlash:
Backlash - .0045"
Pinion preload - 21 in-lbs
Carrier shims - .127" total for 15 in-lbs carrier preload (.066"/.061")
Pinion shim - .137"
--
Chassis Work
I also pulled out the carpet and started stripping the tar paper off the floor / away from the spot weld seams on the tunnel so I can stitch weld. In this picture there's still some remaining but I have since gotten it all off. Need to get it to bare metal before welding but other than that it's ready to go.
I also finally got started on the seam welding. Engine bay / strut towers are pretty much complete and I started wire wheeling the rest of the seams along the transmissions tunnel and floor. Not going to be a very ideal thing rolling around on the ground, being showered in undercoating and welding sparks for hours on end but gotta get it done. Hoping to get most of the remaining welding on the chassis done this weekend.
--
Subframe Reinforcements
Since my mig machine is 115v and fitup of all this stuff wasn't tight enough to use tig, all the tricks in the book were thrown at trying to burn everything in nice......preheat with a torch, welding uphill, short arc, etc. Pictured below is the mounting ears that the motor mounts bolt onto....an area on this car that is sensitive to cracking when high(er) loads are put on it....like those from a fire breathing V8.
Rear subframe reinformements. Boxed in the diff mounting ears, along with all of the subframe mounting sleeves. Since I won't be using a rear swaybar I elected to shave the mounting ears to get them out of my way.
I left a gap here to give me access for corrosion protection.
All of the sleeves were reinforced thusly, welded top and bottom. From here I still need to blast everything and powdercoat it.
I've also been spending some time to practice tig welding. Still suck lol. Hoping that I'll be good enough when it comes time to fab exhaust and mounts
This brings me to where I am now. Hopefully more progress to come soon.
-Chuck
 06-16-2014, 09:02 PM
#22

You are undercutting. Try feeding the electrode in quicker or turn down the voltage a tad. TIG is still tough you will get the hang of it. Another option is weld in flat position vs. horizontal. From my experiance, TIG is more for ancillary joints. For structural joints I would definitely stick with a higher penetrating process like MIG.
Nice update looks like it's coming along.
Nice update looks like it's coming along.
06-16-2014, 10:31 PM
#23
You are undercutting. Try feeding the electrode in quicker or turn down the voltage a tad. TIG is still tough you will get the hang of it. Another option is weld in flat position vs. horizontal. From my experiance, TIG is more for ancillary joints. For structural joints I would definitely stick with a higher penetrating process like MIG.
Nice update looks like it's coming along.
Nice update looks like it's coming along.
Hoping to get more powdercoating done this week along with some more seam welding. Once the welding is done I'll be able to throw the interior back together and put the suspension on the car. Still need to acquire a transmission before I can layout the driveline but hopefully I'll be ready to pull the trigger by the time I finish the other stuff. Going with a 2.66 T56 Magnum box.
 06-23-2014, 12:05 AM
#26
Got some powdercoating done over the weekend. Extremely time consuming as always but made some headway. Zinc primer > black base > starlight clear. I sprayed all the internal surfaces with cavity wax.
Using AKG 75D bushings


Couple small parts left to do but the majority is done. Gonna try to get back on the chassis this week.
 06-26-2014, 09:08 AM
#28
Thanks man, appreciate it
Been working on detailing the rest of the longblock out this week....needed a change of pace. Last night I powdercoated the front timing cover in wrinkle black and the coil mounting brackets in the black / starlight clear after work. Still to do on this guy: plumb my steam vent crossover lines, figure out a pcv / catch can setup, powdercoat the valve covers, figure out a throttle cable bracket, and rebuild / reloom the wiring harness. The rest will have to wait until it's in the car I think.

I've been sitting on these parts for a while, but here's a look at my oil cooler setup that I plan on running. Setrab 925 cooler and -10AN Raceflux fittings.

The cooler adapter is the one with the built in thermostat from Improved racing. It diverts flow until the oil gets to 180F. It also has a 1/8-NPT port that I plan on using to measure oil temperature - and it does get flow past the sensor port when the thermostat is still closed. Hopefully that means it will be fairly accurate.

I've also been doing some reading and checking over some of my measurements on engine layout, I ended up buying a slightly thicker set of head gaskets. At TDC my pistons are ~.0085" above deck since I had a clean up cut done when the block was machined. I was originally going to use .040" gaskets to set my quench nice and tight, but taking piston rock into account I was only left with ~.010" of clearance before my pistons start hitting the heads. Since I don't want to grenade a brand new motor I figured it'd be wise to heir on the safer side and get .045" gaskets.....buys me a little more room while still keeping my quench tight.
Unrelated to the above, I've also been researching rear cage / 4-pt bolt-in options. I was originally set on a TCK 4-pt bolt in but the price gets pretty out of hand for what it is once you factor in shipping. Even the Kirks are pretty pricey. My friend has a hydraulic tubing bender at his shop so I very well might end up buying some DOM and fabbing one. We'll see - lot's of research still to be done there.
More soon.
Been working on detailing the rest of the longblock out this week....needed a change of pace. Last night I powdercoated the front timing cover in wrinkle black and the coil mounting brackets in the black / starlight clear after work. Still to do on this guy: plumb my steam vent crossover lines, figure out a pcv / catch can setup, powdercoat the valve covers, figure out a throttle cable bracket, and rebuild / reloom the wiring harness. The rest will have to wait until it's in the car I think.
I've been sitting on these parts for a while, but here's a look at my oil cooler setup that I plan on running. Setrab 925 cooler and -10AN Raceflux fittings.
The cooler adapter is the one with the built in thermostat from Improved racing. It diverts flow until the oil gets to 180F. It also has a 1/8-NPT port that I plan on using to measure oil temperature - and it does get flow past the sensor port when the thermostat is still closed. Hopefully that means it will be fairly accurate.
I've also been doing some reading and checking over some of my measurements on engine layout, I ended up buying a slightly thicker set of head gaskets. At TDC my pistons are ~.0085" above deck since I had a clean up cut done when the block was machined. I was originally going to use .040" gaskets to set my quench nice and tight, but taking piston rock into account I was only left with ~.010" of clearance before my pistons start hitting the heads. Since I don't want to grenade a brand new motor I figured it'd be wise to heir on the safer side and get .045" gaskets.....buys me a little more room while still keeping my quench tight.
Unrelated to the above, I've also been researching rear cage / 4-pt bolt-in options. I was originally set on a TCK 4-pt bolt in but the price gets pretty out of hand for what it is once you factor in shipping. Even the Kirks are pretty pricey. My friend has a hydraulic tubing bender at his shop so I very well might end up buying some DOM and fabbing one. We'll see - lot's of research still to be done there.
More soon.
06-30-2014, 10:07 AM
#29
Bunch of random progress this weekend....put my alternator and starter motor back together, and also installed my fuel pump. I went with the rally road kit, pretty straightforward install.


Also spent (a lot) more time under the car wire wheeling and seam welding. Pretty much spent all day on it but got the entire drivers side done. a couple small areas to finish up front before I can move to the rear subframe area, trailing arm pockets, etc.

Also spent (a lot) more time under the car wire wheeling and seam welding. Pretty much spent all day on it but got the entire drivers side done. a couple small areas to finish up front before I can move to the rear subframe area, trailing arm pockets, etc.
06-30-2014, 10:33 PM
#30

Another bad *** build.
Great job.
Keep it up bro !
Great job.
Keep it up bro !
07-01-2014, 09:04 PM
#31

Almost done with my E36 LS1/T56 swap.
Limited test drives and it's great.
This weekend going to put some miles on to check everything.
See attached pic.
Any E36 LS swaps at Car Craft St.Paul this year?
Limited test drives and it's great.
This weekend going to put some miles on to check everything.
See attached pic.
Any E36 LS swaps at Car Craft St.Paul this year?
07-29-2014, 12:42 PM
#33
Slow, thanks for asking haha. Was out of town for a couple consecutive weekends and got rained out for the most part this past weekend, but making slow progress nonetheless.
Figured I'd post some pics of the finished alternator. The one that came on the motor originally was all old and crusty so I disassembled it to powdercoat the case. I coated the stator in Dolphs EB-41 insulating enamel (black) and replaced the diodes, rectifier, and rotor bearings. Probably could have just bought a new one but that's not really my style. Hopefully it works.


Coil brackets

Also spent some time to sort out some of my hardware. Decided to pick up some rivet nuts for various areas on the car / adding fastening points in the engine bay or elsewhere if/when I need it. M6/M8/M10 nuts with install tools and the appropriate drill sizes.

Front diff bolt / AKG bushing sleeve. Using an M14 x 2.0 x 80 grade 10.9 bolt. Had to ream out the bushing sleeve a bit with a sandpaper roll to get the bolt to pass through but no big deal.

I hate using anything but antiseize on anything I have the intention to remove (easily) in the future, so looked for other anti-loosening solutions. Ended up getting some nordlock washers - they're a matched pair with a cam profile cut into them with an angle greater than the pitch angle of the threads. This makes it impossible for the bolt to loosen

Got back to work on the chassis. Worked on removing what was left of the interior (b pillars, rear panels, headliner, c pillars, rear deck). They'll be getting refurbed / recovered.
Also cut into the floor to expose the subframe mounts. I'm going to be boxing these together with tubing similar to how a lot of guys running full or rear-half cages have done it.

Some detail to show where I cut


I also decided to quit messing around and remove the wiring harness to make working in the car easier. I got tired of having to work around it and wanted to get it out of my way for welding / grinding and for when I paint and lay down dynamatting. Spent the rest of the day cleaning it up and labeling everything...it's really not that intimidating when you get into it.

I ordered some DOM tubing to tie in the subframe mounting points along with a carbon fiber sunroof delete panel from S2R tuning that should be on the way soon.
Figured I'd post some pics of the finished alternator. The one that came on the motor originally was all old and crusty so I disassembled it to powdercoat the case. I coated the stator in Dolphs EB-41 insulating enamel (black) and replaced the diodes, rectifier, and rotor bearings. Probably could have just bought a new one but that's not really my style. Hopefully it works.
Coil brackets
Also spent some time to sort out some of my hardware. Decided to pick up some rivet nuts for various areas on the car / adding fastening points in the engine bay or elsewhere if/when I need it. M6/M8/M10 nuts with install tools and the appropriate drill sizes.
Front diff bolt / AKG bushing sleeve. Using an M14 x 2.0 x 80 grade 10.9 bolt. Had to ream out the bushing sleeve a bit with a sandpaper roll to get the bolt to pass through but no big deal.
I hate using anything but antiseize on anything I have the intention to remove (easily) in the future, so looked for other anti-loosening solutions. Ended up getting some nordlock washers - they're a matched pair with a cam profile cut into them with an angle greater than the pitch angle of the threads. This makes it impossible for the bolt to loosen
Got back to work on the chassis. Worked on removing what was left of the interior (b pillars, rear panels, headliner, c pillars, rear deck). They'll be getting refurbed / recovered.
Also cut into the floor to expose the subframe mounts. I'm going to be boxing these together with tubing similar to how a lot of guys running full or rear-half cages have done it.
Some detail to show where I cut
I also decided to quit messing around and remove the wiring harness to make working in the car easier. I got tired of having to work around it and wanted to get it out of my way for welding / grinding and for when I paint and lay down dynamatting. Spent the rest of the day cleaning it up and labeling everything...it's really not that intimidating when you get into it.
I ordered some DOM tubing to tie in the subframe mounting points along with a carbon fiber sunroof delete panel from S2R tuning that should be on the way soon.
07-30-2014, 10:11 AM
#36
trying to do the best I can, thanks for the kind words fellas.
hopefully more to come soon. the tubing is supposed to be showing up tomorrow so I'll be able to start working on tying the subframe mounts together. Something like this is what I'm envisioning for the mounting points and rear shock towers (not my picture, obviously). Ignore the other sections tying into the main hoop.
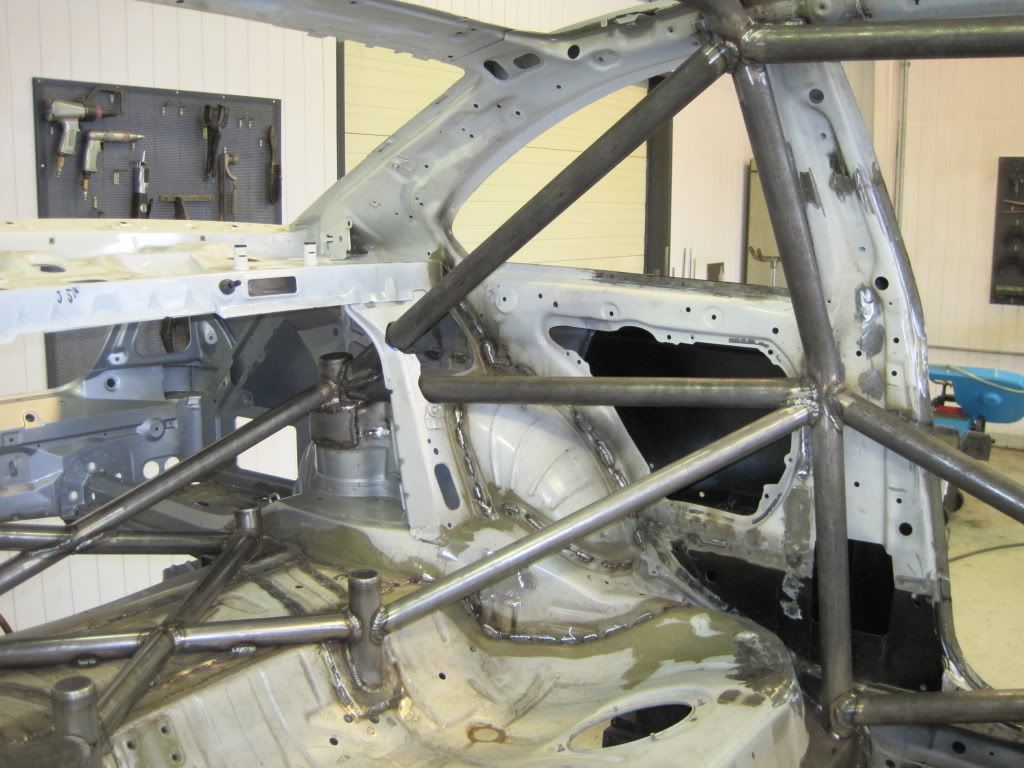
hopefully more to come soon. the tubing is supposed to be showing up tomorrow so I'll be able to start working on tying the subframe mounts together. Something like this is what I'm envisioning for the mounting points and rear shock towers (not my picture, obviously). Ignore the other sections tying into the main hoop.
07-30-2014, 02:14 PM
#37
Staging Lane

Join Date: Oct 2013
Location: Hollywood of Dreams
Posts: 84
Likes: 0
Received 0 Likes
on
0 Posts
just like your engine build thread, spectacular build thread sir.
i read it and am overwhelmed by your attention to every detail, and also the depth to which you go to get the correct solution.
i read it and am overwhelmed by your attention to every detail, and also the depth to which you go to get the correct solution.
07-30-2014, 02:15 PM
#38
Staging Lane
Join Date: Oct 2013
Location: Hollywood of Dreams
Posts: 84
Likes: 0
Received 0 Likes
on
0 Posts
just like your engine build thread, spectacular build thread sir.
i read it and am overwhelmed by your attention to every detail, and also the depth to which you go to get the correct solution.
i read it and am overwhelmed by your attention to every detail, and also the depth to which you go to get the correct solution.
08-04-2014, 07:45 AM
#39
Spent another weekend grinding it out, complete with welding burns and undercoating in my eyes. Focused mainly on prepping the rear end of the car.
1.75" x .120" DOM came in

The business

Didn't get a chance to cut any of it up and fit any in because the bulk of the time was spent behind a drill wire wheeling all the crap out of the way. Got the top side of the shock towers done, some of the seams on the underside of the car in the rear subframe mount area, and the rear trailing arm pockets.
Still have to clean off the backside of the tower so it'll weld nice.

More seam welding

Rear trailing arm pockets

I'll also be welding in the reinforcement plates from AKG. I coated them in weld thru primer to protect the areas on the interior of the weld seam from rust. Wasn't able to get to welding them in yet though.

In other news, I cut out my spare tire well out to make room for a second muffler. Fixing to run true duals into a quad exhaust - more exhaust flow capability with still decent noise reduction.


Throughout this process I discovered some questionable body work done sometime in past with a previous owner that I'm going to need to address. There's rust coming through in several small areas where the tailpanel was apparently welded back in, so I'm probably going to need to cut it out and replace it. The tailpanel is the piece that houses the headlights, spanning in between the rear quarterpanels. You can kind of see where it's coming through on the seam in the front, as well as in the right corner.

Irritates me because I bought the car under the impression that it had never been to the shop. At the same time, I no longer feel bad about hacking away at it lol. Oh well.
More soon.
1.75" x .120" DOM came in
The business
Didn't get a chance to cut any of it up and fit any in because the bulk of the time was spent behind a drill wire wheeling all the crap out of the way. Got the top side of the shock towers done, some of the seams on the underside of the car in the rear subframe mount area, and the rear trailing arm pockets.
Still have to clean off the backside of the tower so it'll weld nice.
More seam welding
Rear trailing arm pockets
I'll also be welding in the reinforcement plates from AKG. I coated them in weld thru primer to protect the areas on the interior of the weld seam from rust. Wasn't able to get to welding them in yet though.
In other news, I cut out my spare tire well out to make room for a second muffler. Fixing to run true duals into a quad exhaust - more exhaust flow capability with still decent noise reduction.
Throughout this process I discovered some questionable body work done sometime in past with a previous owner that I'm going to need to address. There's rust coming through in several small areas where the tailpanel was apparently welded back in, so I'm probably going to need to cut it out and replace it. The tailpanel is the piece that houses the headlights, spanning in between the rear quarterpanels. You can kind of see where it's coming through on the seam in the front, as well as in the right corner.
Irritates me because I bought the car under the impression that it had never been to the shop. At the same time, I no longer feel bad about hacking away at it lol. Oh well.
More soon.