
1967 Cougar build (over 500 pictures and videos)
 02-01-2015, 08:32 AM
#221
TECH Senior Member
Thread Starter
iTrader: (7)

Don't make fun of me...Those are my first two welding passes...Clearly I need A LOT of practice!!!

I like the stock heat shields for the spark plug wires, but they looked like crap. So I hit them with a wire wheel and they cleaned up very well.

Andrew


 02-05-2015, 10:35 AM
#224
TECH Senior Member
Thread Starter
iTrader: (7)
Thank you!
Alright...I got the last piece of "bling" that will go on this engine. I had to do something about the coils, but I really didn't want to remove them from the valve covers. So I got these individual coil covers...


I like the tool marks, but I am not really digging the super shiny finish. I think I will get these media blasted to smooth out the texture and get the hard anodized as well.
Next week I am gathering all of the various parts that need to be blasted and anodized and getting them taken in.
Andrew
Alright...I got the last piece of "bling" that will go on this engine. I had to do something about the coils, but I really didn't want to remove them from the valve covers. So I got these individual coil covers...
I like the tool marks, but I am not really digging the super shiny finish. I think I will get these media blasted to smooth out the texture and get the hard anodized as well.
Next week I am gathering all of the various parts that need to be blasted and anodized and getting them taken in.
Andrew
02-05-2015, 12:28 PM
#225
TECH Resident

Those are pretty cool. Never saw those before.
You can also get parts tumbled. Conventional media blast on aluminum leaves microscopic sharp / jagged pits that collect dirt. Tumbling will provide similar look but knock off any rough edges that collect dirt.
I learned this the hard way on a set of Porsche Fuchs wheels. I wanted a satin look on the non-painted parts. Even looking at the wheels with greasy hands would leave marks that were very tough to clean. Sometimes only with a cleaning acid could I remove the marks.
Obviously a finish like anodizing will solve that issue.
Will be cool to see all of your parts anodized and ready to assemble!
You can also get parts tumbled. Conventional media blast on aluminum leaves microscopic sharp / jagged pits that collect dirt. Tumbling will provide similar look but knock off any rough edges that collect dirt.
I learned this the hard way on a set of Porsche Fuchs wheels. I wanted a satin look on the non-painted parts. Even looking at the wheels with greasy hands would leave marks that were very tough to clean.
Sometimes only with a cleaning acid could I remove the marks. Obviously a finish like anodizing will solve that issue.
Will be cool to see all of your parts anodized and ready to assemble!
02-05-2015, 12:52 PM
#226
On The Tree

I love your build and your attention to detail. I really enjoyed following along when you built the GTO. It was inspirational for my son (high schooler at the time) as we build a 1966 GTO with LS power. I have three questions: Where did you get those coil covers? They look great.
Where did you get the "pigtails� for your T56? I have purchased them before and the wires were much shorter. I need a set for my current build (1955 Chevy Pick up w/T56).
Finally, who makes the valve covers you purchased. I'm thinking about the valve cover/coil cover upgrade on our 66 GTO LQ9.
Thanks again.
Ricky
02-05-2015, 01:13 PM
#227
TECH Senior Member
Thread Starter
iTrader: (7)
I love your build and your attention to detail. I really enjoyed following along when you built the GTO. It was inspirational for my son (high schooler at the time) as we build a 1966 GTO with LS power. I have three questions: Where did you get those coil covers? They look great.
Where did you get the "pigtails� for your T56? I have purchased them before and the wires were much shorter. I need a set for my current build (1955 Chevy Pick up w/T56).
Finally, who makes the valve covers you purchased. I'm thinking about the valve cover/coil cover upgrade on our 66 GTO LQ9.
Thanks again.
Ricky
Where did you get the "pigtails� for your T56? I have purchased them before and the wires were much shorter. I need a set for my current build (1955 Chevy Pick up w/T56).
Finally, who makes the valve covers you purchased. I'm thinking about the valve cover/coil cover upgrade on our 66 GTO LQ9.
Thanks again.
Ricky
Thanks for the compliments. Your son is lucky to have a father to help him with the project. I've owned my GTO since about the same age, but had to go at it myself.
The coil covers are made by Granatelli:
http://granatellimotorsports.com/cat...vers-38-1.html
I got mine from Colorado Speed as they seemed to have the best price.
The pigtails I got from an eBay vendor:
http://www.ebay.com/itm/111372069727?_trksid=p2059210.m2749.l2649&ssPageName=STRK%3AMEBIDX%3AIT
The valve covers are made by Holley.
https://holley.com/products/ls_power/dress_up/
Andrew
 02-06-2015, 05:29 PM
#229
TECH Senior Member
Thread Starter
iTrader: (7)
In some of the previous pictures you guys might have noticed that the water pump has a funky yellowish tint. I suspect someone sprayed it with clear at some point. This was driving me nuts, but I didn't want to ditch a perfectly good low mileage pump. So on another forum someone suggested painting it with black wrinkle paint. I have to admit, I was a little skeptical at first, but I gave it a shot. Got some VHT black wrinkle paint, Googled around for some tips and went to town. I did the thermostat housing and the water pump and before spraying them, I took a sander and ground down the casting parting lines, just to smooth everything out a little. I am pretty happy with the results:

Here is the top of the water pump. I am just letting it sit for 24 hours before messing with it.

Not too bad for a couple of hours work and 10 bucks worth of rattle can magic.
Andrew
Here is the top of the water pump. I am just letting it sit for 24 hours before messing with it.
Not too bad for a couple of hours work and 10 bucks worth of rattle can magic.
Andrew
02-08-2015, 12:33 PM
#230
TECH Senior Member
Thread Starter
iTrader: (7)
I let the wrinkle painted parts sit for about 24 hours and then I stuck them in a 200 degree oven. I did the water neck first, not wanting to risk messing up the bigger water pump part. Here is what the final product looks like:

The water pump is in the oven now and I'll post pictures later of what it all looks like mounted to the engine. I think it came out pretty good. Certainly better looking than the raw, yellowish cast look.
Andrew
The water pump is in the oven now and I'll post pictures later of what it all looks like mounted to the engine. I think it came out pretty good. Certainly better looking than the raw, yellowish cast look.
Andrew
02-08-2015, 05:31 PM
#231
TECH Senior Member
Thread Starter
iTrader: (7)
Got the water pump baked off and managed not to screw it up too badly. Went to the garage to install everything and see how it all looks. Frankly, I wasn't going to mess with it anymore, so this was a permanent installation. First, gotta put some thread sealer on the water pump bolts because some of them go into water. I don't know which ones exactly, so I just did them all. I like using the teflon paste for this.

Looks pretty good with the ARP stainless hardware. The black really makes the polished bolts stand out.

I did have one spot that got messed up when I was pulling the water pump out of the oven. The paint was soft and I grabbed it with a towel. Luckily, the pain didn't come off all the way but just got a little wrinkled up. I am not going to worry about it, because that area will get covered up by the alternator bracket.

Here is a bit of a close-up showing the thermostat housing and its stainless bolts. You can also see where, like an idiot, I touched the pulley with the sander. Should have taped it up first.

Finally, I decided to install the Katech belt tensioner too.


I may have to get some extra ARP hardware for the belt tensioner bracket, alternator bracket, and the steam cross-over pipe hardware. I think I have a problem...:Alchy:
Andrew
Looks pretty good with the ARP stainless hardware. The black really makes the polished bolts stand out.
I did have one spot that got messed up when I was pulling the water pump out of the oven. The paint was soft and I grabbed it with a towel. Luckily, the pain didn't come off all the way but just got a little wrinkled up. I am not going to worry about it, because that area will get covered up by the alternator bracket.
Here is a bit of a close-up showing the thermostat housing and its stainless bolts. You can also see where, like an idiot, I touched the pulley with the sander. Should have taped it up first.
Finally, I decided to install the Katech belt tensioner too.
I may have to get some extra ARP hardware for the belt tensioner bracket, alternator bracket, and the steam cross-over pipe hardware. I think I have a problem...:Alchy:
Andrew
 02-10-2015, 09:12 AM
#233

Last SBC I built for my C10 before I went LS was my first delve into wrinkle finish.
It had a 142 blower that I did in wrinkle and did chrome allen head case bolts etc. Looked killer imo. Just have to hammer that paint on thick to get it to wrinkle up nice.
Wish I wouldn't have blown it up... I had a lot of time in paint/powdercoat and general prettiness lol
It had a 142 blower that I did in wrinkle and did chrome allen head case bolts etc. Looked killer imo. Just have to hammer that paint on thick to get it to wrinkle up nice.
Wish I wouldn't have blown it up... I had a lot of time in paint/powdercoat and general prettiness lol
 02-10-2015, 02:27 PM
#235

Sent this question via PM, but thought maybe others would want to know the answer too.
Is there room to run truck front accessories with the radiator in the stock location??
Thanks
Is there room to run truck front accessories with the radiator in the stock location??
Thanks
02-10-2015, 02:48 PM
#236
TECH Senior Member
Thread Starter
iTrader: (7)
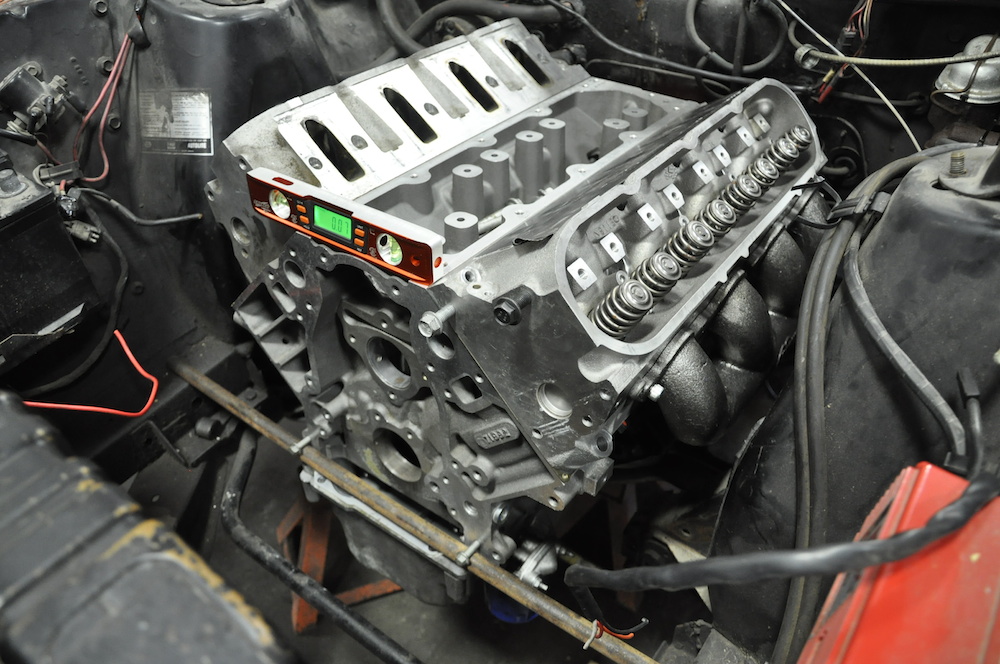
You can see that there is quite a bit of distance between the radiator and the engine. The LS engine is not any longer than a SBF, just a little wider.
I personally prefer the Corvette style accessory arrangement because it draws everything closer to the engine. With the Holley brackets, you can reuse the truck alternator and stock Corvette balancers are easy to find and inexpensive. I got mine almost new (pulled of a crate engine) for $75 shipped.
I would be more concerned with the height of a truck intake.

Andrew
02-10-2015, 03:53 PM
#237
I'm asking because I'm working on a 73 mustang convertible project with my son and his budget is limited. We found a complete low mileage '05 LQ4 (Hummer H2) that he can afford but would need to use the stock accessories and brackets for cost reasons. Since the 71-73 mustang engine bay is wider than your Cougar, we are hoping everything will fit.
Thanks
Thanks
02-12-2015, 11:24 AM
#238
TECH Senior Member
Thread Starter
iTrader: (7)
Dropped off a bunch of parts at the blaster yesterday. They are going to soften up the texture on the coil covers and match up the texture as best they can on the intake so that the machined surfaces and the cast surfaces have a similar look. Then it is off to the anodizer for some hard anodizing. The Holley alternator bracket and the valley cover are getting done too.
Andrew
Andrew
02-12-2015, 07:25 PM
#239
TECH Senior Member
Thread Starter
iTrader: (7)
Got home tonight and was greeted by a little package from C&R. I got these little brackets that C&R uses on their C6 replacement radiators. They are perfect for mounting the stock C6 fan assembly.

The brackets simultaneously support the weight of the fan and retain it with a screw. I assume that I need to add a u-nut as the bracket is not threaded.
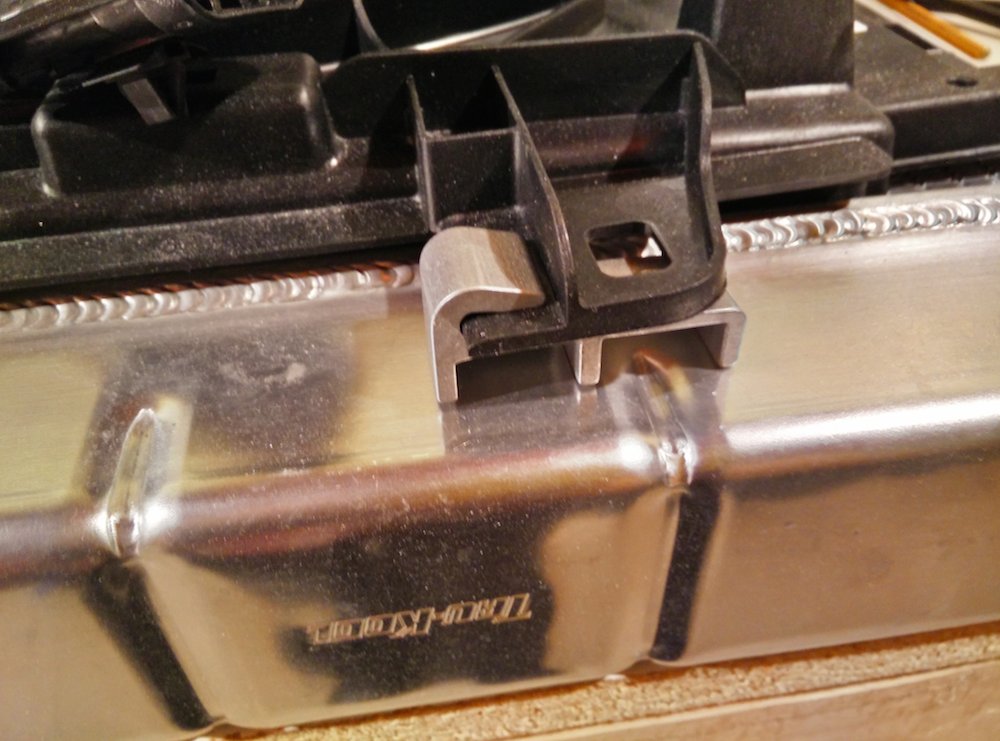
C&R part numbers:
CR-UC-GPB014A bracket with mount
CR-UC-GPB013A bracket no mount (not pictured)
Hat tip: samckitt on lat-g.com
Andrew
The brackets simultaneously support the weight of the fan and retain it with a screw. I assume that I need to add a u-nut as the bracket is not threaded.
C&R part numbers:
CR-UC-GPB014A bracket with mount
CR-UC-GPB013A bracket no mount (not pictured)
Hat tip: samckitt on lat-g.com
Andrew
02-13-2015, 04:10 PM
#240
TECH Senior Member
Thread Starter
iTrader: (7)
I have been looking locally for a fitting to go into the water pump for the steam crossover, but I haven't had much luck finding anything that was remotely attractive and the right size. The crossover tube has a 1/4" OD but I tapped the water pump for 1/16" NPT, to keep the fitting as small as possible. Well, finding anything that small locally was just not happening. So I got on Amazon and found this:
It is nickel plated brass and is the perfect size (1/16" NPT to 1/4" barb)


Andrew
It is nickel plated brass and is the perfect size (1/16" NPT to 1/4" barb)
Andrew