New Gen V project...
It may not look like much has happened, but I spent the last two days with a toner and a pin out diagram trying to figure this thing out. Not too difficult, but it is amazing the # of sensors that have been added since the 411' days. For some reason this particular harness does not have the VSS wires in it, although they are called out in the generic E92 pinout. I am going to try and add those pins in myself. Also does anyone have any idea what I am supposed to do with (2) GMLAN wire pairs? The E92 has two sets. I am going to try the single pair first with a 120 ohm resistor. I may also have to add a second resistor to the other pair.
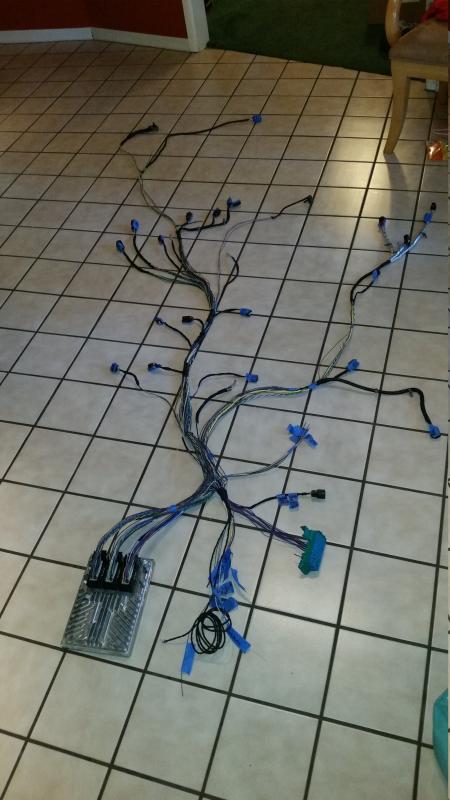
I am waiting on the relay and fuse panel assembly to show up, and a couple of sensors that need to get added to the fuel rail before I re-wrap the harness. Shouldn't be more than a few more days, I hope.

I am waiting on the relay and fuse panel assembly to show up, and a couple of sensors that need to get added to the fuel rail before I re-wrap the harness. Shouldn't be more than a few more days, I hope.
SO progress has been a little slow. Greg@Pace sent me the fuel composition sensor as well as the fuel pressure sensor. I then had to order all the push lock to AN adapter fittings as well as a couple of other fittings. My original plan was to link these two sensors together and then connect them right to the fuel rail inlet fitting. This would allow me to complete the harness work, recover and build out the fuse panel. Now I am not so sure. Once the erector set is all put together, it is somewhat bulky. I am looking at some other options
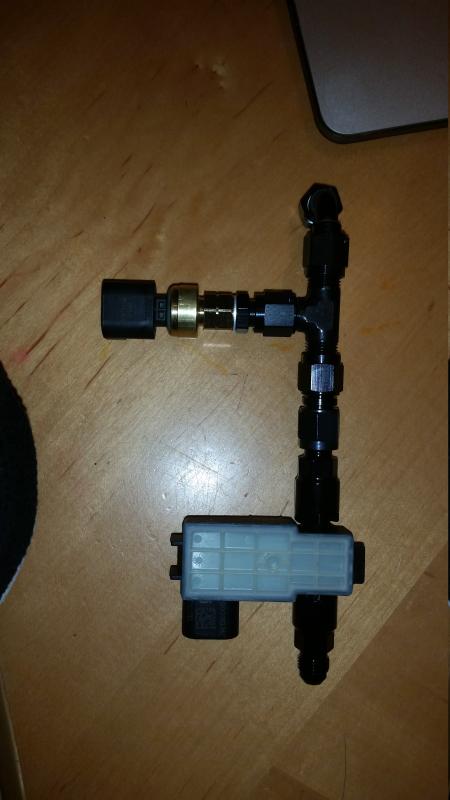
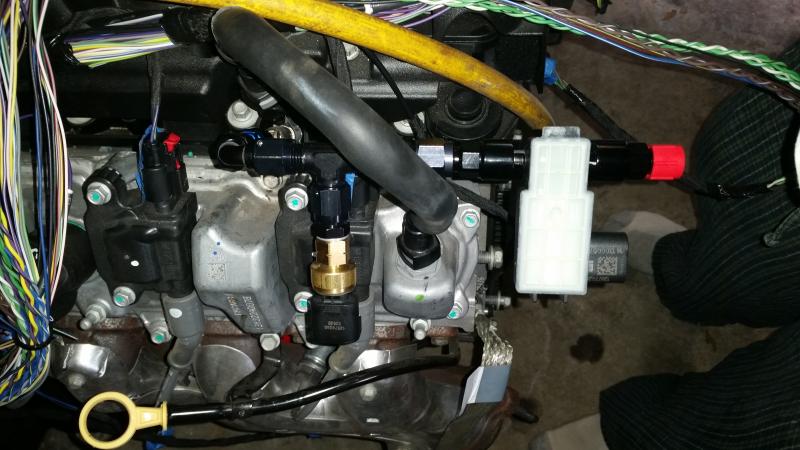
Here it is on the engine. It is also relatively heavy, and I don't think letting it hang on the fuel rail is the best thing. I am probably going to add an additional 90 degree to the fuel pressure fitting, and put the fuel composition sensor somewhere after the fuel pressure regulator.
I should have just bought stock in Russell and Fragola fittings! I also acquired the Helms manual for the truck to help with the wiring.
The reason I am using all GM sensors is that I would like to use a Digital dash like the AIM or RacePak that have an OBD2 bridge, and I can program all readouts in to a single place.

Here it is on the engine. It is also relatively heavy, and I don't think letting it hang on the fuel rail is the best thing. I am probably going to add an additional 90 degree to the fuel pressure fitting, and put the fuel composition sensor somewhere after the fuel pressure regulator.

I should have just bought stock in Russell and Fragola fittings! I also acquired the Helms manual for the truck to help with the wiring.

The reason I am using all GM sensors is that I would like to use a Digital dash like the AIM or RacePak that have an OBD2 bridge, and I can program all readouts in to a single place.
Also, on the off chance any one knows what the terminal part # is for the small pins for the harness connections to the computer, let me know. Naturally, new computer, new pin configuration for the X connectors. Service manual shows as not available for the small one, lists 7116-4152-02 for the large one. These connectors do not appear to be listed on the Delphi site yet, and I hunted around on Mouser, Waytek and Digikey but couldn't come up with them. The harness as installed in the truck has the ECM installed up on the left rear fender, which in my application is not in the correct location. If I position the computer where I want it to be relative to the motor, The left bank connectors for the coils, and connections to sensors on the front are too short. MY preference would be to make all new wiring on these specific wires, but if I have to I will splice and extend.
nice work so far, thanks for sharing the progress. can't wait to get my hands on a gen V setup but will probably be a while. on the fuel pressure/comp assembly I would agree with not mounting it off the fuel rail. maybe you could solid mount it to the block or valvecover or something and run a flex line between the fuel rail fitting and your assembly just to allow some movement between the two without imparting a lot of stress on that fuel rail fitting.
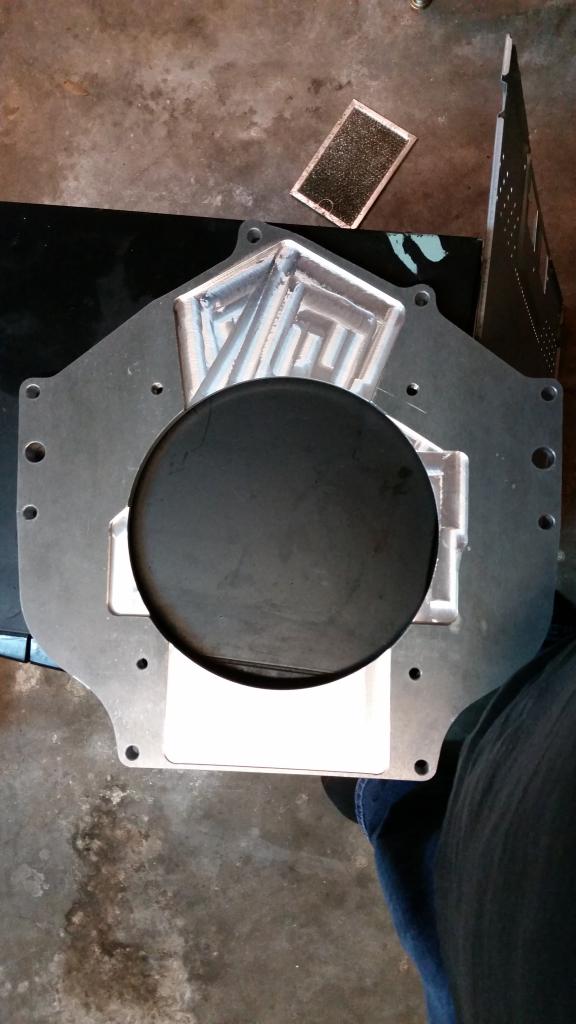
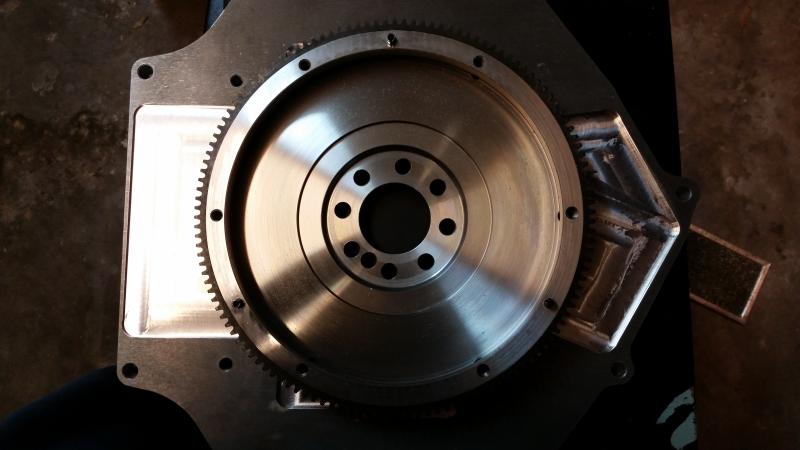
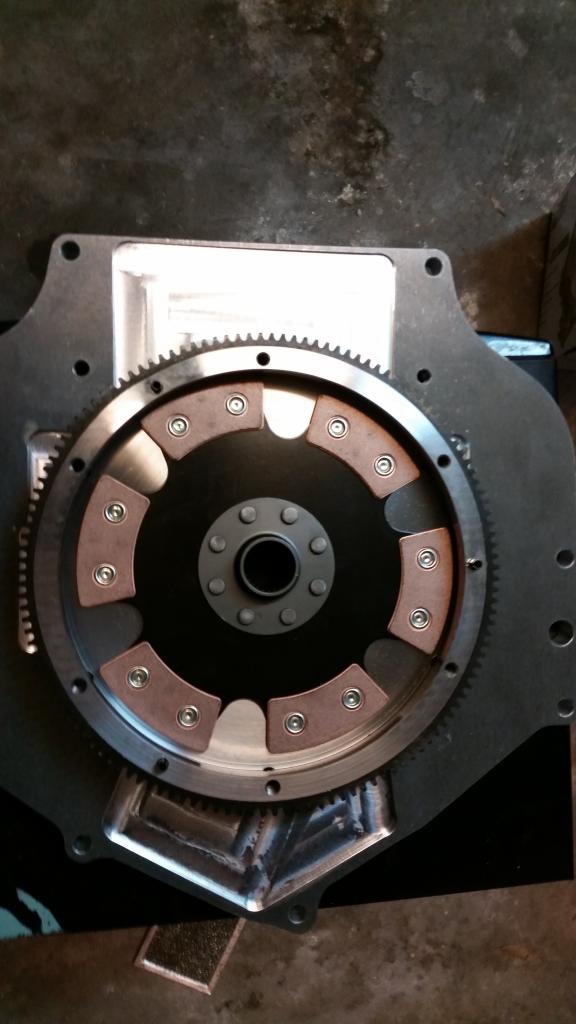
So no more picture updates, but I have been busy chasing down various aspects of the build. The last few weeks I have been trying to figure out a clutch package to use. I called Weddle (The company who make the transaxle), when I thought they had something I could put together. As a I mentioned previously, they make a Chevy flange bellhousing that I could swap out for the VW style that I currently have. Well after some extended conversations with them about it, I found out that it is a Chevy LS bellhousing pattern, however it is not very deep and still requires specialized flywheel and clutch components to utilize it. The bell housing alone was $700, and for something that wasn't going to take OEM style clutch components I just scrapped the idea because it would have still required some special parts because of the 8 bolt crank flange. So my next call was to Kennedy Engineering. Kennedy pretty much makes adapters to bolt any engine to quite a few of the common transaxles, (VW, VW style aftermarket, Porsche, Renault, etc, etc). I told them what I was trying to do, and he stated that because GM offset the top bolt in the bellhousing pattern on the Gen V, and on the LS pattern they do not use the bolt in the middle on the passenger side, he didn't feel comfortable with the gap between the remaining bolts was sufficient... So, he is going to send me a template with some measuring instructions. He will then take that, build me an adapter, and a dual disk flywheel assembly for use. I have my choice between 8" and 9" diameters. I think the dual 8" disks will be more than sufficient for surface area and allow me to use a nice soft pressure plate.
Aside from all that, I am ready to start on some major surgery on the harness. In the truck the ECM is located on the left front fenderwell of the engine bay. I would very much like to change that so that it is mounted behind the engine. If it was in the truck still picture it being on the firewall, or at least in that general direction. If I do that the coil control wires and some of sensor wires will need to be extended. Not overly difficult just tedious.
I will post more pictures when I have something picture worthy to post.
So nothing earth shattering, but finally a picture. The fine folks at Kennedy sent me a template so that I could get the adapter plate created. It's already back in the mail to them so I hope that I will have the engine and tranny mocked up together in a month or two.

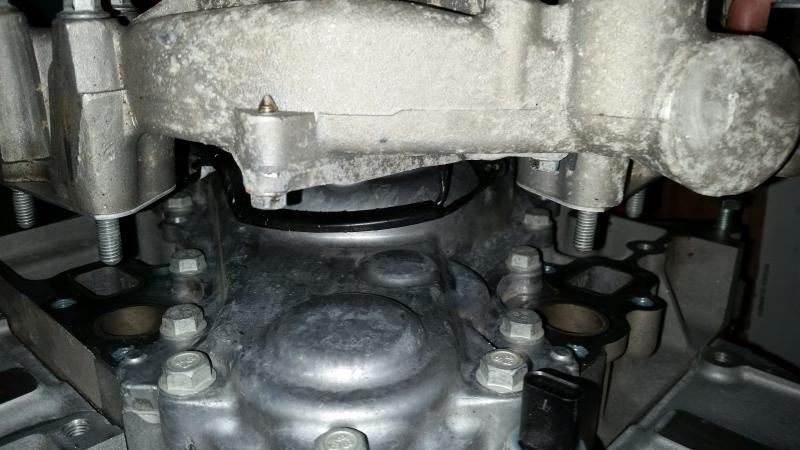
Hmmm, still deliberating on the water pump situation. This morning I pulled the LS1 style water pump off of my LS2 engine today, just for grins. Some major interference going on there with the Cam cover on the Gen V., mostly around the cam gear. I was hoping to use something like the Edelbrock 8895 water pump because it was nice and compact unit, and it was reverse rotation, meaning I could just wrap the belt around it and come up with a dirt simple belt routing config. I was even willing to make up some 1/2" or 3/4" adapter plates to help with the transitions from the hole in the block to the water pump. Due to the fact that the 8895 is $425 and I can't even find a picture of what the back of the water pump looks like, I am probably going to go back to my original plan of doing a remote electric water pump. The picture below is as close as I can get the water pump to the block. Does anyone know of a compact reverse rotation water pump for use with an LS3 (vvt style)? It's a long shot but I figure if anyone would know, it's someone here.

Last edited by 96 Comp T/A; Dec 23, 2014 at 10:44 AM. Reason: Added Picture
LS1 Tech Stories
The Best V8 Stories One Small Block at Time

Top 10 Greatest Cadillac V Series Performance Models Ever, Ranked
Pouria Savadkouei
Top 10 Most Powerful Chevy Trucks Ever Made!

Hennessey's New Supercharged Silverado ZR2 Has 700 HP
Verdad Gallardo
Coachbuilt N2A Anteros Is an LS2-Powered C6 Corvette In Italian Clothes
Verdad Gallardo
Awesome K5 Blazer Restomod Comes With C7 Corvette Power
Verdad Gallardo
10 Camaros You Should Never Buy

10 LS Engine Myths That Refuse to Die
Verdad Gallardo
Five Reasons the Camaro Was the Most Pivotal Player in the Pony Car Wars 2.0
Brett Foote
10 Reasons the LS7 Is GM's Most Extreme Naturally Aspirated V8 Engine Ever
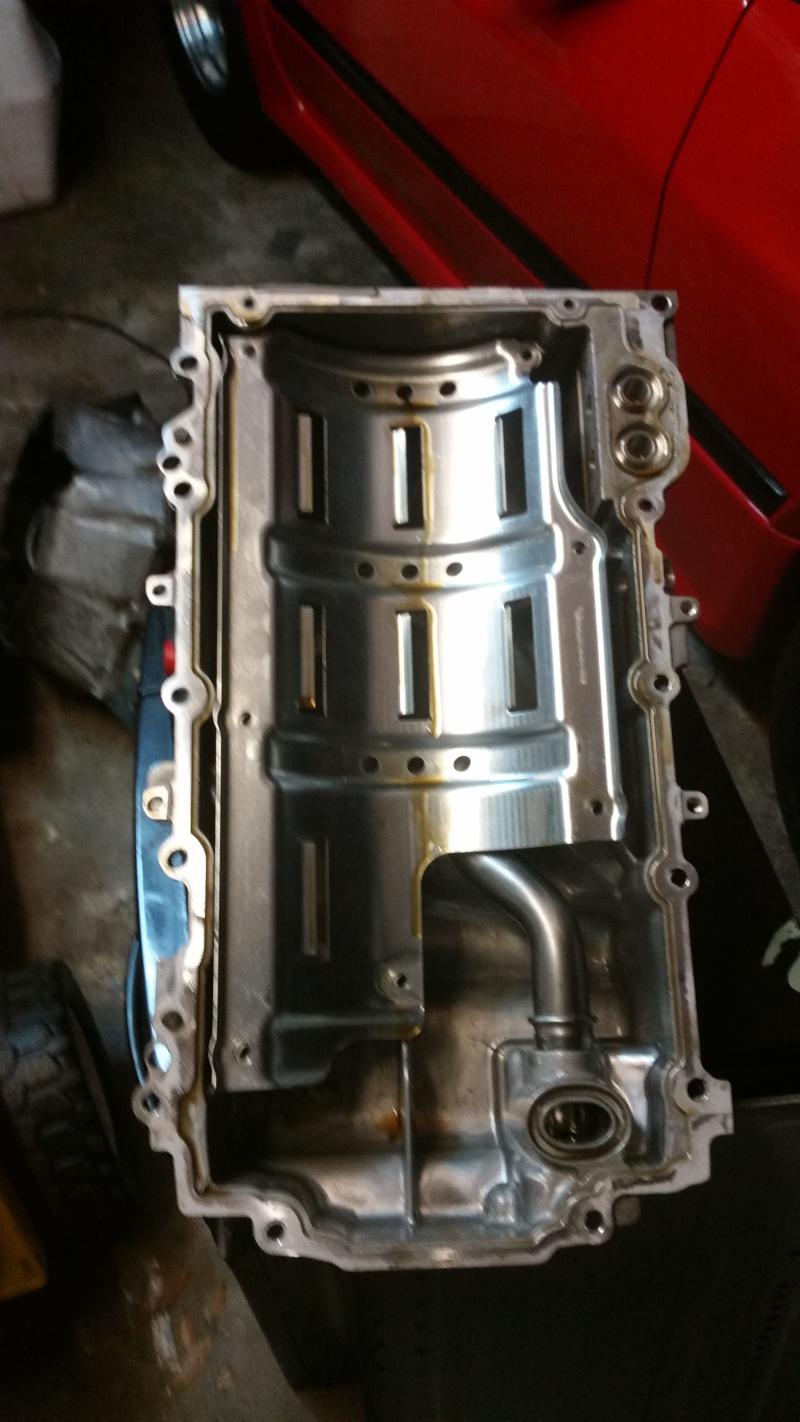
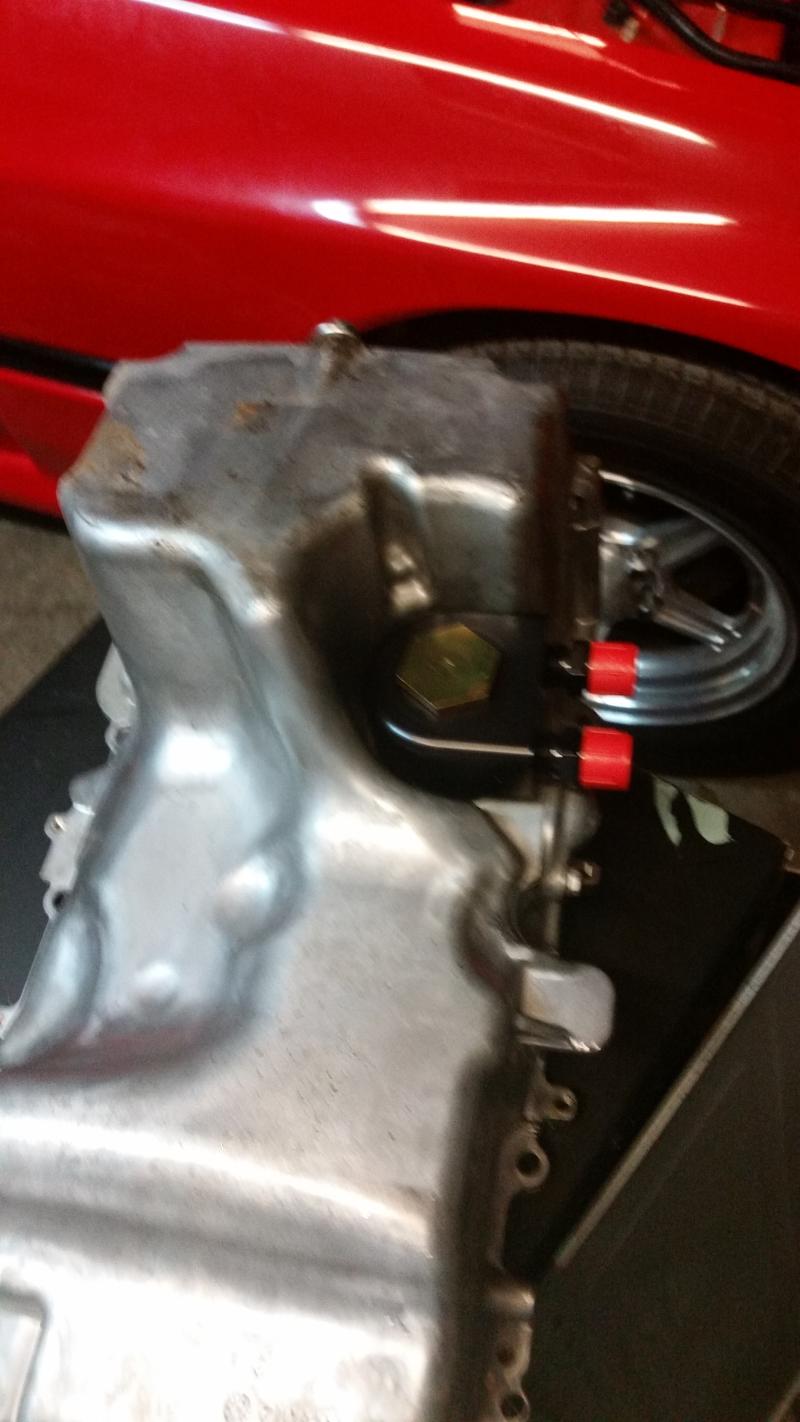
Verdad Gallardo So I pulled the pan off tonight. Because of the truck application, this engine has a really deep sump pan. I am going to have to shorten the total depth to make it work. I would like to take as much off as possible. I am going to see my machinist+ fab friend tomorrow, and see what we can come up with. It looks like I can take a good bit out of the total height out, but that looks to be a quart or two out of the total capacity. Going to see how much adding a set of wings will cost.
The oiling system a little different from the Gen 3/4. Most seem like refinements. There is a 90 degree boss cast in the oil pan that mates to the oil pump via an Oring, and connects to a steel pickup tube that is bolted to the pan. The windage tray is also bolted to the pan. There is a removable crossover manifold inside the oil pan that places the oil filter on the passenger side of the engine. I don't see any reason why I can't cut the pan down to the top of the remote filter adapter if I can add the oil capacity with kickout wings.
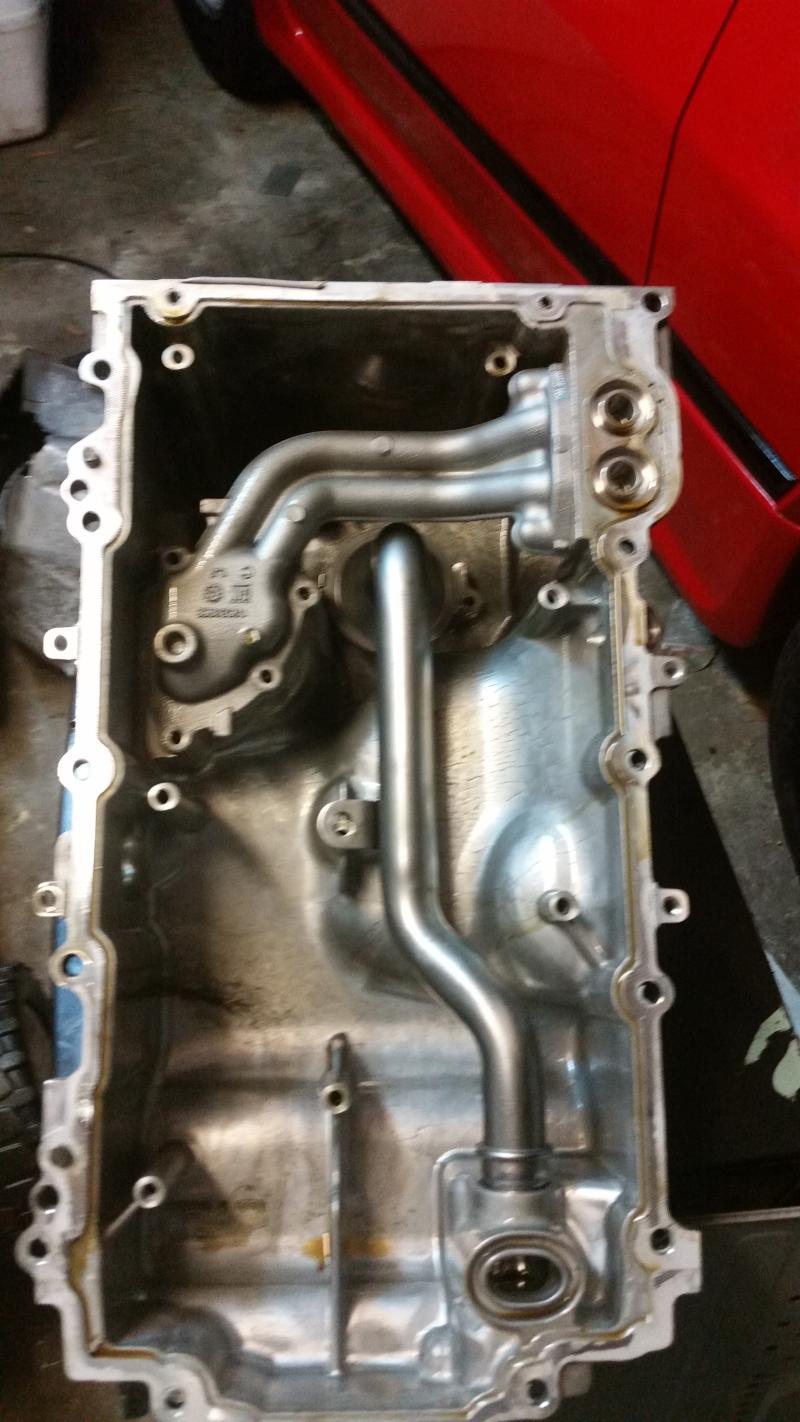
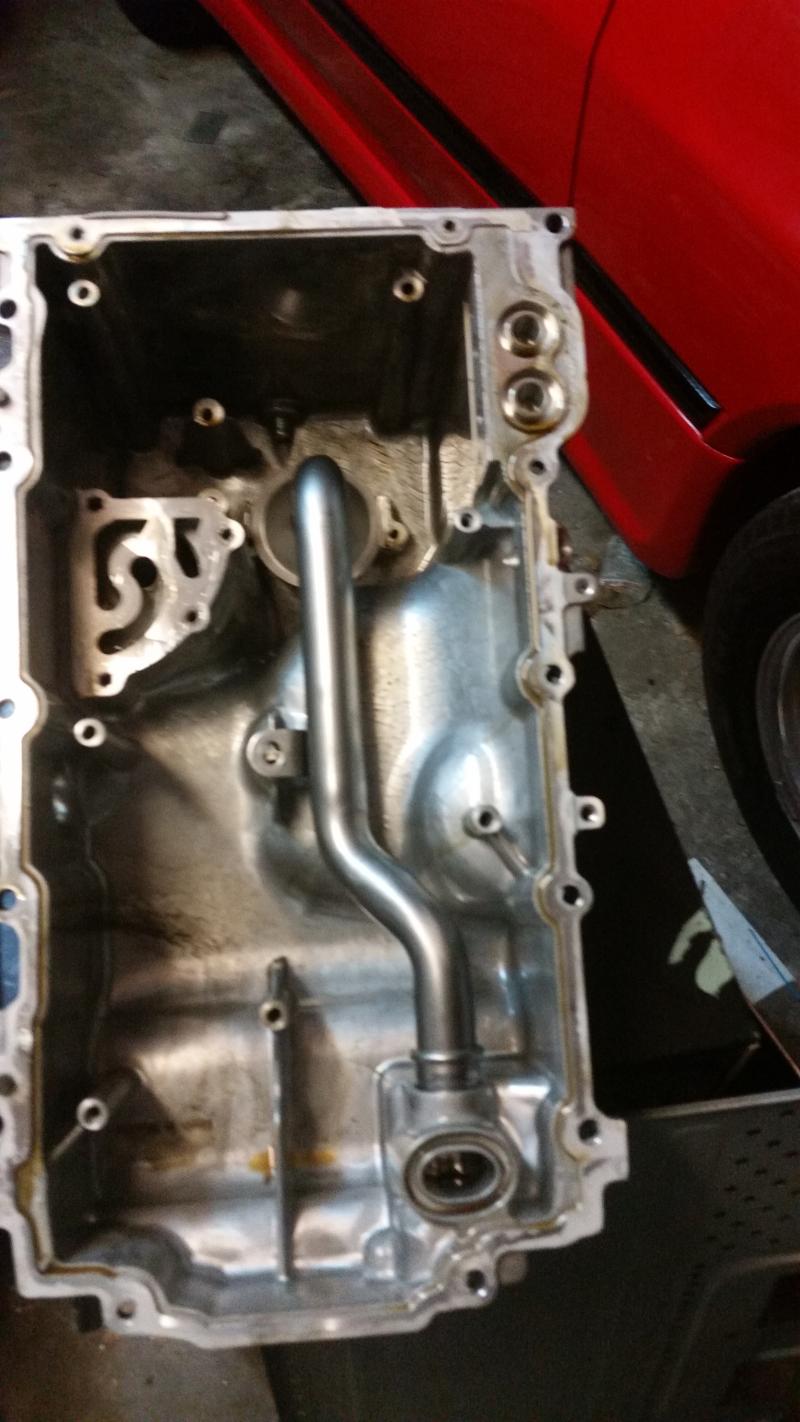
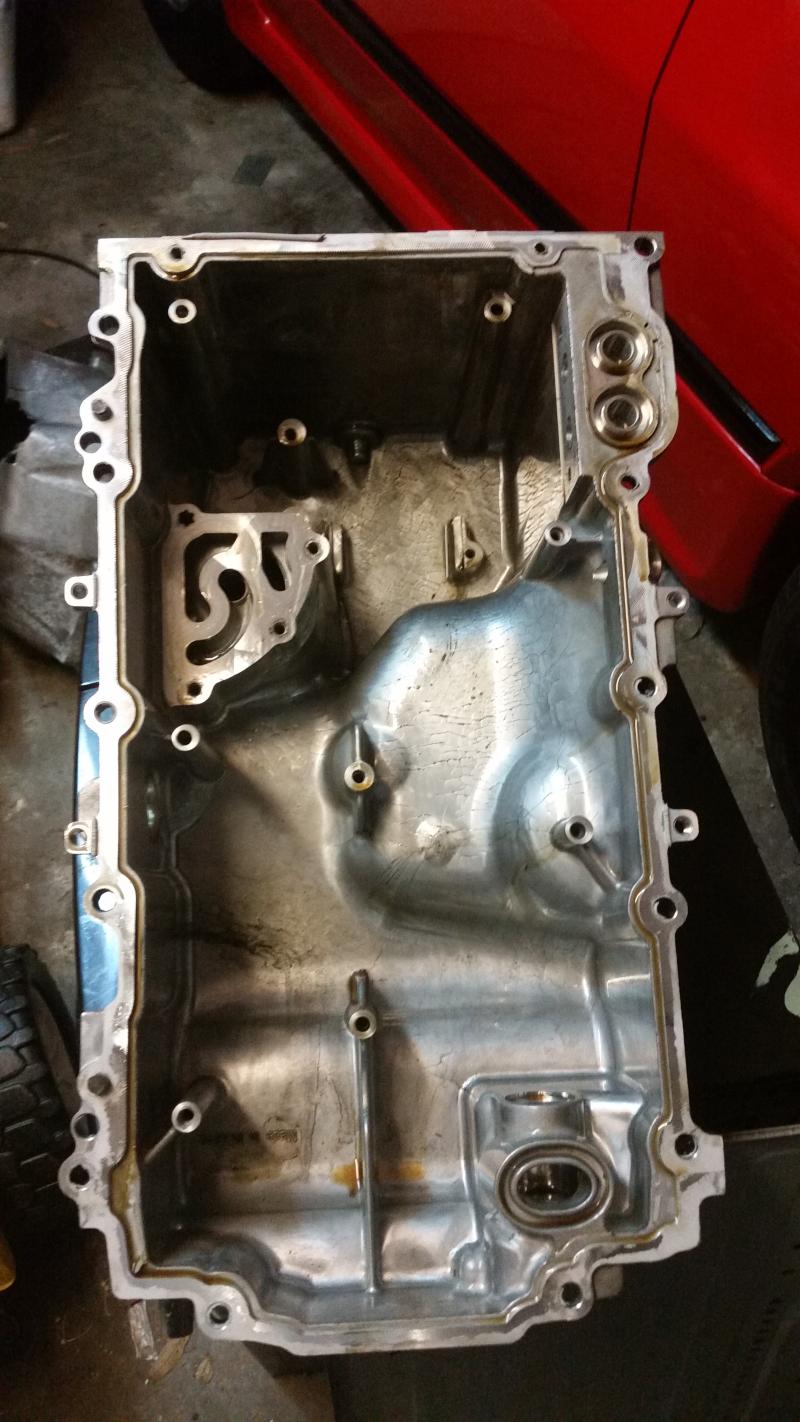
The oiling system a little different from the Gen 3/4. Most seem like refinements. There is a 90 degree boss cast in the oil pan that mates to the oil pump via an Oring, and connects to a steel pickup tube that is bolted to the pan. The windage tray is also bolted to the pan. There is a removable crossover manifold inside the oil pan that places the oil filter on the passenger side of the engine. I don't see any reason why I can't cut the pan down to the top of the remote filter adapter if I can add the oil capacity with kickout wings.


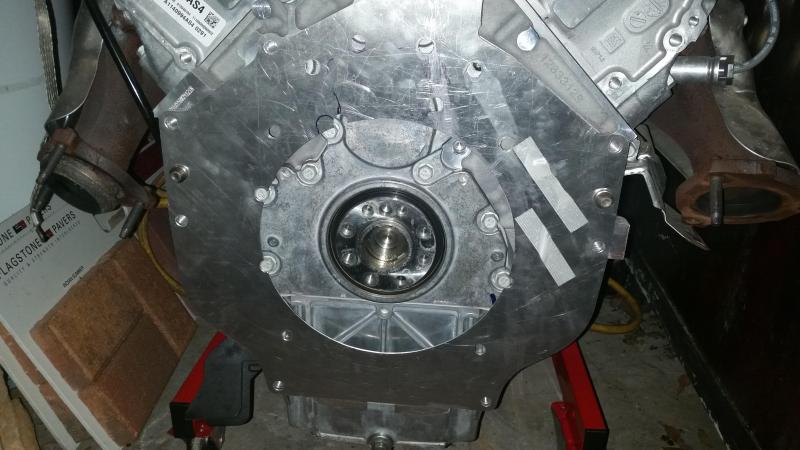
So the pan and rear cover are off the motor. I am having the pan modified to increase ground clearance. I also had to take off the rear cam/crank cover and send to Kennedy so that they could contour the transmission adapter plate to it. An interesting tidbit is that this engine uses no gaskets on either the oil pan or the rear cover. GM used some type of grey bonding agent, like what is used on ATV/motorcycle engine cases. It has a different texture than regular RTV.
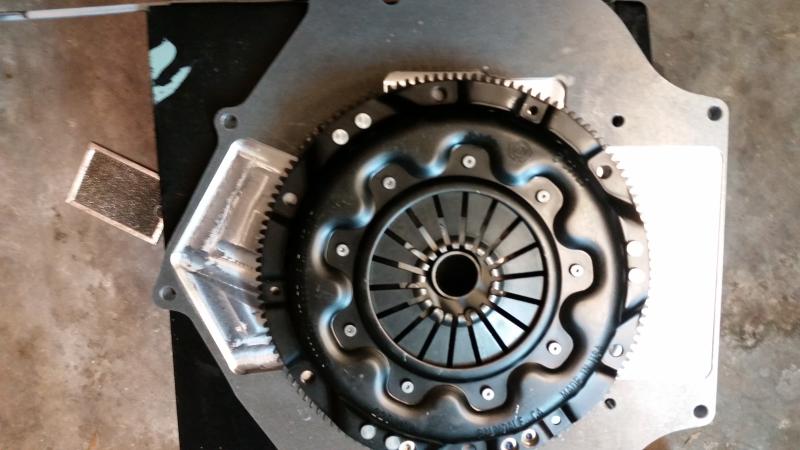
You will spend around $550 for the adapter and flywheel. I haven't got the bill yet for the clutch disk, but it's nothing super special, just a 9" disk with a chevy 26 spline hub. It uses metallic linings for additional torque holding capacity. The pressure plate is standard VW style 228MM stage 2 pressure plate also from Kennedy. It's about $220.
Also, on the off chance any one knows what the terminal part # is for the small pins for the harness connections to the computer, let me know. Naturally, new computer, new pin configuration for the X connectors. Service manual shows as not available for the small one, lists 7116-4152-02 for the large one. These connectors do not appear to be listed on the Delphi site yet, and I hunted around on Mouser, Waytek and Digikey but couldn't come up with them.
If you got them, I will gladly take them. If you don't mind me asking, where would you find such info? I find it odd that the Helms manual would have it down as simply "unavailable".
The ECU connectors are Molex MX123 family. See more details on the links below.
http://www.molex.com/molex/products/...ection_systems
http://www.molex.com/mx_upload/famil...UserManual.pdf
The part number for the small pins are:
33467-0003 for 22 AWG wire
33467-0005 for 18 AWG wire
Can get them at Mouser or Digikey.
The large terminal that is used for ground is Yazaki part number 7116-4152-02. Yazaki terminals are difficult to find; I have only found one place that sells these however, they require a minimum order of $25 which sucks. Also, I have no idea why they would use terminals from two different manufacturers on the same connector .
.
GM service manuals are a great source of connector part numbers. Otherwise, just doing a Google search for the connector function (e.g. LS3 MAF connector) will get you the part number needed.
http://www.molex.com/molex/products/...ection_systems
http://www.molex.com/mx_upload/famil...UserManual.pdf
The part number for the small pins are:
33467-0003 for 22 AWG wire
33467-0005 for 18 AWG wire
Can get them at Mouser or Digikey.
The large terminal that is used for ground is Yazaki part number 7116-4152-02. Yazaki terminals are difficult to find; I have only found one place that sells these however, they require a minimum order of $25 which sucks. Also, I have no idea why they would use terminals from two different manufacturers on the same connector
.GM service manuals are a great source of connector part numbers. Otherwise, just doing a Google search for the connector function (e.g. LS3 MAF connector) will get you the part number needed.
The ECU connectors are Molex MX123 family. See more details on the links below.
http://www.molex.com/molex/products/...ection_systems
http://www.molex.com/mx_upload/famil...UserManual.pdf
The part number for the small pins are:
33467-0003 for 22 AWG wire
33467-0005 for 18 AWG wire
Can get them at Mouser or Digikey.
The large terminal that is used for ground is Yazaki part number 7116-4152-02. Yazaki terminals are difficult to find; I have only found one place that sells these however, they require a minimum order of $25 which sucks. Also, I have no idea why they would use terminals from two different manufacturers on the same connector.
GM service manuals are a great source of connector part numbers. Otherwise, just doing a Google search for the connector function (e.g. LS3 MAF connector) will get you the part number needed.
http://www.molex.com/molex/products/...ection_systems
http://www.molex.com/mx_upload/famil...UserManual.pdf
The part number for the small pins are:
33467-0003 for 22 AWG wire
33467-0005 for 18 AWG wire
Can get them at Mouser or Digikey.
The large terminal that is used for ground is Yazaki part number 7116-4152-02. Yazaki terminals are difficult to find; I have only found one place that sells these however, they require a minimum order of $25 which sucks. Also, I have no idea why they would use terminals from two different manufacturers on the same connector
.GM service manuals are a great source of connector part numbers. Otherwise, just doing a Google search for the connector function (e.g. LS3 MAF connector) will get you the part number needed.
So I just got back from a week long trip to California for work. There was a present from Kennedy waiting for me when I got home. unfortunately I will not have time to mess with it this weekend, and I am on the west coast again all next week, but I will get it all mounted up and stab the transaxle on there to check fitment.