

G8 GT 6.0 / 6L80e swap into 72 Chevelle
 02-11-2015, 04:08 PM
#21
Launching!
Thread Starter
iTrader: (4)

Join Date: Jan 2007
Location: Medford, OR
Posts: 221
Likes: 0
Received 0 Likes
on
0 Posts

Well after staring at the G8 pinouts for the ecm, I don't think the cut harness is a huge problem. I had my orientations wrong the cut plug is the X1, which isn't as necessary as the X2 stuff... Comparing the G8 pinouts w/ the 5th gen Camaro data on lt1swap.com, I only need to reconnect 21 wires back to the X1 for a stand alone setup and the rest are not used.
I did not get a pedal with the eng/trans, but I do have a 5th gen Camaro pedal already, I'm hoping I can use that. I'll have to look into the trans output/driveshaft thing a little more.
I did not get a pedal with the eng/trans, but I do have a 5th gen Camaro pedal already, I'm hoping I can use that. I'll have to look into the trans output/driveshaft thing a little more.
Last edited by RacnJsn95; 02-13-2015 at 05:33 PM.
 02-11-2015, 08:47 PM
#22

I would think the 5th Gen Camaro pedal should work. You should be able to just splice the new wires onto the X1 connector and make it work. There are places that sell the right color wires. The accelerator pedal wires are one set that goes to the X1 connector. Sounds like you already have the schematics needed.
02-13-2015, 01:45 PM
#23
Launching!
Thread Starter
iTrader: (4)
Join Date: Jan 2007
Location: Medford, OR
Posts: 221
Likes: 0
Received 0 Likes
on
0 Posts
I took some time this morning to stare at the Camaro harness info on lt1swap and the G8 pinouts and was able to piece this together.

Items highlighted in red are what I will need to retain. Looks pretty simple to me? X2 is no big deal at all, as the only wire than can be removed is for the purge solenoid. I believe that's everything I will need to reconnect to the X1. I'll have to double check and see if I even have the MAF sensor connector, and the pedal connector... After looking at my personal G8 GT, I see why the X1 was just hacked off and they didn't take the time to pull the whole harness. I don't have the MAF, and the engine didn't come with the g8 pedal, so I'm gonna take a wild guess and say the connectors are also missing.
The pedal wires (shown in green) are not correct for the Camaro pedal I have, I'll have to revisit that, but shouldn't be an issue as I'll likely have to buy the pigtail for the pedal anyway.
I need to find the pinout for the Camaro LS3 MAF card style sensor, I think I will convert to that one as it's a cheap easy to find sensor, where as the g8 sensor is kind of spendy, and not real common in the event of a failure.
At the moment, the only question I have is: Pin 58, 50 & 17, the fan and fuel pump relay controls. I'm assuming I will run those to relays that control their prospective devices. Does the ECM provide a ground, or a postive power output to those?
Any of you pros out there see anything wrong with my picture above?
My boss dropped my engine off the pallet while moving it with the forklift, which broke the oil filler tube, oil cap, and the engine cover. Luckily no other damage. I have a new oil filler tube, and oil cap on the way, as well as a new GM coil to replace the broken one the engine showed up with. I will figure something else out for the engine cover if I decide to run one, I didn't really like the G8 one anyway.
I also bought some front brake parts to convert the car to front disc... This brake setup is going to be something no one has done yet to my knowledge, I hope I'm not screwing myself and throwing money down the drain.
Last edited by RacnJsn95; 02-13-2015 at 02:19 PM.
02-15-2015, 03:30 PM
#24
Launching!
Thread Starter
iTrader: (4)
Join Date: Jan 2007
Location: Medford, OR
Posts: 221
Likes: 0
Received 0 Likes
on
0 Posts
This was my Saturday project, pulled all the unused pins/wires out of the X1 connector:

Looking at the pinouts, I think that I will make the X1 and X2 harness(es) independent of each other and not wrap them all together. It appears the X1 is mostly "body" related items, and the X2 is all engine. In theory, this may make removal, and diagnosis easier going down the road?
I also ordered a new X2 connector as the locking mechanism is broken on the one I received. Hoping I can get lucky and just swap out the locking arm, and parts. If not I'll swap the pins/wires into the new connector. I also ordered another X1 connector and parts to make a bench top harness, and bunch of other random electrical crap.
I also ordered the rotors for the brake stuff, so I'll just need to come up with caliper brackets and I'll probably order lines from kore3 once I have the calipers situated.
Decided that since I will be pulling the engine apart to do a cam swap and DOD delete, that I will also put new rings and bearings in the engine. With any luck, I'll get the engine on an engine stand next weekend.
Also picked up the truck pan, tray, and pick up yesterday, so I will probably start modifying that here pretty quick.
02-15-2015, 06:31 PM
#25
Pin 17 is for fan #2 or the high speed fan and the ECM provides the ground.
Pin 50 is for the fuel pump relay. I did not use it on my car. Looking at the drawing it looks like the ECM supplies the voltage for the relay.
Pin 58 is the for the low speed fan or #1 fan. The ECM provides the ground
As to the MAF here is the way it is on my car.
Pin E TN and it goes to ground pin X1-38. IAT
Pin D TN/BLK and it goes to pin X1-37. IAT signal.
Pin C PK and it is ignition voltage from Fuse 4 15A. MAF
Pin B BK/WH and it goes to ground. MAF
Pin A YE and it goes to X1-41 and is the MAF sensor signal.
Looks like you have this under control.
Edit: I also have the pinouts for the 6L80 if you need them but they are easy to find.
Last edited by 1989GTA; 02-15-2015 at 06:43 PM.
02-15-2015, 10:16 PM
#26
Launching!
Thread Starter
iTrader: (4)
Join Date: Jan 2007
Location: Medford, OR
Posts: 221
Likes: 0
Received 0 Likes
on
0 Posts
Thanks! So pin 17 and 58 provide a ground, and 50 provides positive voltage. I think I will retain the pin 50, fuel pump relay control. Unless there is some benefit to just going with key hot power direct to a relay to power it?
I have the trans pinout, but haven't looked too hard at it yet. I don't imagine I will have to do too much with it? Most of it should already be hooked up? Just the 3 wires from the ecm I've noted in my diagram need to be hooked up, and ensure it has power and ground? I'm not sure what the extra GM LAN is for, it doesn't look like that goes to the BCM, or if it's important/needed?
So far most of this wiring I'm looking at seems pretty straight forward, I'm just not real sure about the GM LAN +- stuff??

I took a look at the MAF stuff last night, it appears to be already wired correctly for the Camaro card style maf. Lucky for me, it even takes the same plug as I plugged a camaro maf into it last night.
As I don't have the factory fuse/relay block, I'm going to have to make some kind of setup, or come up with something aftermarket... Looks like I'll need 3 relays, maybe 4? Not sure how many fuses I'll need.
I have the trans pinout, but haven't looked too hard at it yet. I don't imagine I will have to do too much with it? Most of it should already be hooked up? Just the 3 wires from the ecm I've noted in my diagram need to be hooked up, and ensure it has power and ground? I'm not sure what the extra GM LAN is for, it doesn't look like that goes to the BCM, or if it's important/needed?
So far most of this wiring I'm looking at seems pretty straight forward, I'm just not real sure about the GM LAN +- stuff??
I took a look at the MAF stuff last night, it appears to be already wired correctly for the Camaro card style maf. Lucky for me, it even takes the same plug as I plugged a camaro maf into it last night.
As I don't have the factory fuse/relay block, I'm going to have to make some kind of setup, or come up with something aftermarket... Looks like I'll need 3 relays, maybe 4? Not sure how many fuses I'll need.
02-15-2015, 11:05 PM
#27
On the 6L80 transmission pin 7 is one of the keys if you plan on doing the TUTD feature and are not running a body control module(Corvette style). I added the purple wire at pin 7 and ran it into the cabin area, so if I decide to add the TUTD feature it will make it easier to do.
Now also out of the 6L80 you will have to run one set of the GMLAN serial data wires to the ALDL connector in your car. Not sure which set goes where without looking it up. One set obviously comes from the E38ECM and the other goes to the ALDL in connector that is usually under the dash or some convenient spot.
If you use a body control module than the set would run to that and the set coming out of the module would go the ALDL conector. Every thing is daisy chained.
Last edited by 1989GTA; 02-15-2015 at 11:13 PM.
02-15-2015, 11:34 PM
#28
Launching!
Thread Starter
iTrader: (4)
Join Date: Jan 2007
Location: Medford, OR
Posts: 221
Likes: 0
Received 0 Likes
on
0 Posts
When you say ALDL connector, you mean the obd ii connector in the car?

I think the LAN stuff is throwing me for a loop because I'm trying to piece it together in my mind with things I don't have (like the BCM), the circuit numbers don't match up so IDK if they can be connected or not... The circuit numbers for the LAN on this connector don't match up with either the ECM or trans plug numbers.
I'm probably getting too far ahead of myself.
I will add a wire to pin 7 on the trans connector, I would like to figure out a way to make the TUTD work, preferably without the BCM as I don't have one.
02-16-2015, 02:49 AM
#29
Launching!
Thread Starter
iTrader: (4)
Join Date: Jan 2007
Location: Medford, OR
Posts: 221
Likes: 0
Received 0 Likes
on
0 Posts
Looks like you have to good plan! If you are planning on using the harness that came with the engine check and make sure the X1 was included. Just like on the GTO, the G8 donor harnesses are often missing that connector!
I look forward to the updates! That was a real nice score at $800!
Bill
I look forward to the updates! That was a real nice score at $800!
Bill
I guess I'll just hack the X102 connector off and connect what I can from the X1 to what's there (MAF connection wires, etc)...
I've also identified the other random connector with the white covers on one side... it's part of the bottom side of the fuse box that SHOULD HAVE come with the damn drop out. Basically this is where the power/fuses/relays would have gone, if I only had the top side where all the fuses/relays and crap plug into...
So I think I've basically identified what I'm missing and why I'm missing it... for the most part. In my searching there seems to be a lack of G8GT specific info, "G8"*space*"GT", or either of the two is too short to search for so searching doesn't help much, but G8GT will come up in a search if anyone ever comes across this. I'll post this for future reference for G8 swappers, hopefully it will help someone down the road.
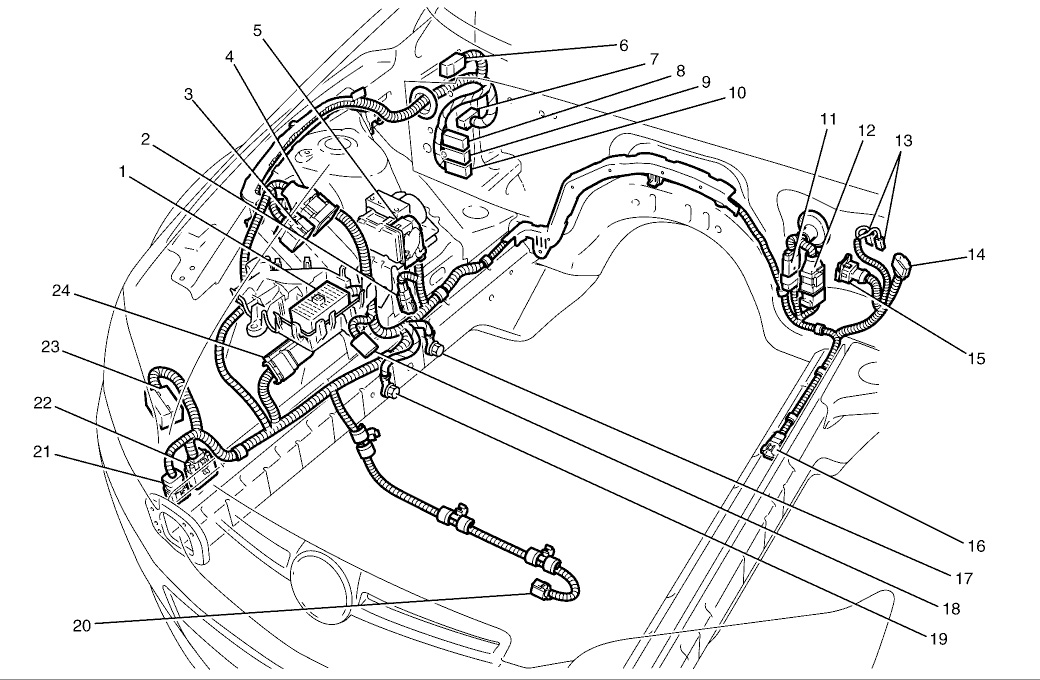
1 - Fuse Block - Underhood - X124
2 - Body Front Harness to RF Wheel Speed Sensor Connector - X161
3 - Engine and Transmission Wiring Harness Connector 3 - X103
4 - Engine and Transmission Wiring Harness Connector 1 - X102
5 - Electronic Brake Control Module (EBCM) - A116
6 - Transmission Control Module (TCM) Connector - A112 (4L60E)
7 - Body Wiring Harness Connector 1 - X206
8 - Instrument Panel Wiring Harness Connector 3 - X200
9 - Instrument Panel Wiring Harness Connector 4 - X204
10 - Instrument Panel Wiring Harness Connector 5 - X207
11 - Instrument Panel Wiring Harness Connector 2 - X203
12 - Instrument Panel Wiring Harness Connector 1 - X104
13 - Theft Horn Connector - B9-X1 & B9-X2
14 - Windshield Wiper Motor Connector - M17
15 - Brake Fluid Level Switch Connector - S36
16 - Body Front Harness to LF Wheel Speed Sensor Connector - X160
17 - Right Chassis Rail Ground - G101
18 - Engine and Transmission Wiring Harness Connector 2 - X110
19 - Right Chassis Rail Ground - G102
20 - Automatic Headlamp Levelling Sensor Connector- B179 (Long Wheel Base)
21 - Body Front to Front Fascia Wiring Harness Connector - X108
22 - Front Compartment Wiring Harness Connector 1 - X106
23 - Automatic Headlamp Levelling Module Connector - A172 (Long Wheel Base)
24 - Engine Control Module Connector - A43-X1
I still haven't identified everything I have/don't have connector wise, but I'm much farther ahead than I was. It still doesn't seem like I'm too bad off yet harness wise as for the most part I think I know what I need to do with it.
I'm guessing with the GM LAN stuff that's been confusing me nothing really matters as far as circuit number, as long as I connect LAN + to LAN + and LAN- to LAN- and it should just work?
And Bill, at the very lest I think I will be buying the premium diy harness kit (fuse/relay harness) setup from you, after I do some more research on the harness I have and diagram searching, I may just through in the towel and buy the H407 harness from you.
02-16-2015, 04:55 PM
#30
Yes the OBD2 port/connection. Here is what you will have to do.
Out on the 6L80 connector Pin 10 goes to pin 6 of the OBD2 port. Pin 11 on the 6L80 goes to pin 14 on the OBD2 port. A 120ohm resister needs to go across pins 6 and 14 at the OBD2 port connector. That signals the end of the LAN serial connection. The voltages and ground at the OBD2 connector are straight forward.
Out on the 6L80 connector Pin 10 goes to pin 6 of the OBD2 port. Pin 11 on the 6L80 goes to pin 14 on the OBD2 port. A 120ohm resister needs to go across pins 6 and 14 at the OBD2 port connector. That signals the end of the LAN serial connection. The voltages and ground at the OBD2 connector are straight forward.
Last edited by 1989GTA; 02-22-2015 at 12:01 PM. Reason: Revised wording.Changed pin 7 to pin 6.
02-20-2015, 08:11 PM
#31
Launching!
Thread Starter
iTrader: (4)
Join Date: Jan 2007
Location: Medford, OR
Posts: 221
Likes: 0
Received 0 Likes
on
0 Posts
Yes the OBD2 port/connection. Here is what you will have to do.
Out on the 6L80 connector Pin 10 goes to pin 6 of the OBD2 port. Pin 11 on the 6L80 goes to pin 14 on the OBD2 port. A 120ohm resister needs to go across pins 7 and 14 at the OBD2 port connector. That signals the end of the LAN serial connection. The voltages and ground at the OBD2 connector are straight forward.
Out on the 6L80 connector Pin 10 goes to pin 6 of the OBD2 port. Pin 11 on the 6L80 goes to pin 14 on the OBD2 port. A 120ohm resister needs to go across pins 7 and 14 at the OBD2 port connector. That signals the end of the LAN serial connection. The voltages and ground at the OBD2 connector are straight forward.
No progress so far on the engine... Ordered a replacement coil and an ecm mount.
I bought this modified truck pan from Alwhite00 a few days ago...

It's already been shortened so this will save me quite a bit of time modifying the stock pan I have... I may still have to modify the front to clear the center link, possibly have to replace the radius-ed area with a hard 90 degree piece of angle or something, but too soon to tell. Either way, I'm going to save a ton of time with the pan, thanks for the great deal Alwhite00!
In non-swap related car news, I think I mentioned I'm going to piece together my own disc brake setup for the front. Essentially the same idea as buying the Kore3 brackets, and scrounging up some c5 vette parts... Except I picked up some Brembo calipers off a 2014 ATS, and I will be making my own brackets. I will end up buying the kore3 brake lines. Bought the calipers for $230 loaded, off a car with only 14k miles. They are a lot bigger than they looked on the ebay pictures!!! WOW! The rotors are Centric StopTech Sport, slotted, best deal I could find on them was Rock Auto for $80 ea.

I'm going to attempt to get the drum brakes off one side get the rotor on, and come up with the mounting bracket template tomorrow. Maybe even get the brackets cut out if this goes easy... rotors are basically the same size as the c5 rotors, so I'm thinking if I'm lucky, these will work with my current 17" wheels.
02-20-2015, 09:05 PM
#32
Here is how my OBD2 connector is wired. The pins I used. I did not use pin 1 as that appears to be for the low speed Can wire.
4. Ground
5. Ground
6. Can High
14. Can Low
16. Battery +12V
I have a 120 ohm resistor across pins 6 and 14.
From what I have been told 13" rotors are about it for 17" wheels. Nice score on the brakes and oil pan.
4. Ground
5. Ground
6. Can High
14. Can Low
16. Battery +12V
I have a 120 ohm resistor across pins 6 and 14.
From what I have been told 13" rotors are about it for 17" wheels. Nice score on the brakes and oil pan.
02-20-2015, 10:22 PM
#33
Launching!
Thread Starter
iTrader: (4)
Join Date: Jan 2007
Location: Medford, OR
Posts: 221
Likes: 0
Received 0 Likes
on
0 Posts
Here is how my OBD2 connector is wired. The pins I used. I did not use pin 1 as that appears to be for the low speed Can wire.
4. Ground
5. Ground
6. Can High
14. Can Low
16. Battery +12V
I have a 120 ohm resistor across pins 6 and 14.
From what I have been told 13" rotors are about it for 17" wheels. Nice score on the brakes and oil pan.
4. Ground
5. Ground
6. Can High
14. Can Low
16. Battery +12V
I have a 120 ohm resistor across pins 6 and 14.
From what I have been told 13" rotors are about it for 17" wheels. Nice score on the brakes and oil pan.
The rotors are about 12.637" (321mm)... I'm not sure if the brakes are a score yet or not, that depends on if I can make them work... Of course I can never take the easy route on anything

Definitely scored on the pan.
02-22-2015, 11:31 AM
#34
Teching In

Join Date: Dec 2010
Location: alberta canada
Posts: 9
Likes: 0
Received 0 Likes
on
0 Posts
reading about your project and we both are useing the same combo from a 2009 g8.I was told that the belt drive is the same offset as the Corvette from Edelbrock,thats the kit to use if you want to use there E Force super charger.I'm just about to set the motor and transmission in the frame with the body off but your info on the harness with be of great value when the time comes.
02-23-2015, 12:19 PM
#35
Teching In
iTrader: (1)

Join Date: Oct 2014
Location: Ohio
Posts: 24
Likes: 0
Received 0 Likes
on
0 Posts
Had a 2009 G8 GT and damn I miss that car. The 6.0 got it down the road pretty good I am sure your Chevelle will be a fun ride with that in there. Love the modern stuff going into classics.
02-25-2015, 09:08 AM
#36
Teching In

Join Date: Nov 2014
Posts: 12
Likes: 0
Received 0 Likes
on
0 Posts
I'm doing the same G8 GT 6.0L/ 6L80E swap into my 67 Chevelle. I just finished the frame off portion with the CPP protouring stage 3 upgrade. I'm just now starting the engine/tranny installation. I'll make a build thread soon and follow yours, I'm sure we can help each other out quite a bit. I sent out my harness to be redone, it was $300 from My-efi.com . He did a hell of a job, very fast and tailored to my build.
02-25-2015, 10:09 AM
#37
Launching!
Thread Starter
iTrader: (4)
Join Date: Jan 2007
Location: Medford, OR
Posts: 221
Likes: 0
Received 0 Likes
on
0 Posts
reading about your project and we both are useing the same combo from a 2009 g8.I was told that the belt drive is the same offset as the Corvette from Edelbrock,thats the kit to use if you want to use there E Force super charger.I'm just about to set the motor and transmission in the frame with the body off but your info on the harness with be of great value when the time comes.
I'm doing the same G8 GT 6.0L/ 6L80E swap into my 67 Chevelle. I just finished the frame off portion with the CPP protouring stage 3 upgrade. I'm just now starting the engine/tranny installation. I'll make a build thread soon and follow yours, I'm sure we can help each other out quite a bit. I sent out my harness to be redone, it was $300 from My-efi.com . He did a hell of a job, very fast and tailored to my build.
I'll be sure to watch both of your threads if/when you get them started. At the moment, I'm still leaning towards doing my own harness, so more wiring info and diagrams will most likely be popping up on here as I move forward with that area.
Back to my car, I'm still working on figuring out the front disc setup. I'm close, but ran into a snag. The issue at the moment is that the wheels hit the face of the calipers because they are too wide (Cadillac ATS/CTS 4 piston Brembo). Would have been fine with some 2 piston calipers.

Caliper/Rotor propped up w/ the hammer in the position I want the calipers. This position was chosen as it clears everything fine. I was able to use compressed air for a blower nozzle in the hydraulic hose to force the pistons out to clamp onto the rotor, then put a vise grip on the hose to keep it pressurized to maintain clamping force. Neat trick.
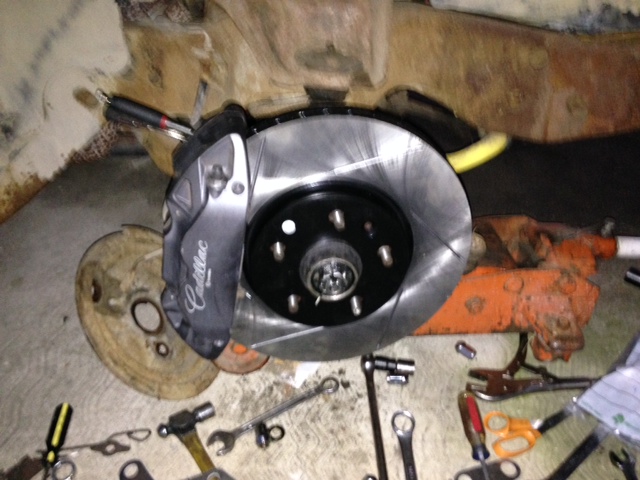
Air released and caliper supported by the trial mounting bracket.
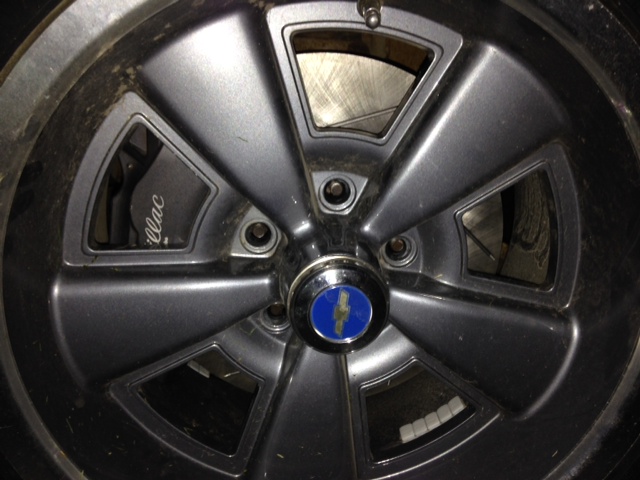
Looks cool, but wheel hits the caliper as you can see. I think if I had different wheels, there is a good chance I wouldn't have this issue, but I'm not willing to change the wheels.
An easy fix would be to just run a wheel spacer. An 8mm spacer would allow more than enough clearance. I already made one spacer, but I'm going to try a rotor with a different offset first which would pull the caliper back from the wheel. I've got a rotor coming with about 9.1mm more offset to it, should be here Friday. I'll have to open up the center hub bore on the rotor by .211", but I don't think that's a deal breaker. If this rotor doesn't end up working for me, I'll either just run the wheel spacer with the original rotors or just sell everything I have here on ebay and go with the original plan of the C5 brake stuff.
This is what happens when I try to get creative

Oh, and I plan on repainting/coating the calipers if I can make them work and I will mill/engrave the "Chevelle" script in them... I can't decide if I want to coat them a similar gray (heat dissipation coating), or a red (ceramic coating)... I think the heat dissipation coating would probably be better performance wise, but the red ceramic coating may look better?
Last edited by RacnJsn95; 02-25-2015 at 10:18 AM.
02-27-2015, 02:31 PM
#39
Teching In

Join Date: Feb 2015
Posts: 8
Likes: 0
Received 0 Likes
on
0 Posts
I just picked up a LS3/L92 with a 6L80 for my 71 Chevelle and im curious if you guys know what is or isn't involved in getting that trans to fit in the tunnel. I heard if you get the trans tuned to your set up its ridiculous so I hate to go to something else and drop more money. Im not experienced at all with metal work but I really want to try to tackle this myself if it isn't to involved or at least know what needs to be done if I take it somewhere. Have you had a chance to see what you need to do to make it work yet? has anyone seen any other threads with photos that could help me out? Thanks