When you click on links to various merchants on this site and make a purchase, this can result in this site earning a commission. Affiliate programs and affiliations include, but are not limited to, the eBay Partner Network.
Received the harness mod/fuse/relay box kit from BP-Automotive. It's a pretty nice looking piece for what it is I guess... Just got to figure out how to wire it in and finish the harness.
Comp finished and shipped my custom grind cam 3 weeks ahead of schedule from when I was told it would be shipped. I'll have it Saturday. My crap from BTR (DOD/AFM delete kit, valve spring kit, other random crap) will be here tomorrow. Pretty much just waiting on the heads now, I have to ship the spring kit out so they can be assembled after the valve job. I'll ship the springs out to Bo White (porting a set of LS3 heads for me), and the LS3 intake out to RCR next week.
Picking up the heat dissipation coating for the calipers today, I'll get them prepped for coating maybe this weekend, maybe coat them next week and engrave the Chevelle script.
I'll start pulling the old engine and trans out of the car in the next couple weeks while I'm waiting for the rest of the 6.0 engine parts. Make up some engine mount plates and get the mock up block in the car?
Are you still modifying the majority of your harness yourself?
That's the plan. The harness that came with my engine didn't have a fuse/relay box, and some of the other stuff that was attached to the car is missing (like the gas pedal wiring/plug, obd ii plug, etc)...
the harness mod from BP-automotive looks to be a fuse box/relay panel that has the wiring I'm missing. Just splice this in with my existing harness, and I should be set?
Looks nice! I planning to follow the instructions on LT1swap.com for how to wire in the OBDII port, and add the relays. I'm running to my existing fuses in my Jag. Hopefully. haha.
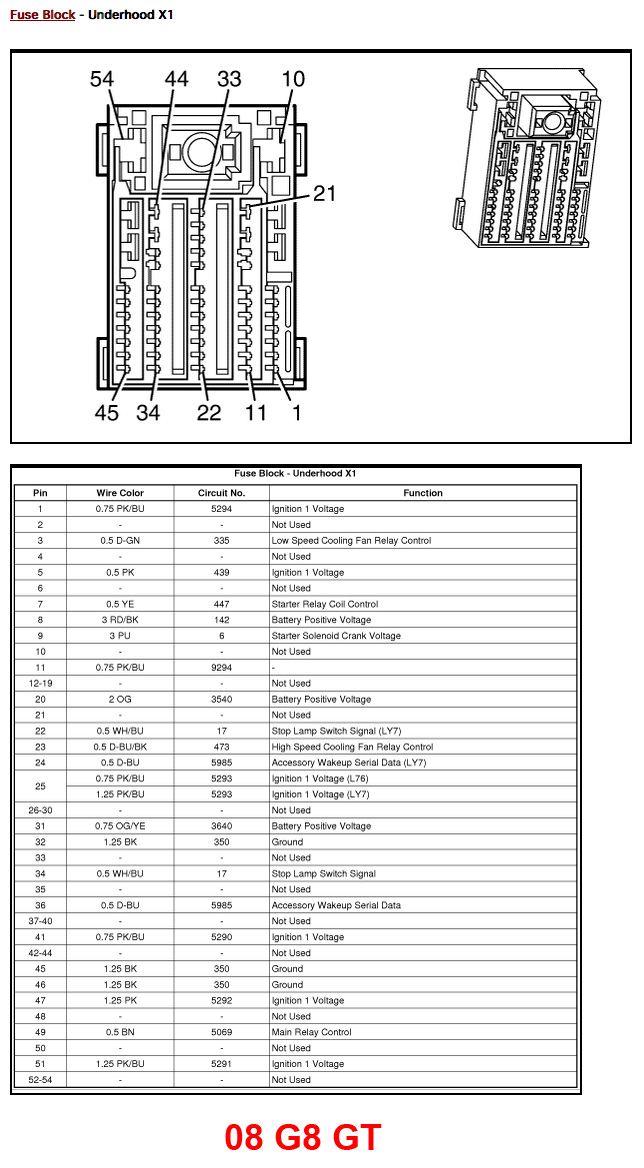
Did you ever find a pin out for that big connector that's in the engine harness and goes to the fuse block?
That's the plan. The harness that came with my engine didn't have a fuse/relay box, and some of the other stuff that was attached to the car is missing (like the gas pedal wiring/plug, obd ii plug, etc)...
the harness mod from BP-automotive looks to be a fuse box/relay panel that has the wiring I'm missing. Just splice this in with my existing harness, and I should be set?
Looks nice! I planning to follow the instructions on LT1swap.com for how to wire in the OBDII port, and add the relays. I'm running to my existing fuses in my Jag. Hopefully. haha.
Did you ever find a pin out for that big connector that's in the engine harness and goes to the fuse block?
I had looked for it before, but couldn't find it because I didn't know what it was. I only just realized what it was when I started working on my harness.
Anyway, the "Underhood fuseblock X1" is the bigger part on the left in my picture with the White-er cover. This is the connector you were holding up in the wiring diagram thread. I also have the "Underhood fuseblock X3" hooked to mine still, shown the smaller brownish tinged cover on the right in my picture. Not really needed because it's mainly just for the headlights, signals, etc.
Basically from the looks of it, the BP-Auto harness mod fuse/relay setup I bought will replace that "Underhood fuseblock X1", and then some.
Thanks for posting that! I just happened to find it last night while searching the interwebs too. That's definitely the one I was looking for.
I dug into the harness a bit more, and found the O2 plugs I needed. Annoyingly the pinout diagrams show the V6 O2 sensor plugs looking the same as the rear "Sensor 2" plugs, the inline 4 pin, as opposed to the square 2x2 pin style they are. Of course had I just opened the box for the new O2 sensors, I would have noticed this.
Going to have to dig into the MAF thing more, I swear there's a plug that matches the MAF in my harness near the driver side front of the engine, which is the side the MAF was on (I thought), but looking through the pinouts, I see what you mean about the MAF wires being in the X1 plug (I'm for sure missing the 73 pin connector, and have the 80 pin).
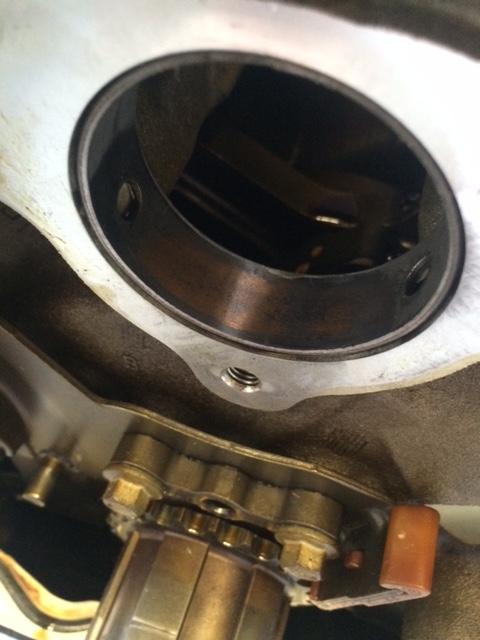
It looks like the signal for the MAF might pass through via the X102, Engine to body harness. Which I have the plug for, so maybe the signal is being routed through that, back in to the X1 plug for the ECM.
X102, see pic below, Do you have this plug on your harness?
You probably DO have the maf plug, but a section of the harness may be missing. That was my problem. Like half of the important wires for the ECU X1 plug run through the X102 plug above. Because I was missing the other half of the X102, I don't have the "body side" related parts of the harness like the accelerator pedal, CEL, etc. Took me a while of staring at diagrams, body harness diagram in the link above, and my own G8 to figure it all out. Why it splits off in so many places, I don't know.
Here you can see I re-attached what I could from the X1 plug to the end of the X102 (part of the X102 plug, shown yellow on the left-center of the pic), including all of the MAF wires to my existing MAF plug of the drivers side front of the engine.
Hope this makes sense and helps you.
*edit* I see you already figured that out, you're on the right track from what I can tell... Unless I'm totally wrong, then we're both screwed.
Yeah, I have the plug in the hand pictured, my harness doesn't appear to be cut anywhere. I have the X1 underhood, and the X2 ECM plugs. Mine unfortunately was completely missing the X1 ecm plug. I wish I had the partial like your's. I'm hoping/planning to do like you did, but add pins and recreate the X1 plug from parts I ordered.
Mine did come with a pedal, and the pigtail plug for the pedal, I just need to pull the wires or extend them and put them in the X1 ecm plug. I think I get which ones I need from the LT1swap diagrams. I agree it was confusing at first with the yellow and blue, until I looked through the older diagrams to see yellow meant delete and blue was keep. The orange connections for the gas pedal make that fairly easy, and the colors all match with the pigtail plug that came with my pedal. Unfortunately the bigger issue with the pedal for me, is figuring out how to mount it in my car.
I don't know if you've seen this work in progress: X1 diagram for G8
The diagram is correct for the G8 pedal. I'm going to be using a Camaro pedal as 1) I already have one from a previous project, 2) Much cheaper to replace than the G8 pedal if I ever have to replace it. I'll have to swap some wires around for the Camaro pedal.
Nice thing about the BP-Auto harness mod when you purchase it for the Gen IV, it comes with the pedal pigtail, and obd ii pigtail with what looks like enough wire to wire them to the ECM plug, so now I have all the plugs/wiring that I was missing along with a fuse/relay panel.
Yes, I saw that diagram. I need to print it out and add it to my pile of charts and pinouts.
I'm putting the engine in a '99 Jaguar XK8. Using most of a kit from Jaguar Specialties, which allows CAN communication to keep the stock gauges, AC, and everything. So I have some different wiring things going on for that also.
I would like the 6L80 to be shifted from the column shifter, so I imagine I'll have to come up with a cable affair? I think I've seen something used in 1989GTA's skylark build?
This is supposed to work with the column shifter and a 6L trans.
RacnJsn95 -
I've been following your build and I really love those Chevelles! My first car was a 72, and I've owned 70 through 72 body styles since then and still really like them. Great info on all the wiring stuff and I also enjoyed the milling practice. Keep it up!
RacnJsn95 -
I've been following your build and I really love those Chevelles! My first car was a 72, and I've owned 70 through 72 body styles since then and still really like them. Great info on all the wiring stuff and I also enjoyed the milling practice. Keep it up!
Thanks, I appreciate that! Your Ford is coming along amazing. Way above and beyond anything I'm doing here. I'm just trying to get the engine/trans in the car and get it drivable, not a lot of upgrading and keeping the body on the frame. I'll throw a quick paint job on it down the road after it's drivable. That will have to hold me over until I win the lottery and can do a frame off.
This is my 4th Chevelle, my first car was a 71 Chevelle. I also owned a 67 and a 68 but decided I wanted to go back to this body style and do all the things I've always wanted to do and keep it.
As for the wiring info, I'm not sure how much of it is good for anything other than the G8 harness. It seems to always be a pain due to how it's removed from the car.
Well the calipers are now coated. They turned out pretty good for the most part, a couple small blemishes on them, but you'd have to really be looking for them to see them once they are on the car.
In my mind, I figured it would be best to put a heat dissipation coating on them, as in theory, ceramic or powder coat would only retain heat inside the caliper? Because of going this route I was limited to this "Transfer Grey" or black... Didn't want black. The Grey come out a lot lighter than I imagined it would. I'm wondering if the milling will even be noticeable now?
So now I'm debating maybe just cutting a vinyl template and spraying the Chevelle script onto the calipers in a darker Ceramic coat??? Similar to the way it was before with the Cadillac script painted on...
It would look similar to this as far as the color contrast:
I'm lucky enough to live right down the street from NIC Industries and can buy various coatings in various sizes. The calipers took only 2oz of a 4oz tester bottle of the Transfer Grey (only $35)... I can buy another 4oz tester of a darker ceramic coating for another $35 and just spray it on... I think it would still look good. Idk...
I've been out of town on vacation for the past 10 days so not much has been accomplished recently.
I did pull the cam out this weekend. The cam bearings seem a little worn from looking at them. I've a couple different opinions on that, 1)GM line bores/hones the bearings after they have been put in, and some copper showing is normal 2)they are worn and should be changed. I was hoping not to change them, but am seriously considering it... Pics of a couple of the bearings and cam journals below:
Obviously I won't be using the cam as I have a new Comp cam to put in, but I'm leaning toward changing the cam bearings. Thoughts?
While I was out of town my speedhut gauges came in. I think they look pretty good. A little different than I was thinking they would look on the speedhut customizer, but I think they will work out just fine. Probably went a little overboard with the logos but oh well.
I had ordered a complete used dash in good condition off ebay, but once UPS got done with it it was pretty busted up so I ended up returning it and getting a refund... Still up in the air as of right now on exactly how I will get the gauges into a dash, but leaning toward something along the lines of using SuperDave's techniques with his dashes I've seen.
How's it coming? Did you end up coating a logo on the calipers? That would look good I think, but your machining options look pretty slick too. I wish I could make some logo's like that.
Nice gauges too. How's the wiring coming? I got mine wired up and fit on the car, and got the car to fire. I'm trying to switch to a different pedal, since the G8 pedal won't mount in our Jag. I just need to figure out how to change it in my hptuner software. Now I'm going to finish taping and looming the harness, now that I know it works.
I have the GMPP-2 oil pan and there is no place for the dipstick or oil sensor like on the L76 pan. Anyone have a solution? Do I need to sensor? I am not sure if the dipstick hole that is plugged is in the right spot to reach the oil sump, is there a replacement dipstick?
I switched to a GTO oil pan for my swap (which is a different car), and it had a dipstick hole. But it doesn't have the oil level/temp sensor. I'm hoping to shut that sensor off via hptuners in the ECM.


 04-09-2015 | 05:54 PM