

Porsche Boxster S L33
 03-27-2015, 02:51 PM
#41


Since you already have the Boxster 6 speed, I'd suggest you work directly with Kennedy Engineering for your adapter plate/clutch/flywheel. I've been to their shop a couple of times; they're really good guys, and know their stuff! They have a very good reputation, and their quality is always highly regarded.
I have a Porsche 914/LS1 with and Audi 01E 6 speed transaxle, but the fabrication required for it to mate up with axles, CV's, and mounting scheme can was a challenge.
Andy1
I have a Porsche 914/LS1 with and Audi 01E 6 speed transaxle, but the fabrication required for it to mate up with axles, CV's, and mounting scheme can was a challenge.
Andy1
great 914 Andy! if it goes up for sale sometime in the future would like to know

 04-06-2015, 10:47 PM
#42
On The Tree
Thread Starter
iTrader: (1)
Join Date: Dec 2014
Location: Toronto, Canada
Posts: 142
Likes: 0
Received 0 Likes
on
0 Posts
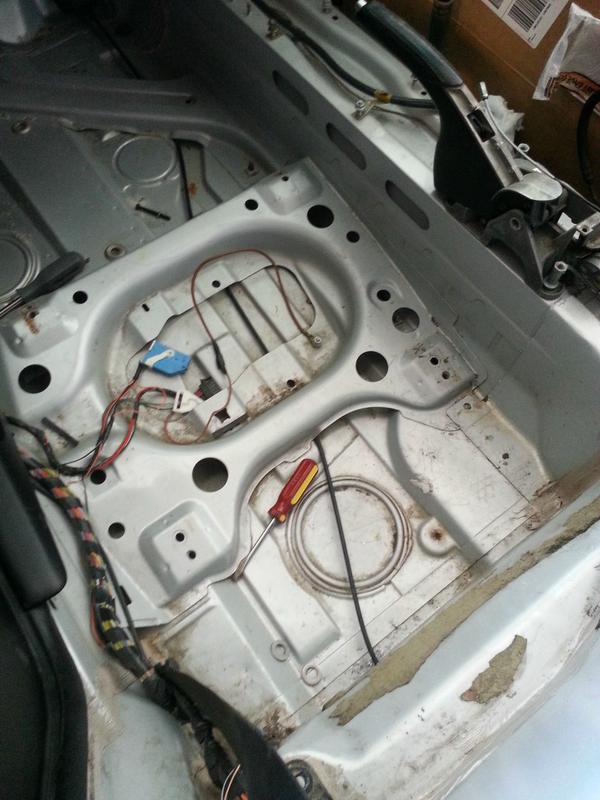
There�s still no word on the status of the mounting kit, so I guess for now I just have to suck it up and wait. Today I started cutting the engine compartment to make clearance for the engine. It was a lot harder than I thought, the sheet metal is reinforced and having the car on jack stands does not provide enough room. I found it was easier to first drill out all the tack welds on the reinforcements to detach them from the actual sheet metal. This makes cutting and bending away the metal much easier. There was quite a bit of water in the enclosed compartment, which got me a little worried, but thankfully there was no rust.
Today I only had enough time to do a rough cut on the left side, but hopefully tomorrow I can finish it up if I can find my rotary tools. I also plan on making a reinforcement brace to replace all the missing sheet metal and also make relocation bracket for the e-brake.
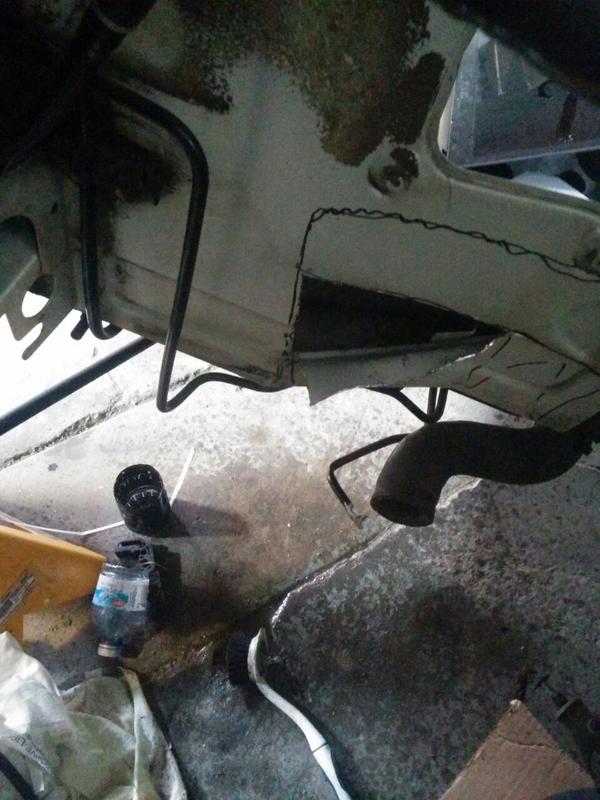
The puddle on the floor is all the water that came out


Today I only had enough time to do a rough cut on the left side, but hopefully tomorrow I can finish it up if I can find my rotary tools. I also plan on making a reinforcement brace to replace all the missing sheet metal and also make relocation bracket for the e-brake.
The puddle on the floor is all the water that came out
04-09-2015, 07:53 PM
#43
On The Tree
Thread Starter
iTrader: (1)
Join Date: Dec 2014
Location: Toronto, Canada
Posts: 142
Likes: 0
Received 0 Likes
on
0 Posts
Today I managed to finish cutting up the engine bay. It took much longer than I had planned. Make sure you have all the right tools before you begin this one; a rotary tool and an angle grinder a must. If you don�t have a car lift, expect to spend 4-6 hours in there. I would also suggest drilling out all the tack welds first, that way you can just pull some metal off.
Tomorrow I�m picking up a flat steel bar for a brace. I will have to stiffen up the chassis to make up for all the sheet metal that�s been cut. The hand brake splitter will also mount to the brace.


Tomorrow I�m picking up a flat steel bar for a brace. I will have to stiffen up the chassis to make up for all the sheet metal that�s been cut. The hand brake splitter will also mount to the brace.
04-15-2015, 02:56 PM
#44
On The Tree
Thread Starter
iTrader: (1)
Join Date: Dec 2014
Location: Toronto, Canada
Posts: 142
Likes: 0
Received 0 Likes
on
0 Posts
Hey guys,
I just spoke to Renegade yesterday, the kit should be on its way next week! I also started fabricating the reinforcement plate to replace all that metal that I cut out, but I have no pictures to show you. I probably won't be welding it in until I get weld-thru primer and good aerosol 2K primer. I might also get some seam sealer to seal the welds and keep the moisture out. There was a whole bunch of water inside the body when I was cutting it up, so just want to make sure the reinforcement plate doesn't rust.
Since it's been a little slow lately, I decided to run up the total for my build up to this point. You can find the updated BOM here. This does not include everything, I still need: seats, brake lines, starter, alternator, belt, power steering fittings, headlights, water pump, water hoses, and whatever else I'm forgetting.
05-21-2015, 05:39 PM
#45
On The Tree
Thread Starter
iTrader: (1)
Join Date: Dec 2014
Location: Toronto, Canada
Posts: 142
Likes: 0
Received 0 Likes
on
0 Posts
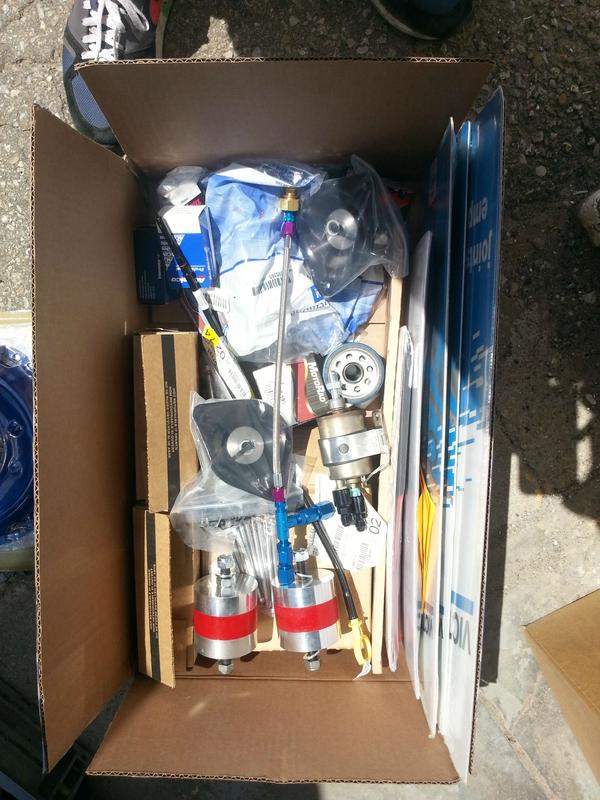
The kit finally arrived and this morning I was able pick up all my parts from the Niagara Falls mailbox. In total 21 packages! Had to pay $150 to the mailbox facility in storage fees while I way waiting on the delayed Renegade Hybrids kit and an additional $460 in border taxes.
There are still a few little things that I will have to buy as I go, but the majority of parts are here. Tomorrow I will begin on the motor assembly and possibly fit the renegade kit to see where everything goes.
My first impressions of the Renegade kit are mixed. The packaging was horrible! The boxes looked like they've been reused about a dozen times, and two of them had holes the size of a grown mans fist. I just hope that nothing fell out in transit. The overall quality looks pretty good, the welds look nice and the paint finish is excellent. All the hardware came in one huge bag with no labels or instructions. I feel like I will have to spend some time figuring out which bolts go where.
The Kennedy Engineering bits look amazing. You can tell that a lot of care went into the design and machining of their parts. Their kit also comes with an installation manual, but I haven't had a chance to look through it.
 05-22-2015, 07:21 AM
#48
Teching In

Join Date: May 2015
Location: Atlanta
Posts: 12
Likes: 0
Received 0 Likes
on
0 Posts
Anyone thinking of doing a Boxster S - LS conversion should spend an hour and read this build. It started last Fall and is almost road ready. Tons of pictures and details. Also, some really informative YouTube videos.
http://986forum.com/forums/show-tell...onversion.html
http://986forum.com/forums/show-tell...onversion.html
06-01-2015, 09:04 PM
#49
On The Tree
Thread Starter
iTrader: (1)
Join Date: Dec 2014
Location: Toronto, Canada
Posts: 142
Likes: 0
Received 0 Likes
on
0 Posts
Hey guys,
Sorry for the lack of updates recently. Last week I put together the engine and tranny. I am using a low profile LS2/LS3 oil pan for ground clearance. At 4.75", this is the thinnest OEM wet sump pan available. I had to get a new o-ring (blue) for the pickup tube, which cost a whoppig $14 from the dealership. I believe all LS pans are interchangeable, so there was no trouble there.
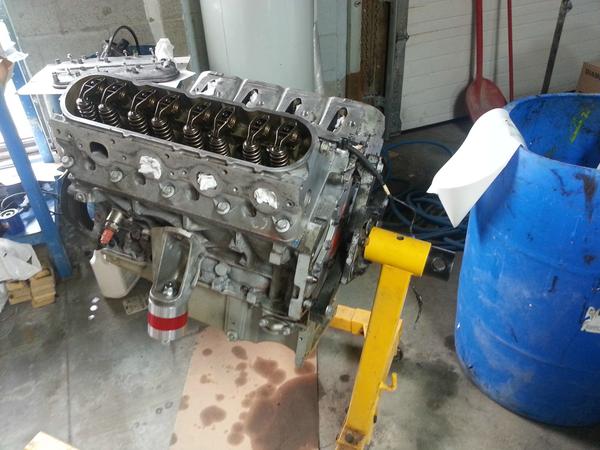
I am also using an LS1 intake manifold. The intake is rotated 180 degrees for clearance. I've heard of issues with the oil pressure sensor getting in the way with LS3 engines, but mine seems to be ok. Nonetheless, I plan on mounting both GM and Porsche oil pressure sensors on a 4 AN line remotely (I will make a post on this with a complete parts list when I'm done).


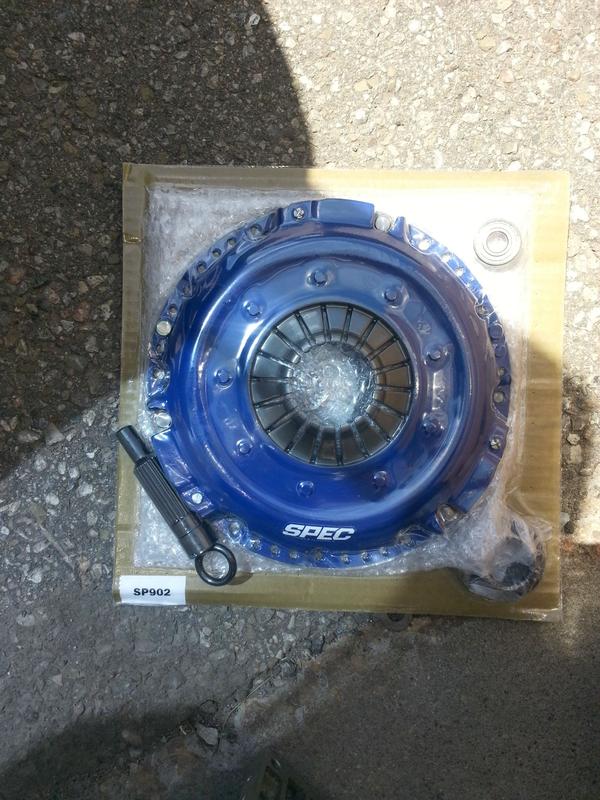
The Kennedy engineering adapter and flywheel look amazing. The adapter plate was slightly damaged during shipping, but it was nothing serious. The kit comes complete with hardware and instructions. I didn't purchase the optional KEP clutch, so I had to buy the pressure plate bolts myself. These are longer than the OEM Porsche bolts, so please give KEP a call to find what size you need.

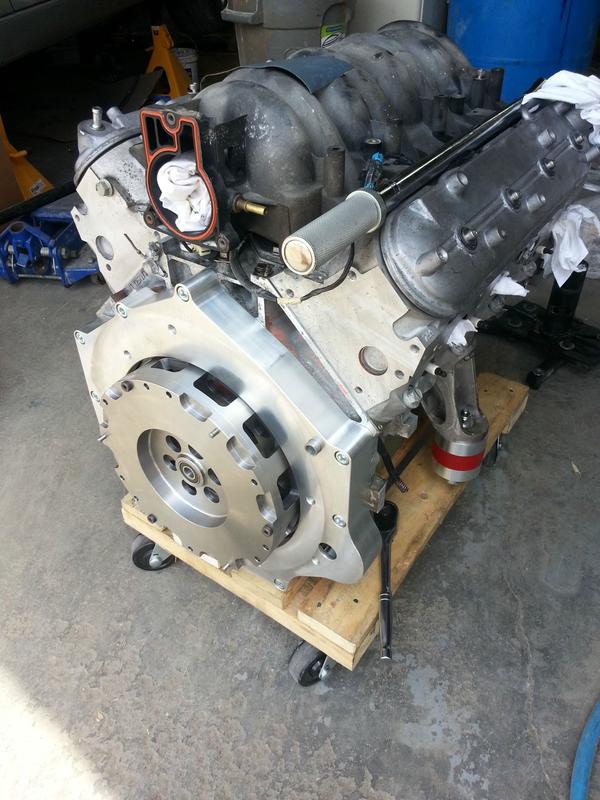
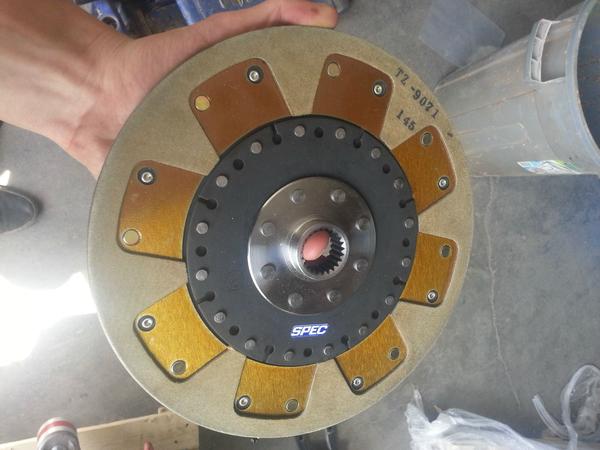
I was told that the Boxster S clutch will work for a 5.3L swap, but Kennedy Engineering suggested that I upgrade to a sprung hub disk. The new flywheel is no longer a dual mass design, hence a rigid disk might be a bit too harsh. The KEP clutch is amazing, but its close to $1000, so I had to downgrade to a SPEC Stage 2 clutch for $650. As I was putting everything together, I realized that I was actually sent a rigid disk. The online store where I had made the purchase admitted their mistake and offered me a full refund. I decided to give SPEC a call directly to see if I could just make swap with them instead of shipping everything back to the store. They told me that the Boxster clutch normally only comes rigid, but they could make a sprung disk for me free of charge if I just paid for shipping. I guess for now I'll just bolt up the tranny without the clutch to see how everything fits together.
I used a pallet jack to line up the transmission to the engine. This is pretty easy if you have the right equipment, but I would still suggest an extra set of helping hands.

The Renegade Hybrids kit wasn't so straight forward. All the hardware that comes with the kit is mixed in one ziplock bag. It's not that big of a deal, but it still takes a while to figure out which bolt goes where. I was short a few washers, a harmonic balancer spacer, and a belt pulley. Either these parts were never put in, or they fell out the massive hole in the box during shipping (Steve promised me that the replacements would be on the way shortly). The Wevo transmission mounts which you must purchase separately come with a the bolt and washer for the stock setup. I replaced mine with a 75mm bolt and ground down the square protrusion on the washer.

I had no issues with the rest of the Renegade kit except for clearance around the oil pan. I opened up the bolt holes a bit to allow for some extra clearance.

Sorry for the lack of updates recently. Last week I put together the engine and tranny. I am using a low profile LS2/LS3 oil pan for ground clearance. At 4.75", this is the thinnest OEM wet sump pan available. I had to get a new o-ring (blue) for the pickup tube, which cost a whoppig $14 from the dealership. I believe all LS pans are interchangeable, so there was no trouble there.
I am also using an LS1 intake manifold. The intake is rotated 180 degrees for clearance. I've heard of issues with the oil pressure sensor getting in the way with LS3 engines, but mine seems to be ok. Nonetheless, I plan on mounting both GM and Porsche oil pressure sensors on a 4 AN line remotely (I will make a post on this with a complete parts list when I'm done).
The Kennedy engineering adapter and flywheel look amazing. The adapter plate was slightly damaged during shipping, but it was nothing serious. The kit comes complete with hardware and instructions. I didn't purchase the optional KEP clutch, so I had to buy the pressure plate bolts myself. These are longer than the OEM Porsche bolts, so please give KEP a call to find what size you need.
I was told that the Boxster S clutch will work for a 5.3L swap, but Kennedy Engineering suggested that I upgrade to a sprung hub disk. The new flywheel is no longer a dual mass design, hence a rigid disk might be a bit too harsh. The KEP clutch is amazing, but its close to $1000, so I had to downgrade to a SPEC Stage 2 clutch for $650. As I was putting everything together, I realized that I was actually sent a rigid disk. The online store where I had made the purchase admitted their mistake and offered me a full refund. I decided to give SPEC a call directly to see if I could just make swap with them instead of shipping everything back to the store. They told me that the Boxster clutch normally only comes rigid, but they could make a sprung disk for me free of charge if I just paid for shipping. I guess for now I'll just bolt up the tranny without the clutch to see how everything fits together.
I used a pallet jack to line up the transmission to the engine. This is pretty easy if you have the right equipment, but I would still suggest an extra set of helping hands.
The Renegade Hybrids kit wasn't so straight forward. All the hardware that comes with the kit is mixed in one ziplock bag. It's not that big of a deal, but it still takes a while to figure out which bolt goes where. I was short a few washers, a harmonic balancer spacer, and a belt pulley. Either these parts were never put in, or they fell out the massive hole in the box during shipping (Steve promised me that the replacements would be on the way shortly). The Wevo transmission mounts which you must purchase separately come with a the bolt and washer for the stock setup. I replaced mine with a 75mm bolt and ground down the square protrusion on the washer.
I had no issues with the rest of the Renegade kit except for clearance around the oil pan. I opened up the bolt holes a bit to allow for some extra clearance.
06-01-2015, 09:04 PM
#50
On The Tree
Thread Starter
iTrader: (1)
Join Date: Dec 2014
Location: Toronto, Canada
Posts: 142
Likes: 0
Received 0 Likes
on
0 Posts
Today I finally managed to bolt in the engine for the first time. This was a very frustrating experience, especially trying to do this on my own using a set of stands and a pallet jack. At first I thought I could just roll the whole assembly in together and just bolt it all in inside. I played around with it for a few hours and failed miserably. There's just too many things to get in the way and too many holes to line up in one shot.
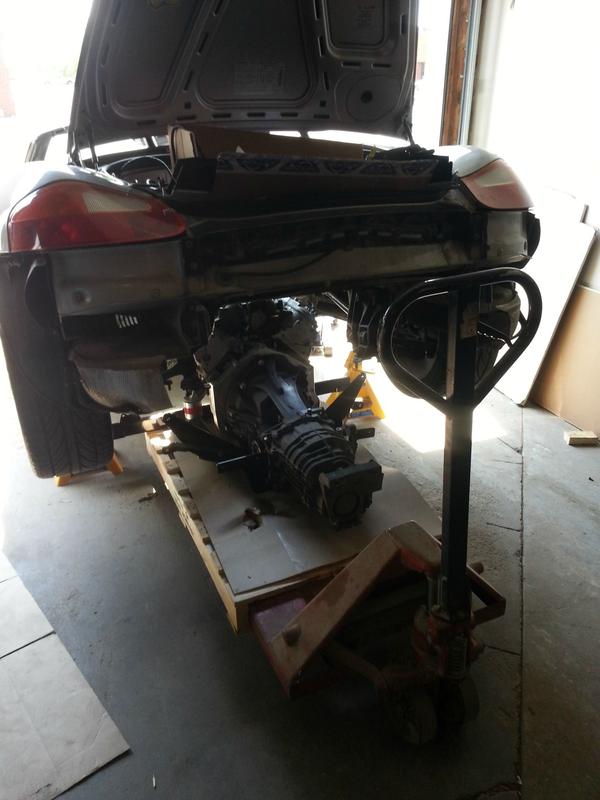
I partially disassembled the engine mounts and tried fitting everything piece by piece. This was still a huge pain in the butt, but at least I managed to put it all together. The clearance seems to be pretty good, and I don't expect to be doing much more cutting. I am a little more concerned about the air intake situation since there's only 6.75" of space between the manifold opening and the firewall.


The way it is now, the engine is slightly tilted towards the front. I may have to add some spacers to the engine or transmission mounts to level it out.
I partially disassembled the engine mounts and tried fitting everything piece by piece. This was still a huge pain in the butt, but at least I managed to put it all together. The clearance seems to be pretty good, and I don't expect to be doing much more cutting. I am a little more concerned about the air intake situation since there's only 6.75" of space between the manifold opening and the firewall.
The way it is now, the engine is slightly tilted towards the front. I may have to add some spacers to the engine or transmission mounts to level it out.
06-02-2015, 09:55 PM
#51
On The Tree
Thread Starter
iTrader: (1)
Join Date: Dec 2014
Location: Toronto, Canada
Posts: 142
Likes: 0
Received 0 Likes
on
0 Posts
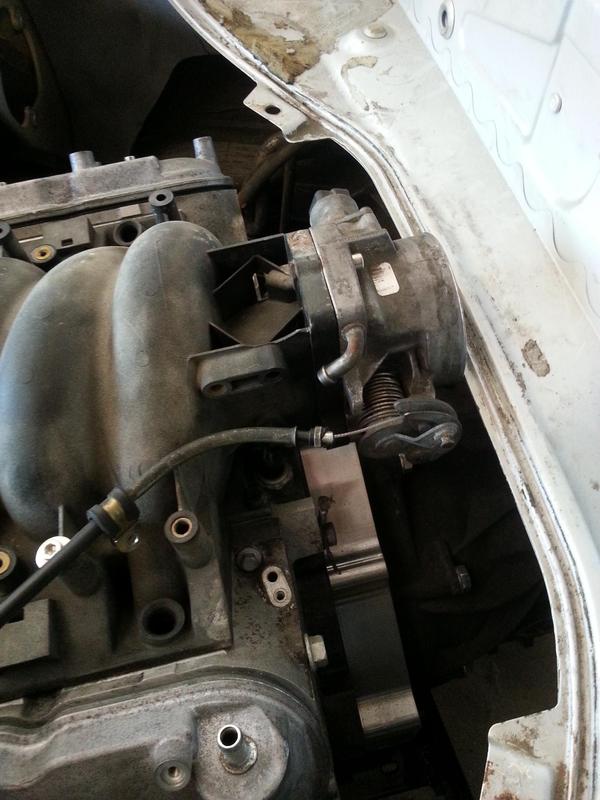
Today I tested an early 986 Boxster throttle cable to see how it would work with the engine. From what I�ve read on other blogs, the cable is too short and the pedal travel only gives you about 60% throttle. The only alternative is to run a drive by wire setup, which requires some fabrication to mount the GM pedal and a lot of money to buy the whole setup. I would have to get a C5 corvette ECU, harness, TAC module, and pedal. This setup is about $800 used if you can actually find it. I was able to find a cable and pedal setup from an early 986 Boxster for $50, so I decided to give it a try first (these are rare, but believe some pre 99 models came with cable throttle).
There are no mounts on the new chassis for the cable, but it�s easy enough to bolt on. The cable is perfect length and you get about 90% throttle without any modifications. If you grind down the pedal stop you can go up to about 95%, which I am happy with. I will have to figure out a custom throttle cable bracket, but that�s pretty much it. The other issue is the space for intake hoses, but that's a whole other project.


There are no mounts on the new chassis for the cable, but it�s easy enough to bolt on. The cable is perfect length and you get about 90% throttle without any modifications. If you grind down the pedal stop you can go up to about 95%, which I am happy with. I will have to figure out a custom throttle cable bracket, but that�s pretty much it. The other issue is the space for intake hoses, but that's a whole other project.
06-03-2015, 01:26 PM
#52
TECH Resident

What if you change the diameter of the pulley wheel on the throttle. Cut it down to a slightly smaller diameter and less cable pull will be required to achieve WOT.
Find one at a junkyard with a slightly smaller diameter and cut one off and weld the other one on?
OR modify yours.
Seems to be a big concession to leave 5% throttle on the table.
Doug
Find one at a junkyard with a slightly smaller diameter and cut one off and weld the other one on?
OR modify yours.
Seems to be a big concession to leave 5% throttle on the table.
Doug
06-03-2015, 04:23 PM
#53

What if you change the diameter of the pulley wheel on the throttle. Cut it down to a slightly smaller diameter and less cable pull will be required to achieve WOT.
Find one at a junkyard with a slightly smaller diameter and cut one off and weld the other one on?
OR modify yours.
Seems to be a big concession to leave 5% throttle on the table.
Doug
Find one at a junkyard with a slightly smaller diameter and cut one off and weld the other one on?
OR modify yours.
Seems to be a big concession to leave 5% throttle on the table.
Doug
Andy1
06-04-2015, 09:34 AM
#54
On The Tree
Thread Starter
iTrader: (1)
Join Date: Dec 2014
Location: Toronto, Canada
Posts: 142
Likes: 0
Received 0 Likes
on
0 Posts
What if you change the diameter of the pulley wheel on the throttle. Cut it down to a slightly smaller diameter and less cable pull will be required to achieve WOT.
Find one at a junkyard with a slightly smaller diameter and cut one off and weld the other one on?
OR modify yours.
Seems to be a big concession to leave 5% throttle on the table.
Doug
Find one at a junkyard with a slightly smaller diameter and cut one off and weld the other one on?
OR modify yours.
Seems to be a big concession to leave 5% throttle on the table.
Doug
I was considering something like this myself, but I think for now 95% is good enough until I get the big stuff sorted out.
Vlad
06-04-2015, 09:38 AM
#55
On The Tree
Thread Starter
iTrader: (1)
Join Date: Dec 2014
Location: Toronto, Canada
Posts: 142
Likes: 0
Received 0 Likes
on
0 Posts
It's hard to tell the color of the spring in the TB pictured to identify it, but it looks like an LS1. The LS1 has a blue spring and the angled-down hose connector and large throttle cam. The Truck TB has an orange spring and the has a rear pointed (horizontal) hose connector and small throttle cam. If that indeed is an LS1 TB, using the truck TB will shorten up the gas pedal travel quite a bit. The truck TB is the same intake diameter as the LS1 TB and it's way cheaper than an early Camaro TB with the small cam. Think I paid $35 for my truck TB with sensors.
Andy1
Andy1
Thanks for the tip. I will look into this. Any idea which models came with cable throttle? If I go this route, this will be my 4th TB purchased in the last 3 months haha
EDIT: I just did some research, but I couldn't find any orange springs. I found this one with a yellow spring . Any idea if that would work?
Vlad
Last edited by martsink; 06-04-2015 at 09:50 AM.
06-04-2015, 10:03 AM
#56
On The Tree
Thread Starter
iTrader: (1)
Join Date: Dec 2014
Location: Toronto, Canada
Posts: 142
Likes: 0
Received 0 Likes
on
0 Posts
It is possible, but I find there's a general lack of care when it comes to Renegade. Their products are great, but they need to step up their service. That day I picked up 21 packages, and all of them were spotless except for the Renegade stuff. I hate constantly ragging on them, but I do it in hopes that someone at the company will actually read this and do something about it. I am not the only one either, pretty much every person I spoke to that ordered the Boxster kit had something missing or wrong with it.
06-04-2015, 01:28 PM
#57
Hey Andy,
Thanks for the tip. I will look into this. Any idea which models came with cable throttle? If I go this route, this will be my 4th TB purchased in the last 3 months haha
EDIT: I just did some research, but I couldn't find any orange springs. I found this one with a yellow spring . Any idea if that would work?
Vlad
Hope this helps,
Andy1
06-12-2015, 09:23 PM
#58
On The Tree
Thread Starter
iTrader: (1)
Join Date: Dec 2014
Location: Toronto, Canada
Posts: 142
Likes: 0
Received 0 Likes
on
0 Posts
I can't thank the guys at SPEC enough for rebuilding my clutch disc. The store where I had bought it from miss advertised it as a sprung hub, when in reality it was a rigid design. Took only about a week to get my disc back. Shipping it back to the store for a refund would have sucked. Here's a picture of the old and new clutch disc.


Instead of flexing, the plastic clip on the release bearing just sheared off when I put it in the clutch fork. Not sure if this was a defect, but the plastic seemed much more brittle than on the old one. I didn't want to take any chances on such a cheap part, so I called Downtown Porsche to pick up a replacement. The guy on the phone told me it would be $260 PLUS TAX! WTF?!?! The whole clutch kit cost me $620... At this point I decided that I'd rather keep my money. The old bearing was in pretty good condition, so I swapped out the plastic sleeve from that one. Not an ideal solution, but hopefully it will do. I did check the sleeve ID for wear and it was the same as the new one.

The tolerance on the SPEC splines seem to be much tighter than the OEM disc. Putting the transmission on was nearly impossible this time; we struggled for a couple of hours to get it on by hand. At first I thought we weren't getting it into the pilot bearing, but then I realised it was just the friction of the clutch disc splines (yes we did lube everything prior). Once we got some spline engagement, we put a few transmission bolts on and slowly tightened them diagonally. Each time I checked the gap using a vernier caliper to make sure the transmission was going in level.

Instead of flexing, the plastic clip on the release bearing just sheared off when I put it in the clutch fork. Not sure if this was a defect, but the plastic seemed much more brittle than on the old one. I didn't want to take any chances on such a cheap part, so I called Downtown Porsche to pick up a replacement. The guy on the phone told me it would be $260 PLUS TAX! WTF?!?! The whole clutch kit cost me $620... At this point I decided that I'd rather keep my money. The old bearing was in pretty good condition, so I swapped out the plastic sleeve from that one. Not an ideal solution, but hopefully it will do. I did check the sleeve ID for wear and it was the same as the new one.
The tolerance on the SPEC splines seem to be much tighter than the OEM disc. Putting the transmission on was nearly impossible this time; we struggled for a couple of hours to get it on by hand. At first I thought we weren't getting it into the pilot bearing, but then I realised it was just the friction of the clutch disc splines (yes we did lube everything prior). Once we got some spline engagement, we put a few transmission bolts on and slowly tightened them diagonally. Each time I checked the gap using a vernier caliper to make sure the transmission was going in level.
06-12-2015, 09:29 PM
#59
On The Tree
Thread Starter
iTrader: (1)
Join Date: Dec 2014
Location: Toronto, Canada
Posts: 142
Likes: 0
Received 0 Likes
on
0 Posts
Wiring was definitely the most intimidating part of the build for me when I was doing the initial research, but it's really not that difficult once you have it all in front of you. For this build, I'm using a 2002 LS1 harness and LS1 PCM. There's tons of useful information and guides on this online, so don't be put off by the electrical work.
Here are some good links:
LS1 Harness diagram and Vacuum Diagram - MX-5 Miata Forum
LS1 harness: Start to finish - Third Generation F-Body Message Boards
Since the intake manifold is flipped 180 degrees, the original harness layout will no longer work.


Here are some good links:
LS1 Harness diagram and Vacuum Diagram - MX-5 Miata Forum
LS1 harness: Start to finish - Third Generation F-Body Message Boards
Since the intake manifold is flipped 180 degrees, the original harness layout will no longer work.
