


1937 Ford Sedan
The Hooker manifolds are a lot narrower at the exit flange than those 5th Gen Camaro manifolds that are on the LS3 now.
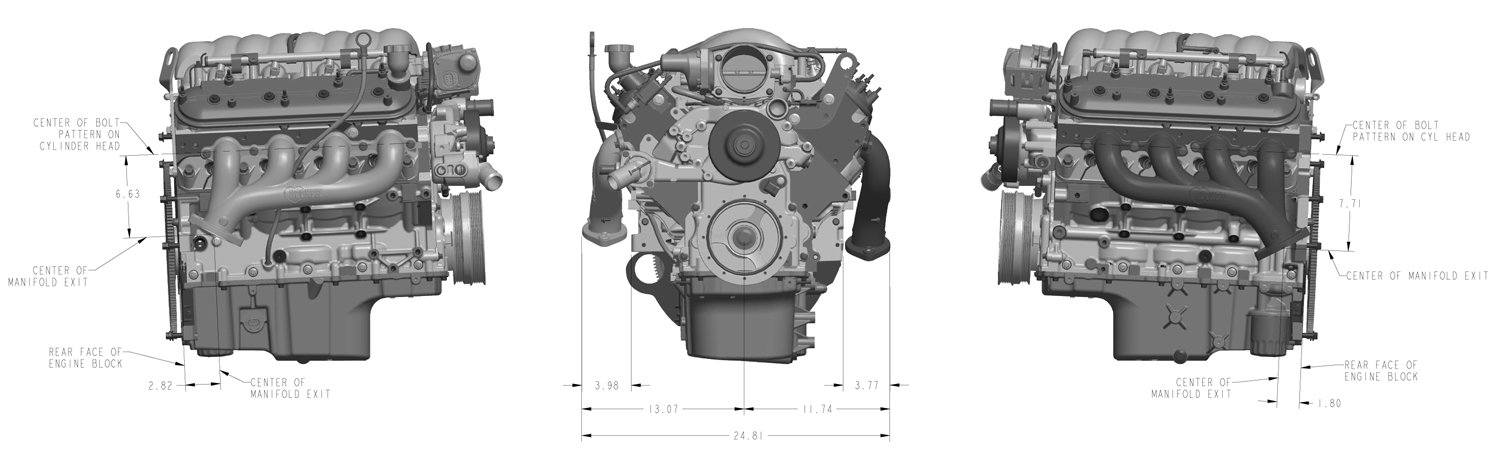
Click the link for a bigger picture...
https://eb9239d2b3c1bda1d53d-6b4eb89...dimensions.jpg
Andrew
Click the link for a bigger picture...
https://eb9239d2b3c1bda1d53d-6b4eb89...dimensions.jpg
Andrew
TECH Apprentice
Joined: Oct 2013
Posts: 319
Likes: 4
From: Longview, TX
Nice work on the dash insert. For what you did, it turned out great! You thanked a Scott for help in this area, was it a guy from the tool room at your place of work?
FWIW, you did not need to cut the hole to final shape to get it to stop oil canning. An oblong hole about 2-3" wide, with the centers of the ends at about the center of the outer end radius would have been enough. The material needs to pull from somewhere to get the offset you wanted. Once it was pressed, you could then cut the final to final shape/size.
FWIW, you did not need to cut the hole to final shape to get it to stop oil canning. An oblong hole about 2-3" wide, with the centers of the ends at about the center of the outer end radius would have been enough. The material needs to pull from somewhere to get the offset you wanted. Once it was pressed, you could then cut the final to final shape/size.

Thread Starter
TECH Regular


Joined: Mar 2015
Posts: 485
Likes: 123
From: Tyler, TX
Nice work on the dash insert. For what you did, it turned out great! You thanked a Scott for help in this area, was it a guy from the tool room at your place of work?
FWIW, you did not need to cut the hole to final shape to get it to stop oil canning. An oblong hole about 2-3" wide, with the centers of the ends at about the center of the outer end radius would have been enough. The material needs to pull from somewhere to get the offset you wanted. Once it was pressed, you could then cut the final to final shape/size.
FWIW, you did not need to cut the hole to final shape to get it to stop oil canning. An oblong hole about 2-3" wide, with the centers of the ends at about the center of the outer end radius would have been enough. The material needs to pull from somewhere to get the offset you wanted. Once it was pressed, you could then cut the final to final shape/size.
Thread Starter
TECH Regular
Joined: Mar 2015
Posts: 485
Likes: 123
From: Tyler, TX
This project is definitely a good test for planning what to do next. I'm actually in limbo on nailing where the motor will live until I get the steering figured out. That led me inside the car because I need to know where the steering will exit the firewall. And I'd really like to know where the pedals will be, seat, shifter, etc etc..... soooo here we are ready to install some front floor pans and a tunnel 
Starting point

In process. Shop tip: At some point if you buy yourself a new pillow be sure to save your old one for the shop!

Here is the issue that we faced. The toe plates from the kit that I bought didn't fit very well and had an angle where it needed to be flat. And the tunnel didn't come close to being big enough for the 4L65E. So we made some toe plates from scratch to allow a little more foot room, and we cut the tunnel in half and will add pieces in the middle later. I saw this sharp guy named Kwhizz do this one time on a previous build
Its a really good fab weekend when you run out of clecos!

Last edited by Kharp; Nov 15, 2016 at 05:54 AM.
Thread Starter
TECH Regular
Joined: Mar 2015
Posts: 485
Likes: 123
From: Tyler, TX
The seats came in for the car last week. Went with some Glide seats and I really like them, but the Mrs. threw me a curve when she told me to order buckets. All this time I was thinking bench seat.....like the one we sat on in Glides vendor booth and we both nodded that we liked it Evidently she had a change of heart and here we are with buckets Anyway, they will be a little bit harder to install because of the space constraints on the tunnel side, but here we go. Here is the beginning of the driver mock up. Sure feels good to at least be sitting in the car again

Evidently she had a change of heart and here we are with buckets Anyway, they will be a little bit harder to install because of the space constraints on the tunnel side, but here we go. Here is the beginning of the driver mock up. Sure feels good to at least be sitting in the car again 
LS1 Tech Stories
The Best V8 Stories One Small Block at Time

Gas Monkey Built a 6-Wheel Ferrari Testarossa With a Corvette LT4 Engine
Verdad Gallardo
7 Most Reliable High-Performance Engines GM Has Ever Built
Verdad Gallardo
Amazing '71 Camaro Restomod Is Modern Muscle Car Under the Skin
Verdad Gallardo
6 Common C5 Corvette Failures and What's Involved In Repairing Them
Pouria Savadkouei
Retro Modern Bandit Pontiac Trans AM Comes With Burt Reynolds' Autograph
Verdad Gallardo
Top 10 Greatest Cadillac V Series Performance Models Ever, Ranked
Pouria Savadkouei
Top 10 Most Powerful Chevy Trucks Ever Made!

Hennessey's New Supercharged Silverado ZR2 Has 700 HP
Verdad Gallardo
Coachbuilt N2A Anteros Is an LS2-Powered C6 Corvette In Italian Clothes
Verdad Gallardo
TECH Fanatic


Joined: Jul 2008
Posts: 1,570
Likes: 173
I would pull the back side of the tunnel together to give the seat mounting more room.....Before reading the next post and seeing that you mentioned bucket seats I was thinking that the tunnel was too wide in the back and I hope you were using a Bench seat........as far as the steering, I would use a shorty column and get a steer clear unit and figure where the column would come thru the firewall.........the units come in different length's, then I would swing the bottom of the steer clear towards the drivers side to suit.......even if you have to pocket it into the firewall ...........get the straightest shot to get to the rack with a minimum number of "U" joints........When you get a number of joints in to clear around everything you will get some binding in turning the wheel with all the twists and turns..........very annoying when driving......
Ken
Ken
Thread Starter
TECH Regular
Joined: Mar 2015
Posts: 485
Likes: 123
From: Tyler, TX
I would pull the back side of the tunnel together to give the seat mounting more room.....Before reading the next post and seeing that you mentioned bucket seats I was thinking that the tunnel was too wide in the back and I hope you were using a Bench seat........as far as the steering, I would use a shorty column and get a steer clear unit and figure where the column would come thru the firewall.........the units come in different length's, then I would swing the bottom of the steer clear towards the drivers side to suit.......even if you have to pocket it into the firewall ...........get the straightest shot to get to the rack with a minimum number of "U" joints........When you get a number of joints in to clear around everything you will get some binding in turning the wheel with all the twists and turns..........very annoying when driving......
Ken
Ken
Last edited by Kharp; Nov 7, 2016 at 08:21 PM.
Thread Starter
TECH Regular
Joined: Mar 2015
Posts: 485
Likes: 123
From: Tyler, TX
Still working on the floor pans and tunnel, but in the meantime I decided to work on some brackets this week as I will need them soon. The GM fuse block has sort of a funny story to go along with it. The fuse block that came with my kit only had 1 mounting tab and I wasn't real sure how to mount it so I started researching how GM does it. GM makes a plastic base that the fuse block locks into and screws down with a clip and a bolt (plastic inside plastic I'm liking that). Once I found the part number I searched what vehicles it came on. It just so happens it was used on some Chevy trucks like the 1999 model parked in my driveway. I lifted the hood and "bingo" that's what I need. I ordered one for 6$ plus shipping. Here is a pic of how it mounts. If you need one the part number is 15723696. I did massage it a little bit for my application, but it works really well. The fabricated metal bracket on the left mounts on the floor, and the plastic bracket on the right is the cradle that I found.

Here is how they go together with a couple more brackets.

Now I have to create some room for all this stuff !


Here is how they go together with a couple more brackets.

Now I have to create some room for all this stuff
! 

Thread Starter
TECH Regular
Joined: Mar 2015
Posts: 485
Likes: 123
From: Tyler, TX
I've been working on a way to get the harness through the firewall. It is a factory harness and mounts behind the cylinder heads and makes an arc behind the motor. I tried making a 90 degree turn but it doesn't bend easy and eats up some of the length that is needed elsewhere. For this reason the seals it grommet wouldn't work, but I do like them and plan on using them elsewhere. I tried several other ideas with no success. Here is the pile of ideas that didn't work.

Fab director came up with this. These are all made by hand so it took a while to do this. It has a ring where the 2 halves will bolt together. Eventually will have to create some type of leak proof seal around the ring. The bottom half becomes part of the firewall and the top half will bolt in. The top half is where you can push all the connectors through. It will eventually have a faceplate for the outside with a gasket to seal it it all together.

At this point we did a mock up to check the fit. Looked good enough to proceed. The trans dipstick tube is TCI 743865. It is a good starting point if you need one for a 4L60 series transmission. Used an EMT 1/2" bender to get it fitting really nice and made a different mounting tab.


Thread Starter
TECH Regular
Joined: Mar 2015
Posts: 485
Likes: 123
From: Tyler, TX
The inside of the firewall will have a plate to add some strength and also provide a good way to tie all the tunnel and sheet metal together. The plate worked good for a welding fixture too.

The bottom piece did not work well because it wasn't deep enough or wide enough once the harness was inside the car. Here is rev 10 in process.

The latest pieces - looks like they will work well.


The bottom piece did not work well because it wasn't deep enough or wide enough once the harness was inside the car. Here is rev 10
in process.
The latest pieces - looks like they will work well.

