

LQ4/4L80 swap 1969 Mercedes
 10-03-2016 | 01:38 AM
#1

Thread Starter
Staging Lane
Joined: Aug 2016
Posts: 85
Likes: 1
From: Honolulu
In January I purchased a stock, clean, original 35k mile W114 (Mercedes nomenclature) out of Washington state and had it shipped to me here in Honolulu. I've wanted to build a sleeper for a year or so and planned on a newer Mercedes engine. But after I purchased the engine I planned to build up I couldn't get around the fact that 280 HP would be the limit without a turbo. And that's after spending a good amount of money and time.
I swapped a 4.8 Vortec into my YJ 5 years ago and it makes me smile every time I drive it! So midstream I changed my mind to swap a "sure thing".
Mercedes has used this chassis for their 6.3 V-8 and others have swapped in other V-8's so I knew with a little work it could be done. This is a unibody car and is pretty light, front 1760 rear 1400 total 3140 lbs as stock, 1/2 tank of gas with its inline 6 and auto trans. Perfect for a little upgrade.
While driving it around somewhat as a daily driver until June when I put in on jack stands in my garage, I made a list of items to change/upgrade.
At this point I have purchased a 2005 LQ4/4L80 dropout, fit it to the car, purchased the items for the rebuild and the trans is at one shop getting refreshed and the engine components are at the machine shop.
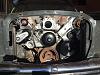
Here is the car just before starting;

I swapped a 4.8 Vortec into my YJ 5 years ago and it makes me smile every time I drive it! So midstream I changed my mind to swap a "sure thing".
Mercedes has used this chassis for their 6.3 V-8 and others have swapped in other V-8's so I knew with a little work it could be done. This is a unibody car and is pretty light, front 1760 rear 1400 total 3140 lbs as stock, 1/2 tank of gas with its inline 6 and auto trans. Perfect for a little upgrade.
While driving it around somewhat as a daily driver until June when I put in on jack stands in my garage, I made a list of items to change/upgrade.
At this point I have purchased a 2005 LQ4/4L80 dropout, fit it to the car, purchased the items for the rebuild and the trans is at one shop getting refreshed and the engine components are at the machine shop.
Here is the car just before starting;
 10-03-2016 | 02:20 AM
#2
Thread Starter
Staging Lane
Joined: Aug 2016
Posts: 85
Likes: 1
From: Honolulu
No real goals for power, this will be somewhat my daily driver. We have a lot of traffic here in Honolulu and no track. So this is more for fun than trying to hit specific numbers.
My block has already been cleaned, hot tanked, magnafluxed, blasted and measured. Due to a little pitting going to bore 30 over. It had spun a rod bearing and so I purchased a rebuilt crank. New flat-top pistons from Autotec, I beam rods from Scat, and a Pat G spec cam from Texas Speed 218/224, .600/.600, 114LSA +4. Now that all the parts have arrived and at the machine shop the rotating assembly can be balanced and the block honed to fit the pistons.
Along with new bearings, LS3 head gaskets, Melling 10295 oil pump, new chain, and all ARP bolts have been purchased.
The stock 317 heads are getting a valve job, PAC 1218 springs fit to spec and milled .030 to help raise compression. Yesterday the rockers arrived back from Harland Sharp from getting their trunion upgrade. Morel 5315 Lifters
The engine bay is tight so I purchased a set of Hooker Headers coated cast iron exhaust manifolds. They say there good to 500HP so shouldn't be too restrictive. But they fit is the real plus.
Induction is LS3 throttle body, Speedmaster intake, Holley fuel rails, Fast 36 lb injectors (42 lbs @58 psi).
I also purchased all new engine sensors, water pump and coil packs.
150 Tunes rebuilt the wire harness and preprogrammed the ECU to match everything I bought including matching the harness to the injectors, split to fun down each side of the intake LS style, longer lead to the mass air flow and enough length to mount the ECU under the dash.
Dirty Dingo is my source for front drive brackets and A/C compressor. Look great and fit to the engine/chassis like a glove.
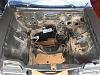
Here is a pic at the fitment stage;
My block has already been cleaned, hot tanked, magnafluxed, blasted and measured. Due to a little pitting going to bore 30 over. It had spun a rod bearing and so I purchased a rebuilt crank. New flat-top pistons from Autotec, I beam rods from Scat, and a Pat G spec cam from Texas Speed 218/224, .600/.600, 114LSA +4. Now that all the parts have arrived and at the machine shop the rotating assembly can be balanced and the block honed to fit the pistons.
Along with new bearings, LS3 head gaskets, Melling 10295 oil pump, new chain, and all ARP bolts have been purchased.
The stock 317 heads are getting a valve job, PAC 1218 springs fit to spec and milled .030 to help raise compression. Yesterday the rockers arrived back from Harland Sharp from getting their trunion upgrade. Morel 5315 Lifters
The engine bay is tight so I purchased a set of Hooker Headers coated cast iron exhaust manifolds. They say there good to 500HP so shouldn't be too restrictive. But they fit is the real plus.
Induction is LS3 throttle body, Speedmaster intake, Holley fuel rails, Fast 36 lb injectors (42 lbs @58 psi).
I also purchased all new engine sensors, water pump and coil packs.
150 Tunes rebuilt the wire harness and preprogrammed the ECU to match everything I bought including matching the harness to the injectors, split to fun down each side of the intake LS style, longer lead to the mass air flow and enough length to mount the ECU under the dash.
Dirty Dingo is my source for front drive brackets and A/C compressor. Look great and fit to the engine/chassis like a glove.
Here is a pic at the fitment stage;
 10-03-2016 | 02:35 AM
#3
Thread Starter
Staging Lane
Joined: Aug 2016
Posts: 85
Likes: 1
From: Honolulu
The engine bay took a little work to fit the engine. I built a new firewall, one to replace some rust spots and two to push the engine a little more rearward for balance.
The transmission tunnel took a lot of work. The 4L80 is about 2" wider and longer. I had to widen the tunnel by 1" on each side and weld in addition support side to side and up and over the tunnel to support the added weight of the trans. My placement of the engine put the tail of the trans back about 8" from the stock location. I purchased Lokar's tail mount shifter and that actually placed the shifter right at the stock location.
I had to modify the crossmember to fit the engine with a front sump pan, and add some metal for additional strength. The new motor mounts are almost exactly in the same location as the stock ones.
After I mocked everything up to the engine and trans I pulled them and sent them off while I finished the tunnel, engine bay, crossmember, motor mounts, steering and painting.
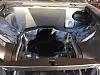
Here is where I started;
And here is where I finished yesterday;
The transmission tunnel took a lot of work. The 4L80 is about 2" wider and longer. I had to widen the tunnel by 1" on each side and weld in addition support side to side and up and over the tunnel to support the added weight of the trans. My placement of the engine put the tail of the trans back about 8" from the stock location. I purchased Lokar's tail mount shifter and that actually placed the shifter right at the stock location.
I had to modify the crossmember to fit the engine with a front sump pan, and add some metal for additional strength. The new motor mounts are almost exactly in the same location as the stock ones.
After I mocked everything up to the engine and trans I pulled them and sent them off while I finished the tunnel, engine bay, crossmember, motor mounts, steering and painting.
Here is where I started;

And here is where I finished yesterday;


 10-05-2016 | 01:16 AM
#6
Thread Starter
Staging Lane
Joined: Aug 2016
Posts: 85
Likes: 1
From: Honolulu
10-05-2016 | 01:32 AM
#7
Thread Starter
Staging Lane
Joined: Aug 2016
Posts: 85
Likes: 1
From: Honolulu
Andrew I will update as I move forward. I'm hoping to have it drivable by Thanksgiving. As I mentioned above I have already fit the engine and trans to the car. I brake booster was installed, front drive assembly all the way to the intake tube and air filter.
Motor mounts are installed but the transmission mount still needs to be finalized. I have already purchased all the parts to connect the 4L80 to the stock MB diff, just need the trans installed to get the final length and take the parts to the local drive shaft shop. I forgot to measure the length before I pulled it the first time.
The MB used a steering gear box the size of a mini fridge, no way to route the exhaust around it. So I'm changing to rack and pinion. I have already fit a 1992 Cavalier unit, but need to adjust final brackets after the exhaust is complete. Very tight fit. Should be a small upside to the R&P but the downside is loss of some of the turning radius.
I have also dropped the fuel tank, cleaned it up, and installed an in tank fuel pump.
After its drivable it will get final tuned on the dyno.
Trending Topics
10-06-2016 | 12:09 AM
#9
Thread Starter
Staging Lane
Joined: Aug 2016
Posts: 85
Likes: 1
From: Honolulu
10-08-2016 | 06:41 PM
#12
I wanted to swap a ls in a w124 but Mercedes makes it so hard. The steering system is the biggest problem. There is just not that much room in the engine bay. Also the trans tunnel is very small
10-09-2016 | 11:39 AM
#13
Thread Starter
Staging Lane
Joined: Aug 2016
Posts: 85
Likes: 1
From: Honolulu
10-09-2016 | 11:48 AM
#14
Thread Starter
Staging Lane
Joined: Aug 2016
Posts: 85
Likes: 1
From: Honolulu
For right now I'm keeping the stock IRS. Not a lot of info available on how much power it can take. So I'm shooting for a "safe" 450 crank HP. My weak link should be the tires, I can only fit 225mm (8.9") tires.
10-09-2016 | 12:03 PM
#15
Thread Starter
Staging Lane
Joined: Aug 2016
Posts: 85
Likes: 1
From: Honolulu
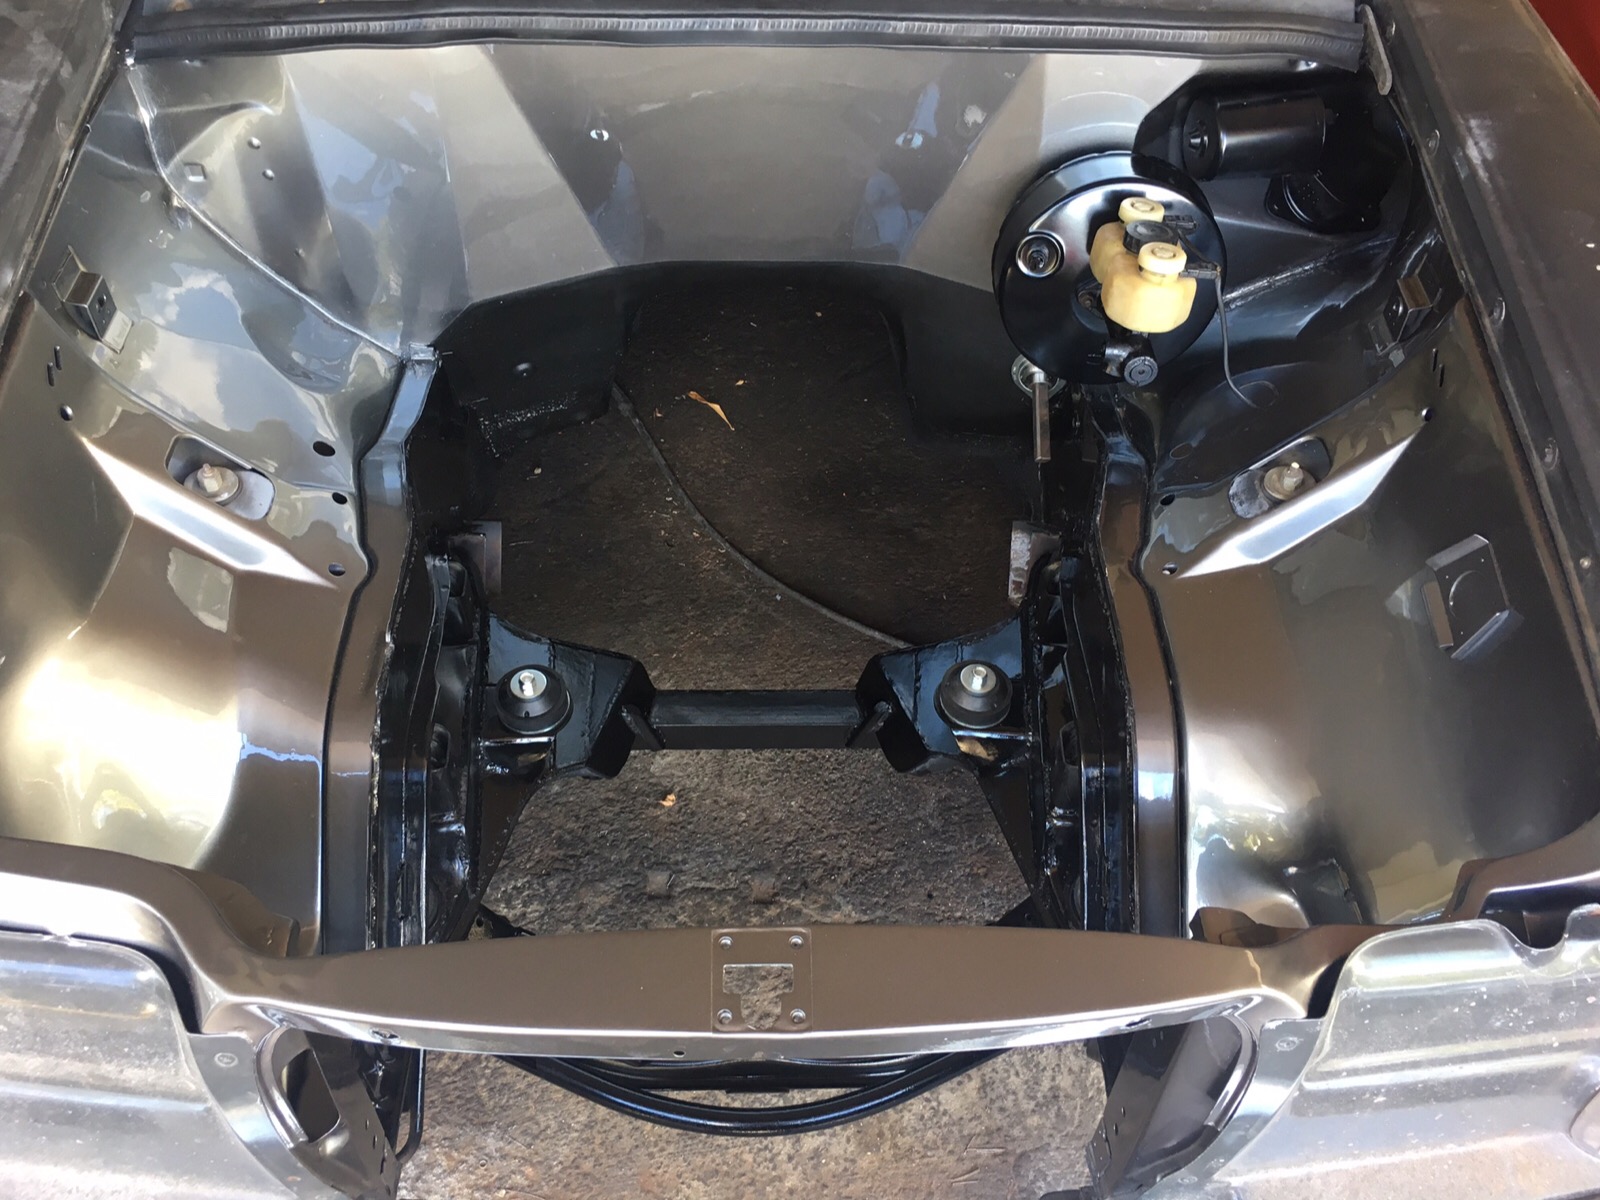
After a couple of evening this week my engine bay is ready
 10-09-2016 | 12:34 PM
#16
Thread Starter
Staging Lane
Joined: Aug 2016
Posts: 85
Likes: 1
From: Honolulu
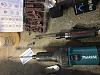
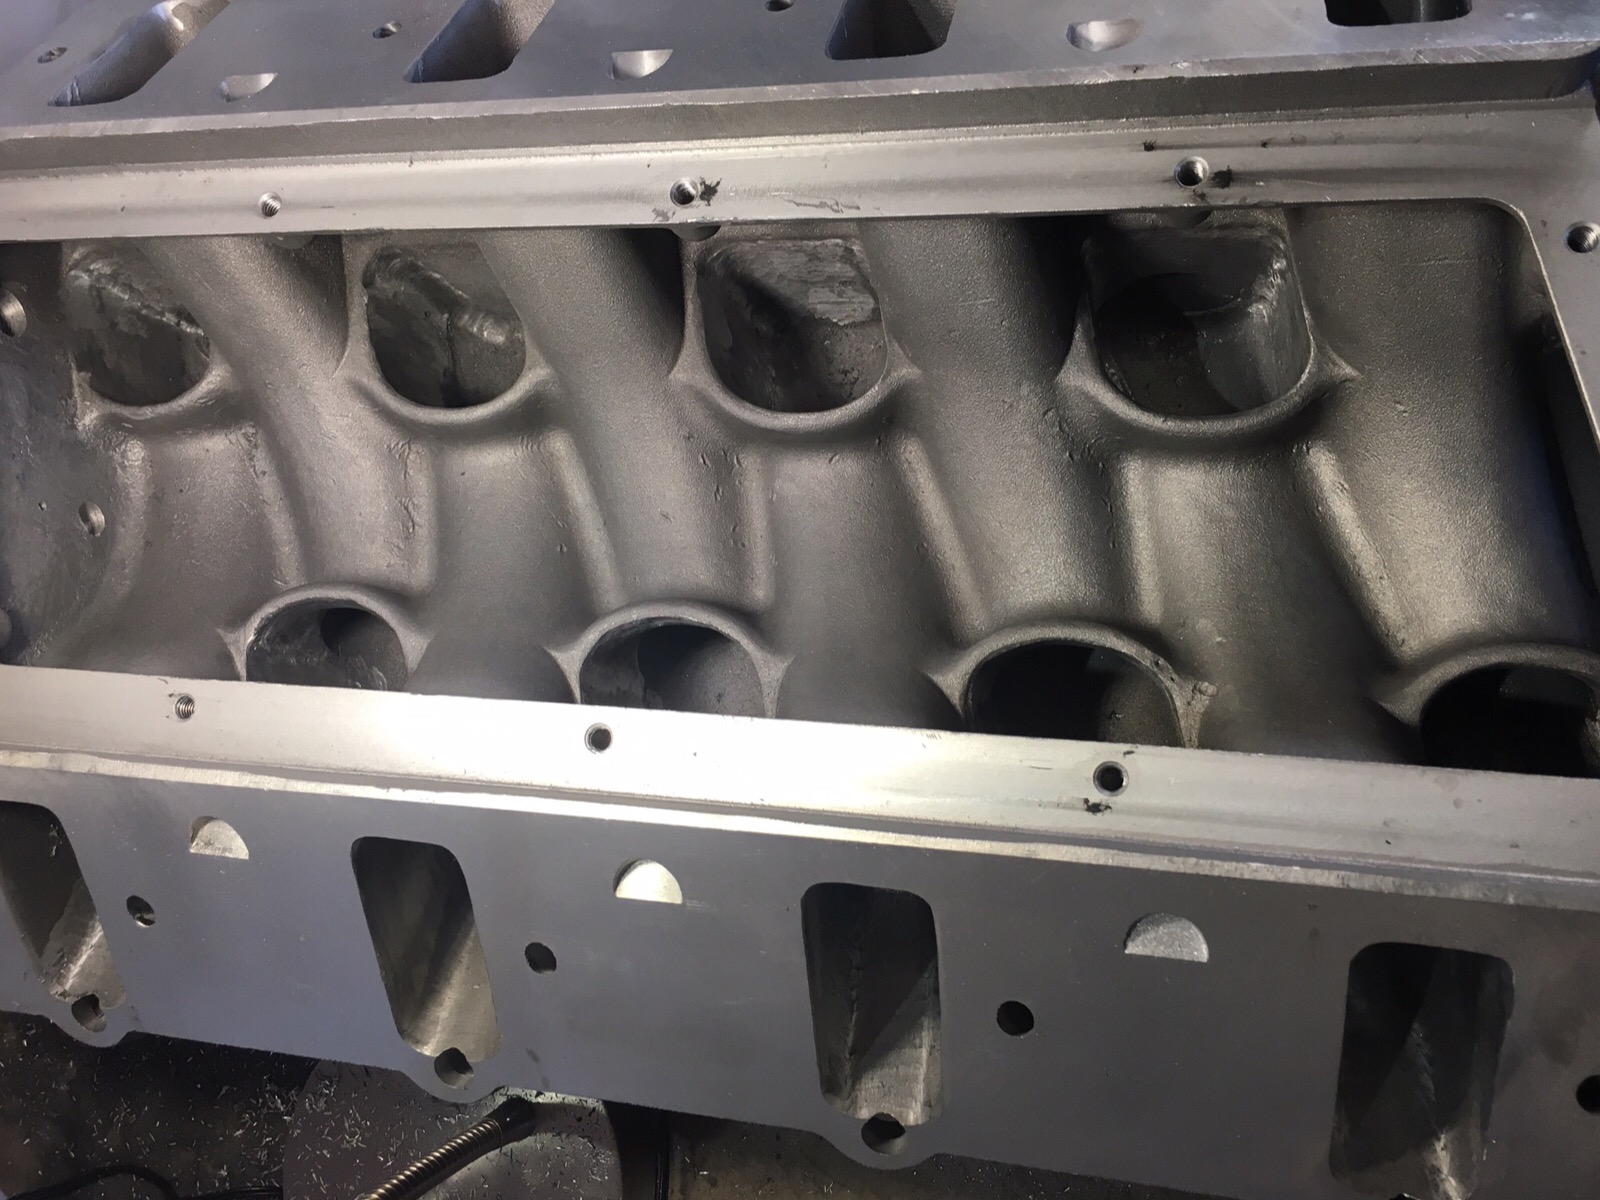
I'm using the stock 317 heads, milled 0.030 with springs to match my cam. Even though I don't need the power I plan on cleaning up the heads a little. So to practice I bought some tools and started work on the intake.
I bought the cheaper Makita grinder without the speed control and purchased a $25 fan control from a local garden center to control the speed, works good. Then some burrs from Buckeye Carbide, sanding rolls and cross buffs from Summit.
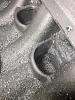
You can see in the pic the ridge around the beginning of each runner. This ridge is protruding out from the wall as much as 3/16". With the burr I shaved it flush all around.
In the last pic I have finished with the burr and working on the sanding, paying special attention to the short turn radius. As I understand it, when porting the head you only sand to 60 grit to keep the fuel from puddling, but the intake runner is pre fuel so I plan to take to 120.
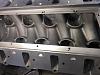
There are some casting lines in the runner that I will flatten and maybe a little port matching, but no plans to otherwise enlarge the runners.
My first time trying this, kind of fun, and harder than it looks, more fun this coming week!
I bought the cheaper Makita grinder without the speed control and purchased a $25 fan control from a local garden center to control the speed, works good. Then some burrs from Buckeye Carbide, sanding rolls and cross buffs from Summit.

You can see in the pic the ridge around the beginning of each runner. This ridge is protruding out from the wall as much as 3/16". With the burr I shaved it flush all around.
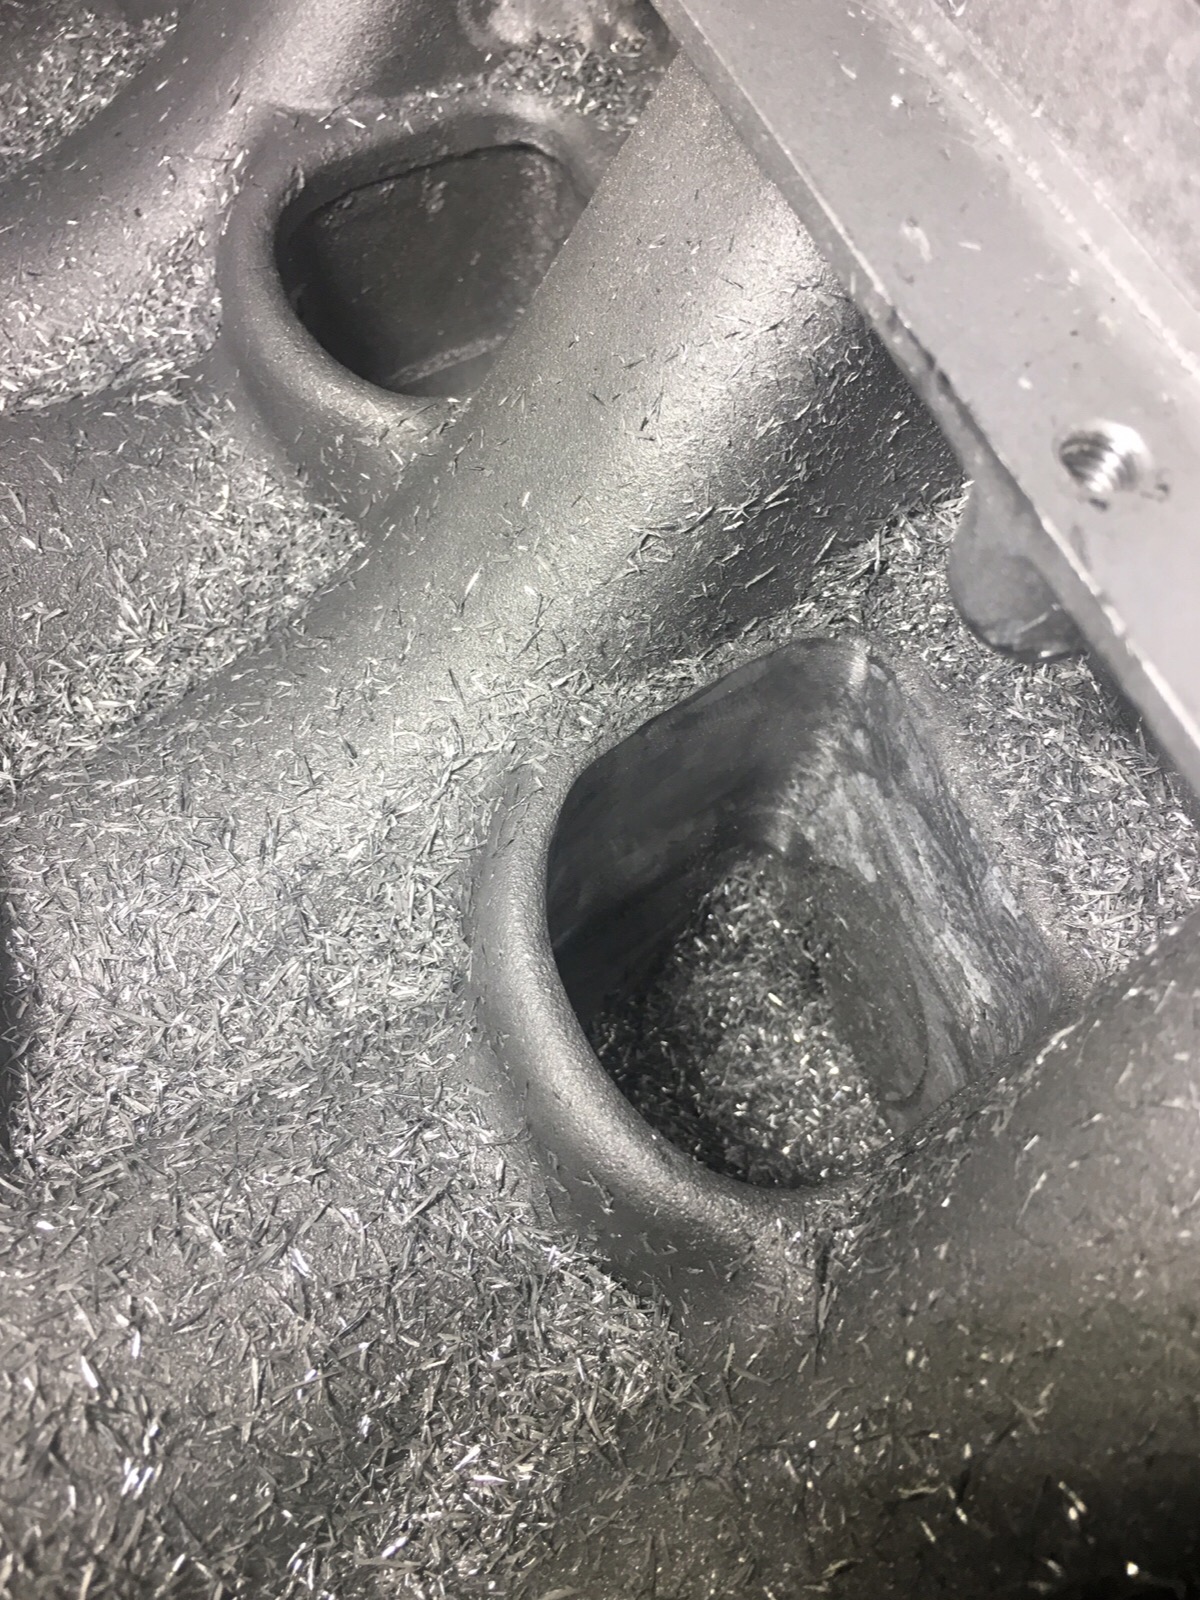
In the last pic I have finished with the burr and working on the sanding, paying special attention to the short turn radius. As I understand it, when porting the head you only sand to 60 grit to keep the fuel from puddling, but the intake runner is pre fuel so I plan to take to 120.
There are some casting lines in the runner that I will flatten and maybe a little port matching, but no plans to otherwise enlarge the runners.
My first time trying this, kind of fun, and harder than it looks, more fun this coming week!
10-09-2016 | 02:09 PM
#17

a little tip i learned back when i was a puppo---die grinding on camel hump sbc heads---was to use a piece of stiff cardboard as a template for matching throat widths and cross sections. make different templates for different depths into the throat.
looks like a fun project, nice work on that engine bay!
looks like a fun project, nice work on that engine bay!
10-09-2016 | 09:58 PM
#18
TECH Fanatic
Joined: Jan 2010
Posts: 1,074
Likes: 17
From: sarasota fl
For now I'll just be putting the fattest tires I can stuff under the skirts, still just the stock open diff, so next year I'll workout a plan for a mini tub/posi/airbags then we will see about getting it to the ground lol
10-11-2016 | 01:26 AM
#19
Thread Starter
Staging Lane
Joined: Aug 2016
Posts: 85
Likes: 1
From: Honolulu
a little tip i learned back when i was a puppo---die grinding on camel hump sbc heads---was to use a piece of stiff cardboard as a template for matching throat widths and cross sections. make different templates for different depths into the throat.
looks like a fun project, nice work on that engine bay!
looks like a fun project, nice work on that engine bay!
10-11-2016 | 01:29 AM
#20
Thread Starter
Staging Lane
Joined: Aug 2016
Posts: 85
Likes: 1
From: Honolulu