

2002 Porsche C4S (996) LS3 525HP
 05-10-2017 | 09:13 AM
#81

Thread Starter
Staging Lane
Joined: Jan 2016
Posts: 51
Likes: 0
The plug with bolt through it is to secure a plastic trim panel is all. I'm actually missing one  The little winged plastic clips for battery cover and other stuff are cheap if you're missing any of those. I can snap a pic if you need one.
Glad the GT3 pump worked out! I too will be interested in how that goes together!
The little winged plastic clips for battery cover and other stuff are cheap if you're missing any of those. I can snap a pic if you need one.Glad the GT3 pump worked out! I too will be interested in how that goes together!
05-26-2017 | 01:44 PM
#82
Thread Starter
Staging Lane
Joined: Jan 2016
Posts: 51
Likes: 0
edit: nvm...found it
http://www.porscheatlantaperimeterpa...wd=&origin=pla
Buy #17 & 18 (O-rings).
#17 is the small line (2 o rings): 999-230-543-40
#18 is the larger line (1 o ring): 999-230-542-40
#18 is tied to hose #2 -->"return line" (Low Pressure)
#17 is tied to hose #1 --> "Pressure line" (high Pressure)
________
I'm trying to figure out the PN's (and where to order) the Power Steering line 3 O-Rings for the connection to the power steering rack.
The small connector has 2 O-rings (1 black, 1 white)
The large connector has 1 O-Ring (1 Black).
Picture of 1 of the fittings w/ the Weld-on AN fitting; the O-ring is at the bottom.

Picture of the general set-up...OE PS fittings w/ hardline cut off to Weld-on -6AN fitting, to 90 degree PS -6AN fittings.

Last edited by First350; 05-26-2017 at 08:45 PM.
06-07-2017 | 09:22 AM
#83
Thread Starter
Staging Lane
Joined: Jan 2016
Posts: 51
Likes: 0
It’s been a few weeks…had a 2 week vacation, but other than that I’ve been making good progress:
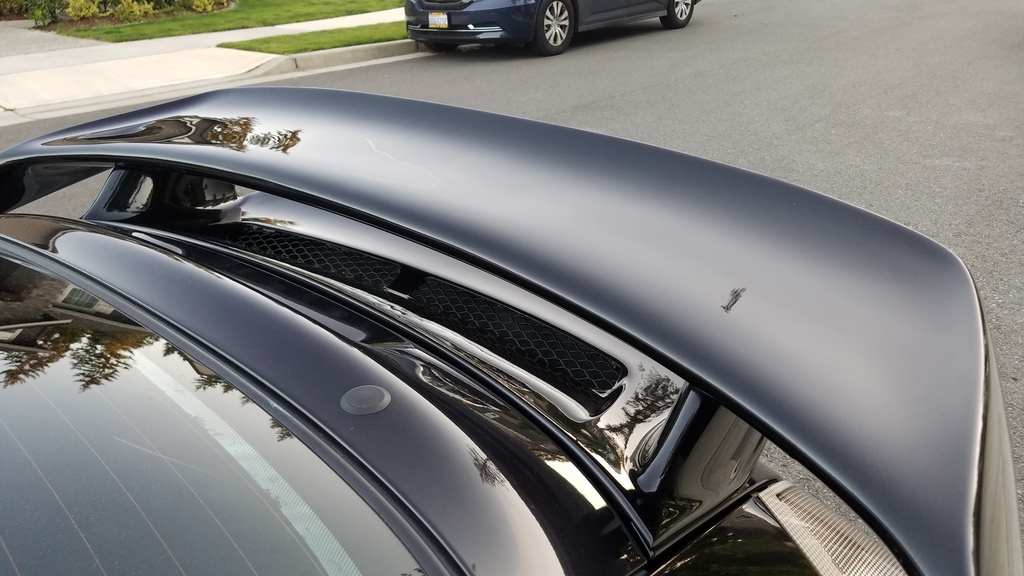
Prior to my vacation, I dropped it off for body work to get the Misha Wing installed and the bumpers cleaned up…it was in good company (RUF, martini track car,…)


Grill inlet to top of wing: I’m hoping this helps provide enough cooling, especially w/ the OEM engine fan being deleted.
I had broken the front sway bar bolt: It’s a steel bolt threaded into the Aluminum front subframe. I’ve always had great success in welding a washer and then nut onto the broken bolt…reduce the feed rate and just dump as much heat as possible into the bolt. This is the first time it didn’t work, but at least it makes for a pretty picture!

I had a few other items to do around the front subframe (broken bolt, new LCA/caster arms, access to the PS connections @ the rack), so I decided to just drop the whole frame.
Popped off the front LCA: the initial “pop” always makes me nervous…there’s so much compression before it lets loose.

Once the subframe was out, I pulled out the pressure washer:

I ended up having to drill out the broken front sway bar bolt and re-tap it:

New Front LCA: I filled the bushing that connect to the caster arms w/ urethane to stiffen it up (aka Cheap Sport bushings!)


As things went back together, I’ve been using anti-seize for the bolts & then TQ paint:


Prior to my vacation, I dropped it off for body work to get the Misha Wing installed and the bumpers cleaned up…it was in good company (RUF, martini track car,…)


Grill inlet to top of wing: I’m hoping this helps provide enough cooling, especially w/ the OEM engine fan being deleted.

I had broken the front sway bar bolt: It’s a steel bolt threaded into the Aluminum front subframe. I’ve always had great success in welding a washer and then nut onto the broken bolt…reduce the feed rate and just dump as much heat as possible into the bolt. This is the first time it didn’t work, but at least it makes for a pretty picture!

I had a few other items to do around the front subframe (broken bolt, new LCA/caster arms, access to the PS connections @ the rack), so I decided to just drop the whole frame.
Popped off the front LCA: the initial “pop” always makes me nervous…there’s so much compression before it lets loose.

Once the subframe was out, I pulled out the pressure washer:

I ended up having to drill out the broken front sway bar bolt and re-tap it:

New Front LCA: I filled the bushing that connect to the caster arms w/ urethane to stiffen it up (aka Cheap Sport bushings!)


As things went back together, I’ve been using anti-seize for the bolts & then TQ paint:


Last edited by First350; 06-07-2017 at 09:27 AM.
06-08-2017 | 08:47 AM
#84
Thread Starter
Staging Lane
Joined: Jan 2016
Posts: 51
Likes: 0
Update #2:
More gold…the rear bumper was getting pretty hot:

I’m at ~450 miles now (500 is the break in period), which means I need my fuel system updated so that I can go dyno it and confirm everything is good.
I did a ~80% throttle pull up to ~4,500 rpms…I set my OBDII display to show the O2 sensor Volt and was able to watch the O2 go from rich (~.8 volts) to lean (~0.2 volts). At this point I assume the OEM fuel pump is not keeping up.

*the LS3 OBDII has a parameter for Fuel pressure, but it never changes/fluctuates…I never saw a fuel pressure sensor on the engine or fuel rails, so I’m wondering if this isn’t real.
Fuel system update: The plan is for an inline external Bosch 044 mounted in a swirl/surge tank. This set-up should be good for well over 600HP…the OEM pump is freed up because it’s no longer having to hold a ~40+psi upstream pressure, it’s just dumping into an unpressurized surge tank.
Pulling the fuel tank apart so that I can install a return fitting; the oem fuel set-up is return-less. The zip tie was to help me remember which connections go where.

Knowing that the Fuel tank top was going to take more than a day, I used a zip lock bag to temporarily re-seal the tank:

I ran into an issue and my orginal plan to use a -6AN bulkhead fitting wasn’t going to work…I needed to reduce the OD of the fitting; what better excuse to finally buy a mini Lathe from HF. The quality and effectiveness of the lathe was surprisingly good. In less than 2 hrs I drove to HF, set it up and finished this fitting.

Fittings on OEM fuel top:
1) The Blue fitting is the one I drilled a hole for and is the fuel return
2) The Black fitting is the fuel outlet (it’s a quick disconnect type 5/16” fuel fitting…I had to cut it short to slip on)

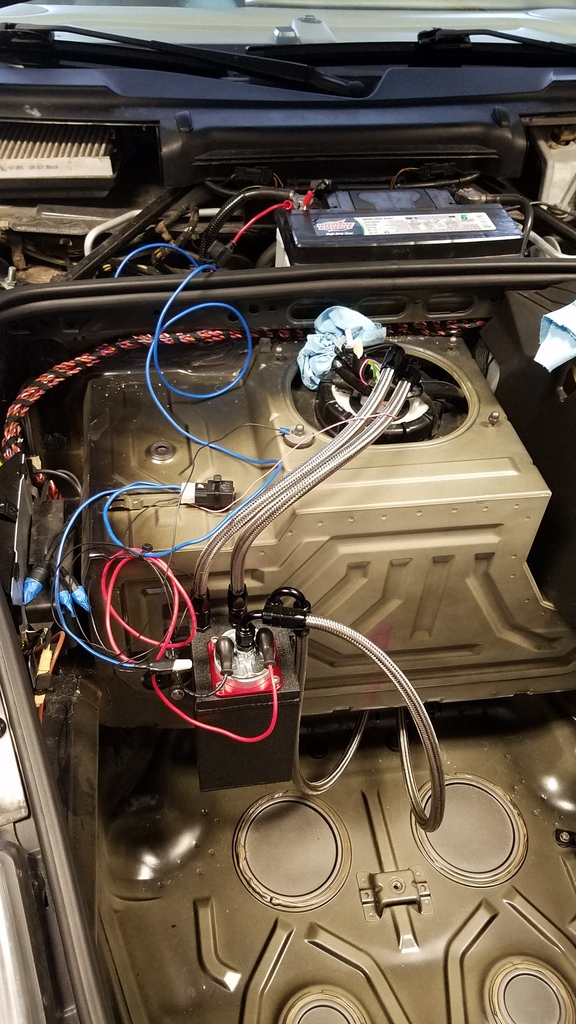
Drilling & mounting rivnuts into bulkhead (fuel tank is ~1/2” away) to mount the surge tank…and trying not to poke into the fuel tank!

Bosch 044 w/ connections: This is how the Bosch 044 looked just before I installed it in the Surge tank…I opted to install the upstream fitting so that it was closer to the bottom of the surge tank to help ensure no fuel starvation.

Surge Tank Installed w/ lines to Fuel tank:

Koul Tools AN fitting tool…works really well. It’s only purpose is to help feed in the braided hose into the fitting (instead of having to push the individual frayed SS wires in w/ a screw driver.)

Front Trunk holes: 4 holes drilled…2 for fuel, 2 for PS.

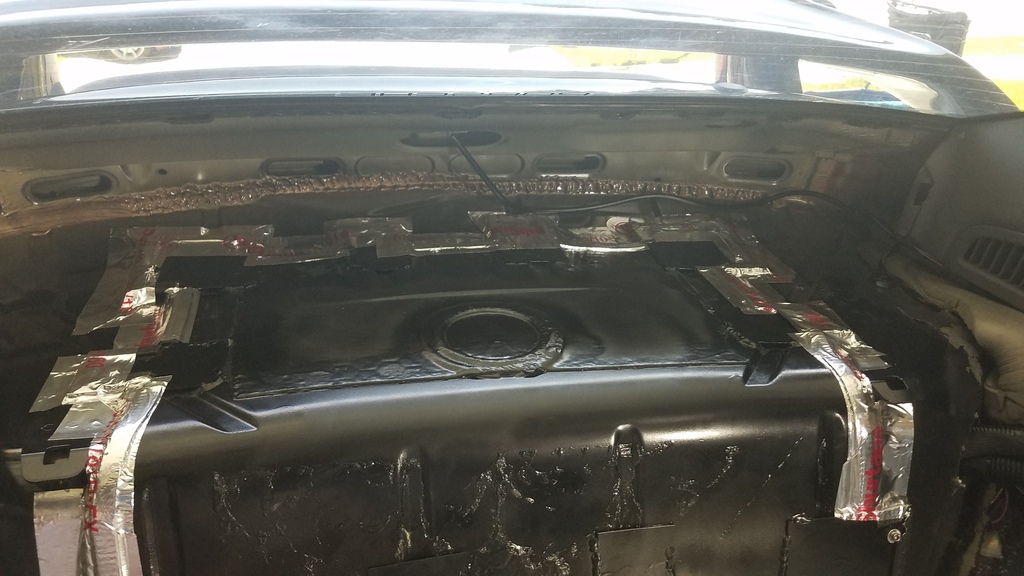
Interior: is starting to come together…I had been waiting to ensure there wasn’t any engine leaks that would require access through the interior cut-out.
Access panel installed & tape/sealed:
Carpet going back in: had to cut a small hole for the LS3 wire harness

Interior panels going back in…I hate old plastic pieces, luckily 90% of them stayed intact.

Roll bar test fit: glad I check, the clearance to the OEM ECU is really tight, so that means I can’t leave the LS3 ECU on that shelf….it’s now moved further back.

Electric Power Steering:
I plan to mount the electric PS pump onto a 4.5” round Al tube, seal the bottom (to catch any leaks), and then install it on the bulkhead next to the fuel surge tank.

PS rack fitting: I had planned to weld these to -6AN fittings until I realized it was brass! Guess there’s some kind of coating on them. Looking to buy a set from BRS (they specialize in Cayman’s, which uses the same fittings as the 996)

PS rack, pick of inlet to fittings. Descent access once the front driver’s wheel is off. I plugged it with towels to prevent any leakage and then zip tied them in place so that I could keep driving.

More gold…the rear bumper was getting pretty hot:

I’m at ~450 miles now (500 is the break in period), which means I need my fuel system updated so that I can go dyno it and confirm everything is good.
I did a ~80% throttle pull up to ~4,500 rpms…I set my OBDII display to show the O2 sensor Volt and was able to watch the O2 go from rich (~.8 volts) to lean (~0.2 volts). At this point I assume the OEM fuel pump is not keeping up.

*the LS3 OBDII has a parameter for Fuel pressure, but it never changes/fluctuates…I never saw a fuel pressure sensor on the engine or fuel rails, so I’m wondering if this isn’t real.
Fuel system update: The plan is for an inline external Bosch 044 mounted in a swirl/surge tank. This set-up should be good for well over 600HP…the OEM pump is freed up because it’s no longer having to hold a ~40+psi upstream pressure, it’s just dumping into an unpressurized surge tank.
Pulling the fuel tank apart so that I can install a return fitting; the oem fuel set-up is return-less. The zip tie was to help me remember which connections go where.

Knowing that the Fuel tank top was going to take more than a day, I used a zip lock bag to temporarily re-seal the tank:

I ran into an issue and my orginal plan to use a -6AN bulkhead fitting wasn’t going to work…I needed to reduce the OD of the fitting; what better excuse to finally buy a mini Lathe from HF. The quality and effectiveness of the lathe was surprisingly good. In less than 2 hrs I drove to HF, set it up and finished this fitting.

Fittings on OEM fuel top:
1) The Blue fitting is the one I drilled a hole for and is the fuel return
2) The Black fitting is the fuel outlet (it’s a quick disconnect type 5/16” fuel fitting…I had to cut it short to slip on)

Drilling & mounting rivnuts into bulkhead (fuel tank is ~1/2” away) to mount the surge tank…and trying not to poke into the fuel tank!

Bosch 044 w/ connections: This is how the Bosch 044 looked just before I installed it in the Surge tank…I opted to install the upstream fitting so that it was closer to the bottom of the surge tank to help ensure no fuel starvation.

Surge Tank Installed w/ lines to Fuel tank:

Koul Tools AN fitting tool…works really well. It’s only purpose is to help feed in the braided hose into the fitting (instead of having to push the individual frayed SS wires in w/ a screw driver.)

Front Trunk holes: 4 holes drilled…2 for fuel, 2 for PS.

Interior: is starting to come together…I had been waiting to ensure there wasn’t any engine leaks that would require access through the interior cut-out.
Access panel installed & tape/sealed:

Carpet going back in: had to cut a small hole for the LS3 wire harness

Interior panels going back in…I hate old plastic pieces, luckily 90% of them stayed intact.

Roll bar test fit: glad I check, the clearance to the OEM ECU is really tight, so that means I can’t leave the LS3 ECU on that shelf….it’s now moved further back.

Electric Power Steering:
I plan to mount the electric PS pump onto a 4.5” round Al tube, seal the bottom (to catch any leaks), and then install it on the bulkhead next to the fuel surge tank.

PS rack fitting: I had planned to weld these to -6AN fittings until I realized it was brass! Guess there’s some kind of coating on them. Looking to buy a set from BRS (they specialize in Cayman’s, which uses the same fittings as the 996)
PS rack, pick of inlet to fittings. Descent access once the front driver’s wheel is off. I plugged it with towels to prevent any leakage and then zip tied them in place so that I could keep driving.

 06-08-2017 | 10:27 PM
#86
Thread Starter
Staging Lane
Joined: Jan 2016
Posts: 51
Likes: 0
Haha, thanks! When I did my first car build ~6yrs ago someone gave me the advice to make progress daily...I try to get in 1 hr/day (after the kids go to bed), even if it's just cleaning.
06-13-2017 | 01:17 AM
#87
Thread Starter
Staging Lane
Joined: Jan 2016
Posts: 51
Likes: 0
Updates…lots of progress: I’ve got several business trips this month (I’m writing this on the airplane as I head to my first one), so I’ve been pushing hard to make progress.
UPS Man bringing me the last of the fuel connections:

Fuel system is Done! I wasn’t sure if the OEM pump wiring (driven by the LS3) could handle both the OEM fuel pump and the Bosch 044, so I used the OEM fuel pump power as the trigger to a new relay that powers the Bosch directly to the battery (w/ inline 30amp fuse). I plan to use the same relay to power the new electric Power Steering pump (once I install it). BTW…these 6AN fittings are expensive once you add them all up.
I’m using the Corvette LS3 Fuel Filter/Regulator which meets the fuel pressure the LS3 ECU is expecting: I should’ve looked at this pic before I made the connections…I ended up swapping the inlet and return lines. When I started the fuel system, I could hear the Bosch 044 keep building pressure until it sounded like it was stalling. I tried starting the car and nothing…then I realized my mistake and swapped the lines. I re-primed the fuel system and this time could hear the return fuel dumping back into the surge tank; Engine started right up…now I just hope I didn’t hurt the Bosch or filter/regulator!

Once I confirmed the new fuel system was working, I took it for a drive and confirmed WOT @ higher RPM’s that it stayed rich (~0.8 volts); after that I did a few 2nd/3rd gear pulls to redline…WOW, this thing is fun! With the fuel system done, I installed the Front/Rear Sway bars and braces installed…The steering feels heavier, and bump steer is fairly hard. Reminds me why I’m installing PS.
Rear sway: I installed the rear bar and was rotating it up and down (simulating it’s expected movement) and noticed it had an interference with the Transmission adapter to the engine. Rather than shaving off some of the adapter, I just cut the bar and welded the center section offset. I added extra weld material at the transitions to try to recover some of the lost torsional rigidity. I always assumed I’d be upgrading the sway bars to something w/ adjustability, so I wasn’t too worried about cutting this OEM unit.


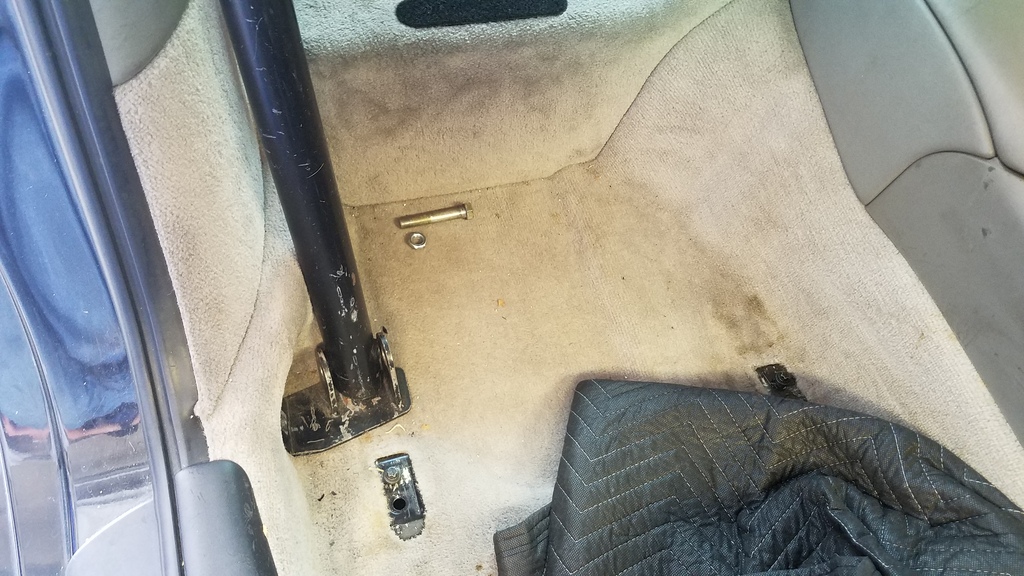
Now that the interior was coming back together, I permanently installed the LS3 ECU/fuse panel on the top shelf. I then installed the used DAS roll bar…it’s really nice, hefty, and fit perfectly. Looking at the design, I think it’s really solid…the only unique portion is the front lower footings; they are secured to the sides where the front seat belts bolt to, and then the footings allow the lower portion of the roll bar to slide into place and bolted down. Ultimately it’s a really snug fit, and the footing is enough that it’d have to be a really hard hit for them to puncture the floor…especially b/c they’re at the base of a structural area of the car.

Eye bolts lower mounts of the roll bar: I had some Eye bolts, but they weren’t long enough…so I bought longer bolts and just welded the Eye portion on.

Roll bar bottom front: You have to bolt the lower mounts to the seat belt holes…which means you can’t (at least not easily) route the bottom of the seat belt through the seat lap belt holes (b/c the seats have to be removed for the roll bar install.
Roll bar installed

Side driver’s panels installed: Most of my wiring runs the driver’s side…the speaker hole is a convenient access point. I’ll tidy things up later and then install the speaker.

Installing seats: nothing exciting….but reason #100 why I love a lift; doing seat belt bolts at standing height is soooo much easier!

Now that I have the full interior back in the car, the engine sound is greatly diminished….it’s still louder than I want, but there’s minimal drone and at freeway speeds it’s a non-issue. The bad part is that I can now hear how much the dash is rattling…the front seems to be flexing a lot and is really jittery over uneven pavement; I’ll try softening the front shocks, but I think this dash is going to rattle regardless; I’m wondering if I can spray some grease or silicon on the various joints/seams to reduce it??
I had my wife sit in the car for the first time…she was really shocked at how nice it looked; she’s accustomed to my “car projects” resulting in stripped interiors J
Question 1: The engine died on my way home…this is the 3rd time it’s done it. All 3 times have been going down hill (2 times when it was steep, this last time a low grade), while braking and low speed (~5-15MPH). I’ve also had a higher idle at times (usually when it’s cold)…I’m wondering if I have a brake boost vacuum leak. Any other thoughts?
Question 2: I remember reading that there’s some fairly “easy” tuning that can be done w/ the LS376/525 ECU to greatly improve low rpm surging and take out some areas that are excessively rich. I plan on getting a dyno tune this coming weekend…does anyone have more detailed information that I can pass along to the tuner? They’re a good local shop, just not sure if they have any specific experience with this crate motor.
UPS Man bringing me the last of the fuel connections:

Fuel system is Done! I wasn’t sure if the OEM pump wiring (driven by the LS3) could handle both the OEM fuel pump and the Bosch 044, so I used the OEM fuel pump power as the trigger to a new relay that powers the Bosch directly to the battery (w/ inline 30amp fuse). I plan to use the same relay to power the new electric Power Steering pump (once I install it). BTW…these 6AN fittings are expensive once you add them all up.

I’m using the Corvette LS3 Fuel Filter/Regulator which meets the fuel pressure the LS3 ECU is expecting: I should’ve looked at this pic before I made the connections…I ended up swapping the inlet and return lines. When I started the fuel system, I could hear the Bosch 044 keep building pressure until it sounded like it was stalling. I tried starting the car and nothing…then I realized my mistake and swapped the lines. I re-primed the fuel system and this time could hear the return fuel dumping back into the surge tank; Engine started right up…now I just hope I didn’t hurt the Bosch or filter/regulator!

Once I confirmed the new fuel system was working, I took it for a drive and confirmed WOT @ higher RPM’s that it stayed rich (~0.8 volts); after that I did a few 2nd/3rd gear pulls to redline…WOW, this thing is fun! With the fuel system done, I installed the Front/Rear Sway bars and braces installed…The steering feels heavier, and bump steer is fairly hard. Reminds me why I’m installing PS.
Rear sway: I installed the rear bar and was rotating it up and down (simulating it’s expected movement) and noticed it had an interference with the Transmission adapter to the engine. Rather than shaving off some of the adapter, I just cut the bar and welded the center section offset. I added extra weld material at the transitions to try to recover some of the lost torsional rigidity. I always assumed I’d be upgrading the sway bars to something w/ adjustability, so I wasn’t too worried about cutting this OEM unit.


Now that the interior was coming back together, I permanently installed the LS3 ECU/fuse panel on the top shelf. I then installed the used DAS roll bar…it’s really nice, hefty, and fit perfectly. Looking at the design, I think it’s really solid…the only unique portion is the front lower footings; they are secured to the sides where the front seat belts bolt to, and then the footings allow the lower portion of the roll bar to slide into place and bolted down. Ultimately it’s a really snug fit, and the footing is enough that it’d have to be a really hard hit for them to puncture the floor…especially b/c they’re at the base of a structural area of the car.

Eye bolts lower mounts of the roll bar: I had some Eye bolts, but they weren’t long enough…so I bought longer bolts and just welded the Eye portion on.

Roll bar bottom front: You have to bolt the lower mounts to the seat belt holes…which means you can’t (at least not easily) route the bottom of the seat belt through the seat lap belt holes (b/c the seats have to be removed for the roll bar install.

Roll bar installed

Side driver’s panels installed: Most of my wiring runs the driver’s side…the speaker hole is a convenient access point. I’ll tidy things up later and then install the speaker.

Installing seats: nothing exciting….but reason #100 why I love a lift; doing seat belt bolts at standing height is soooo much easier!

Now that I have the full interior back in the car, the engine sound is greatly diminished….it’s still louder than I want, but there’s minimal drone and at freeway speeds it’s a non-issue. The bad part is that I can now hear how much the dash is rattling…the front seems to be flexing a lot and is really jittery over uneven pavement; I’ll try softening the front shocks, but I think this dash is going to rattle regardless; I’m wondering if I can spray some grease or silicon on the various joints/seams to reduce it??
I had my wife sit in the car for the first time…she was really shocked at how nice it looked; she’s accustomed to my “car projects” resulting in stripped interiors J
Question 1: The engine died on my way home…this is the 3rd time it’s done it. All 3 times have been going down hill (2 times when it was steep, this last time a low grade), while braking and low speed (~5-15MPH). I’ve also had a higher idle at times (usually when it’s cold)…I’m wondering if I have a brake boost vacuum leak. Any other thoughts?
Question 2: I remember reading that there’s some fairly “easy” tuning that can be done w/ the LS376/525 ECU to greatly improve low rpm surging and take out some areas that are excessively rich. I plan on getting a dyno tune this coming weekend…does anyone have more detailed information that I can pass along to the tuner? They’re a good local shop, just not sure if they have any specific experience with this crate motor.
06-13-2017 | 05:46 AM
#88

Staging Lane

Joined: Oct 2014
Posts: 92
Likes: 3
You might want to check the fuel rail pressure .I went thru two corvette regulators before switching to a fuel pressure regulator .The corvette regulator would not bring the pressure down to 58 psi .Some of the drivability issues could be related to no vss signal .
06-13-2017 | 12:44 PM
#89

TECH Resident
Joined: Feb 2014
Posts: 954
Likes: 9
From: Encinitas CA
Awesome progress!
I had thought I read about idle issues with lower rotational mass fly wheels. Maybe that is an issue to explore?
Also, I might suggest using a separate relay to power the electric power steering. Last thing you'd want is that dropping voltage to your fuel pump.
cheers,
Doug
I had thought I read about idle issues with lower rotational mass fly wheels. Maybe that is an issue to explore?
Also, I might suggest using a separate relay to power the electric power steering. Last thing you'd want is that dropping voltage to your fuel pump.
cheers,
Doug
06-15-2017 | 03:50 PM
#90
Thread Starter
Staging Lane
Joined: Jan 2016
Posts: 51
Likes: 0
Do you know what kind of signal the LS3 VSS is looking for...wonder if the Porsche speedo (that comes from the ABS sensors) would work.
Awesome progress!
I had thought I read about idle issues with lower rotational mass fly wheels. Maybe that is an issue to explore?
Also, I might suggest using a separate relay to power the electric power steering. Last thing you'd want is that dropping voltage to your fuel pump.
cheers,
Doug
I had thought I read about idle issues with lower rotational mass fly wheels. Maybe that is an issue to explore?
Also, I might suggest using a separate relay to power the electric power steering. Last thing you'd want is that dropping voltage to your fuel pump.
cheers,
Doug
Relay: good point. I was thinking about IF the fuse popped, but since I would loose PS, that failure mode would not be latent. But a dropping voltage would be hard to catch...and I was looking at the relay wire guage, which seemed too small to handle up to ~60 amps (I'm reading ~30amps peak start up for both the fuel and power steering pumps).
06-15-2017 | 04:14 PM
#91
Staging Lane
Joined: Oct 2014
Posts: 92
Likes: 3
The gm ecm is looking for a sine wave -the signal into the Porsche dme from the abs controller is a digital square wave easily converted to a sine wave with a 1uf capacitor and 1 meg resistor .If you do a search on this forum :solution swap 3 wire vss the how to is there .It's for a Toyota but works for the Porsche .
06-18-2017 | 04:08 PM
#92
Thread Starter
Staging Lane
Joined: Jan 2016
Posts: 51
Likes: 0
The gm ecm is looking for a sine wave -the signal into the Porsche dme from the abs controller is a digital square wave easily converted to a sine wave with a 1uf capacitor and 1 meg resistor .If you do a search on this forum :solution swap 3 wire vss the how to is there .It's for a Toyota but works for the Porsche .
06-18-2017 | 04:10 PM
#93
Thread Starter
Staging Lane
Joined: Jan 2016
Posts: 51
Likes: 0
next update: Was gone most of the week for a work trip...so I took off Friday to get some QT w/ the 996.
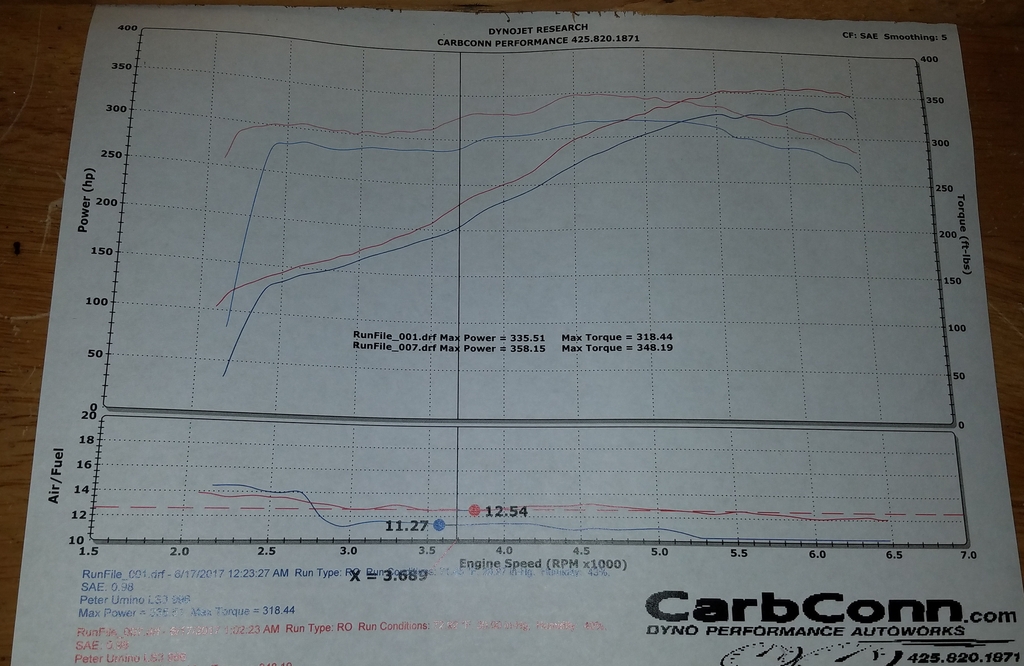
Dyno: I’ve been working towards this day for a long time…was so excited until I saw the 1st run w/ <350HP.

Getting tuned: I used this shop earlier when I needed some CEL’s turned off to the pass emissions, so I had already paid the HP Tuner’s license fee. They’ve got a good reputation and knew what they were doing…and they’re 5 minutes from my house.

Dyno chart before/after: He made good gains…but it started really low
Thoughts:
1) I was expecting ~420HP (525HP with a 20% drivetrain loss)…so clearly something is wrong.
2) RWD/AWD: while the front driveshaft was disconnected, I don’t think this should account for any power loss…if anything, the drivetrain loss should be less.
3) Intake Air Temperature: It was ~65F ambient and my IAT was hovering around 140-150F. the Tuner could see it pulling timing & the knock sensor was pulling more. I assume this is a big (if not all) of the cause...but ~100 HP does seem like a lot to loose just from hot intake temps.
4) Bad Gas: ? I filled up with 92 Octane from Chevron and haven’t felt any driving issues…plus, I’ve put on more than 500 miles now, so the old gas (which sat for 10 months) should have been flushed out by now.
5) Cats: I installed used Camaro SS cats (primary & secondary)…they had looked like new and no signs of clogging. I’m wondering if the big 525 cam just moved the restriction to the exhaust and is ineffective. I plan to make either test pipes OR get a free flowing chambered muffler (I’m worried about being too loud).
6) Transmission: it doesn’t feel like I have a lot of loss through the tranny (ie. when I’m slowing down w/ no throttle), but my 3rd gear does whine, so maybe there’s a bit more resistance.
7) The GMPP ECU was really rich…10:1 in some areas. Pretty easy for the tuner to make descent gains. (+23HP, +30TQ). In any other situation, I would’ve been thrilled with this.
8) Redline: We kept the redline at 6,600 rpms. Sounds like many bump it to 6,800, but I didn’t see the point. If I was going to bump it, I would’ve wanted to match the 996 redline of 7,000…but that didn’t sound advisable. They switched the style of redline, rather than the orginal power cut (throttle butterfly plate being closed which causing a very abrupt power cut) we used an ignition cut (“banging off the rev limiters” style).
9) Idle: OE it’s high 900’s…I didn’t mind where it was, and when he tried to lower it, there was some odd surging. In the end he left it at the factory setting.
Heat: After I got home I quickly used some cardboard, duct tape, and some left over heatsheild to box in the air filter. It sits in the passenger side area of the bumper (where the OE muffler’s sit). It’s really close to the cats, so I was hoping this would force ambient air to be drawn in from the bumper slots. Clearly not working…Even while cruising on the freeway, the intake temps was ~150F, and this is with ambient around 60-70F. I think these bumper slots was designed specifically for the Turbo (the 4S has them b/c it shares the widebody); it looks like it’s a low pressure zone…which makes sense b/c it’d help pull the air out of the Intercoolers (the air enters the scoops ahead of the rear wheels, is ducted through the intercoolers, and then dumped back in this area).
My next plan is to leave all of this box’d in, but figure out a way to duct in fresh air…I’m wondering if I can run a slim duct to 1) the top inside of the rear passenger wheel (that area usually has high pressure) or 2) under the car low enough to get moving air.


AWD: I had heard it was better to dyno w/ RWD (less to worry about), so I finnaly installed the front driveshaft. I supported the Tranny, then dropped the bracket to install the Front Drivshaft…overall pretty easy to do. Now I need to figure out how to better test if the front diff is working…It was raining last night when I went for a test and the rear wheels spun fairly easily; if I understand the AWD correctly, the front diff should transfer as much as 40% of the power when the rear starts to loose traction…it didn’t feel like that was happening. I’ve also read that the front diff wears out…w/ 150K miles, I’m assuming that likely occurred and I need to refresh it. All of this makes me consider converting it to RWD…less weight, I could convert to better front geometry, and I could run a large duct up front for the intake filter.

Front Sway Bar drop links: I noticed the drop links had some rubbing/interference…so I finally took some time to figure out what was going on. The AWD front spindles are a PITA…it makes some really odd geometry; after it’s all connected, I pushed/pulled the rack to get the full motion…it took awhile to finnaly position everything so that there was no interference. It was interesting to feel that when turning the rack, 1 side is pulling up on the sway bar while the other is pushing down….it all makes sense while the steering felt so much easier w/ the sway bar wasn’t installed!

Charging the battery via engine bay: I had left the key in the ignition (to unlock the steering rack so that I could move the rack back/forth for the sway bar drop links)…with the front engine hood closed, this was the next easiest thing. I know there’s a metal wire behind the Passenger headlight, but I couldn’t easily find it.

Lift ramps: got a 2nd set of ramps that extend the orginal ones…my driveway is on a slop (uphill), which limits clearance, and I plan on lowering the car another ~1”. This should help prevent any scraping.

Coolant leak: I’ve seen about 1 drop per day of coolant on the ground…finally took the time to trace it down. Looks like 1 of the clamps was a little loose…also found some coolant tubes that were rubbing a bit (zip tie’d the red foam pad to prevent any future issues)

Engine Hood Props: With the wing installed, the old props wouldn’t hold the weight…I’m glad these new ones easily hold it in place, I was worried the OE units wouldn’t hold the wing’s weight, luckily they were just old J

Porsche Driving Experience LA: At my last work trip I finished 2 hrs early and was down the street from the new (?) Porsche driving experience…I dropped by hoping that there would be a cancelation, but no luck. They were super nice and let me walk around…lots of cool cars, and the driving course looked really interesting!

Slingshot Trike: Met up with a friend in LA and got to take his car/bike for a drive…pretty fun! 170HP @ 1,700lbs, so nothing crazy, but plenty of power for an eager chassis. The front is very open, really odd sensation…just like a bike (go figure).

Dyno: I’ve been working towards this day for a long time…was so excited until I saw the 1st run w/ <350HP.

Getting tuned: I used this shop earlier when I needed some CEL’s turned off to the pass emissions, so I had already paid the HP Tuner’s license fee. They’ve got a good reputation and knew what they were doing…and they’re 5 minutes from my house.

Dyno chart before/after: He made good gains…but it started really low

Thoughts:
1) I was expecting ~420HP (525HP with a 20% drivetrain loss)…so clearly something is wrong.
2) RWD/AWD: while the front driveshaft was disconnected, I don’t think this should account for any power loss…if anything, the drivetrain loss should be less.
3) Intake Air Temperature: It was ~65F ambient and my IAT was hovering around 140-150F. the Tuner could see it pulling timing & the knock sensor was pulling more. I assume this is a big (if not all) of the cause...but ~100 HP does seem like a lot to loose just from hot intake temps.
4) Bad Gas: ? I filled up with 92 Octane from Chevron and haven’t felt any driving issues…plus, I’ve put on more than 500 miles now, so the old gas (which sat for 10 months) should have been flushed out by now.
5) Cats: I installed used Camaro SS cats (primary & secondary)…they had looked like new and no signs of clogging. I’m wondering if the big 525 cam just moved the restriction to the exhaust and is ineffective. I plan to make either test pipes OR get a free flowing chambered muffler (I’m worried about being too loud).
6) Transmission: it doesn’t feel like I have a lot of loss through the tranny (ie. when I’m slowing down w/ no throttle), but my 3rd gear does whine, so maybe there’s a bit more resistance.
7) The GMPP ECU was really rich…10:1 in some areas. Pretty easy for the tuner to make descent gains. (+23HP, +30TQ). In any other situation, I would’ve been thrilled with this.
8) Redline: We kept the redline at 6,600 rpms. Sounds like many bump it to 6,800, but I didn’t see the point. If I was going to bump it, I would’ve wanted to match the 996 redline of 7,000…but that didn’t sound advisable. They switched the style of redline, rather than the orginal power cut (throttle butterfly plate being closed which causing a very abrupt power cut) we used an ignition cut (“banging off the rev limiters” style).
9) Idle: OE it’s high 900’s…I didn’t mind where it was, and when he tried to lower it, there was some odd surging. In the end he left it at the factory setting.
Heat: After I got home I quickly used some cardboard, duct tape, and some left over heatsheild to box in the air filter. It sits in the passenger side area of the bumper (where the OE muffler’s sit). It’s really close to the cats, so I was hoping this would force ambient air to be drawn in from the bumper slots. Clearly not working…Even while cruising on the freeway, the intake temps was ~150F, and this is with ambient around 60-70F. I think these bumper slots was designed specifically for the Turbo (the 4S has them b/c it shares the widebody); it looks like it’s a low pressure zone…which makes sense b/c it’d help pull the air out of the Intercoolers (the air enters the scoops ahead of the rear wheels, is ducted through the intercoolers, and then dumped back in this area).
My next plan is to leave all of this box’d in, but figure out a way to duct in fresh air…I’m wondering if I can run a slim duct to 1) the top inside of the rear passenger wheel (that area usually has high pressure) or 2) under the car low enough to get moving air.


AWD: I had heard it was better to dyno w/ RWD (less to worry about), so I finnaly installed the front driveshaft. I supported the Tranny, then dropped the bracket to install the Front Drivshaft…overall pretty easy to do. Now I need to figure out how to better test if the front diff is working…It was raining last night when I went for a test and the rear wheels spun fairly easily; if I understand the AWD correctly, the front diff should transfer as much as 40% of the power when the rear starts to loose traction…it didn’t feel like that was happening. I’ve also read that the front diff wears out…w/ 150K miles, I’m assuming that likely occurred and I need to refresh it. All of this makes me consider converting it to RWD…less weight, I could convert to better front geometry, and I could run a large duct up front for the intake filter.

Front Sway Bar drop links: I noticed the drop links had some rubbing/interference…so I finally took some time to figure out what was going on. The AWD front spindles are a PITA…it makes some really odd geometry; after it’s all connected, I pushed/pulled the rack to get the full motion…it took awhile to finnaly position everything so that there was no interference. It was interesting to feel that when turning the rack, 1 side is pulling up on the sway bar while the other is pushing down….it all makes sense while the steering felt so much easier w/ the sway bar wasn’t installed!

Charging the battery via engine bay: I had left the key in the ignition (to unlock the steering rack so that I could move the rack back/forth for the sway bar drop links)…with the front engine hood closed, this was the next easiest thing. I know there’s a metal wire behind the Passenger headlight, but I couldn’t easily find it.

Lift ramps: got a 2nd set of ramps that extend the orginal ones…my driveway is on a slop (uphill), which limits clearance, and I plan on lowering the car another ~1”. This should help prevent any scraping.

Coolant leak: I’ve seen about 1 drop per day of coolant on the ground…finally took the time to trace it down. Looks like 1 of the clamps was a little loose…also found some coolant tubes that were rubbing a bit (zip tie’d the red foam pad to prevent any future issues)

Engine Hood Props: With the wing installed, the old props wouldn’t hold the weight…I’m glad these new ones easily hold it in place, I was worried the OE units wouldn’t hold the wing’s weight, luckily they were just old J

Porsche Driving Experience LA: At my last work trip I finished 2 hrs early and was down the street from the new (?) Porsche driving experience…I dropped by hoping that there would be a cancelation, but no luck. They were super nice and let me walk around…lots of cool cars, and the driving course looked really interesting!

Slingshot Trike: Met up with a friend in LA and got to take his car/bike for a drive…pretty fun! 170HP @ 1,700lbs, so nothing crazy, but plenty of power for an eager chassis. The front is very open, really odd sensation…just like a bike (go figure).
 06-18-2017 | 06:21 PM
#94
Start by pulling that exhaust off, you are getting robbed somewhere. My LS2 with a crappy 915 trans was putting down 400hp and 425lbs torque at the wheels all stock motor.
Have a look at this muffler and see if it will squeeze under your back bumper and run test pipes. Overall sound is not that loud and similar to a C5 Vette.
http://www.dynomax.com/mufflers/ultr...ded-x-mufflers
Have a look at this muffler and see if it will squeeze under your back bumper and run test pipes. Overall sound is not that loud and similar to a C5 Vette.
http://www.dynomax.com/mufflers/ultr...ded-x-mufflers
06-28-2017 | 07:13 PM
#96
Thread Starter
Staging Lane
Joined: Jan 2016
Posts: 51
Likes: 0
Thanks for the video Todd...I'm really hoping I don't need to replace my 4 HP-2 mufflers; I made some test pipes and that seemed to help a lot (Butt dyno and cooler Intake Temps), but it was fairly loud. Next step is to put a small chambered muffler as part of the Test pipes to try to knock down the noise without impacting power or temps.