
'Round these wheels in 80 (?) days
 04-20-2018, 06:06 AM
#21

Have you thought about ordering a different radiator? I know that Superior Radiator in Mt. Clemens. MI builds some S10 swap radiators, and they get pretty good reviews. As I understand it, they also build custom units...and (at least on the S10 swap radiator) they have the filler neck come back toward the driver's compartment so you don't have to notch the core support. They're S10 unit is meant to recess into the core support.
http://www.wwwsuperiorradiator.com/s10_v-8
Just a thought. then there's no need to mess up the pain in the engine bay, anyway.
Jay
http://www.wwwsuperiorradiator.com/s10_v-8
Just a thought. then there's no need to mess up the pain in the engine bay, anyway.
Jay
 04-20-2018, 09:34 AM
#22

MUCH appreciated Jay, thank you! Before ordering the Frostbite radiator, I called around to a bunch of places that make/sell radiators (both locally & around the country), but all of the other options that I found were cost-prohibitive (around $800-$1100). I'll be giving them a call on my way to work this morning & see what they have to say. It would make me pretty happy if I could get a radiator that wouldn't require customization! 
04-20-2018, 06:40 PM
#23
Well, I did a bit of research today, & from everything I found, Superior Radiator has a really good reputation. I called & spoke with them, liked the answers I received, so the new rad should be here within a week to 10 days. 
Thanks again for the pointer Jay!!
EDIT: A bit more info (now that I have a little bit more time):
FWIW, the Frostbite radiator looks really nice, it seems to be made from good material, plenty sturdy, welds look good, & polished all shiny & "real purty". If only it actually FIT!
The guy I spoke with at Superior Radiator told me that one of the biggest problems with the stock 3rd- and 4th-gen F-body setups is that the radiators are leaned back for hood clearance, which noticeably hinders airflow through the radiator. They make their radiator a bit shorter than stock (less than 1", IIRC) so that it can "stand up more straight" & from what he told me, they have local customers who are making 1500 hp at the wheels, & these radiators are working just fine for them...
I paid $400 for the Frostbite, the one from Superior cost $600 - but that $600 includes a shroud & two fans (that have a 2-year warranty), so I feel that's a pretty solid deal. I was going to use a pair of fans that I'd scrounged from a local junkyard (Taurus fans, IIRC), but this way I don't have to fab up a custom shroud. Getting those parts + saving that bit of fabrication time is easily worth $200 to me.
Based on what he told me, & the reviews that I've read, I'm looking forward to getting my grubby mitts on it...
Last edited by Cheese Weasel; 04-20-2018 at 08:51 PM. Reason: Additional info
04-26-2018, 07:03 PM
#24
Holy mackerel - I've actually gotten a day where:
* I got off work early enough to be useful;
* I'm not completely exhausted;
* and we have decent weather!!
Let's see what I can get done this evening!
EDIT: Forgot to add
* No "honey-do's"!
Update - Wife found my camera (in her glovebox of all places), so I'll be able to ask a couple of the questions I've had. Not tonight though, it's gotten too late. Made a little bit of progress on the car, but a fair amount of time was taken up by a small fabrication effort & some test-fitting, which slowed things down some...
Last edited by Cheese Weasel; 04-27-2018 at 12:08 AM. Reason: More info...
04-28-2018, 01:26 PM
#25
Going to try to cram a quick update in while I have a couple of minutes free (which seems to be the biggest challenge lately...). 
The little fabrication project that I referred to in my previous message was my decision to fabricate the flanges for the exhaust-side of the exh. manifolds that I'm using, since I felt that $40/each was highway robbery. Well, I still feel like it's robbery, but after spending a bit of time with my drill press, hole saw & die grinder on the $10 piece of mild steel I bought (that turned out to be too small to make both pieces anyway!), I'm probably going to just suck it up & buy the driver's side flange... With this deadline I simply can't afford to burn time like that.
Since my wife found my camera, I can ask a couple of questions that I've had. The first one is this - if you look at this picture, you might be able to see that the idler pulley in the center protrudes forward a bit too far (roughly 3/4" IIRC).
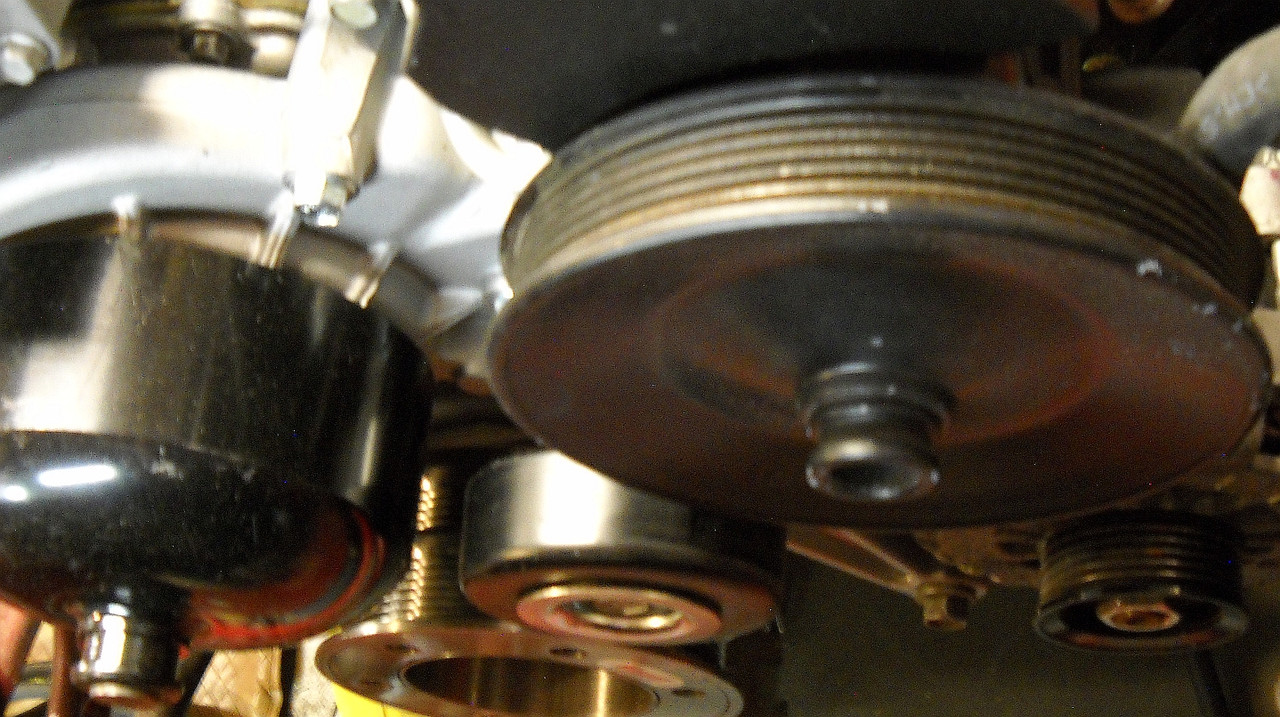
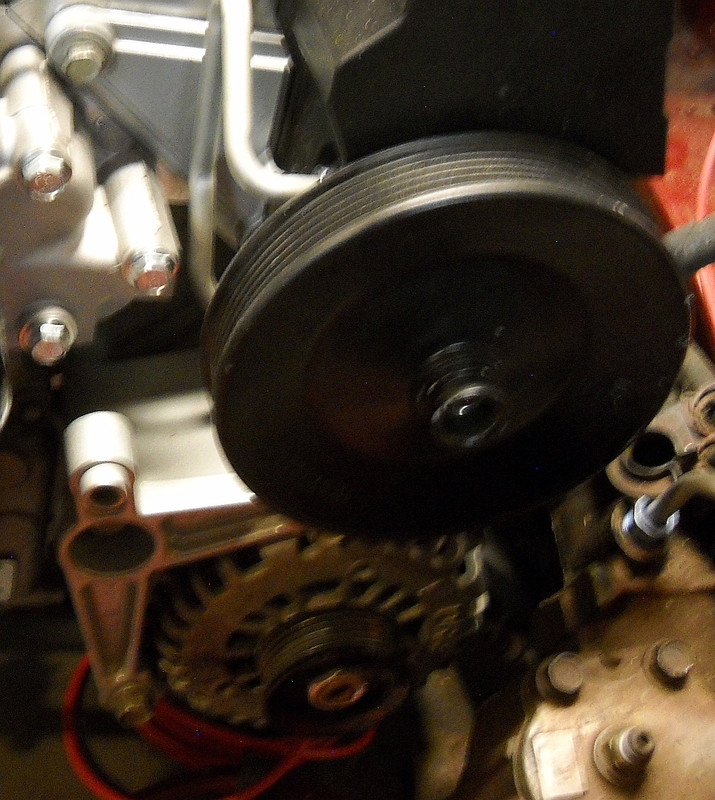
I'm pretty sure that this bracket that it mounts to (in the picture below) is the correct (4th-gen F-body) bracket, but can someone confirm that?? And if it is the correct bracket, then I need to check the PN of the pulley assembly itself, just to confirm that I'm not trying to use a truck part, I guess. Anyone have any suggestions here??
The little fabrication project that I referred to in my previous message was my decision to fabricate the flanges for the exhaust-side of the exh. manifolds that I'm using, since I felt that $40/each was highway robbery. Well, I still feel like it's robbery, but after spending a bit of time with my drill press, hole saw & die grinder on the $10 piece of mild steel I bought (that turned out to be too small to make both pieces anyway!), I'm probably going to just suck it up & buy the driver's side flange...
With this deadline I simply can't afford to burn time like that.Since my wife found my camera, I can ask a couple of questions that I've had. The first one is this - if you look at this picture, you might be able to see that the idler pulley in the center protrudes forward a bit too far (roughly 3/4" IIRC).
I'm pretty sure that this bracket that it mounts to (in the picture below) is the correct (4th-gen F-body) bracket, but can someone confirm that?? And if it is the correct bracket, then I need to check the PN of the pulley assembly itself, just to confirm that I'm not trying to use a truck part, I guess. Anyone have any suggestions here??
04-28-2018, 01:57 PM
#26
The other stuff I've been working on has primarily been getting the battery power run from the rear of the car up to the starter & block - yes, I'm running both cables. I know that a lot of people just run a short ground cable to the chassis, but I feel that running a full circuit (with the ground attached close to the starter) is likely to be more reliable in the long run. I've been trying to avoid having to add any new holes in the firewall, which is why I've run the cables out through the fender (as shown in the picture below),

...and it looks like that might work OK for the negative cable, but the positive cable (which is red, but appears pink in the photo) isn't as flexible, & I'm resigning myself to the fact that I'll probably have to run that one through the firewall. What kinds of sealant do you guys like to seal up holes in the firewall?? I do have a grommet that I'll probably be using, but that doesn't offer much protection in case of fire, & I'd like to have a bit more weatherproofing as well. (FWIW, I do have a piece of aluminum sheet that I was thinking of using to cover the cable(s) that come out of the hole shown above if I go that route.)
And in case anyone's curious, I'm attaching the negative cable to the block right above the starter:

Constructive comments/suggestions welcome.
...and it looks like that might work OK for the negative cable, but the positive cable (which is red, but appears pink in the photo) isn't as flexible, & I'm resigning myself to the fact that I'll probably have to run that one through the firewall. What kinds of sealant do you guys like to seal up holes in the firewall?? I do have a grommet that I'll probably be using, but that doesn't offer much protection in case of fire, & I'd like to have a bit more weatherproofing as well. (FWIW, I do have a piece of aluminum sheet that I was thinking of using to cover the cable(s) that come out of the hole shown above if I go that route.)
And in case anyone's curious, I'm attaching the negative cable to the block right above the starter:
Constructive comments/suggestions welcome.
04-28-2018, 05:35 PM
#27

I just started my own super tight deadline build, and am on here now only because I'm letting primer dry between coats...But anyway, your pulley looks right to me. This is a factory set up ive had on a stand for years and it sticks out a bit too. Id put a belt on it to verify it though.
04-29-2018, 12:44 PM
#28
ls1nova71, thank you for posting that, I'll pick up a belt & see how it looks.
I wrote the following a couple days ago, but I didn't post it because I didn't want to distract from the two questions I had (FWIW, I'm still looking for an answer on the firewall sealant, but I'll do some research online & see what I can find...):
After puzzling over the items in the two previous posts last night, I felt like I needed a "quick/easy win" to help me feel like I still had a bit of momentum going. So I grabbed the intake manifold (which hadn't been bolted down yet), & applied this sheet of Thermo-Tec insulation to the bottom. I got a sheet that (if memory serves) was 12" x 24" from an Amazon vendor for less than $15. It's about the thickness of a sheet of paperboard (maybe around the same thickness as 6 or 8 sheets of paper), cuts easily with scissors, & it seems to have a pretty good adhesive. I thought about adding some of this material to the spots between the intake ports in order to provide additional protection against heat, but decided against it, since I didn't want to take a chance on causing even a small vacuum leak.
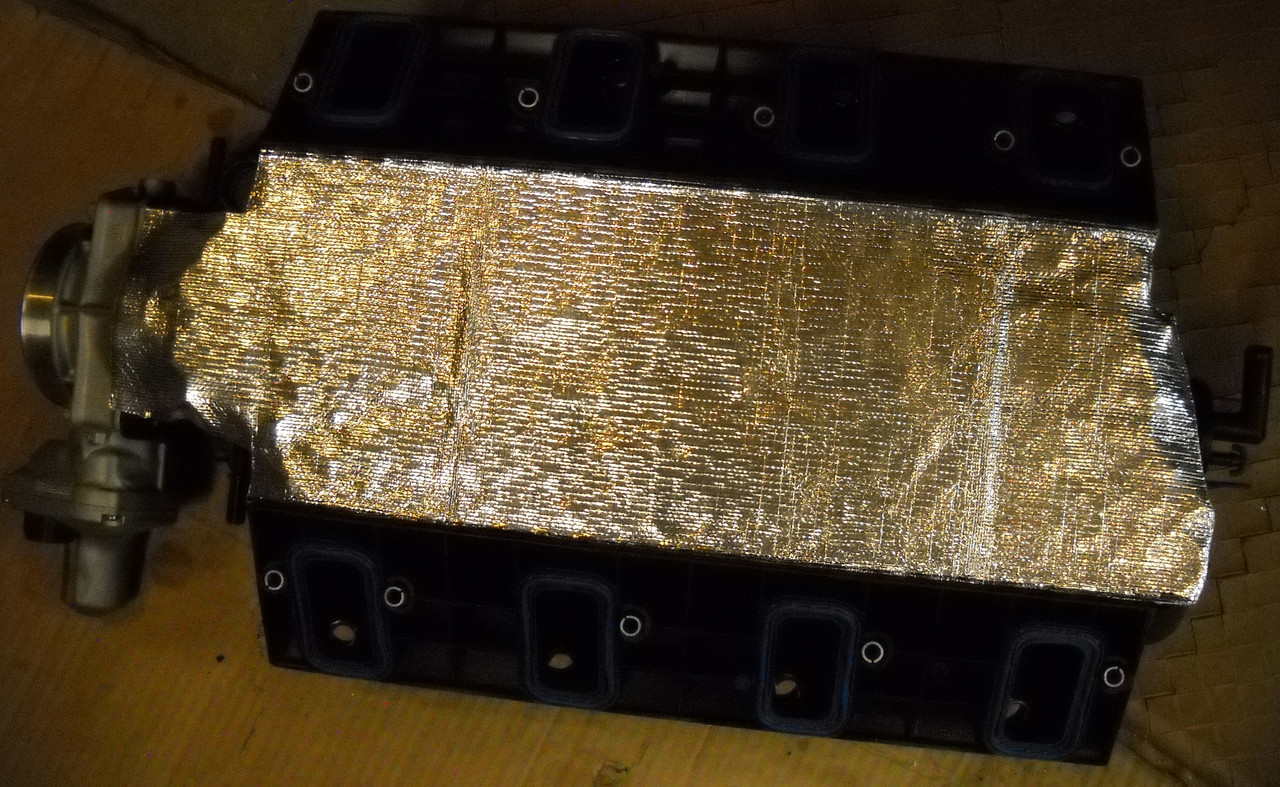
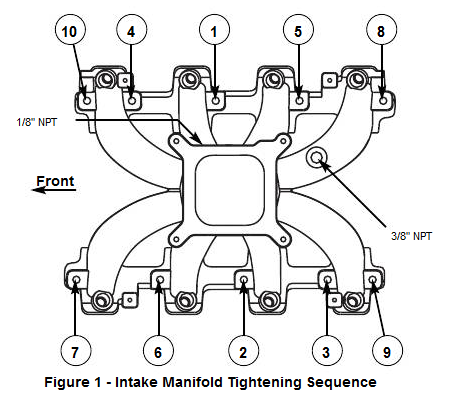
After trimming it to fit & sticking it to the bottom of the manifold, I removed the tape that had been covering the intake ports in the heads, dropped the manifold in place & bolted it on using this diagram as a guide for the tightening sequence.
(At this point, I took a minute to admire the engine - to me, the LS engine looks best before it has the fuel rails & coils bolted on to it. Just "cleaner", I guess.) Once that was done, I bolted the fuel rails/injectors on & called it a night. It is always nice to have something bolted on with the knowledge that it's DONE & you (probably!) won't have to mess with that any more...
I didn't get a lot done yesterday (it's springtime, so my old nemesis "yardwork" is rearing it's ugly head ), but I did make a bit more progress last night toward getting the battery cables finished. I'm determined to make some serious progress on it today!
I wrote the following a couple days ago, but I didn't post it because I didn't want to distract from the two questions I had (FWIW, I'm still looking for an answer on the firewall sealant, but I'll do some research online & see what I can find...):
After puzzling over the items in the two previous posts last night, I felt like I needed a "quick/easy win" to help me feel like I still had a bit of momentum going. So I grabbed the intake manifold (which hadn't been bolted down yet), & applied this sheet of Thermo-Tec insulation to the bottom. I got a sheet that (if memory serves) was 12" x 24" from an Amazon vendor for less than $15. It's about the thickness of a sheet of paperboard (maybe around the same thickness as 6 or 8 sheets of paper), cuts easily with scissors, & it seems to have a pretty good adhesive. I thought about adding some of this material to the spots between the intake ports in order to provide additional protection against heat, but decided against it, since I didn't want to take a chance on causing even a small vacuum leak.
After trimming it to fit & sticking it to the bottom of the manifold, I removed the tape that had been covering the intake ports in the heads, dropped the manifold in place & bolted it on using this diagram as a guide for the tightening sequence.
(At this point, I took a minute to admire the engine - to me, the LS engine looks best before it has the fuel rails & coils bolted on to it. Just "cleaner", I guess.) Once that was done, I bolted the fuel rails/injectors on & called it a night. It is always nice to have something bolted on with the knowledge that it's DONE & you (probably!) won't have to mess with that any more...
I didn't get a lot done yesterday (it's springtime, so my old nemesis "yardwork" is rearing it's ugly head
), but I did make a bit more progress last night toward getting the battery cables finished. I'm determined to make some serious progress on it today!
05-06-2018, 11:18 AM
#30
Well, I won't be attending that car show as a participant this year - I've discovered a couple of difficulties with the wiring harness (yes, it was created by a "reputable" board sponsor). 

I'm still going to push to get the swap done as quickly as I'm able to, but the June 9th date is probably not realistic at this point. 
I'm still going to push to get the swap done as quickly as I'm able to, but the June 9th date is probably not realistic at this point.
05-11-2018, 12:07 AM
#31
The new radiator arrived yesterday. Had a bit of hassle when trying to get the delivery date (I was given three delivery windows, & it arrived on the last day of the 3rd one),  and once again, I never did get a tracking number (despite asking at least twice for it)
  - but the radiator did arrive, & from what I can see so far, it looks pretty good. My initial view:


and once again, I never did get a tracking number (despite asking at least twice for it) - but the radiator did arrive, & from what I can see so far, it looks pretty good. My initial view:I liked the fact that they double-boxed it for shipping...
And opening the inner carton didn't let me down either - the radiator was packed like your grandma's fine china: 
And FINALLY, a look at it:
I'm a little bit underwhelmed by the "shroud" that comes with it, for some reason I was expecting a proper shroud that covers the entire core section - but I have some sheet aluminum that I can slip in there to cover the sides there, so no biggie, I guess. Functionally, perhaps it won't make that big of a difference, I'm not sure.
So how does it actually fit you ask?? It's not a "100% drop-in," but it fits a LOT better than the Frostbite unit that I initially purchased. I'll post a couple photos on that within the next day or so...
So how does it actually fit you ask?? It's not a "100% drop-in," but it fits a LOT better than the Frostbite unit that I initially purchased. I'll post a couple photos on that within the next day or so...
 05-12-2018, 12:04 PM
#34
TECH Senior Member

 05-12-2018, 02:51 PM
#36
Thanks guys, I appreciate it. I guess now I'll contact the vendor & ask them what size thread that uses (I'm guessing it's NPT), so that I can buy a hose adapter for it.
I guess now I'll contact the vendor & ask them what size thread that uses (I'm guessing it's NPT), so that I can buy a hose adapter for it.  05-28-2018, 12:07 PM
#38
Hey, thank you for the interest in this thread! We hosted a BBQ yesterday, had my anniversary & a family birthday recently, + Mother's Day, so not a whole lot of time to work on the car, but I have a good part of today to make some progress, so I should be able to post up "installed" pics of the radiator sometime tonight (I'm hoping). In the meantime, here's what I have...
As you can see by the picture below, the horizontal dimensions of the radiator are pretty much spot-on - from side-to-side it drops into place nicely.


I spent a bit of time thinking about how to address this, whether to pound those "tabs" up, or to cut them off with a cutoff wheel,& I think I'm probably going to cut them off- I think that if I try to pound them up, I'll end up messing up the paint on the top of the core support. :
The other thing that I'm a bit concerned with is that I might need to clearance the top of the core support to make room for the radiator cap - we'll see once I get those two protrusions trimmed off. If I DO have to do some trimming, I'll probably lay down some masking tape & go slowly with my die grinder. I'm hoping that won't be necessary though.
05-28-2018, 01:25 PM
#39
TECH Senior Member
Yeah that DOES look close. Like you said, let's hope no serious work is needed. Cool build!
05-28-2018, 09:41 PM
#40
Well, I got the radiator in today. It's a bit discouraging to realize that that's all that I got done today, but I had to do a bit of fabrication (which isn't my strong suit - yet), & I took the time to try to do it right. Here's what it looks like:
This is a picture that I didn't post back when I received the radiator - it came with this really nice piece of aluminum in the bottom of the carton:


Fitting it to my core support meant that I had to put an extra bend in it, thankfully the first bend that I did got it pretty close, because this metal was almost too thick for my cheap little HF brake. But it worked, & (after some fitting, trimming, making a template so I'd only have to drill the holes once, & filing the rough edges) here's what it looks like now:

To get the radiator to fit, I did have to cut those two pieces circled in yellow above, I really need to shoot a bit of primer & then paint those spots just to keep rust from forming, but that'll have to be next time I touch the radiator - which won't be that long, because...

Yes, I did have to notch the core support for the fill neck. I really didn't want to, but the advantages of having the radiator standing more vertically (& thus passing more air through it more easily) just WAY outweighed the aesthetic concerns. The arrow shows where I need to grind it still more, because the neck is touching the core support, which doesn't allow a radiator cap to rotate.
The only other thing to note with this is that there are still a couple of areas on the sides where air can flow around (instead of through) the radiator. I don't know how well you'll be able to see it on this first picture:


I'm thinking that those are trivial things to work around, & all in all, I'm happy with the way that this radiator fit. I'm not sure why the two protrusions had to be trimmed, or why it was necessary to notch the core support in order to fit the filler neck, but I suspect that maybe this was designed from a Camaro (which has a higher hood line) rather than a Firebird. It wouldn't be the first time that's bitten me...
I also have a minor update on the serpentine pulley misalignment issue that I mentioned several posts above, but this is all the time I have for tonight, I'll have to hit that in the next couple of days...