When you click on links to various merchants on this site and make a purchase, this can result in this site earning a commission. Affiliate programs and affiliations include, but are not limited to, the eBay Partner Network.
I'm going to be adding some wires together to wire my stand alone harness into the fusebox, like a few of the injector wires for example. From what I've read the best way to combine these wires is to strip the insulation off one wire and take the end of another wire, wrap it around the stripped wire, and then solder it together and tape it up. Is there a better method? What's your opinion?
Solder and some sort of heat shrink if you can do it. For splicing a connection in an uncut line where you can't use heat shrink use liquid electrical tape that gets brushed on and then tape of some sort
Be sure you use flux designed for electrical soldering and not plumbing flux -- they're different. Also check your solder joint for any little pieces of sharp wire 'sticking up'. Those can and often do poke through your heat shrink.
First, do a 'net search for how to solder wires. Last thing you need is cold solder joints. Also get a wire holder made for soldering wires together. It has two alligator clips on a bar that hold the wires in place for the process. Don't forget to put the shrink tubing on BEFORE you start the soldering process. Same thing as put the nut on before flaring a brake line!
The factory uses ultrasonic welding when joining many wires (for example in the coil harness) then encases the connection in adhesive shrink tube which seals it up.
I have used the soldering method and the crimp method. I prefer crimp with appropriately sized crimp connectors, step-up/down connectors if appropriate depending on the wire areas being joined - but only if you have the right/good crimpers and I'm not talking about the kind of crimp connectors you find at Home Depot or the local autoparts store. The reason I prefer crimp over solder is that the crimp connection is not as susceptible to cracking due to vibration. In either case, the use of adhesive shrink tube about twice the length of the connection will both prevent corrosion of the connection and provide stress relief.
For solder connections especially on larger gauges wires I strongly recommend a butane soldering torch like a Portasol. They can put a lot of heat into the connection to ensure a good joint where a small electronics soldering iron just doesn't have the power.
Here is a step-by-step overview of doing a multi-wire solder joint using photos and info from my build thread. In this case I needed to join 5 separate wires into one joint for the ignition coils.
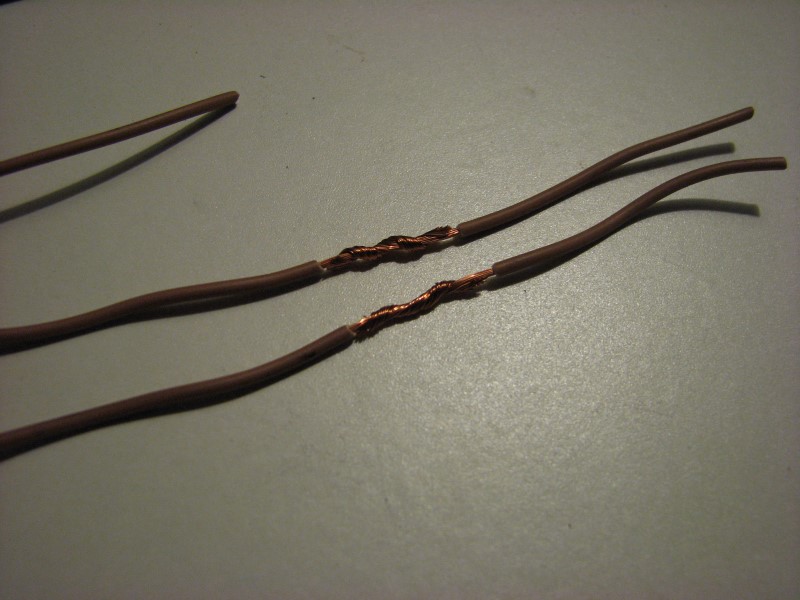
Step 1: Strip and wrap wire
It's very important to strip a sufficient length of insulation and do a good job with tightly wrapping the wire strands. Simple mechanical wrapping of the strands by itself can create a strong wire joint that will not want to separate even without solder. After stripping roughly 1" of each wire, I start by putting a slight bend in both wires about half way, hook them with eachother, then carefully twist/wrap the strands.
If you keep the wires sort of flat next to eachother while you wrap them, you will get a tighter connection. When complete you should pull the two wires apart to get them even tighter. They should tighten down on eachother sort of like a Chinese finger lock.
Above are two wires connected. To join four, I cross two sets of two wires into an "X" and twist them together so the wires are tightly packed and touching.
The last wire in this 5 wire arrangement needs to be stripped longer so there will be enough wire strands to wrap all the way around the now large joint. For this wire I hold the insulation where I want it to be positioned, then I take the loose end of the wire and pull it tightly around as I wind it around the outside.
Step 2: Soldering
I use a 125w Portasol butane soldering torch. This tool is well worth the money for doing this kind of work. I also have a little stand with alligator crimps for holding wire while soldering, but this isn't necessary. First you need to tin the torch by putting a little solder on the tip and wiping it off using a wet sponge. This will coat the tip of the torch with a thin layer of solder to help conduct heat. Once the torch is tinned and clean, place the torch against the wire strands and wait for them to heat. Dip the end of your flux-core solder against the wire strands (NOT the torch) - when the wires are hot enough the solder should melt instantly and wick between all the wire strands. Feed enough solder onto the connection so it flows and coats all the wire strands.
Before solder
After solder
Notice there is enough solder to coat all the wire strands and make good connection between each strand, but not excessive solder blobbing around the joint. Excess solder will eventually crack. Uncoated/unsoldered strands will easily corrode and lose their connection.
Step 3 Heat Shrink
Heat shrink is very important. It serves at least three functions: (1) insulate the connection from accidental shorting/arcing (2) seal the connection to prevent corrosion and (3) provide additional mechanical strength. I highly recommend ADEHSIVE SHRINK for this kind of joint. I was able to find the Delphi adhesive shrink wrap that is used on the factory harness. It is Delphi PN 12186167. They are 2.5" long. I bought a bunch from Mouser. http://www.mouser.com/Search/m_Produ...EaDdmQhlpZiPA= and it includes a sort of expanding foam that does a great job of sealing the joint.
Shrink tube can be shrunk using a heat gun or a butane lighter.
Shrink comes in different sizes and you should get an assortment so you can use a size that is close to the joint size - it will only shrink so far.
I have used both crimp and solder connections on my harness. Here is an example using a crimp connection using Greenlee/Palladin 8000 series ratching crimper, Palladin 2031 indent-style dies, and Molex closed-barrel butt connector.
With this style of connection you are trying to create a very tight mechanical bunching of the wire strands.
Mechanical connections like this can be more reliable than solder-only joints because they are less likely to be affected by vibration. But they must be properly crimped with quality tools and dies because if the wire strands are not very tightly packed the connection will be unreliable. Solder is more "fool proof" because it can fill gaps between strands.
Some feel soldering a crimp connection is the best of both worlds - the solder adds insurance against improper crimping helps seal off corrosion. This may be the best route for hobbyist like us, although solder is completely avoided in factory harnesses.
Last edited by -TheBandit-; 08-27-2018 at 12:14 PM.
If you want a bit more of a mechanical lock between wires without a crimped fitting, I like to hook each end, hook the hooks, and then twist - then solder.
I'm not a fan of the loop-loop method because less overlap of strands from one wire to the other. The only contact is at the loops and it's easy for it to hinge at that location and break the solder.
Don�t use the loop method. Fails too easily. Just twist the wires starting from a X pattern. The loop method is the exact reason why people will say that a crimp connection is better than a solder connection - which it most certainly is not. Nothing is more secure than a solder connection except for an actual weld.
One additional precaution is to wear those cheap plastic gloves when doing this work to avoid contaminating the copper with dirty fingers just before you solder.
I take the plastic covered butt-connectors, hold them against a grinder wheel to remove the plastic, then the barrel from inside. Then, I crimp each of the wires to be connected into either end of the butt connector-after using flux, then I solder them together, then I heat shrink them, then I use the liquid sealer type tape on the ends for added security. It just works. I've not had one of these joints fail yet, and hope that I never do. I don't like doing electrical, but when I do I want to insure I don't ever have to go back and do it again.
To the OP's specific question, and because I recently built a stand alone harness myself from a GM harness. On the injector power supply wires, and also on the coil power supply wires, I basically took 2 wires and twisted them together, then into a barrel connector on 1 side, and then on the other side I would step up the wire size.. For example-2 16 guage wires twisted together going into 1 side of the barrel connector, 1 12 ga. wire coming out the other side. Then once I got the coils down to 4 wires coming out of barrel connectors, I twisted 2 12 ga. wires together for one side of the barrel connector and 1 10 ga. wire for the other side. This got me down to 2 10 ga. wires for all 8 coils-with 1 10 Ga. wire feeding each bank of coils/injectors. I then ran each bank of coils on it's own fuse. Yes, I wound up with 2 fuses for coils, and 2 fuses for injectors. Probably over-kill, but, again, it's just my thing. I'm not a pro at wiring so I attempt to complicate things where I can. Yes, I know that's ALL WRONG! Motor starts & runs so I guess I got "lucky".
for boats and cars they are waterproof and tough, if your uber paranoid you can install the sleeve on one wire,, tightly twist the wires together,, put a TINY amount of solder in the center of the splice then cool and slide the sleeve so the bead is centered on the wire and heat shrink it.. done. and you haven't created a rigid splice that might break the wire.. I believe these are available with hot adhesive in them as well.
G atsma- I believe you can buy the internal barrels out of the butt connectors sans the plastic coverings. I've been told that you can get them from Grainger but I've never really spent any time looking for them personally. It only takes a couple seconds on a grinder wheel to "free" them.


 08-26-2018 | 09:18 PM