

1968 Camaro Resto-mod LS3/6 speed; Project Penny Pincher
 02-15-2022, 12:49 PM
#301
TECH Fanatic
Thread Starter
iTrader: (27)


I'll have to see what the brand is when I get home, but it's very similar to POR-15. I want to say it's Rustoleum, but I like that it's an oil-based paint since it's being applied to metal. I used it on a steel beam in my basement and the rear end in the car currently and it's held up really well. It usually takes about 2-3 days to fully dry though.

The following users liked this post:
Project GatTagO (02-16-2022)
02-16-2022, 02:08 PM
#303

Por15 doesn�t hold up too well. Check YouTube for comparisons. Pot doesn�t do too well
VHT epoxy paint on a can works great. Adheres really good, resists rust and goes on really nice. I prefer the �satin�. Roll bar paint.
VHT epoxy paint on a can works great. Adheres really good, resists rust and goes on really nice. I prefer the �satin�. Roll bar paint.
02-22-2022, 08:01 AM
#304
TECH Fanatic
Thread Starter
iTrader: (27)
Made some great progress over the weekend. I can finally call the frame connector install finished. All that was left was welding in the seat riser sections that I had to cut out for the install. Welded those up and sprayed a little paint.

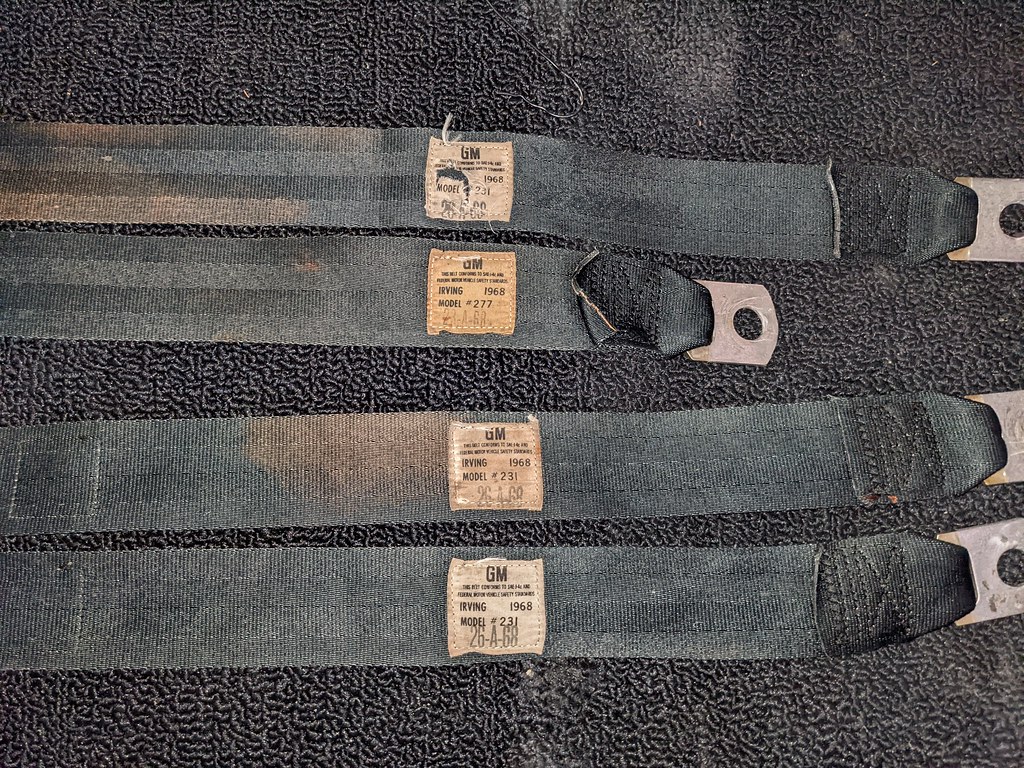
I realized that there should have been a trunk divider which I never had installed when I first put the car together, so I grabbed one with the jute insulation on it. Hopefully that will quiet the car down a little. I also cleaned my seatbelts with hot water, Oxy clean and a little dish soap. The water was black, and I had to do that twice. Looks like they are a little sun faded.

Note the date code 1968 original belts!
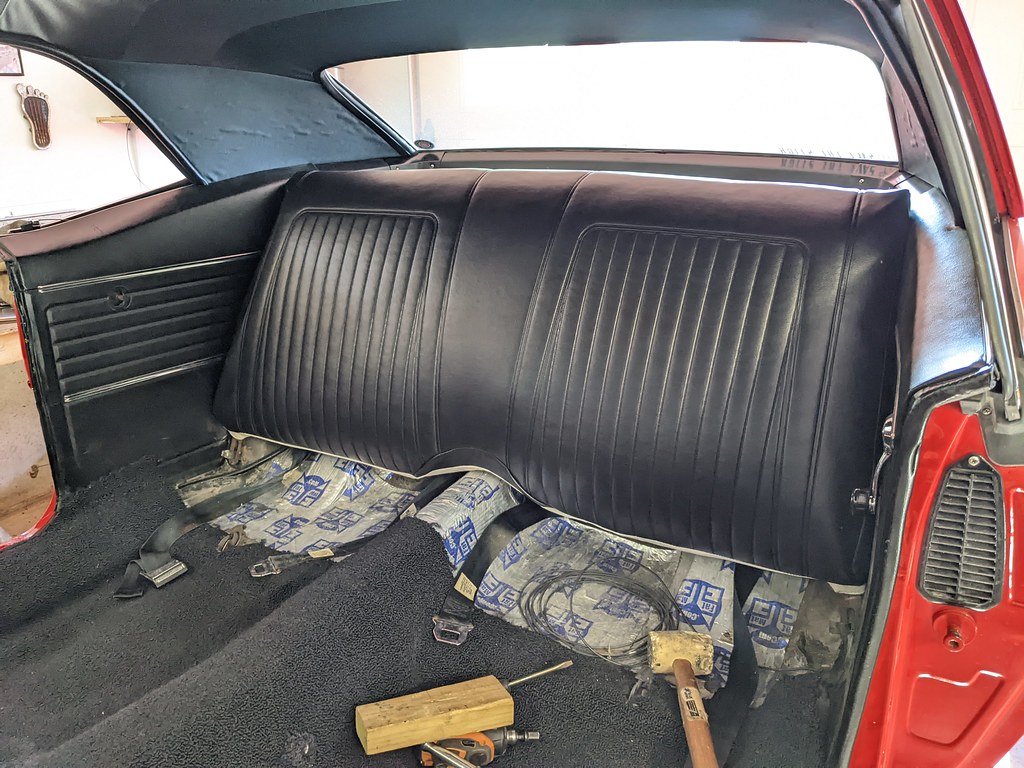
Next up was recovering the rear seats. I got busy and didn't take any pictures during the disassembly or recovering process. I added new burlap and kept the original reinforced burlap for added strength. I re-used the cotton padding, but added a 1.5" layer of foam on top. That really filled out the seat covers and gave more support. I used a hog ring kit and carefully installed them all as well as installing some reinforcement wires to help the hog rings not to pull out. I'm not sure why they didn't come with those, but they were simple to install. I used some scrap 12/3 ga wiring I had left over from a house wiring project. I separated the wires into the individual sections and it worked great. Plus the copper will take a lot longer to corrode than a steel wire will rust. Here they are all done. I left them in my boiler room and used a steamer on the wrinkles, but they weren't coming out. I was hoping that they would have come out smoother.

Then yesterday it was in the 50s and sunny so I put them outside for a few hours. BINGO! All the wrinkles were gone on the top of the seat back and the crease line was gone on the seat bottom! That was the ticket and now I'm thrilled with how they came out. Better than I expected actually. Not bad for my first time.


I couldn't help myself, I had to install them last night. Wow what a difference! Little bummed about my sail panels though and how they are almost delaminating...
I also got my new to me rear view mirror installed. It's wayy better than the original one that I had.

I'm hoping to plug away this week and get the carpet and front seats re-installed. It will be nice to have the car back together again.
Ryan
I realized that there should have been a trunk divider which I never had installed when I first put the car together, so I grabbed one with the jute insulation on it. Hopefully that will quiet the car down a little. I also cleaned my seatbelts with hot water, Oxy clean and a little dish soap. The water was black, and I had to do that twice. Looks like they are a little sun faded.
Note the date code 1968 original belts!
Next up was recovering the rear seats. I got busy and didn't take any pictures during the disassembly or recovering process. I added new burlap and kept the original reinforced burlap for added strength. I re-used the cotton padding, but added a 1.5" layer of foam on top. That really filled out the seat covers and gave more support. I used a hog ring kit and carefully installed them all as well as installing some reinforcement wires to help the hog rings not to pull out. I'm not sure why they didn't come with those, but they were simple to install. I used some scrap 12/3 ga wiring I had left over from a house wiring project. I separated the wires into the individual sections and it worked great. Plus the copper will take a lot longer to corrode than a steel wire will rust. Here they are all done. I left them in my boiler room and used a steamer on the wrinkles, but they weren't coming out. I was hoping that they would have come out smoother.
Then yesterday it was in the 50s and sunny so I put them outside for a few hours. BINGO! All the wrinkles were gone on the top of the seat back and the crease line was gone on the seat bottom! That was the ticket and now I'm thrilled with how they came out. Better than I expected actually. Not bad for my first time.
I couldn't help myself, I had to install them last night. Wow what a difference! Little bummed about my sail panels though and how they are almost delaminating...
I also got my new to me rear view mirror installed. It's wayy better than the original one that I had.
I'm hoping to plug away this week and get the carpet and front seats re-installed. It will be nice to have the car back together again.
Ryan
02-22-2022, 09:08 AM
#305
Those look great! How long did that take? Front then back?
02-22-2022, 12:51 PM
#306
TECH Fanatic
Thread Starter
iTrader: (27)
Jim, I was taking my time when I did the install and it took me about 6 hours to strip down recover the seat back, and probably 7-8 hours to strip down and cover the seat bottom. The bottom had more pleats and sections to pay attention to. If I had to do another one I'll bet I could shave off an hour off of each easily.
02-22-2022, 02:06 PM
#307
Ok. That�s good to know. I�m been playing around with the idea of doing it next winter IF I get it drivable this summer
it�s a testament to your skill set and determination seeing your whole build. I seen some of the proturing threAd before. Hard to believe it�s the same car. You�ve done such a great job.
it�s a testament to your skill set and determination seeing your whole build. I seen some of the proturing threAd before. Hard to believe it�s the same car. You�ve done such a great job.
02-28-2022, 07:28 AM
#308
TECH Fanatic
Thread Starter
iTrader: (27)
Thanks Jim. I'm really happy with the way the car came together.
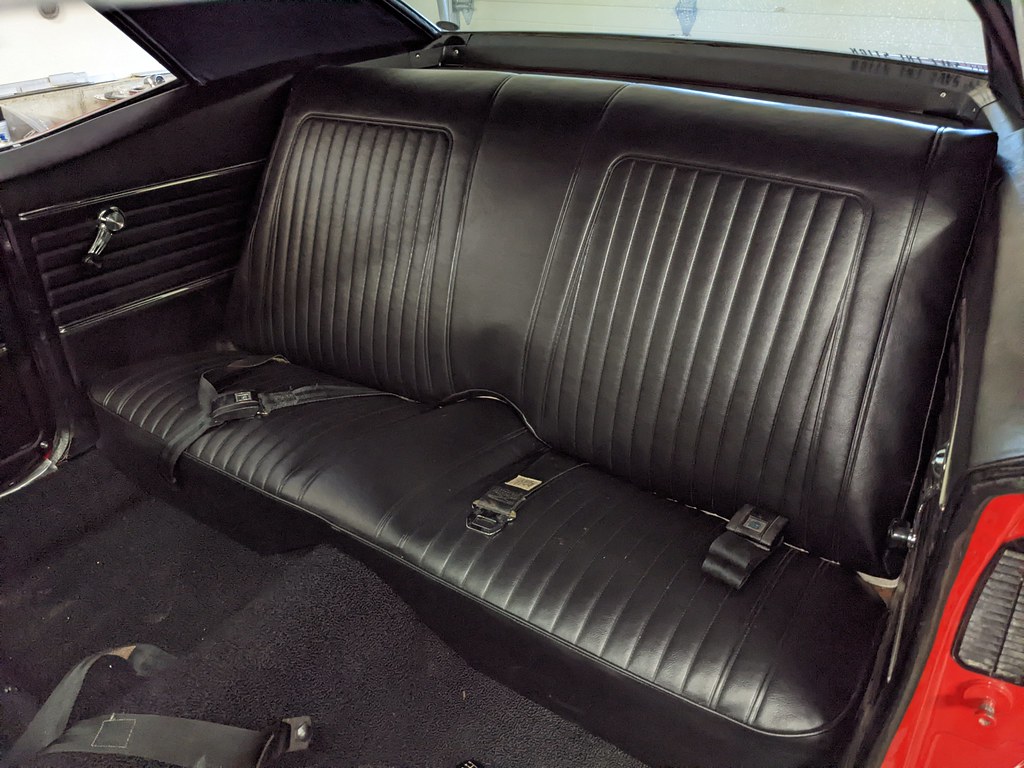
Been plugging away this weekend to get the interior buttoned up. The easiest one was getting the rear seat bottom installed. Wow, that is a huge difference from the original white seats.
Two years ago:

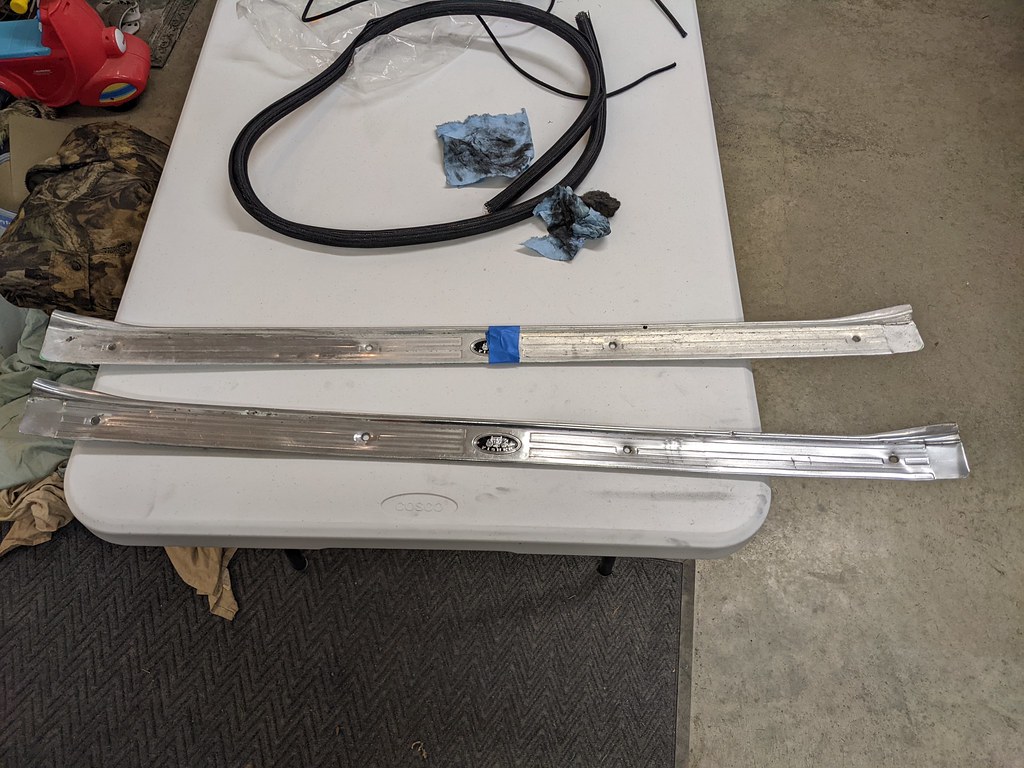
I also put a little elbow grease into my sill plates. While they are not in the best condition, I picked them up at a swap meet along with the RS turn signals from an original RS/Z28 car. Amazing how that aluminum polish cleaned them up.

Finished up my 4th Gen Nova overflow jug swap. Turned out so great, I'm so happy I found that as an option. I love how it tucks away in the fender, and the script matches the era perfectly.
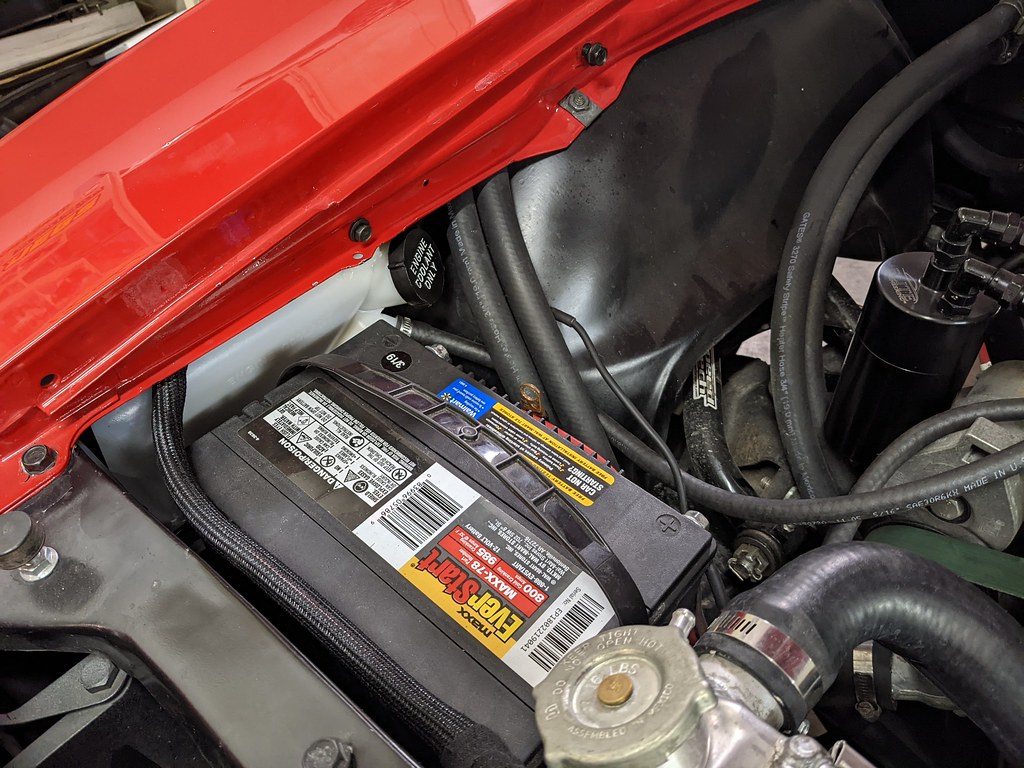
I also got the shroud pieces and CAI painted with the Trim Black that I painted the rest of my engine bay. Turned out really nice. I'm glad that I painted the CAI, I think it looks a lot better than the polished aluminum.


I also wanted to finalize the supercharger reservoir bracket. I temporarily mounted it last summer and never got around to making a mount. Well because I was driving it haha. My father in law stopped over on night after work and wanted to work on something so I gave him the task of making the bracket. He did a fantastic job, just what I was looking to do.


All done with the lines re-routed and cleaned up.

With that, I decided to clean up the car inside and out. I never cleaned it up before I put the car away last winter... No time like the present!


Cleaned up the engine bay too. I think this is what the final form will look like.


Just to prove that I do drive this car in the winter, I backed down my driveway and grabbed some cool wintery shots. I was on the fence about it, but I'm glad I did. The pictures turned out great. Really cool background. I really like the first one, when the sun peaked out and gave better lighting.


Well I'm going to call the car done for now. Can't wait for spring!!
Cheers,
Ryan
Been plugging away this weekend to get the interior buttoned up. The easiest one was getting the rear seat bottom installed. Wow, that is a huge difference from the original white seats.
Two years ago:
I also put a little elbow grease into my sill plates. While they are not in the best condition, I picked them up at a swap meet along with the RS turn signals from an original RS/Z28 car. Amazing how that aluminum polish cleaned them up.
Finished up my 4th Gen Nova overflow jug swap. Turned out so great, I'm so happy I found that as an option. I love how it tucks away in the fender, and the script matches the era perfectly.
I also got the shroud pieces and CAI painted with the Trim Black that I painted the rest of my engine bay. Turned out really nice. I'm glad that I painted the CAI, I think it looks a lot better than the polished aluminum.
I also wanted to finalize the supercharger reservoir bracket. I temporarily mounted it last summer and never got around to making a mount. Well because I was driving it haha. My father in law stopped over on night after work and wanted to work on something so I gave him the task of making the bracket. He did a fantastic job, just what I was looking to do.
All done with the lines re-routed and cleaned up.
With that, I decided to clean up the car inside and out. I never cleaned it up before I put the car away last winter... No time like the present!
Cleaned up the engine bay too. I think this is what the final form will look like.
Just to prove that I do drive this car in the winter, I backed down my driveway and grabbed some cool wintery shots. I was on the fence about it, but I'm glad I did. The pictures turned out great. Really cool background. I really like the first one, when the sun peaked out and gave better lighting.
Well I'm going to call the car done for now. Can't wait for spring!!
Cheers,
Ryan
 02-28-2022, 02:11 PM
#311
That engine bay looks great. Nice and tidy IMO. Over 600RWHP to boot. What is the volume on the Eddy reservoir? I�ve thought about making a aluminum one, but it�s fairly pricey vs. the eddy. Im not sure if it�s worth the effort.
thanks,
jimbo
thanks,
jimbo
Last edited by Jimbo1367; 03-01-2022 at 04:52 AM.
03-01-2022, 08:24 AM
#313
TECH Fanatic
Thread Starter
iTrader: (27)
Hey Jim, I think that the reservoir is about 1-2 quarts. Something like that, but it works much better than the stock CTSV that I was using before. The CWA50 pump would drain the line and cause it to get aerated. The reservoir gives enough volume to keep the line full of water and properly purge the system of air.
jrs396, Love the seats. They are very comfortable and the bolsters on the side keep you planted in the seat. Highly recommend them.
jrs396, Love the seats. They are very comfortable and the bolsters on the side keep you planted in the seat. Highly recommend them.
 03-22-2022, 11:11 AM
#315
TECH Fanatic
Thread Starter
iTrader: (27)
Well, I'm really proud of the car that I've built, but I've decided to put it on the chopping block. I've been thinking about getting another project, but I can't have two. I've had a lot of fun building and restoring this car, but it's time for me to move on.
https://bringatrailer.com/listing/19...et-camaro-123/
https://bringatrailer.com/listing/19...et-camaro-123/
The following users liked this post:
G Atsma (03-22-2022)
03-22-2022, 11:32 AM
#316
TECH Senior Member

Well, if anyone around here is considering buying your car, they'll know it's put together right!
Best of luck selling, and you KNOW we'll stick around to harass you through your new project! LOL
Best of luck selling, and you KNOW we'll stick around to harass you through your new project! LOL
03-23-2022, 02:48 AM
#317
I hope you get more than you hoped for. Real nice car I know I�ll be sorry to see it go
 05-10-2022, 08:23 AM
#319
TECH Fanatic
Thread Starter
iTrader: (27)
All good things must come to an end, and it's no different for the Penny Pincher Camaro and I. Sorry for the clich�, but a lot of blood, sweat and tears went into this build and I have learned so much in the process. My spot in life has changed from when I first bought this car and with a growing family I'll need something bigger. I feel really good that I was able to revive an old Camaro and bring new life to it. The guy that bought it is really excited for it and is not a re-seller so that makes me feel so much better about the sale. I was able to take the car from a broken down car, to running/driving on it's 50th anniversary. I was able to swap in 3 different engines, with the final being an absolute beast. It was also the first car that I've ever had with any forced induction. I owe a lot to that car, but in the end we are only caretakers of these cars and now it will live on for another 50+ years.
Here's a few send off pictures of the car before, during and after it was loaded up on it's way to Los Angeles.
I wanted to get a proper picture of myself with the car before I sold it, so I got a quick one before it was loaded on the trailer.

It was in good company too.


I'd like to thank everyone here that has helped me along the way with parts, advice/suggestions, critiques, or other support. Great community here and I look forward to sharing my next project when it comes along. It's likely going to be a 2 door wagon of some sort. I want to find a solid body late 50s or early 60s wagon with really cool patina. Ford, Chevy or other. Not sure what it will be but I'll know it when I see it.
Cheers,
Ryan
Here's a few send off pictures of the car before, during and after it was loaded up on it's way to Los Angeles.
I wanted to get a proper picture of myself with the car before I sold it, so I got a quick one before it was loaded on the trailer.
It was in good company too.
I'd like to thank everyone here that has helped me along the way with parts, advice/suggestions, critiques, or other support. Great community here and I look forward to sharing my next project when it comes along. It's likely going to be a 2 door wagon of some sort. I want to find a solid body late 50s or early 60s wagon with really cool patina. Ford, Chevy or other. Not sure what it will be but I'll know it when I see it.
Cheers,
Ryan
The following 5 users liked this post by ryeguy2006a:
AAIIIC (05-11-2022), brucebanner (05-17-2022), G Atsma (05-10-2022), jrs396 (05-10-2022), theunderlord (05-10-2022)
05-10-2022, 12:02 PM
#320
Glad to see you will do something when the right case arises. 65 Malibu or other A-body look really cool