
Madaguy 1955 Nomad Build
 01-12-2023, 12:12 PM
#21
TECH Fanatic
Thread Starter
iTrader: (27)


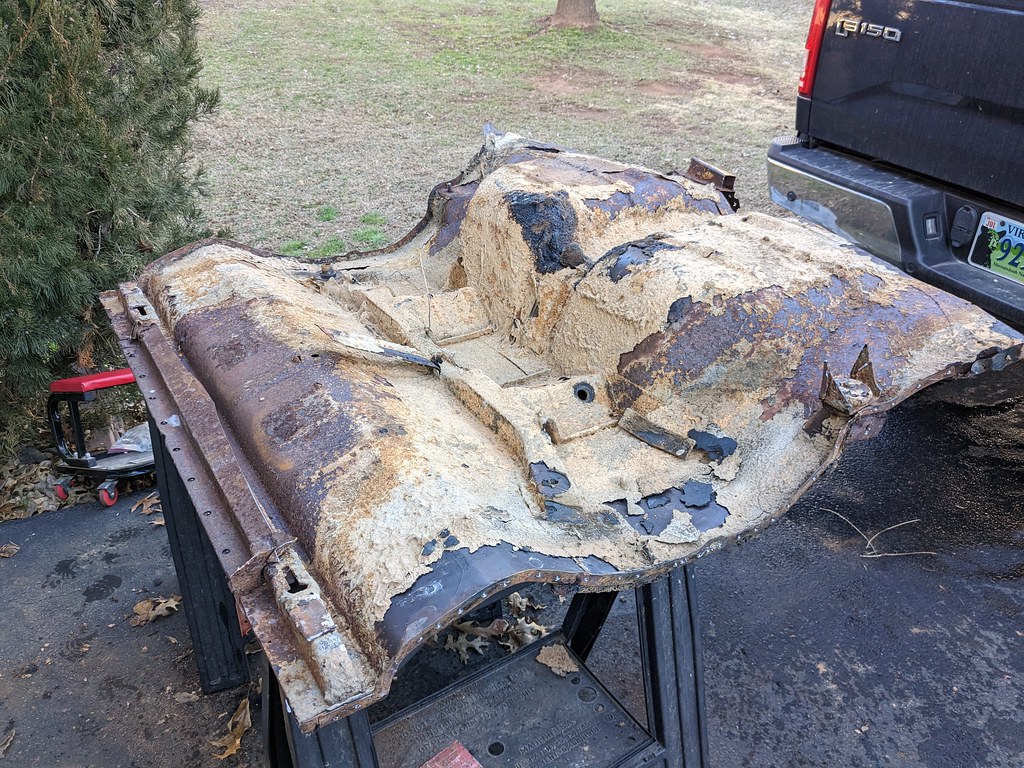
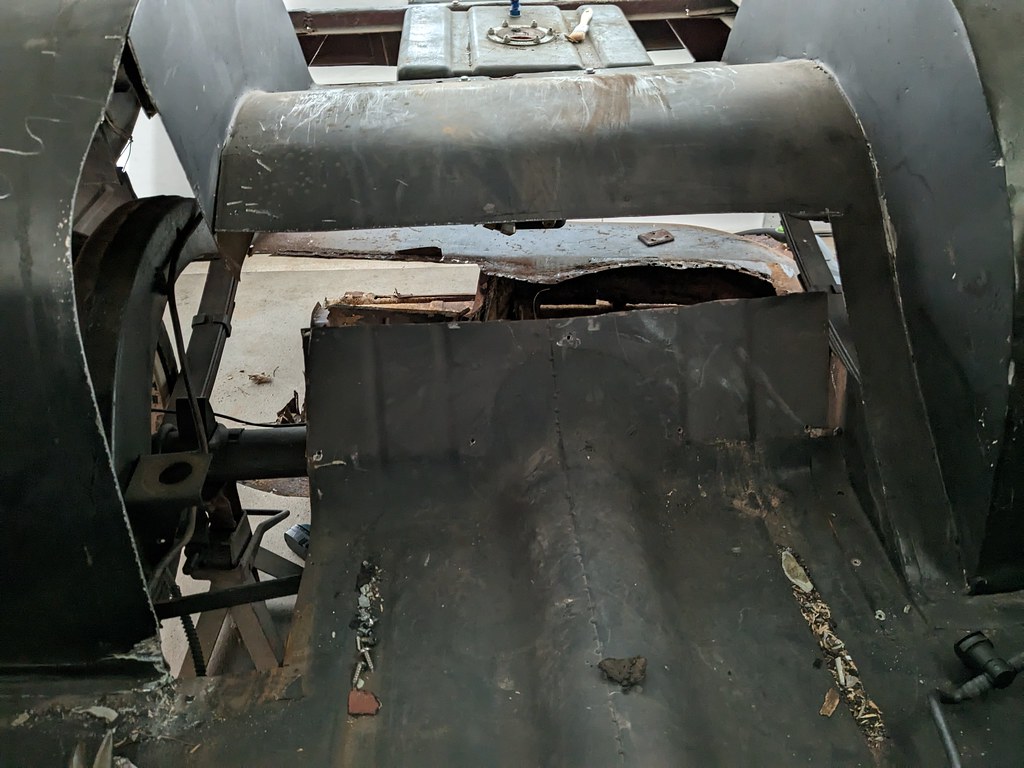
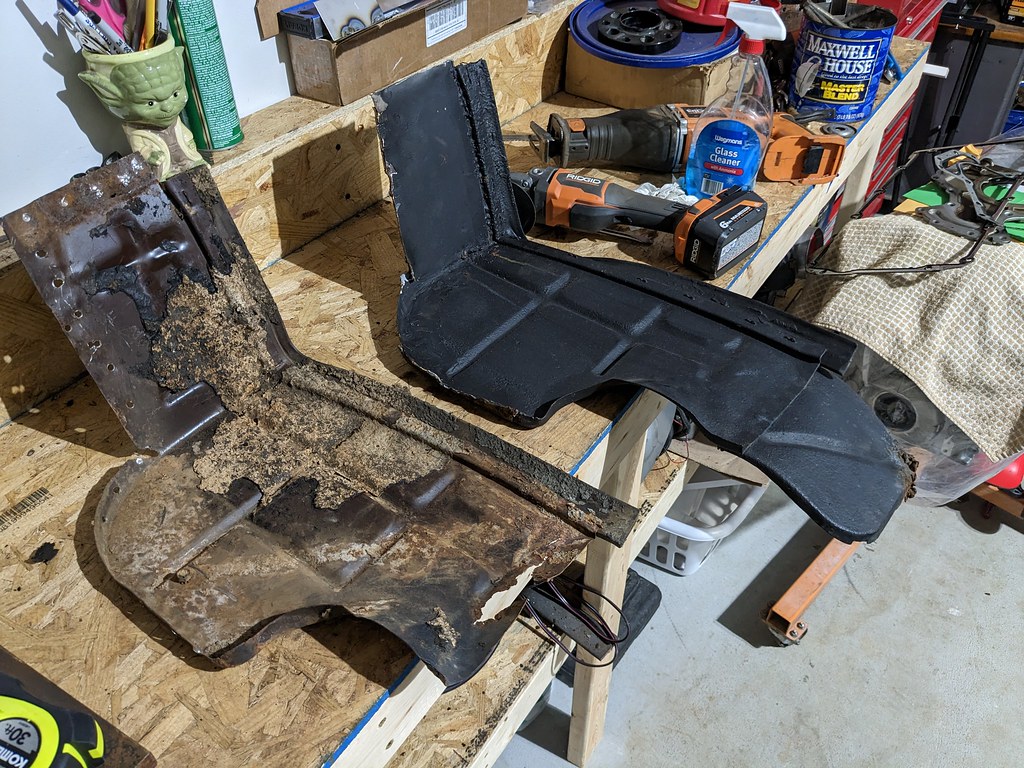
Not a huge update as I've been mostly just collecting parts at this point. I have been slowly working on the what started as a simple tailgate hinge rebuild, into needing a whole new tail panel and rear cargo floor extension panel. After wire wheeling some of the section that looked a little odd, I found bondo on that rear section...

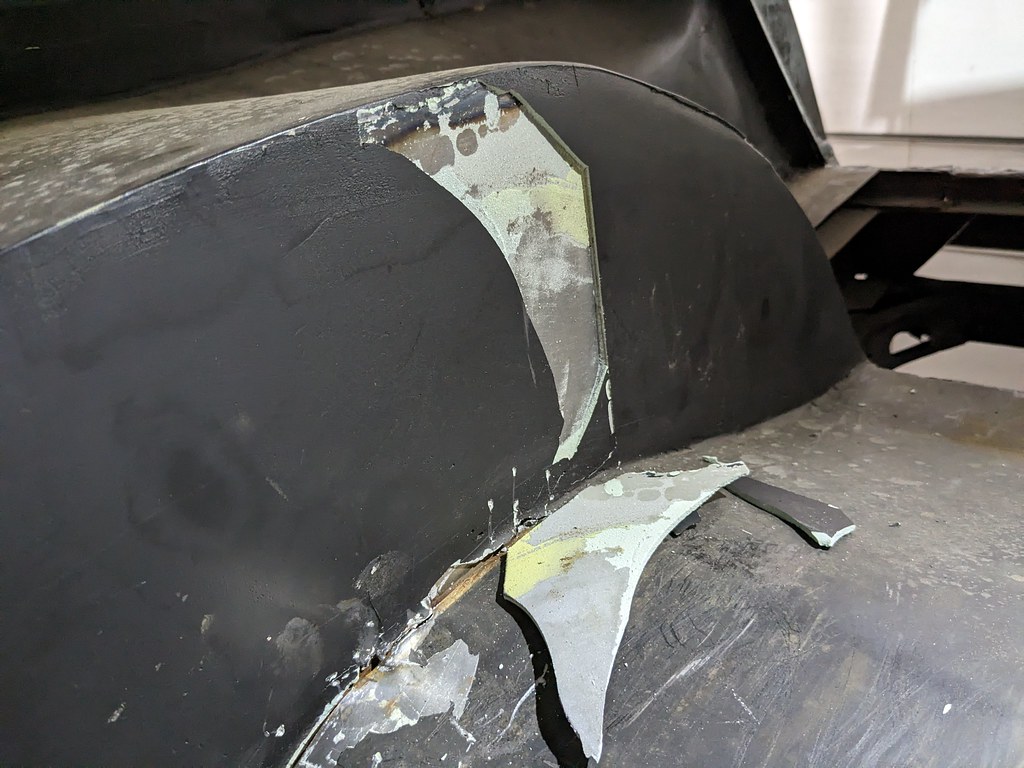
And bondo over rust...
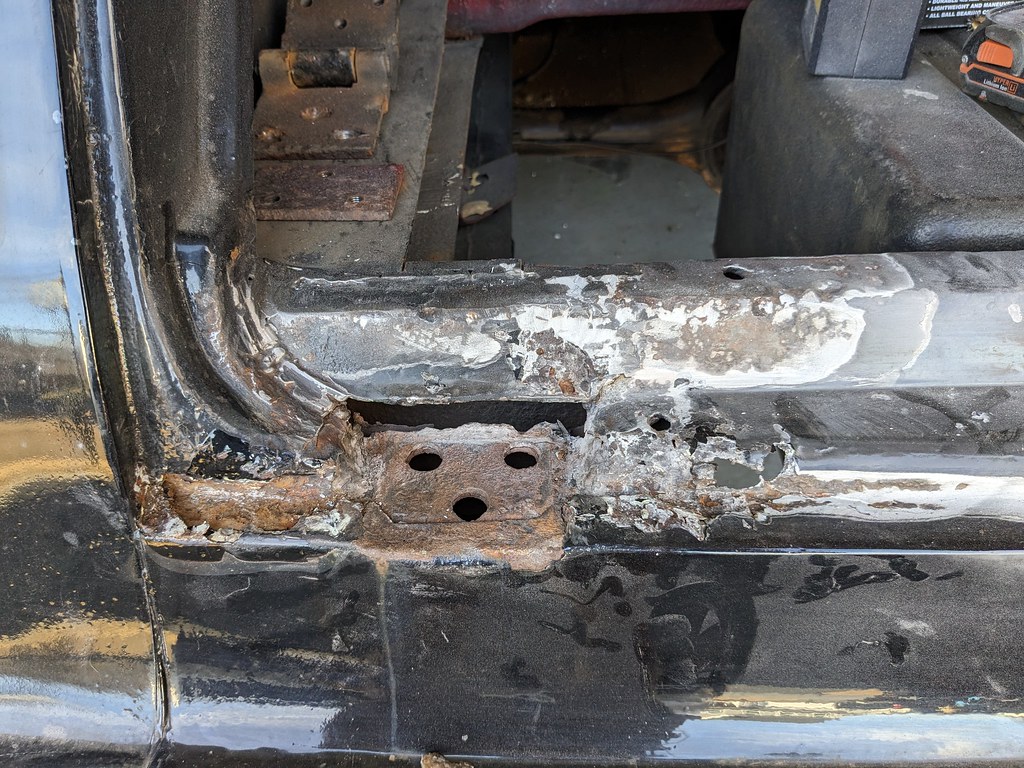
Whole panel was unfortunately pitted pretty badly.
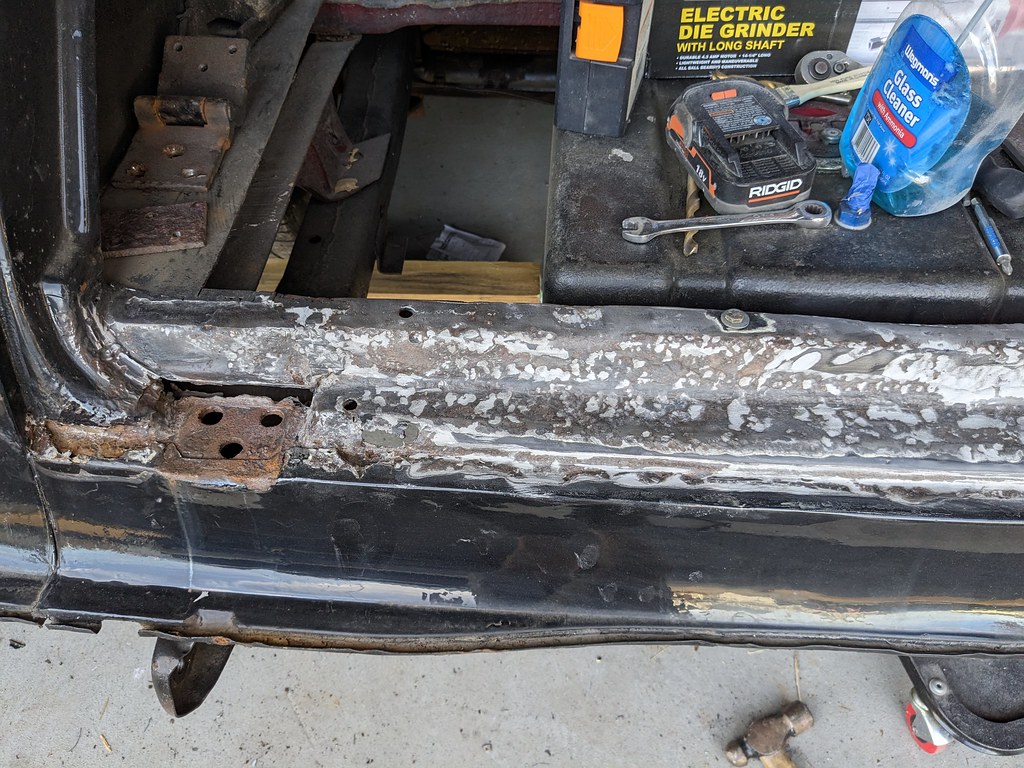
Luckily I need to do surgery in that area anyway when I replace the wheel tubs, so I placed an order to Real Deal Steel and have the new cargo extension panel, but waiting on the tail panel and hardware kit. I also, finally got a chance to get one of the pins removed from the stock hinges. Wow, were they stuck in there and rusted away on the inside. Since apparently no one makes the replacement door pins right now, the door pins that I ordered were for a 55ish truck and were about 3/4" too short. So I opted to order a set from Dorman that are way too long, but I can turn them on my lathe to the right length.


Next part is a huge thanks to GTO Jack! He was tired of looking at some oil pans and posted them up in the for free section of the for sale! I messaged him about the knock off 302-2 pan and he shipped it right out to me. While they have a few sections cut out for tie rod clearance, it makes the perfect project for me to use my new TIG welder! So I'm hoping to practice up and get some panels buzzed in. Now some sharp eyed LS guru's may notice that this is an LS pan. Well after pricing out all that it will take to get the Gen5 motor installed in the car with the Holley Terminator X Max kit, I've decided to leave that swap for phase 2. I'm going to hang onto the motor and collect parts when they pop up, but I'm going to pick up a cheap Gen3 LS motor and use some spare parts I have to get it up and running sooner than later.


Since I made the decision to go LS right now, I started looking around for a good candidate engine. After searching around for a few weeks, I found a 2011 5.3 for cheap and it came with a bunch of parts. So I'll either be swapping the reluctor rings to 24x to keep my budget on track, or horse trading the long block for a gen3 motor and keep all the parts that it came with.

I feel like I'm starting to have a problem haha. It's also kinda cool that in my garage I have a gen 1 SBC 327, Gen 4 5.3(327) and gen 5 5.3(327).

Last one is probably my most exciting post. I found a smoking deal on a split front bench seat! It's in rough shape, but nothing a little TLC can't take care of. Most of these are selling for around $600-800 and I found this for $50 bucks! It came out of a 55 Chevy, but is supposed to be a 57 Pontiac seat pattern.

Cheers,
Ryan
And bondo over rust...
Whole panel was unfortunately pitted pretty badly.
Luckily I need to do surgery in that area anyway when I replace the wheel tubs, so I placed an order to Real Deal Steel and have the new cargo extension panel, but waiting on the tail panel and hardware kit. I also, finally got a chance to get one of the pins removed from the stock hinges. Wow, were they stuck in there and rusted away on the inside. Since apparently no one makes the replacement door pins right now, the door pins that I ordered were for a 55ish truck and were about 3/4" too short. So I opted to order a set from Dorman that are way too long, but I can turn them on my lathe to the right length.
Next part is a huge thanks to GTO Jack! He was tired of looking at some oil pans and posted them up in the for free section of the for sale! I messaged him about the knock off 302-2 pan and he shipped it right out to me. While they have a few sections cut out for tie rod clearance, it makes the perfect project for me to use my new TIG welder! So I'm hoping to practice up and get some panels buzzed in. Now some sharp eyed LS guru's may notice that this is an LS pan. Well after pricing out all that it will take to get the Gen5 motor installed in the car with the Holley Terminator X Max kit, I've decided to leave that swap for phase 2. I'm going to hang onto the motor and collect parts when they pop up, but I'm going to pick up a cheap Gen3 LS motor and use some spare parts I have to get it up and running sooner than later.
Since I made the decision to go LS right now, I started looking around for a good candidate engine. After searching around for a few weeks, I found a 2011 5.3 for cheap and it came with a bunch of parts. So I'll either be swapping the reluctor rings to 24x to keep my budget on track, or horse trading the long block for a gen3 motor and keep all the parts that it came with.
I feel like I'm starting to have a problem haha. It's also kinda cool that in my garage I have a gen 1 SBC 327, Gen 4 5.3(327) and gen 5 5.3(327).
Last one is probably my most exciting post. I found a smoking deal on a split front bench seat! It's in rough shape, but nothing a little TLC can't take care of. Most of these are selling for around $600-800 and I found this for $50 bucks! It came out of a 55 Chevy, but is supposed to be a 57 Pontiac seat pattern.
Cheers,
Ryan

The following users liked this post:
truckdoug (02-15-2023)
01-12-2023, 02:31 PM
#22
TECH Senior Member

Hey Ryan-
That 2011 5.3 has a lot of good parts. The intake manifold equals or even surpasses the LS6 intake, plus it has 243/799 heads.
BUT it might also have AFM/DOD and/or VVT, which you'll likely want or need to delete.
Choices.....
That 2011 5.3 has a lot of good parts. The intake manifold equals or even surpasses the LS6 intake, plus it has 243/799 heads.
BUT it might also have AFM/DOD and/or VVT, which you'll likely want or need to delete.
Choices.....

 01-15-2023, 08:25 AM
#24

Ryan,
Glad to see you found a new toy and your kids are excited about it too.
55 Nomad- I love these cars. Def. A bucket list car. Congrats
L83- that�s a smoking deal. Even if it needs a rebuild. IIRC Richard Holdner was gettng 6.2L numbers out of L83 engines with stock exhaust manifolds.
Relocating- Lucky you. I imagine the taxes are a lot cheaper. More money for the family and toys
im really glad to see you back at it.
01-17-2023, 10:33 AM
#26
TECH Fanatic
Thread Starter
iTrader: (27)
Thanks guys, I'm really glad to have another project. I get antsy when I don't have something to work on. I'm not entirely sure what I'm doing with the engine situation at the moment. I'm just going to pause the engine situation for now. Maybe I'll get a deal on a Terminator X Max and not worry about it.
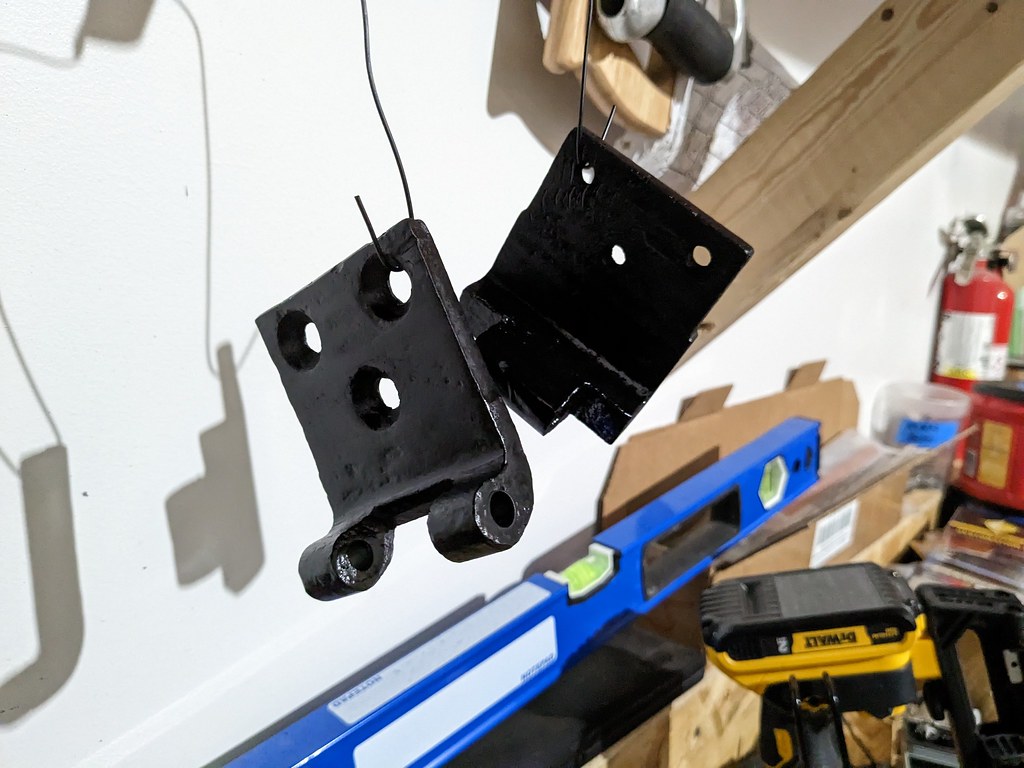
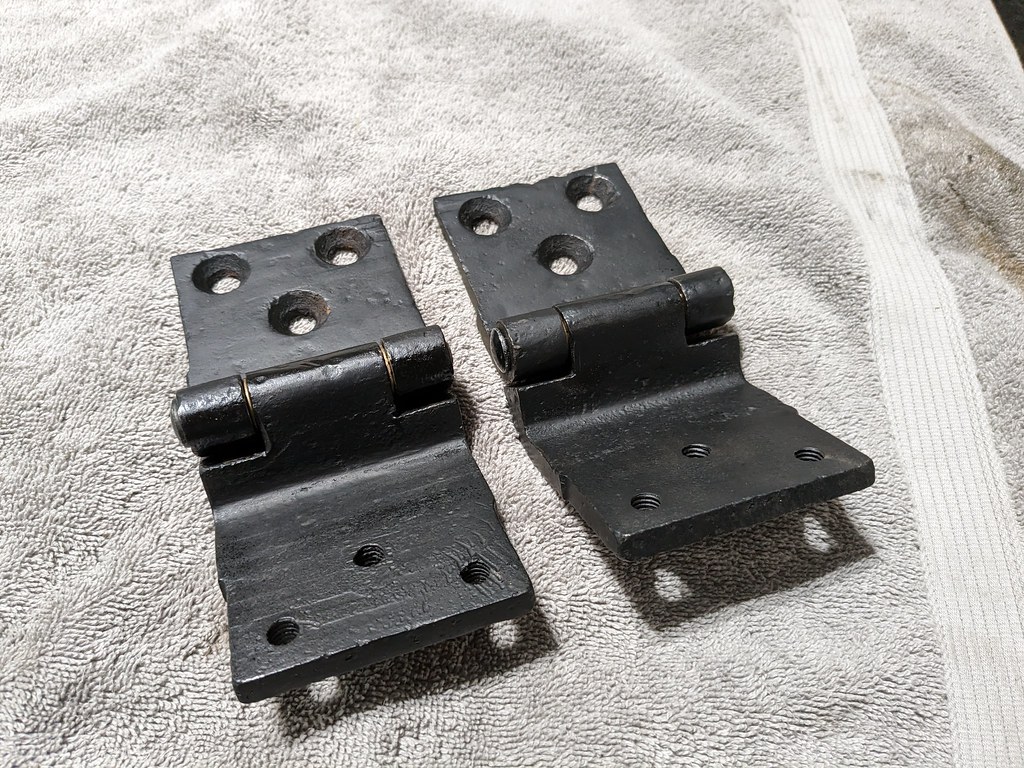
After a long struggle with rebuilding the tailgate hinges, I was finally able to get them torn down, cleaned up and rebuilt. I'll say that was a huge PITA! I thought that I'd be able to drive the pins out after drilling out the heads, but they were frozen in place. The second one was even more stubborn as it was frozen in both side of the hinge. The hinges aren't perfect, but they will function as they should now. I'm planning to get an upgraded billet aluminum pair from MadMooks down the road, but these will get the tailgate back on.
I used Dorman #38400 and it was a perfect fit other than being a touch too long. I cut them down to 3.125" under head length and chamfered the sides. Had the perfect amount of stick out and looked really original to me. Just what I wanted.

This was the first attempt at 3.25" and was going to be too long once I drove it in.

Primed pair of rebuilt original tailgate hinges.
My next project was a huge win for me as well as a really cool hot rodding adventure. This super cool old school salvage yard near me is full of old cars. I went back yesterday and got permission from the guy to cut out the rear floor section on this 56 Wagon. The floor pans on it were in great shape for sitting for so long, and the rear wheel wells are really solid in all the spots that I need them to be. Here's a few pictures of the entrance into the junk yard. Just soo cool, and I love that it's only 25 mins from my house!


I didn't get any pictures from when I first got there because I had to get right to work. He's only open from 8-12 and after that he let's his dogs out! But here's the car after I carefully removed the one quarter panel. I did that same thing on the other side then just cut the pillars.

After hitting several obstacles and not knowing where two body bolts were, I finally was able to get it out in one piece. What was simply amazing to me was that I removed at least a dozen bolts, and only broke or had to cut three. The rest came out with my impact driver! Just amazing to me, so glad we moved down south!

And here's where the Hot Rodding adventure comes in. This place is about 100 acres, and this car was almost in the back corner of the property. Here's what I had to get this out with! Up and down hills on little tractor paths. Needless to say, I was exhausted when I finally got this back to the front shop! What I thought was really cool about what I did, is that was something that guys have been doing for so long in hot rodding, before you could go into a catalogue and buy what you need and get it two days later. I love to use original metal where I can, and this was in great shape considering how old it is, as well as sitting in that field for 40 years!

I put everything back together and thanked the '56 9 passenger wagon for donating the parts to repair my Nomad.

Once I got it back to my house, I got it up on some saw horses and inspected more thoroughly what I worked so hard to get.


Too bad it's rusted here on both sides... I guess I'll just have to cut it out and add in a 2.75" strip. This is a pro-touring site after all. And the biggest regret that I have about building my Camaro was not putting in mini-tubs when I had the chance.

It was getting late, but I ground down the seam with a wire wheel and started drilling out the spot welds. I'm going to separate the panels first, then prep them for installation/modification. I had a spot weld drill bit, but can't find it since the move so I ordered a new one.

I also grabbed a column shift steering column and the cargo pan/wheel well sections came with some other parts attached that I've stripped off. I'm going to convert the column and indicator to a 4 speed PRND321 pattern.

With that purchase, I've not got a ton of work ahead of me!
Cheers,
Ryan
After a long struggle with rebuilding the tailgate hinges, I was finally able to get them torn down, cleaned up and rebuilt. I'll say that was a huge PITA! I thought that I'd be able to drive the pins out after drilling out the heads, but they were frozen in place. The second one was even more stubborn as it was frozen in both side of the hinge. The hinges aren't perfect, but they will function as they should now. I'm planning to get an upgraded billet aluminum pair from MadMooks down the road, but these will get the tailgate back on.
I used Dorman #38400 and it was a perfect fit other than being a touch too long. I cut them down to 3.125" under head length and chamfered the sides. Had the perfect amount of stick out and looked really original to me. Just what I wanted.
This was the first attempt at 3.25" and was going to be too long once I drove it in.
Primed pair of rebuilt original tailgate hinges.
My next project was a huge win for me as well as a really cool hot rodding adventure. This super cool old school salvage yard near me is full of old cars. I went back yesterday and got permission from the guy to cut out the rear floor section on this 56 Wagon. The floor pans on it were in great shape for sitting for so long, and the rear wheel wells are really solid in all the spots that I need them to be. Here's a few pictures of the entrance into the junk yard. Just soo cool, and I love that it's only 25 mins from my house!
I didn't get any pictures from when I first got there because I had to get right to work. He's only open from 8-12 and after that he let's his dogs out! But here's the car after I carefully removed the one quarter panel. I did that same thing on the other side then just cut the pillars.
After hitting several obstacles and not knowing where two body bolts were, I finally was able to get it out in one piece. What was simply amazing to me was that I removed at least a dozen bolts, and only broke or had to cut three. The rest came out with my impact driver! Just amazing to me, so glad we moved down south!
And here's where the Hot Rodding adventure comes in. This place is about 100 acres, and this car was almost in the back corner of the property. Here's what I had to get this out with! Up and down hills on little tractor paths. Needless to say, I was exhausted when I finally got this back to the front shop! What I thought was really cool about what I did, is that was something that guys have been doing for so long in hot rodding, before you could go into a catalogue and buy what you need and get it two days later. I love to use original metal where I can, and this was in great shape considering how old it is, as well as sitting in that field for 40 years!
I put everything back together and thanked the '56 9 passenger wagon for donating the parts to repair my Nomad.
Once I got it back to my house, I got it up on some saw horses and inspected more thoroughly what I worked so hard to get.
Too bad it's rusted here on both sides... I guess I'll just have to cut it out and add in a 2.75" strip. This is a pro-touring site after all. And the biggest regret that I have about building my Camaro was not putting in mini-tubs when I had the chance.
It was getting late, but I ground down the seam with a wire wheel and started drilling out the spot welds. I'm going to separate the panels first, then prep them for installation/modification. I had a spot weld drill bit, but can't find it since the move so I ordered a new one.
I also grabbed a column shift steering column and the cargo pan/wheel well sections came with some other parts attached that I've stripped off. I'm going to convert the column and indicator to a 4 speed PRND321 pattern.
With that purchase, I've not got a ton of work ahead of me!
Cheers,
Ryan
The following 3 users liked this post by ryeguy2006a:
01-19-2023, 03:01 AM
#27
Teching In
Looks like a good candidate for a great build, I'm definitely going to be following along. I've always been a fan of station wagons and especially the '50s - '60s GM wagons. Keep up the good work and keep us updated on the progress!
The following users liked this post:
Project GatTagO (01-21-2023)
02-03-2023, 12:23 PM
#28
TECH Fanatic
Thread Starter
iTrader: (27)
I haven't done any work on the Nomad, but I do have some updates. First off, unfortunately that cargo/floor pan section that I bought with the wheel wells will not work quite like I had hoped. Fortunately the wheel wells will work perfectly, however I was informed by a tri5 guru that the floor pan section that I bought is something of a unicorn as it was from a 56-57 only 9 Passenger Wagon, which has a very unique and "rare" floor/cargo section. It's different enough that I didn't want to mess with cutting/modifying it so I'll be selling it and hoping that maybe there's some guy out there that has been looking for this section of floor since it's not and like will never be re-popped.
With that news I had to start over on my search for the rear floor pan section, but still needed to separate all of my metal to get it out of my driveway and also store it easier. I drilled out all the spotwelds carefully and removed the two wheel well sections. Then I was left with the middle piece. It went pretty quick once I got in a rhythm.
Looks pretty rusty, but are really solid in the spots that I need them to be.


Here you can see where it's drastically different than the typical cargo/floor pan area with the shock mounts and added brace for the extra weight of 9 passengers.
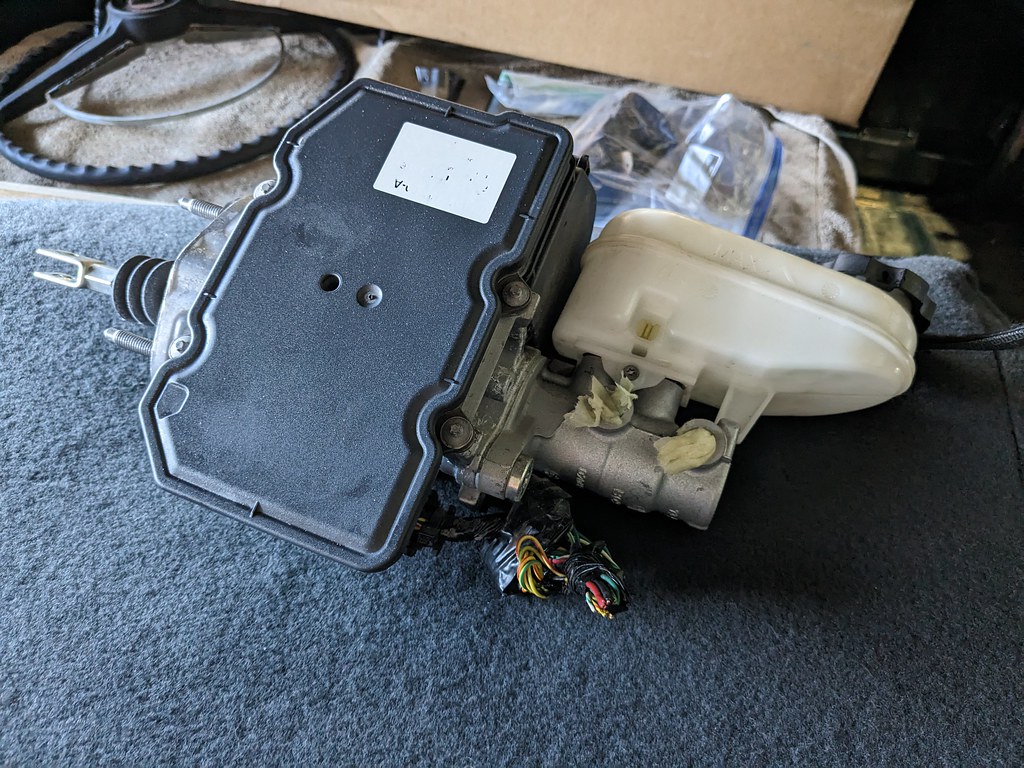
Since I need so many parts to get this car back together I'm constantly parts shopping, and then I saw Andrew's post about the iBooster followed shortly after by many others. Brakes are where I need a serious upgrade as my car has 4 wheel drum brakes on a single pot MC. I got to shopping around and found a good deal from a Tesla disassembler. He sold me the iBooster, wiring and brake line sections off of a Model S. I still need to get some brackets to mount it to the firewall, but I think this will make a huge difference. I'm planning to pick up a pair of 5th Gen Camaro front Brembo calipers and make my own mounts. Not sure on what rotor I'll run, but it will likely be the stock 5th Gen too.
I was also crunching numbers on what it would take to get the L83 into my car and at this time, it's more than I want to spend. So that had me on the hunt for a Gen4 5.3, and I really wanted to get one with an aluminum block. Then I stumbled on a guy who was selling a L76 with forged pistons. After I contacted him he mentioned that he had a tuning error that lead to a bent rod. After talking to him on the phone, I wanted to check it out to see things more closely. I looked it all over and there weren't any cracks in that cylinder and all the other rods were straight so I wanted the motor. To my surprise, he was willing to trade me straight for the L83, so I'm very pleased with that deal. I just need to find a new Gen4 rod, have the small end honed to .945" and I'll put it all back together.


After a little research I was able to find out that all 5.3, 6.0 and 6.2 gen4 motors share the same rods, and since I had picked up that 5.3 a few weeks earlier decided it was going to donate some parts. Time to tear that down and see why it was pulled in the first place. I assumed the normal DOD lifter failure, but it's fun to find out. Got the motor on my hoist and got to work on the teardown.

It's a miracle, no broken exhaust manifold bolts!

Really clean on the inside. Motor is supposed to have 190k on it, so I'm impressed so far.


Pulled the rockers off and I think I found out why it was pulled. "one of these things is not like the others"


I didn't get any pictures, but I pulled both heads off and the cylinder walls all look good with visible cross-hatching and no metal in the cylinders. Cylinder 8 exhaust is the one with the bent pushrod, and in the cylinder looked great. So, looks like they were able to get it shut off in time before any damage occurred. I still want to flip it over and see what the bottom end looks like, but I'm thinking this may be a good short-block. Now I'm not sure what I want to do. I was able to get all the lifters removed but the one with the bent push rod. It wouldn't pull out from the top, so it's probably mushroomed on the bottom side. It should fall out once the cam is out, then I'll know for sure what I want to do. For now though I'm thinking I'm going to find someone who has a single gen4 rod.
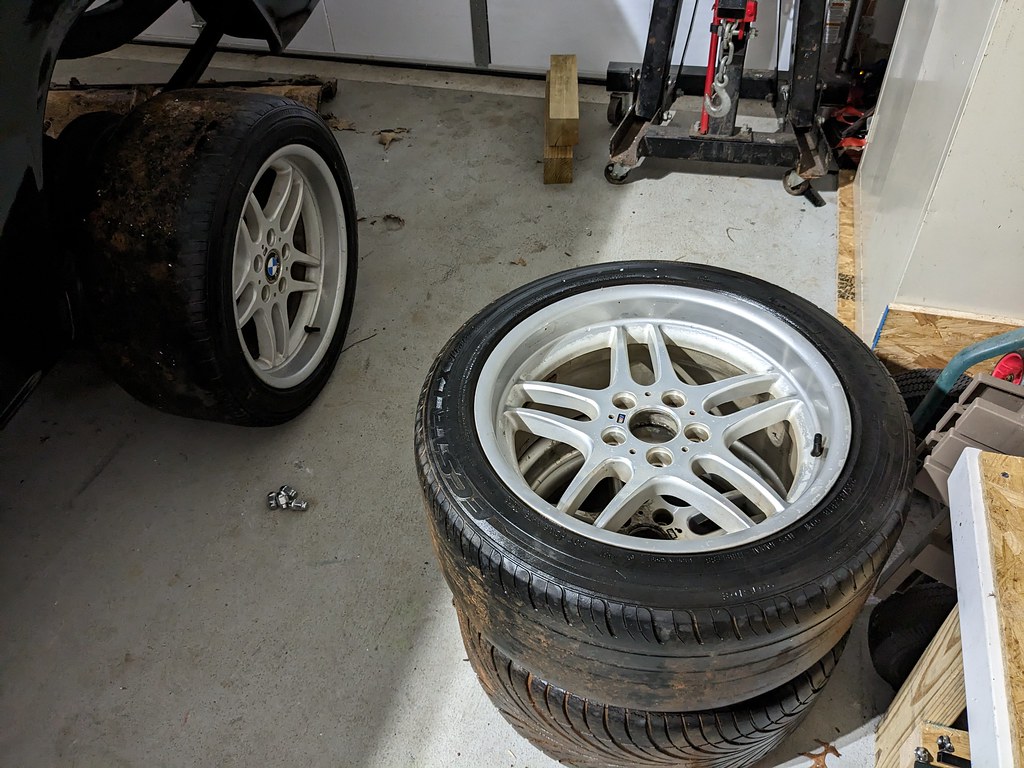
Since I know the 4 wheel drums aren't going to work, I've been keeping an eye out for some 17"+ wheels that would work with the Nomad. I found a guy on FB marketplace who had a 2001 740i with M Parallel wheels who was selling the car for cheap and decided to ask him if he would sell just the wheels. To my surprise, he said he would sell them for $400 bucks and they have tires. Earlier that day I sold the rear wheels that came off my car for $200, so I was only into the wheels for $200 bucks! For those that don't remember, these were the same wheels that I ran on my 68 Camaro "Penny Pincher". Unlike my Camaro, these wheels are temporary as I really want a set of Salt Flat wheels from American Racing. But they look ok and will allow me to upgrade my front disks, so I'm stoked. The M Parallel wheel (BMW Style 37) is a 1 piece forged wheel and is a staggered setup 18x8 fronts and 18x9.5 rear. The front backspacing is perfect for muscle cars, and the rear requires a 1" spacer. I've got a set of spacers on order, but for now I put a front wheel on the rear just to see what it looked like. Much better than the 90s American Racing wheels!!


And lastly I was able to go to the salvage yard early this morning and get the floor pan that I had partially pulled before I found that 9 passenger wagon. This is the section that I need, but it a little rusty in a few spots. This section is in ok shape, and will clean up pretty nicely. I just can't justify buying a full floor pan (or two half pans) only to cut off the rear section, with shipping so high. Now that I have this piece I'll be able to trim this down and get the wheel wells fit up. It will be nice to make some real progress to the body since I haven't been able to do much without this key piece. I basically need to build everything off of this section.

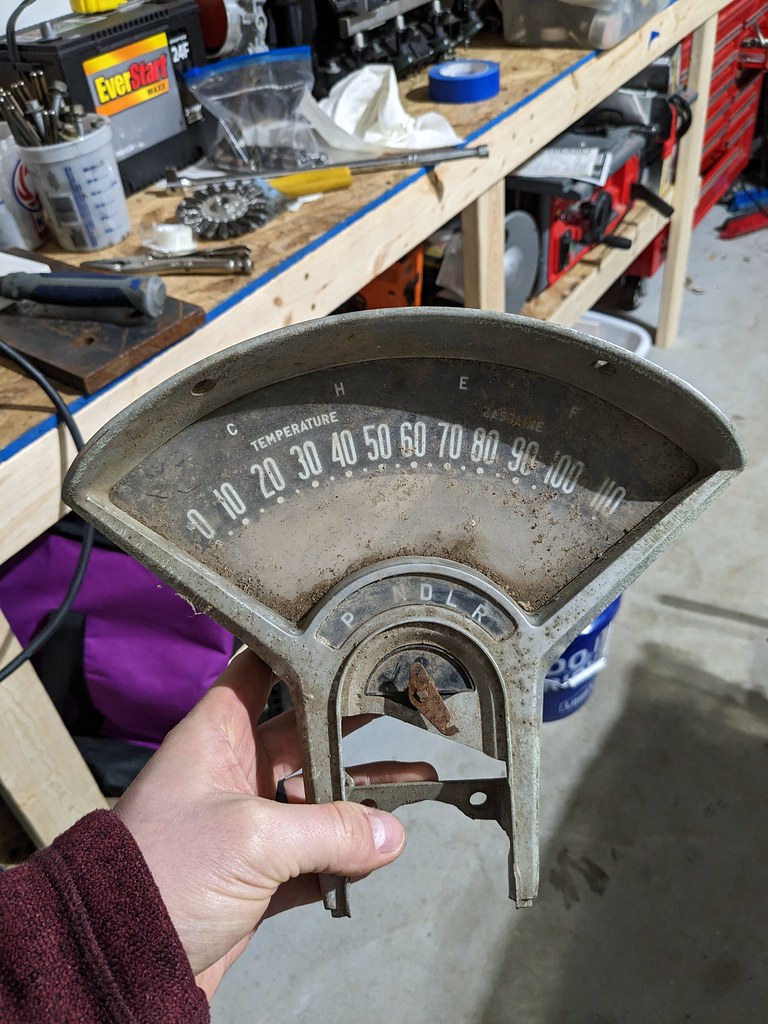
I also grabbed an automatic cluster since I'll be converting over to a column shift. I will need to get the 4 speed OD lense and detent kit, but this will work great to get me the mechanism I need. My cluster is in much better shape, so I'll just use the shifting guts from this one.
Hopefully my next update will be cutting out out the Pro-Street tubs and test fitting my floor section/mini-tub wheel wells.
Cheers,
Ryan
With that news I had to start over on my search for the rear floor pan section, but still needed to separate all of my metal to get it out of my driveway and also store it easier. I drilled out all the spotwelds carefully and removed the two wheel well sections. Then I was left with the middle piece. It went pretty quick once I got in a rhythm.
Looks pretty rusty, but are really solid in the spots that I need them to be.
Here you can see where it's drastically different than the typical cargo/floor pan area with the shock mounts and added brace for the extra weight of 9 passengers.
Since I need so many parts to get this car back together I'm constantly parts shopping, and then I saw Andrew's post about the iBooster followed shortly after by many others. Brakes are where I need a serious upgrade as my car has 4 wheel drum brakes on a single pot MC. I got to shopping around and found a good deal from a Tesla disassembler. He sold me the iBooster, wiring and brake line sections off of a Model S. I still need to get some brackets to mount it to the firewall, but I think this will make a huge difference. I'm planning to pick up a pair of 5th Gen Camaro front Brembo calipers and make my own mounts. Not sure on what rotor I'll run, but it will likely be the stock 5th Gen too.
I was also crunching numbers on what it would take to get the L83 into my car and at this time, it's more than I want to spend. So that had me on the hunt for a Gen4 5.3, and I really wanted to get one with an aluminum block. Then I stumbled on a guy who was selling a L76 with forged pistons. After I contacted him he mentioned that he had a tuning error that lead to a bent rod. After talking to him on the phone, I wanted to check it out to see things more closely. I looked it all over and there weren't any cracks in that cylinder and all the other rods were straight so I wanted the motor. To my surprise, he was willing to trade me straight for the L83, so I'm very pleased with that deal. I just need to find a new Gen4 rod, have the small end honed to .945" and I'll put it all back together.
After a little research I was able to find out that all 5.3, 6.0 and 6.2 gen4 motors share the same rods, and since I had picked up that 5.3 a few weeks earlier decided it was going to donate some parts. Time to tear that down and see why it was pulled in the first place. I assumed the normal DOD lifter failure, but it's fun to find out. Got the motor on my hoist and got to work on the teardown.
It's a miracle, no broken exhaust manifold bolts!
Really clean on the inside. Motor is supposed to have 190k on it, so I'm impressed so far.
Pulled the rockers off and I think I found out why it was pulled. "one of these things is not like the others"
I didn't get any pictures, but I pulled both heads off and the cylinder walls all look good with visible cross-hatching and no metal in the cylinders. Cylinder 8 exhaust is the one with the bent pushrod, and in the cylinder looked great. So, looks like they were able to get it shut off in time before any damage occurred. I still want to flip it over and see what the bottom end looks like, but I'm thinking this may be a good short-block. Now I'm not sure what I want to do. I was able to get all the lifters removed but the one with the bent push rod. It wouldn't pull out from the top, so it's probably mushroomed on the bottom side. It should fall out once the cam is out, then I'll know for sure what I want to do. For now though I'm thinking I'm going to find someone who has a single gen4 rod.
Since I know the 4 wheel drums aren't going to work, I've been keeping an eye out for some 17"+ wheels that would work with the Nomad. I found a guy on FB marketplace who had a 2001 740i with M Parallel wheels who was selling the car for cheap and decided to ask him if he would sell just the wheels. To my surprise, he said he would sell them for $400 bucks and they have tires. Earlier that day I sold the rear wheels that came off my car for $200, so I was only into the wheels for $200 bucks! For those that don't remember, these were the same wheels that I ran on my 68 Camaro "Penny Pincher". Unlike my Camaro, these wheels are temporary as I really want a set of Salt Flat wheels from American Racing. But they look ok and will allow me to upgrade my front disks, so I'm stoked. The M Parallel wheel (BMW Style 37) is a 1 piece forged wheel and is a staggered setup 18x8 fronts and 18x9.5 rear. The front backspacing is perfect for muscle cars, and the rear requires a 1" spacer. I've got a set of spacers on order, but for now I put a front wheel on the rear just to see what it looked like. Much better than the 90s American Racing wheels!!
And lastly I was able to go to the salvage yard early this morning and get the floor pan that I had partially pulled before I found that 9 passenger wagon. This is the section that I need, but it a little rusty in a few spots. This section is in ok shape, and will clean up pretty nicely. I just can't justify buying a full floor pan (or two half pans) only to cut off the rear section, with shipping so high. Now that I have this piece I'll be able to trim this down and get the wheel wells fit up. It will be nice to make some real progress to the body since I haven't been able to do much without this key piece. I basically need to build everything off of this section.
I also grabbed an automatic cluster since I'll be converting over to a column shift. I will need to get the 4 speed OD lense and detent kit, but this will work great to get me the mechanism I need. My cluster is in much better shape, so I'll just use the shifting guts from this one.
Hopefully my next update will be cutting out out the Pro-Street tubs and test fitting my floor section/mini-tub wheel wells.
Cheers,
Ryan
02-06-2023, 08:35 AM
#30
TECH Fanatic
Thread Starter
iTrader: (27)
The connecting rod belongs to the L76 motor and the guy I got it from said it was a tuning error on his part. It was boosted and he said something about a fuel cut off and then when it reactivated it dumped too much fuel. Everything else looks good, so I'm just getting a new rod and sending it.
The pushrod is off of the parts motor that I picked up. It's a gen4 motor, but has the worst of everything. DOD, VVT and iron block. I'm borrowing all the good parts to build up the aluminum 6.0.

The following users liked this post:
G Atsma (02-06-2023)
02-08-2023, 12:52 PM
#31
On The Tree

Love the Nomad! I've got a '56 210 2 door sedan (since 1983), that will be my next project once I'm done with my 6.2L T56 73 Vega wagon.
Before you go tearing into that 5.3 for a single connecting rod for the aluminum 5.3, you might shop around for a single rod. You can get singles all day long on ebay for $30. I've seen entire sets of Gen 4 rods for $100 on FB marketplace.
Before you go tearing into that 5.3 for a single connecting rod for the aluminum 5.3, you might shop around for a single rod. You can get singles all day long on ebay for $30. I've seen entire sets of Gen 4 rods for $100 on FB marketplace.
02-09-2023, 08:28 AM
#32
TECH Fanatic
Thread Starter
iTrader: (27)
Hi Zanie, Thanks, for the tip. After I tore the heads off the short block, I was thinking the same thing actually. I think that the guy who I bought it from wasn't sure why the motor stopped working, but told me it was low oil pressure. After finding the bent rod and all the pistons and lifter bores look great, I feel confident that this is a good shortblock as is. I'm actually debating on just putting it back together and saving the LS2 for a later build. If anyone has a cheap 3 bolt cam shoot me a PM. 
I've been patiently collecting parts and waiting until I had everything before I started cutting out the wheel tubs. I finally got my chance and now's the time. I started by unscrewing (yes that's what was holding the middle portion down), the center hump, and cutting away a few spot welds. I was very surprised that this is how someone built this wheel tub section. On the outside it appeared that they did an ok job on the fabrication side, but turns out that wasn't the case. Not confident that sheet metal screws are a great way to secure floor pan sections...


While I'm in here, I plan to fully butt weld the two floor pan halves together. Some of the spot welds missed and aren't connecting the two together. Then I made my first big cut. I wanted to get down to the original floor pans to see what I had left to work with. Thankfully they left me more than I had anticipated, so that is great news. That floor section I got from the salvage yard is rusty in the spots that are solid on my car, so I'll have a really clean repair.
Then I cut out the other side to see what that looked like. As I was cutting I tapped the side of the wheel tub with a hammer and this happened! Why did you take the time to add that much filler, but not to fully weld the panels together??

This section had no spot welds at all. The only thing holding it together was body filler.

Once I cut away these sections, I was left with this opening. Overall, I'm pleased with the amount of the original floor that they left since it gives me a really good base to built back. As I was going over how I wanted to proceed with the repairs, it became very clear that I'll need to have the cargo panel in order to get the right height since I'll be splicing the two panels together. I ordered the cargo panel with the braces separate as I was informed that they don't coat the inner braces before they install them. I wanted to spray something behind to protect them, but I'm going to narrow it for the wider wheel tubs so that should make my job easier not having to drill out spot welds.

I also grabbed some parts to get my engine back together. VVT Delete timing cover, new oil pump and 4x 3 bolt timing gear.

I also found a single 8" M Parallel wheel on eBay shipped for $100 bucks, so I jumped on that. Since the wheels that I had came with 1 8" and 3 9.5" this will give me a complete staggered set.

I wasn't sure what to do with the front seat since it was taking up a lot of real estate on the floor of my garage, so I decided to test fit it in the car. I still have plenty of room to work on the rear floor pan, so that's where it'll stay for the foreseeable future. It looks good in there, but the sliders are not from a Chevy. They must be from a Pontiac or something similar. I can modify the brackets to work with my floor, and then get a new seat cover for it. It needs some rust repair and reinforcement on the passenger side where you can see it's drooping down. Overall I'm happy with the placement of it. Looks right at home.

I've been patiently collecting parts and waiting until I had everything before I started cutting out the wheel tubs. I finally got my chance and now's the time. I started by unscrewing (yes that's what was holding the middle portion down), the center hump, and cutting away a few spot welds. I was very surprised that this is how someone built this wheel tub section. On the outside it appeared that they did an ok job on the fabrication side, but turns out that wasn't the case. Not confident that sheet metal screws are a great way to secure floor pan sections...
While I'm in here, I plan to fully butt weld the two floor pan halves together. Some of the spot welds missed and aren't connecting the two together. Then I made my first big cut. I wanted to get down to the original floor pans to see what I had left to work with. Thankfully they left me more than I had anticipated, so that is great news. That floor section I got from the salvage yard is rusty in the spots that are solid on my car, so I'll have a really clean repair.
Then I cut out the other side to see what that looked like. As I was cutting I tapped the side of the wheel tub with a hammer and this happened! Why did you take the time to add that much filler, but not to fully weld the panels together??
This section had no spot welds at all. The only thing holding it together was body filler.
Once I cut away these sections, I was left with this opening. Overall, I'm pleased with the amount of the original floor that they left since it gives me a really good base to built back. As I was going over how I wanted to proceed with the repairs, it became very clear that I'll need to have the cargo panel in order to get the right height since I'll be splicing the two panels together. I ordered the cargo panel with the braces separate as I was informed that they don't coat the inner braces before they install them. I wanted to spray something behind to protect them, but I'm going to narrow it for the wider wheel tubs so that should make my job easier not having to drill out spot welds.
I also grabbed some parts to get my engine back together. VVT Delete timing cover, new oil pump and 4x 3 bolt timing gear.
I also found a single 8" M Parallel wheel on eBay shipped for $100 bucks, so I jumped on that. Since the wheels that I had came with 1 8" and 3 9.5" this will give me a complete staggered set.
I wasn't sure what to do with the front seat since it was taking up a lot of real estate on the floor of my garage, so I decided to test fit it in the car. I still have plenty of room to work on the rear floor pan, so that's where it'll stay for the foreseeable future. It looks good in there, but the sliders are not from a Chevy. They must be from a Pontiac or something similar. I can modify the brackets to work with my floor, and then get a new seat cover for it. It needs some rust repair and reinforcement on the passenger side where you can see it's drooping down. Overall I'm happy with the placement of it. Looks right at home.
The following users liked this post:
Zanie (02-09-2023)
02-13-2023, 10:30 AM
#33
TECH Fanatic
Thread Starter
iTrader: (27)
Not a huge update, but I'm plugging away. I got the spot weld drill bit out and started separating some of the panels for the rear floor pan section that were welded to it. When I cut the section out, I cut everything around it much larger than I'd need knowing that I would have to cut and trim it down. Way easier to cut it too big than too small.

Once it was trimmed down, it was clear that I needed to cut more of the wheel wells away to get an initial test fit. What was amazing to me is how these wheel wells were put together in the first place. These welds were so cold that many of the spot welds didn't have enough penetration and were breaking off. It made the removal process very easy, but honestly a little scary that people put together panels like this.


This was a very rough fitment, but this panel will work perfectly! I also realized that the back side of the panel I got has a brace for the driveshaft bumper and my car was missing that too, so that's another win. I need to find some body mounts, or get a whole new kit, before I can go much further. I need to get the height set properly before I can burn it in for good. For now, I'll get the panel trimmed up for a much tighter fitment.

I was also able to get the wheel wells trimmed up as well. The wells had all of the inner structures attached as well as the outer wheel houses. I had to cut out the inner structures I didn't need, then drill out the spot welds for the outer wheel house panels. Most of the wheel house panels are in really good shape, and I may or may not need them so I carefully removed them. If I don't end up needing them, I'll try and sell them to recoup some funds. The factory undercoating did a great job of keeping most of the metal in fantastic shape.

I had my garage helper with me too.

It felt great to get these panels trimmed down and much closer to being installed. As you can see they still need a few patches, but they shouldn't take long to fix.

I'm still trying to think through how I want to install the wheel tubs and widen them. I should have the cargo panel and braces in the next week or so which will help me to locate the rear floor and wheel wells. Initially I'm thinking it may be best to install all the panels with screws or clecos, then narrow the cargo panel by the amount I want and bring all of the panels in to the modified cargo panel. I can't wait to get through the sheet metal phase, and into the more fun things like LS swapping the car!
Ryan
Once it was trimmed down, it was clear that I needed to cut more of the wheel wells away to get an initial test fit. What was amazing to me is how these wheel wells were put together in the first place. These welds were so cold that many of the spot welds didn't have enough penetration and were breaking off. It made the removal process very easy, but honestly a little scary that people put together panels like this.
This was a very rough fitment, but this panel will work perfectly! I also realized that the back side of the panel I got has a brace for the driveshaft bumper and my car was missing that too, so that's another win. I need to find some body mounts, or get a whole new kit, before I can go much further. I need to get the height set properly before I can burn it in for good. For now, I'll get the panel trimmed up for a much tighter fitment.
I was also able to get the wheel wells trimmed up as well. The wells had all of the inner structures attached as well as the outer wheel houses. I had to cut out the inner structures I didn't need, then drill out the spot welds for the outer wheel house panels. Most of the wheel house panels are in really good shape, and I may or may not need them so I carefully removed them. If I don't end up needing them, I'll try and sell them to recoup some funds. The factory undercoating did a great job of keeping most of the metal in fantastic shape.
I had my garage helper with me too.
It felt great to get these panels trimmed down and much closer to being installed. As you can see they still need a few patches, but they shouldn't take long to fix.
I'm still trying to think through how I want to install the wheel tubs and widen them. I should have the cargo panel and braces in the next week or so which will help me to locate the rear floor and wheel wells. Initially I'm thinking it may be best to install all the panels with screws or clecos, then narrow the cargo panel by the amount I want and bring all of the panels in to the modified cargo panel. I can't wait to get through the sheet metal phase, and into the more fun things like LS swapping the car!
Ryan
The following users liked this post:
n2xlr8n66 (02-28-2023)
02-14-2023, 10:54 PM
#34
On The Tree
I might have some extra new tri-chevy body mounts. This guy gave me a bunch of his excess parts some time back once he was done with his resto. Let me check Wednesday night, and if I have some I can send them to you.
The following users liked this post:
ryeguy2006a (02-15-2023)
 02-20-2023, 10:54 AM
#38
TECH Fanatic
Thread Starter
iTrader: (27)
St3v3, I haven't but I'll have to take a look.
Zanie, PM sent!
Another weekend and some more progress and parts. I worked more on getting my floor pan section modified and trimmed up to get a better mock up. The fit up is really looking great, and it will only need a little more trimming to be in it's final place. I'll need to make a few small pieces to go around the wheel wells, but I'll need other panels in place before that happens.


Body mounts are now able to be centered in the frame mounts. Once I'm happy with the fitment, I'm going to take some sheet metal screws and secure it all before I start welding.

As I usually do after the kids go to bed at night, I was cruising FB marketplace and came across a guy selling a 55 2 door handyman wagon for parts. He was selling it as a whole car, but asked him if it had a rear seat and if he would sell separately. To my surprise he said it did have a seat and that he would sell separately with the brackets. After he sent me the pictures, the seats were in very good condition and very complete. Best part is his price was about 1/4 of the going rate for rear seats, plus it came with the brackets!


When I got there he had a few other parts, but ended up only buying the spare wheel well. It's very solid everywhere but where all the spot welds were drilled out. I'll have to replace some of the sections, but for the most part is in great shape. Love using original parts when I can.


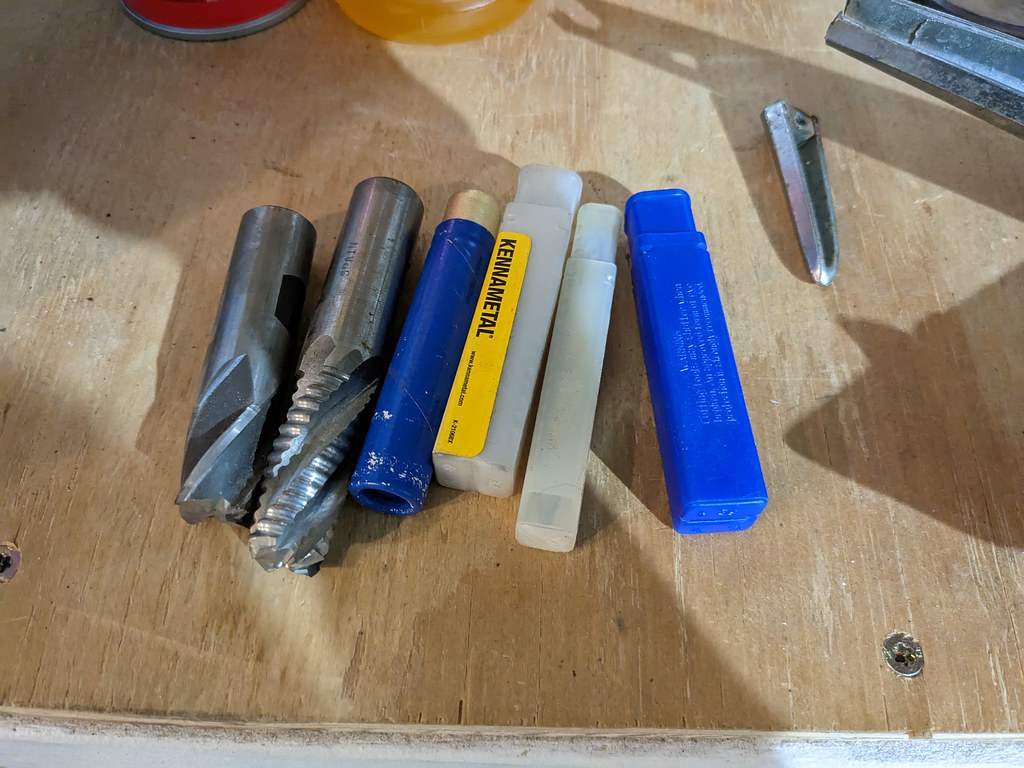
I got to talking with the guy and he ended up giving me some end mill bits and a hood ornament too! Car people are the best kinds of people!! Love this community.

I got sick of looking at the wheel wells and decided that it was time to get them removed. As I was cutting away I kept wondering why they did a lot of the things that they did. First up was cutting one of two large stitch welds that connected these two panels after chipping away the bondo that filled the 1/4" gap. So much wrong about that last sentence...

Oh, what's this? A little hidden compartment for body filler to go.


If you look closely you can see the rings of body filler that were used in apparently different stages. Almost like the rings of a tree.

Same on both sides.


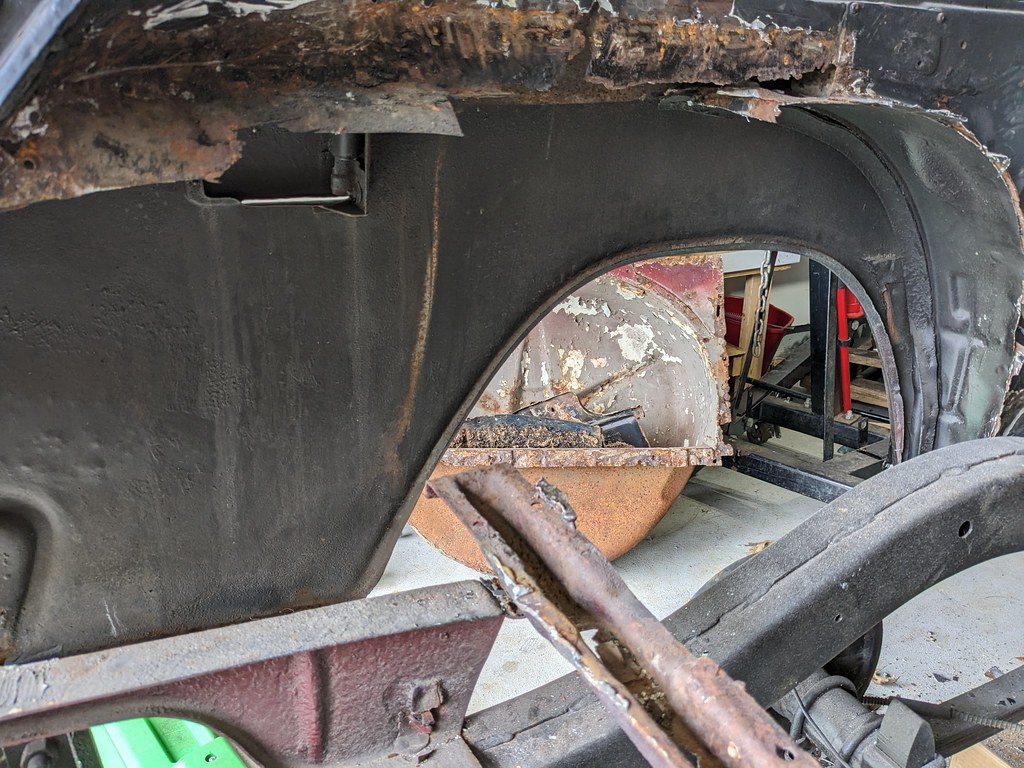
This is where I left it for the day. While scary, it looks way better to me than before. The good news to come of all this destruction is they did leave the stock outer wheel wells intact as well as some of the stock wheel wells which will make my job a little easier. I'm hoping that I can just cut what's left of the inner wheel wells and see what's there to work with.

With the wheel tubs all removed, I was able to start checking things out. I knew that with the cargo area, it would lay flat all the way to the rear floor pan section. So eyeballing it with the section I cut out mocked up, it looks very flat. The rear floor panel may need to come up just slightly, but is a really good place to start.

Now for the next few pictures, if you squint it really looks like something.

The FedEx guy had impeccable timing, as the rear cargo area that I ordered was delivered! I ordered the flat section and the inner braces separately because I wanted to weld them in myself, but also prime /paint the inner sections to prevent future corrosion, but also separately qualified for free shipping through Jeg's! The cargo panel with braces welded together has to be shipped oversized. Anyway I couldn't help myself and took it out of the box to give myself some motivation. I need to clean off all of the remaining pieces of the wheel wells so that the panel will sit flat against the rear brace, but it looks great. Very pleased with my progress this weekend. Hopefully I can work for 15-20 mins here and there this week to continue to peal back the layers of what the PO did. Once I get to some solid metal I can hopefully start test fitting more panels.

Zanie, PM sent!
Another weekend and some more progress and parts. I worked more on getting my floor pan section modified and trimmed up to get a better mock up. The fit up is really looking great, and it will only need a little more trimming to be in it's final place. I'll need to make a few small pieces to go around the wheel wells, but I'll need other panels in place before that happens.
Body mounts are now able to be centered in the frame mounts. Once I'm happy with the fitment, I'm going to take some sheet metal screws and secure it all before I start welding.
As I usually do after the kids go to bed at night, I was cruising FB marketplace and came across a guy selling a 55 2 door handyman wagon for parts. He was selling it as a whole car, but asked him if it had a rear seat and if he would sell separately. To my surprise he said it did have a seat and that he would sell separately with the brackets. After he sent me the pictures, the seats were in very good condition and very complete. Best part is his price was about 1/4 of the going rate for rear seats, plus it came with the brackets!
When I got there he had a few other parts, but ended up only buying the spare wheel well. It's very solid everywhere but where all the spot welds were drilled out. I'll have to replace some of the sections, but for the most part is in great shape. Love using original parts when I can.
I got to talking with the guy and he ended up giving me some end mill bits and a hood ornament too! Car people are the best kinds of people!! Love this community.
I got sick of looking at the wheel wells and decided that it was time to get them removed. As I was cutting away I kept wondering why they did a lot of the things that they did. First up was cutting one of two large stitch welds that connected these two panels after chipping away the bondo that filled the 1/4" gap. So much wrong about that last sentence...
Oh, what's this? A little hidden compartment for body filler to go.
If you look closely you can see the rings of body filler that were used in apparently different stages. Almost like the rings of a tree.
Same on both sides.
This is where I left it for the day. While scary, it looks way better to me than before. The good news to come of all this destruction is they did leave the stock outer wheel wells intact as well as some of the stock wheel wells which will make my job a little easier. I'm hoping that I can just cut what's left of the inner wheel wells and see what's there to work with.
With the wheel tubs all removed, I was able to start checking things out. I knew that with the cargo area, it would lay flat all the way to the rear floor pan section. So eyeballing it with the section I cut out mocked up, it looks very flat. The rear floor panel may need to come up just slightly, but is a really good place to start.
Now for the next few pictures, if you squint it really looks like something.
The FedEx guy had impeccable timing, as the rear cargo area that I ordered was delivered! I ordered the flat section and the inner braces separately because I wanted to weld them in myself, but also prime /paint the inner sections to prevent future corrosion, but also separately qualified for free shipping through Jeg's! The cargo panel with braces welded together has to be shipped oversized. Anyway I couldn't help myself and took it out of the box to give myself some motivation. I need to clean off all of the remaining pieces of the wheel wells so that the panel will sit flat against the rear brace, but it looks great. Very pleased with my progress this weekend. Hopefully I can work for 15-20 mins here and there this week to continue to peal back the layers of what the PO did. Once I get to some solid metal I can hopefully start test fitting more panels.
The following 4 users liked this post by ryeguy2006a:
 02-27-2023, 09:21 AM
#40
TECH Fanatic
Thread Starter
iTrader: (27)
Thanks Steve!
So my plan this time around was to buy a car that was painted, and didn't need a whole lot of repairs. I'd say the plan failed, but in my defense the previous owner hid the "repairs" very well. Seems like I just keep cutting deeper and deeper, but thankfully I came to the end of the covered up rusty metal. It's disappointing to see when people just layer new metal over rusty metal then cover it with body filler. I kept going on the driver's side and finally hit the original metal.


That panel above the wheel well will need some patches, but thankfully I have extra from the wheel wells that I bought. Glad that the window channels are in good shape. Out comes that outer wheel well.
It's easy to see now, but when I was looking under the car it all looked minty. Here you can see the bottom looks great, but the top had another secret. More new metal layered over rusty metal.


I'm glad when I pulled the wheel houses out of that 9 passenger wagon that it came with the outer wheel houses because they are in pretty good shape with just some small patches needed. The lower section of the wheel house is in good shape, so I can section off what I need and splice it to the one in good shape.
Did a little measuring, then just cut it. It lined up nicely, and after I tacked it in place fits just like the one that came off the car.

Finally broke out my new welder. Everlast MTS 225, and the MIG Function works great. I should have ground back the metal more, but the kiddos were sleeping and didn't want to be too loud.


The front outer wheel house is actually in great shape, but I'll need to weld on a new tab that attaches the rear/upper panel that I just repaired.
Here's just another example of what not to do. If you have weak stomach's, scroll quick.

After all of that cutting I decided to get some motivation and roughly mocked up the wheel wells again. To get a better idea of how they will sit, I needed to trim off the little dip from the 9 passenger cargo panel. Just needs to be straight across, so painters tape did the trick.


What I'm coming to realize is that the rear section of the wheel house is much different on the Nomad vs the other tri5 wagons. I could see that the angle was different, but that also makes the top section too long so I'm going to need to do some cutting. I made one big cut, then was able to get the panel to sit down nicely where it will eventually go. It's a bit unconventional, as there is usually just a flange left that welds to the upper structure, but since mine is so rusted in spots, I'm going to be doing a little of both and left the top tab attached. I'll spot weld that to the upper channel, then left the flange for the rest of the wheel house. I'm going to use some sheet metal screws when the time comes to secure it all, and tack weld the whole wheel well together once it's all fitting great. Then I can remove it and weld into a solid piece on my bench.

Really happy with that fitment. Once I get the panel all patched up, it will fit really well.

Then one thing that kept bothering me was that middle brace seemed to be shifted towards the driver's side. It wasn't allowing the wheel well to go straight back, then I threw a tape measure on it and it was about 3/8" towards the driver's side. With that information, it changes the game. I needed to see what was going on with the passenger's side too so that I can make sure that it's square. Time to cut up the passengers side. I was hoping to leave it and get the one side mocked up to give the body more rigidity. Nope...
I'll spare the details, but it's the same story on this side as well.

This is why we can't have nice things.

I don't like leaving the car like this, but it gives me the motivation to get it back together.

I'm going to pick up some weld-through primer very soon and get some panels welded back into the car shortly. Another panel that I need to replace which is going to be a huge PITA will be the heavy steel panel where the tailgate mounts. That was spliced and cut up over the years, so it just needs to be completely cut out and a new one welded in. I need to replace that panel before I do a final weld of the wheel wells because it attaches to almost everything in the rear of the car. I also need to figure out how to brace it all from moving when I replace that panel. That's one of the next items on my list to address, so stay tuned.
Cheers,
Ryan
So my plan this time around was to buy a car that was painted, and didn't need a whole lot of repairs. I'd say the plan failed, but in my defense the previous owner hid the "repairs" very well. Seems like I just keep cutting deeper and deeper, but thankfully I came to the end of the covered up rusty metal. It's disappointing to see when people just layer new metal over rusty metal then cover it with body filler. I kept going on the driver's side and finally hit the original metal.
That panel above the wheel well will need some patches, but thankfully I have extra from the wheel wells that I bought. Glad that the window channels are in good shape. Out comes that outer wheel well.
It's easy to see now, but when I was looking under the car it all looked minty. Here you can see the bottom looks great, but the top had another secret. More new metal layered over rusty metal.
I'm glad when I pulled the wheel houses out of that 9 passenger wagon that it came with the outer wheel houses because they are in pretty good shape with just some small patches needed. The lower section of the wheel house is in good shape, so I can section off what I need and splice it to the one in good shape.
Did a little measuring, then just cut it. It lined up nicely, and after I tacked it in place fits just like the one that came off the car.
Finally broke out my new welder. Everlast MTS 225, and the MIG Function works great. I should have ground back the metal more, but the kiddos were sleeping and didn't want to be too loud.
The front outer wheel house is actually in great shape, but I'll need to weld on a new tab that attaches the rear/upper panel that I just repaired.
Here's just another example of what not to do. If you have weak stomach's, scroll quick.
After all of that cutting I decided to get some motivation and roughly mocked up the wheel wells again. To get a better idea of how they will sit, I needed to trim off the little dip from the 9 passenger cargo panel. Just needs to be straight across, so painters tape did the trick.
What I'm coming to realize is that the rear section of the wheel house is much different on the Nomad vs the other tri5 wagons. I could see that the angle was different, but that also makes the top section too long so I'm going to need to do some cutting. I made one big cut, then was able to get the panel to sit down nicely where it will eventually go. It's a bit unconventional, as there is usually just a flange left that welds to the upper structure, but since mine is so rusted in spots, I'm going to be doing a little of both and left the top tab attached. I'll spot weld that to the upper channel, then left the flange for the rest of the wheel house. I'm going to use some sheet metal screws when the time comes to secure it all, and tack weld the whole wheel well together once it's all fitting great. Then I can remove it and weld into a solid piece on my bench.
Really happy with that fitment. Once I get the panel all patched up, it will fit really well.
Then one thing that kept bothering me was that middle brace seemed to be shifted towards the driver's side. It wasn't allowing the wheel well to go straight back, then I threw a tape measure on it and it was about 3/8" towards the driver's side. With that information, it changes the game. I needed to see what was going on with the passenger's side too so that I can make sure that it's square. Time to cut up the passengers side. I was hoping to leave it and get the one side mocked up to give the body more rigidity. Nope...
I'll spare the details, but it's the same story on this side as well.
This is why we can't have nice things.
I don't like leaving the car like this, but it gives me the motivation to get it back together.
I'm going to pick up some weld-through primer very soon and get some panels welded back into the car shortly. Another panel that I need to replace which is going to be a huge PITA will be the heavy steel panel where the tailgate mounts. That was spliced and cut up over the years, so it just needs to be completely cut out and a new one welded in. I need to replace that panel before I do a final weld of the wheel wells because it attaches to almost everything in the rear of the car. I also need to figure out how to brace it all from moving when I replace that panel. That's one of the next items on my list to address, so stay tuned.
Cheers,
Ryan