
Alaska Exocet LS build thread!
Thread Starter
TECH Regular


Joined: Oct 2011
Posts: 453
Likes: 178
From: Alaska
Geez, that’s the first one I’ve ever seen do that! What power level/usage does that diff see? I’m assuming it’s in an RX7 based on your username.
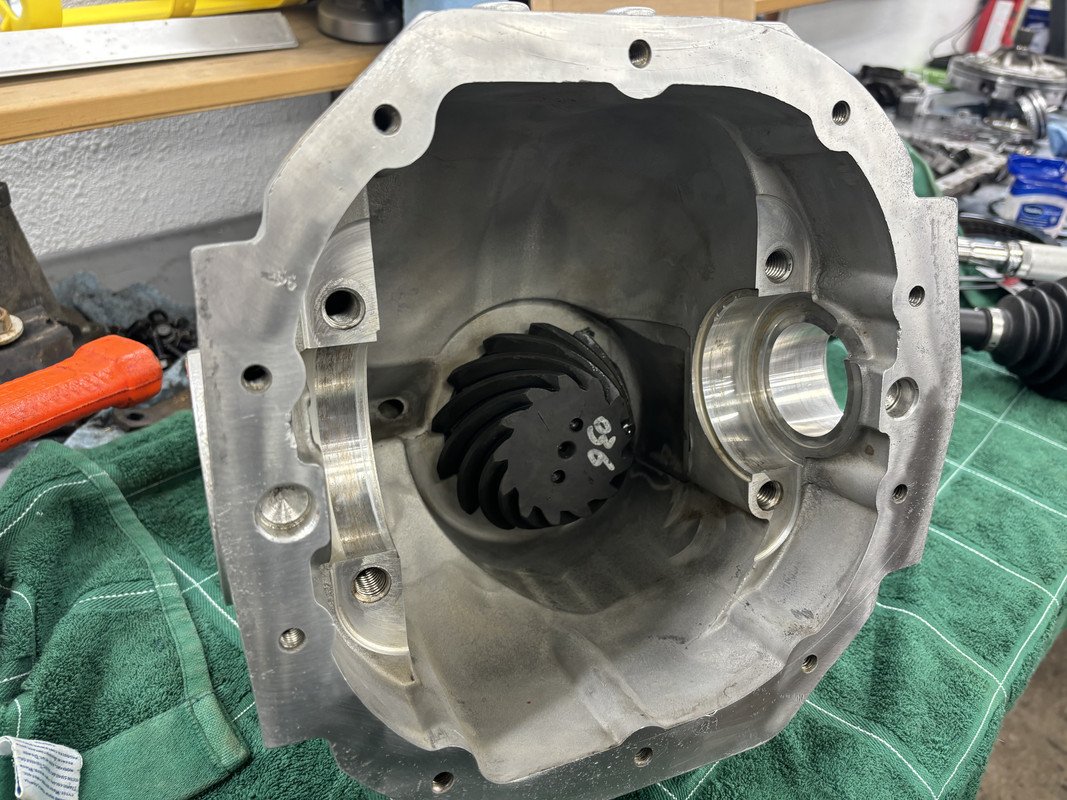
Can’t really do much until I get the subframes in and my parts back from PC. Went out and installed the ring gear and bearings onto the center section.
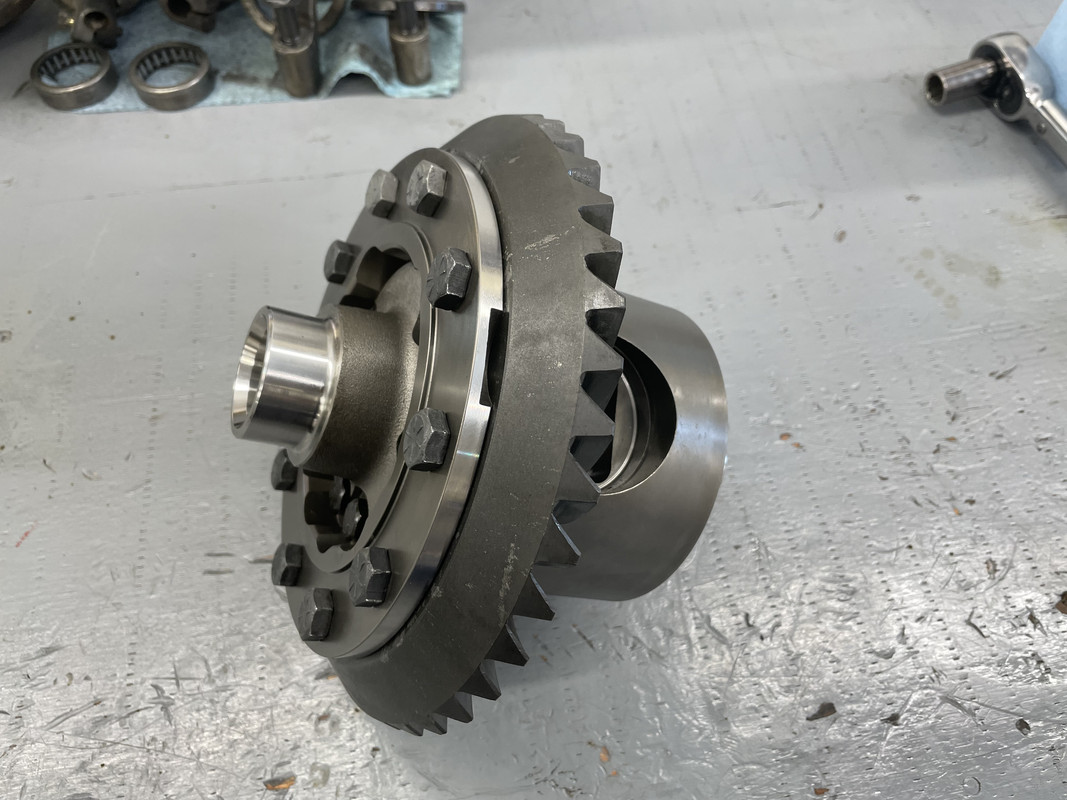
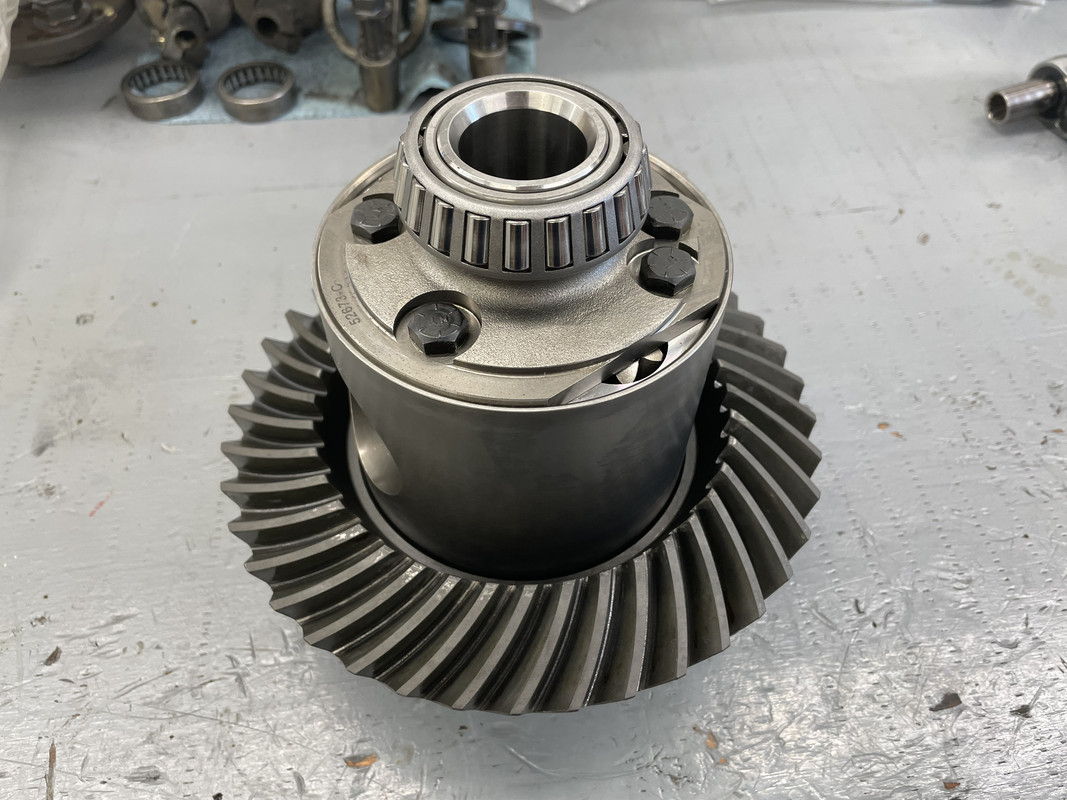
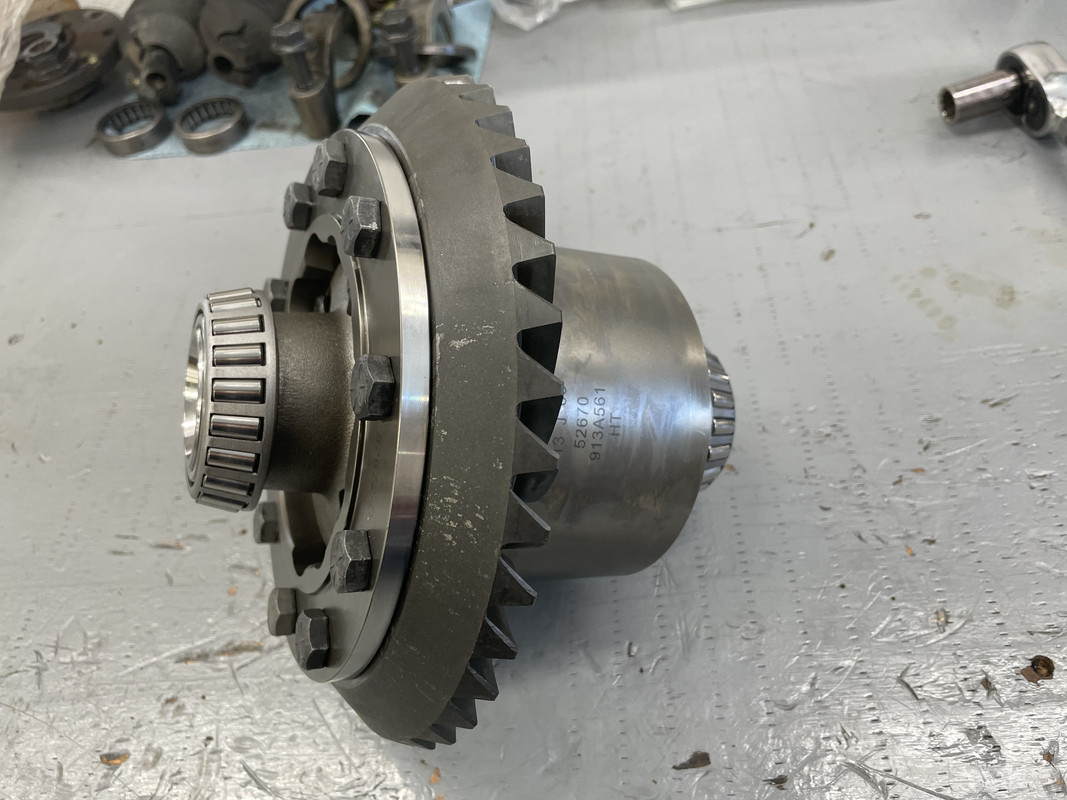
Can’t really do much until I get the subframes in and my parts back from PC. Went out and installed the ring gear and bearings onto the center section.
I've been with my wife since we were teenagers. I realize that is not the norm. At that I could never see myself be miserable in a relationship. Wish you a brighter future.
This thing is going to be a rocket!
Thread Starter
TECH Regular
Joined: Oct 2011
Posts: 453
Likes: 178
From: Alaska
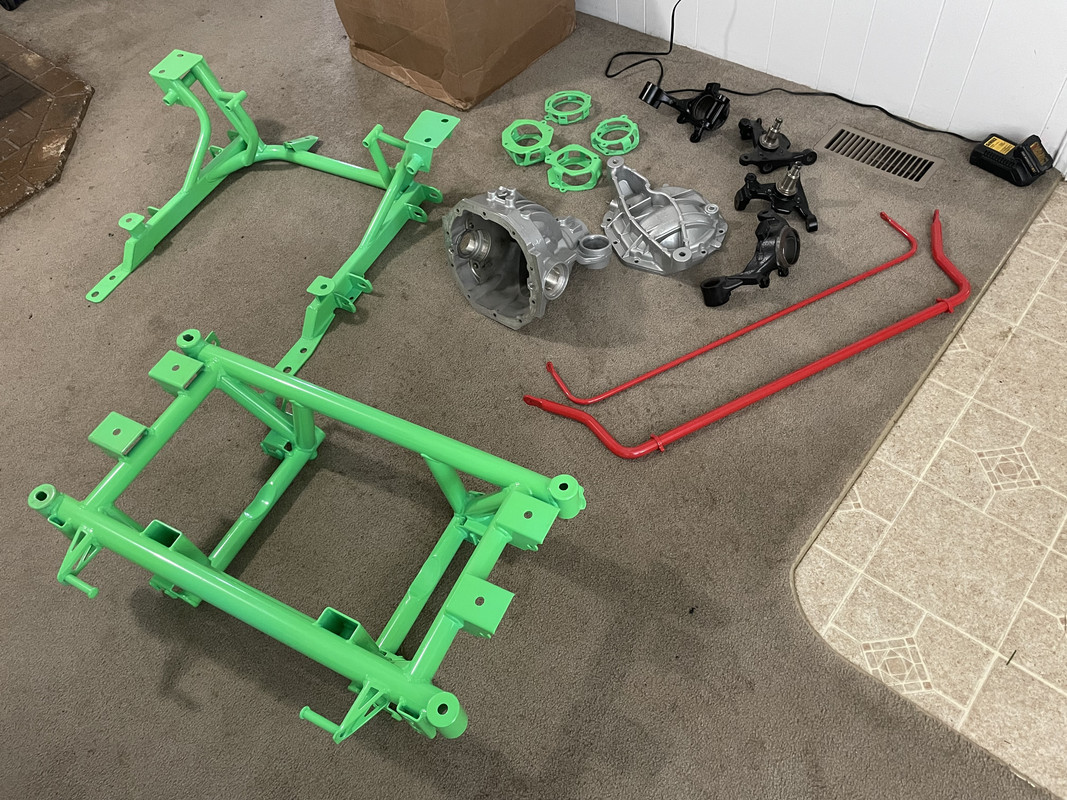
The powdercoaters came through this week! They were very backlogged so it took a while to see these again, but I can finally more forward!
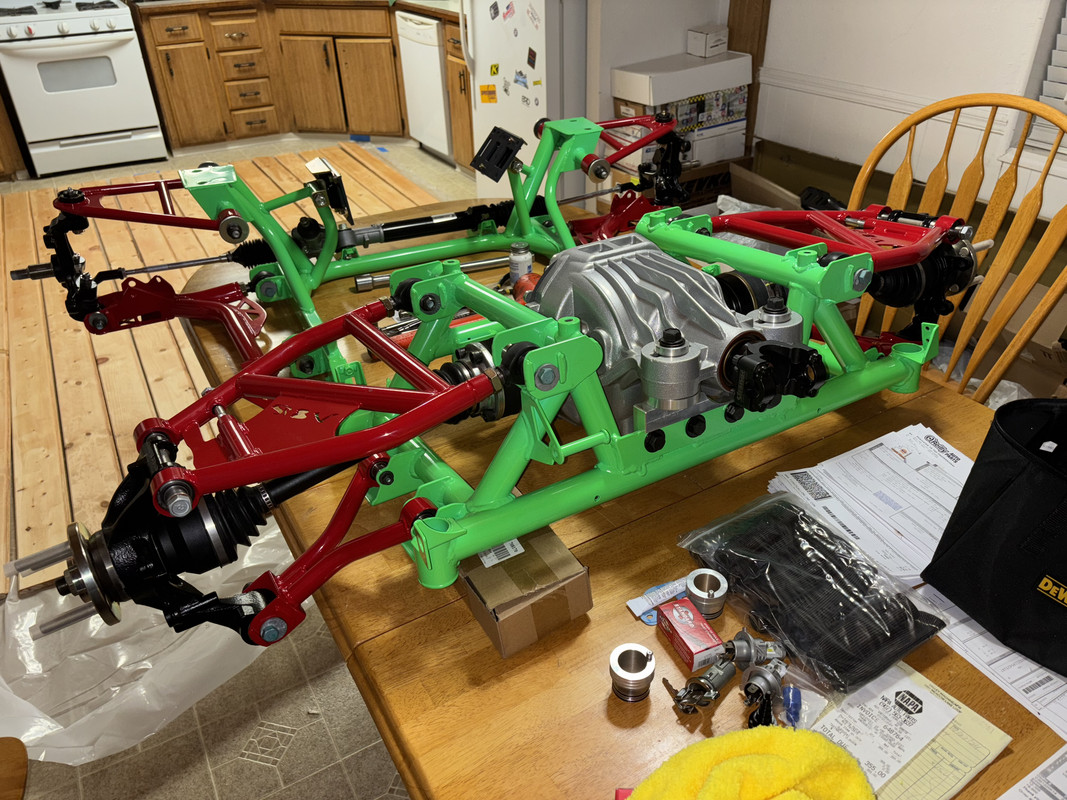
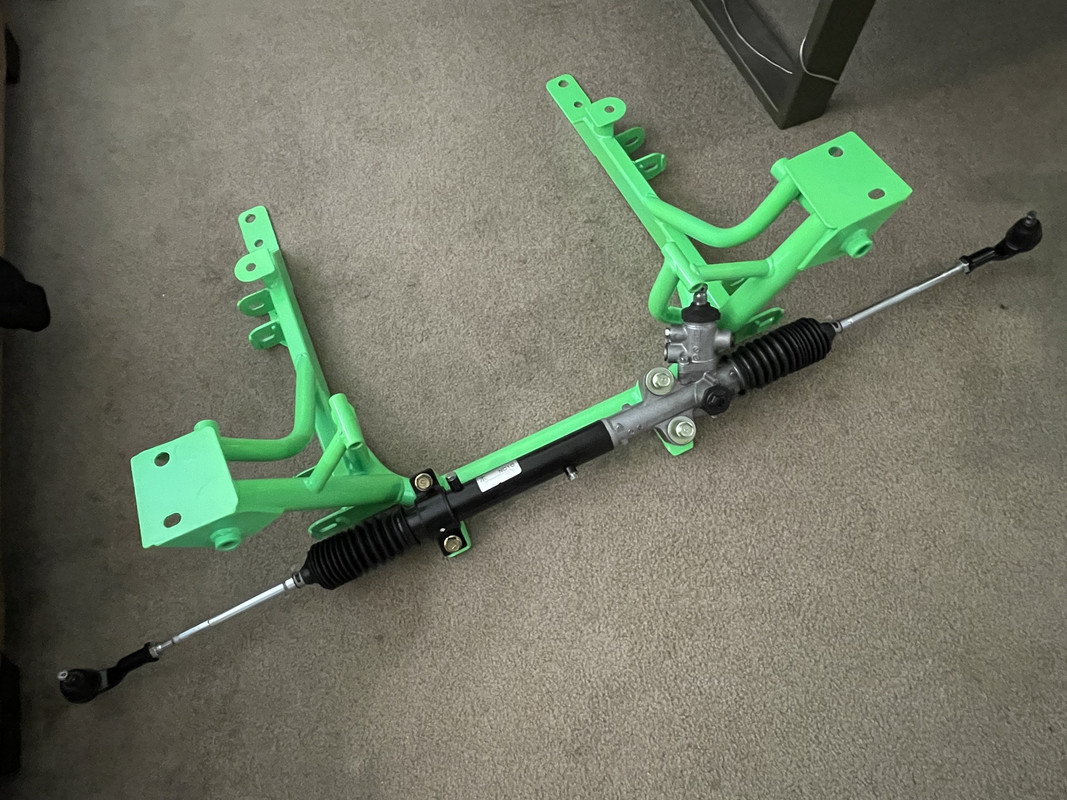
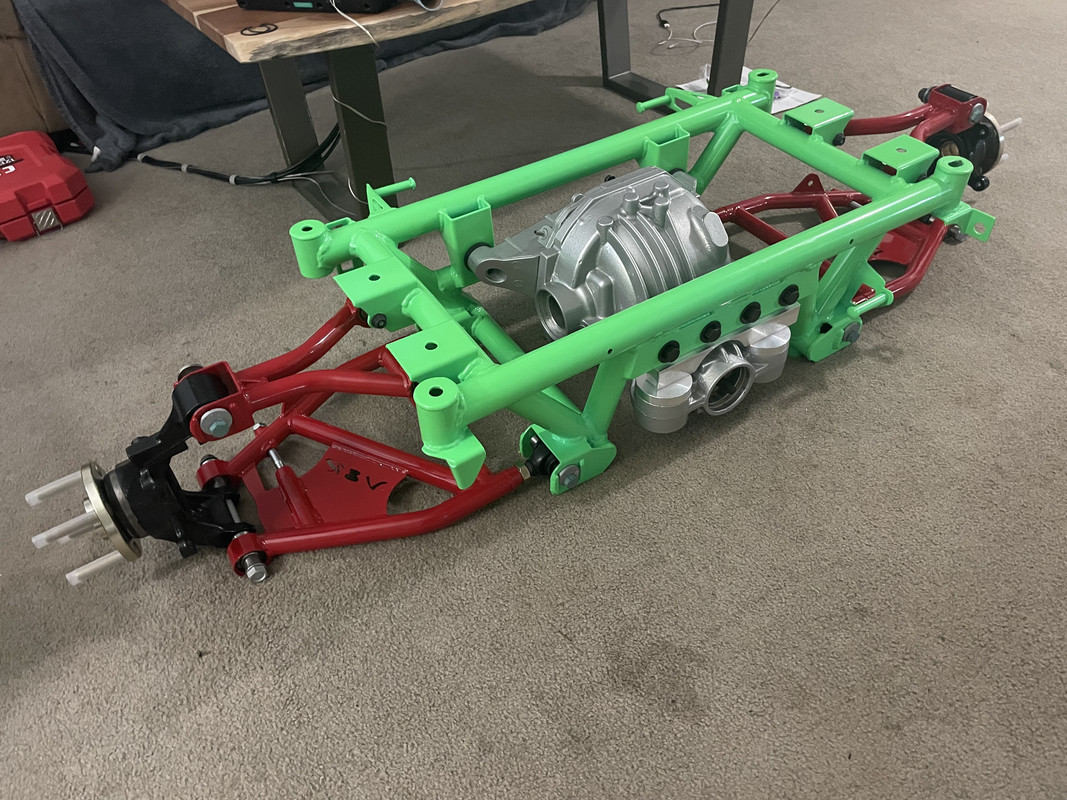
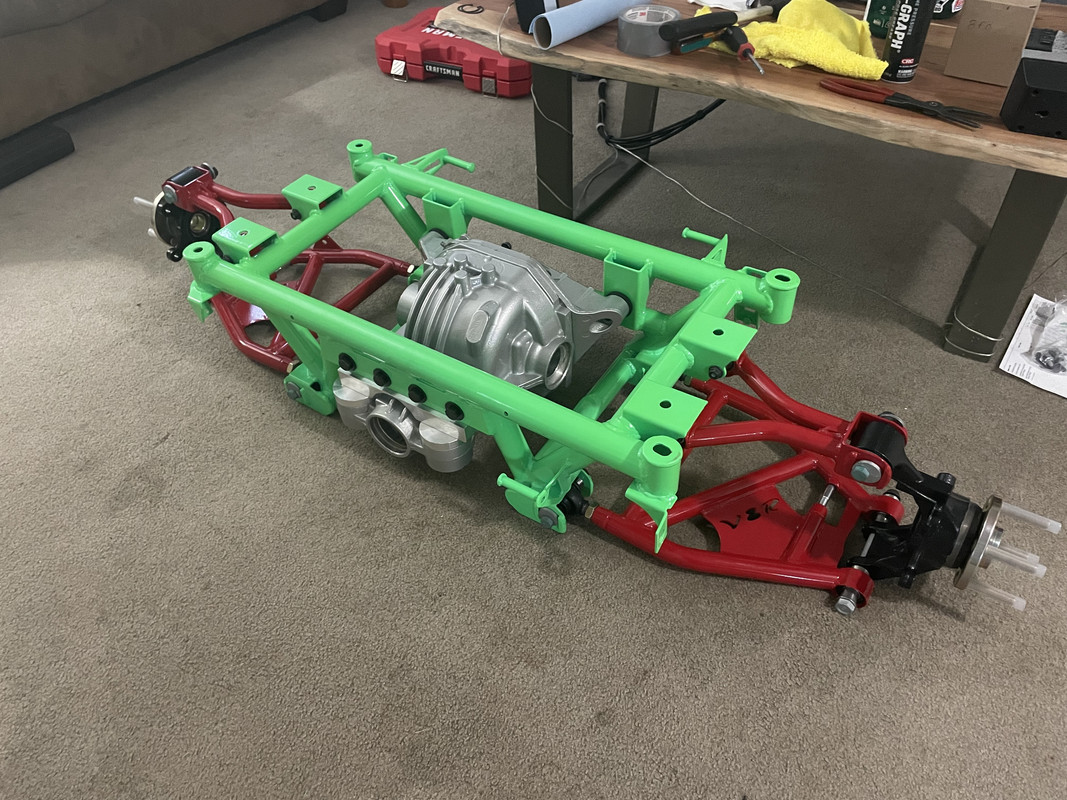
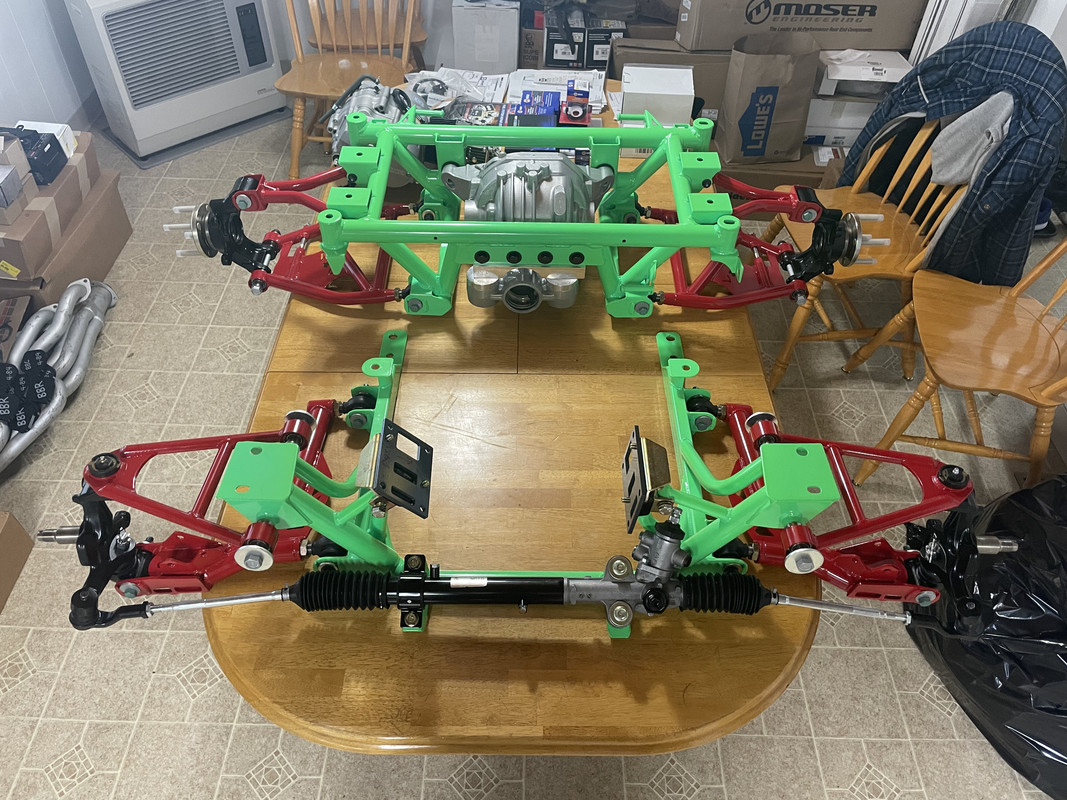
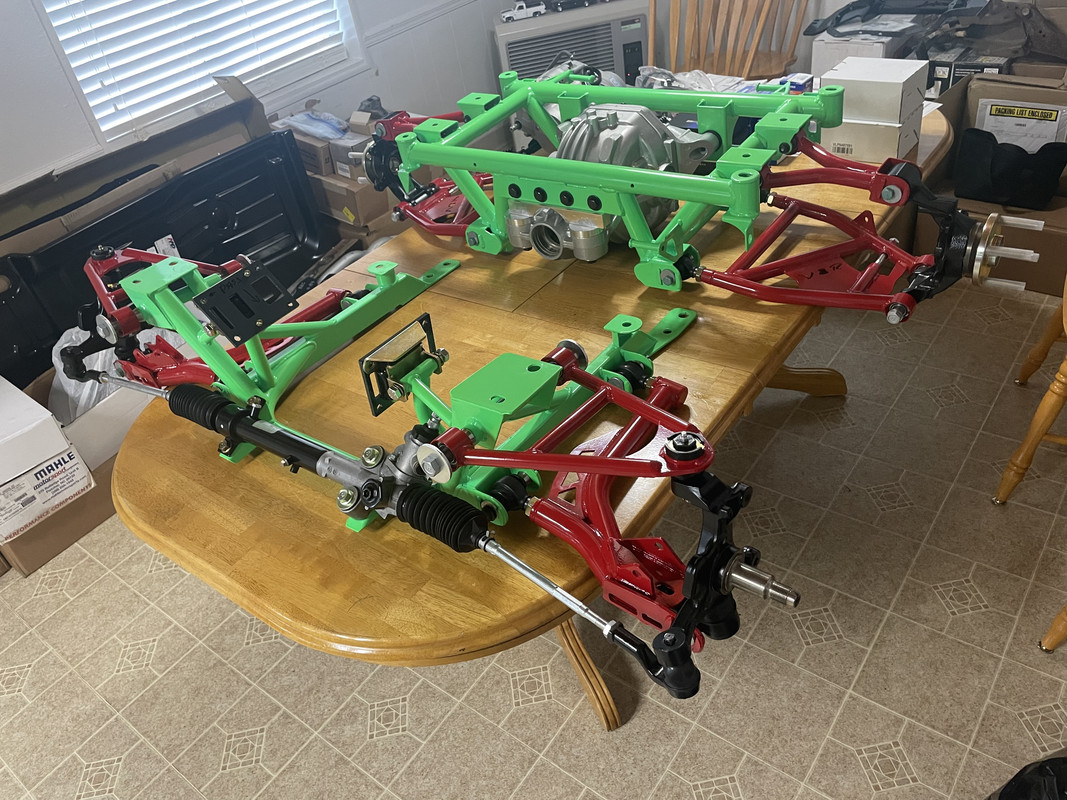
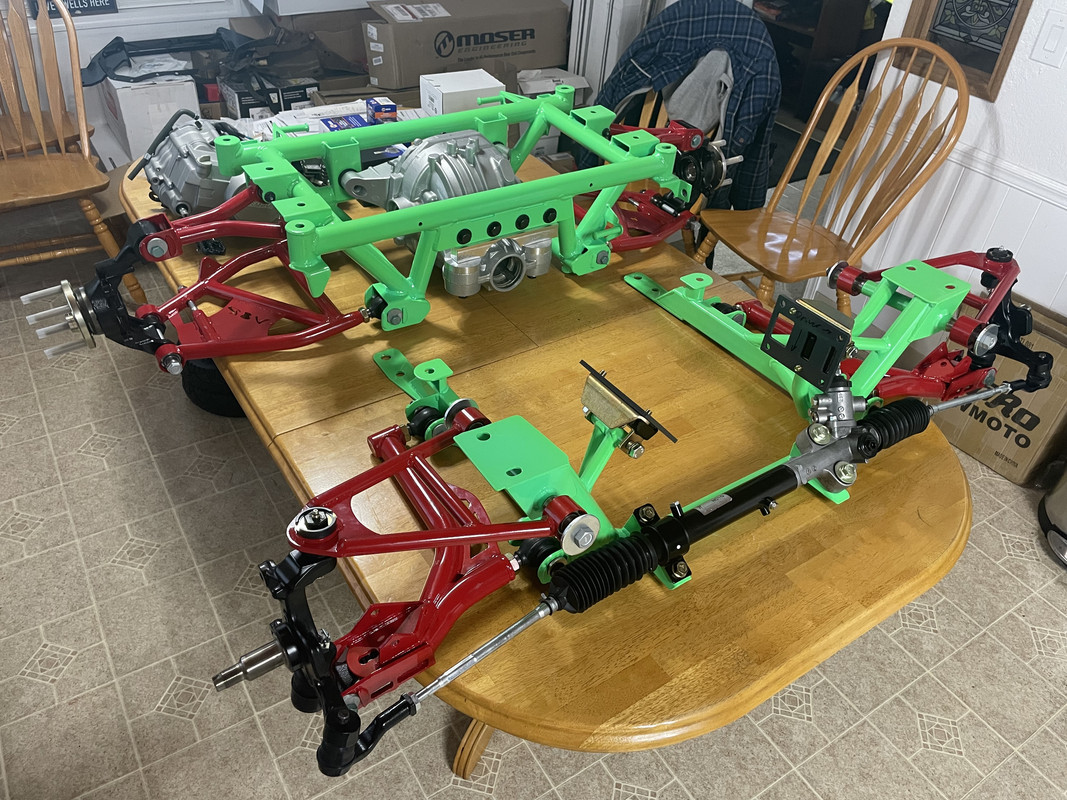
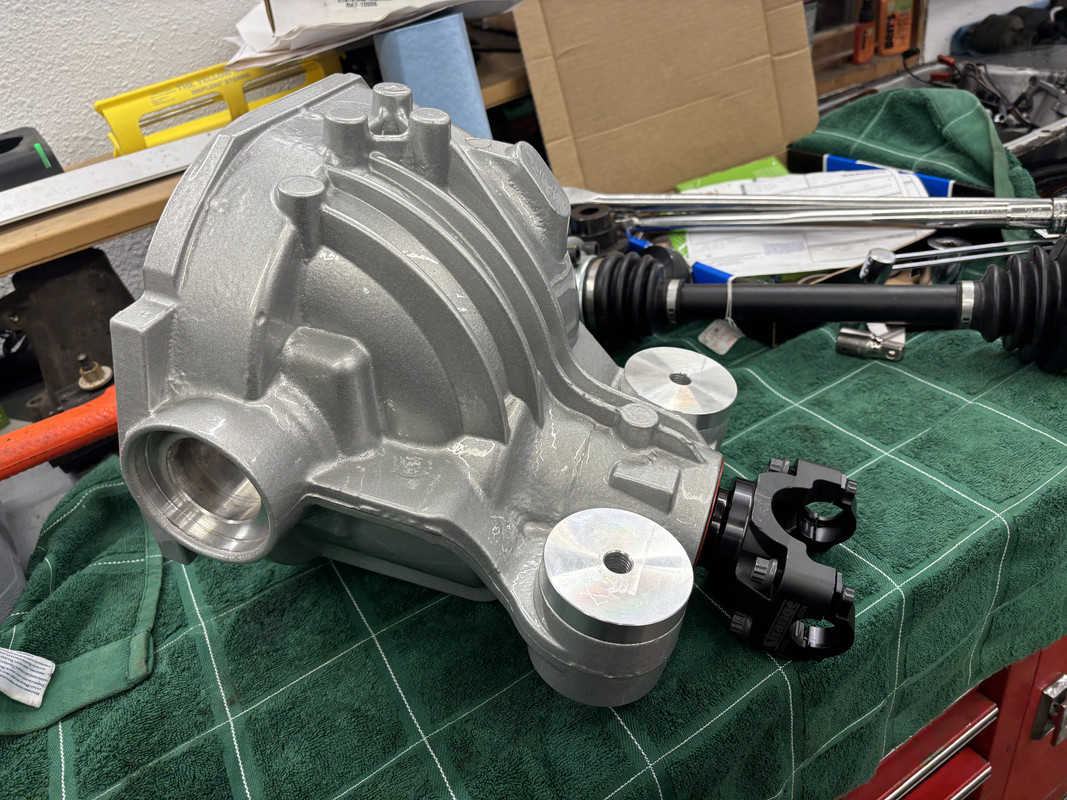
I received the correct front subframe from V8R. I wasn’t super happy that I had to pay shipping both ways since it was their error, but at least I have the right part now. The rear subframe, spindles, knuckles, differential case and cover, and sway bars were all done together.
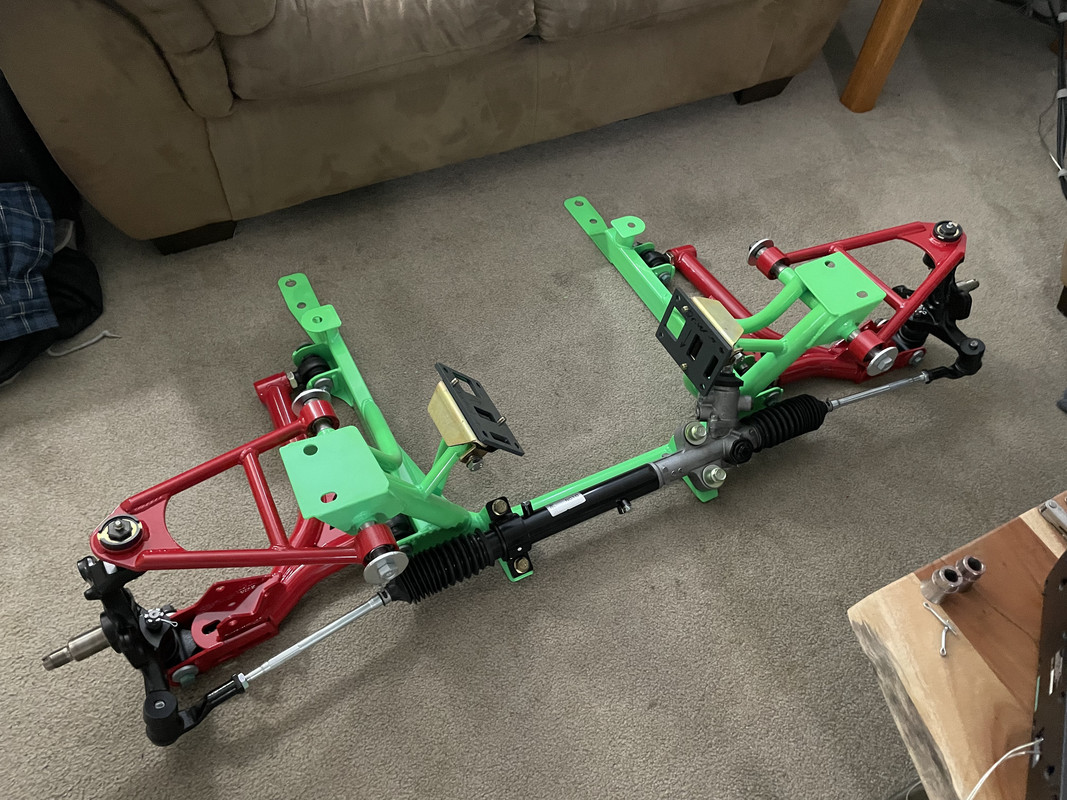
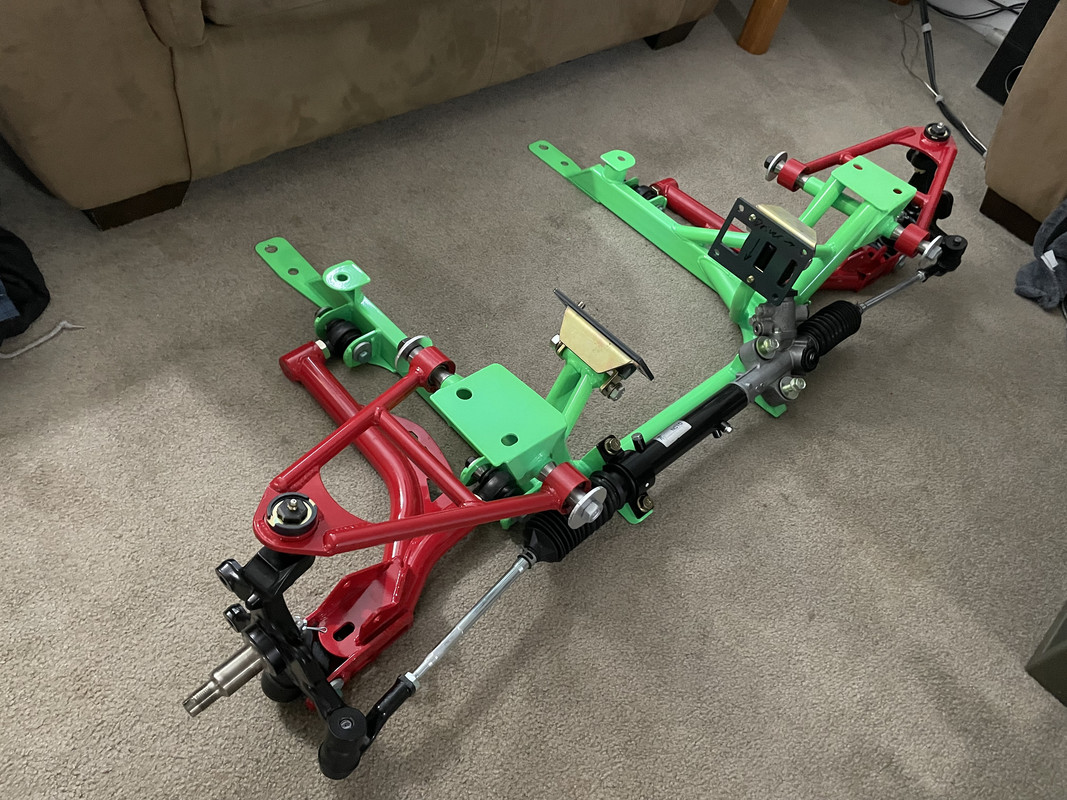
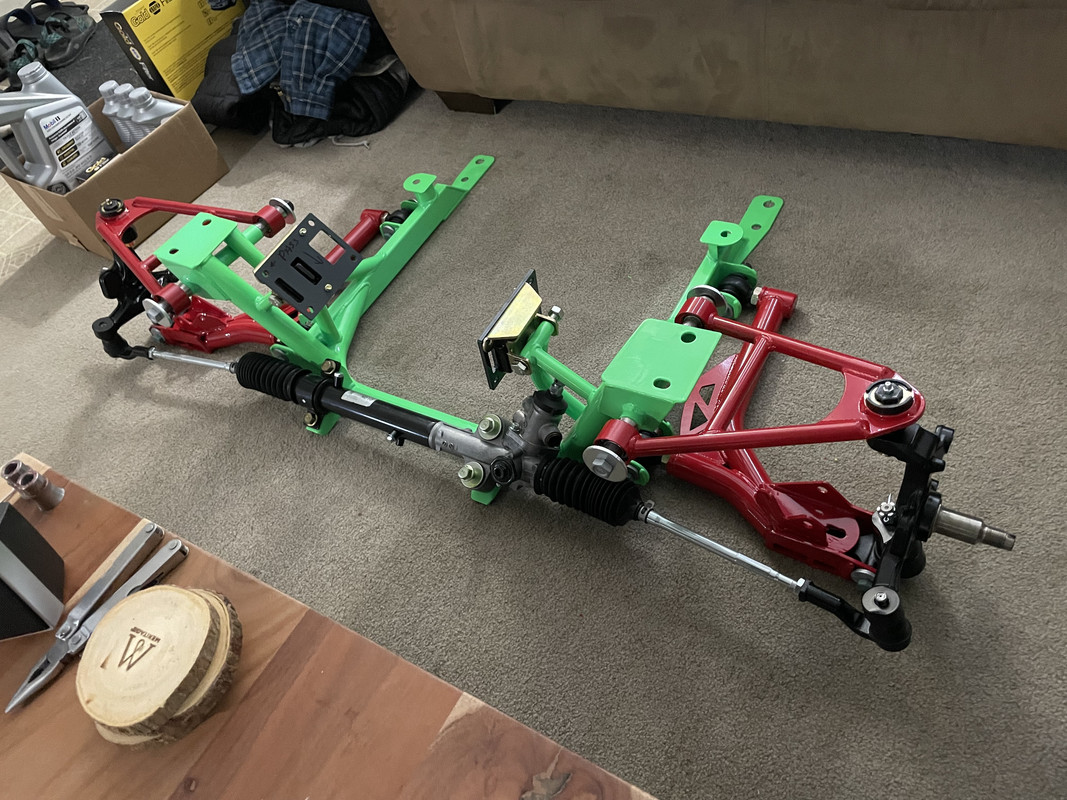
The steering rack fits!
I received the correct front subframe from V8R. I wasn’t super happy that I had to pay shipping both ways since it was their error, but at least I have the right part now. The rear subframe, spindles, knuckles, differential case and cover, and sway bars were all done together.
The steering rack fits!
LS1 Tech Stories
The Best V8 Stories One Small Block at Time

6 Common C5 Corvette Failures and What's Involved In Repairing Them
Pouria Savadkouei
Retro Modern Bandit Pontiac Trans AM Comes With Burt Reynolds' Autograph
Verdad Gallardo
Top 10 Greatest Cadillac V Series Performance Models Ever, Ranked
Pouria Savadkouei
Top 10 Most Powerful Chevy Trucks Ever Made!

Hennessey's New Supercharged Silverado ZR2 Has 700 HP
Verdad Gallardo
Coachbuilt N2A Anteros Is an LS2-Powered C6 Corvette In Italian Clothes
Verdad Gallardo
Awesome K5 Blazer Restomod Comes With C7 Corvette Power
Verdad Gallardo
10 Camaros You Should Never Buy

10 LS Engine Myths That Refuse to Die
Verdad Gallardo Thread Starter
TECH Regular
Joined: Oct 2011
Posts: 453
Likes: 178
From: Alaska
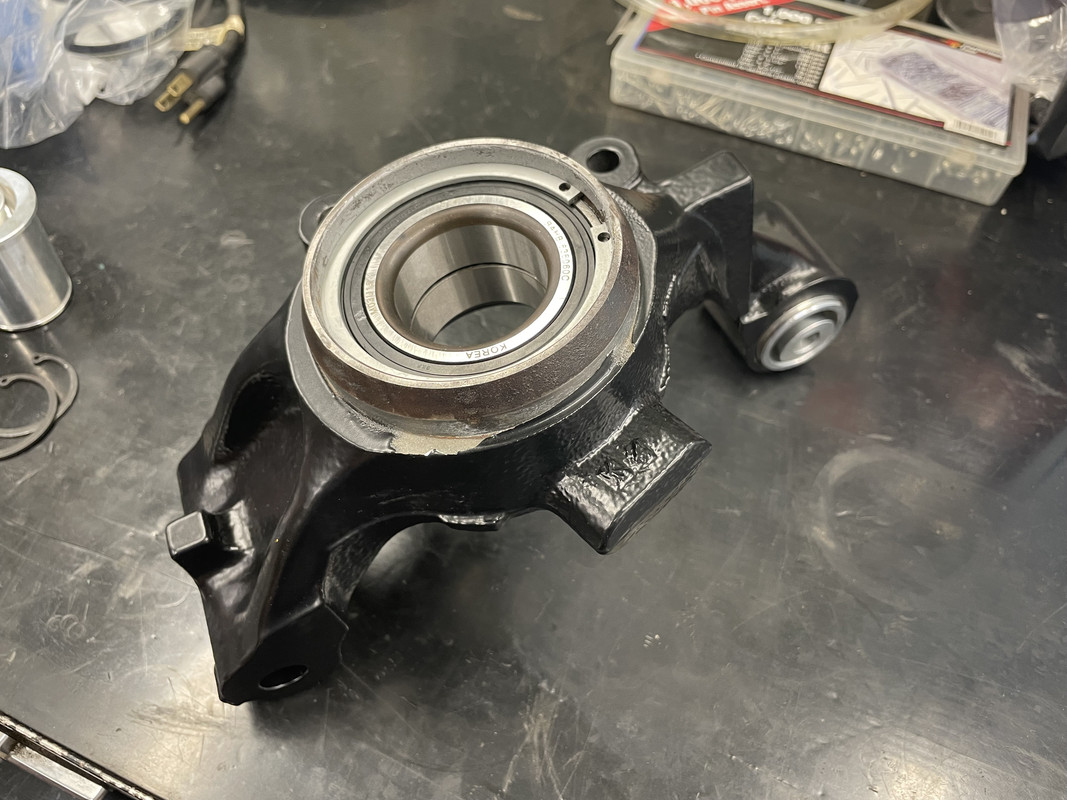
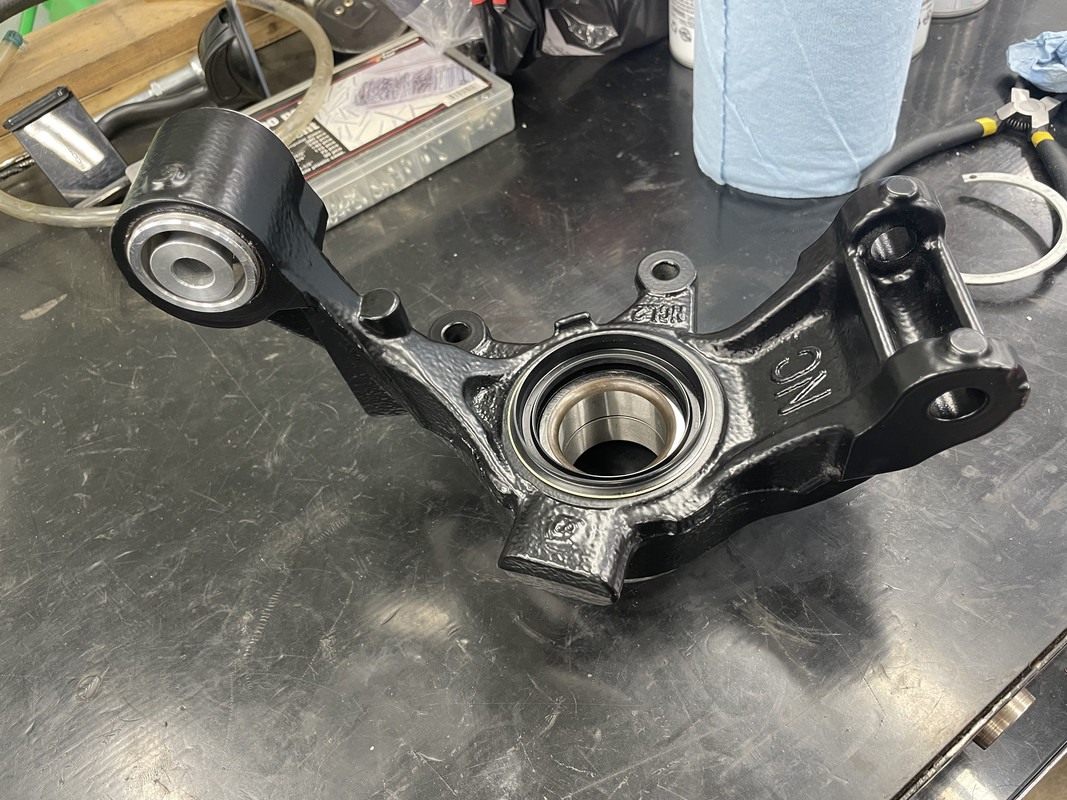
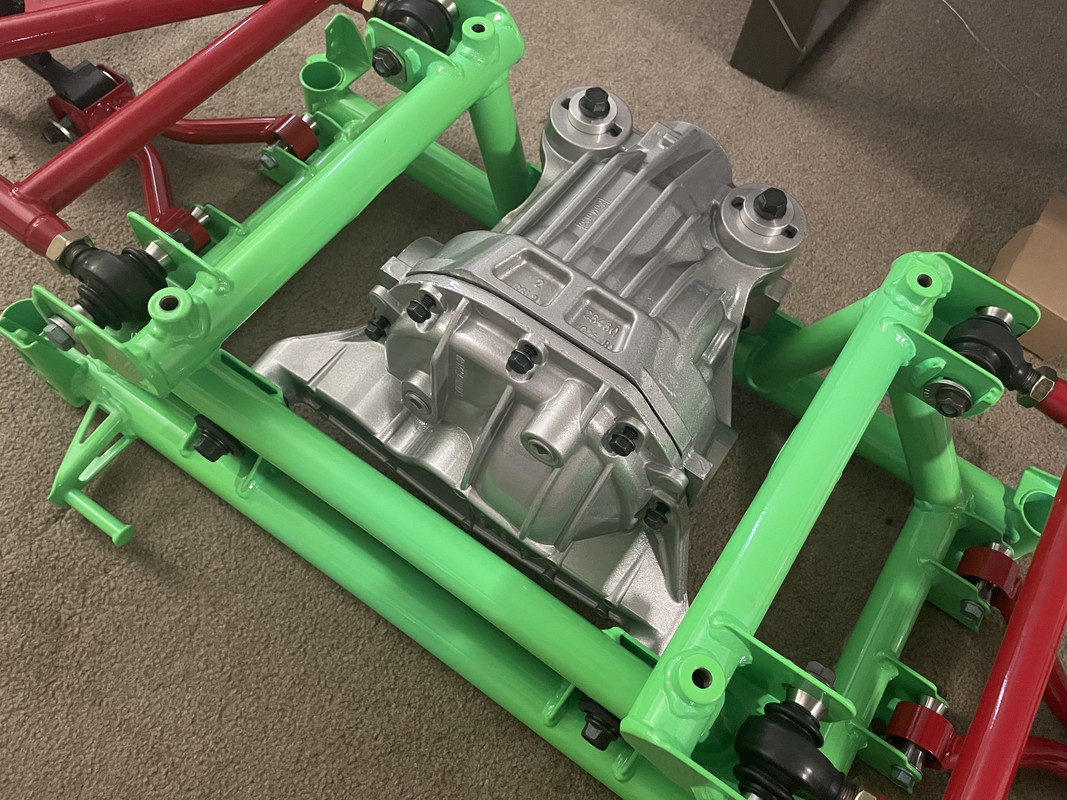
Started working on the rear subframe. I got the new wheel bearings and upper sphericals installed in the knuckles.
Solid mounting bushings installed in the differential case
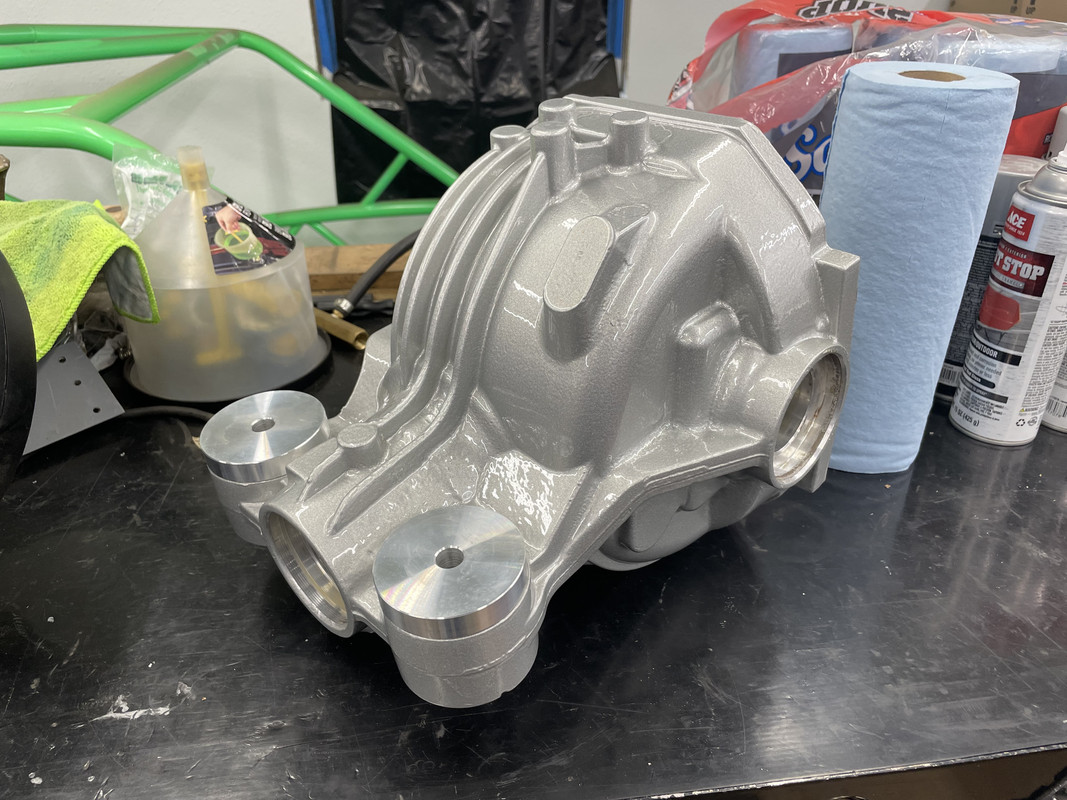
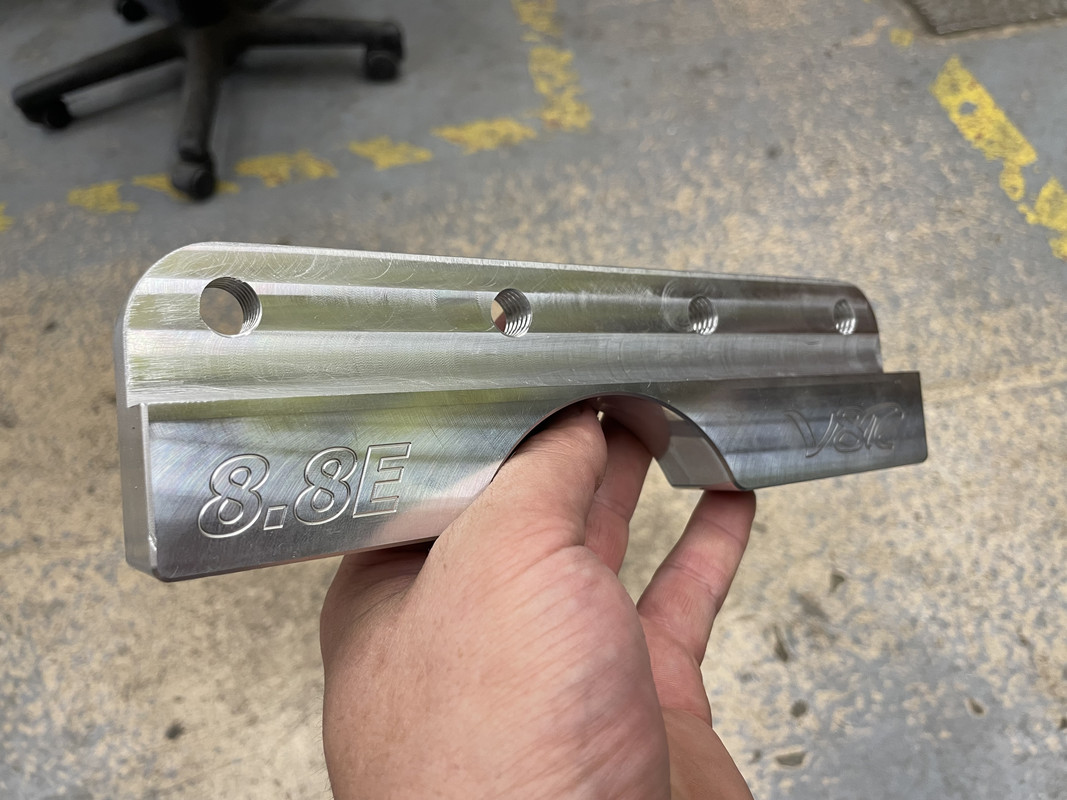
New case bolts and the V8R mounting bracket.
Solid mounting bushings installed in the differential case
New case bolts and the V8R mounting bracket.
Thread Starter
TECH Regular
Joined: Oct 2011
Posts: 453
Likes: 178
From: Alaska
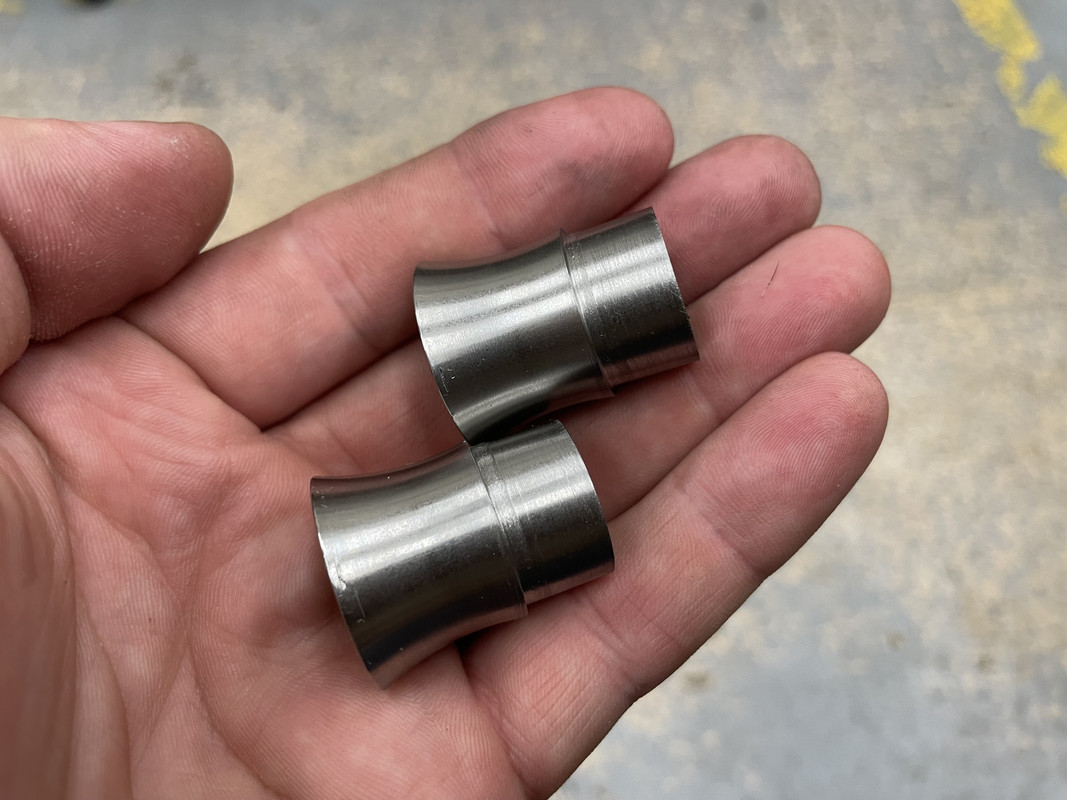
The next few parts needed some lathe and milling work. I�ve come to realize that V8R�s tolerances are�not always great. At least everything falls on the tight side of things so far, so that�s easy enough to correct. First up, the two rearmost spherical bearing spacers. The front subframe is VERY tight in that rear A-Arm mount area. These spacers required .070� taken off the step, but this is a lot better than the first subframe I received.
Next up is the front differential mounting block. V8R�s technical drawing states that the differential fit is tight by design, but even with the rear mounting bushings fully compressed, the front mounting bolt holes are still off alignment by close to 1/4�. Tight is one thing, impossible is another. I milled .200� off the mounting face of the block to bring the differential slightly more forward while still keeping a tight fit.
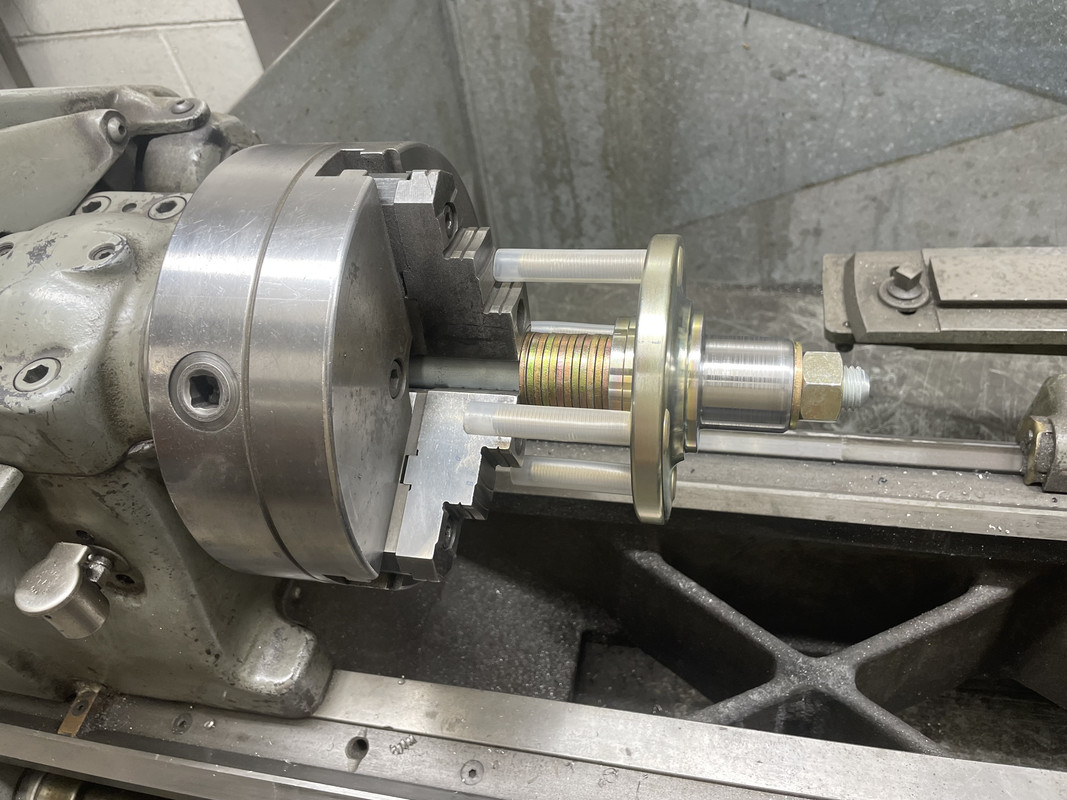
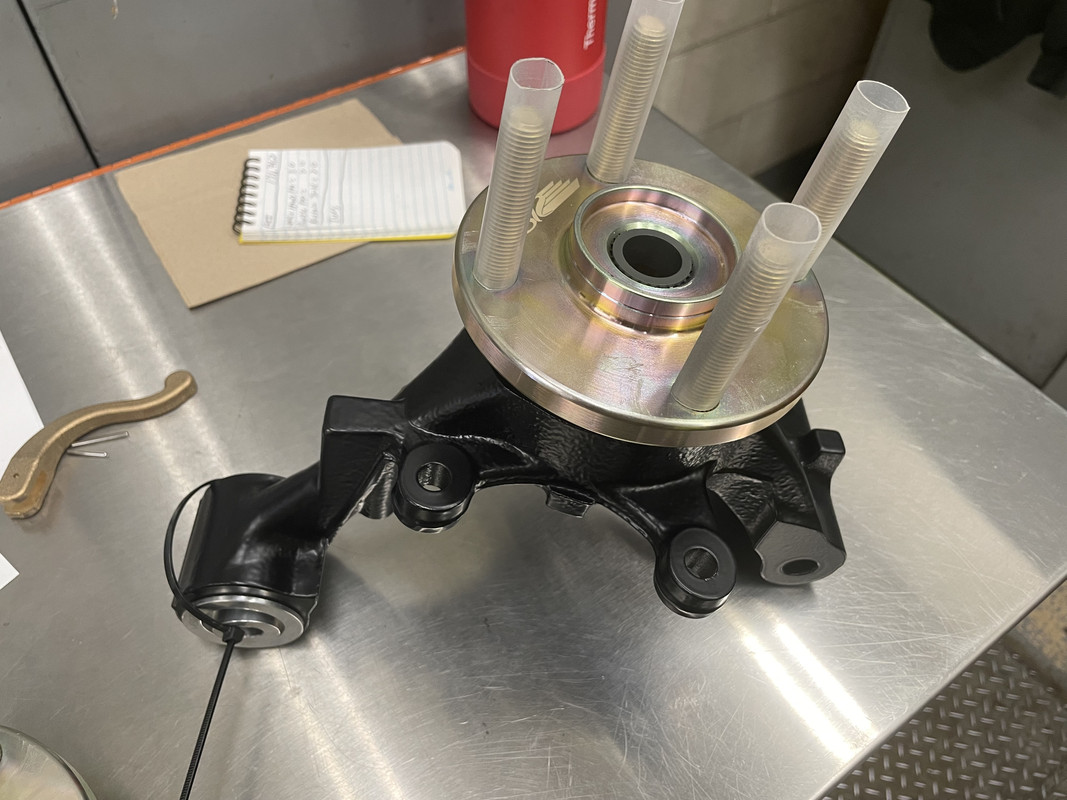
Finally, the rear wheel hubs. The hubs don�t fit the SKF bearings, mic�ing both parts revealed that it would have been a .0015� interference press fit to get these on. I used an illegal machining technique to mount the hubs in the lathe, then hone the shaft surface to a .001� slip fit. Started with 80 rough cut, 180 smooth cut, and 320 polish cut.
Pushed in some plastic bushings to center and protect the splines.

3/4� x 10� concrete anchor with washers as spacers to get the studs away from the spindle.
Perfect fit!
Next up is the front differential mounting block. V8R�s technical drawing states that the differential fit is tight by design, but even with the rear mounting bushings fully compressed, the front mounting bolt holes are still off alignment by close to 1/4�. Tight is one thing, impossible is another. I milled .200� off the mounting face of the block to bring the differential slightly more forward while still keeping a tight fit.
Finally, the rear wheel hubs. The hubs don�t fit the SKF bearings, mic�ing both parts revealed that it would have been a .0015� interference press fit to get these on. I used an illegal machining technique to mount the hubs in the lathe, then hone the shaft surface to a .001� slip fit. Started with 80 rough cut, 180 smooth cut, and 320 polish cut.
Pushed in some plastic bushings to center and protect the splines.
3/4� x 10� concrete anchor with washers as spacers to get the studs away from the spindle.
Perfect fit!

Thread Starter
TECH Regular
Joined: Oct 2011
Posts: 453
Likes: 178
From: Alaska
I got the pinion installed last night, the Ratech tool was extremely helpful. Ended up with their solid spacer kit instead of a crush sleeve so I can take it back apart anytime if needed.
Thread Starter
TECH Regular
Joined: Oct 2011
Posts: 453
Likes: 178
From: Alaska
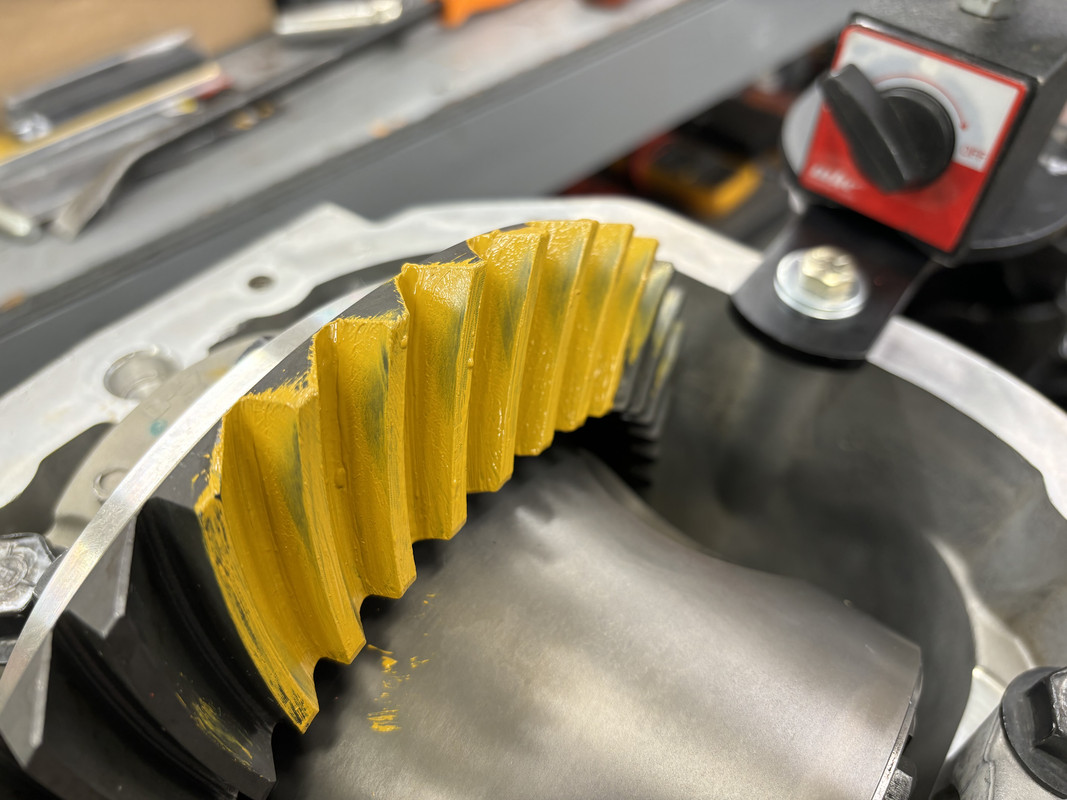
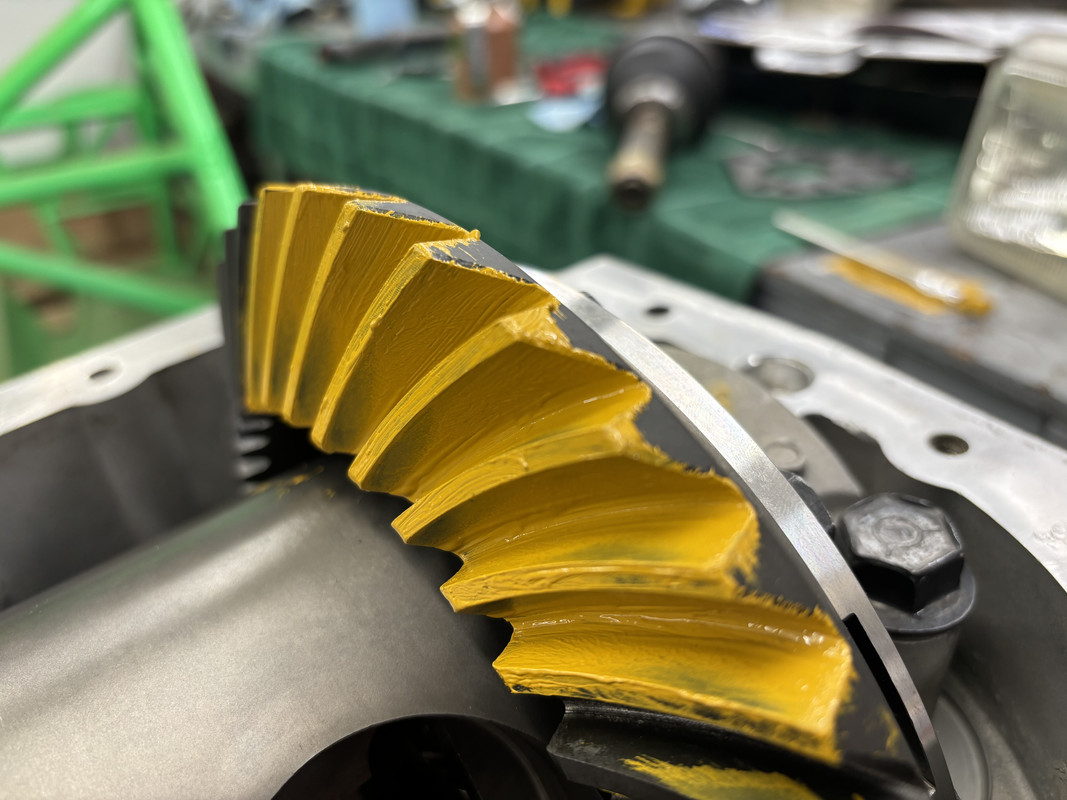
Alright, is there anyone that is fluent in rebuilding rear ends that can give me some advice? I’m not sure where to go on this one. I spent a LOT of time setting up the pinion correctly. Bearing races are 100% fully seated. I used the Ratech pinion depth setting tool, and after about 5-6 shim adjustments, I got the pinion depth set exactly to spec. I have the crush sleeve eliminator kit, and after a few tries, I have the correct preload (19 in-lbs of rotating torque, reading taken on a beam wrench). I know without a doubt that the pinion is set up EXACTLY correct.
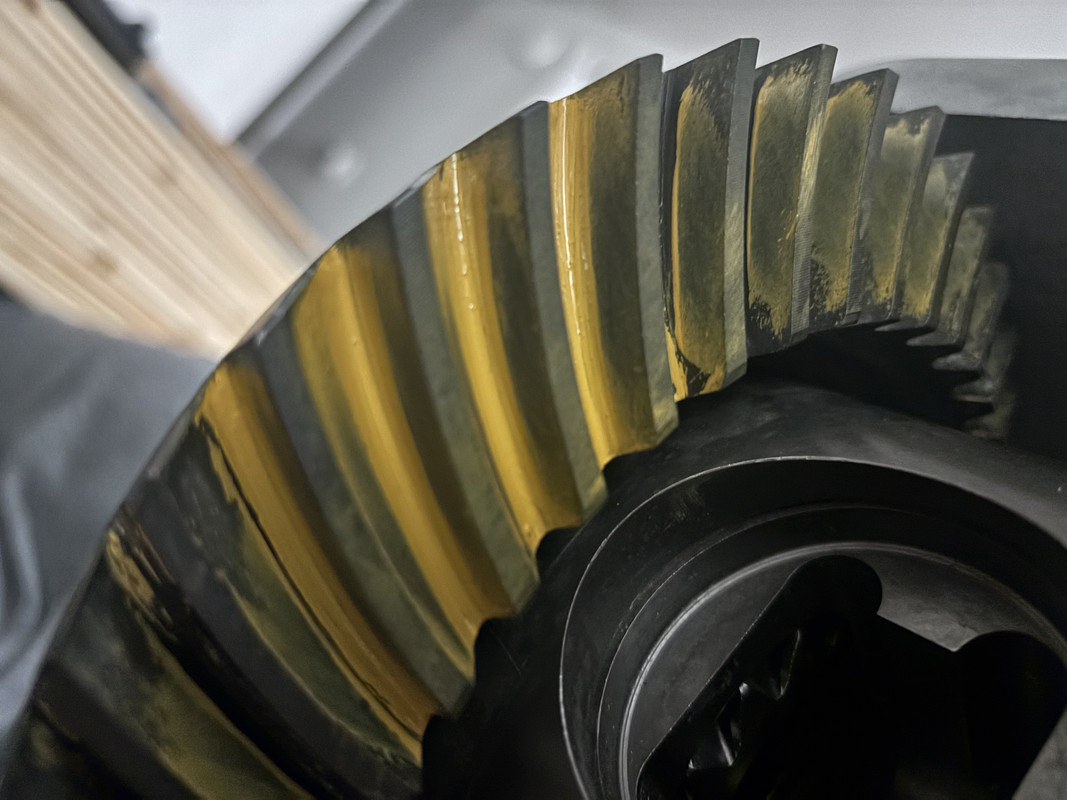
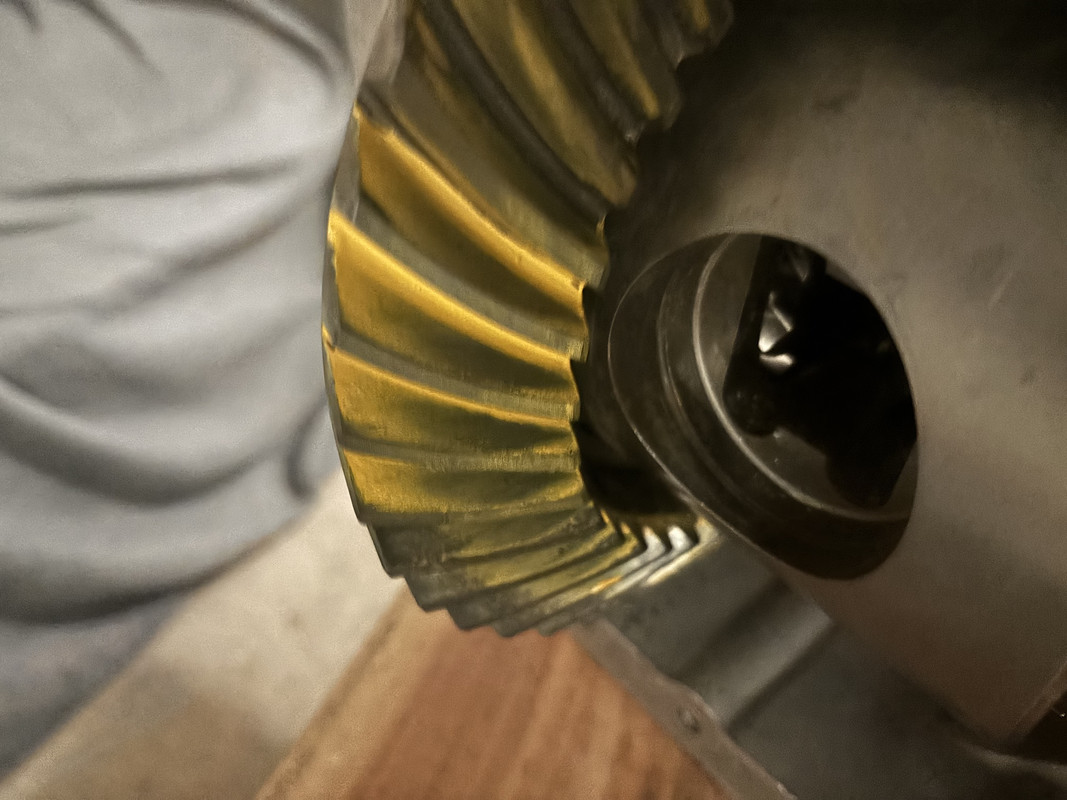
Today I’m trying to set up the carrier and it’s not going as smoothly. The directions I have are vague, and I can’t find many YouTube videos that show this process in detail, they all sort of just skim through. I have a shim pack on either side of the carrier, shimmed to where I can just slide the shim packs in by lightly tapping it in with a plastic handle, and will add a .006” shim to each side at the end to establish preload. I have them currently adjusted to where I have a perfect .010” backlash. However, this is the pattern I am getting with this setup. From the crappy pictures I’m seeing provided in the directions, my carrier needs to move closer to the pinion, but I am already set on backlash. I tried moving a .006” shim from the right side to the left side anyway, and the pattern improved slightly, but I lost most of my backlash, so I reversed it. Is this an acceptable pattern, or did I screw up somewhere?
Today I’m trying to set up the carrier and it’s not going as smoothly. The directions I have are vague, and I can’t find many YouTube videos that show this process in detail, they all sort of just skim through. I have a shim pack on either side of the carrier, shimmed to where I can just slide the shim packs in by lightly tapping it in with a plastic handle, and will add a .006” shim to each side at the end to establish preload. I have them currently adjusted to where I have a perfect .010” backlash. However, this is the pattern I am getting with this setup. From the crappy pictures I’m seeing provided in the directions, my carrier needs to move closer to the pinion, but I am already set on backlash. I tried moving a .006” shim from the right side to the left side anyway, and the pattern improved slightly, but I lost most of my backlash, so I reversed it. Is this an acceptable pattern, or did I screw up somewhere?

I don't have an answer, but I asked a buddy that does this for a living. Here are his direct quotes:
"Pinion is definitely way shallow. Advised pinion depth (as marked below on pinion) is just a starting point as all housings may be slightly different since they are built on an assembly line. I set all differentials to what the application might be. I run pinion slightly deeper on certain race applications than I would on a street car. Backlash setting I have no more than .006" on the street and about .003" on drag race applications as they don't build heat and tolerances tighten like a street car. More than six whines tighter than three does as well.
Add more shim to the pinion to push it deeper into the ring gear, about .002" judging the picture. Definitely need to check both the coast side and pull side of gear. Paint more than one point on the ring gear and check as ring gears have tighter points than others until they are run in properly. I always split the gear into thirds and go from there.:
Andrew
Thread Starter
TECH Regular
Joined: Oct 2011
Posts: 453
Likes: 178
From: Alaska
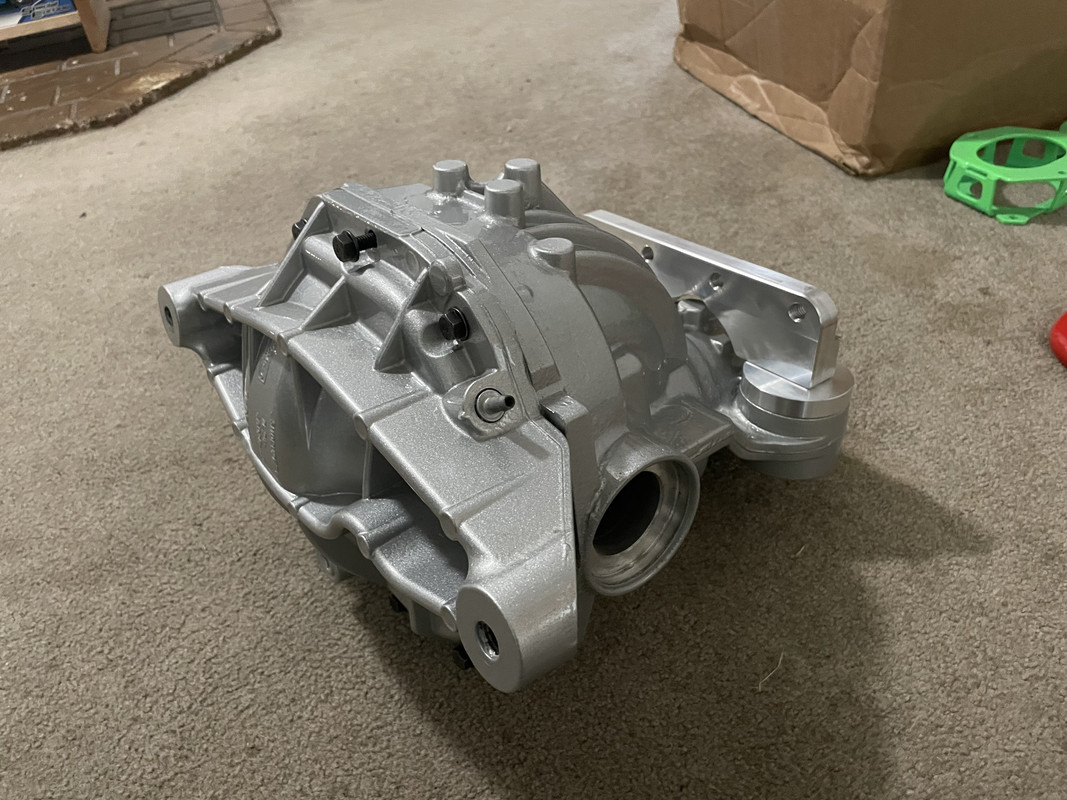
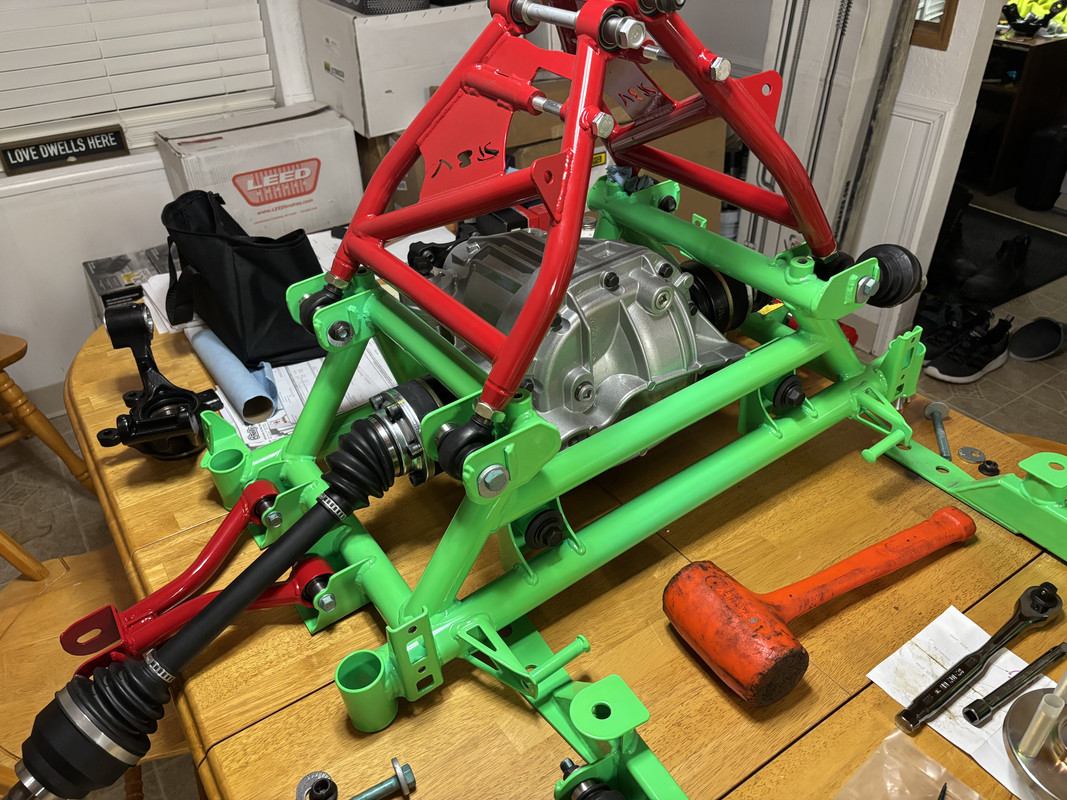
Over two months later I’ve been so busy that I haven’t had time to dedicate to fine tuning the differential setup…so I ended up dropping it off just to get things moving again. $480 later, Young’s Gear did an excellent job with the setup!
Brought it home safely
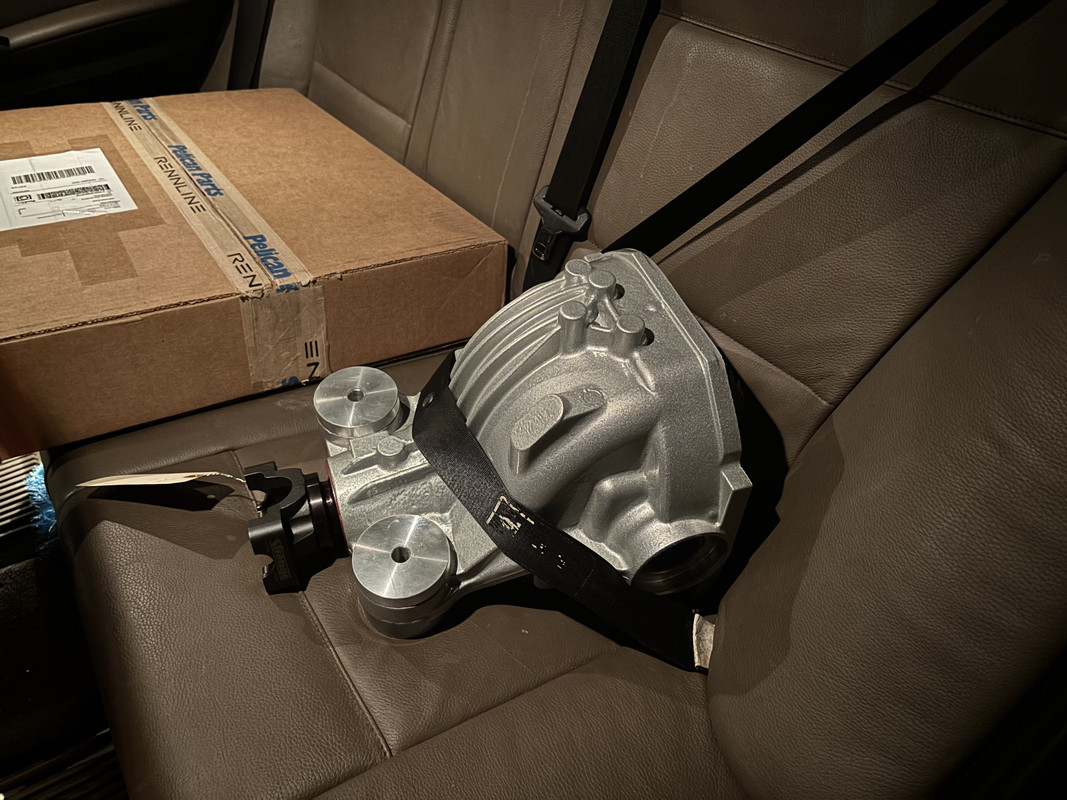
New seals installed
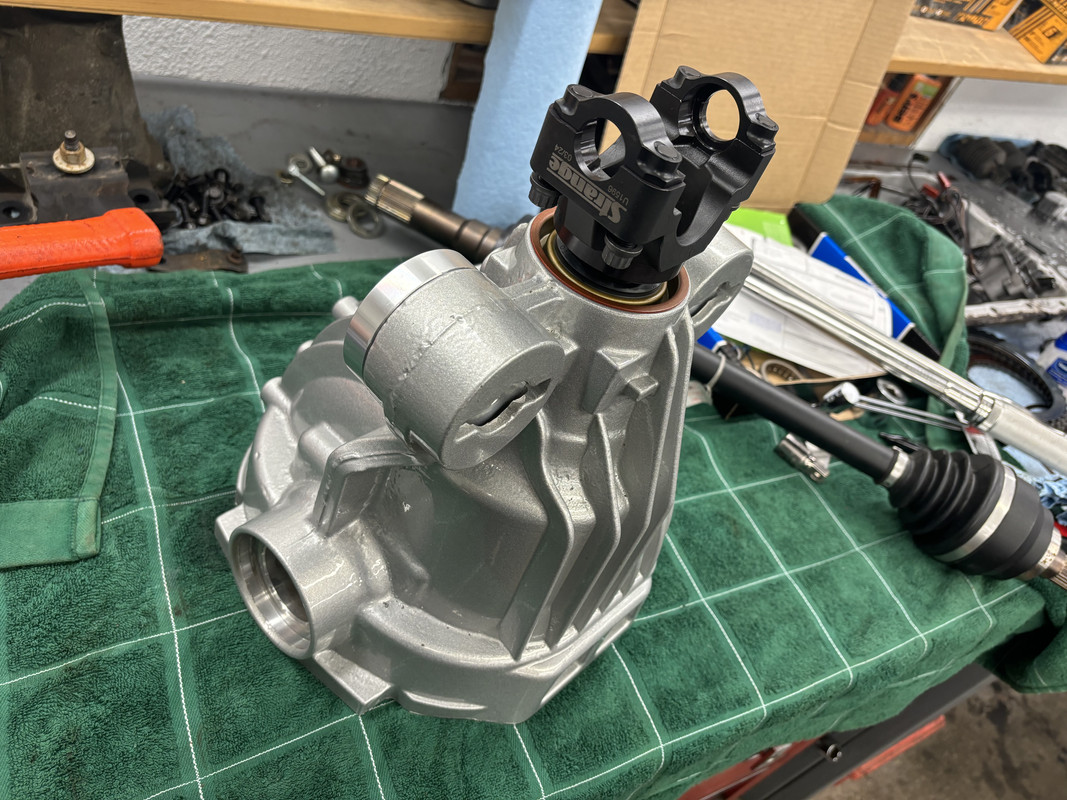
Installed the rear cover, mounted the diff, and installed the CV axles

Brought it home safely
New seals installed
Installed the rear cover, mounted the diff, and installed the CV axles
Thread Starter
TECH Regular
Joined: Oct 2011
Posts: 453
Likes: 178
From: Alaska
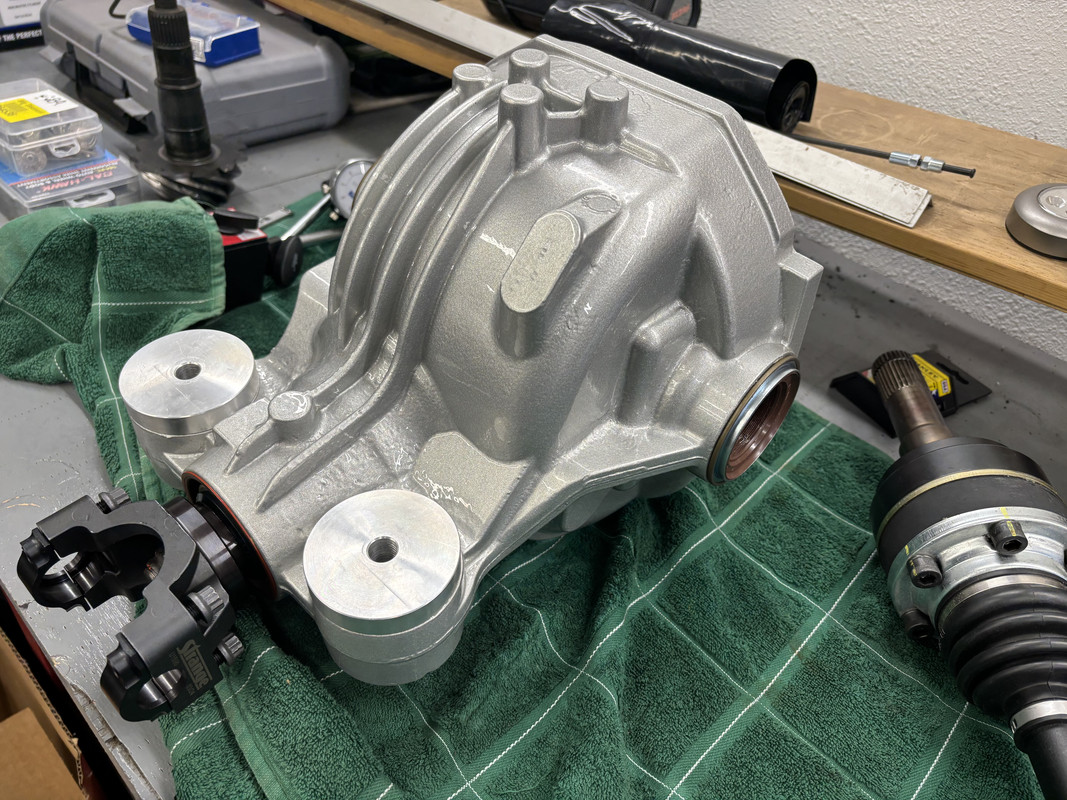
Everything is installed on the rear subframe! My only concern is that the CV axles may need some reworking. The fit is good, but towards the upper side of suspension travel, they appear to lock up. I’m not sure yet if this is a concern or something I can “adjust out” by setting up some of the alignment pieces on the wide end, such as unthreading the spherical joints more. I’m also not sure where my actual end of travel point is without having suspension available to install. Worst case, I have to get shorter shafts made.