

Couple swap issues. Clutch Master, Pan Clearance. Thirdgen TA.
 07-13-2006 | 07:19 AM
#1

Thread Starter
TECH Fanatic
iTrader: (17)
Joined: Mar 2006
Posts: 1,746
Likes: 2
From: West Chester, PA
Hey everyone. I just got my engine in the other night. I have a couple of issues maybe someone could help me out with. I will start a thread with ab unch of pictures of my swap here soon. Some of my pics have helped people over at thirdgen.org so maybe they will help here too.
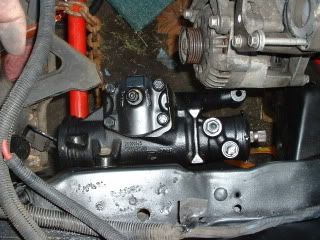
First... this problem has me the most worried. My oil pan is really close, and in a couple places actually touching my k-member. Here is a pic.
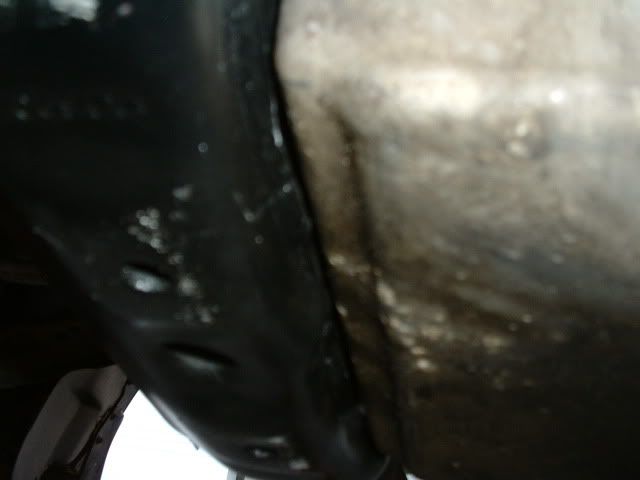
Not the best pic...but some of the areas I cant even get a thin pieces of cardboard in. Now...Im using prothane motor mounts, and engergy suspension tranny mount. WHen I installed the trans mount, I did not use that little "pre-load" plate. That thing is only like 1/8" thick, so I dnot see that tilting the tranny up enough to make a difference, but Im willing to try it. I didnt use that place because I read somewhere on here that its not needed and causes more vibrations. Any other ideas??? I really dont awnt to pull the motor again.
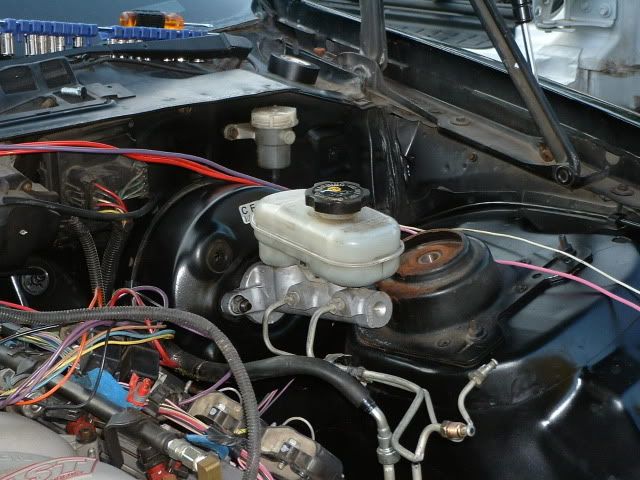
Second issue. I mounted my clutch master cylinder using the pedal bracket as a guide. Cut a nice oval hole, made the bolt holes line up. The master slipped right into place while I was installing the motor. No issues what so ever. The rod angle has me worried. Its somewhat severe IMO. Clutch action seems smooth so far, and it doesnt seem to want to bind too much if at all. So...will this cause failure? Any ideas on a fix without butchering up my firewall?
Any insight into these areas would help me a lot. LIke I said Im mainly worried about the crossmember clearnance.
Justin
First... this problem has me the most worried. My oil pan is really close, and in a couple places actually touching my k-member. Here is a pic.
Not the best pic...but some of the areas I cant even get a thin pieces of cardboard in. Now...Im using prothane motor mounts, and engergy suspension tranny mount. WHen I installed the trans mount, I did not use that little "pre-load" plate. That thing is only like 1/8" thick, so I dnot see that tilting the tranny up enough to make a difference, but Im willing to try it. I didnt use that place because I read somewhere on here that its not needed and causes more vibrations. Any other ideas??? I really dont awnt to pull the motor again.
Second issue. I mounted my clutch master cylinder using the pedal bracket as a guide. Cut a nice oval hole, made the bolt holes line up. The master slipped right into place while I was installing the motor. No issues what so ever. The rod angle has me worried. Its somewhat severe IMO. Clutch action seems smooth so far, and it doesnt seem to want to bind too much if at all. So...will this cause failure? Any ideas on a fix without butchering up my firewall?
Any insight into these areas would help me a lot. LIke I said Im mainly worried about the crossmember clearnance.
Justin
07-13-2006 | 05:22 PM
#2

Staging Lane
Joined: Nov 2005
Posts: 63
Likes: 0
From: Latrobe PA
As far as the pan, what motor mounts are you using? Hawks? Mine in very close but not actually touching If you have less than 1/8 inch you are going to have to move the motor back. To do that you need to move your mounts back on the front crossmember but don't go overboard or you will create other problems. As for the master cylinder I had the same problem with a set of thirdgen pedals. If you do a serach you will find a few different soloutions. I chose to take out the pedals and modify them. I ground the pin off, welded a 1/4 inch plate to the original plate, drilled it a little lower on the pedal and used a grade 8 bolt washers and a nylon bushing to make it adjustable and smooth. The end result is a perfect angle on the master. And for your other question, most people destroy the master in a few thousand miles from leaving the rod angled. If you need more pedal advice just shoot me a pm and I can try to help
07-14-2006 | 09:21 AM
#3
Thread Starter
TECH Fanatic
iTrader: (17)
Joined: Mar 2006
Posts: 1,746
Likes: 2
From: West Chester, PA
Hey man thanks for the reply. Well...last night I played around with the pan clearance. I installed the "preload" plate on the trans mount, and inserted a spacer between the mount and the crossmember. This spacer was maybe 1/8"... Now I can get cardboard in between the pan and k-member along the entire k-member. So there is hope!! However, Im not happy with the clearance that I have. I dont like using the spacer because its not supposed to be there...but it is only 1/8" so I might leave it. I have to look into the "preload" plate that energy suspension supplies with their tranny mount. Ive read somewhere that it makes for more vibes... I think my course of action is going to go something like this... Im going to hold the motor up somehow from below, support the body with the engine hoist again, then drop the k-member back out. Since I have nothing installed on the k-member besides the motor, now is the best time to do this. Once its out, Im going to either grind the heck out of it...or grind a chamfer and weld in plate to reinforce. Its going to be a pain...but Ill fee better about it.
Now...onto the clutch master cylinder. I think I know exactly what you mean. Basically take the rod off, make it so its parallel to the body of the master, and more or less modify the pin on the clutch pedal to match that location. Again...I dont really want to take out the pedals again...but I might as well. I shouldnt have to move the actual master cylinder mounting right? I was really glad the holes I made lined up so nice...Ide REALLY hate to butcher my firewall more. Besides...it flexs enough as it is. Im still alittle confused on how to make sure the throw is correct...and that Im getting full engagment from the clutch master cylinder. Maybe Ill take some more pics and email them to you...with a "paint" sketch of what I think I have to do.. and see if you agree???
Thanks again!!! I hate doing work over again, but like many have told me on other sites, might as well do it now before its all back together.
Justin
Last edited by ghettocruiser; 07-14-2006 at 09:27 AM.
07-14-2006 | 09:58 PM
#4
Staging Lane
Joined: Nov 2005
Posts: 63
Likes: 0
From: Latrobe PA
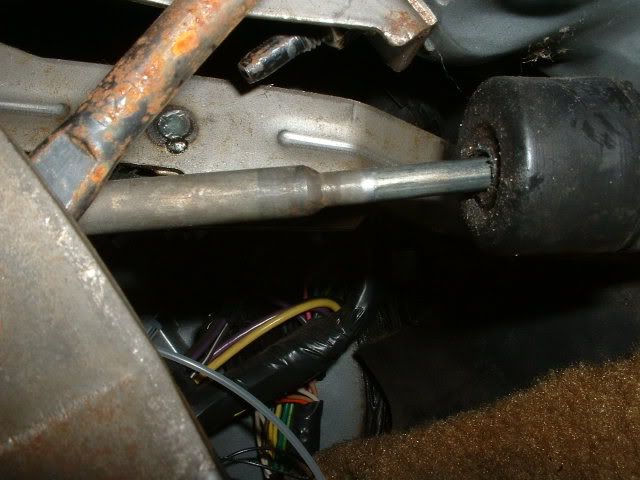
You definatley do not have to remove the master but unfortunatley you do have to remove the pedals. Trust me, I know that is a bitch but it has to be done. Here is an attached picture a little fuzzy but you get the idea. I chose to weld more metal to the existing pedal bracket rather than using a long bolt since I thought that it would eliminate any flex. I suppose you could skip that part and use a long bolt and a few extra nuts but I think it might bind and flex a bit much. Also, you will have to gring a little metal from the switch mounting tab as the new position will cause it to hit but it's not a big deal. If you need a better pic just let me know and I will crawl under
Andy
Andy
07-17-2006 | 08:50 AM
#5
Thread Starter
TECH Fanatic
iTrader: (17)
Joined: Mar 2006
Posts: 1,746
Likes: 2
From: West Chester, PA
LS1RS89: Hey man thanks for taking the time and posting the pic. Its kind of hard from the pic to see exactly how you did it...but I think I get the gist of what needs to be done. I thought that if I used the pedals from the donar car..that it would all line up and have the correct throw without issue. Silly me. haha.
Ok...course of action. Ill be on vaca from wed. to sun. Before then, Im going to figure out how to drop the k-member, without touching the motor. Im good like that. haha. While out, Im going to grind the living crap out of it. Im going to grind and not look back. If I feel that Im getting thin somewhere, Ill toss some weld on it. Thats the big thing. Then it'll be back together for good and I can start putting suspension back on.
Then Ill pull the pedals after I figure out where to put the pin...and weld that stuff together. I might do some MS paint drawings and post them and see if my positioning is good. If you can post any more pics of your set up to that make it alittle easier to see, that would be awsome.
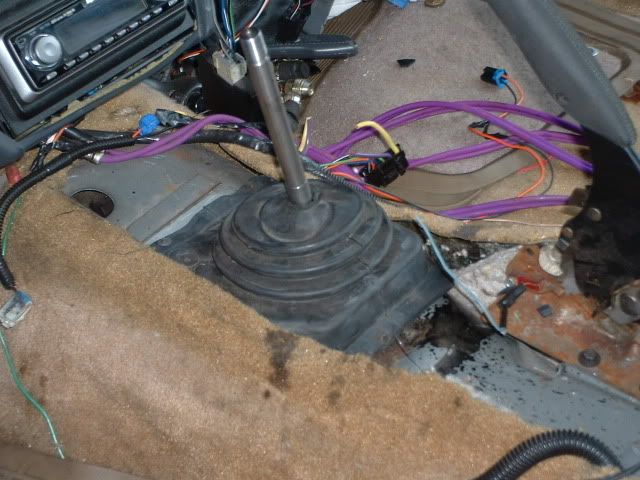
I just got my SJM abs delete kit, big brake upgrade, and a few other goodies...so things should come together soon I hope. My next big desicion is where to mount the PCM. With my A/C set up, its making it difficult to do it where others have. So I think Im going to try to go inside with it. Im alittle nervous about making the hole in the fire wall...because Im not 100% sure the wires will reach. But I guess the only way Ill know for sure is to try.
Does anyone who mounted the PCM inside have any pics of how it sits under the dash???
Thanks again!!
justin
Ok...course of action. Ill be on vaca from wed. to sun. Before then, Im going to figure out how to drop the k-member, without touching the motor. Im good like that. haha. While out, Im going to grind the living crap out of it. Im going to grind and not look back. If I feel that Im getting thin somewhere, Ill toss some weld on it. Thats the big thing. Then it'll be back together for good and I can start putting suspension back on.
Then Ill pull the pedals after I figure out where to put the pin...and weld that stuff together. I might do some MS paint drawings and post them and see if my positioning is good. If you can post any more pics of your set up to that make it alittle easier to see, that would be awsome.
I just got my SJM abs delete kit, big brake upgrade, and a few other goodies...so things should come together soon I hope. My next big desicion is where to mount the PCM. With my A/C set up, its making it difficult to do it where others have. So I think Im going to try to go inside with it. Im alittle nervous about making the hole in the fire wall...because Im not 100% sure the wires will reach. But I guess the only way Ill know for sure is to try.
Does anyone who mounted the PCM inside have any pics of how it sits under the dash???
Thanks again!!
justin
07-17-2006 | 10:12 AM
#7
Thread Starter
TECH Fanatic
iTrader: (17)
Joined: Mar 2006
Posts: 1,746
Likes: 2
From: West Chester, PA
Well Im using the pedals from the donar car...which is a 99. The car used to be an auto...so its had the swap done too. I can only assume the pedals are from a 98 - 02 car...since the swap was done as a "swap package". Im using the 4th gen brake booster, and everything dealing with the booster and that single upper bolt seemed to bolt in without issue. The brake booster rod lines up good, and the length is right on. I think its just the fact that the firewall is alittle different, and clutch master cylinder bracket was off by alittle. At first I was going to rework the firewall area alittle...to make it match the angle of the pedal braket, and to give it some additional strength. But I ditched that when I saw how close it actually was.
So to make a long story short...no drilling was required on the pedals as of yet. It was a tiny bit off here and there, but once I started to bolt it in, it was fine. Clutch seems to operate ok as it is...but I watn it to be lined up alittle better than it is. So Im going to probably just move the rod connecting location. I shouldnt have to go far with it...and the fact that the master is adjustable will help me out so that I keep my engagment.
Justin
Trending Topics
07-31-2006 | 07:36 PM
#8
Thread Starter
TECH Fanatic
iTrader: (17)
Joined: Mar 2006
Posts: 1,746
Likes: 2
From: West Chester, PA
Ok all.. I fixed my pan clearance issue... As good as its going to get.
Now...I took my pedals back out, and Im trying to figure out how to make the angle on the master better without affecting the throw. I have an adjustable master already, so that should help...but Im having trouble visualizing what I have to do to modify the pedals. I was originally thinking about movin the actual master cylinder down on the firewall by slotting the holes, but that just seems like a sloppy fix to me. And Im not sure how far down Ide have to move it in order for it to be straight... Anyone have any really detailed pics or a write up on how they modified their pedals or master to correct for this??? Its really my only hang up at this point. Once I figure this out Im going to start final assembly and running my wires, etc. Thanks!
Justin
07-31-2006 | 10:39 PM
#10
Thread Starter
TECH Fanatic
iTrader: (17)
Joined: Mar 2006
Posts: 1,746
Likes: 2
From: West Chester, PA
Stevenk... I think there is a slight mis-understanding when I say move it down.. I mean the whole master cylinder... If I move the rod attachment point, then yes I have to move that up. But, if I slot the mounting holes for the master cylinder, then I have to move it down... If I moved the entire thing up, the angle would get worse. If I move the attachment point of the rod up, then the angle gets better.
I do have a question regarding the master cylinder breaking though... When people say it will break from the angle, do they mean that the body itself will phsyically break? Or do they mean that it will malfunction internally? This in no way means that I want to leave it alone... more of a curiousity thing...
Back on track... I would feel fine welding the pin for the master push rod up alittle further. But I just dont see how there is room to move it much. Maybe its because I have an adjustable master cylinder...and the rod end is wider than the stock one? But I have to wedge it in over the pin now as it is.
I think my idea of moving the master itself down alittle probably wont work... not because of the angle issue..but I think it might affect the throw since the overall angle of the pivot system will change. I gotta do some cad drawings at work tomorrow during my lunch break. This one stupid simple issue is holding me up..haha. On a positive note...I found wires for the clutch neutral safety switch behind my kick panel. The plug fit perfect on the 4th gen pedals... I guess the wires were there incase the car was made as a manual... I still think its cool how a wire/plug from 1987 fits and works perfect with a switch from 1999. Now I just have to figure out the other pedal switches..
Justin
08-01-2006 | 08:41 AM
#11
Thread Starter
TECH Fanatic
iTrader: (17)
Joined: Mar 2006
Posts: 1,746
Likes: 2
From: West Chester, PA
Ok...sorry for these really crude drawings, but Im crazy busy at work today. Anyway...these three kind of show my two options. I would really like to leave the holes that I made in the firewall alone, because they are really clean and I dont like hacking things like that. Today if the heat doesnt kill me too fast, Im going to check out what it will take to move the master cylinder rod pin. Just have to figure out how much to move it. I guess even a little bit will help that angle though.
Here is the set up with the angle... estimated angle...
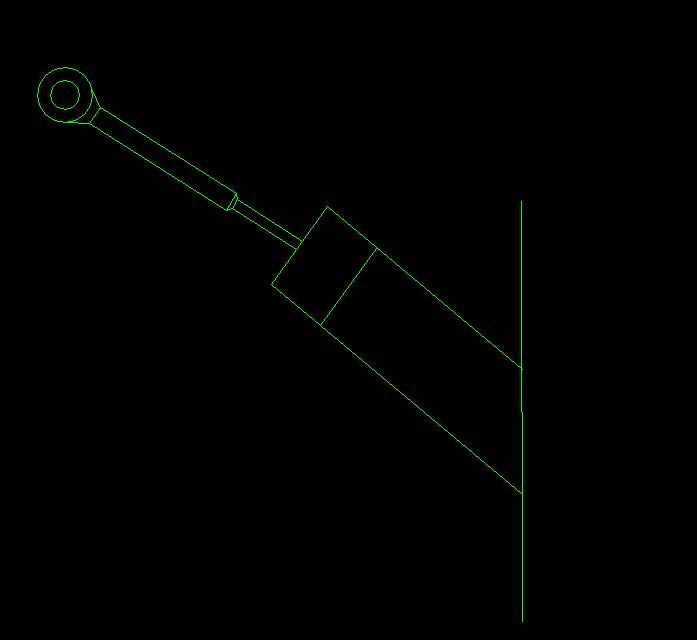
Here is the direction of movement if I move the rod...
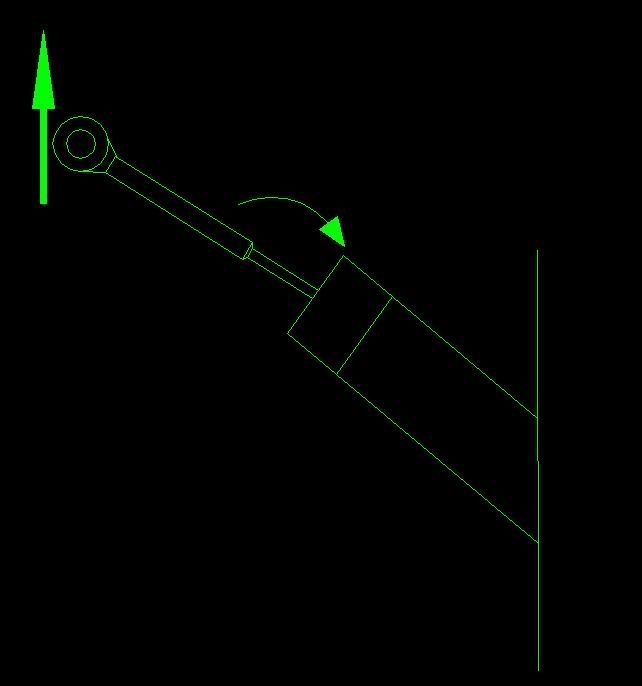
Here it is if I move the entire master cylinder down...
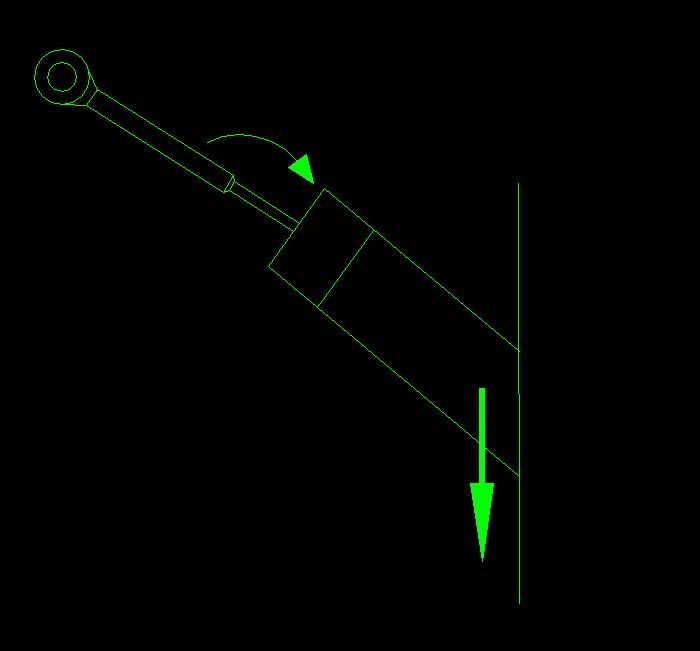
Anyone that started off with the same angle as me have any detailed pics of where you moved the pin to in order for it to work??? Worse comes to worse Ill try it, and if I mess up, Ill have to grab another set of pedals... Just the time that will be wasted that gets me.
Justin
Here is the set up with the angle... estimated angle...
Here is the direction of movement if I move the rod...
Here it is if I move the entire master cylinder down...
Anyone that started off with the same angle as me have any detailed pics of where you moved the pin to in order for it to work??? Worse comes to worse Ill try it, and if I mess up, Ill have to grab another set of pedals... Just the time that will be wasted that gets me.
Justin
08-02-2006 | 10:10 PM
#12

On The Tree

Joined: Apr 2005
Posts: 144
Likes: 0
From: Austin, Tx
That pic is perfect, good job on that. Look at the last pic, if you move the entire body down, you make the angle worse.
The break point for me has always been the push rod that goes to the pedal. The eyelet part that attaches to the pedal is slightly larger than the part that goes into the master cylinder. Where the eyelet part connects to the smaller part its just kinda "crimped" together. Mine has broken at that meeting 3 times due to crappy angle
The break point for me has always been the push rod that goes to the pedal. The eyelet part that attaches to the pedal is slightly larger than the part that goes into the master cylinder. Where the eyelet part connects to the smaller part its just kinda "crimped" together. Mine has broken at that meeting 3 times due to crappy angle
08-03-2006 | 07:20 PM
#13
Staging Lane
Joined: Nov 2005
Posts: 63
Likes: 0
From: Latrobe PA
Hey I tried like hell to get a better picture but I'm fat and there is NO room under the dash  Also, I have an old *** Kodak digi cam with no macro mode or close up. Either way the drawings you have look like what I had to deal with only a little easier. I used thirdgen pedals and had a diagonal angle to the master. I had to move the rod sideways and down. That is where welding the additional plate to the pedal came from. I can only suggest taking the rod off the pedal and centering it while pulling the pedal all the way out. Leave the adjuster for the master in the middle so you have room to move in either direction. Try to make a mark through the rod end with a sharpie marker or something similiar. Once you have a good mark either weld a stud on or use the bolt nuts and washer method. Just make sure if you use the latter, use a nylon bushing. good luck to you and sorry I cold not be of more help
Andy
Also, I have an old *** Kodak digi cam with no macro mode or close up. Either way the drawings you have look like what I had to deal with only a little easier. I used thirdgen pedals and had a diagonal angle to the master. I had to move the rod sideways and down. That is where welding the additional plate to the pedal came from. I can only suggest taking the rod off the pedal and centering it while pulling the pedal all the way out. Leave the adjuster for the master in the middle so you have room to move in either direction. Try to make a mark through the rod end with a sharpie marker or something similiar. Once you have a good mark either weld a stud on or use the bolt nuts and washer method. Just make sure if you use the latter, use a nylon bushing. good luck to you and sorry I cold not be of more helpAndy
08-04-2006 | 08:31 AM
#14
Thread Starter
TECH Fanatic
iTrader: (17)
Joined: Mar 2006
Posts: 1,746
Likes: 2
From: West Chester, PA
Andy,
Thanks for the advice man. Im at the point now where this is really the only thing holding me up from getting some serious stuff put together. My course of action is going to go like this... I cant really see how i can move my pushrod mounting point enough to correct the angle. So...Im going to bolt the pedals in without the booster so I can have access to the clutch master. Then Im going to mess with things from there. I have a feeling that the part of the pedals that the clutch master bolts to is causing some issues. When I tighten the bolts, its pulling the front of the pedal assembly down...or twisting it alittle. With the pedals out, if I bolt the master to it, it lines up fairly well. So Im going to look into options there first.
I just cant see why it would be different from a 4th gen to a 3rd gen...??? I mean...the pedal assembly is what is locating the clutch master. Im using the 4th gen booster, so those holes are unmolested.
The only thing that can be different is the shape of the firewall. So Im going to look there for a solution instead of modifying the pedals. There are some ideas Im kicking around about how the master cylinder works...that might make it easier to fix the angle problem. Im afraid to post them because a lot of people arent goin to like it. haha. Im just goign to try it, and if I have success, then Ill share. HOPEFULLY today the darn heat breaks. I couldnt work under the dash at all this week. Just too hot. I sold a bunch of 4th gen parts yesterday, so that stuff is almost gone. If the weather gets alittle more tolerable, Ill be on it hardcore here soon.
I have my fuse/relay boxes figured out. I hooked them up to a battery to test things out. Everything that needs constant power gets it...and everything that needs switched 12v gets it when I energize the IGN relay. So it looks like once I plug it all in the motor SHOULD fire...I have to figure out the wires coming from the tank now...
Thanks for all your help guys...Ill keep you updated. I want to drive her so bad!!!
Justin
08-09-2006 | 08:52 AM
#15
Thread Starter
TECH Fanatic
iTrader: (17)
Joined: Mar 2006
Posts: 1,746
Likes: 2
From: West Chester, PA
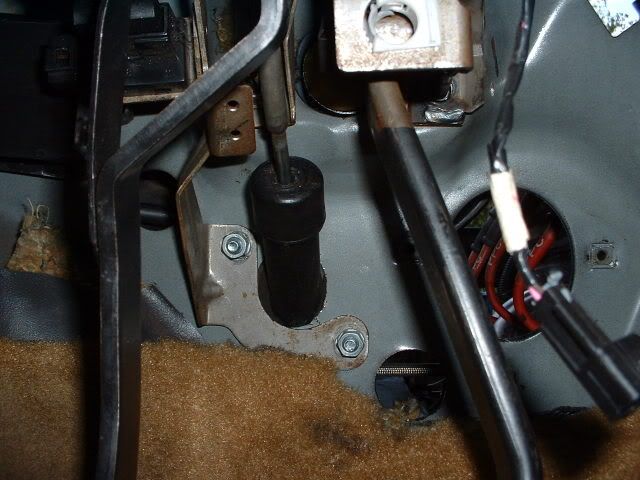
Well, I think I finally got my clutch master cylinder situation figured out. Its not perfect still...but its MUCh better than before. I dont see it breaking at all now. here is a pic...
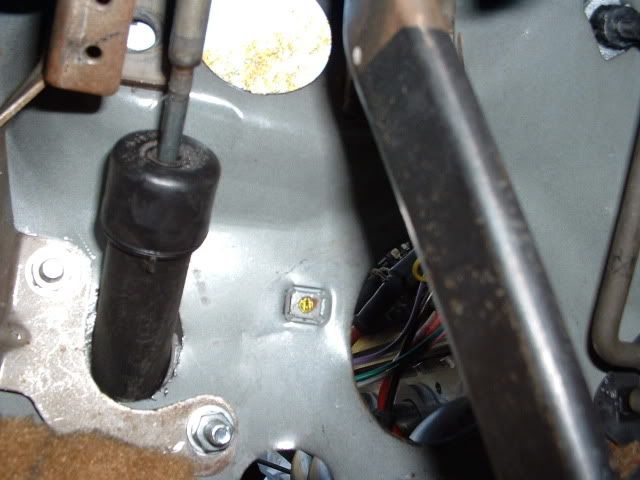
Has a slight angle side to side...but I dont think it will hurt anything. I fixed the angle by bending the clutch support bracket on the pedal set. I noticed that when I tightened the two bolts for the master, it was distorting the pedals alittle. Also, it forced the firewall back alittle. So I banged on the firewall, bent the pedals, and slotted the one hole for the master cylinder so I could rotate it DOWN alittle bit. Now its almost perfect. Im sure if I used the dremel on that hole alittl emore I could have gotten it better. But I didnt want to unbolt again.
Some more pics... self explanitory.
Justin
08-10-2006 | 06:40 AM
#17
Thread Starter
TECH Fanatic
iTrader: (17)
Joined: Mar 2006
Posts: 1,746
Likes: 2
From: West Chester, PA
Steve,
Yeah tell me about it. But when its done... Im sure the power will be enough to keep me happy for alittle while atleast
Good eye man! Thats the Pioneer P-9300. I got it for a steal from a website that isnt around anymore. Haha...it was like a "fell off the back of the truck deal" I think. I love that thing. My only gripe is I cant see the display hardly at all when its bright. When the tops are out, forget about it. Im toying with building a car-pc... So I might be ditching it soon.
J.
Yeah tell me about it. But when its done...
Im sure the power will be enough to keep me happy for alittle while atleast Good eye man! Thats the Pioneer P-9300. I got it for a steal from a website that isnt around anymore. Haha...it was like a "fell off the back of the truck deal" I think. I love that thing. My only gripe is I cant see the display hardly at all when its bright. When the tops are out, forget about it. Im toying with building a car-pc... So I might be ditching it soon.
J.
08-13-2006 | 08:04 AM
#18
Staging Lane
Joined: Nov 2005
Posts: 63
Likes: 0
From: Latrobe PA
Congrats on getting the pedals set up right. That was one of the most frustrating things of my entire swap due to how cramped it is laying under the dash bolting and unbolting the pedals.
Looks like the rest of the swap is very close to being done!! Good luck you will be very impressed when it's on the road.
I having been driving mine daily since it was finished with no problems at all so if you have any other issues feel free to shoot me a PM
Andy
Looks like the rest of the swap is very close to being done!! Good luck you will be very impressed when it's on the road.
I having been driving mine daily since it was finished with no problems at all so if you have any other issues feel free to shoot me a PM
Andy
08-14-2006 | 08:40 AM
#19
Thread Starter
TECH Fanatic
iTrader: (17)
Joined: Mar 2006
Posts: 1,746
Likes: 2
From: West Chester, PA
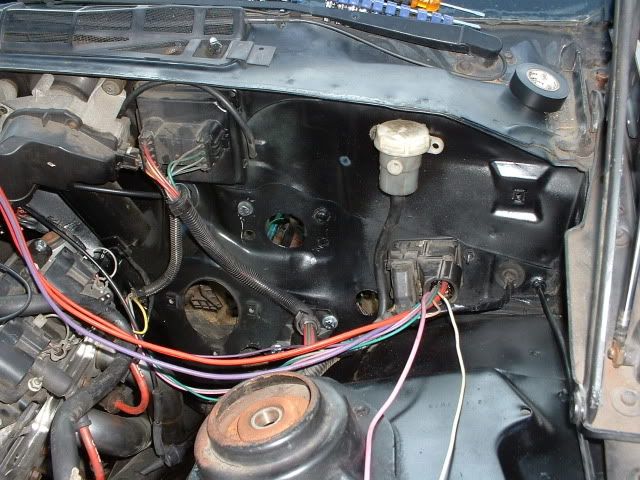
Hey all. Not much progress. I started to bundle the wires and loom them. Makes things much less intimidating. I have the PCM C1 and C2 plugs in their final resting place I hope. Looks like I have even more wire than I originally thought. Looming and taping them up squeezed another inch or two out of the harness.
I do have a question...something sort of took me by surprise.
Im fooling around with wiring now...trying to figure out all the wires from the tank (99 tank). And trying to figure out the 220 and 230 plugs...
I went to pull the plastic fuel line off the hard fuel line coming from the tank, and fuel shot out like crazy... I dont have the line for the evap hooked to anything, and the soft line wasnt even snapped on all the way. But when I took it off, it came shooting out with a good pressure.
Does this sound normal?? I figured that once I got everything hooked up and running, the evap would vent taht pressure. But what about when its just sitting there??? The fuel pump hasnt been run in a long time either...so nothing is pumping pressure. Im just hoping pressure isnt constanly building up, causing it to leak into my motor somehow or ruin the injectors... Any thoughts on this?
Justin