Taking the plunge: LS3 into '64 Tempest. Need help with shopping list.
 12-12-2008, 11:35 PM
#41

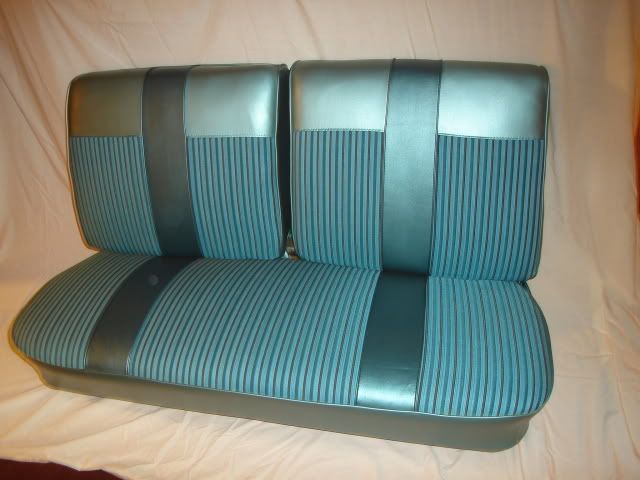
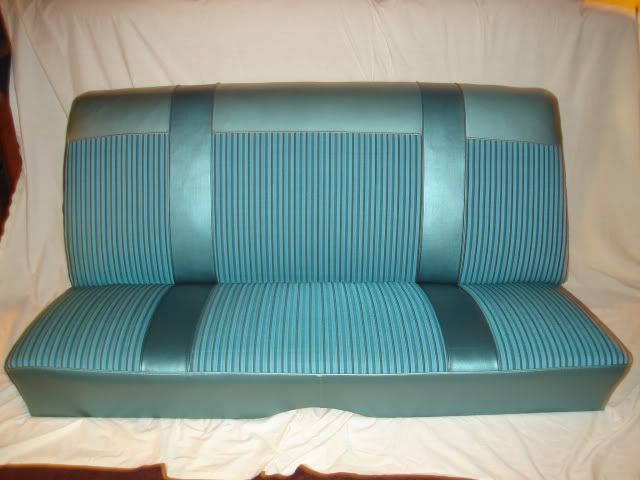
Picked up the seats from the upholstery shop today.
I'm pretty happy with the work, the original colors and fabric patterns were fairly closely duplicated. I had the work done by a small one-man shop that's local to me.
I know the stock front bench seat is far from ideal for a lot of hard cornering, but it has the look I want for the car and I won't be changing it anytime soon.
 12-14-2008, 06:13 PM
#43
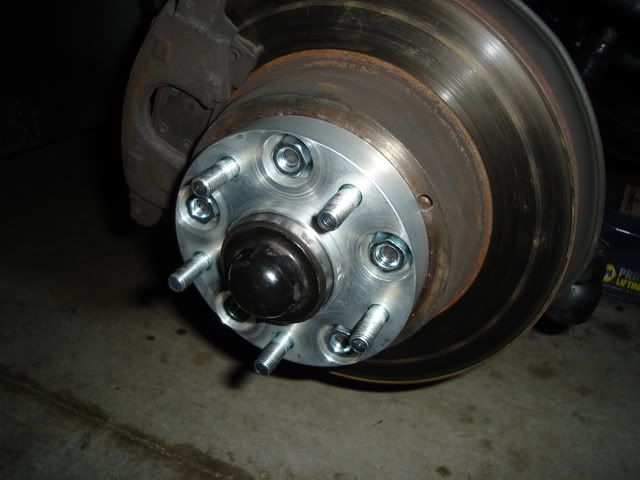
.....to the front hubs so the wheel adapters would fit.
The outermost portion of the hub needed to be ground down a bit so the wheel-centric ring that's machined on the wheel side of the adapter would slip over the hub.
I did most of the material removal with a die grinder, if the 12" rotor would have fit on one of the lathes we have at work I would have used that method instead. Doing it this way was more labor-intensive, but it did save me the trouble of taking the rotors off and the cost of replacing the wheel bearing seals.
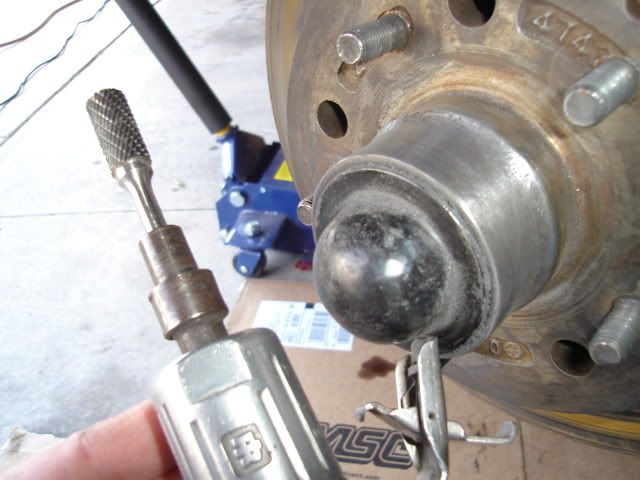
The rough cast surface (a spare rotor is shown here) needed to be dressed down about .040" on the diameter, so around .020" of material needed to be removed all around. The outer hub strength was not compromised in any way, the end result looks like it was done only for the sake of cosmetics.
Another small but important job out of the way.
The outermost portion of the hub needed to be ground down a bit so the wheel-centric ring that's machined on the wheel side of the adapter would slip over the hub.
I did most of the material removal with a die grinder, if the 12" rotor would have fit on one of the lathes we have at work I would have used that method instead. Doing it this way was more labor-intensive, but it did save me the trouble of taking the rotors off and the cost of replacing the wheel bearing seals.
The rough cast surface (a spare rotor is shown here) needed to be dressed down about .040" on the diameter, so around .020" of material needed to be removed all around. The outer hub strength was not compromised in any way, the end result looks like it was done only for the sake of cosmetics.
Another small but important job out of the way.
12-14-2008, 10:41 PM
#45

I'll be able to bolt up the fronts pretty soon, but with no engine or trans in the car the stance won't even be close to where it will end up. After the engine and trans are installed the front springs will need to either be cut or replaced since the front of the car will lose a good 250 pounds with the all-aluminum LS3 engine.
As soon as I take delivery of the new 8.5" 10-bolt rear end the rear wheels & tires can be installed, hopefully it will be here by late December or early January.
The new wheels and tires will only fit the new wider rear end width, they can't be used with the old narrow rear end that's in the car now or the narrow '66 GTO 3.36 rear I was previously planning on using. I'll still need to do some rear ride height adjustments back there as well since I'm installing some new Global West #S-60 rear springs.
12-16-2008, 10:23 PM
#46
.....will be required to get the LS3 engine in the car.
So I spent some more money, what else?
Ordered up a new SS3600 245 mm (9.5") lock-up converter from YANK Performance Converters: http://www.converter.cc/converters/street/GM/1/ They're on sale right now for $725 with free shipping. This one should flash to about 3200 behind the LS3 according to Dave at YANK, it's their most popular converter.
Street/Strip Super Stock 3600 Converter description from the YANK site:
245mm very high stall torque ratio. 3600 stall, 2.50 STR
Lightweight billet cover
Rather than swap to a bigger cam I spent about the same money on a torque converter. A good converter is an absolute must for anyone with a performance car running an automatic trans.
I had them send the new converter over to Finish Line Transmissions: http://www.finishlinetrans.com/trans...meDuty4L65.htm When the new 4L70E trans is finished they can put the trans and converter combo on their dyno for testing before shipment.
The 4L70E-5 Extreme Duty – Level 5 trans is on sale for 10% off right now, for $2,295 plus $150 shipping (core return shipping is free). I'll have my trans here in about 4 weeks.
I spoke with Andy at FLT and he helped me figure out exactly what I needed before placing my order, a big thanks to LS1TECH member Karch for steering me towards this fine trans shop.
I'll have it configured as a Trail Blazer SS trans rather than an F-body unit so the correct speed sensor will be installed to 'talk' to the Speartech computer/wiring harness that I still need to buy. Right now I need to find a trans core to send them.
New 4L70E description from the FLT site:
4L65/70E-5 Extreme Duty – Level 5
FLT performance built pump ( Includes machined pump halfs to ensure flat surfaces, New delco 13 vain pump/rotor/slide kit )
Media blast case, bell housing, and tail housing to restore a new aluminum finish. Prep case for assembly.
FLT sleeved input drum
FLT beast shell kit w/bearing
GM 5 pinion input carrier
GM 5 pinion reaction carrier
Bearing style reaction shaft
New reverse input drum
Alto wide 2-4 carbon lined band with reinforced anchor
8 B/W hi-energy clutches w/koleen steels in 3-4 clutch
B/W 29 element sprag
4L65 low roller clutch
Transgo HD-2 shift kit
Corvette Servo
Sonnax super hold 4th servo
Bushing kit
New solenoids
New Internal wire harness ( If needed on 4L70E )
New GM Spacer plate
B/W clutches
Seal & gasket kit
Filter
GM deep pan
Updated aluminum accumulator pistons
FLT prepped valvebody
Set end play to FLT specs
Install new cooler fittings
Previous (swap-related only) total - $9,903
Cost of the today's installment - $3,170
Total swap-related expenditures at this point - $13,073
New seat upholstery, wheels, tires, wheel adapters and rear brakes not included.
Short list of needed items:
Vintage Air setup
Speartech engine/trans controller and harness
Driveshaft
Corporate 8.5" 10-bolt rear end (still on order)
New windshield
Floor insulation
This hobby can be expensive if you're trying to build something nice.
12-17-2008, 10:07 PM
#48
.....that I needed for the 4L70E trans and the rear suspension upgrade.
Ordered a Shiftworks tailhousing that will allow me to run the original cable-driven speedometer along with the electronic speed sensor. They get $495 for this plus $15 shipping, I had it sent directly to FLT so they could install it during the trans build.
I had my choice of this or an electric motor to drive the speedo for a couple hundred dollars less, I figured the mechanical drive would be more trouble-free in the long run.
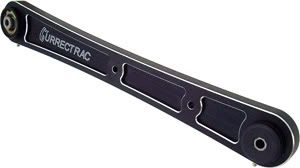
I also decided to buy a set of Currie Currectrac� control arms for the rear suspension. These feature Currie's Johnny Joint� which allow a full 30 degrees of articulation on the chassis end of the arms. This joint is fully greasable and rebuildable.
The upper arms will allow me to adjust the pinion angle.
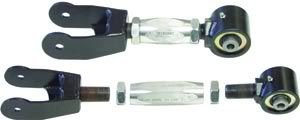
The lower arms are made from lightweight billet aluminum, both the urethane bushing and Johnny Joint� are greaseable.
Today's swap-related expenditure - $510
New swap-related total - $13,583
It's going to be a lot of fun when it's time to get this all put together.
Ordered a Shiftworks tailhousing that will allow me to run the original cable-driven speedometer along with the electronic speed sensor. They get $495 for this plus $15 shipping, I had it sent directly to FLT so they could install it during the trans build.
I had my choice of this or an electric motor to drive the speedo for a couple hundred dollars less, I figured the mechanical drive would be more trouble-free in the long run.
I also decided to buy a set of Currie Currectrac� control arms for the rear suspension. These feature Currie's Johnny Joint� which allow a full 30 degrees of articulation on the chassis end of the arms. This joint is fully greasable and rebuildable.
The upper arms will allow me to adjust the pinion angle.
The lower arms are made from lightweight billet aluminum, both the urethane bushing and Johnny Joint� are greaseable.
Today's swap-related expenditure - $510
New swap-related total - $13,583
It's going to be a lot of fun when it's time to get this all put together.
12-19-2008, 08:48 PM
#51
.....shopping today, I ordered up a new wiring harness and controller for the Tempest project.
I send an email last night to Speartech http://speartech.com/ detailing my needs. However I decided to call them today before I had a chance to read their very quick and detailed email response to discuss my needs and place my order.
Contents of the email response I received from John at Speartech:
Here's an overview of what we offer:
This package was specifically developed for the new 2006-2008 LS2, LS3, LS7 crate engines with the 58X crankshaft sensor. The complete LSx/4L70E custom stand alone wiring harness and computer package sells for $1695.00.
The package includes the following:
A new custom length, stand-alone LSx/4L70E wiring harness. The harness includes a check engine light, diagnostic connector, fuel pump relay, fuse block, and labeled wires for easy hookup to the battery, ignition switch, and fuel pump. Wires are also included for tach, speed, A/C, cooling fan relays, and cruise control functions where applicable. These custom stand alone harnesses are built for full function, closed loop control, and designed for non-emissions use (no post-cat O2's, purge canister, or fuel tank evap interface). Our harnesses can be built to your desired length specifications.
The package comes with the GM LSx ECM (engine control module) and TCM (transmission control module) fully programmed for your application including: VATS (vehicle anti-theft system) removal, emissions equipment removal (whatever you don�t need or are not using on your swap such as: catalytic converters, rear O2 sensors, fuel tank pressure, EVAP), torque management removal, gear ratio and tire size, etc.
The reprogramming lets your new engine run properly without the �check engine� light being on unless there is a problem with the engine that needs to be addressed.
Since the LSx is an Electronic Throttle Control (ETC) engine, the electronic pedal is also included in the package.
As with all Speartech packages our systems can be serviced with any late model diagnostic equipment designed for GM vehicles.
Options available:
Extra length (beyond 4�): $50.00
Emissions package (wiring for rear O2 sensors and charcoal canister control): $50.00
Sensor package (includes correct front O2 sensors and MAF sensor for one-stop shopping): $350.00
The harness and controller will add another $1,695 to the cost of the swap, plus an as yet undetermined shipping cost.
Does anyone here have an opinion or input on what is the best Mass Air Flow sensor for my application and how much they go for? I'm considering buying the O2 sensors and MAF sensor I need from Speartech.
Today's swap-related expenditure - $1,695
New swap-related total - $15,278
I have to gather up as many pieces to the puzzle as I can as quickly as possible. There's a lot of stuff to arrange in the engine compartment and under the dash, you pretty much need everything all at once in order to do it right.
 12-21-2008, 06:30 PM
#53
.....for those of you who may be contemplating a swap from stock rear drum brakes to Corvette disc brakes.
The thickness of the Z51 13" Corvette rotors where they attach to the axle flange is .275", the GM 9-1/2" brake drums are only .095" thick.
These rear disc brakes will move the rear wheels out by .180", nearly 3/16". Don't forget to use slightly longer lug studs if needed.
Those of you who are tucking super-wide wheels and tires on the back of your car should know this, sometimes there's very little room to spare. In my case the .180" added thickness is a plus, I was expecting about .125" which would have been fine.
I needed a little bit less wheel backspace and this will put my 6.57" backspace 18X9" wheels within about .020" of their ideal location, it's really hard to get it to work out much closer than this.
12-21-2008, 09:04 PM
#55
Patience my friend.
I'm even more anxious than you of course.
I'm still waiting for the new rear end, the rear wheels won't fit with the old narrower one.
Even at that, there's hardly any weight in the car right now (no motor/trans/interior) so it will sit like a 4X4 truck.
I'm even more anxious than you of course.
I'm still waiting for the new rear end, the rear wheels won't fit with the old narrower one.
Even at that, there's hardly any weight in the car right now (no motor/trans/interior) so it will sit like a 4X4 truck.
01-02-2009, 11:16 PM
#58
.....today fitting the wheel adapters and front wheels to the Tempest and making sure they had clearance.
Also tried out the spare wheel & 245/45-18 tire on the front, it will have to take the place of one of the 245/40-18s if I ever suffer a flat front tire.
I bought this particular size for the spare because it's spec'd at 26.7" tall, very close to the same height as the 26.6" tall 275/40-18 rear tires, but narrow enough that I'll still be able to use it up front with little to no interference with the front wheelwells. Actual measuring showed the 275/40s and the 245/45s to be exactly the same height, right about 26.75" unloaded.
The reason I wanted the spare tire to be the same height as the rear tires is to avoid damaging the posi unit in the rear end. Running tires of differing diameters on the rear end will burn up most limited-slip rear ends if you have to drive any real distance with it that way.
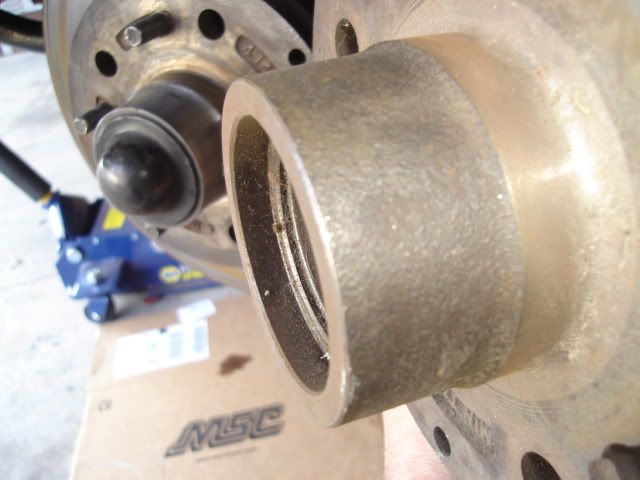
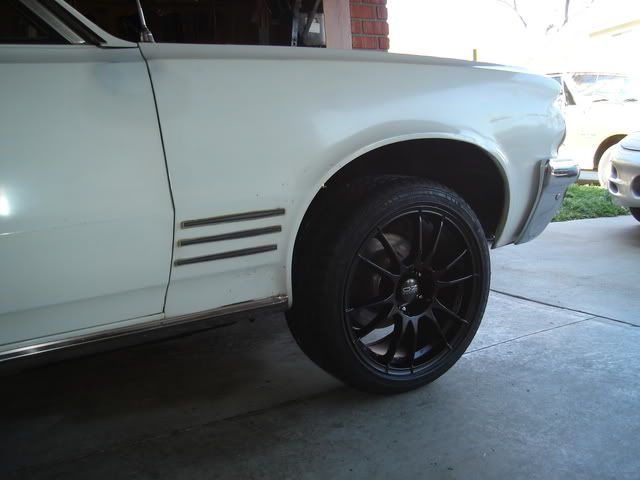
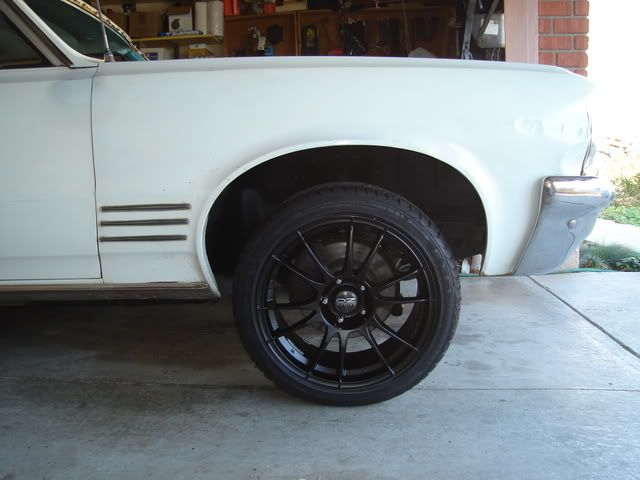
Wheel adapter mounted, I had them made with a wheel-centric ring to locate the wheel as precisely as possible.
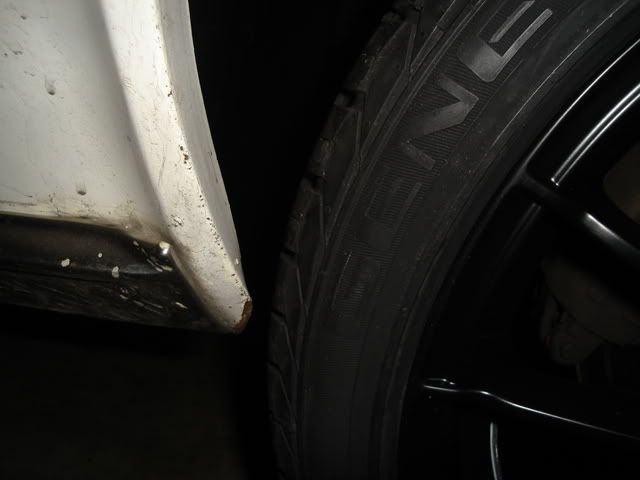
Point of slight interference, at the rear bottom corner of the front fender. On right turns, the right fender hits the tire here. Same deal on the other side when turn left. Pictures show the 245/40s, additional clearance will be needed for the spare 245/45 tire.
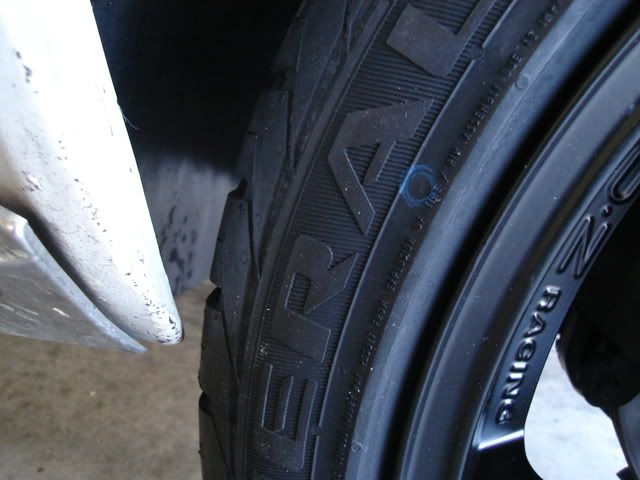

After a few whacks with a 2-pound hammer there's now enough room for the spare tire to have the clearance it needs to make turns. Even though the Tempest isn't sitting anywhere near its normal ride height right now this was a known point of interference with the old 17" wheel/tire combo. It needed some more attention due to the added diameter of the new 245/40-18s over the old 235/45-17s, not to mention the new taller spare.
The Tempest sits like a 4-wheel drive with no engine, trans or interior installed. I'll have to wait until the car goes together completely before I can figure out how much I'll need to trim the front coils.
Not much else going on right now until the trans and converter arrive in a couple of weeks, the new rear end and rear suspension parts have yet to arrive as well.
I still have to gather up all of the Vintage Air parts I need. There's a lot of things yet to do here in 2009 to get this car running.
Happy New Year all!
Also tried out the spare wheel & 245/45-18 tire on the front, it will have to take the place of one of the 245/40-18s if I ever suffer a flat front tire.
I bought this particular size for the spare because it's spec'd at 26.7" tall, very close to the same height as the 26.6" tall 275/40-18 rear tires, but narrow enough that I'll still be able to use it up front with little to no interference with the front wheelwells. Actual measuring showed the 275/40s and the 245/45s to be exactly the same height, right about 26.75" unloaded.
The reason I wanted the spare tire to be the same height as the rear tires is to avoid damaging the posi unit in the rear end. Running tires of differing diameters on the rear end will burn up most limited-slip rear ends if you have to drive any real distance with it that way.
Wheel adapter mounted, I had them made with a wheel-centric ring to locate the wheel as precisely as possible.
Point of slight interference, at the rear bottom corner of the front fender. On right turns, the right fender hits the tire here. Same deal on the other side when turn left. Pictures show the 245/40s, additional clearance will be needed for the spare 245/45 tire.
After a few whacks with a 2-pound hammer there's now enough room for the spare tire to have the clearance it needs to make turns. Even though the Tempest isn't sitting anywhere near its normal ride height right now this was a known point of interference with the old 17" wheel/tire combo. It needed some more attention due to the added diameter of the new 245/40-18s over the old 235/45-17s, not to mention the new taller spare.
The Tempest sits like a 4-wheel drive with no engine, trans or interior installed. I'll have to wait until the car goes together completely before I can figure out how much I'll need to trim the front coils.
Not much else going on right now until the trans and converter arrive in a couple of weeks, the new rear end and rear suspension parts have yet to arrive as well.
I still have to gather up all of the Vintage Air parts I need. There's a lot of things yet to do here in 2009 to get this car running.
Happy New Year all!
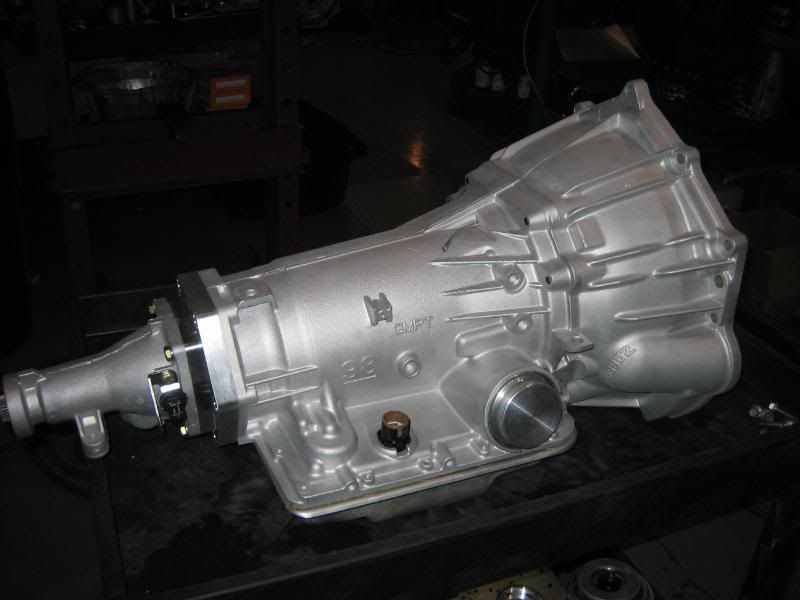
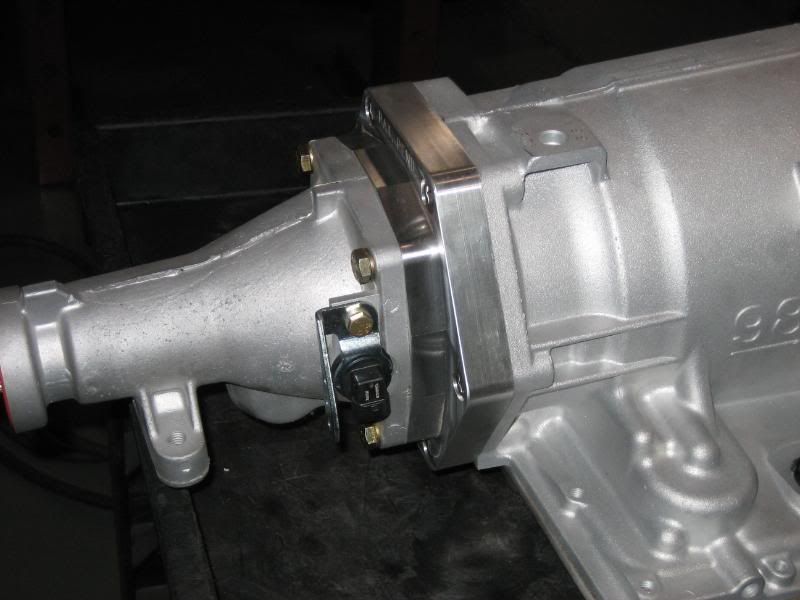
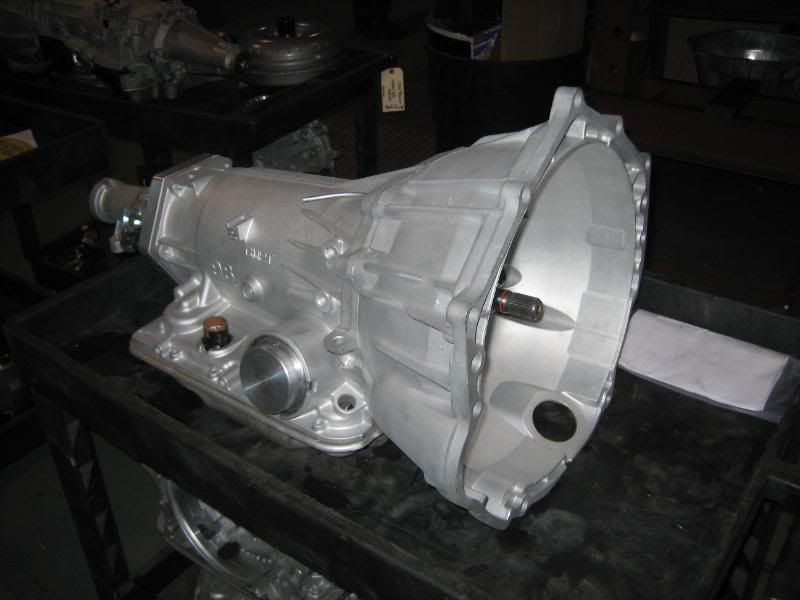
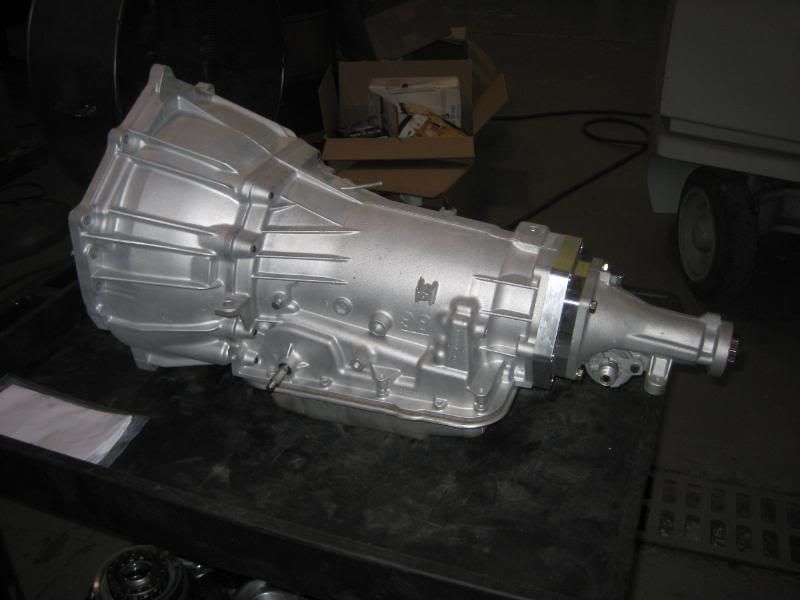
 01-15-2009, 08:40 AM
#60
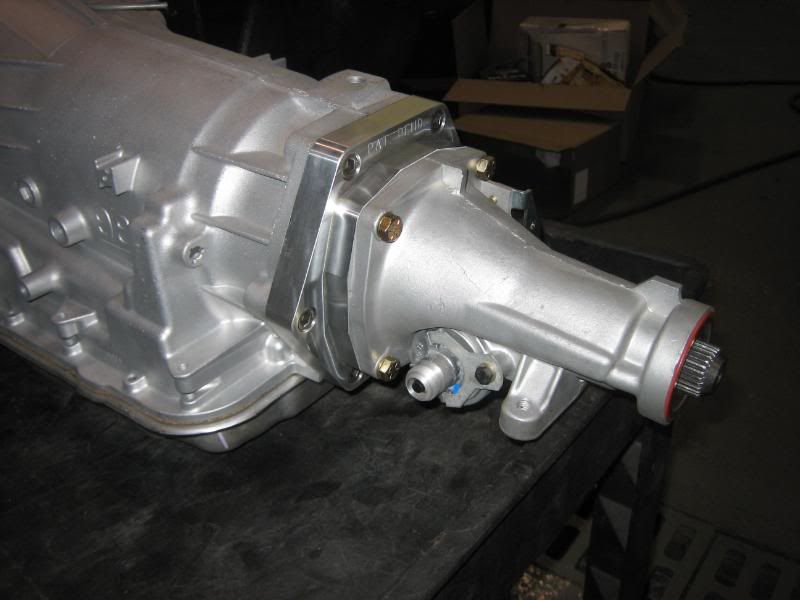
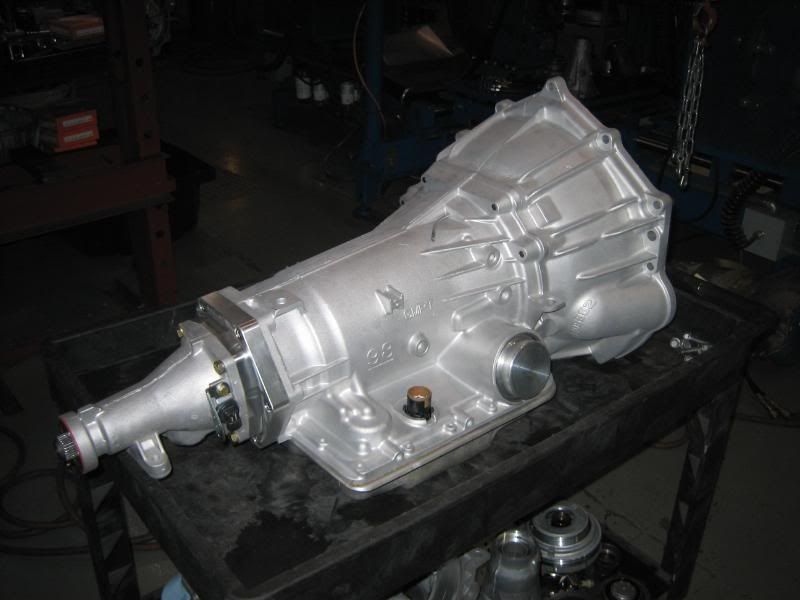
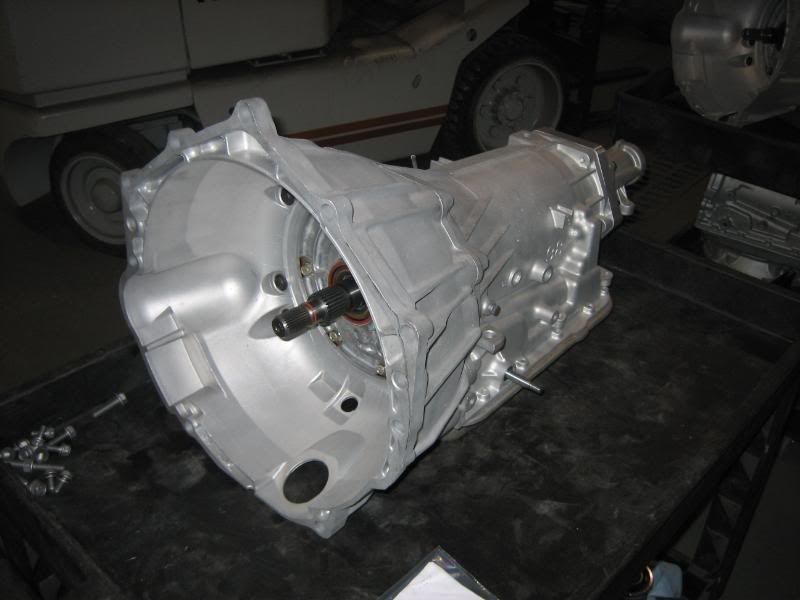
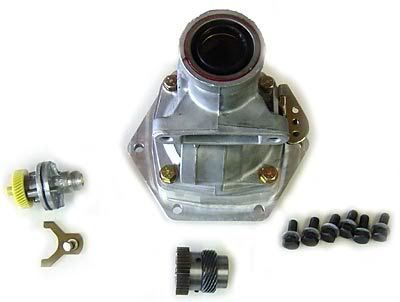
Just wanted to add to the thread here. I took a few photo's of the trans for you here. The only thing changed in the photo's was a new trans pan and also a short linkage shaft for the shifter. I did also install some 3/8 cooler fittings for you as well. Vince