
Taking the plunge: LS3 into '64 Tempest. Need help with shopping list.
 04-08-2009, 09:53 PM
#81
Registered User

Join Date: Apr 2009
Posts: 1
Likes: 0
Received 0 Likes
on
0 Posts
I decided to buy 245/40-18s and 275/40-18s since this thing could really use some tire to help handle the 450+ HP I'm expecting. Now that my wheels and tires are on order along with my front wheel adapters (27 mm/1.06") it's time again to do some more work to prep the body.
I removed the windshield so I could put a halt to the rust that was forming in the window channel, plus it had a crack that was slowly growing downward from the rear view mirror area.
Other than a few lower windshield trim clips that were pretty much consumed by the rust I don't see any really bad spots.
Some heavy pitting is present but no holes that I can see so far, after some more work with a wire brush it will soon be ready for the POR-15 treatment. For those of you who haven't tried POR-15, you'll soon see the near miracles this stuff can perform. At only $45 a quart it's an affordable solution for minor to moderate rust problems.
its on a 1972 nova can upload pictures if u need
starting on project car
 04-08-2009, 10:04 PM
#82
TECH Resident
iTrader: (3)

Join Date: Sep 2005
Location: Edmond, Oklahoma
Posts: 796
Likes: 0
Received 0 Likes
on
0 Posts

Looks like the build is coming along nicely. You made the best choices imo on suspension components. Those currietrac rear control arms and those ATS spindles are almost a work of art.
04-09-2009, 11:00 PM
#84
If it's really too rotted out, then welding in new metal is best way to go, POR-15 isn't a cure all for rusted-out metal that needs replacement. Use your best judgement.
04-09-2009, 11:10 PM
#86
No can do, the C6 Z06 brakes need 18" wheels at a minimum for caliper clearance and not all 18" wheels will clear them. My new wheels swallow them right up!
But I do have another use for my old 17" steelies, they'll end up on my '64 Lemans convertible (455 Tri-Power/TH400).
But I do have another use for my old 17" steelies, they'll end up on my '64 Lemans convertible (455 Tri-Power/TH400).
04-09-2009, 11:12 PM
#87
.....for the drivetrain and suspension upgrades.
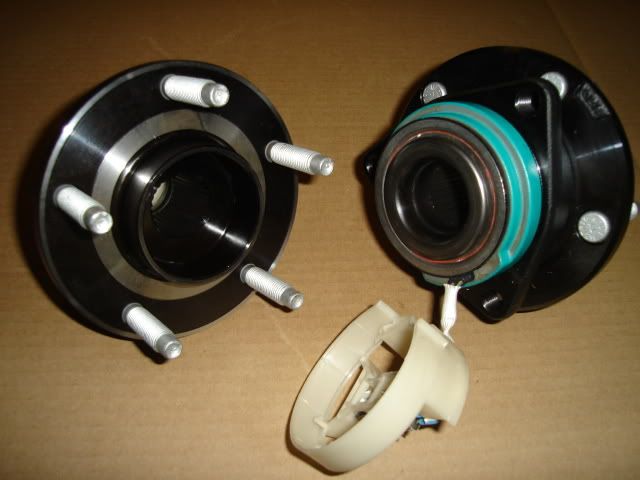
A set of C6 Corvette SKF racing hubs. I can't run the forged aluminum ATS spindles without these, I went for these heavy-duty parts instead of standard OEM replacments hoping that they'll last me a lifetime.
Along with the front hubs I bought some new MOOG A-body upper ball joints and outer tie rod ends to complete the front suspension.
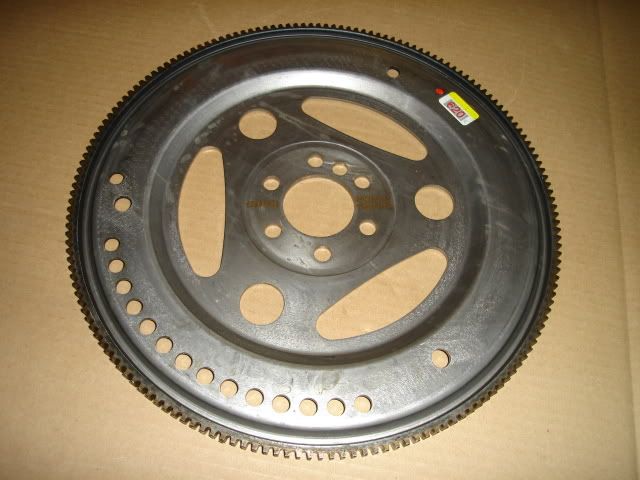
New GM part # 12606620 flexplate, to replace the C6 Corvette-specific one that was supplied with the LS3 engine. I can't mate the engine and trans together without this, thanks again to Rich (TURBO BUICK) for the technical help.
My work hours will be reduced to 45 per week as of this coming Monday due to the slowing economy, I'm glad that I have already collected 90% of the parts I need.
On the brighter side I'll have more time and energy to get some work done on my project, there's a long road ahead.
A set of C6 Corvette SKF racing hubs. I can't run the forged aluminum ATS spindles without these, I went for these heavy-duty parts instead of standard OEM replacments hoping that they'll last me a lifetime.
Along with the front hubs I bought some new MOOG A-body upper ball joints and outer tie rod ends to complete the front suspension.
New GM part # 12606620 flexplate, to replace the C6 Corvette-specific one that was supplied with the LS3 engine. I can't mate the engine and trans together without this, thanks again to Rich (TURBO BUICK) for the technical help.
My work hours will be reduced to 45 per week as of this coming Monday due to the slowing economy, I'm glad that I have already collected 90% of the parts I need.
On the brighter side I'll have more time and energy to get some work done on my project, there's a long road ahead.
04-16-2009, 10:29 AM
#88
Teching In

Join Date: Apr 2009
Posts: 1
Likes: 0
Received 0 Likes
on
0 Posts
I have watching this swap for awhile...time and patience ...me too!
I have the same issues on my 64 ss swap...but had the body off resto and custom already for the driveline....
I wait for parts ...get some wrong some right but at the end it will be sweet just like yours.
Here is where I at ...should I try to use the LS swap kit for the pan or buy the custom ones presented in this thread...part # 19212593 kit is around 150.00 shipped any help or advice greatly appreciated I send some pictures as I set the hot cam ls in next few weeks Doug new to the site
05-02-2009, 11:20 PM
#89
.....some real motivation to keep moving forward on my Tempest project.
I was actually caught in the act of working on the Tempest by a long-time internet forum friend who I had not had the pleasure of meeting yet. I was all wet and dirty from laying underneath the car. I was really getting into washing down the underside of the floor pans and frame rails to remove all of the grease and dirt when a 'stranger' walked up my driveway called out my name.
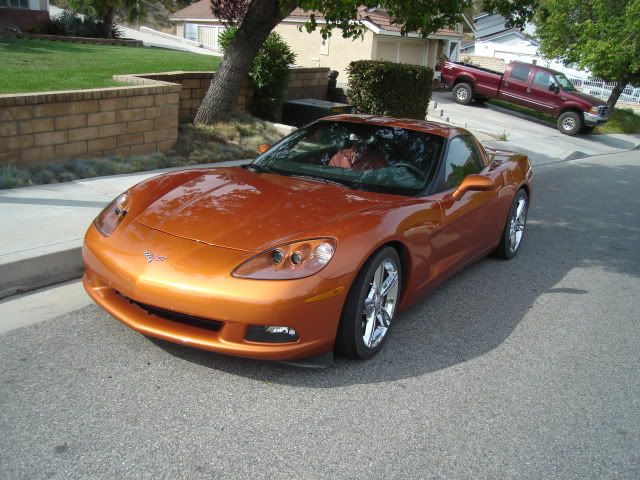
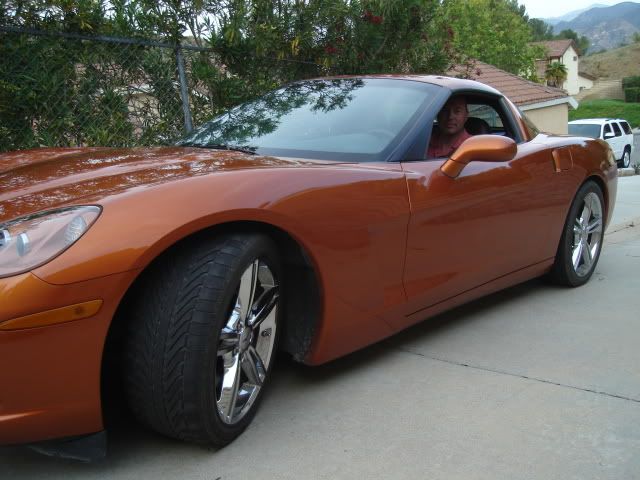
Mike (455HOGT37 on Performance Years) stopped by in his LS3-powered six-speed manual 2008 Corvette. We talked cars and took inventory of some of the major components I had for the LS3 swap for a while. It wasn't long befire Mike forced me to get behind the wheel of his 'vette. I gladly accepted his generous offer.
I impressed Mike right away with my ability to handle a stick-shift by trying to take off in 3rd gear instead of first. Those shift gates are mighty close together.
We headed out for a little drive and right away I was impressed with the smooth low-RPM power of the LS3. I had the car in sixth gear at a little over 50 MPH, it was doing about 1100 RPM on the tach and wasn't complaining. I pushed it back into 5th to keep it a little happier.
Mike asked me to find a spot where I could launch the car in low gear from a dead stop, I gladly obliged. Beat on your car? Sure.
The car spun the tires with ease, I let out of the throttle once and nailed it again and they spun even harder. These LS3 cars are animals.
We headed to the freeway to check out the high-speed power and acceleration. I was able to get it up to 90 MPH in a very short distance heading down the onramp, letting off before entering the freeway. The acceleration ability of this base model Corvette was nothing less than astonishing, it's stock other than the addition of a set of factory LS7 headers and matching factory 3" exhaust.
Thanks Mike, I'm now even more excited than ever about getting the LS3 Tempest project done!
I was actually caught in the act of working on the Tempest by a long-time internet forum friend who I had not had the pleasure of meeting yet. I was all wet and dirty from laying underneath the car. I was really getting into washing down the underside of the floor pans and frame rails to remove all of the grease and dirt when a 'stranger' walked up my driveway called out my name.
Mike (455HOGT37 on Performance Years) stopped by in his LS3-powered six-speed manual 2008 Corvette. We talked cars and took inventory of some of the major components I had for the LS3 swap for a while. It wasn't long befire Mike forced me to get behind the wheel of his 'vette. I gladly accepted his generous offer.
I impressed Mike right away with my ability to handle a stick-shift by trying to take off in 3rd gear instead of first. Those shift gates are mighty close together.
We headed out for a little drive and right away I was impressed with the smooth low-RPM power of the LS3. I had the car in sixth gear at a little over 50 MPH, it was doing about 1100 RPM on the tach and wasn't complaining. I pushed it back into 5th to keep it a little happier.
Mike asked me to find a spot where I could launch the car in low gear from a dead stop, I gladly obliged. Beat on your car? Sure.
The car spun the tires with ease, I let out of the throttle once and nailed it again and they spun even harder. These LS3 cars are animals.
We headed to the freeway to check out the high-speed power and acceleration. I was able to get it up to 90 MPH in a very short distance heading down the onramp, letting off before entering the freeway. The acceleration ability of this base model Corvette was nothing less than astonishing, it's stock other than the addition of a set of factory LS7 headers and matching factory 3" exhaust.
Thanks Mike, I'm now even more excited than ever about getting the LS3 Tempest project done!
05-03-2009, 12:16 AM
#90
On The Tree
iTrader: (1)

Join Date: Oct 2008
Location: NE PA
Posts: 181
Likes: 0
Received 0 Likes
on
0 Posts
Bart, that is DEFINITELY motivation to get working on the 64 Tempest. I am still gathering parts for my 87 Buick T-Type project which is going to get the LS376/480. These are NOT cheap conversions the way you and I are doing them but I think it will be worthwhile. I hope that I will be pleased as you were when you were "forced" to drive the LS3 Vette. LOL
By the way tell Mike that is a sharp vette.
Rich
By the way tell Mike that is a sharp vette.
Rich
05-03-2009, 01:43 AM
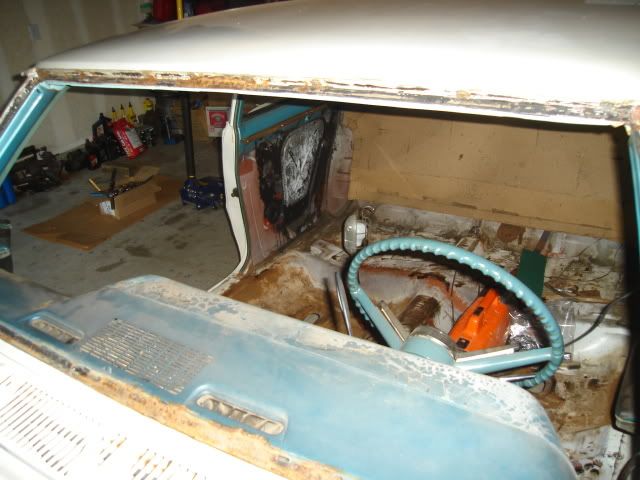
#91
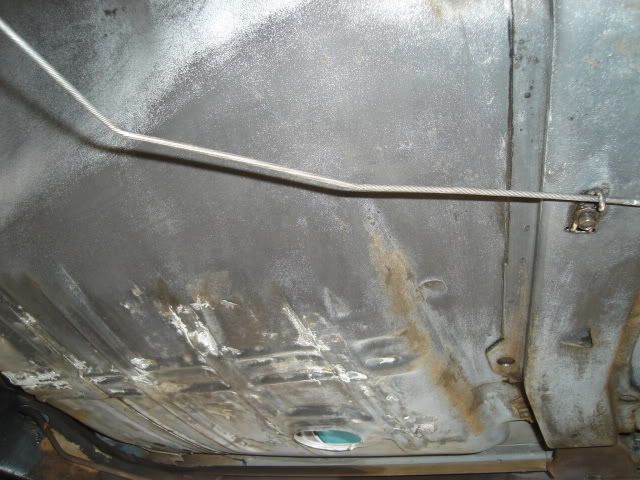
.....look like underneath. This little Tempest is as close to being a rust-free car as you could ever hope for. After a little bit of help on the floor pans and in the front and rear window channels with POR-15 she'll be good to go.
Today I was busy cleaning up the underside of the car and took a few shots. I wanted to degrease the underside before installing the new set of body mounts and 3/8" fuel line. Both of the old drivetrains (original 215-six and the 455 V8) did have a few oil leaks, but all in all it was a pretty easy cleaning job. The sealing technology on the newer LSx engines is so much improved that I fully expect the underside to stay free of oil after this car is back on the road.
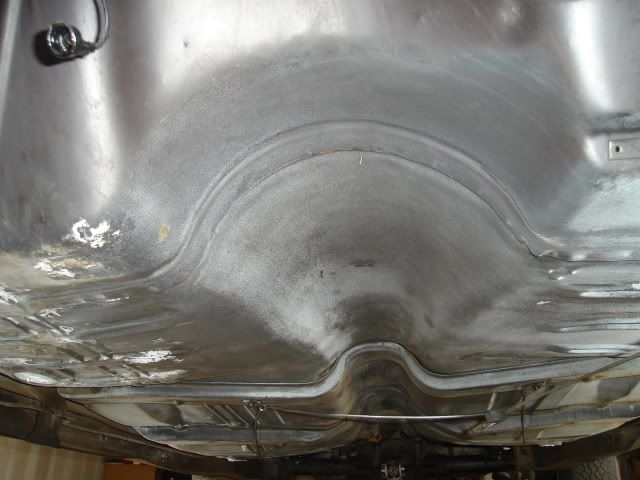
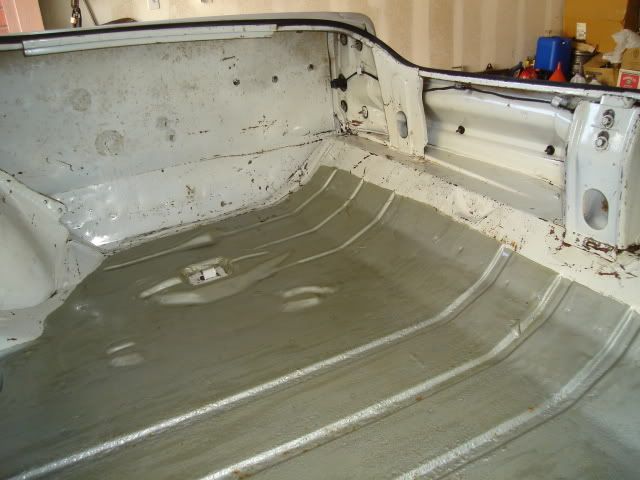
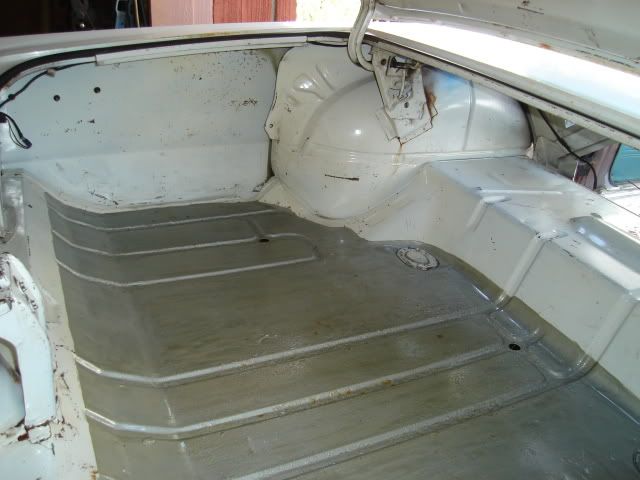
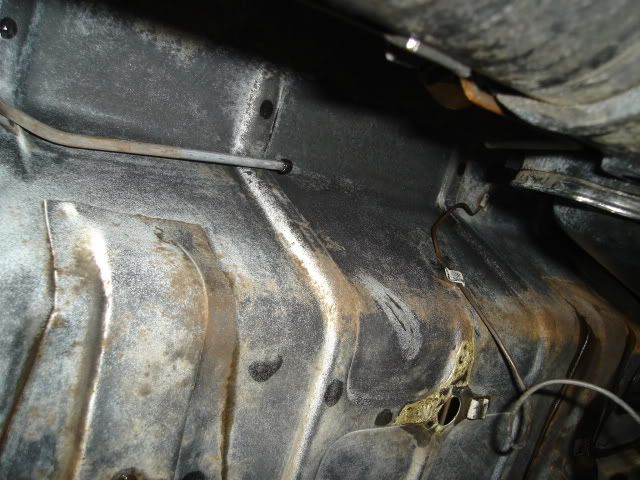
Trans tunnel.
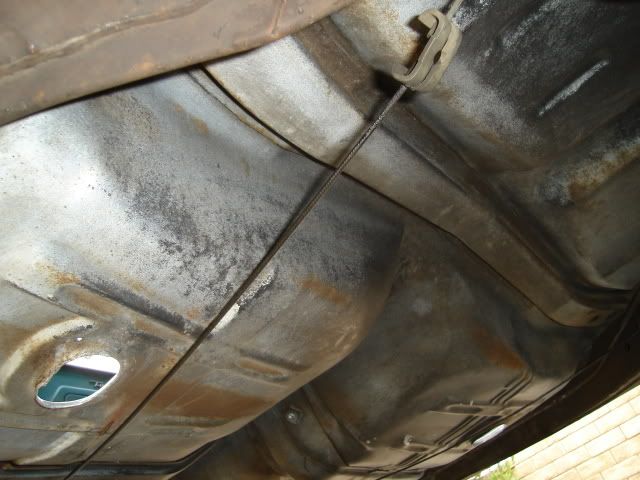
Rear pans looking from the driver's side.
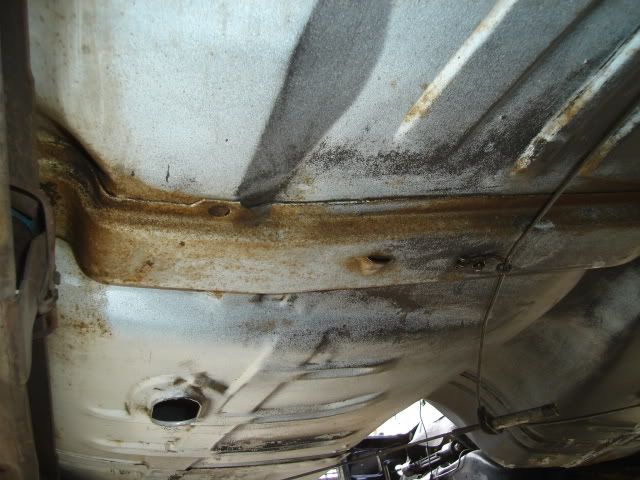
Driver's side pans looking toward the front. Plenty of factory white overspray can be seen here.
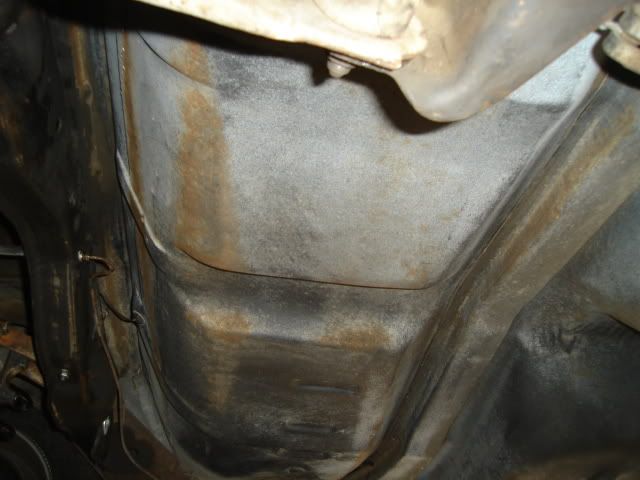
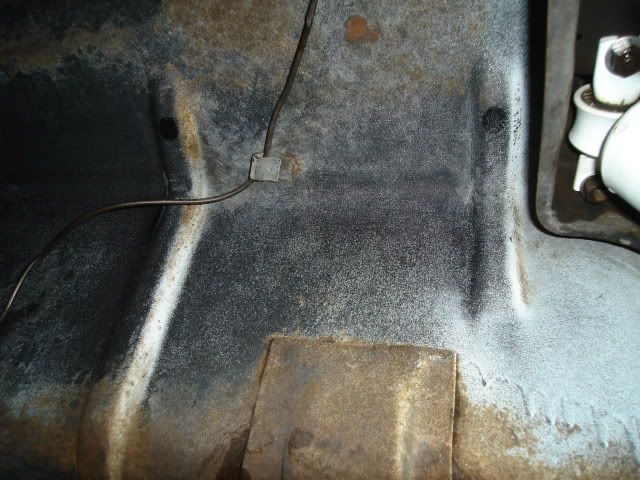
Underneath the rear seat area looking from the passenger side.
Front passenger floor looking from the driver's side. You can see where the silver POR-15 seeped past the duct tape a little, this side needed the most patching to fix rust holes.
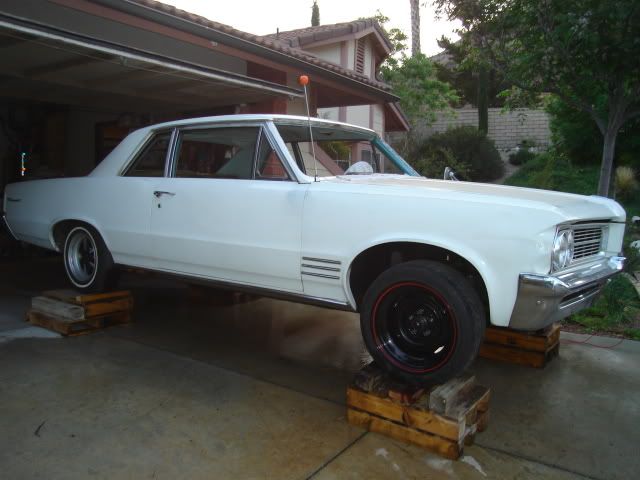
The Tempest is shown here up off the ground by using about a foot-tall stack of small wooden shipping pallets under each tire, a very safe way to get under the car and get work done.
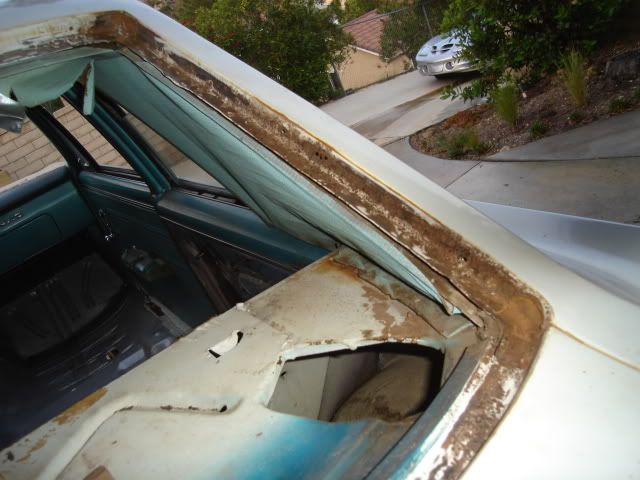
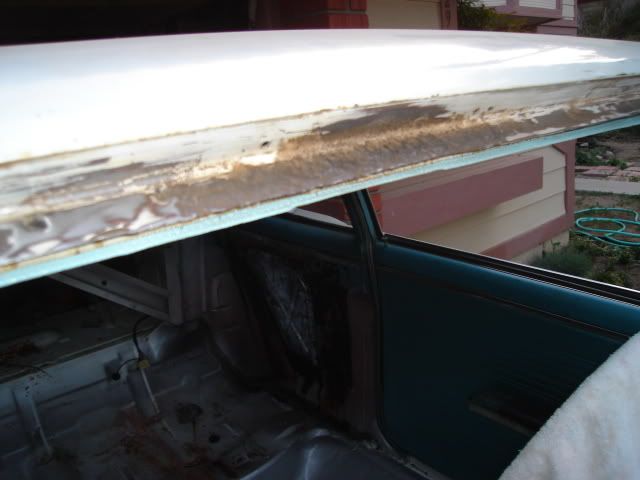
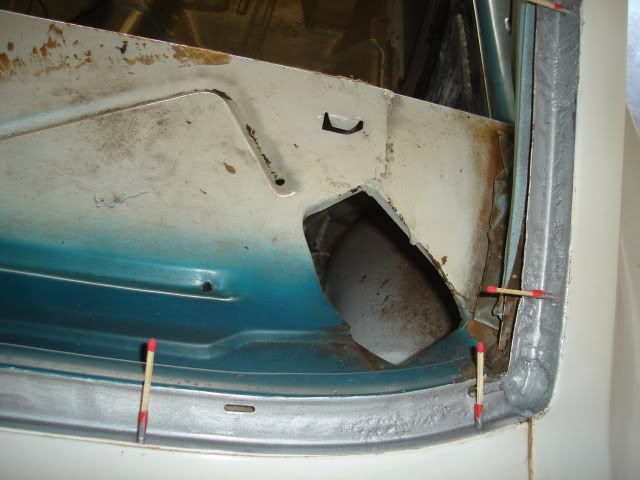
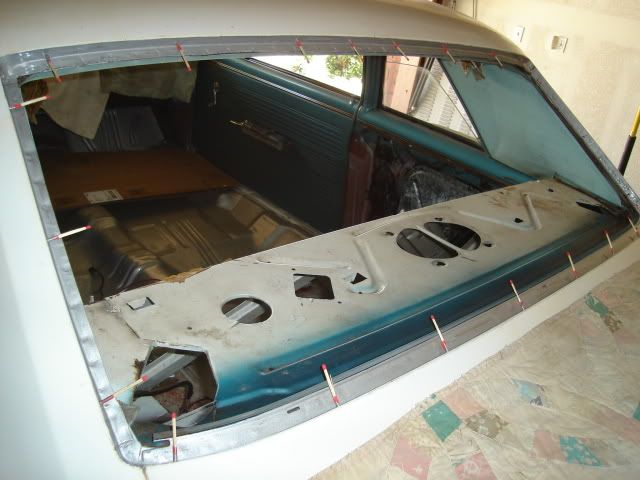
Two weeks ago I spent a few hours removing the back glass, it needed to come out in order to arrest the rust in the window channel and reseal it. Breaking this back glass means spending over $500 for a new replacement, so I was very careful cutting it loose and removing it.
Last weekend I sanded using 80-grit paper for quite a few hours on the front and rear window channels to remove whatever rust that I could. I also removed all of the window reveal moulding clips. They will be replaced with new repro clips, about half of the old ones were rusted badly or broken.
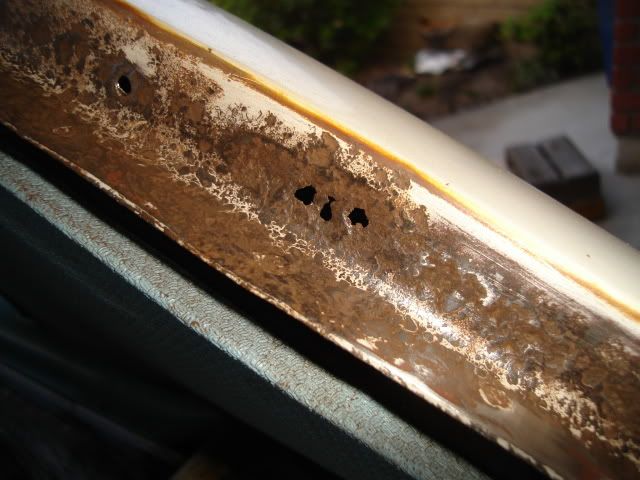
For whatever reason, the worst rust was on the passenger side of the rear window channel.
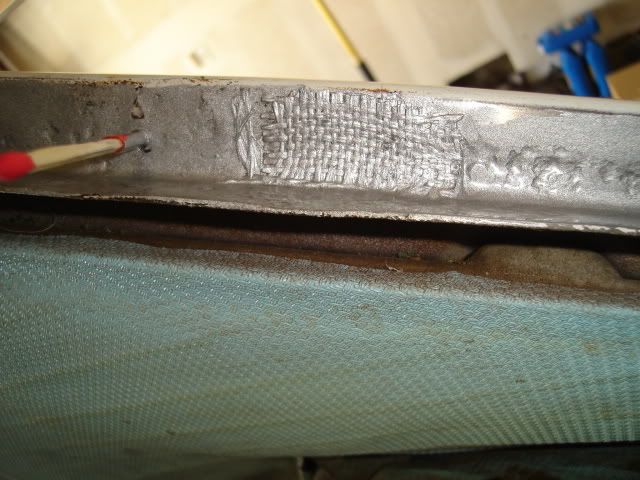
Here are 3 small holes on the passenger side, the only rust that penetrated all the way through on the front or rear channels. I'm feeling pretty lucky.
Bottom of the rear channel is in great condition, just a little rust needed sanding near the center for the most part.
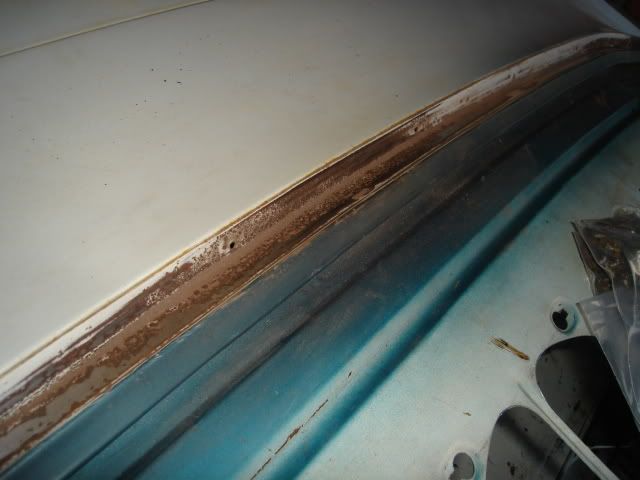
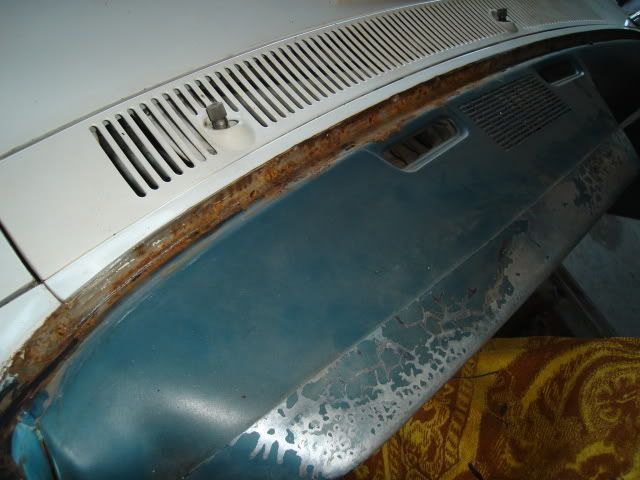
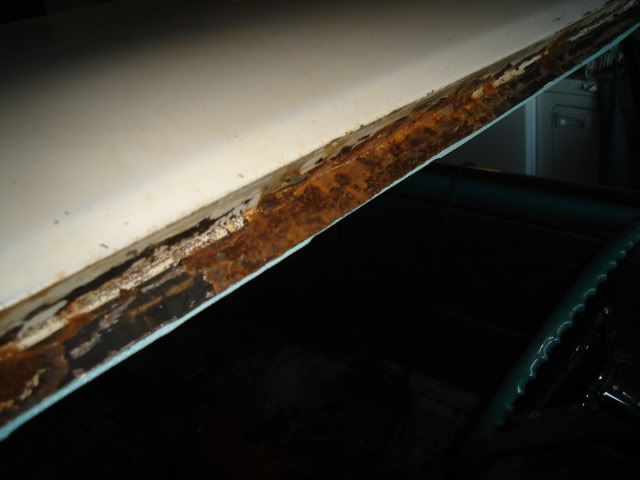
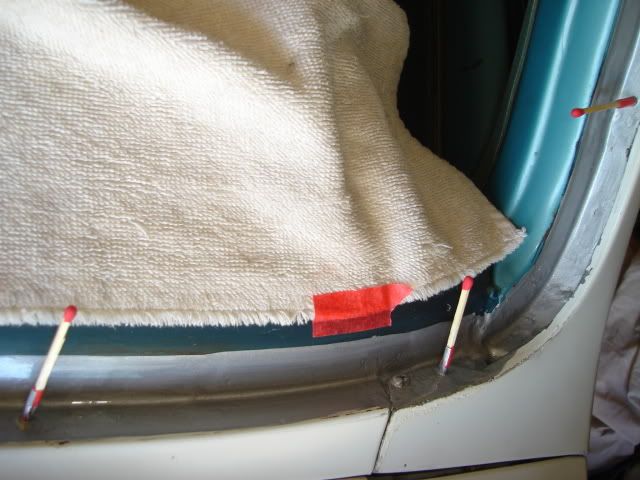
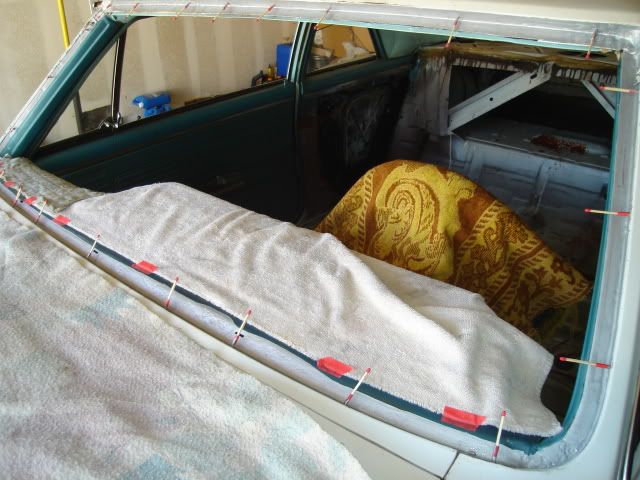
The windshield channel at the bottom has some fairly heavy pitting, it started to creep up into the dash a little on the driver's side. I tucked some white towels under the back edge of the hood to keep most of the sanding dust out of the cowl vents.
Top center of the windshield channel has some pitting too.
After doing a little more prep work on the channels I'll lay on a few coats of the silver POR-15. After that I'll topcoat it with another POR-15 product, either their 2-part Whitecoat or 1-part Flexcoat in white. Both are UV-resistant topcoats, the silver POR-15 isn't and is the wrong color since the edge will be seen once the window mouldings are installed. While I'm at it I'll topcoat the trunk floor with white as well since I'll have plenty left over, right now it's finished in some silver POR-15 that I put down about 13 years ago.
Still collecting parts and doing some dirty work, nothing too exciting is happening yet.
Today I was busy cleaning up the underside of the car and took a few shots. I wanted to degrease the underside before installing the new set of body mounts and 3/8" fuel line. Both of the old drivetrains (original 215-six and the 455 V8) did have a few oil leaks, but all in all it was a pretty easy cleaning job. The sealing technology on the newer LSx engines is so much improved that I fully expect the underside to stay free of oil after this car is back on the road.
Trans tunnel.
Rear pans looking from the driver's side.
Driver's side pans looking toward the front. Plenty of factory white overspray can be seen here.
Underneath the rear seat area looking from the passenger side.
Front passenger floor looking from the driver's side. You can see where the silver POR-15 seeped past the duct tape a little, this side needed the most patching to fix rust holes.
The Tempest is shown here up off the ground by using about a foot-tall stack of small wooden shipping pallets under each tire, a very safe way to get under the car and get work done.
Two weeks ago I spent a few hours removing the back glass, it needed to come out in order to arrest the rust in the window channel and reseal it. Breaking this back glass means spending over $500 for a new replacement, so I was very careful cutting it loose and removing it.
Last weekend I sanded using 80-grit paper for quite a few hours on the front and rear window channels to remove whatever rust that I could. I also removed all of the window reveal moulding clips. They will be replaced with new repro clips, about half of the old ones were rusted badly or broken.
For whatever reason, the worst rust was on the passenger side of the rear window channel.
Here are 3 small holes on the passenger side, the only rust that penetrated all the way through on the front or rear channels. I'm feeling pretty lucky.
Bottom of the rear channel is in great condition, just a little rust needed sanding near the center for the most part.
The windshield channel at the bottom has some fairly heavy pitting, it started to creep up into the dash a little on the driver's side. I tucked some white towels under the back edge of the hood to keep most of the sanding dust out of the cowl vents.
Top center of the windshield channel has some pitting too.
After doing a little more prep work on the channels I'll lay on a few coats of the silver POR-15. After that I'll topcoat it with another POR-15 product, either their 2-part Whitecoat or 1-part Flexcoat in white. Both are UV-resistant topcoats, the silver POR-15 isn't and is the wrong color since the edge will be seen once the window mouldings are installed. While I'm at it I'll topcoat the trunk floor with white as well since I'll have plenty left over, right now it's finished in some silver POR-15 that I put down about 13 years ago.
Still collecting parts and doing some dirty work, nothing too exciting is happening yet.
05-03-2009, 10:42 PM
#92
.....and more progress.
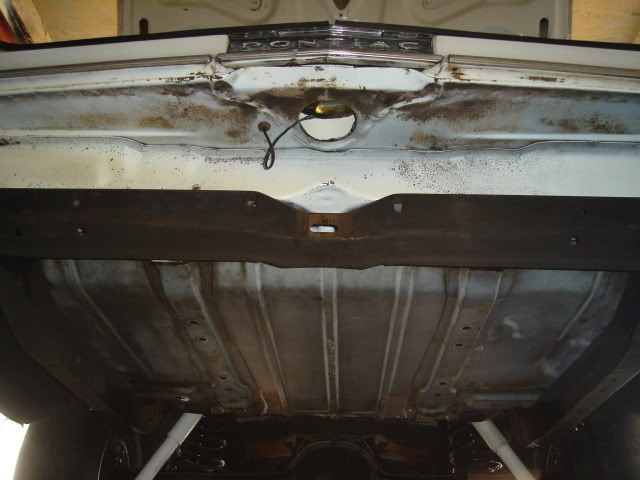
First thing today I removed the rear bumper and fuel tank, and emptied out the trunk. Both bumpers will need to removed to replace the body mounts. The bumpers bolt to the frame and body needs to move up enough to get the mounts out, so removing the bumpers is a must.
While I was under the car I loosened up all of the body mount bolts in preparation for their replacement. Every single one broke free and turned freely without any penetrating oil, there will be no cutting out the floor to remove any rusted-up captured nuts in the floor pans.
Spent some time inside the trunk scrubbing it cleaner than it's ever been since I've owned the car. My full-size spare 18X9" wheel and 245/45-18 tire needs a nice home.
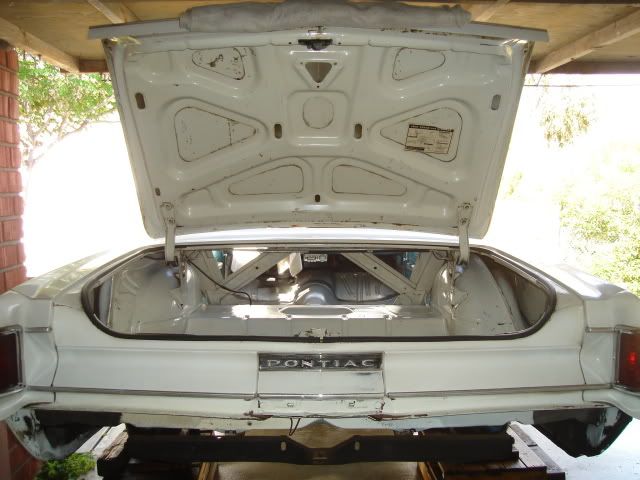
The spare will sit in the stock location on the passenger side.
A look at the driver's side.
The trunk floor still looks pretty good after 13 years, some of the heavier rust has started to bubble up under the silver POR-15. This trunk floor was pretty crusty when I did the POR-15 application, I scrubbed the loose stuff off until I just couldn't scrub any more.
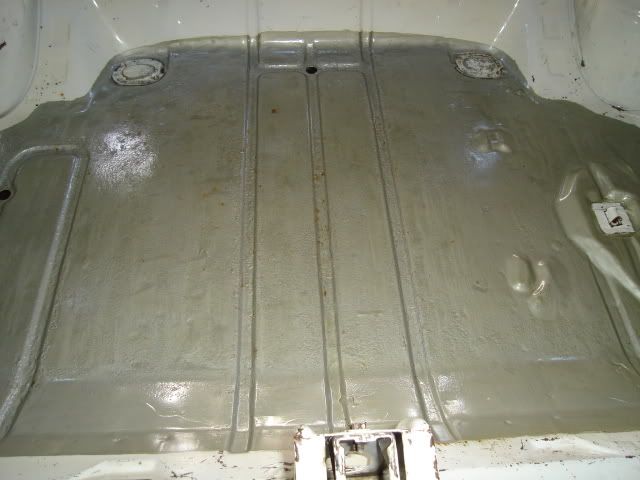
Underneath the trunk floor with the fuel tank removed, you can see where a little silver POR-15 seeped through when I did some patching right in the center.
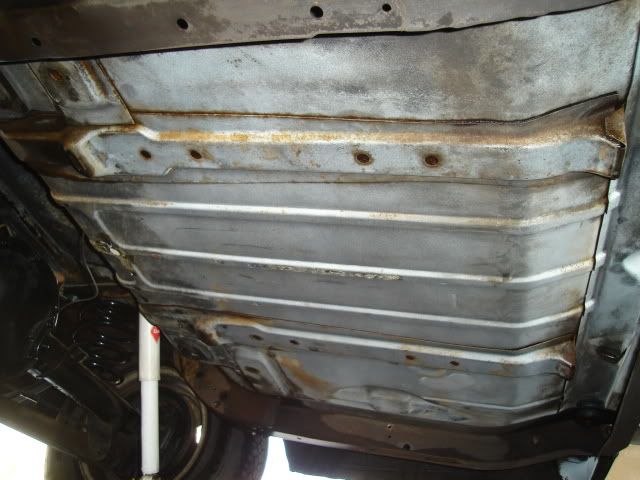
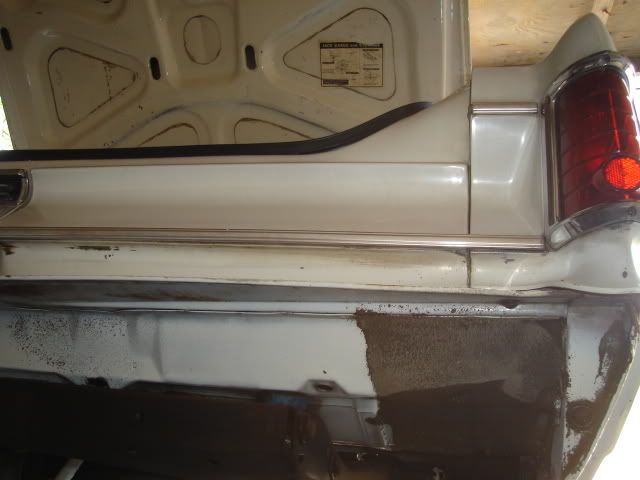
I cleaned the front trunk wall from underneath and the panel above the rear axle, I scrubbed and cleaned as far as I could reach. You can see some more evidence of rust patching right next to the trunk body plug hole.
I even scrubbed everything that's usually hidden behind the bumper.
I won't get an armfull of dirt or grease while I'm working on the chassis or brakes.
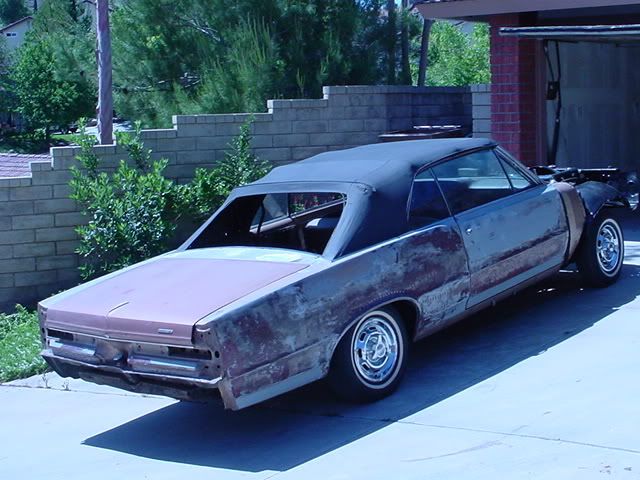
This car's cherry. Moving forward!
First thing today I removed the rear bumper and fuel tank, and emptied out the trunk. Both bumpers will need to removed to replace the body mounts. The bumpers bolt to the frame and body needs to move up enough to get the mounts out, so removing the bumpers is a must.
While I was under the car I loosened up all of the body mount bolts in preparation for their replacement. Every single one broke free and turned freely without any penetrating oil, there will be no cutting out the floor to remove any rusted-up captured nuts in the floor pans.
Spent some time inside the trunk scrubbing it cleaner than it's ever been since I've owned the car. My full-size spare 18X9" wheel and 245/45-18 tire needs a nice home.
The spare will sit in the stock location on the passenger side.
A look at the driver's side.
The trunk floor still looks pretty good after 13 years, some of the heavier rust has started to bubble up under the silver POR-15. This trunk floor was pretty crusty when I did the POR-15 application, I scrubbed the loose stuff off until I just couldn't scrub any more.
Underneath the trunk floor with the fuel tank removed, you can see where a little silver POR-15 seeped through when I did some patching right in the center.
I cleaned the front trunk wall from underneath and the panel above the rear axle, I scrubbed and cleaned as far as I could reach. You can see some more evidence of rust patching right next to the trunk body plug hole.
I even scrubbed everything that's usually hidden behind the bumper.
I won't get an armfull of dirt or grease while I'm working on the chassis or brakes.
This car's cherry. Moving forward!


 05-09-2009, 10:46 PM
#95
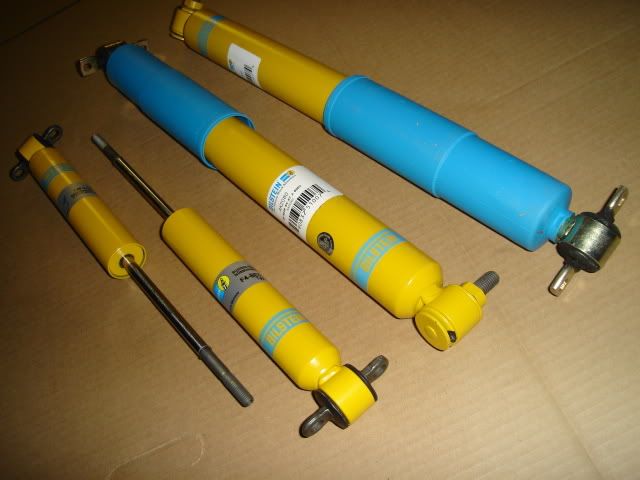
.....to pretty much finish off the suspension upgrades, a new $300 set of Bilstein Heavy-Duty gas shocks. These are supposed to be one of the best riding and handling shocks available for a reasonable price, by just looking at them the German quality is clearly evident.
I really couldn't justify the purchase of single-adjustable shocks (about $700) or double-adjustable shocks (about $1500) since I'll just be doing a little agressive pleasure driving from time to time and really don't have any plans to autocross this car.
Part # F4-BE3-2972-HO front and AK2080 rear.
Soon the new Classic Auto Air system will arrive and it will be time to really dig into some 'real' work on the car. The new A/C system along with the Speartech harness and controller will both need to find a home under the dash and on/through the firewall.
Today I finally finished off the window channel rust sanding with some 180 grit paper and tomorrow I plan to seal up the front and rear window channels with some silver POR-15.
Staying motivated.
05-10-2009, 08:13 PM
#96
Today I got an early start so I could complete 3 coats of POR-15 on the window channels.
I started by scrubbing the already clean channels (cleaned with Simple Green) with some Scotchbrite dipped in PPG DX-579 Metal Cleaner (same as Metalprep) to etch both the rusted areas and the clean bare metal areas as well.
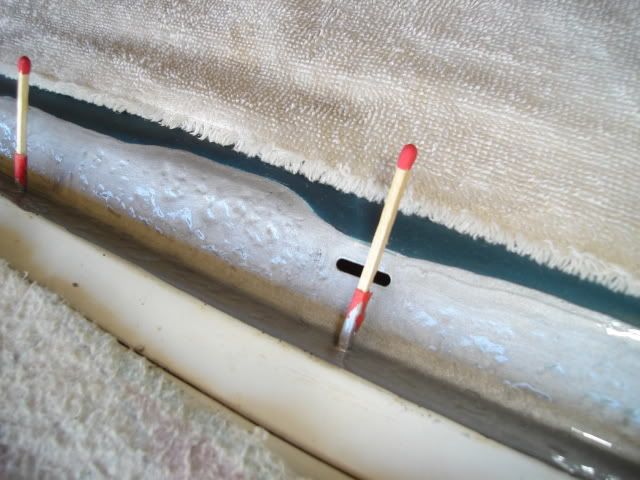
Then to keep the Metal Cleaner and rinse water from finding it's way down into the body I plugged off all of the trim clip screw holes with some wooden matches (of all things!) wrapped with masking tape so they would seal up the holes. I left the matches in place during the POR-15 application to keep it from plugging up or reducing the size of the holes.
All of the pics were taken after the first coat of silver POR-15 was applied.
The 3 small holes on the passenger side rear window channel were patched with 2 layers of fiberglass cloth.
Driver's side bottom corner.
Heaviest pitting is right in front of the driver. I plan to sand this down after the POR-15 cures for about a week and put down a few more coats to level out the surface for a better seal when the new windshield is installed.
Front and rear channels with the first coat completed and waiting 2 to 3 hours for a second coat.
Right now it's time to put down the 3rd coat of POR-15 before the day/weekend is gone.
I did call my Mom right after the second coat was down, Happy Mother's Day!
I started by scrubbing the already clean channels (cleaned with Simple Green) with some Scotchbrite dipped in PPG DX-579 Metal Cleaner (same as Metalprep) to etch both the rusted areas and the clean bare metal areas as well.
Then to keep the Metal Cleaner and rinse water from finding it's way down into the body I plugged off all of the trim clip screw holes with some wooden matches (of all things!) wrapped with masking tape so they would seal up the holes. I left the matches in place during the POR-15 application to keep it from plugging up or reducing the size of the holes.
All of the pics were taken after the first coat of silver POR-15 was applied.
The 3 small holes on the passenger side rear window channel were patched with 2 layers of fiberglass cloth.
Driver's side bottom corner.
Heaviest pitting is right in front of the driver. I plan to sand this down after the POR-15 cures for about a week and put down a few more coats to level out the surface for a better seal when the new windshield is installed.
Front and rear channels with the first coat completed and waiting 2 to 3 hours for a second coat.
Right now it's time to put down the 3rd coat of POR-15 before the day/weekend is gone.
I did call my Mom right after the second coat was down, Happy Mother's Day!
05-13-2009, 11:40 PM
#97
.....to prepare for the Classic Auto Air air conditioning system installation. I'll need to find room to tuck the Speartech wiring harness and controller under there somewhere as well.
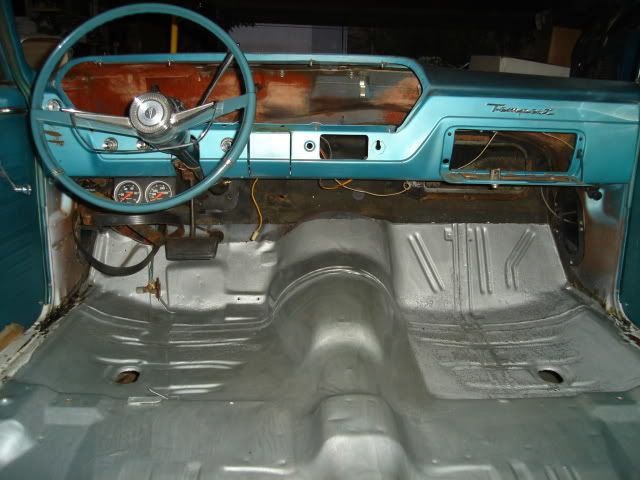
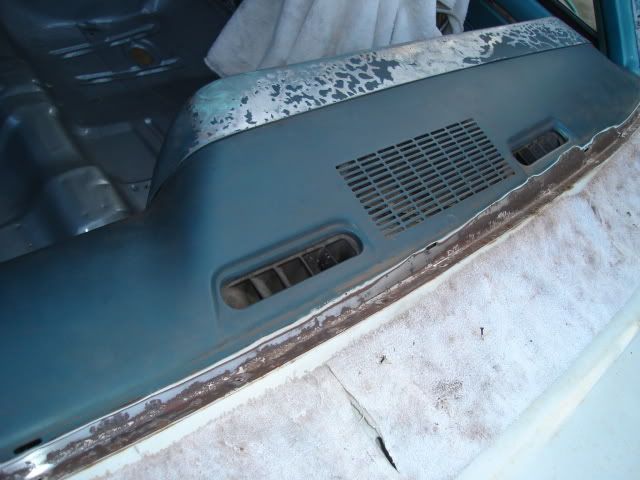
I removed the gauge cluster so I could have room to work under the dash. The cluster housing itself will be replaced with nicer one that isn't warped from sun exposure, it will also have some paint work done to freshen it up a little at the same time.
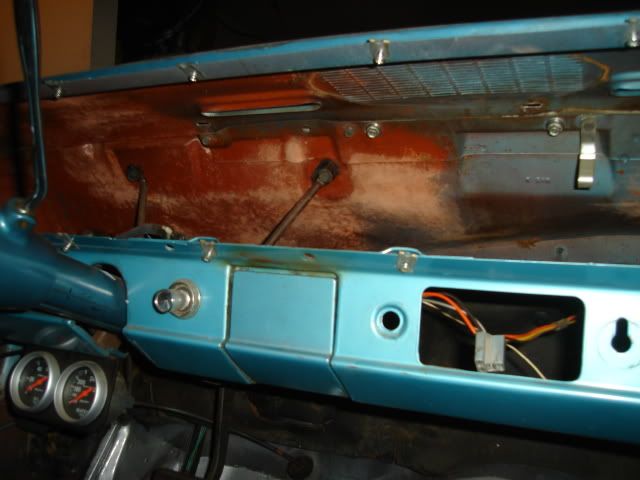
The entire factory heater box assembly and control cables on the inside of the car were removed completely as they will not be needed, the aftermarket A/C unit has both the heater core and A/C evaporator incorporated into a single unit.
The only thing that still needs to come out is the old factory firewall pad and insulation that will be replaced with modern insulation from Second Skin. While I have access I'll put insulation on every surface under the dash and on the firewall that I can reach.
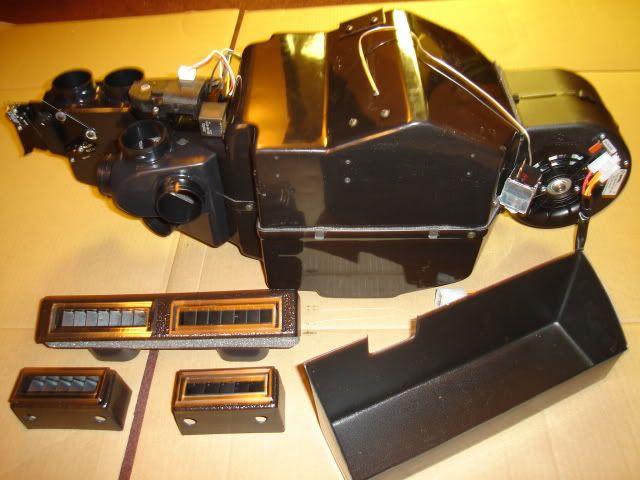
The heater and A/C evaporator main unit is shown here along with the two separate outside small A/C vents and the twin central vent, the vents mount at the bottom edge of the dash. There is a shallow plastic glovebox insert provided that mounts with the stock hardware. The size of the main unit won't allow the stock glovebox cardboard to be used, a very small sacrifice.
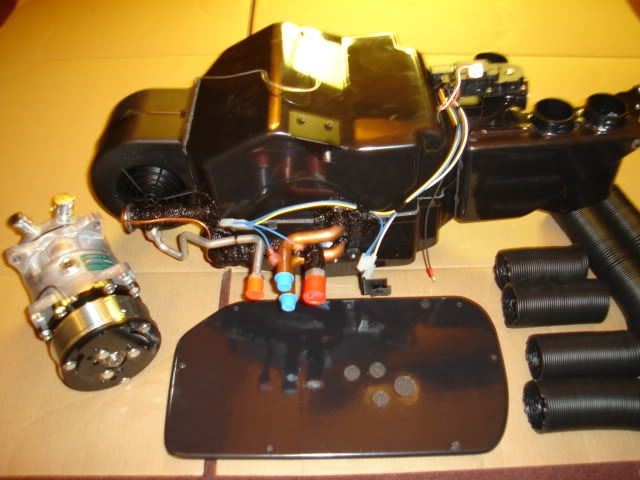
The other side of the unit that will face the firewall is shown here along with the thick composite/plastic insulated main firewall blockoff plate that comes with holes already drilled for the heater and A/C hoses to pass through. The new Sanden compressor and 2" underdash A/C and defrost ducting hose is shown here as well.
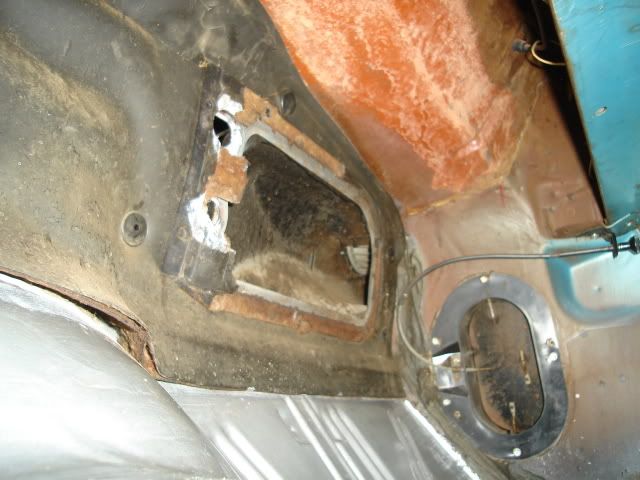
The factory heater blower motor and fan along with the stamped sheetmetal heater housing on the engine side of the firewall will be removed as well, they will be replaced with blockoff plates that are provided with the kit. The passenger side inner fender will have to come out to remove the heater housing. None of the factory heater parts will be retained with the exception of the stock heater control panel in the dash, it will be modified to accept the two new heat and A/C control cables.
Keepin' on it.
I removed the gauge cluster so I could have room to work under the dash. The cluster housing itself will be replaced with nicer one that isn't warped from sun exposure, it will also have some paint work done to freshen it up a little at the same time.
The entire factory heater box assembly and control cables on the inside of the car were removed completely as they will not be needed, the aftermarket A/C unit has both the heater core and A/C evaporator incorporated into a single unit.
The only thing that still needs to come out is the old factory firewall pad and insulation that will be replaced with modern insulation from Second Skin. While I have access I'll put insulation on every surface under the dash and on the firewall that I can reach.
The heater and A/C evaporator main unit is shown here along with the two separate outside small A/C vents and the twin central vent, the vents mount at the bottom edge of the dash. There is a shallow plastic glovebox insert provided that mounts with the stock hardware. The size of the main unit won't allow the stock glovebox cardboard to be used, a very small sacrifice.
The other side of the unit that will face the firewall is shown here along with the thick composite/plastic insulated main firewall blockoff plate that comes with holes already drilled for the heater and A/C hoses to pass through. The new Sanden compressor and 2" underdash A/C and defrost ducting hose is shown here as well.
The factory heater blower motor and fan along with the stamped sheetmetal heater housing on the engine side of the firewall will be removed as well, they will be replaced with blockoff plates that are provided with the kit. The passenger side inner fender will have to come out to remove the heater housing. None of the factory heater parts will be retained with the exception of the stock heater control panel in the dash, it will be modified to accept the two new heat and A/C control cables.
Keepin' on it.
05-14-2009, 04:17 PM
#98
You my friend are doing an amazing job !!! thanks for the inspiration !!!
its guys like you who convince guys like me that i should continue to be patient and collect parts; do it right the first time or not at all. I wont even start a build thread on my car until i can get things sorted out better, and spend cash in all the right areas.
its guys like you who convince guys like me that i should continue to be patient and collect parts; do it right the first time or not at all. I wont even start a build thread on my car until i can get things sorted out better, and spend cash in all the right areas.
05-14-2009, 11:12 PM
#99
You my friend are doing an amazing job !!! thanks for the inspiration !!!
its guys like you who convince guys like me that i should continue to be patient and collect parts; do it right the first time or not at all. I wont even start a build thread on my car until i can get things sorted out better, and spend cash in all the right areas.
its guys like you who convince guys like me that i should continue to be patient and collect parts; do it right the first time or not at all. I wont even start a build thread on my car until i can get things sorted out better, and spend cash in all the right areas.
I know this build seems to be progressing slowly at this point, but as you know both collecting and paying for all of these pieces just doesn't happen overnight.
But some very cool stuff should be happening soon.
05-14-2009, 11:19 PM
#100
.....of silver POR-15 on the passenger floor pan. This one showed up a few holes that I missed the first time around when I pulled the duct tape off the bottom.
I hurried home from work so I could get the first coat down by 5:00 PM, I finished by 4:58 and ate some dinner.
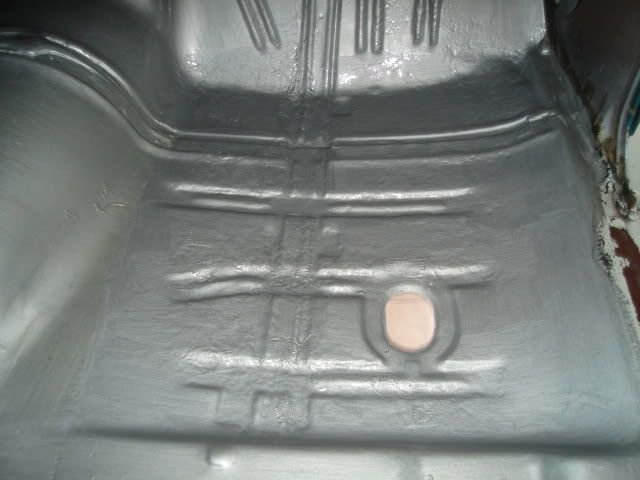
Right now I'm waiting for the second coat to tack-up so I can lay down the third and final coat and call the floors done. I wanted to get this done before the weekend so I can get under the dash and finish up the cleaning and final prep work before laying down the insulation pieces, I need to order the insulation in the next few days.
Thanks for looking!
I hurried home from work so I could get the first coat down by 5:00 PM, I finished by 4:58 and ate some dinner.
Right now I'm waiting for the second coat to tack-up so I can lay down the third and final coat and call the floors done. I wanted to get this done before the weekend so I can get under the dash and finish up the cleaning and final prep work before laying down the insulation pieces, I need to order the insulation in the next few days.
Thanks for looking!