White.Lightning's Build Journal


 11-12-2012, 07:00 PM
#22

Well, it's been a while since I've updated. I haven't done much of anything to the car lately. I have been trying to get my garage in order for the winter so I can get things done while it's cold and miserable out.
I started by building a basic workbench to get my cased tools off the ground. I plan to add a second wall cabinet for hardware and fluids. I also want to add a couple receptacles and an under cabinet light for bench work. Here is the start of this process....

There was a really nice weekend a few weeks ago, and I managed to head out to the Saturday morning Cars-N-Coffee meet. Saw a few friends, and chatted for a bit. It was nice to get the car out and drive it.

I spent the past week or so cleaning every tool I own. I typically use my 3/8" and 1/4" SK socket set. They both come in a nice formed plastic container (green). It makes it easy when I'm working on the car so I'm not running back and forth to the tool chest. But the main reason for cleaning all of the tools was, my complete Craftsman socket set(s) were starting to form a very slight surface rust on the chrome. I haven't used them in probably 8-10 years, and before I bought my house, they were stored in an outdoor shed prone to moisture.
I also picked up a different floor jack. The way 4th gen fbodies are, its very tough to get a 'normal' jack under the front or the rear of the car. The kmember is very far under the nose of the car, and the rear end is in front of the gas tank and muffler setup. So I typically jack the car up from the sides. That's fine and dandy, but with the car being lowered, and having added subframe connectors, the jack wouldn't fit! So I had another small jack on hand to raise the car 1-2", then I would put the regular floor jack under and jack it the rest of the way. Basically, it was a PITA.
I sold my old Craftsman 3.5ton floor jack (5.75" min height), which helped fund the new Napa 2ton floor jack (2.75" min height), which was on sale for $100 off. Score!!!! This jack came HIGHLY recommended by David (MIGHTYMOUSE). I'm glad I took his advice!


So that's it. No real working on the car to speak of, but I have been doing something!!! Hopefully next time, I'll have some real updates to post.

I started by building a basic workbench to get my cased tools off the ground. I plan to add a second wall cabinet for hardware and fluids. I also want to add a couple receptacles and an under cabinet light for bench work. Here is the start of this process....
There was a really nice weekend a few weeks ago, and I managed to head out to the Saturday morning Cars-N-Coffee meet. Saw a few friends, and chatted for a bit. It was nice to get the car out and drive it.
I spent the past week or so cleaning every tool I own. I typically use my 3/8" and 1/4" SK socket set. They both come in a nice formed plastic container (green). It makes it easy when I'm working on the car so I'm not running back and forth to the tool chest. But the main reason for cleaning all of the tools was, my complete Craftsman socket set(s) were starting to form a very slight surface rust on the chrome. I haven't used them in probably 8-10 years, and before I bought my house, they were stored in an outdoor shed prone to moisture.
I also picked up a different floor jack. The way 4th gen fbodies are, its very tough to get a 'normal' jack under the front or the rear of the car. The kmember is very far under the nose of the car, and the rear end is in front of the gas tank and muffler setup. So I typically jack the car up from the sides. That's fine and dandy, but with the car being lowered, and having added subframe connectors, the jack wouldn't fit! So I had another small jack on hand to raise the car 1-2", then I would put the regular floor jack under and jack it the rest of the way. Basically, it was a PITA.
I sold my old Craftsman 3.5ton floor jack (5.75" min height), which helped fund the new Napa 2ton floor jack (2.75" min height), which was on sale for $100 off. Score!!!! This jack came HIGHLY recommended by David (MIGHTYMOUSE). I'm glad I took his advice!
So that's it. No real working on the car to speak of, but I have been doing something!!! Hopefully next time, I'll have some real updates to post.
Last edited by White.Lightning; 11-13-2012 at 09:03 AM.
12-03-2012, 06:27 PM
#23
Update time! Nothing crazy, just a project I've been meaning to tackle for a while. I wanted to have an older bullet muffler I had laying around welded into the intermediate pipe to reduce some rasp in the exhaust at a certain RPM range.
I initially thought this would be a quick fix, by cutting the intermediate pipe and sectioning in the bullet muffler. So a friend offered to weld the muffler in for me. I pulled the pipe and took it to his house only to find out that there were some kicks in it that prevented the bullet muffler from being welded in easily. We cut the intermediate pipe and I was going to take it back home and mess with it to see if the angles would work. (I didn't want to bring the car there and end up leaving with a hacked up exhaust, that's why I pulled the pipe)
I'll let the pictures do the talking.......


Crap......wrong angle


So then I took the car to the local exhaust shop "Mighty Muffler" in Aston. The owner there, Nelson, was real nice and hooked me up. Here are the results.....


Back in business!

Oh, I also restored one of my grandfathers bench vises. The other isn't done yet, but this one came out nice. That's all for now.


I initially thought this would be a quick fix, by cutting the intermediate pipe and sectioning in the bullet muffler. So a friend offered to weld the muffler in for me. I pulled the pipe and took it to his house only to find out that there were some kicks in it that prevented the bullet muffler from being welded in easily. We cut the intermediate pipe and I was going to take it back home and mess with it to see if the angles would work. (I didn't want to bring the car there and end up leaving with a hacked up exhaust, that's why I pulled the pipe)
I'll let the pictures do the talking.......
Crap......wrong angle
So then I took the car to the local exhaust shop "Mighty Muffler" in Aston. The owner there, Nelson, was real nice and hooked me up. Here are the results.....
Back in business!
Oh, I also restored one of my grandfathers bench vises. The other isn't done yet, but this one came out nice. That's all for now.
 01-01-2013, 08:34 AM
#26
Happy new year everyone! I've been kind of MIA with the holidays and such, as you can imagine.
Nothing real to report on the car. I came to a point where I wanted to just clean the car up and sell it. I had a pipe dream of me buying a 4door sedan and modding it. I saw a nice CTSV V1 for sale and thought about myself driving it. I was just pondering that I am in a different phase right now and wanted something more luxury sport. Then reality sets in and I realize that my car isn't worth much to anybody, and that I wouldn't even get half of what I put into the car. So that began to steer me back to reality.
Now that the new year is among us, I wanted to work on the car some and see if I have a new found love for it. Here are the plans for the car in the next couple of months:
-Buy some Lamin-X and smoke out the fog lights and use the remainder of the material on the 3rd brake light. The VHT nite shades looks 'O.K.' for now, but the gunsmoke Lamin-X looks a lot better. We're talking less than $20 for a universal sized sheet.
Before:
http://www.flickr.com/photos/54578570@N03/5192321409/
Photoshop After:
http://www.flickr.com/photos/54578570@N03/8090543073/
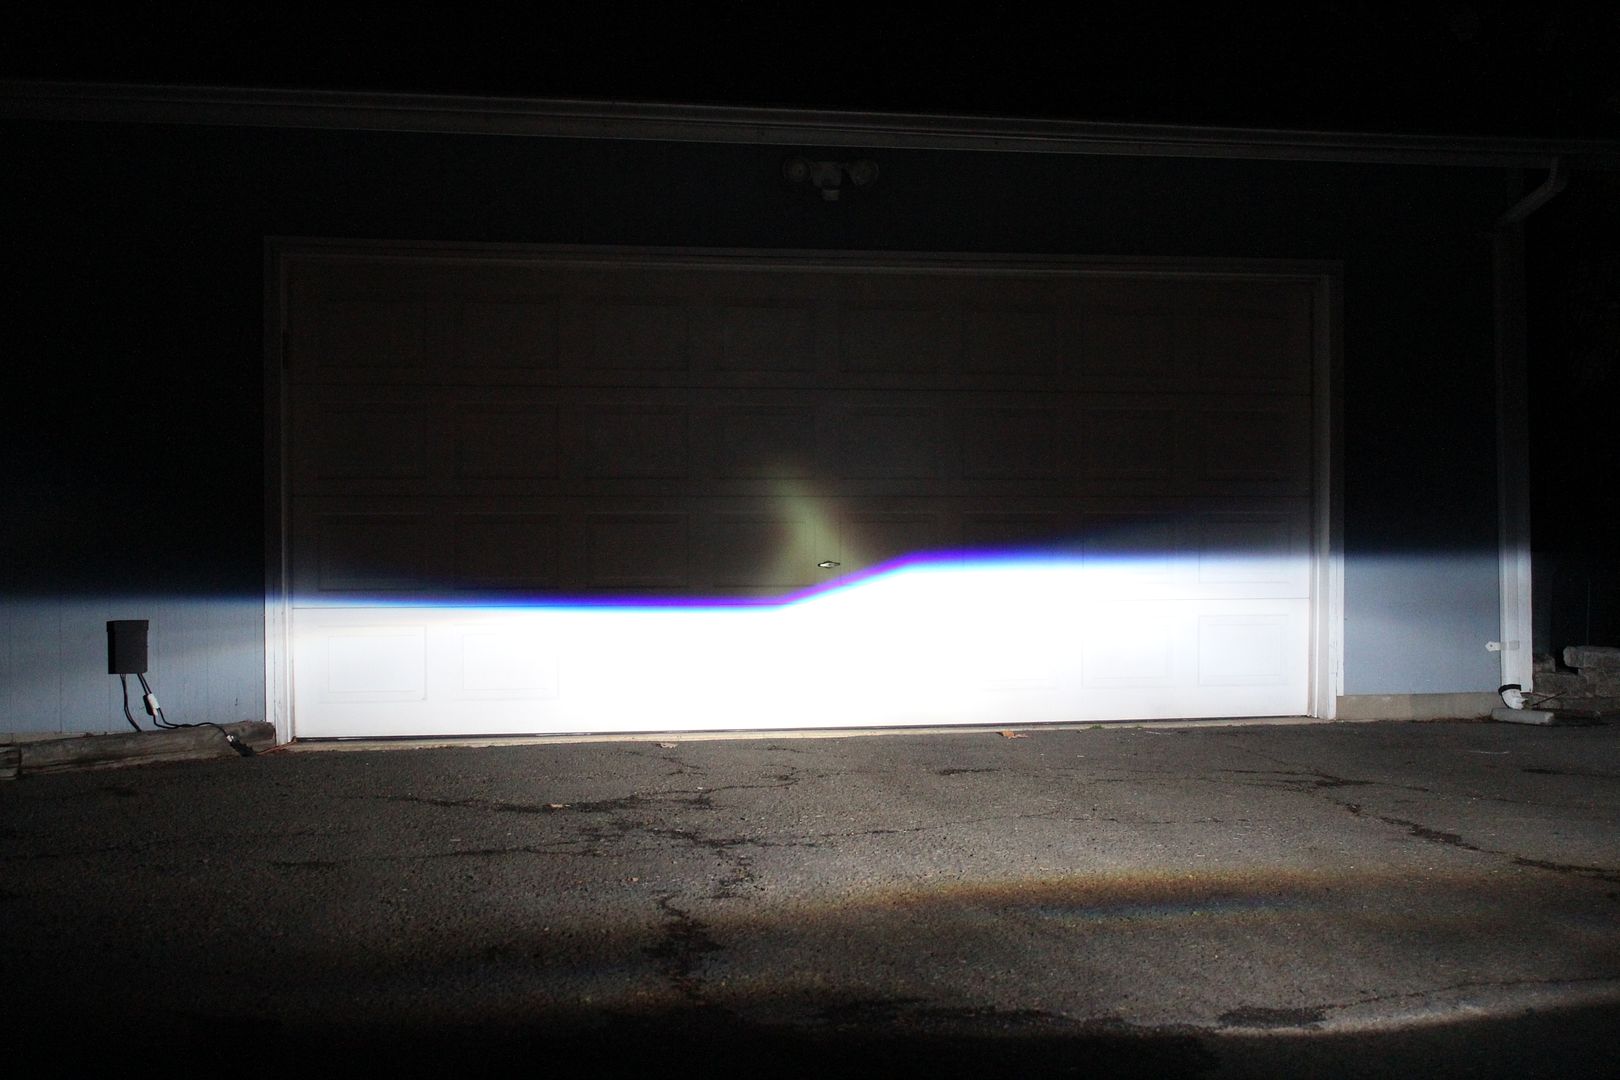
-The headlights have been a PITA to date. The mounting means are bleh, and the output is equally as bleh. The cutoff on the Hella 60mm projectors has a severe cutoff. It doesn't look too bad in this picture, but when driving down the road its very visible.
http://www.flickr.com/photos/54578570@N03/6786478001/
This is what a TSX projector looks like, which is one of the top three projectors available-

For perspective.....the Hella cutoff is ~ 6-7" whereas the TSX cutoff is ~ 3-4". It's noticeable. I'm contemplating going back to an OEM style housing with halogen bulb in it.
http://www.flickr.com/photos/54578570@N03/8333786632/
-Next on my wish list would be to repair my drivers seat. I have a couple rips/tears in it. One thought was to source a used OEM seat cover and patch in the damaged areas. That seems stupid since the OEM seats are vinyl/leatherette. It would cost me ~$2xx to source used covers that need to be patched in, or I could get both re-covered in leather for $340. Ultimately I would like to make the interior more black, with tan accents. So if I got the seats recovered, I'd definitely go with an all black seat cover. I'd then get the rear seats recovered at a later date for an additional $175.
http://www.flickr.com/photos/54578570@N03/8299631895/http://www.flickr.com/photos/54578570@N03/8300681798/
That's it for now. I need to re-group financially from Christmas and then get back it. I hope everyone enjoys their New Years Day!
Nothing real to report on the car. I came to a point where I wanted to just clean the car up and sell it. I had a pipe dream of me buying a 4door sedan and modding it. I saw a nice CTSV V1 for sale and thought about myself driving it. I was just pondering that I am in a different phase right now and wanted something more luxury sport. Then reality sets in and I realize that my car isn't worth much to anybody, and that I wouldn't even get half of what I put into the car. So that began to steer me back to reality.
Now that the new year is among us, I wanted to work on the car some and see if I have a new found love for it. Here are the plans for the car in the next couple of months:
-Buy some Lamin-X and smoke out the fog lights and use the remainder of the material on the 3rd brake light. The VHT nite shades looks 'O.K.' for now, but the gunsmoke Lamin-X looks a lot better. We're talking less than $20 for a universal sized sheet.
Before:
http://www.flickr.com/photos/54578570@N03/5192321409/
Photoshop After:
http://www.flickr.com/photos/54578570@N03/8090543073/
-The headlights have been a PITA to date. The mounting means are bleh, and the output is equally as bleh. The cutoff on the Hella 60mm projectors has a severe cutoff. It doesn't look too bad in this picture, but when driving down the road its very visible.
http://www.flickr.com/photos/54578570@N03/6786478001/
This is what a TSX projector looks like, which is one of the top three projectors available-
For perspective.....the Hella cutoff is ~ 6-7" whereas the TSX cutoff is ~ 3-4". It's noticeable. I'm contemplating going back to an OEM style housing with halogen bulb in it.
http://www.flickr.com/photos/54578570@N03/8333786632/
-Next on my wish list would be to repair my drivers seat. I have a couple rips/tears in it. One thought was to source a used OEM seat cover and patch in the damaged areas. That seems stupid since the OEM seats are vinyl/leatherette. It would cost me ~$2xx to source used covers that need to be patched in, or I could get both re-covered in leather for $340. Ultimately I would like to make the interior more black, with tan accents. So if I got the seats recovered, I'd definitely go with an all black seat cover. I'd then get the rear seats recovered at a later date for an additional $175.
http://www.flickr.com/photos/54578570@N03/8299631895/http://www.flickr.com/photos/54578570@N03/8300681798/
That's it for now. I need to re-group financially from Christmas and then get back it. I hope everyone enjoys their New Years Day!
01-05-2013, 06:23 AM
#27
I finally got around to aiming these projector headlights. I knew something was wrong. The headlights were aimed improperly last time and substantially LOW. No wonder the output was poor. I'll keep these on the car for the time being and focus on other projects.


 01-06-2013, 03:58 PM
#30
One thing that always bothered me on 4th gen f-bodies, was the fact that the ugly PCM was in plain sight. As you can see, the PCM is rather ugly.....

So I got some aluminum and copied this from YoFab.....

And here is my finished product.....


MUCH cleaner!!!!
So I got some aluminum and copied this from YoFab.....
And here is my finished product.....
MUCH cleaner!!!!
Last edited by White.Lightning; 01-06-2013 at 04:08 PM.
 good job
01-21-2013, 10:28 AM
good job
01-21-2013, 10:28 AM
#32
Question for everybody. I want to paint the under body of this car. I'd remove the exhaust, rear end, transmission, etc. Besides a spray gun with basecoat/clearcoat, what are my other options?
I thought about something like Rust Oleum semi gloss black, or POR15. Something that could be rolled/brushed on.
What have others done?
What type paint?
How was it applied?
I thought about something like Rust Oleum semi gloss black, or POR15. Something that could be rolled/brushed on.
What have others done?
What type paint?
How was it applied?
03-06-2013, 12:10 PM
#33
Well, not much to update on my hot rods account. I recently did the following routine maintenance items:
-Checked for burnt out bulbs throughout
-Checked tire pressure
-Re-installed the spare tire (see amp relocation below)
-Siphoned the brake/clutch/power steering reservoirs and put new/fresh fluid in there
-Started disassembling my steering column. Apparently four (4) E8 torx bolts loosen over time and there is 'slop' as a result. Some red loctite and a few days labor will fix that
Once the steering column is buttoned back up, I plan to tackle:
-Amp relocation- used to be in the spare tire well....need to make a quick mount for it
-FULL detail- clay, machine compound, machine polish, hand wax, etc....need temps a bit higher
There's probably more I wanted to do. I have a small list at home that I keep nipping at.
 03-18-2013, 02:40 PM
#35
Nothing to report.....I hit a couple of roadblocks on projects noted above.
-I ended up reinstalling the amp where the spare tire was. I started fabbing an amp rack for the rear wall of the t-top cubby, but wasn't happy with the result. I tried mimicking the Subthump amp rack.
-I got the steering column 85% disassembled and couldn't get past a certain point. Before I broke anything, I put it all back together. The 'slop' is still there. I'll save that project for another day. Haha.
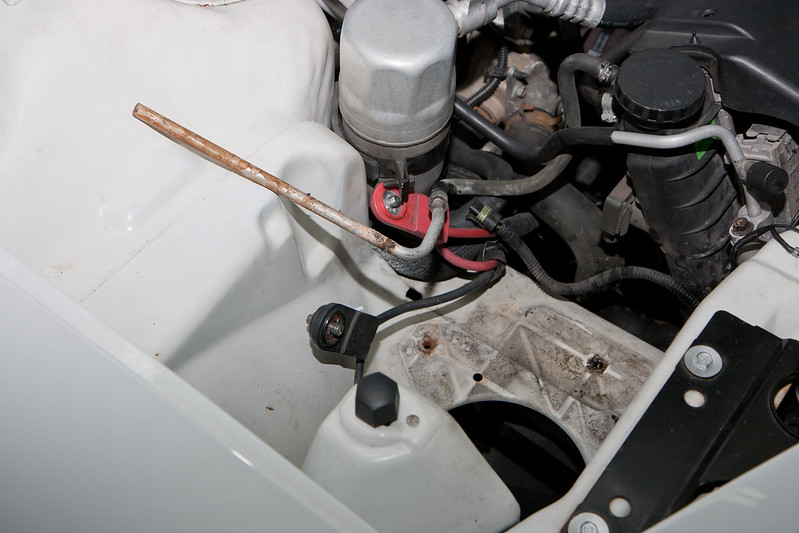
A bolt was stripped on my battery tray/coolant overflow tank so I pulled it to assess what was going on


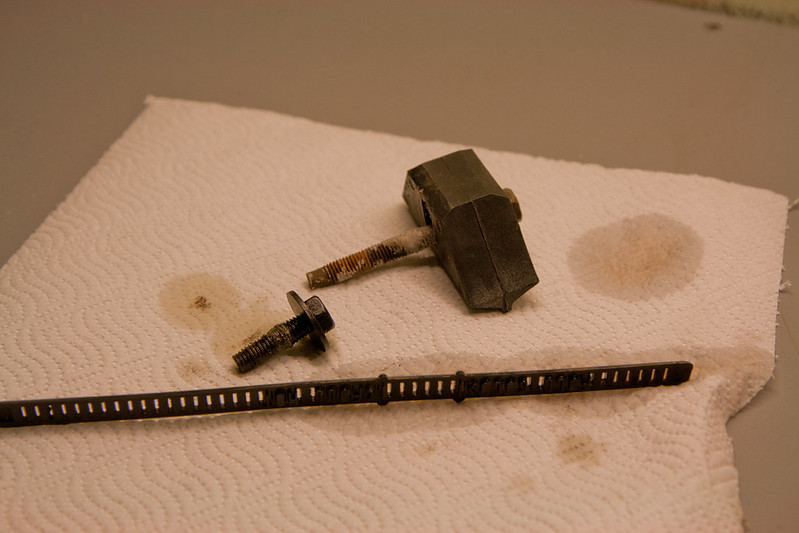
As you can see, the bolt was fubarred. Also, the front 'edge' is broken that holds the battery in the tray. I used a 1/4-20 bolt mounted upside down through the sheet metal. Then I put the OEM battery holder clip down, and used a 1/4-20 nut. It at least holds the battery in some what. Before, the battery would flop around while driving.
I cleaned up underneath the tray too. It was pretty dirty under there for being 15 years old. The tray itself was wet. The battery did not appear to be cracked. I am assuming its from the battery flopping around on the tray and water/fluid escaping from the battery caps. An optima or vented battery, relocated to the rear cubby is on my bucket list.
-I ended up reinstalling the amp where the spare tire was. I started fabbing an amp rack for the rear wall of the t-top cubby, but wasn't happy with the result. I tried mimicking the Subthump amp rack.
-I got the steering column 85% disassembled and couldn't get past a certain point. Before I broke anything, I put it all back together. The 'slop' is still there. I'll save that project for another day. Haha.
A bolt was stripped on my battery tray/coolant overflow tank so I pulled it to assess what was going on
As you can see, the bolt was fubarred. Also, the front 'edge' is broken that holds the battery in the tray. I used a 1/4-20 bolt mounted upside down through the sheet metal. Then I put the OEM battery holder clip down, and used a 1/4-20 nut. It at least holds the battery in some what. Before, the battery would flop around while driving.
I cleaned up underneath the tray too. It was pretty dirty under there for being 15 years old. The tray itself was wet. The battery did not appear to be cracked. I am assuming its from the battery flopping around on the tray and water/fluid escaping from the battery caps. An optima or vented battery, relocated to the rear cubby is on my bucket list.
03-30-2013, 12:45 PM
#37
i cant hear the vid hear at work. so whats involved in fixing this? my car does the same thing...worse than yours if i pull down on it like that. side to side has a little aswell. didnt know there was a correction for it...have a link to the fix?
03-31-2013, 07:34 AM
#39
I've been referencing the following threads/links which all share similar information:
1. https://ls1tech.com/forums/general-m...ew-tricks.html
2. https://ls1tech.com/forums/general-m...mn-repair.html
3. https://ls1tech.com/forums/general-m...oval-pics.html
4. http://www.crankshaftcoalition.com/w...ck_Rebuild.pdf
5. http://www.superchevy.com/tech/sucp_...n/viewall.html
6. http://www.chevyasylum.com/column/tiltcol.html
I still have mine taken apart right now. Once it's back together I'll let you know if I fixed it, and what the issue was.
03-31-2013, 07:53 AM
#40
Question for anyone who has done this before. When I got to the 'lower housing assembly', I was expecting to find four (4) E8 external torx bolts. I found these instead.......
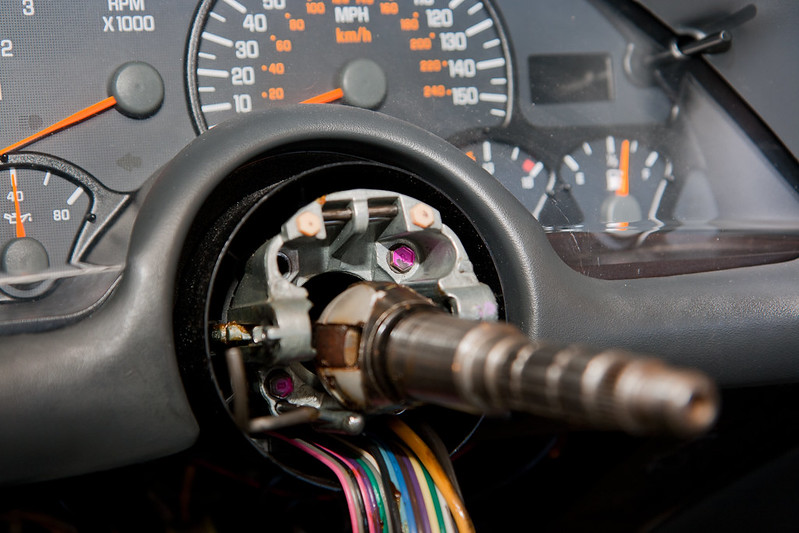
Yes, I had removed one in the picture, it was not missing. So I took these out and applied loctite to them. Before I put everything back together, should I look into sourcing the E8 torx bolts that are 'supposed' to be in there?
I'm thinking someone replaced these at one point, or my 1998 Pontiac steering column differed from all other GM steering columns.