


2001 RCSB GT-42 Build
Thread Starter
TECH Senior Member
iTrader: (8)
Joined: Jan 2007
Posts: 13,845
Likes: 0
From: Here and sometimes there too.
It's me again!!!  Well I'm back at it, can't say I just started working on it because I've been chipping away at it from time to time but here's a quick run-down of the what I have and what I'm doing.
Hopefully, I should have it finished in a couple months. I have most everything I need, just waiting on a few key parts.
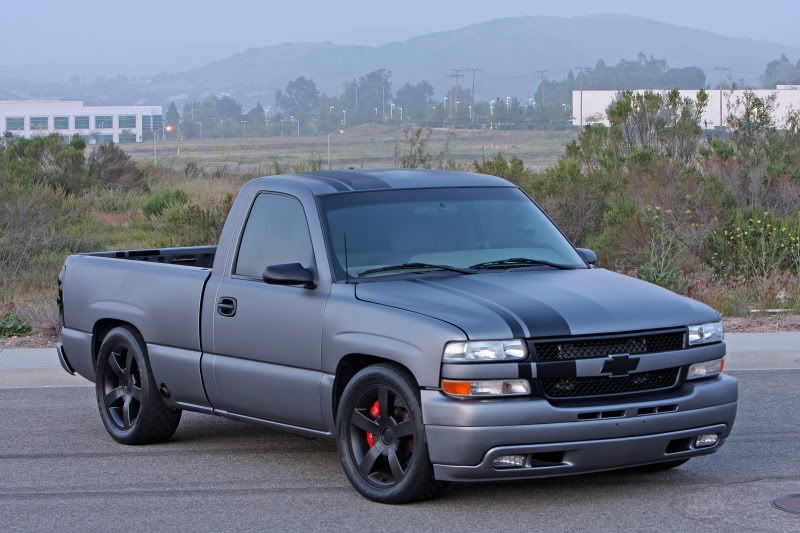
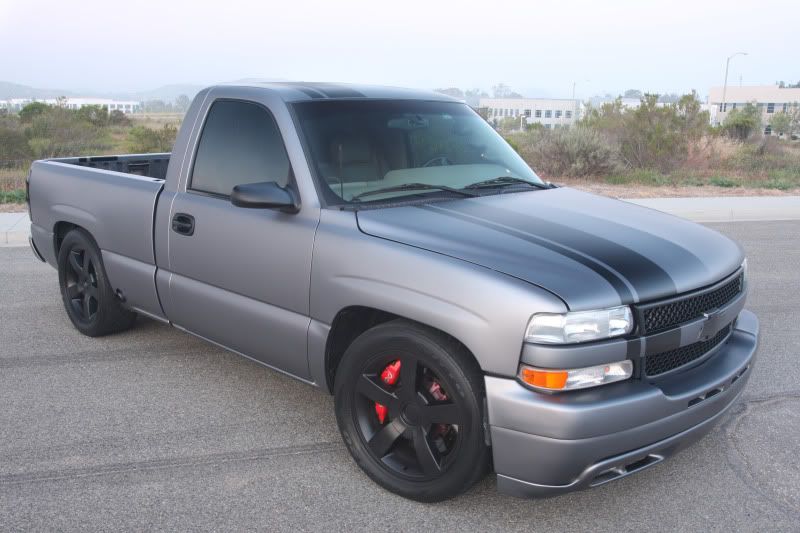
First off here's the truck...
It's a 2001 Regular Cab Short Bed Chevy Silverado. It has a 3/5 drop, HD front end conversion, custom flat/satin paint job, powder coated SSS rims, Massive Wilwood brakes, and a few other things!
Here's a quick vid of when it was an N/A truck...
http://www.youtube.com/watch?v=0dw0x_PlUUE
So after a year of being N/A, I'm now putting a snail back on it. I bought this custom built turbo kit from a member on here (CurtD), the quality and design of the kit were fantastic and couldn't resist buying it from him.
Here's some pics of the passenger side manifold...
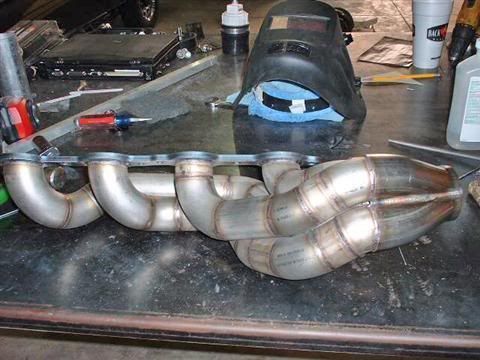
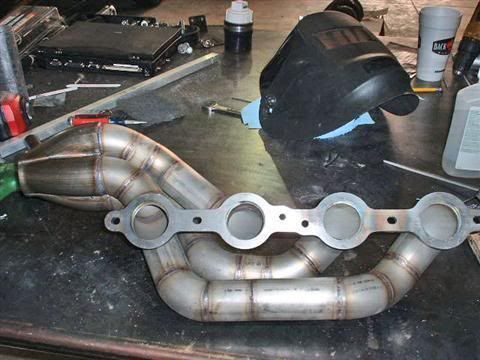
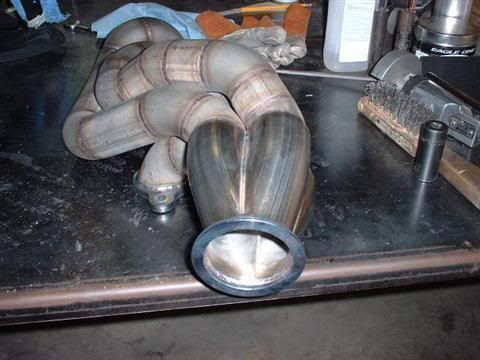
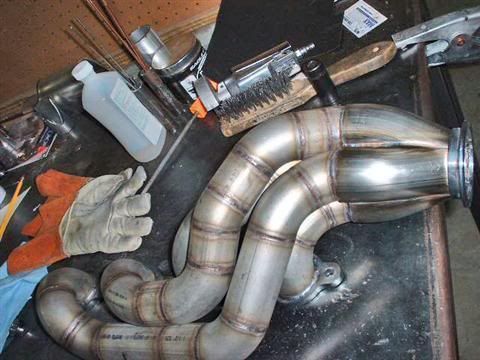
The Driver's side manifold...
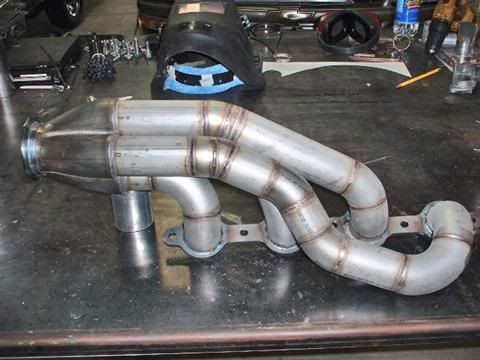
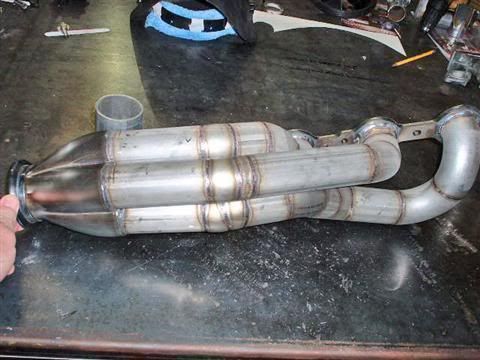

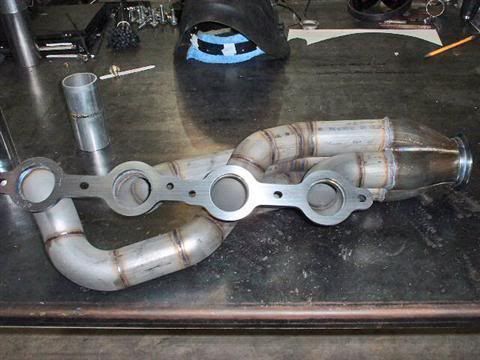
Here they are mocked up in Curt's old truck...
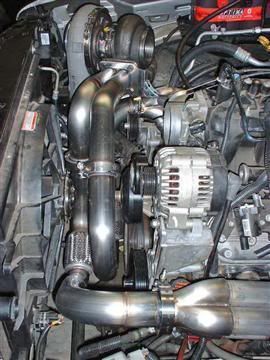
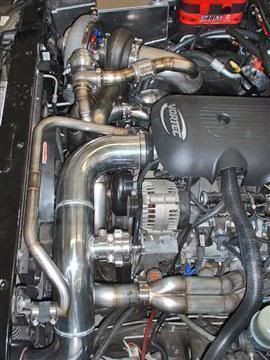
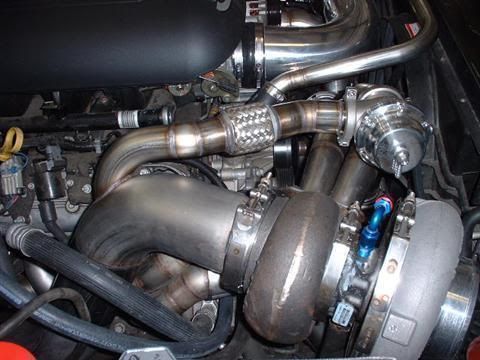
Turbo specs are...
GT-42/02
T 4 Flange
110 AR
102 X Deucer
Motor specs are gonna be...
365ci LQ9
Custom pistons and rods
Trick heads
Edelbrock Pro Flo intake
And other misc go fast parts.
I'll post pics of the motor later as right now I'm still doing some prep work getting the frame ready for it.
Well I'm back at it, can't say I just started working on it because I've been chipping away at it from time to time but here's a quick run-down of the what I have and what I'm doing.Hopefully, I should have it finished in a couple months. I have most everything I need, just waiting on a few key parts.
First off here's the truck...
It's a 2001 Regular Cab Short Bed Chevy Silverado. It has a 3/5 drop, HD front end conversion, custom flat/satin paint job, powder coated SSS rims, Massive Wilwood brakes, and a few other things!
Here's a quick vid of when it was an N/A truck...
http://www.youtube.com/watch?v=0dw0x_PlUUE
So after a year of being N/A, I'm now putting a snail back on it.
I bought this custom built turbo kit from a member on here (CurtD), the quality and design of the kit were fantastic and couldn't resist buying it from him. Here's some pics of the passenger side manifold...
The Driver's side manifold...
Here they are mocked up in Curt's old truck...
Turbo specs are...
GT-42/02
T 4 Flange
110 AR
102 X Deucer
Motor specs are gonna be...
365ci LQ9
Custom pistons and rods
Trick heads
Edelbrock Pro Flo intake
And other misc go fast parts.
I'll post pics of the motor later as right now I'm still doing some prep work getting the frame ready for it.
Thread Starter
TECH Senior Member
iTrader: (8)
Joined: Jan 2007
Posts: 13,845
Likes: 0
From: Here and sometimes there too.
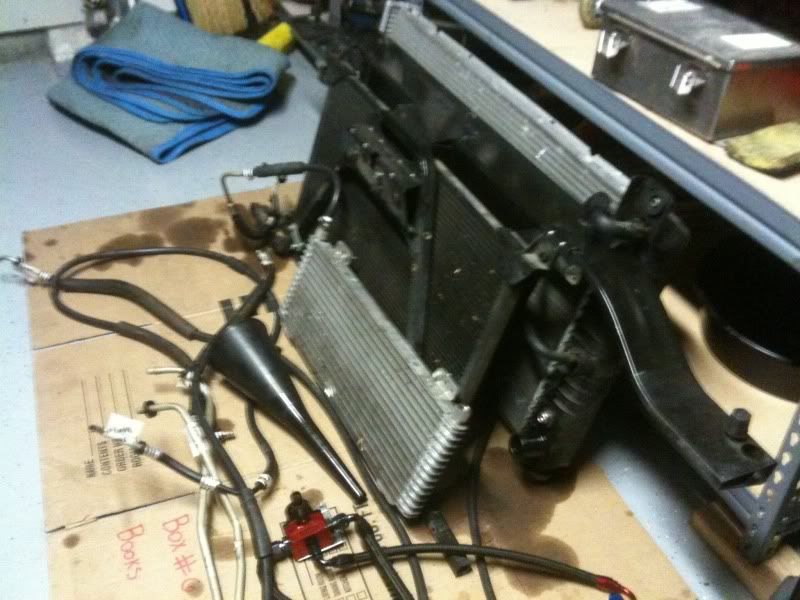
Here's some pics of when I started tearing things apart...
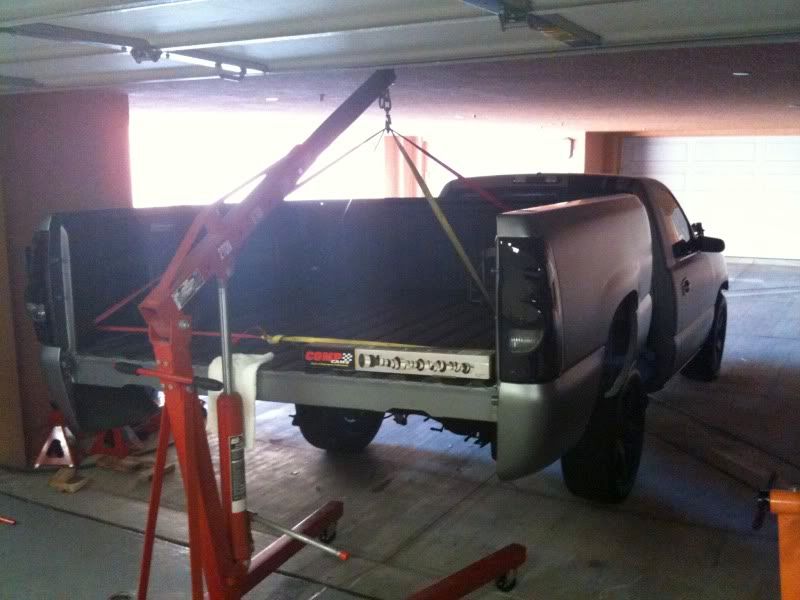
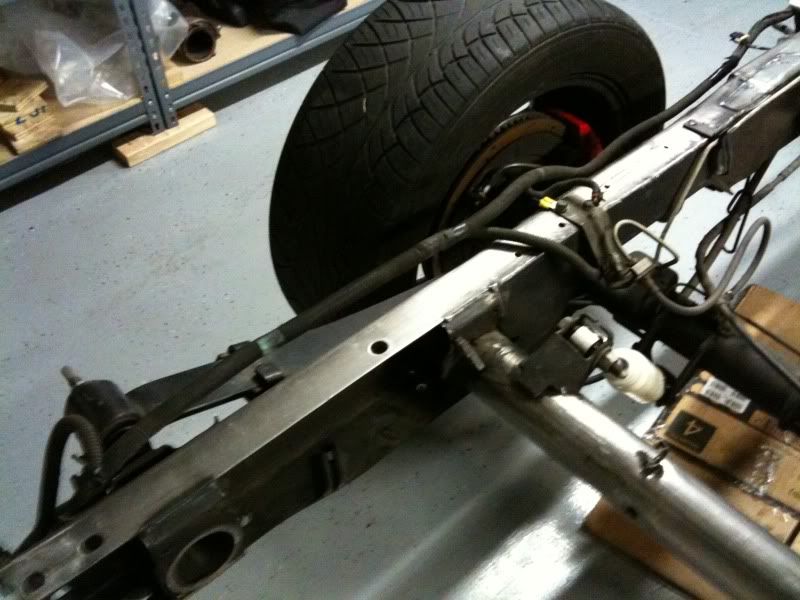
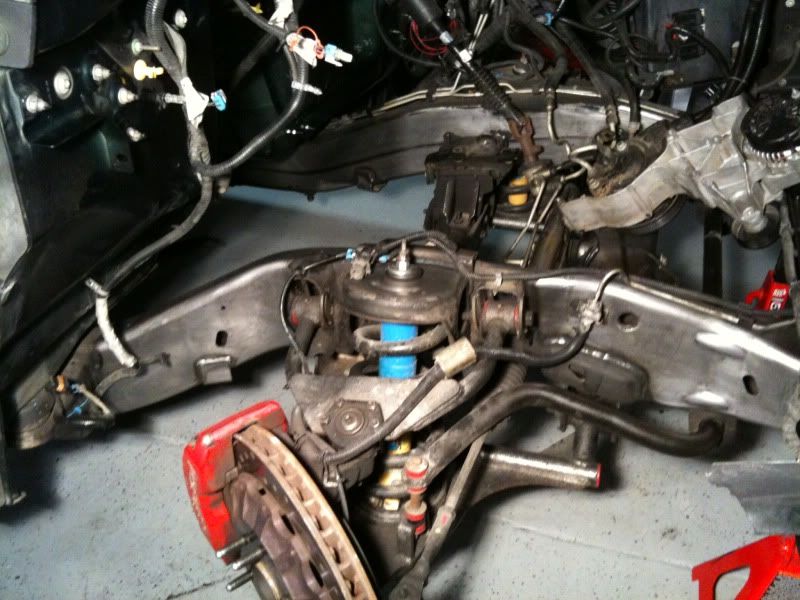
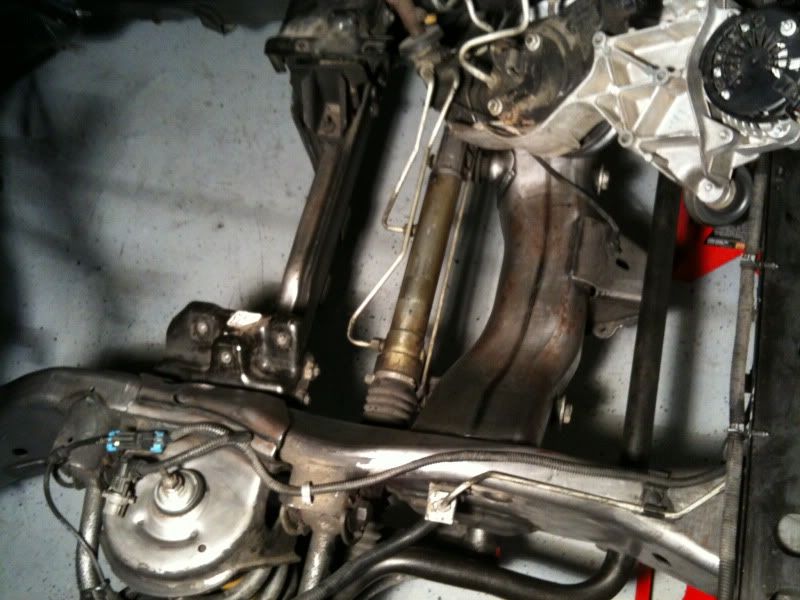
Pulled the whole front end off so I would have lots of room to work with...
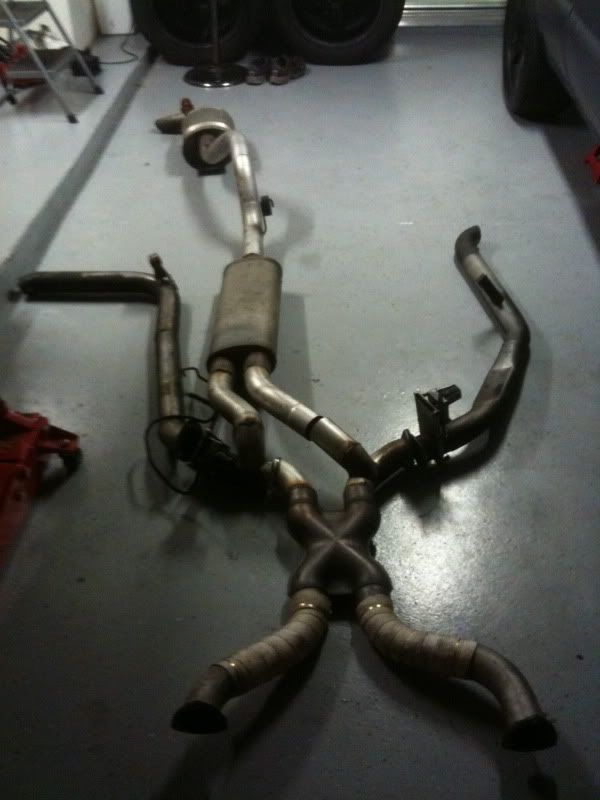
My old Crazy exhaust! That is now going bye bye! :wave:
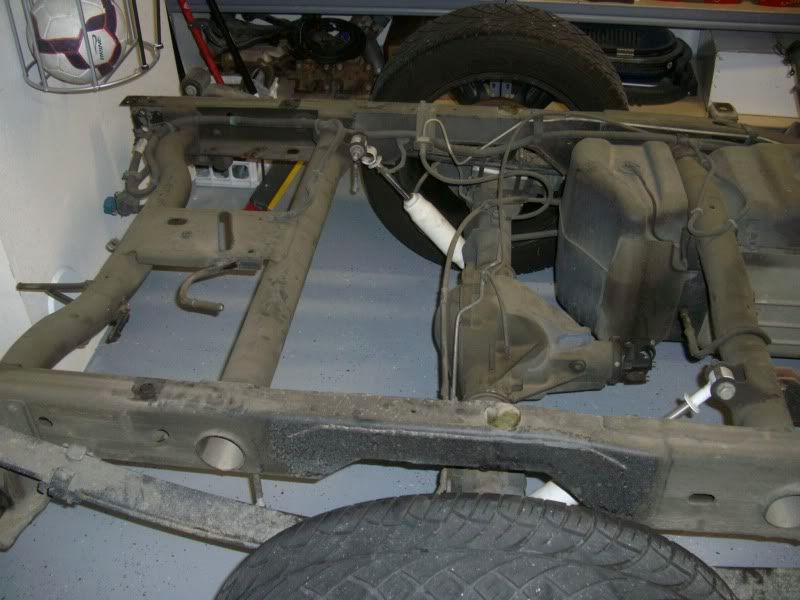
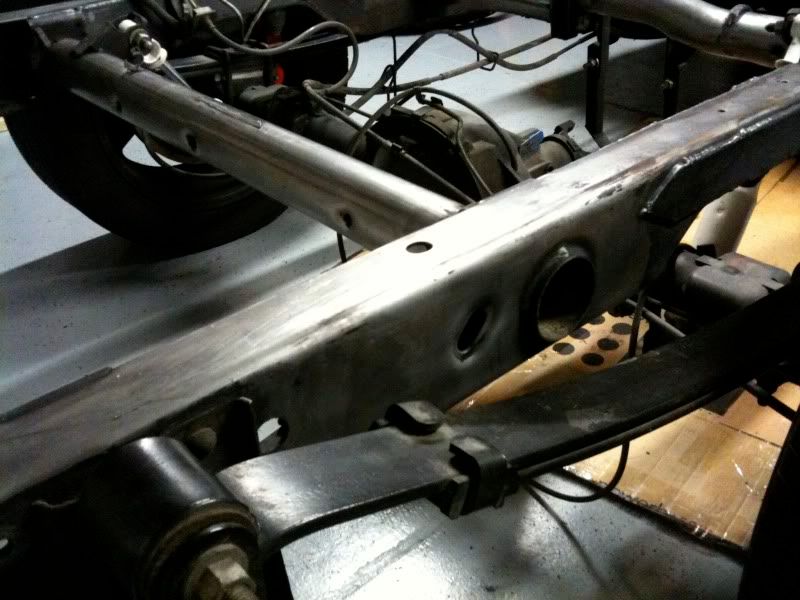
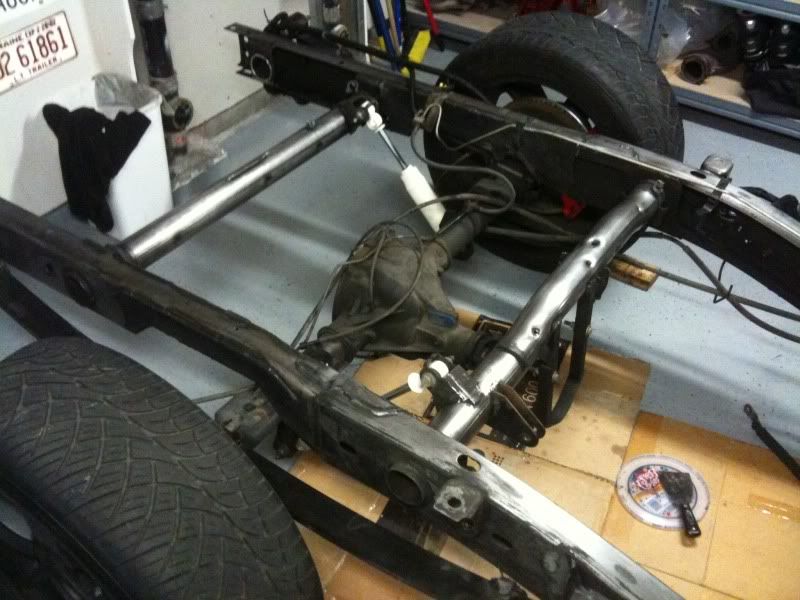
This was what my rear frame looked like, I hated it because the wax got so ridiculously dirty and it made working under the truck a complete nightmare...
So recently I've been stripping it, I'm sure there's a handful of ways to do it but the method that I ended up using was...
-Jusco Paint/Epoxy stripper (Credit due to Lee "SLOXCAB" for coming up with that idea)
-Paint Brush
-Scrapper
-Brillo pad
-Squirt bottle full of 91 Octane gas.
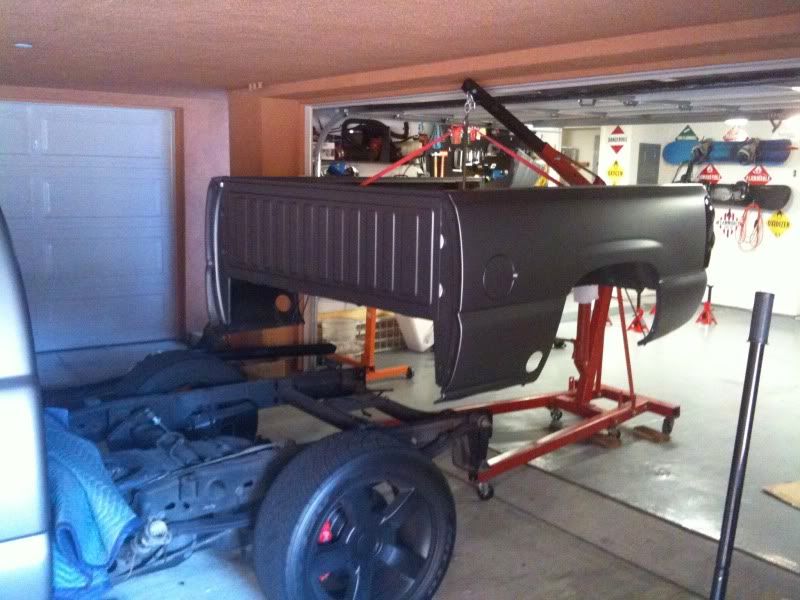
This is what it looks like right now...
Note of warning, the Paint/Epoxy remover will eat through anything not metal so don't touch anything else, such as wiring harness, clips, body of the truck, etc... Here's what it did the the plastic container I had initially used, I did not think it would eat it as fast as it did but it melted it in about 15-20 minutes.
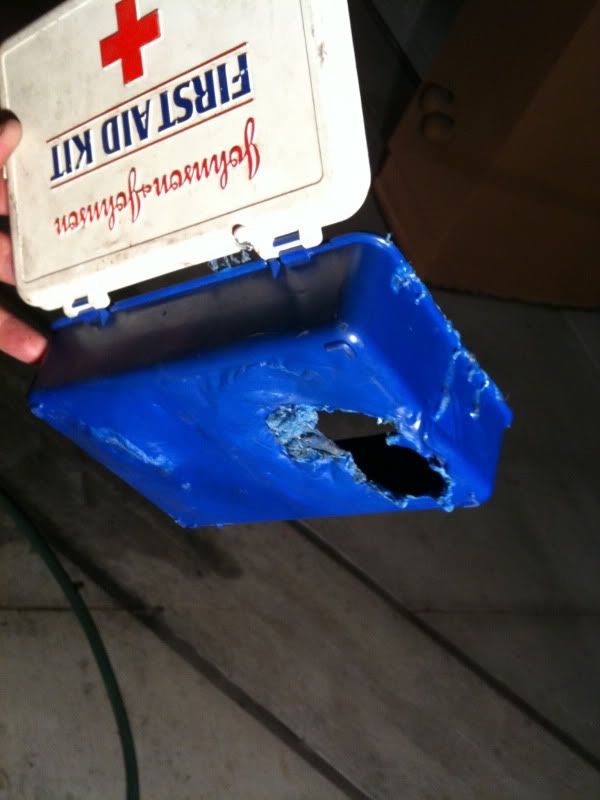
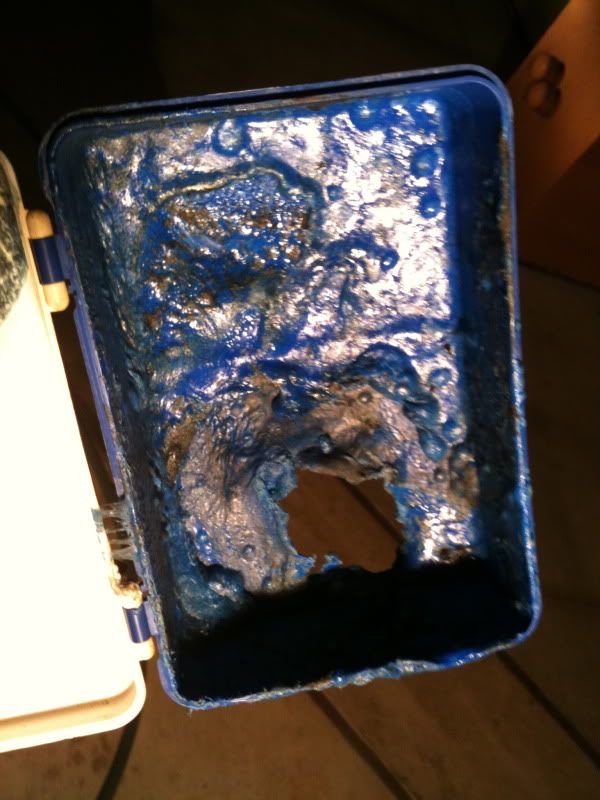
(Safety first right!! It was about as much use as that first aid kit ever got)
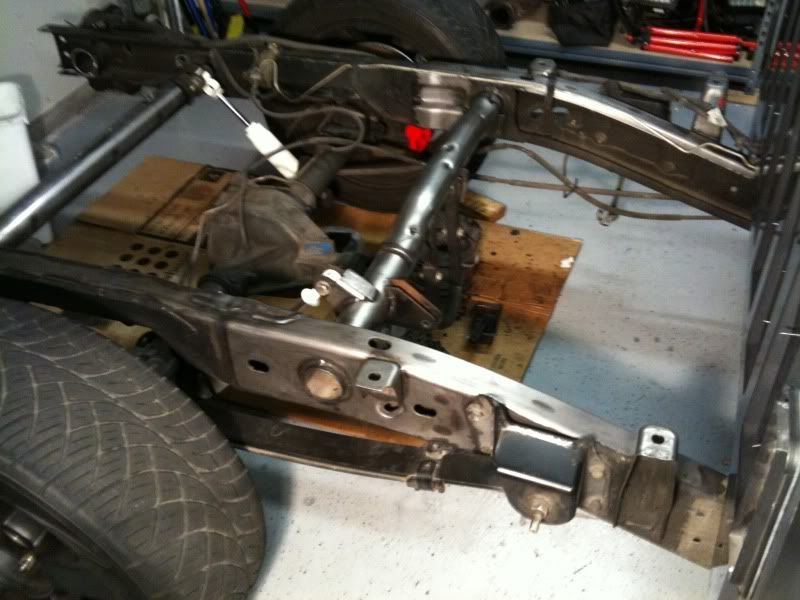
I pulled out and threw away the stock gas tank and had a custom one made. I also ripped out the stock front hangers, cross-member that supported the gas tank as well as the rear cross member that used to support the spare tire.
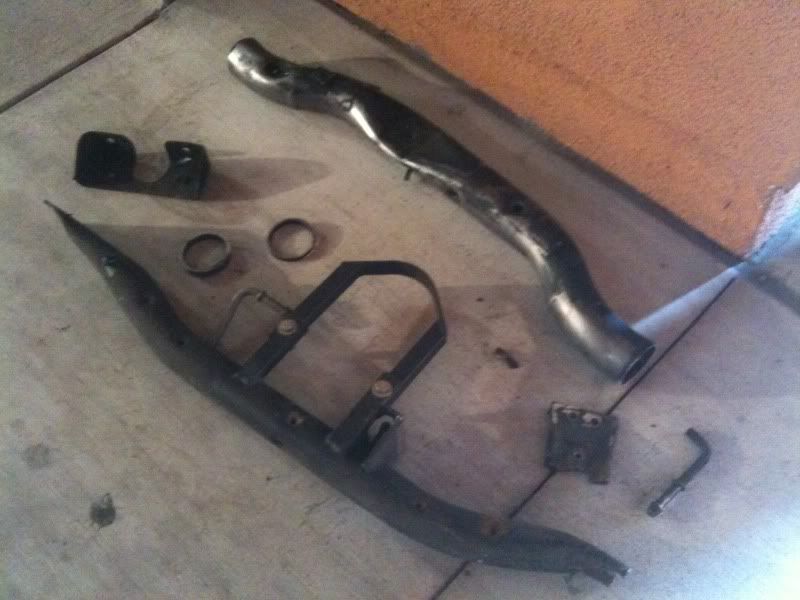
I had not initially planned on removing the rear-most cross member, but clearance issues required me to modify it and in the end I got a little carried away with the sawzall and grinder.
My justification, (if it's even valid at this point) is that the bumper in a sense acts as an additional crossmember when bolted up between the frame rails. Also this truck does not tow as it has no tow package right now, nor do I use it to haul 2000lbs of cement on a daily basis.
Anyone have any opinions on this? I could box the frame rails or just weld that crossmember back in but facing the other way if need be but I don't think it will be necessary, yet at least.
I still have a little bit of de-waxing do up in the engine bay but I should be painting it tomorrow if all goes well.
Pulled the whole front end off so I would have lots of room to work with...
My old Crazy exhaust!
That is now going bye bye! :wave:This was what my rear frame looked like, I hated it because the wax got so ridiculously dirty and it made working under the truck a complete nightmare...
So recently I've been stripping it, I'm sure there's a handful of ways to do it but the method that I ended up using was...
-Jusco Paint/Epoxy stripper (Credit due to Lee "SLOXCAB" for coming up with that idea)
-Paint Brush
-Scrapper
-Brillo pad
-Squirt bottle full of 91 Octane gas.
This is what it looks like right now...
Note of warning, the Paint/Epoxy remover will eat through anything not metal so don't touch anything else, such as wiring harness, clips, body of the truck, etc... Here's what it did the the plastic container I had initially used, I did not think it would eat it as fast as it did but it melted it in about 15-20 minutes.
(Safety first right!!
It was about as much use as that first aid kit ever got)I pulled out and threw away the stock gas tank and had a custom one made. I also ripped out the stock front hangers, cross-member that supported the gas tank as well as the rear cross member that used to support the spare tire.
I had not initially planned on removing the rear-most cross member, but clearance issues required me to modify it and in the end I got a little carried away with the sawzall and grinder.
My justification, (if it's even valid at this point) is that the bumper in a sense acts as an additional crossmember when bolted up between the frame rails. Also this truck does not tow as it has no tow package right now, nor do I use it to haul 2000lbs of cement on a daily basis.
Anyone have any opinions on this? I could box the frame rails or just weld that crossmember back in but facing the other way if need be but I don't think it will be necessary, yet at least.
I still have a little bit of de-waxing do up in the engine bay but I should be painting it tomorrow if all goes well.
Thread Starter
TECH Senior Member
iTrader: (8)
Joined: Jan 2007
Posts: 13,845
Likes: 0
From: Here and sometimes there too.
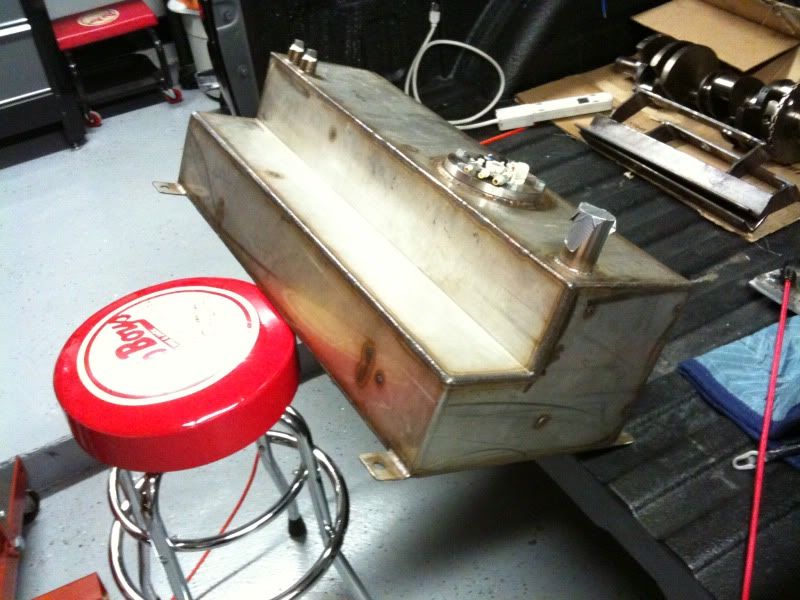
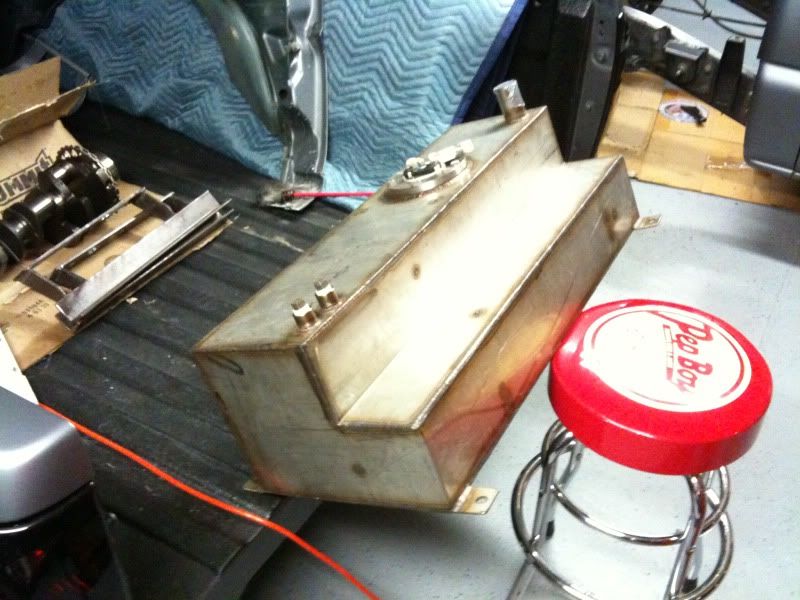
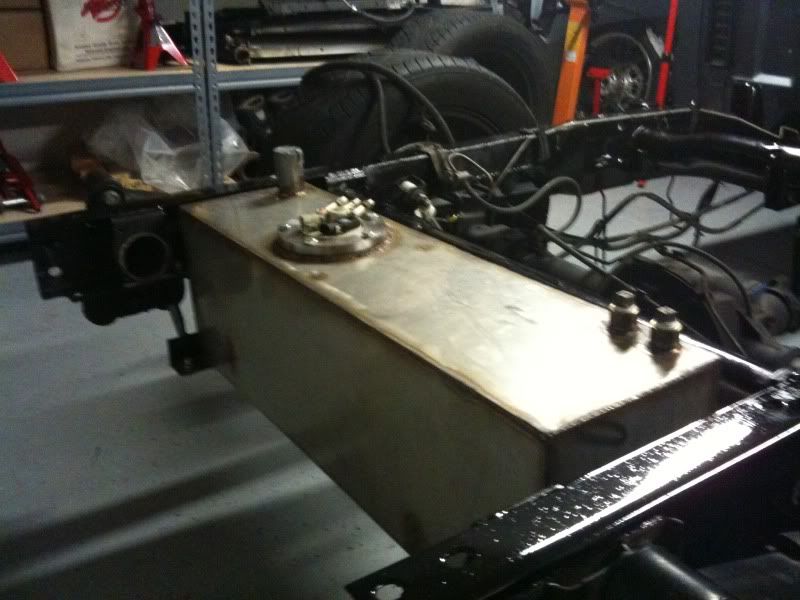
Here's a couple pics of my new gas tank. It's made out of Stainless Steel and it's 32" long x 10" tall and 14" wide. It's sumped and baffled and holds about +/- 21 gallons.
Thread Starter
TECH Senior Member
iTrader: (8)
Joined: Jan 2007
Posts: 13,845
Likes: 0
From: Here and sometimes there too.
I bought them like 4 years ago and I think the Big Brake Kit goes for $4500 from their dealers. Not a cheap purchase by any stretch!!
Thanks! I wish I could take the credit for building them but my welding skills are FAR beneath that!!!
 Thanks! Looking forward to getting it back up and running.
 Trending Topics
LS1 Tech Stories
The Best V8 Stories One Small Block at Time

6 Common C5 Corvette Failures and What's Involved In Repairing Them
Pouria Savadkouei
Retro Modern Bandit Pontiac Trans AM Comes With Burt Reynolds' Autograph
Verdad Gallardo
Top 10 Greatest Cadillac V Series Performance Models Ever, Ranked
Pouria Savadkouei
Top 10 Most Powerful Chevy Trucks Ever Made!

Hennessey's New Supercharged Silverado ZR2 Has 700 HP
Verdad Gallardo
Coachbuilt N2A Anteros Is an LS2-Powered C6 Corvette In Italian Clothes
Verdad Gallardo
Awesome K5 Blazer Restomod Comes With C7 Corvette Power
Verdad Gallardo
10 Camaros You Should Never Buy

10 LS Engine Myths That Refuse to Die
Verdad Gallardo
That's cool man! I bought Curt's old black truck your kit was on and I also have Curt's new white truck at my shop doing a NA 408 install on it. The black truck is getting a FI setup back on it. What pump and such are you doing on the fuel side?
Thread Starter
TECH Senior Member
iTrader: (8)
Joined: Jan 2007
Posts: 13,845
Likes: 0
From: Here and sometimes there too.
What are you gonna do with his old black truck? That thing repairable? I mean I know the damage wasn't terrible but there was quite a bit! Can't wait to see what you do with it as well as the white one.
Thread Starter
TECH Senior Member
iTrader: (8)
Joined: Jan 2007
Posts: 13,845
Likes: 0
From: Here and sometimes there too.
Update time, and Holy Sheep Taint am I glad this part of the build is almost over!
I finished stripping the frame on Wednesday, got about 85% of the whole frame stripped which is about 50% more than I had originally wanted to do but I somehow kept finding myself doing more and more.
With the help of a few people (thanks Joseph, Matt, Lee and Jarrett) I was able to locate the elusive POR-15. I think I called 12 different paint shops and none of them knew what the heck I was talking about. But again with the help of some guys I found a place that carried it that was abut 35 minute drive from me. I bought one pint of that stuff and it cost me a cool $50!!! That's the most expensive paint I've ever bought!!
I also some acetone and a pint of Rustoleum flat black for the engine bay. I actually wish I would of done it in Gray so that if I have some oil leak or something in the engine bay it'll be easier to see, but overall I really like the way it turned out. I'll get some better pics on Sunday but for now here's what the firewall looks like...
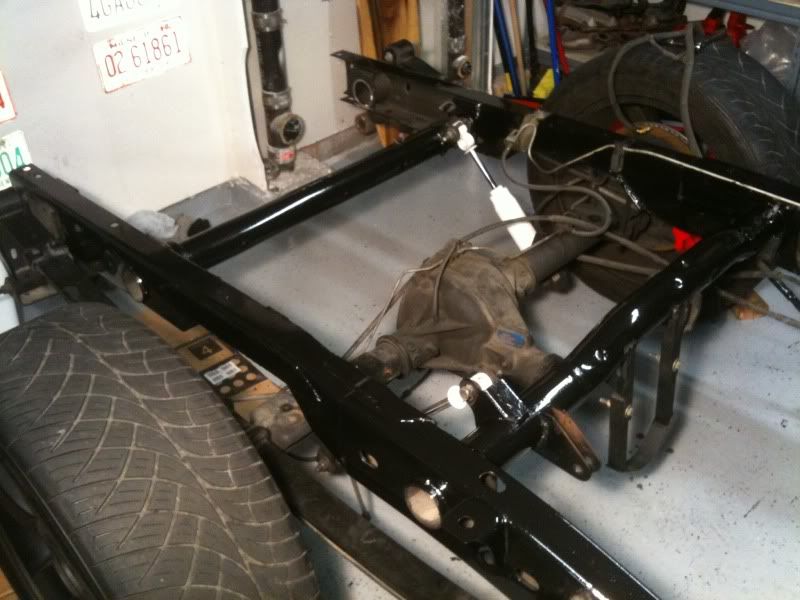
I then turned my attention to the frame and applied that $$ POR-15. I was warned by the people that sold it to me to use gloves and not let ANY of it touch my skin... Well I didn't and I look like a cow right now!! 
Again I'll take some better pics on Sunday but I was able to get the first coat of paint on the frame and it took FOREVER (bout 6 hours). I'm gonna put a second coat on it when I get back from the desert this weekend but this one coat kicked my ***!
BEFORE
AFTER
Engine bay looks really good too now that it's been painted with that POR-15 stuff but I wasn't able to get a picture.
I finished stripping the frame on Wednesday, got about 85% of the whole frame stripped which is about 50% more than I had originally wanted to do but I somehow kept finding myself doing more and more.
With the help of a few people (thanks Joseph, Matt, Lee and Jarrett) I was able to locate the elusive POR-15. I think I called 12 different paint shops and none of them knew what the heck I was talking about. But again with the help of some guys I found a place that carried it that was abut 35 minute drive from me. I bought one pint of that stuff and it cost me a cool $50!!! That's the most expensive paint I've ever bought!!
I also some acetone and a pint of Rustoleum flat black for the engine bay. I actually wish I would of done it in Gray so that if I have some oil leak or something in the engine bay it'll be easier to see, but overall I really like the way it turned out. I'll get some better pics on Sunday but for now here's what the firewall looks like...
I then turned my attention to the frame and applied that $$ POR-15. I was warned by the people that sold it to me to use gloves and not let ANY of it touch my skin...
Well I didn't and I look like a cow right now!! Again I'll take some better pics on Sunday but I was able to get the first coat of paint on the frame and it took FOREVER (bout 6 hours). I'm gonna put a second coat on it when I get back from the desert this weekend but this one coat kicked my ***!
BEFORE
AFTER
Engine bay looks really good too now that it's been painted with that POR-15 stuff but I wasn't able to get a picture.
Thread Starter
TECH Senior Member
iTrader: (8)
Joined: Jan 2007
Posts: 13,845
Likes: 0
From: Here and sometimes there too.
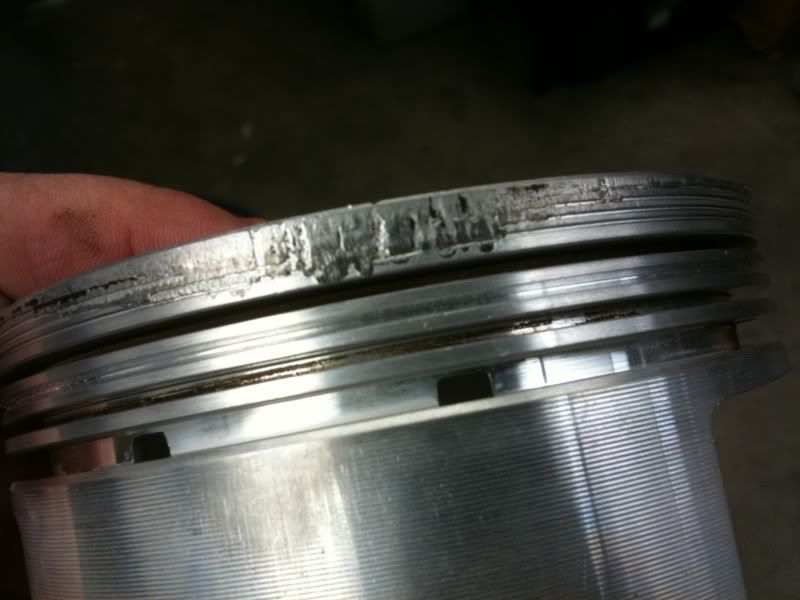
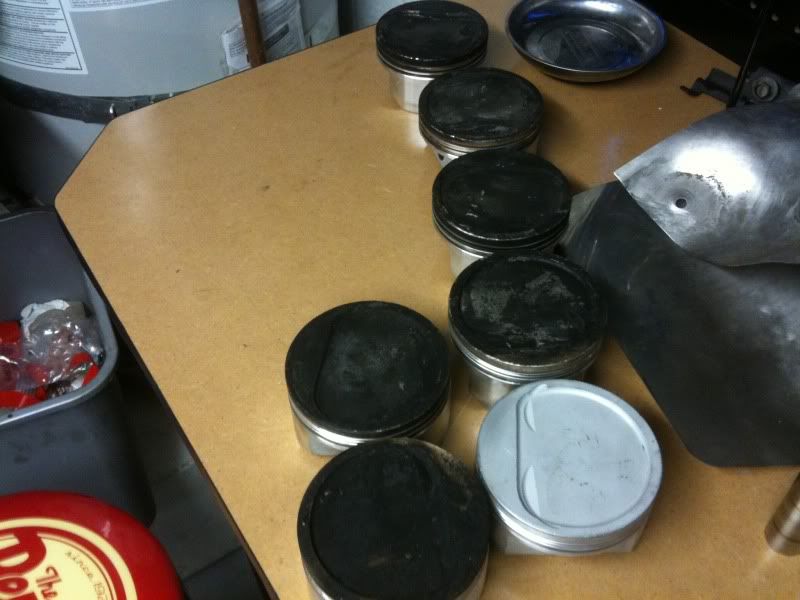
I also got around to disassembling my pistons and rods from my old motor. I had one of the pistons bead blasted by Richard at WCCH and thought I'd share what happened to some of my pistons. I haven't cleaned all of them yet but I think there are four of them like this...
I still have to clean the other 7 but we'll see what they all end up looking like when I get around to cleaning them.
I think I was detonating one whole bank, since I also had 4 intake valves "tulip". Just FYI my old motor was a forged 8.8:1 364ci motor built for boost. It made around 750/750 to the wheels on 18psi. Takes an awful lot to do that to a piston!!
Thread Starter
TECH Senior Member
iTrader: (8)
Joined: Jan 2007
Posts: 13,845
Likes: 0
From: Here and sometimes there too.
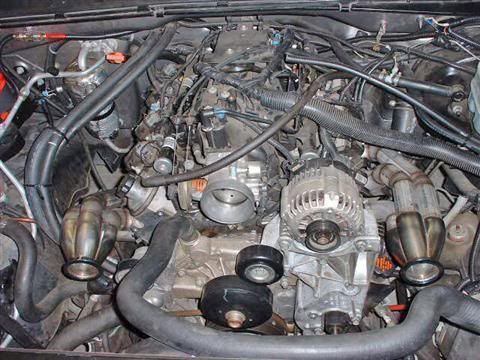
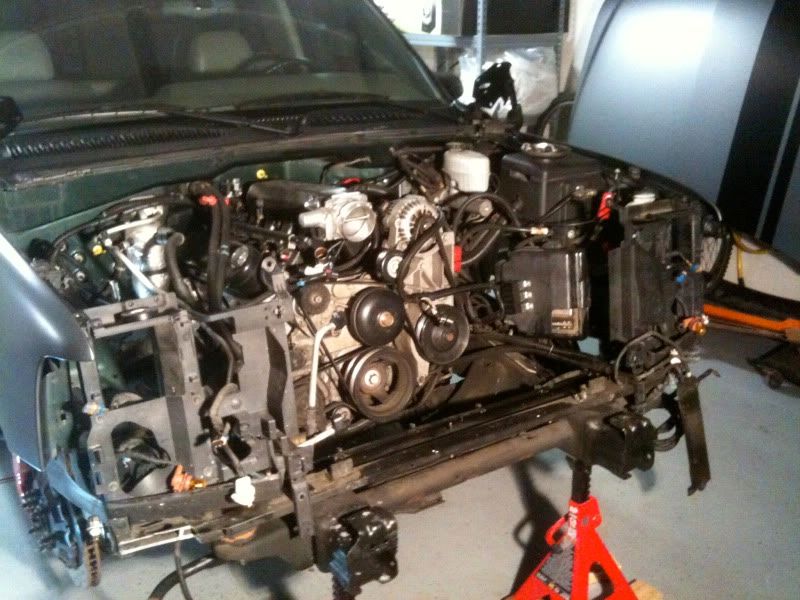
I was able to get a few things accomplished on Sunday, all in all it felt like I took two steps forward and one step back but I was able to drop the engine and transmission in the truck.
Turned out to be a bigger headache than it should of been as I decided to drop them in together rather than one at a time. I've seen people do it before so didn't think it would be that big of a deal since I had the whole front end off, but it didn't turn out that way unfortunately.
First off, here's the motor and tranny...
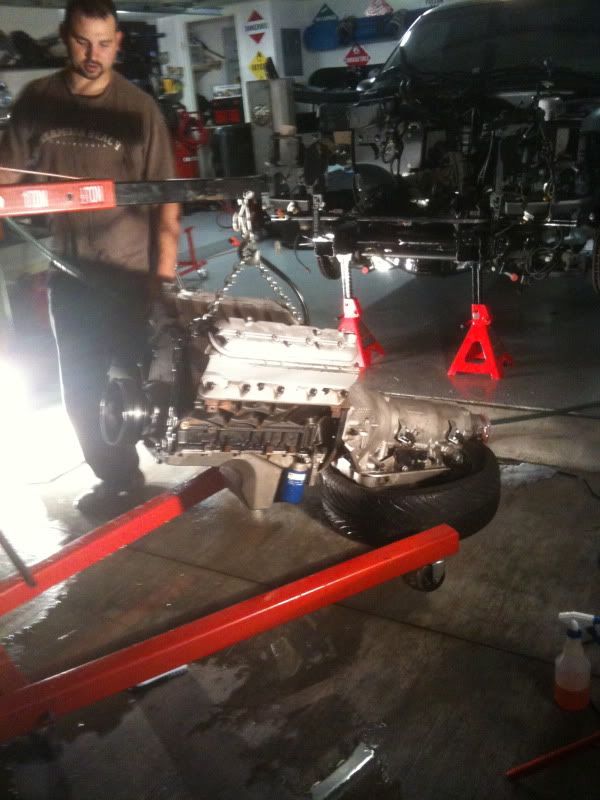
The transmission is the same FLT 4L80-e Lvl-5 that I've been using the last few years.
As far as the motor is concerned, some of you may be familiar with this motor, it's actually stock48 motor out of his 9 second GMC truck. The details of how this came about is a bit complicated but this wasn't the original plan. Unlike most anyone that I've ever dealt with, when some complications arose with the motor he was building for me, instead of running me through the ringer for another couple months until the issues could get ironed out, he offered to sell me his engine as a hold over until my engine is completed and when that motor gets done I have the choice of just keeping his or taking mine. Never really came across anyone who would step up to the plate like that but I'm extremely happy with this turn of events. Stand up guy, no question about it!
Specs on the motor are forged 370, ported 317 heads, custom gas ported forged pistons, comstar rods, isky 215/215 cam and the rest of it I'll just let him explain if necessary. But all in all this motor's reputation kinda speaks for itself!
http://www.youtube.com/watch?v=MwJYPsJfDvE
So the problem that arose was with the cross-member that's just aft of the rack and pinion. No matter what kind of finagling I did I couldn't get the oil pan over it without having the heads hit the firewall. Even pulled the valve covers but to no avail. So instead of separating the two I just pulled that cross-member out and hung the motor in place right above the motor mounts and re-installed the cross-member before dropping the motor onto the mounts. I was a bit reluctant to do it because pulling that cross-member because of what it supports and what's connected to it but all-in-all it turned out alright.
So, with that being said...in it went!
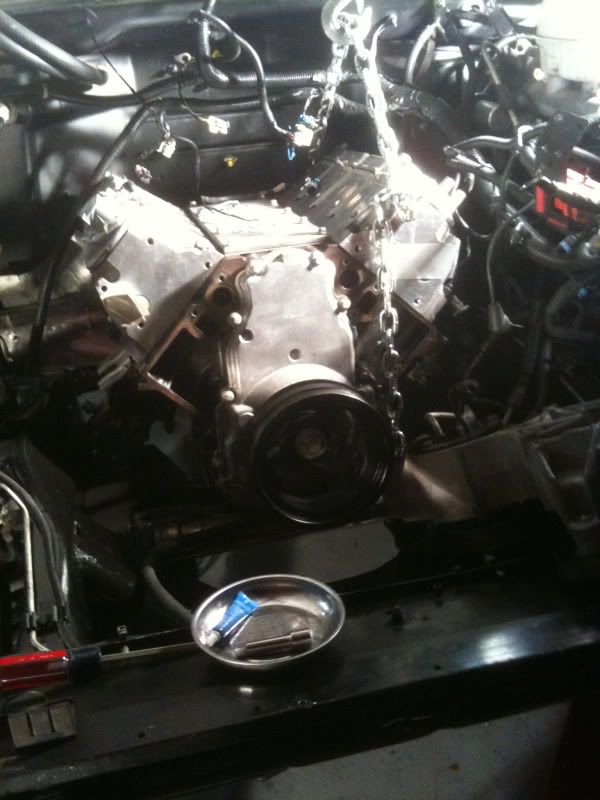
However I'm still not in the clear yet as I'm gonna end up having to pull the oil pan off the motor. There is a turbo oil return line that's been tapped into the bottom of the oil pan that is well positioned in a 4x4 configuration but in my 2wd truck it hit's the rack and pinion. So I'm gonna pull the pan, plug that hole and tap another oil return line that will clear everything.
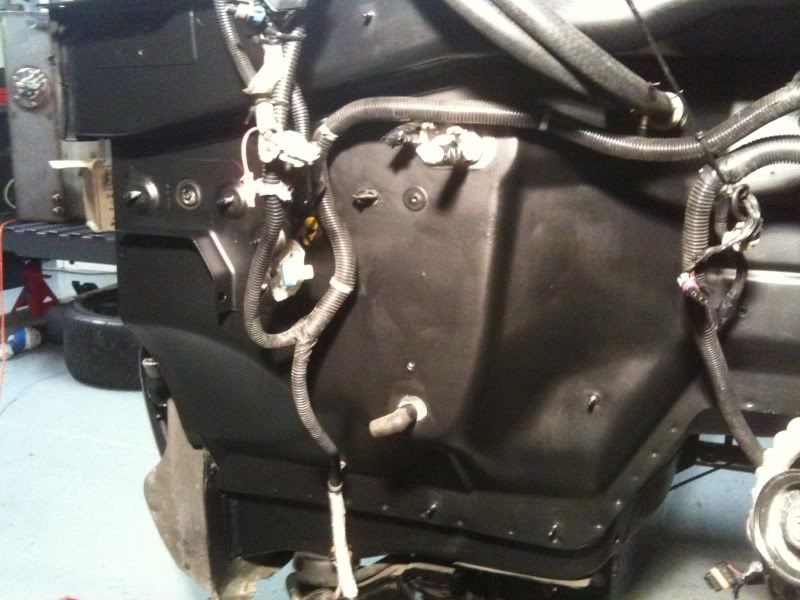
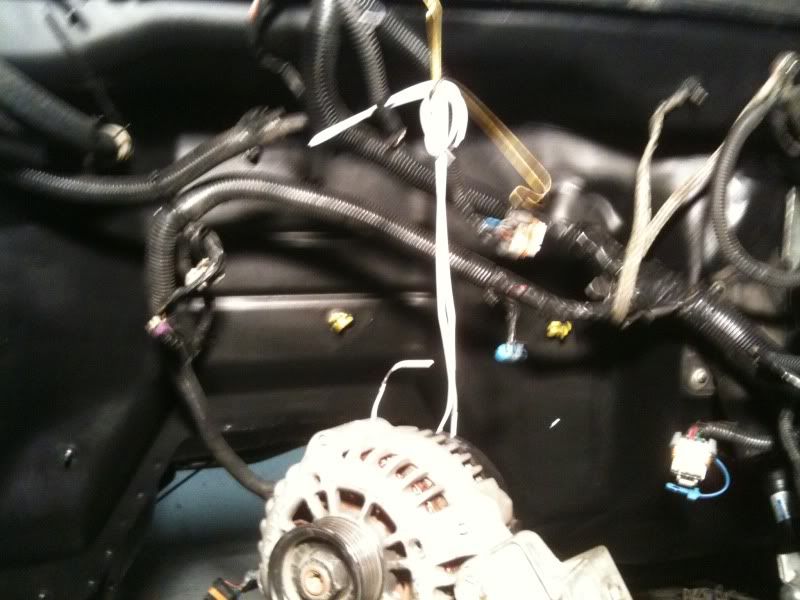
I don't want to move forward until I sort out a few of those issues as well as clean up my wiring. I did pull out the windshield wiper tank, PCM bracket and battery tray and am modifying the stock tray to be able to fit the PCM in place of where the battery used to be.
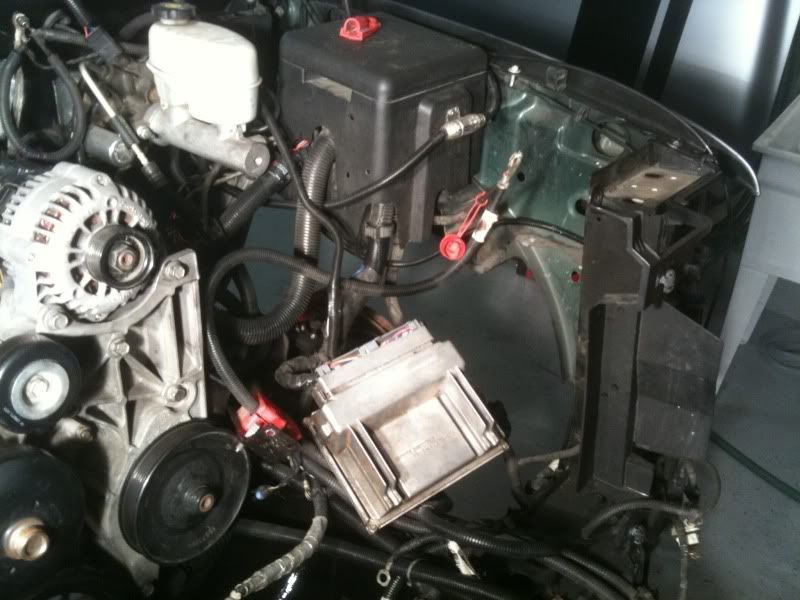
I have a replacement windshield wiper tank that has a meth pump in it and will install that instead. I also got the necessary hardware to mount up my fuel cell, started with the brackets, I painted them with the same POR-15 that I used on the frame, stuff is good!
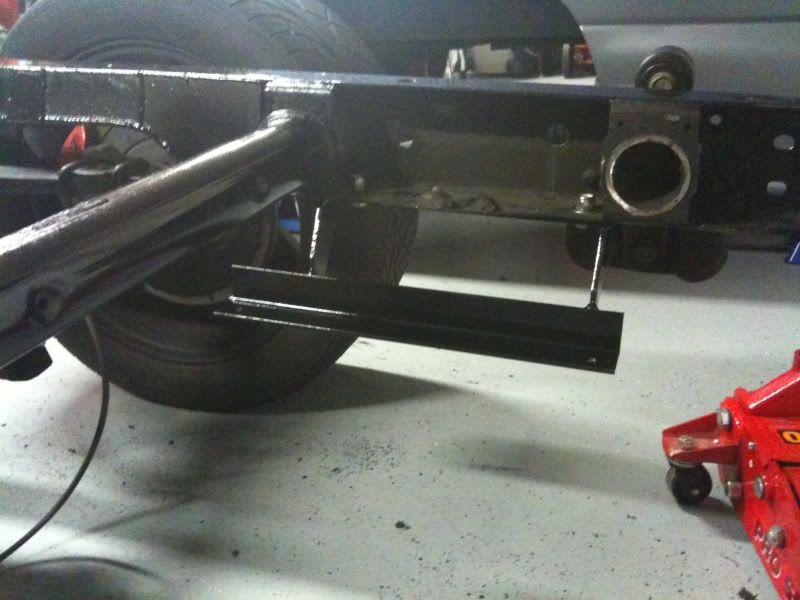
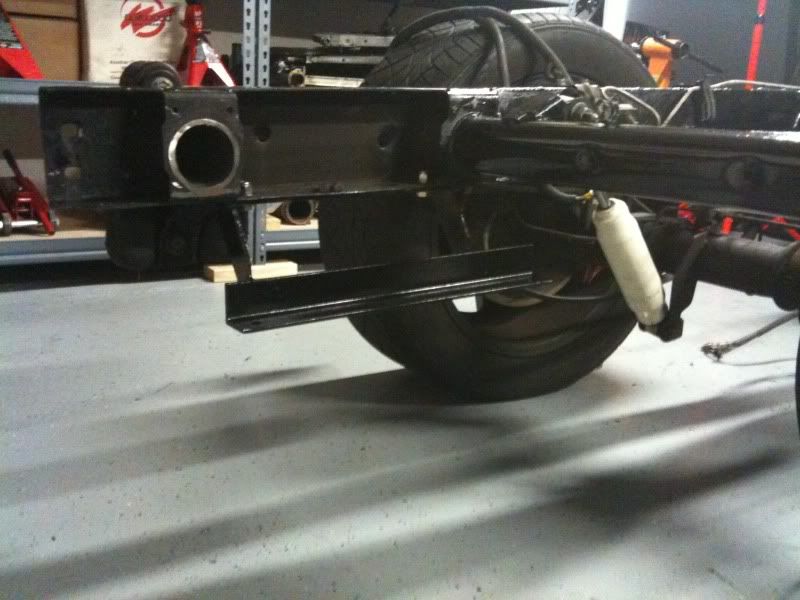
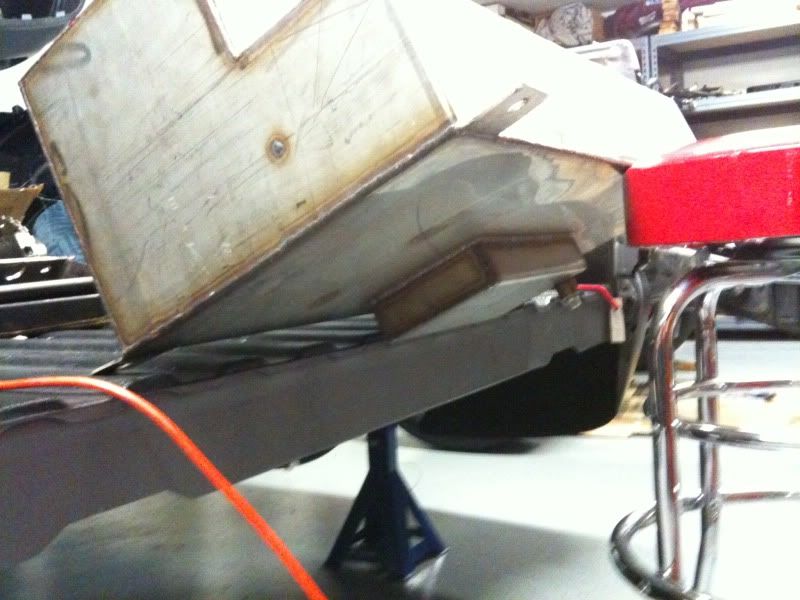
Then I dropped in the tank...
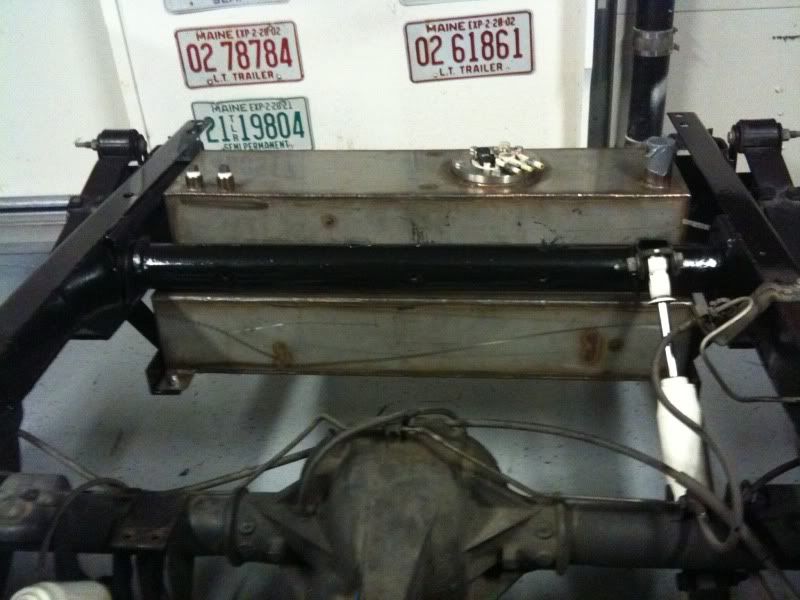
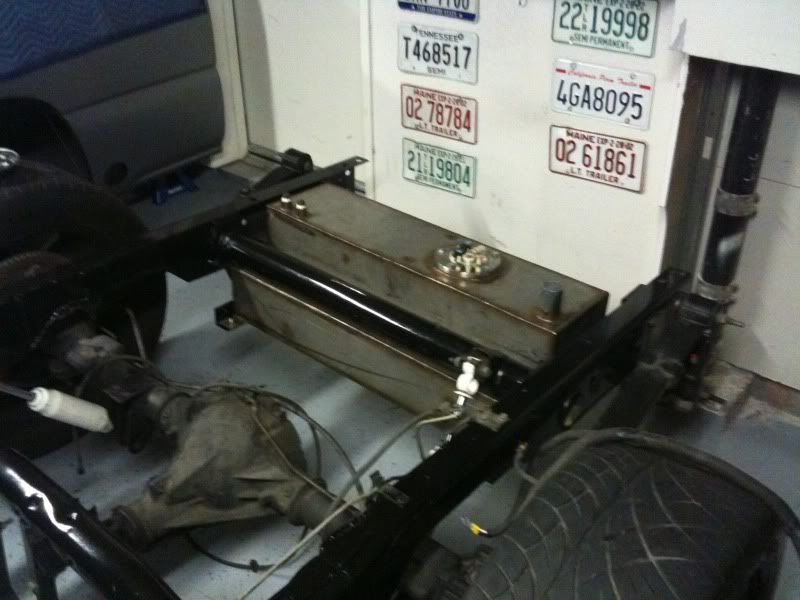
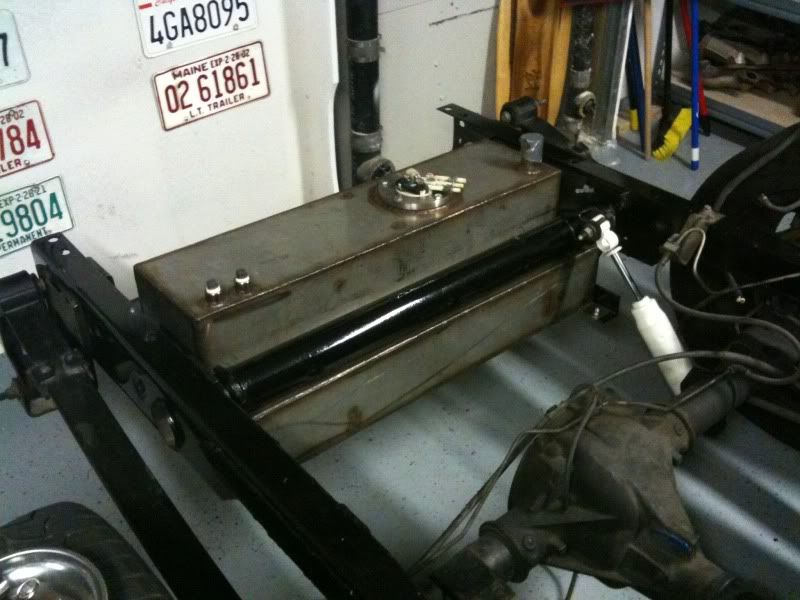
Obviously the bed is off so the suspension is not fully flexed, however it's 10.5 inches from the ground and the drain plug at the bottom of the sump is hovering at 9.5 or so inches.
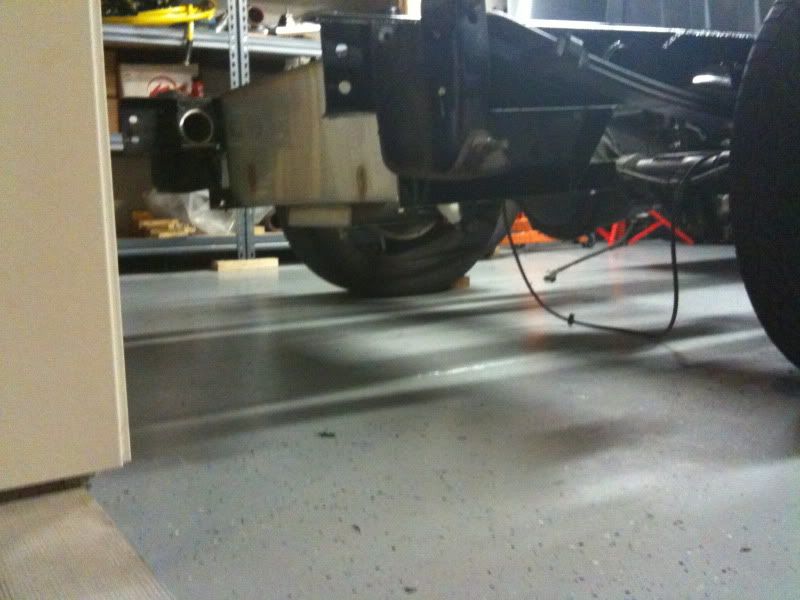
I'm gonna have to get a spacer (thinking rubber ones actually to insulate it from any frame vibration) to drop the tank a little more just because the passenger side is a bit too high to clear the bed I think. I was told I'm gonna need to ground this tank so I'll have to figure something out at well concerning that.
Turned out to be a bigger headache than it should of been as I decided to drop them in together rather than one at a time. I've seen people do it before so didn't think it would be that big of a deal since I had the whole front end off, but it didn't turn out that way unfortunately.
First off, here's the motor and tranny...
The transmission is the same FLT 4L80-e Lvl-5 that I've been using the last few years.
As far as the motor is concerned, some of you may be familiar with this motor, it's actually stock48 motor out of his 9 second GMC truck. The details of how this came about is a bit complicated but this wasn't the original plan. Unlike most anyone that I've ever dealt with, when some complications arose with the motor he was building for me, instead of running me through the ringer for another couple months until the issues could get ironed out, he offered to sell me his engine as a hold over until my engine is completed and when that motor gets done I have the choice of just keeping his or taking mine. Never really came across anyone who would step up to the plate like that but I'm extremely happy with this turn of events. Stand up guy, no question about it!
Specs on the motor are forged 370, ported 317 heads, custom gas ported forged pistons, comstar rods, isky 215/215 cam and the rest of it I'll just let him explain if necessary. But all in all this motor's reputation kinda speaks for itself!
http://www.youtube.com/watch?v=MwJYPsJfDvE
So the problem that arose was with the cross-member that's just aft of the rack and pinion. No matter what kind of finagling I did I couldn't get the oil pan over it without having the heads hit the firewall. Even pulled the valve covers but to no avail. So instead of separating the two I just pulled that cross-member out and hung the motor in place right above the motor mounts and re-installed the cross-member before dropping the motor onto the mounts. I was a bit reluctant to do it because pulling that cross-member because of what it supports and what's connected to it but all-in-all it turned out alright.
So, with that being said...in it went!
However I'm still not in the clear yet as I'm gonna end up having to pull the oil pan off the motor. There is a turbo oil return line that's been tapped into the bottom of the oil pan that is well positioned in a 4x4 configuration but in my 2wd truck it hit's the rack and pinion. So I'm gonna pull the pan, plug that hole and tap another oil return line that will clear everything.
I don't want to move forward until I sort out a few of those issues as well as clean up my wiring. I did pull out the windshield wiper tank, PCM bracket and battery tray and am modifying the stock tray to be able to fit the PCM in place of where the battery used to be.
I have a replacement windshield wiper tank that has a meth pump in it and will install that instead. I also got the necessary hardware to mount up my fuel cell, started with the brackets, I painted them with the same POR-15 that I used on the frame, stuff is good!
Then I dropped in the tank...
Obviously the bed is off so the suspension is not fully flexed, however it's 10.5 inches from the ground and the drain plug at the bottom of the sump is hovering at 9.5 or so inches.
I'm gonna have to get a spacer (thinking rubber ones actually to insulate it from any frame vibration) to drop the tank a little more just because the passenger side is a bit too high to clear the bed I think. I was told I'm gonna need to ground this tank so I'll have to figure something out at well concerning that.


Thread Starter
TECH Senior Member
iTrader: (8)
Joined: Jan 2007
Posts: 13,845
Likes: 0
From: Here and sometimes there too.
Thanks guys, it's gonna be alot of fun when it's done, getting all the smaller details straightened out is what's gonna take me a while to figure out, all the heavy lifting is mostly done.