
1991 Nissan 240sx – T76 LQ4 with T56
 03-05-2015, 10:48 AM
#161


I would say they are as big as an improvement over the z32, as the z32's were over the stock 240 brakes. In my particular case I have the z32 rears as well. Pedal feel is nice with the 1" z32 BMC.
 03-05-2015, 09:41 PM
#162
Staging Lane

Join Date: Jun 2014
Location: brainerd mn
Posts: 98
Likes: 0
Received 0 Likes
on
0 Posts
just read through all 9 pages awesome build hope mine turnes out this good lol
doing an ls1-t s13 right now cant wait to get my motor back to start welding up my turbo setup i see every one runs the down pipe across the top and down is there enough room there? was planning on running 4 in
doing an ls1-t s13 right now cant wait to get my motor back to start welding up my turbo setup i see every one runs the down pipe across the top and down is there enough room there? was planning on running 4 in
03-06-2015, 10:50 AM
#163
just read through all 9 pages awesome build hope mine turnes out this good lol
doing an ls1-t s13 right now cant wait to get my motor back to start welding up my turbo setup i see every one runs the down pipe across the top and down is there enough room there? was planning on running 4 in
doing an ls1-t s13 right now cant wait to get my motor back to start welding up my turbo setup i see every one runs the down pipe across the top and down is there enough room there? was planning on running 4 in
3" was pretty easy, 3.5" would be a little tighter (i'm thinking of stepping this up to 3.5", but it's not really needed).
4" might be extremely difficult. I think that would be difficult, but not impossible. You'd have to relocate coils and brake lines that run down the pass frame rail. a smaller starter would help and you may also have to notch frame rail and possibly the bell housing.
just a question....why would you want a 4"? 3" will support 1000hp
05-27-2015, 09:55 AM
#164
Hey guys,
I've got my motor back together after upgrading to ls3/l92 heads. However, I've got a pretty significant amount of valvetrain noise. I've attached the below post from the Internal Engine section, just to see if anyone had any thoughts about this.
https://ls1tech.com/forums/generatio...317-823-a.html
11-12-2015, 12:06 AM
#165
Man, i haven't updated this thread in quite a while.
after my last post, I got with Martin at Tick Performance and he spec'd out a custom cam for me. after installing, i checked all pushrod lengths multiple times and found out that my machine shop didn't have consistent depths done on my valve job. I ended up running 4 different lengths throughout the motor and that with the cam change quieted the motor down a lot. The Brutespeed blower cam was awesome, the XER lobes didn't really work well with my combo.
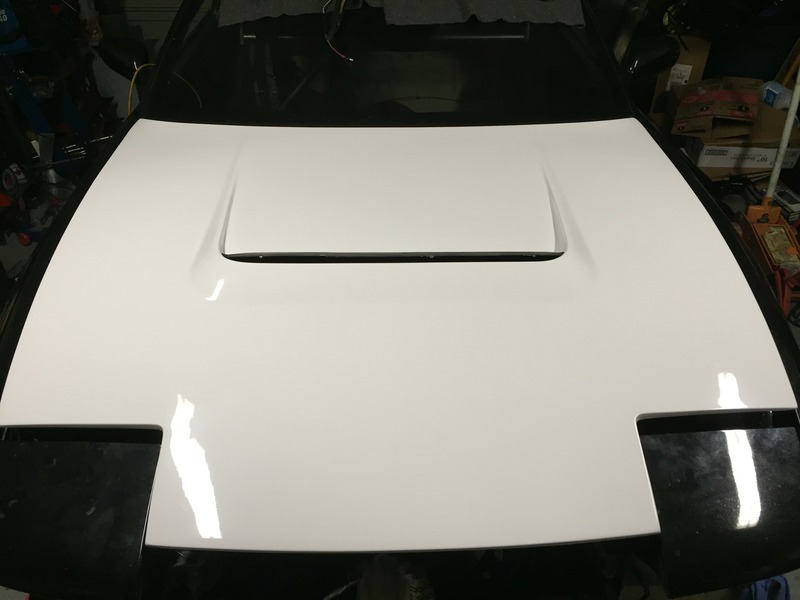
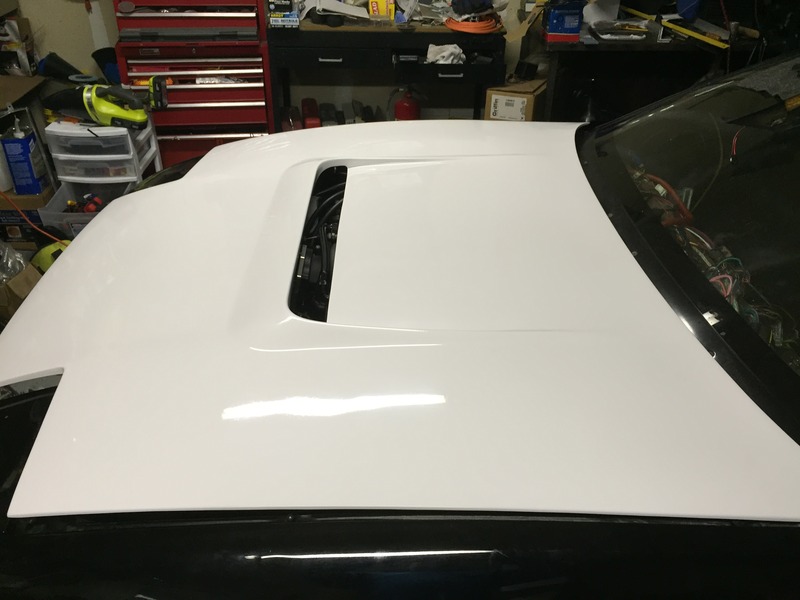
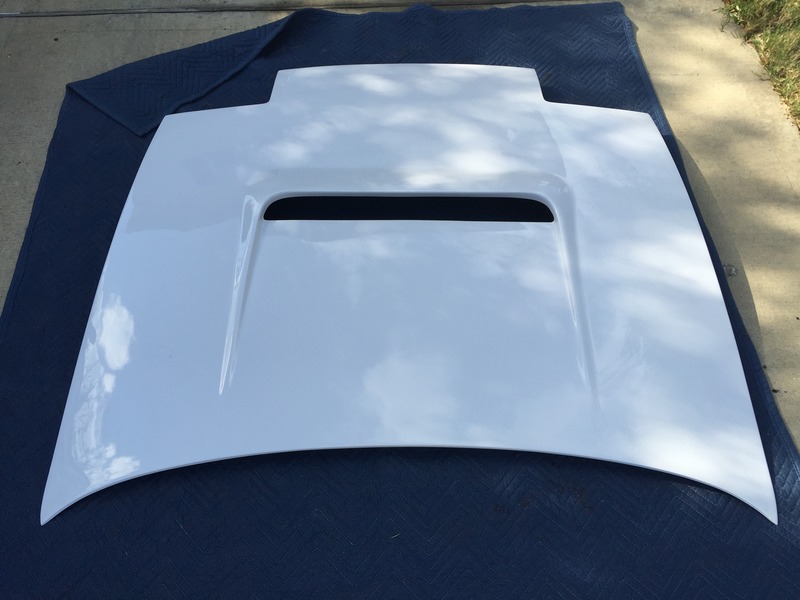
this was a couple months back. since then i was still troubleshooting the cooling issues during the summer here in Texas. I cut up my stock hood to mimic a vent as an experiment. Turns out it worked pretty well. With there not being many vented hoods for the 240sx that i liked, i ordered one from Japan. Took over a month to be made and shipped, but was worth it.
I have a few mods to make to clear the motor, but outside of that, i just need to prep and paint it. I've got some Summit Satin Hot Rod Black (matte black) to paint the hood in the short term, but long term the entire car.....maybe later this summer, hopefully.

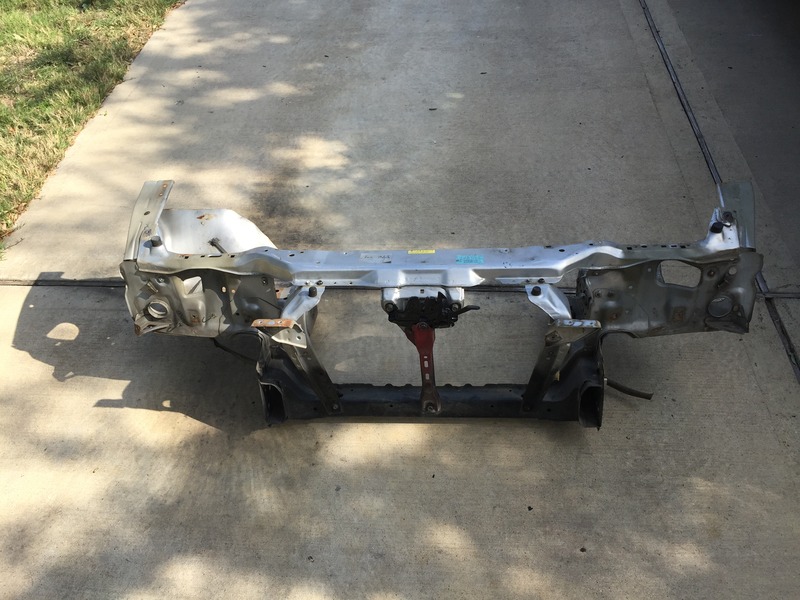
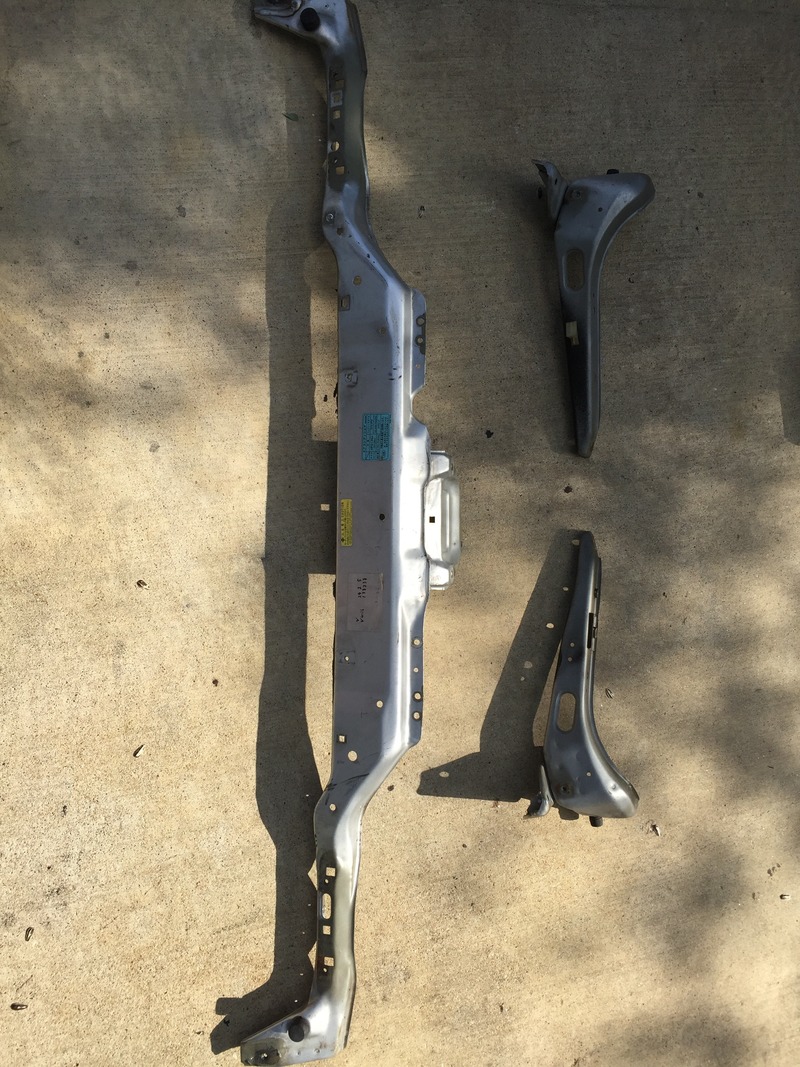
I had a set of AeroCatch hood pins in my stock hood, but i dont want to cut up this FRP hood, so i've decided to revert back to the stock hood latch setup. this required getting a new upper radiator core support as it has the hood latch mount. I got a nose cut section from a friend for this. I cut the upper support out and the have corresponding headlight support brackets. I'm in the process of cutting out what i currently have on the car now. More on the deconstruction of the car to come.
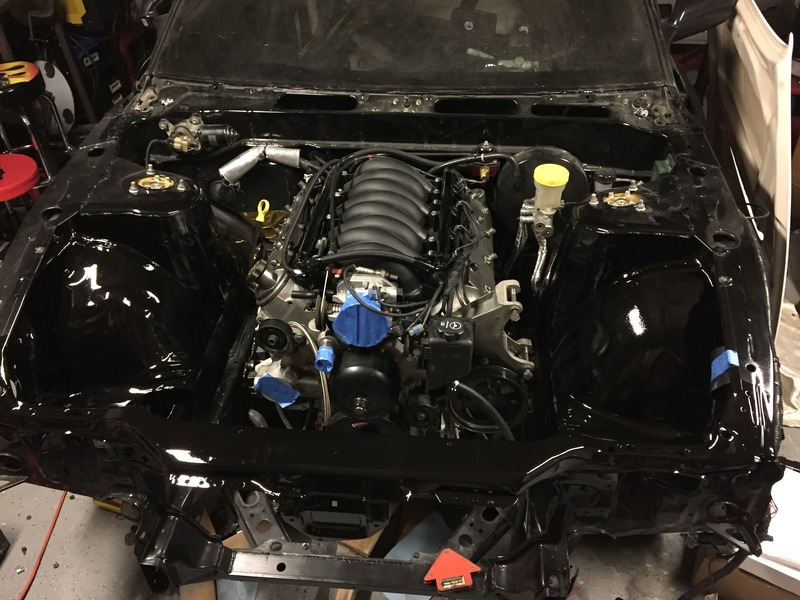
Moving back to the stock core support and hood latch, means i have to move the radiator back about 5". The current Taurus fan is too deep, so i'm working on a new shroud/fan set up and also leads to this next update. My current turbo crossover runs right infront of the waterpump pulley which is pretty tight for the radiator and fan.
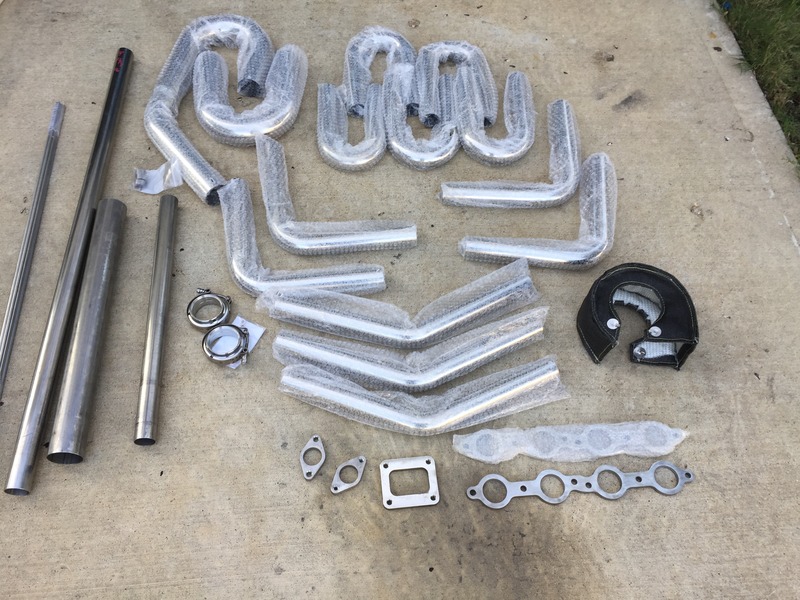
I've been planning a new turbo setup for months and now have to do it to fit everything. I got a recent shipment from Ace Race Parts, all stainless that will be fully tigged and back purged. More pics of the fab work coming. For now, here's some good polished stainless piping goodness.
1/2" manifold, turbo and wastegate flanges
1 5/8" 304l 16ga tubing for wastegate
1 3/4" 304l 16ga tubing for manifolds and going to make custom collectors
2.5" 304l 16ga tubing for crossover
turbo blanket
2.5" stainless vbands
flat and round bar for bracing
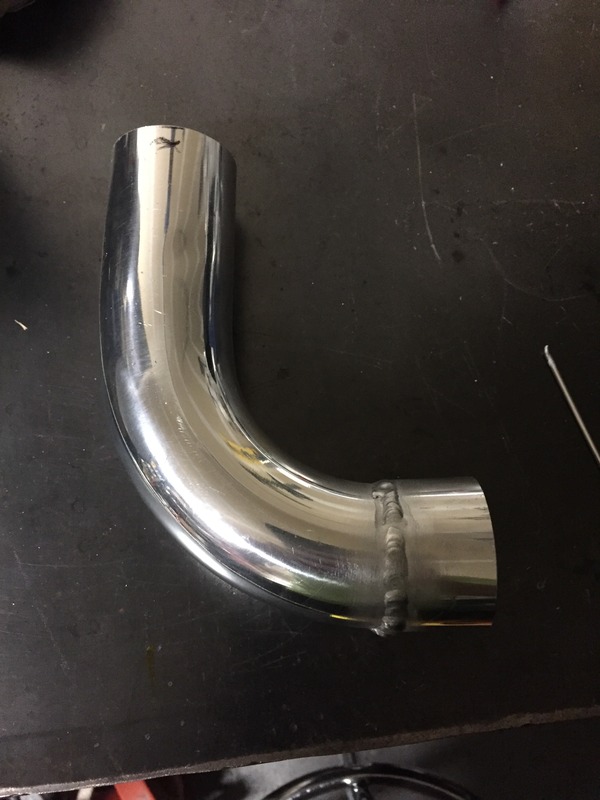
trying to decide if i want 3" or 3.5" for the downpipe. This should keep me busy for a while
More to come.....
after my last post, I got with Martin at Tick Performance and he spec'd out a custom cam for me. after installing, i checked all pushrod lengths multiple times and found out that my machine shop didn't have consistent depths done on my valve job. I ended up running 4 different lengths throughout the motor and that with the cam change quieted the motor down a lot. The Brutespeed blower cam was awesome, the XER lobes didn't really work well with my combo.
this was a couple months back. since then i was still troubleshooting the cooling issues during the summer here in Texas. I cut up my stock hood to mimic a vent as an experiment. Turns out it worked pretty well. With there not being many vented hoods for the 240sx that i liked, i ordered one from Japan. Took over a month to be made and shipped, but was worth it.
I have a few mods to make to clear the motor, but outside of that, i just need to prep and paint it. I've got some Summit Satin Hot Rod Black (matte black) to paint the hood in the short term, but long term the entire car.....maybe later this summer, hopefully.


I had a set of AeroCatch hood pins in my stock hood, but i dont want to cut up this FRP hood, so i've decided to revert back to the stock hood latch setup. this required getting a new upper radiator core support as it has the hood latch mount. I got a nose cut section from a friend for this. I cut the upper support out and the have corresponding headlight support brackets. I'm in the process of cutting out what i currently have on the car now. More on the deconstruction of the car to come.


Moving back to the stock core support and hood latch, means i have to move the radiator back about 5". The current Taurus fan is too deep, so i'm working on a new shroud/fan set up and also leads to this next update. My current turbo crossover runs right infront of the waterpump pulley which is pretty tight for the radiator and fan.
I've been planning a new turbo setup for months and now have to do it to fit everything. I got a recent shipment from Ace Race Parts, all stainless that will be fully tigged and back purged. More pics of the fab work coming. For now, here's some good polished stainless piping goodness.
1/2" manifold, turbo and wastegate flanges
1 5/8" 304l 16ga tubing for wastegate
1 3/4" 304l 16ga tubing for manifolds and going to make custom collectors
2.5" 304l 16ga tubing for crossover
turbo blanket
2.5" stainless vbands
flat and round bar for bracing
trying to decide if i want 3" or 3.5" for the downpipe. This should keep me busy for a while

More to come.....
02-15-2016, 11:09 PM
#166
I've been out and away from the car for the past few months, but finally had some time to do some work over the weekend.
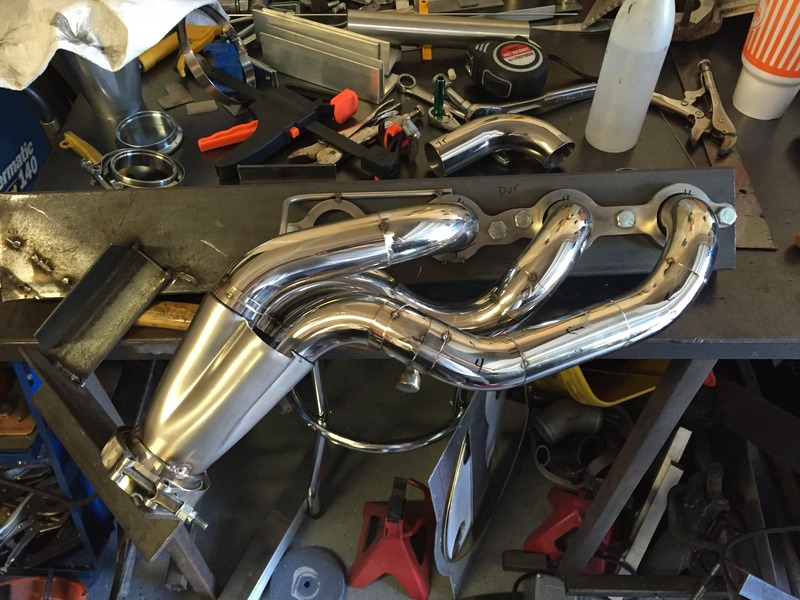
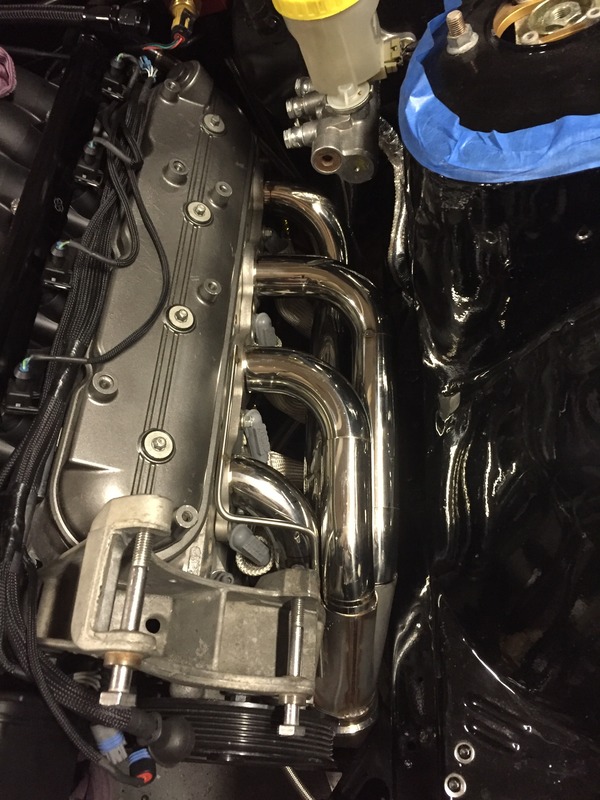
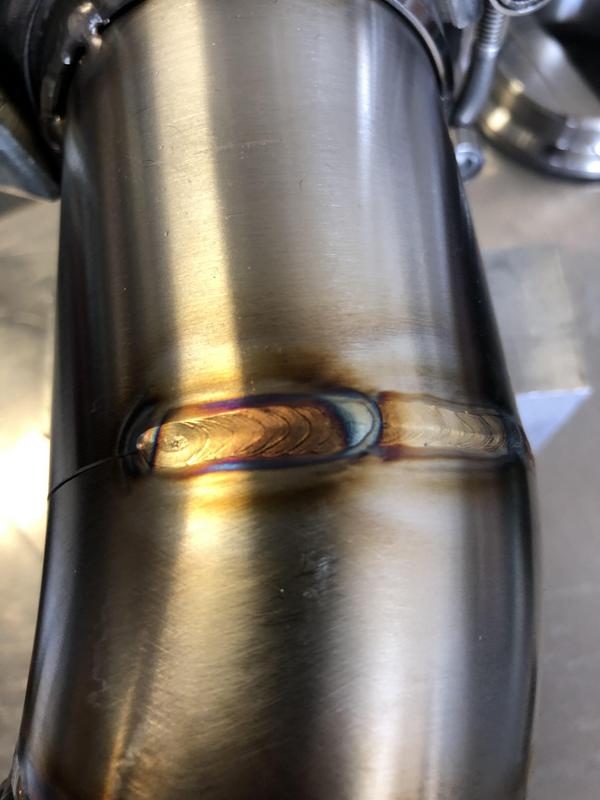
I started working on my new manifold set up. all 1.75" 304SS. I was able to get 3 of the 4 driver's side manifold cut, fit and tacked in place. I hope to finish the last runner next weekend and get it all tigged up shortly after that.
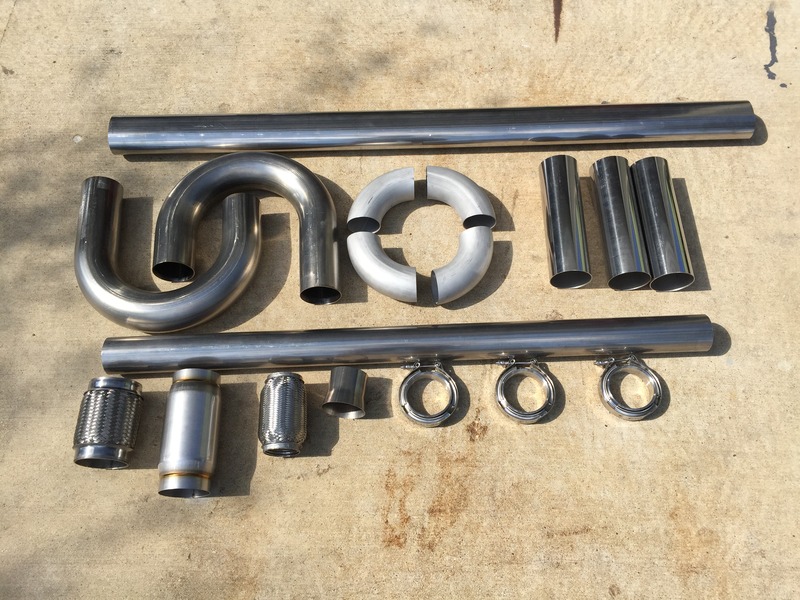
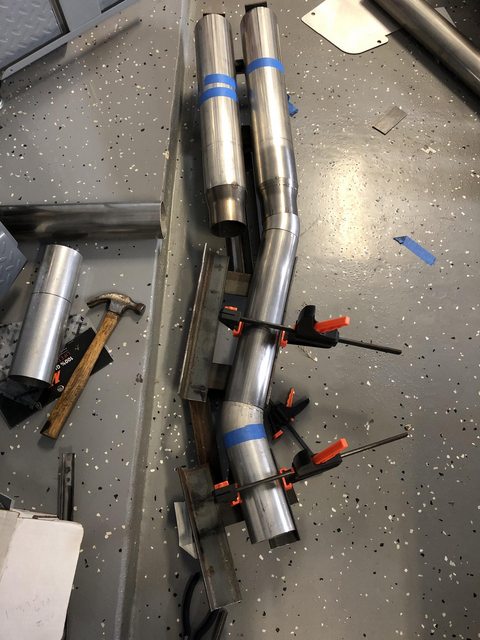
Also, i recently got one of my last shipment of materials in for the exhaust. All 304SS as well. Stepping up to 3.5" from the 3" i had on the last setup. I'm going to make a clone of my Trust DD catback, which was 3" to dual 2.5" that opened up to dual 3.5" tips. This time, i'm going 3.5" to dual 3" to dual 3.5" tips.
Here's what i've got:
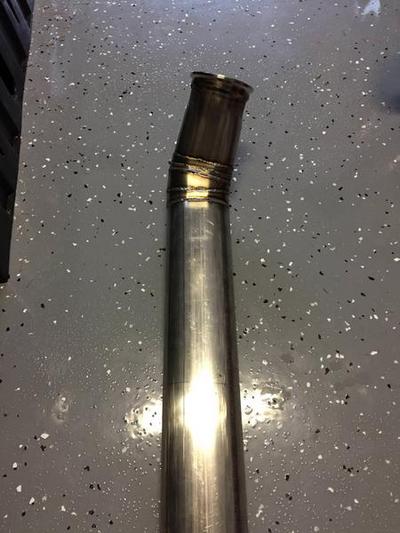
7' of 3.5" straight polished (4' not pictured, on back order)
5' of 3.5" oval tubing
(4) 3" 90* bends
4' of 3" straight tubing
Vibrant 3.5" race muffler
3.5" stainless flex section
2.5" stainless flex section
(3) 3.5" stainless vband kits
(2) 3" > 3.5" transitions
hopefully more to come in the next few weeks
I started working on my new manifold set up. all 1.75" 304SS. I was able to get 3 of the 4 driver's side manifold cut, fit and tacked in place. I hope to finish the last runner next weekend and get it all tigged up shortly after that.

Also, i recently got one of my last shipment of materials in for the exhaust. All 304SS as well. Stepping up to 3.5" from the 3" i had on the last setup. I'm going to make a clone of my Trust DD catback, which was 3" to dual 2.5" that opened up to dual 3.5" tips. This time, i'm going 3.5" to dual 3" to dual 3.5" tips.
Here's what i've got:
7' of 3.5" straight polished (4' not pictured, on back order)
5' of 3.5" oval tubing
(4) 3" 90* bends
4' of 3" straight tubing
Vibrant 3.5" race muffler
3.5" stainless flex section
2.5" stainless flex section
(3) 3.5" stainless vband kits
(2) 3" > 3.5" transitions

hopefully more to come in the next few weeks
 07-11-2016, 01:09 PM
#168
Never enough time to do everything i want.
I have been able to make some progress just recently on the fabrication of new manifolds. Right now i only have the driver side in the works. I've changed the layout from one of my previous posts. Runners are fully welded, just need to do the collectors and then weld the runners to the head flange. FIrst big SS TIG project, so far so good.

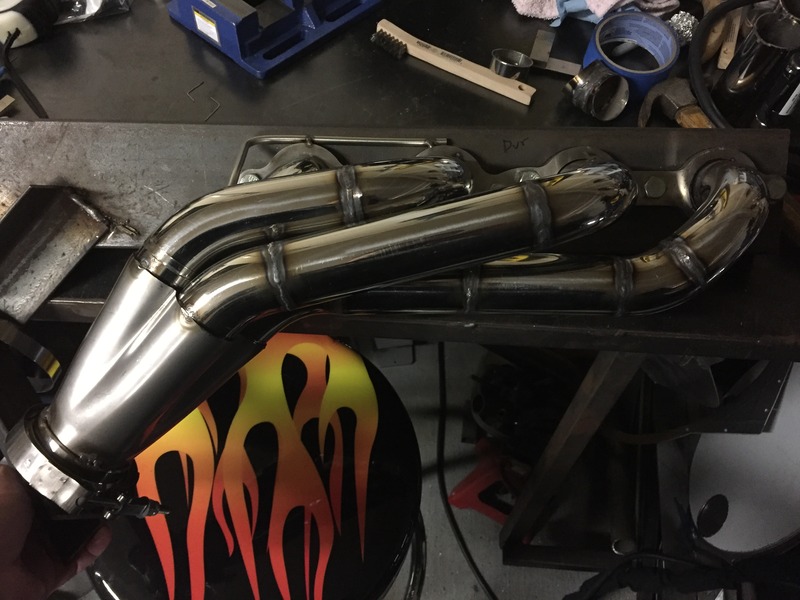
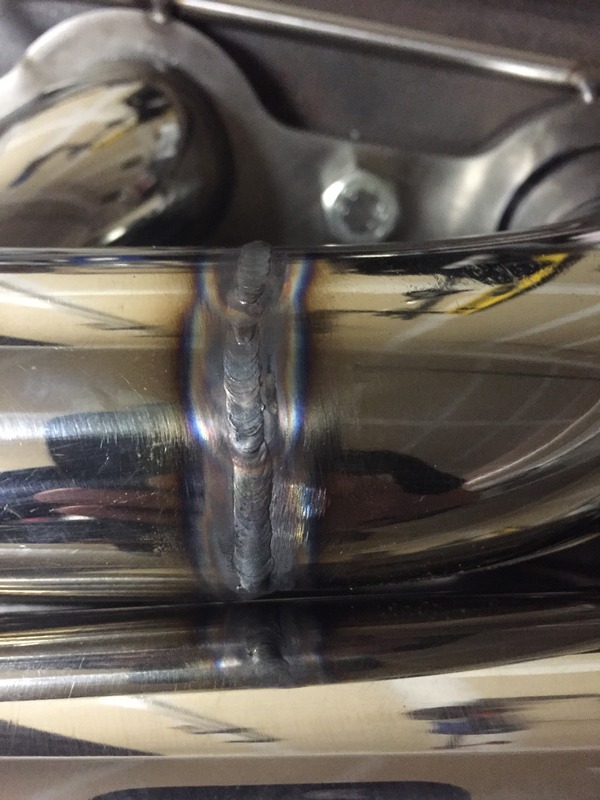
I have been able to make some progress just recently on the fabrication of new manifolds. Right now i only have the driver side in the works. I've changed the layout from one of my previous posts. Runners are fully welded, just need to do the collectors and then weld the runners to the head flange. FIrst big SS TIG project, so far so good.


 07-11-2016, 03:57 PM
#169

You're doing a good job, it looks nice! Bob
__________________
ATI ProCharger and Moser Sales 260 672-2076
PM's disabled, please e-mail me
E-mail: brutespeed@gmail.comob@brutespeed.com
https://brutespeed.com/ Link to website

ATI ProCharger and Moser Sales 260 672-2076
PM's disabled, please e-mail me
E-mail: brutespeed@gmail.comob@brutespeed.com
https://brutespeed.com/ Link to website

 09-20-2016, 04:48 PM
#172
To me it's all research, getting in and actually doing the work and the determination to learn. I've collected tools over the years, bought and taught myself how to weld, and am not afraid to try. I know a ton of people that research the crap out of something but are too scared to life a wrench.
10-24-2016, 04:19 PM
#173
i have a few new updates, while i continue to work on the new manifolds i need to address cooling issues i've been having.
I posted a fiberglass vented hood last year but had several modifications that needed to be done in order for it work.
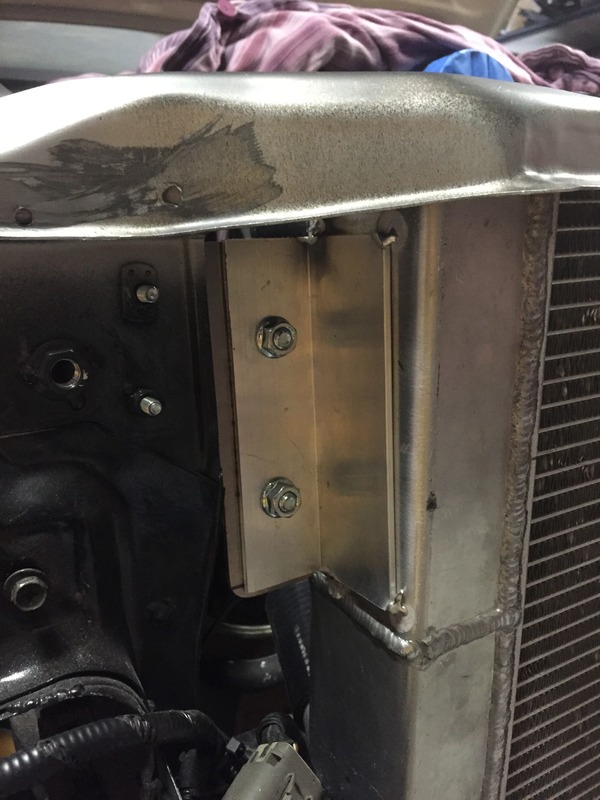
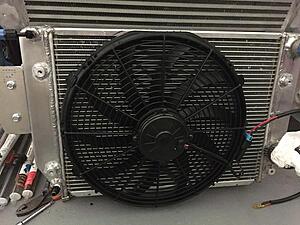
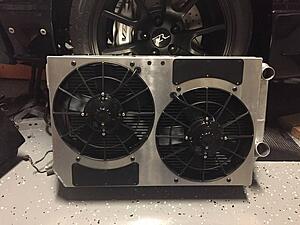
with my previous setup, mainly the Taurus fan, i had to cut out my radiator core support and move the radiator forward 4+ inches. THis time around, i wanted the support back in place so it didn't look so hacked. I welded in the replacement core support and worked on making new mounts for the radiator to tuck up under the support.
To do this, i started by making a alum shroud and used a Volvo 850 efan, pretty much the same motor as the Taurus fan but 3" thinner which allowed me to move it back towards the engine.
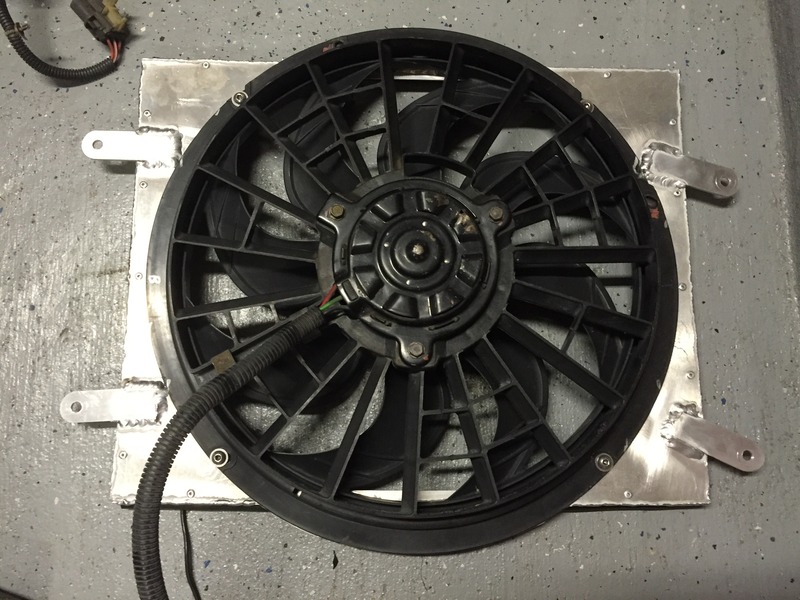
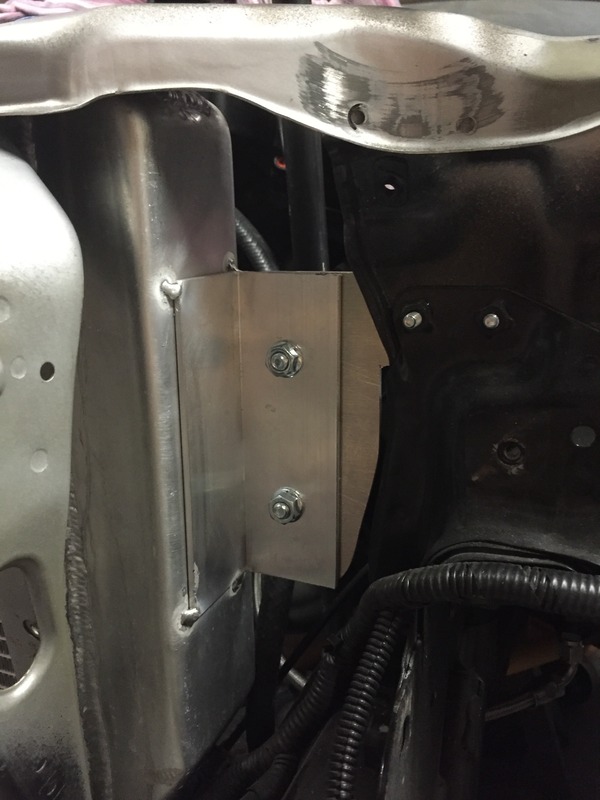
made some new mounts as well. lower mounts not pictured.
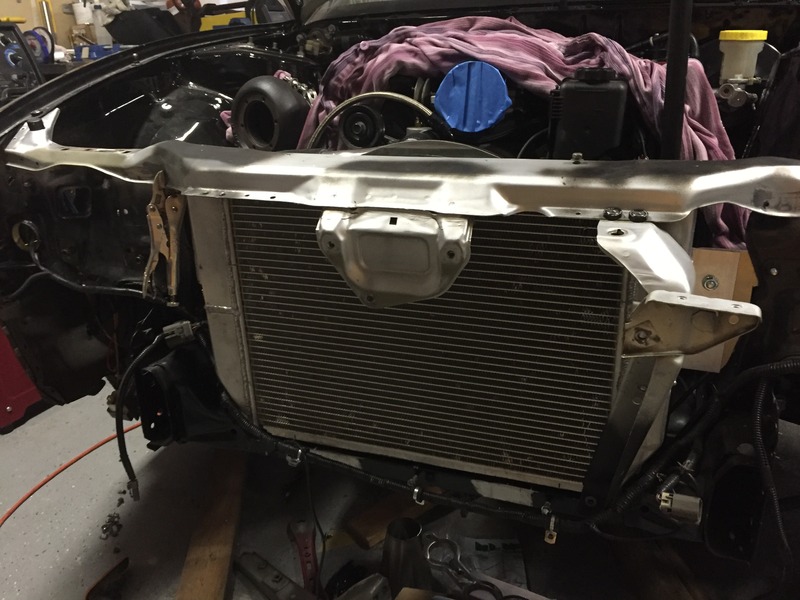
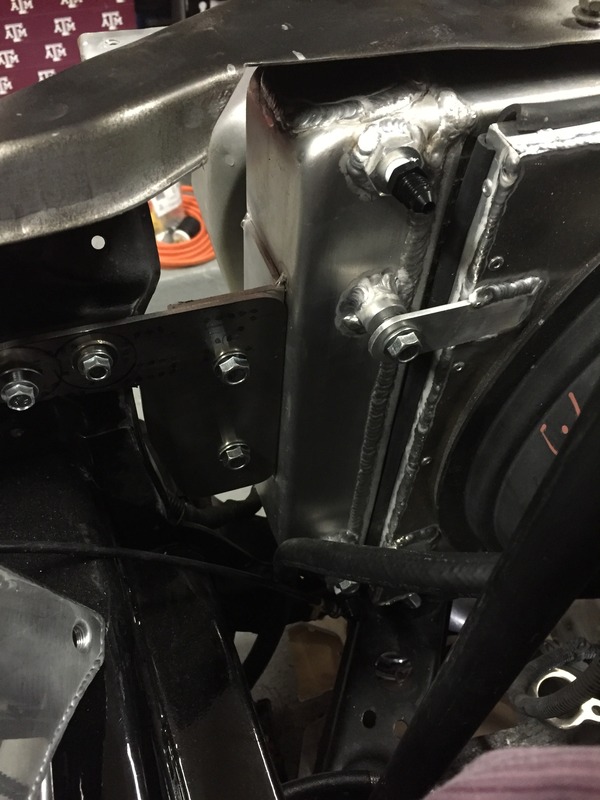
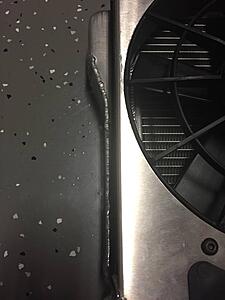
With the fan mounted, wanted to make some coolant hard pipes to get rid of cut up radiator hoses. silicon couplers and 1.75" aluminum tubing.
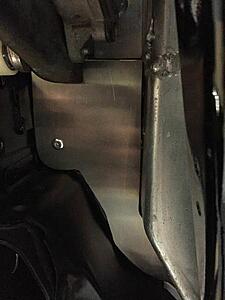
After that, i prepped the engine bay to paint the newly installed core support and welded a few bolt holes shut
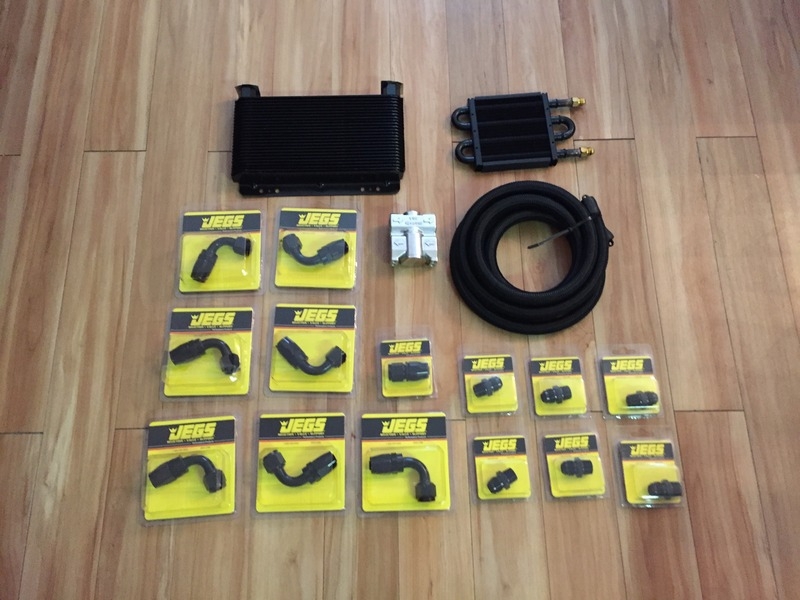
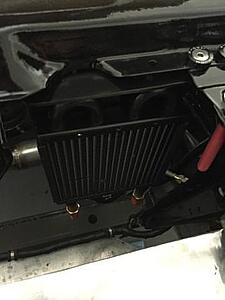
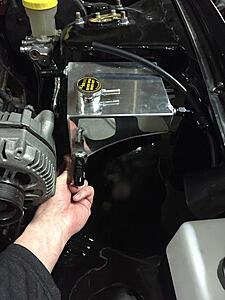
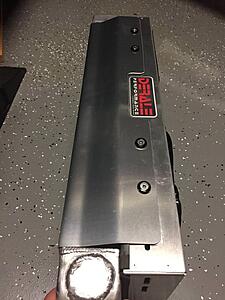
Along with battling the high coolant temps, i was consistently having 250* oil temps, 40* over coolant temps just from daily driving. I decided to add an oil cooler setup and a new powersteering cooler.
B&M 23 row super cooler 70273
Derale 180* oil thermostat
Derale powersteering cooler
Mishimoto oil cooler adapter for the Pontiac GTO oil pan (Improved Racing didn't have the GTO adapter available any longer)
assortment of Jegs -10an fittings and nylon braided line
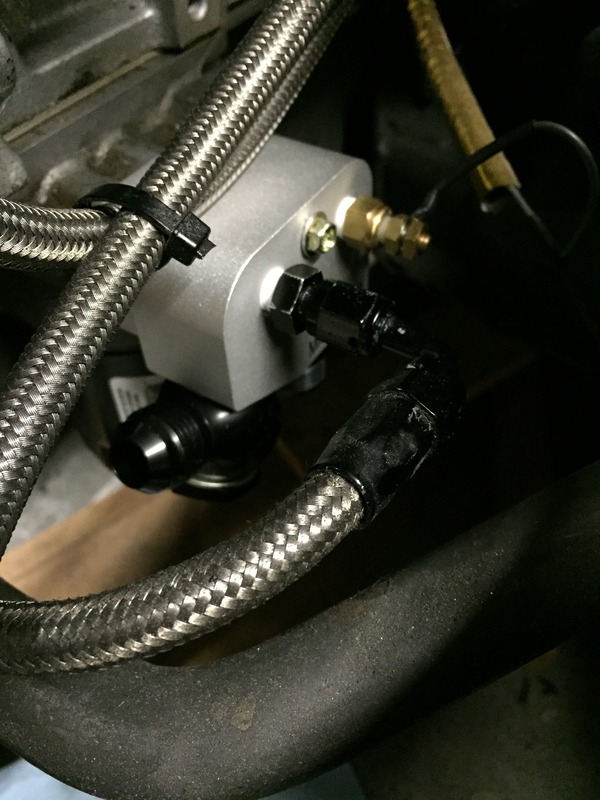
mounted the thermostat on the fender well side of the driver frame rail. Plenty of wheel/tire clearance, plus will be protected when the fender liner goes back in.
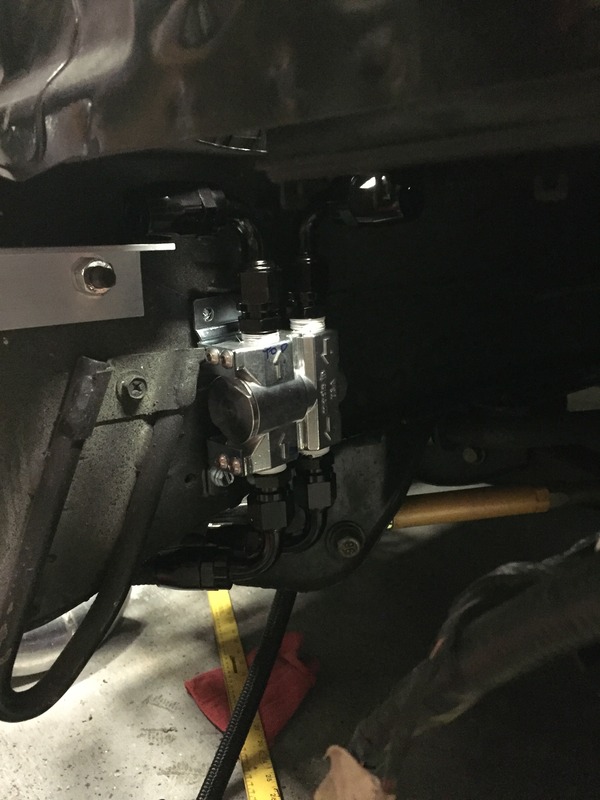
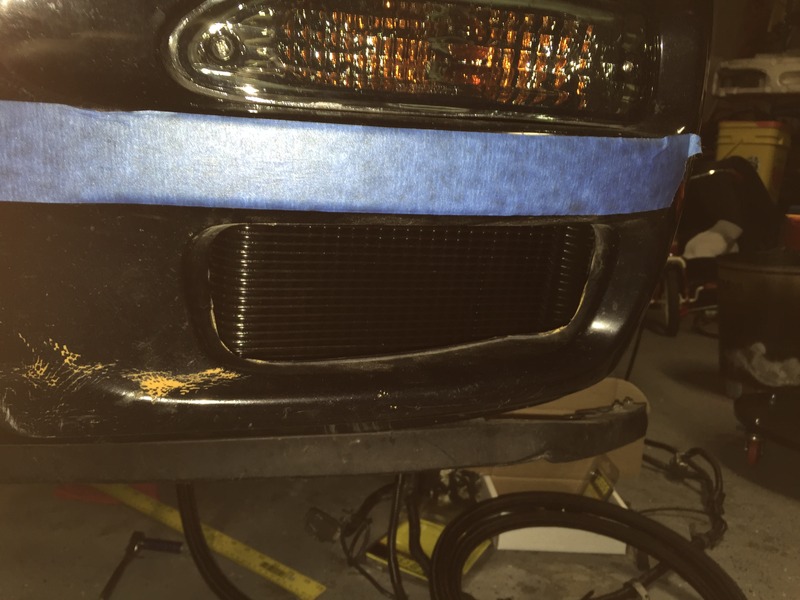
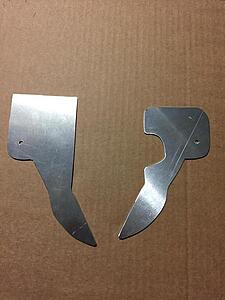
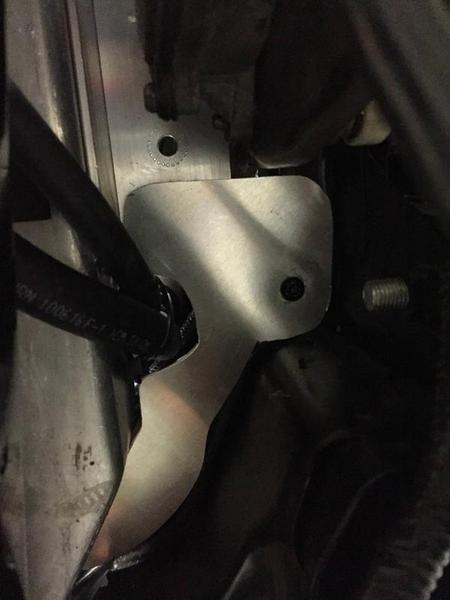
then i fabbed up a bracket to mount the cooler. cut a piece of 1.5 x 1.5 x .125 aluminum angle. going to brace a little more though. Mounting it right below the driver headlight behind the lower vent below the turn signal on the 91-94 bumper.
I'm currently working on the lines right now, but need a few extra fittings and hope to have this buttoned up in the next couple weeks.
More to come!
I posted a fiberglass vented hood last year but had several modifications that needed to be done in order for it work.
with my previous setup, mainly the Taurus fan, i had to cut out my radiator core support and move the radiator forward 4+ inches. THis time around, i wanted the support back in place so it didn't look so hacked. I welded in the replacement core support and worked on making new mounts for the radiator to tuck up under the support.
To do this, i started by making a alum shroud and used a Volvo 850 efan, pretty much the same motor as the Taurus fan but 3" thinner which allowed me to move it back towards the engine.

made some new mounts as well. lower mounts not pictured.


With the fan mounted, wanted to make some coolant hard pipes to get rid of cut up radiator hoses. silicon couplers and 1.75" aluminum tubing.


After that, i prepped the engine bay to paint the newly installed core support and welded a few bolt holes shut

Along with battling the high coolant temps, i was consistently having 250* oil temps, 40* over coolant temps just from daily driving. I decided to add an oil cooler setup and a new powersteering cooler.
B&M 23 row super cooler 70273
Derale 180* oil thermostat
Derale powersteering cooler
Mishimoto oil cooler adapter for the Pontiac GTO oil pan (Improved Racing didn't have the GTO adapter available any longer)
assortment of Jegs -10an fittings and nylon braided line


mounted the thermostat on the fender well side of the driver frame rail. Plenty of wheel/tire clearance, plus will be protected when the fender liner goes back in.

then i fabbed up a bracket to mount the cooler. cut a piece of 1.5 x 1.5 x .125 aluminum angle. going to brace a little more though. Mounting it right below the driver headlight behind the lower vent below the turn signal on the 91-94 bumper.


I'm currently working on the lines right now, but need a few extra fittings and hope to have this buttoned up in the next couple weeks.
More to come!
10-25-2016, 01:43 PM
#174
LS1Tech Sponsor
We redesigned and made improvements to our adapter after they knocked off our old design in order to stay one step ahead of them.
 10-25-2016, 04:49 PM
#175
Our GTO adapter is available here: http://www.improvedracing.com/oil-co...ines-p-82.html
We redesigned and made improvements to our adapter after they knocked off our old design in order to stay one step ahead of them.
We redesigned and made improvements to our adapter after they knocked off our old design in order to stay one step ahead of them.
looking at this new design, it only has one 1/8npt port, right? i do like the idea of a 1 piece adapter.
05-12-2018, 08:42 AM
#176
Damn I've been away for a while. I lot has happened since my last update. Moved from a house to an apartment and finally to our new house back in September.
I've actually done a lot lately, but i dont have too much to show for it. Some out of necessity and other self inflicted. Oh well
I'll start with more self inflicted first, as that's more fun to talk about.
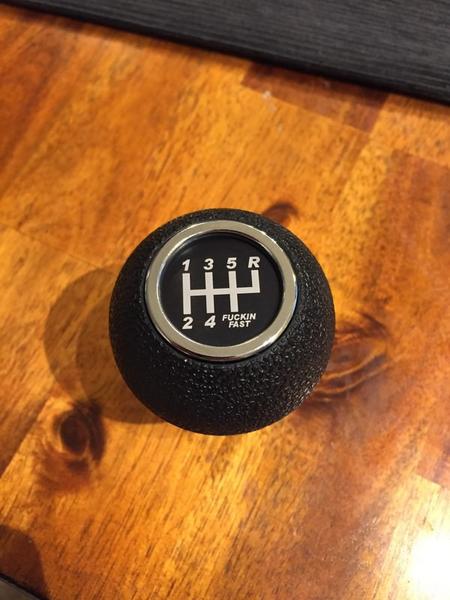
Starting simple. I saw a shift **** I fell in love with years ago but found out it had been discontinued. I had asked if they could do a one off but they no longer had the prints for it, so I said what the hell I'll get it anyway. Turns out they sell blank shift pattern discs and I found a local engraving company to copy the pattern. It's a MGW Gripper **** to go with my MGW short shifter. Here's the original MGW piece
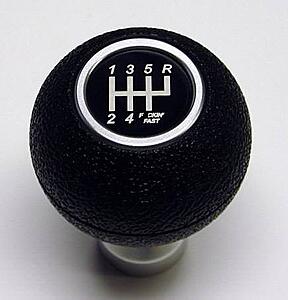
Here's the new one with the piece i had made locally....pretty damn good!!!!

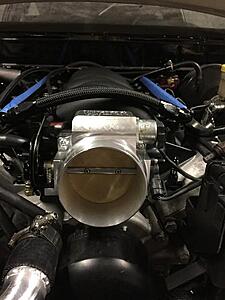
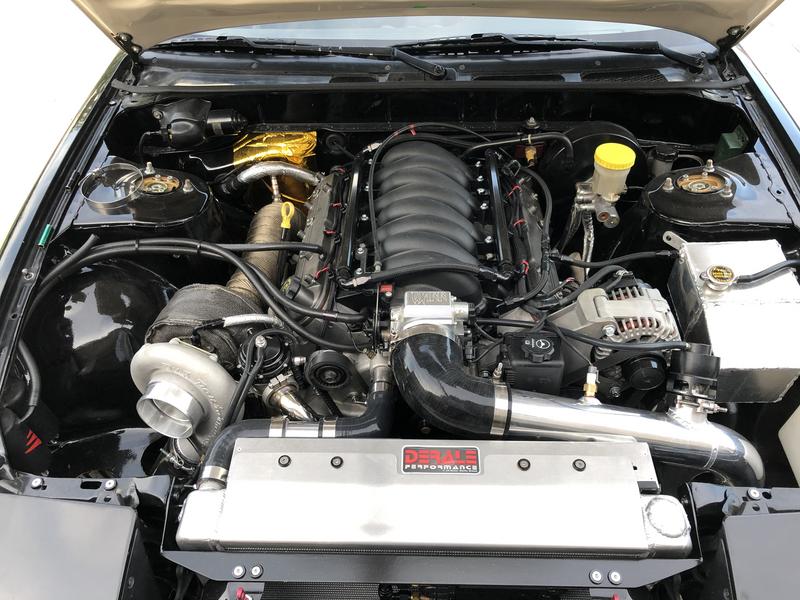
Upgraded from the stock 78mm throttle body to a 92mm
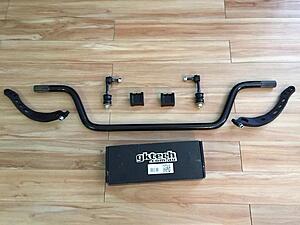
My previous Suspension Techniques sway bar was actually rubbing on my GTO oil pan ever so slightly, so i ordered a GK Tech sway bar for almost 3" of more clearance
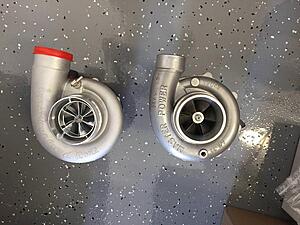
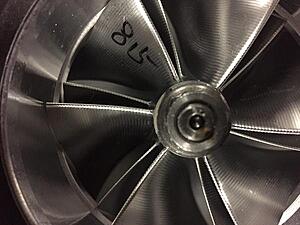
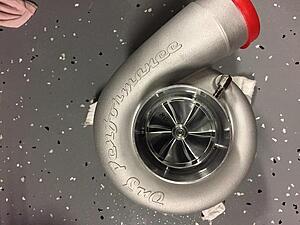
after much thought, i decided to swap out my MasterPower T76 turbo for an On3 Perforance Billet 7675. Better flowing than the MP76, very comparable to the Precision 7675 at half the price, and the LS and Mustang guys have been giving props
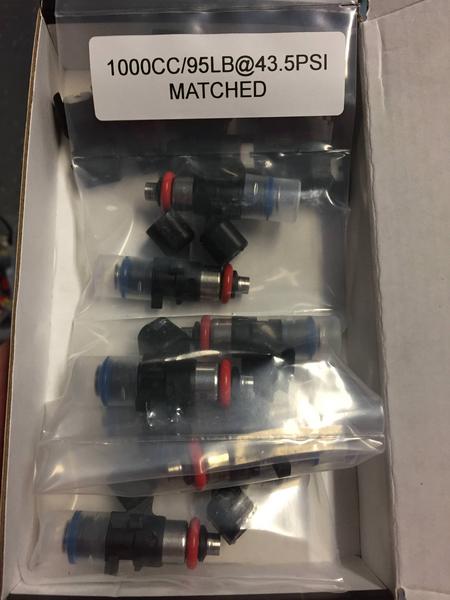
I bumped up from my 80lb injectors to a set of 95lb/1000cc injectors. I'm planning to convert to E85/Flex Fuel later in the year and took the plunge now:

Now for things that needed to be done.....
1. redoing the turbo setup for the new hood
2. cooling issues....this thing still gets hotter than i am comfortable with
Ended up cutting the new hood for Aerocatch latches Sad day getting it towed from the old house to the apartment

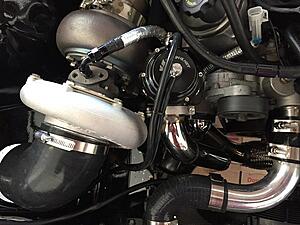
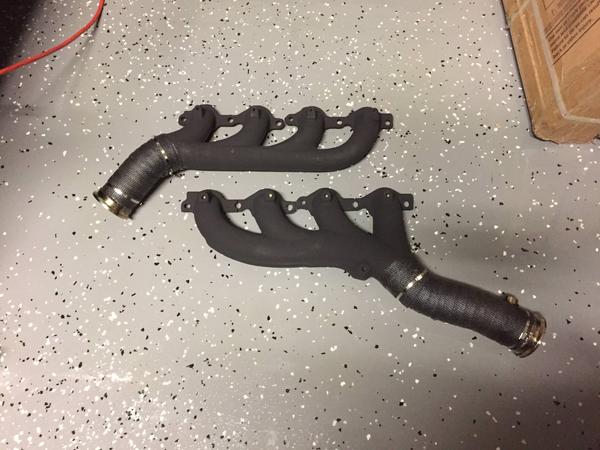
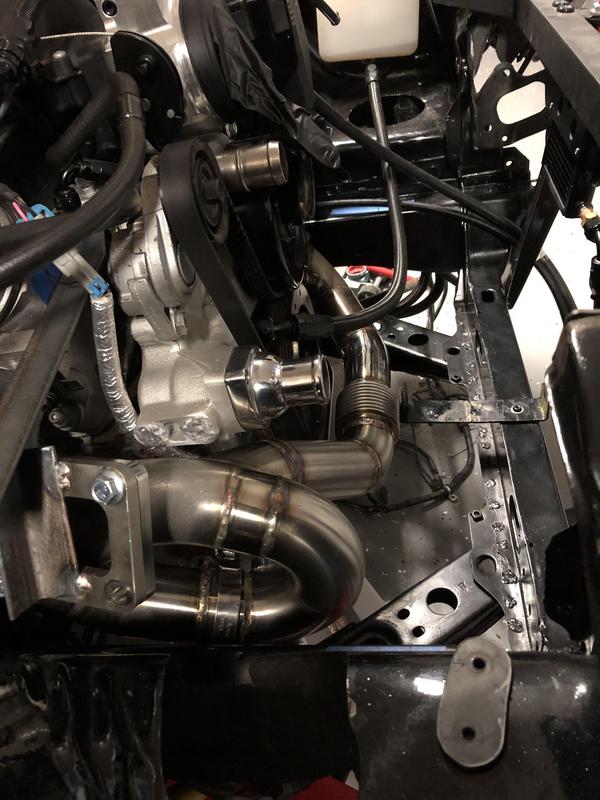
New hotside ended up being modified LS truck manifolds due to timing, i just wanted to get it running while i continued to work on my tubular manifolds. Welded some stainless tubing and vbands to the cast iron manifolds. Had them coated and wrapped the stainless portion

2.5" 304SS crossover with flex section and used a exhaust cutout as the 2>1 merge
Used a Turboflanges.com 2.5" round to T4 304SS flange
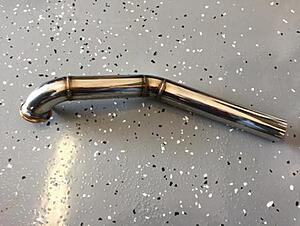
Added a VS Racing 44mm wastegate and dump tube
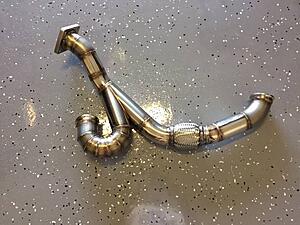
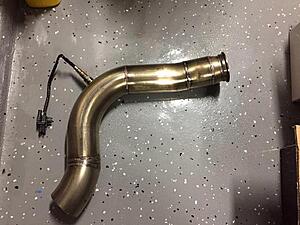
Made a 3.5" downpipe that transitioned to 3.5" oval for ground clearance. It's only complete to the transmission for now. Plans will be to copy my Greddy DD layout and go from 3.5" > dual 3" > 3.5" tips (Greddy DD was 3" > dual 2.5" > 3.5" tips)
Shitty cell phone vid at idle
Next i went on to fluid cooling, in addition to the oil cooler i added earlier
Derale 4 row powersteering cooler mounted to upper radiator support
And finally on to radiator/cooling which is still in the works
for now the same Griffin 24x16x3 (19x15.5x2.5 core) radiator but with a 16" Spal Extreme fan (2500cfm)
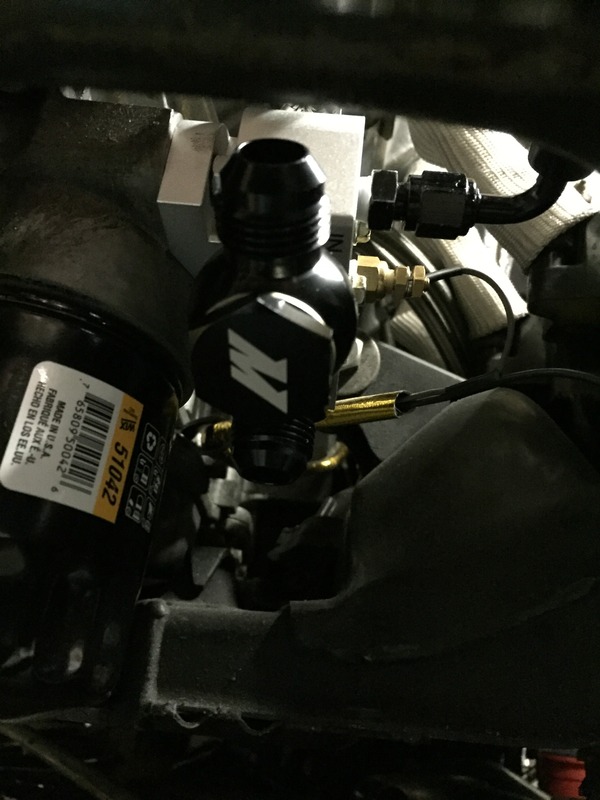
Converted an Ebay aluminum overflow tank to a custom surge tank. Actually modifying this for more capacity and to be self bleeding.
Made a couple of block off plates to fill the gaps around the radiator and lower core support
I also have a LRB undertray to help with airflow while driving
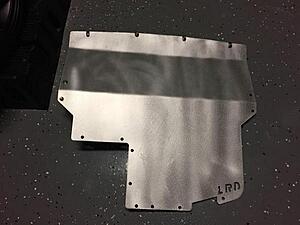
http://lrbspeed.com/product/s13-undertray/
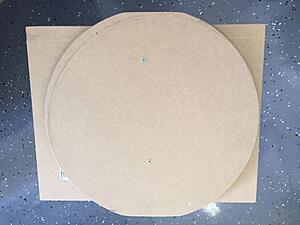
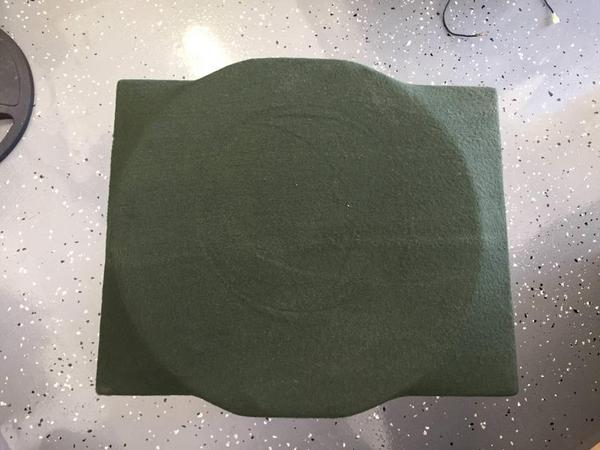
Cooling at idle is still an issue, so i'm making a fiberglass shroud for the Spal fan as a last ditch effor before i splurge for a slightly bigger radiator.
made a form based on the dimensions of the core and the fan
wrapped in a $5 Wal Mart polyester blanket
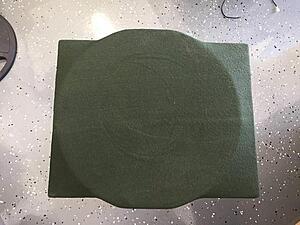
then a couple layers of fiberglass fabric and resin
Need to trim, prep, and paint after it's fully cured to see how it really works.
Cooling has been the thorn in my side for the last 2+ years. I have a pair of N1 style ducts that i have available but i want to keep that as a last resort. I'm seriously considering an Origin Stream or VS racing front bumper so i'd like to have cooling down before having to modify the new bumper.
Hopefully i have more promising updates soon!
I've actually done a lot lately, but i dont have too much to show for it. Some out of necessity and other self inflicted. Oh well
I'll start with more self inflicted first, as that's more fun to talk about.
Starting simple. I saw a shift **** I fell in love with years ago but found out it had been discontinued. I had asked if they could do a one off but they no longer had the prints for it, so I said what the hell I'll get it anyway. Turns out they sell blank shift pattern discs and I found a local engraving company to copy the pattern. It's a MGW Gripper **** to go with my MGW short shifter. Here's the original MGW piece

Here's the new one with the piece i had made locally....pretty damn good!!!!
Upgraded from the stock 78mm throttle body to a 92mm

My previous Suspension Techniques sway bar was actually rubbing on my GTO oil pan ever so slightly, so i ordered a GK Tech sway bar for almost 3" of more clearance

after much thought, i decided to swap out my MasterPower T76 turbo for an On3 Perforance Billet 7675. Better flowing than the MP76, very comparable to the Precision 7675 at half the price, and the LS and Mustang guys have been giving props


I bumped up from my 80lb injectors to a set of 95lb/1000cc injectors. I'm planning to convert to E85/Flex Fuel later in the year and took the plunge now:
Now for things that needed to be done.....
1. redoing the turbo setup for the new hood
2. cooling issues....this thing still gets hotter than i am comfortable with
Ended up cutting the new hood for Aerocatch latches
Sad day getting it towed from the old house to the apartment
New hotside ended up being modified LS truck manifolds due to timing, i just wanted to get it running while i continued to work on my tubular manifolds. Welded some stainless tubing and vbands to the cast iron manifolds. Had them coated and wrapped the stainless portion
2.5" 304SS crossover with flex section and used a exhaust cutout as the 2>1 merge


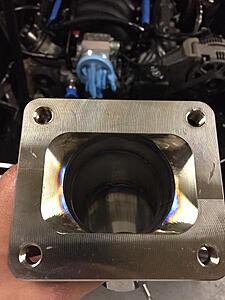
Used a Turboflanges.com 2.5" round to T4 304SS flange

Added a VS Racing 44mm wastegate and dump tube


Made a 3.5" downpipe that transitioned to 3.5" oval for ground clearance. It's only complete to the transmission for now. Plans will be to copy my Greddy DD layout and go from 3.5" > dual 3" > 3.5" tips (Greddy DD was 3" > dual 2.5" > 3.5" tips)


Shitty cell phone vid at idle
Next i went on to fluid cooling, in addition to the oil cooler i added earlier
Derale 4 row powersteering cooler mounted to upper radiator support

And finally on to radiator/cooling which is still in the works
for now the same Griffin 24x16x3 (19x15.5x2.5 core) radiator but with a 16" Spal Extreme fan (2500cfm)

Converted an Ebay aluminum overflow tank to a custom surge tank. Actually modifying this for more capacity and to be self bleeding.

Made a couple of block off plates to fill the gaps around the radiator and lower core support


I also have a LRB undertray to help with airflow while driving

http://lrbspeed.com/product/s13-undertray/
Cooling at idle is still an issue, so i'm making a fiberglass shroud for the Spal fan as a last ditch effor before i splurge for a slightly bigger radiator.
made a form based on the dimensions of the core and the fan

wrapped in a $5 Wal Mart polyester blanket
then a couple layers of fiberglass fabric and resin

Need to trim, prep, and paint after it's fully cured to see how it really works.
Cooling has been the thorn in my side for the last 2+ years. I have a pair of N1 style ducts that i have available but i want to keep that as a last resort. I'm seriously considering an Origin Stream or VS racing front bumper so i'd like to have cooling down before having to modify the new bumper.
Hopefully i have more promising updates soon!
Last edited by 91 240; 05-12-2018 at 08:51 AM.
01-29-2021, 11:27 AM
#177
So yet again another long gap between updates. This is going to have a few changes over the past 2 years.
I ditched my entire cooling setup and started over, however looking back it might have actually ended up being a dead Optima battery. It would hold a charge but as it heated up it would slowing start dropping. Oh well, new battery and these changes have been good so far. Never gotten over 205* after several spirited runs.
I started down the path of going with an A2W setup but decided against it in the end.
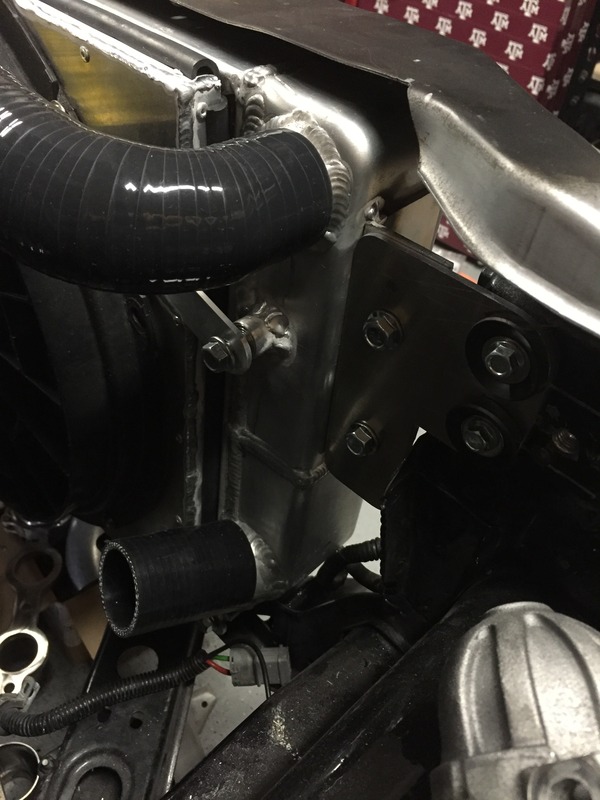
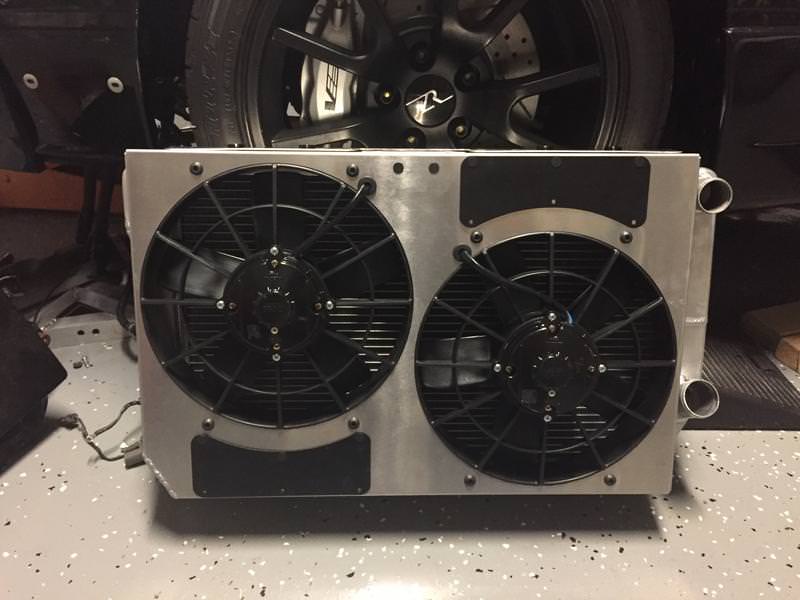
Ended up with a slightly large Griffin Dual Pass radiator with Derale dual fans. I had to notch about 1/2" out of one of the end tanks to get it to fit within the frame rails.
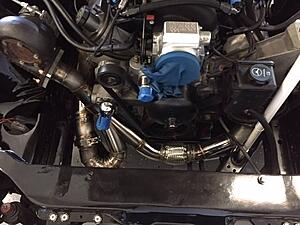
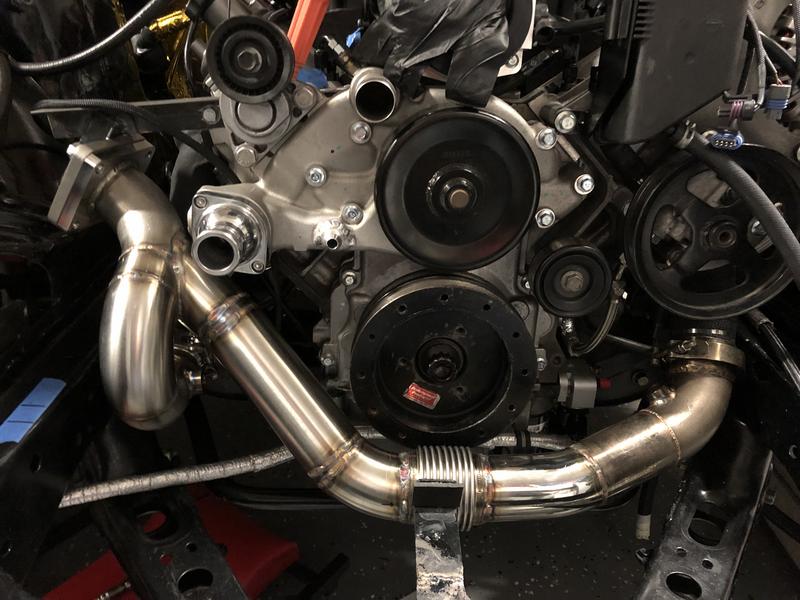
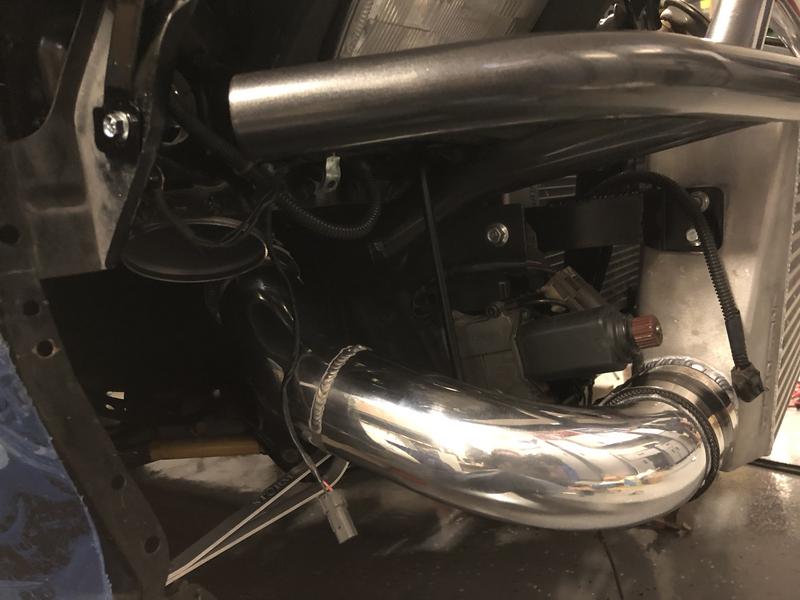
With the larger radiator/fan combo, i had to redo my turbo setup. I had to pull it in about 2" closer to the motor to clear the fan shroud. Stuck with the same 2.5" stainless
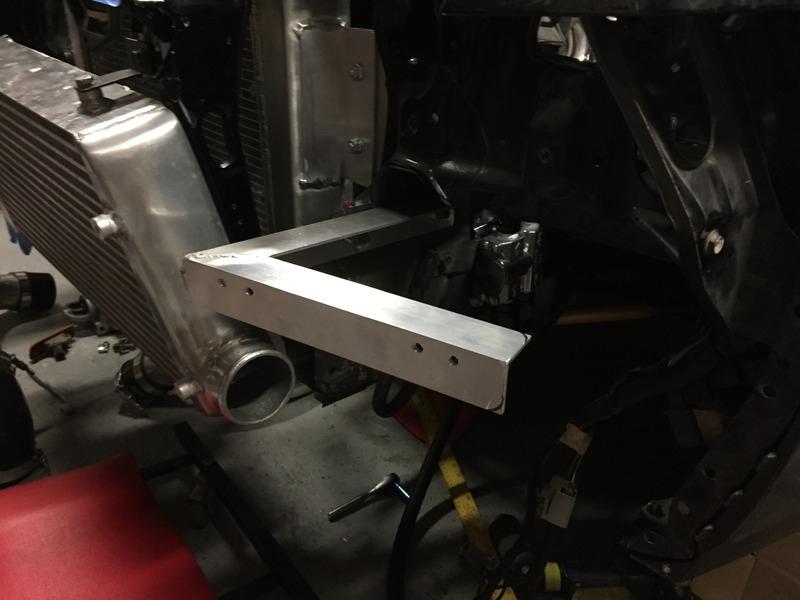
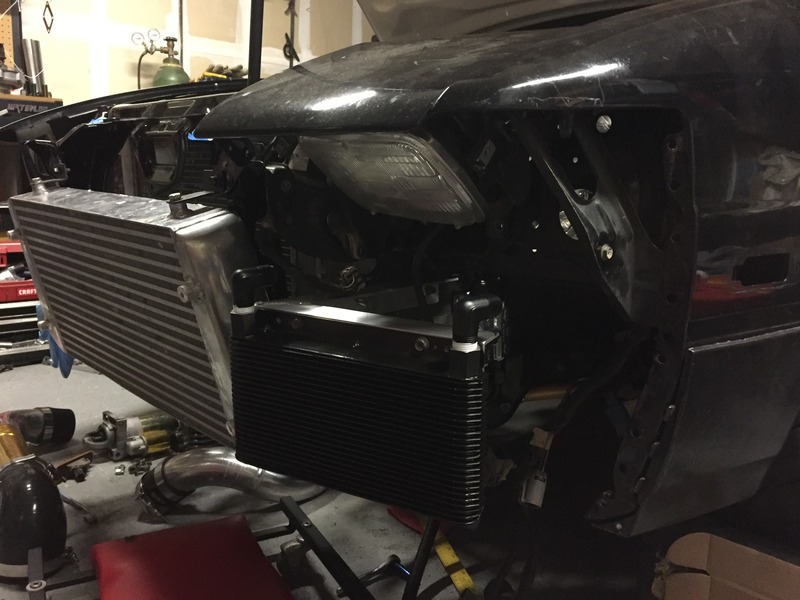
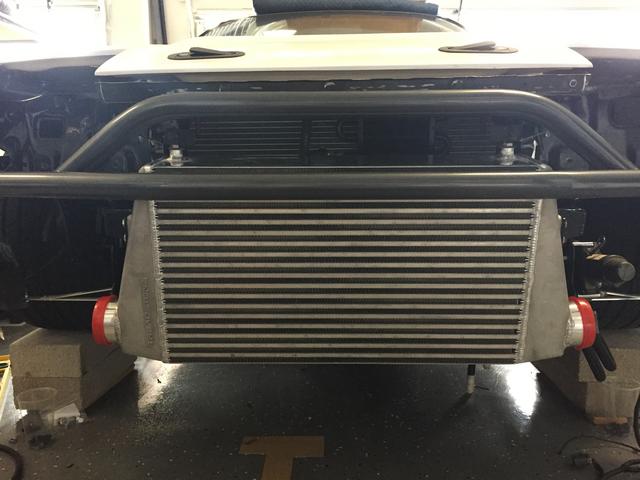
Ditched my old ebay FMIC for a Treadstone TR1245 31x12.5x4.5. IAT temps have been great so far, just barely above ambient
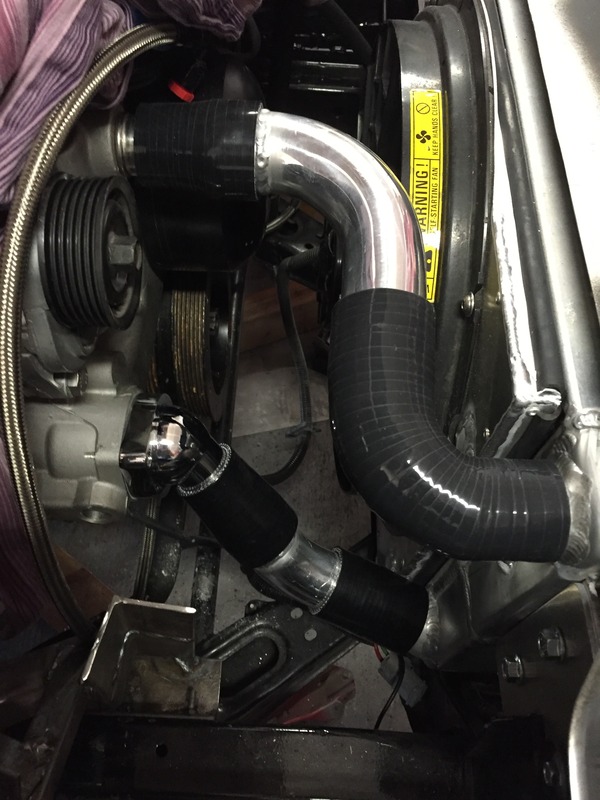
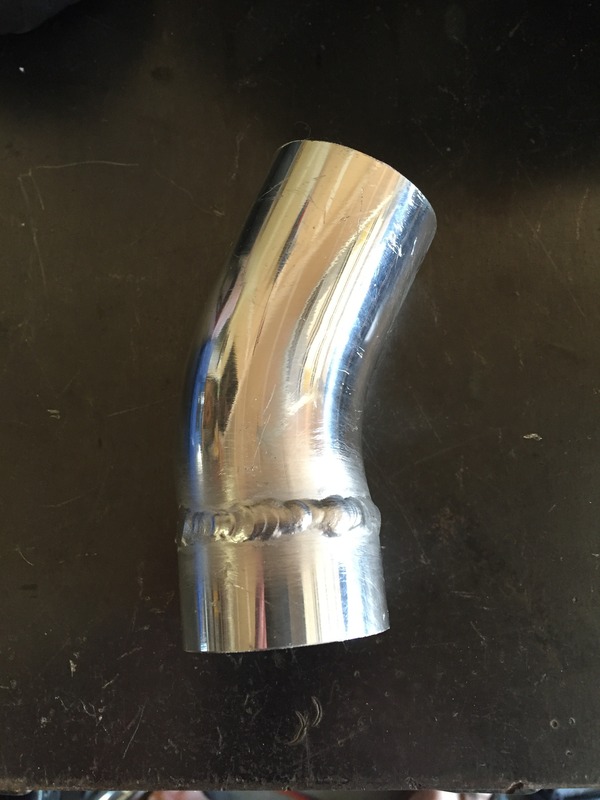
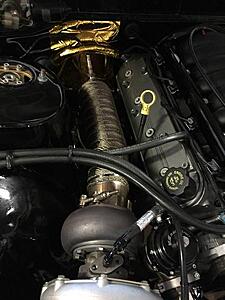
Then made some new IC piping. Got some good practice on my aluminum welding.
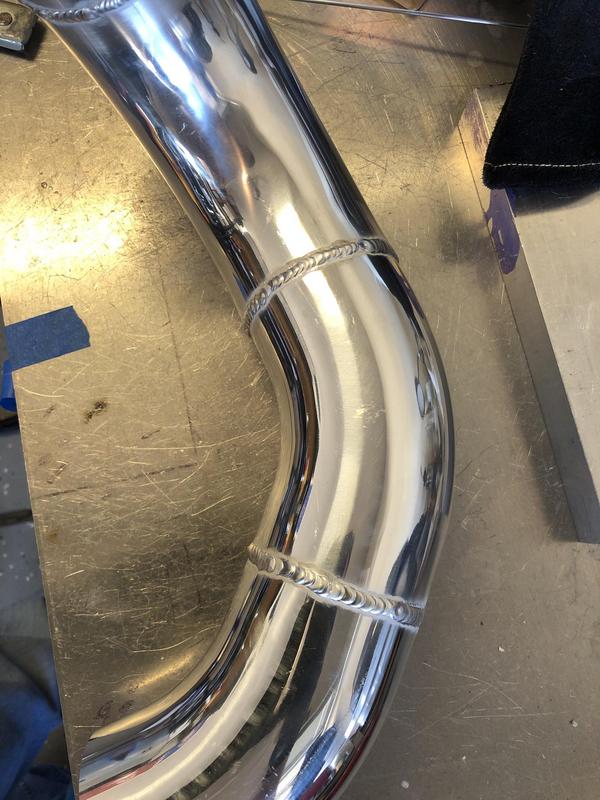


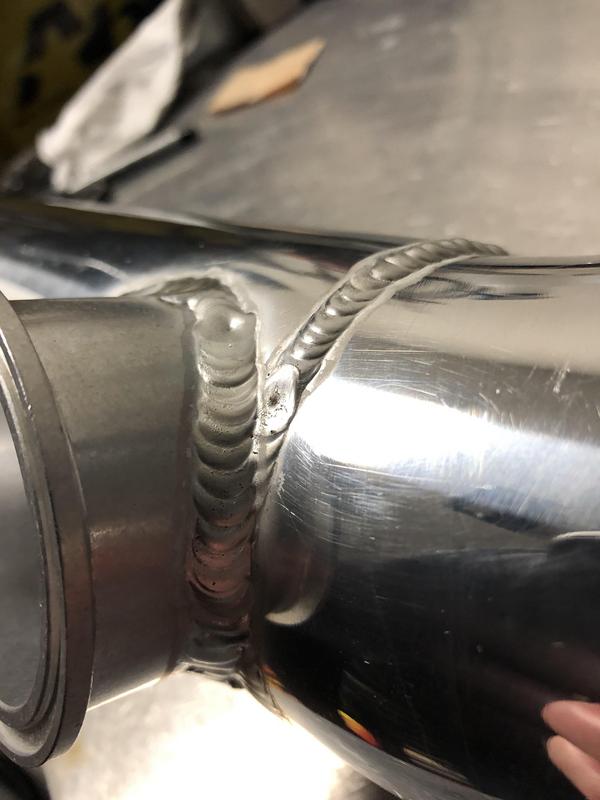
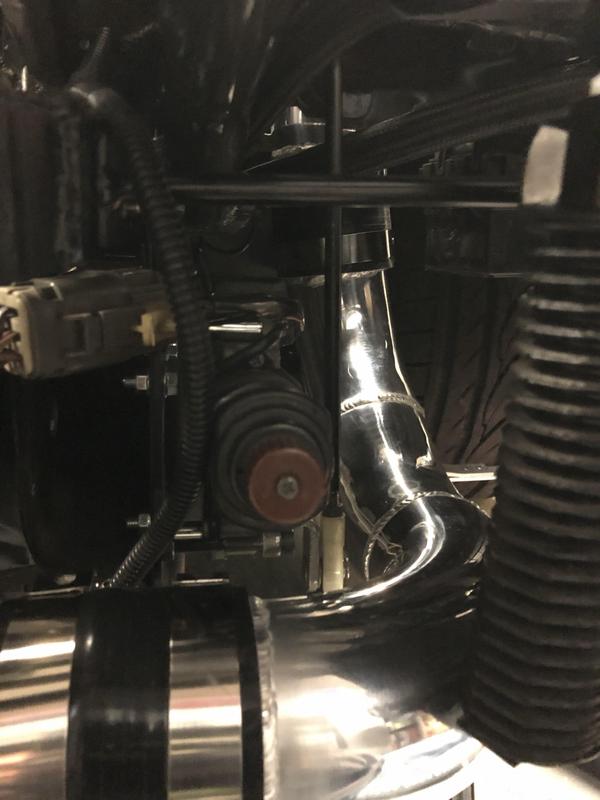
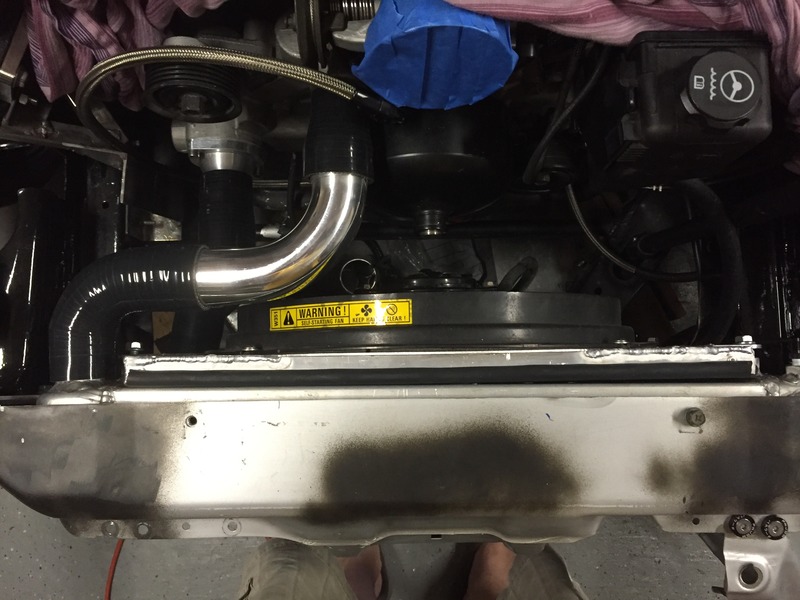
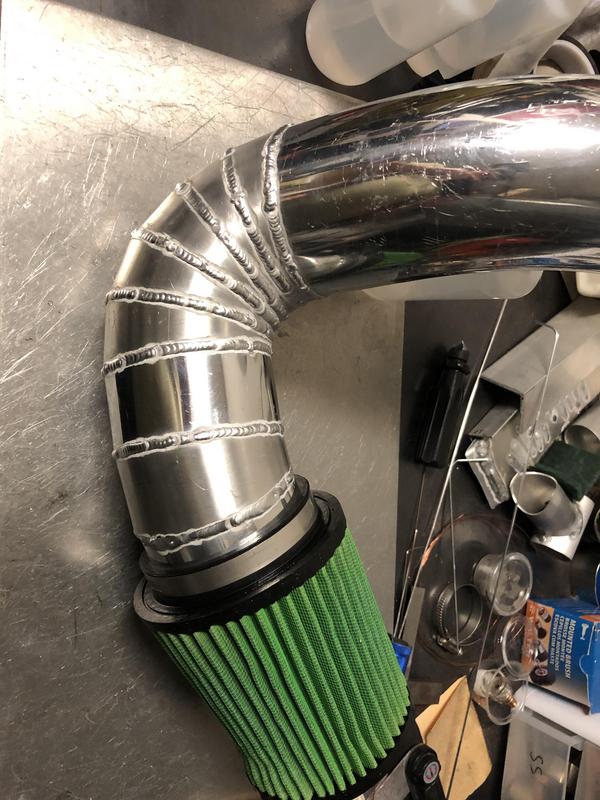
I just finished up my turbo intake piping. Needed to get creative with some pie cuts to get it where i needed it. This took about 6 hours of welding


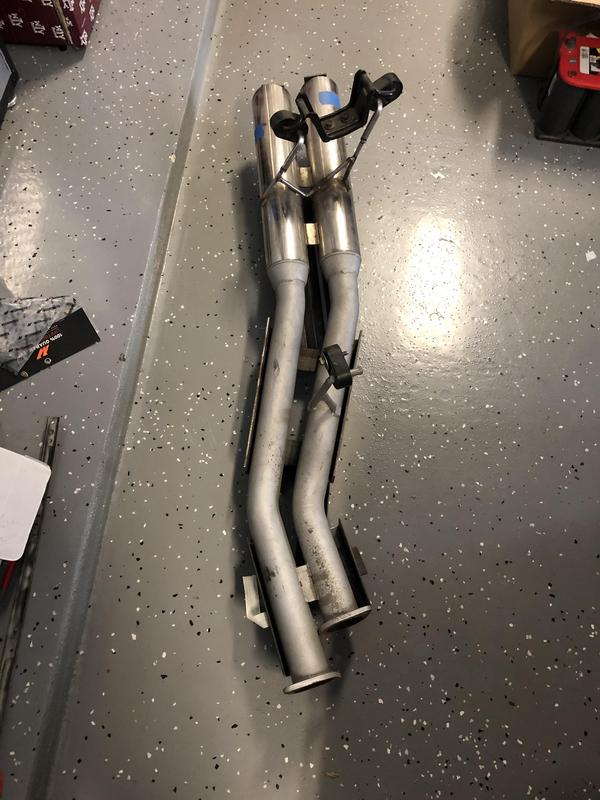
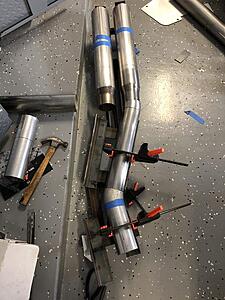
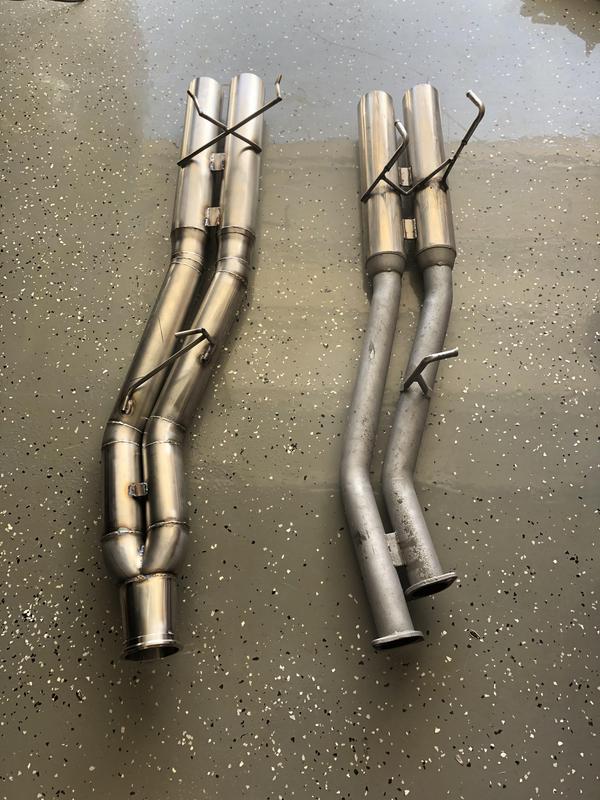
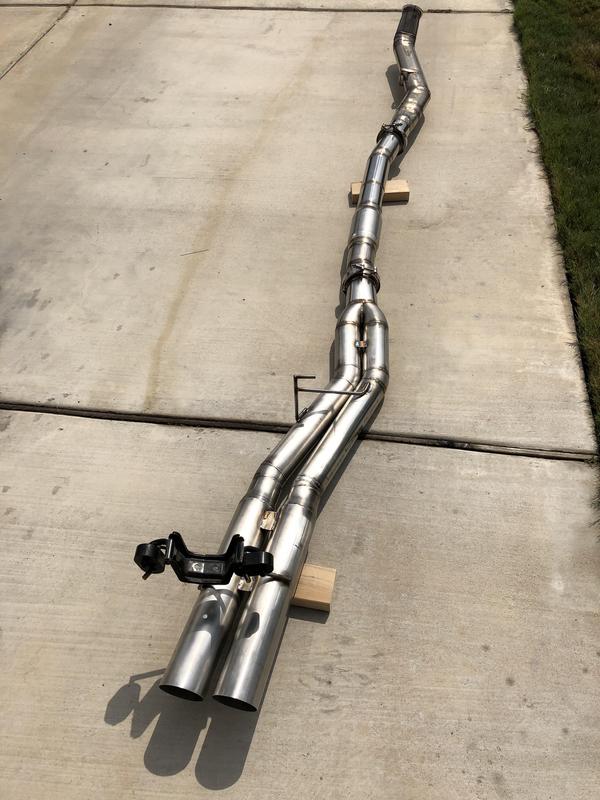
From there I wanted to finish my exhaust. I used my Greddy catback and made a jig to step up the piping size.
Greddy is 3" > two 2.5" > two 3.5" tips.
My exhaust is 3.5" > two 3" > two 3.5 > tips using a Vibrant Race Muffler
Little idle clip
I've been working with PCM o fNC with their mail order tunes. So far it's been awesome. I'd been struggling with my tune and wasn't able to find a local tuner that would work with a Gen3, 3 bar OS, MAP only setup. They've been super helpful and very quick turn around on tune updates.
I've taken it out several times and am getting more and more comfortable with it. I'm still not staying on it all they way through. Looking at logs i'm only getting to 80% throttle and shifting early....i'm a puss!
got a little vid of a couple pulls. I'm hoping to get more as the weather clears up and i can push it harder. Still on spring pressure ~7-8 psi and will slowing building up to 15 or so.
I'm hoping after a few more updates from PCM of NC i will be ready to rent some dyno time to see what this thing is making now. So far it "feels" faster than my previous setup at 608/526.
Oh, i'm pretty sure my stock T56 is on it's way out so i'll be getting a rebuild in the near future.
I ditched my entire cooling setup and started over, however looking back it might have actually ended up being a dead Optima battery. It would hold a charge but as it heated up it would slowing start dropping. Oh well, new battery and these changes have been good so far. Never gotten over 205* after several spirited runs.
I started down the path of going with an A2W setup but decided against it in the end.
Ended up with a slightly large Griffin Dual Pass radiator with Derale dual fans. I had to notch about 1/2" out of one of the end tanks to get it to fit within the frame rails.


With the larger radiator/fan combo, i had to redo my turbo setup. I had to pull it in about 2" closer to the motor to clear the fan shroud. Stuck with the same 2.5" stainless
Ditched my old ebay FMIC for a Treadstone TR1245 31x12.5x4.5. IAT temps have been great so far, just barely above ambient
Then made some new IC piping. Got some good practice on my aluminum welding.
I just finished up my turbo intake piping. Needed to get creative with some pie cuts to get it where i needed it. This took about 6 hours of welding
From there I wanted to finish my exhaust. I used my Greddy catback and made a jig to step up the piping size.
Greddy is 3" > two 2.5" > two 3.5" tips.
My exhaust is 3.5" > two 3" > two 3.5 > tips using a Vibrant Race Muffler
Little idle clip
I've been working with PCM o fNC with their mail order tunes. So far it's been awesome. I'd been struggling with my tune and wasn't able to find a local tuner that would work with a Gen3, 3 bar OS, MAP only setup. They've been super helpful and very quick turn around on tune updates.
I've taken it out several times and am getting more and more comfortable with it. I'm still not staying on it all they way through. Looking at logs i'm only getting to 80% throttle and shifting early....i'm a puss!
got a little vid of a couple pulls. I'm hoping to get more as the weather clears up and i can push it harder. Still on spring pressure ~7-8 psi and will slowing building up to 15 or so.
I'm hoping after a few more updates from PCM of NC i will be ready to rent some dyno time to see what this thing is making now. So far it "feels" faster than my previous setup at 608/526.
Oh, i'm pretty sure my stock T56 is on it's way out so i'll be getting a rebuild in the near future.
The following users liked this post:
Forcefed86 (01-29-2021)
01-29-2021, 12:54 PM
#178
This is awesome!! Forum traffic seems to have dropped off a LOT in the last few years.. but every time I get a notification for this thread it's a treat.
I've had five 240's... all S13 hatches, and always wanted to turbo LS swap one, but my 6'2" frame just never comfortably fit in them, looking back on it. Sad that they've shot up in price and are so hard to find locally here in coastal British Columbia... we had a huge drift scene driven by broke teenagers in like 2008-2015 and all of those relatively rust-free hatches for $1300 are long gone, turned into missiles and totalled. Now the few that are for sale are all guaranteed SR-swapped (automatically bumps the buy-in price up) and have "all the usual rust".. and they're like $5500-10K which sucks. Will have to just live this dream out thru your updates/vids!
I've had five 240's... all S13 hatches, and always wanted to turbo LS swap one, but my 6'2" frame just never comfortably fit in them, looking back on it. Sad that they've shot up in price and are so hard to find locally here in coastal British Columbia... we had a huge drift scene driven by broke teenagers in like 2008-2015 and all of those relatively rust-free hatches for $1300 are long gone, turned into missiles and totalled. Now the few that are for sale are all guaranteed SR-swapped (automatically bumps the buy-in price up) and have "all the usual rust".. and they're like $5500-10K which sucks. Will have to just live this dream out thru your updates/vids!
01-29-2021, 05:35 PM
#179
This is awesome!! Forum traffic seems to have dropped off a LOT in the last few years.. but every time I get a notification for this thread it's a treat.
I've had five 240's... all S13 hatches, and always wanted to turbo LS swap one, but my 6'2" frame just never comfortably fit in them, looking back on it. Sad that they've shot up in price and are so hard to find locally here in coastal British Columbia... we had a huge drift scene driven by broke teenagers in like 2008-2015 and all of those relatively rust-free hatches for $1300 are long gone, turned into missiles and totalled. Now the few that are for sale are all guaranteed SR-swapped (automatically bumps the buy-in price up) and have "all the usual rust".. and they're like $5500-10K which sucks. Will have to just live this dream out thru your updates/vids!
I've had five 240's... all S13 hatches, and always wanted to turbo LS swap one, but my 6'2" frame just never comfortably fit in them, looking back on it. Sad that they've shot up in price and are so hard to find locally here in coastal British Columbia... we had a huge drift scene driven by broke teenagers in like 2008-2015 and all of those relatively rust-free hatches for $1300 are long gone, turned into missiles and totalled. Now the few that are for sale are all guaranteed SR-swapped (automatically bumps the buy-in price up) and have "all the usual rust".. and they're like $5500-10K which sucks. Will have to just live this dream out thru your updates/vids!
the market for these cars is nuts. In August I will have owned this same car for 24 years!! Just last night i was looking around for ***** and giggles for another shell to think about swapping everything over to. Just as you've found, there's nothing close that's worth a damn and the asking price for some are ridiculous.
Hopefully i can keep your dreams alive, and wont disappoint you!
01-31-2021, 09:29 AM
#180
On The Tree

I've owned 2 s13 and 1 s14 all with sr20s. Great platform. What was your freshalloy or zilvia screenname? :-). I really miss these cars. 400 whp in these was the most fun I've ever had on the street. Do you use stock rear or something like a j30? Is that the ict alternator mount?