When you click on links to various merchants on this site and make a purchase, this can result in this site earning a commission. Affiliate programs and affiliations include, but are not limited to, the eBay Partner Network.
Mentor/Fabrication/motor assembly/tons of help by my best bud Sam Heath
Machining and clearancing done by Bob Heckt out of Dysart, IA
Tig Welding by Steve and Chris Williams AKA The Twins
Tuning done by Gerrot Jacobson @ TBG
This is my first "real" thread I've made on here. I enjoy looking around at other people's builds, so I decided to have a go at logging my own build. It is currently running, but there will always be more upgrades to come so I'll update it as needed. One thing I can say is it is much better to do these WHILE you are building the car and not when it is running, but oh well. The car was dubbed "E-bird" because I was originally planning on using a lot of cheap China parts off of eBay so it was a play on the name. However the build changed and I ended up using a lot of nice parts and going over budget, but the name stuck. I will put this out there as a disclaimer, but I go extremely into detail with things when typing so bear with me here.
A little bit about myself before I dive into it all. I am currently 21 years old as of last October. Money doesn't pour out of my wallet as much as I'd like it to so the car took almost a year from start to finish. I don't know anyone else my age that owns something like this so I take a lot of pride in what I was able to accomplish. Throughout the entire build I had a ridiculous amount of help from my best friend who does more LS swaps in a year than I changed my oil in my daily driver. We did 99% of everything in my grandfather's garage and my friend's garage. Sending the car out to have chassis/fabrication work was out of the budget entirely, and my friend has fabricated for a few years so I trusted him completely with it all.
The goals for the build were to run 9s, all while being fairly streetable, and keeping the costs somewhat down. I really didn't care too much about driving the car around, but it's nice to be able to. As far as power I wanted to be able to make roughly 800whp full tilt.
Some history on the car - It's a 1995 Trans Am. Originally was an LT1/T56 car. I bought it when I was only 17 years old bone stock from an old man in Minnesota. One owner car with only 48k miles on it. Extremely clean for an LT1 car. This is a pic of the day I got it, sorry for the grainy picture.
Here's a picture from my high school senior pictures
I started modifying it almost immediately. Doing the usual bolt-on stuff. Eventually dug into the motor and did a cam swap. After the cam swap I had the car tuned and obviously the power gets boring. The best I ran with this combo was a 12.9x. I came to a crossroads with the car on what to do with it at this point. One road was to stick with the LT1 and go for the "different" factor by building it up with a nitrous/24x setup. The other was to leave it the way it was and drive it (sounds silly now that I even considered that). Finally the third route to take came about from my friend. He has a 4 digit HP single turbo LS S10, so naturally he convinced me to go the FI route which sounded great to me. Ironically not even 6 months prior I absolutely hated LS stuff. I guess I am eating my own words at this point.
I started gathering parts in August of 2015. The first thing I got was this TH400 from my grandpa that was freshly built with not very many miles on it. Has an 80e direct drum, 34 element sprag, and a shift kit. The rest is basically stock. Nothing too fancy about it, still retains the vacuum modulator which I got to work with a turbo motor. But more on that later. Best part was it was only 50 bucks. Helps to have a family full of car nuts.
Soon afterwards we started trying to find a decent LS core from the local junkyards to use for the car. I didn't want to have a running junkyard motor in the car just for the peace of mind so we were going to rebuild/refresh everything. After going through a few crap 5.3s we actually found a Gen 3 4.8 that was in great shape. Just to give you an idea how much crap we had laying around...We also snagged 6 6.0s out of the yards shortly after this to add to the chaos.
I ended up using the 4.8 (4.8/5.3) block that we got, along with a 3.622 crank we had out of a 5.3, with a set of Gen 4 rods that had seen 30+ psi in my friend Sam's S10, and a set of new stock replacement pistons off Rockauto. It was a weird missmash of parts but it works great. We took all the stuff down to our good friend Bob down at Heckt Power Products in Dysart, IA. He's done some pretty cool stuff such as this 800+ HP NA all aluminum LS for an extreme late model car.
Off to the machine shop!
While everything was at the machine shop I started gathering all the components to swap the LS into the LT car. Since this was a budget build I went to the local junkyard we frequent very often and managed to snag a stock LS K member as well as a rough looking but non leaking power steering rack. Which ended up cleaning up nicely with some paint. I also grabbed an LS steering shaft off eBay that day for 25 bucks.
Since it was still Summer here in Iowa, I was driving the car still. So no actual labor was being done on it yet. With the block being machined, and the rotating assembly being balanced I didn't have a whole lot to do besides hoard parts and paint things. My grandpa is a talented automotive painter so he did my valve covers along with the front and rear covers for me. We went with a candy apple red and three coats of clear on top. They turned out great.
Next up was valvetrain components. I ended up getting a set of BTR .660s from my bud Sam who ran them for a short amount of time and the price couldn't be beat. Pushrods are a 7.400 length chromoly 5/16 from BTR as well. The cam choice was an LS9. I ended up getting it from a local GM dealership for 108 dollars, and used a 1x front cam gear from a junkyard motor along with an LS2 chain. All I had to buy was a front cover and sensor which wasn't very much. There's a lot of hate for the cam but I ended up making a LOT of power on it, but there's no doubt some left on the table with it. Finally to top off the valve train a set of BTR trunnions. Super simple to install yourself with a bench vice and some sockets.
Probably the prettiest picture you can take of valvesprings
Stock LS9 cam. For 100 dollars they work pretty well
Proving you can put stock bolts through "BTR" trunnions
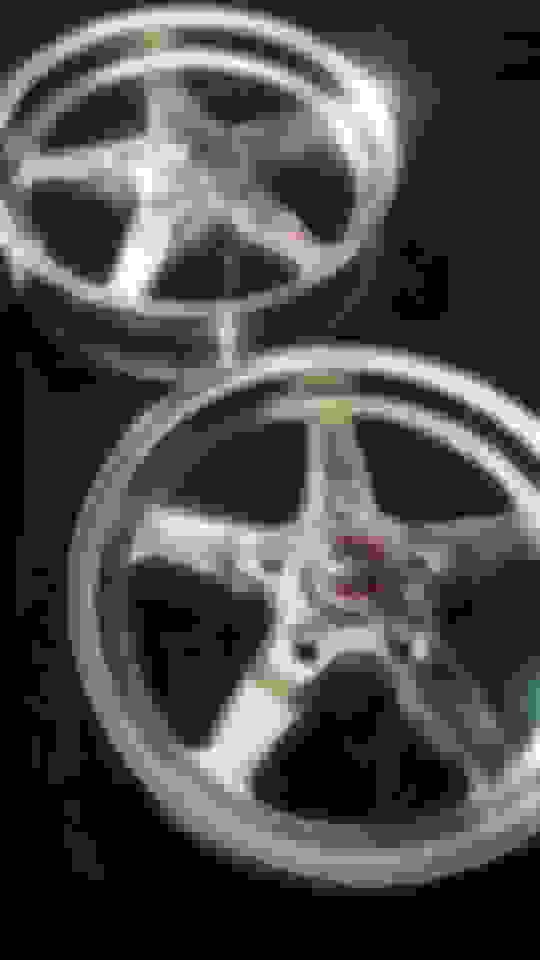
My primary focus at this time was to just get the car running and I have a huge pet peeve for buying wheels for a non running car. I still had stock wheels on the car and a deal popped up that I just couldn't refuse. I ended up getting a pair of polished Racestar front 15x3.75 wheels for 200 bucks. Insanely good deal and one of my stock wheels was slightly bent so it was sort of a safety precaution as well. I cannot stand black on black so the polished wheels are a great contrast.
Last edited by Almonz T/A; Dec 29, 2016 at 07:45 PM.
I ended up grabbing a set of coils from our "potluck" of LS junkyard parts as well as stock truck wires. In the end the wires wouldn't work for what I was doing but the coils work just fine. 10 dollars for a set of them, vs 80 dollars each brand new. I've never seen a coil fail so I just stick to the junkyard ones for budget sake.
Since I have an F body a truck intake obviously wouldn't work. At this point I was considering an LS6 or LS1 intake, the LS1 being the more attractive choice price wise. In the end though I decided to spend the extra money and get a Vic Jr with Holley efi rails from Doug Cook at Motion Raceworks here in Iowa. I have seen great results with the single planes in boosted applications so that influenced my decision. I have heard of issues with the Edelbrock rails so that's why I sprung for Holley rails. I ended up making my own mounts which was fairly simple. I also picked up a flow matched set of SD 80# injectors shortly after.
The mounts were fairly simple to make. The hardest part is drilling holes for the brand new rails to have bolts go through but they work just fine.
For the cylinders heads I am running the stock Castech (I think that's how it's spelled) 706 heads. I checked them for cracks and evenness along the sealing surface. I have access to a valve grinding machine so I cleaned up the stock valves and put a new surface on them myself as well. They turned out really nice and seal perfect. I ran into a little hiccup with an exhaust bolt that I couldn't get out so I had to take the heads down to the machine shop to have it removed. It actually broke my machinist's bit because the bolt was so stubborn.
At this point winter had finally hit so the car was stored which was a perfect time to start tearing it all down. I had a PRW flexplate and Profession Products balancer show up, both sfi approved. I decided to take them down to the machine shop to just be spun to make sure the motor would have perfect harmonics. The balancer actually was pretty dead on but the flexplate needed quite a bit of material removed to spin true. I don't have any pictures at the moment unfortunately.
January 4th, the first day of tear down. First goal was to get the motor and transmission out so I could start selling off the stock stuff.
The stock LT1 T56 was extremely clean. I ended up selling it alone for 1300 dollars!
During tear down I saw this and had no idea they were there beforehand. Ended up breaking it into a bunch of pieces while trying to remove and wound up in the trash.
We got the motor out shortly after. I hated the idea of dropping it down for under the car so we pulled it from the top. Went really smooth to be honest and I'll probably never do it any other way. We left the intake on as you can tell which for some reason everyone says you can't. Obviously you can which makes the job 10x easier.
I was originally planning on going with a CXracing or On3 turbo kit to keep costs down but I found this setup for sale from a guy up in Wisconsin. I drove up and got all of this for 1200 dollars. A complete T6 turbo kit built for a S475, Treadstone 4.5" IC, along with a front hoop/brace to work with everything. It was honestly a deal I couldn't pass up. Some modifications needed to be made to get it all to work but it was worth it.
This is probably about the point where the build started getting crazy. Some sawzalling was obviously needed which I hadn't planned on until I bought this, and didn't have much of a choice.
I got some more parts in the mail at this time as well. Got a new Fbody pan off Rockauto as well as a Howe radiator to fit inside the new front hoop.
Finally had nearly everything to get the motor assembled.
New Howe radiator. A bit different than the usual Griffin combo but it works great and is made in the USA for those that care.
I ended up need a new front cover to run the LS9 cam so I had to retire my nice candy apple front cover. I whipped up this idea and is an inside joke among my friends. I used to say this all the time, and now I actually did a swap in my car. The irony is real.
Finally got the block back from the machine shop so it was time to start throwing it all together. We built it over the course of a few days in my friend Sam's spare bedroom. I put it all together, while he instructed me and watched over it all. Not my first motor build but my first time building an LS. Super easy motors to put together, I like them a lot more than the previous SBC's I did. The block had the bores cleaned up, and all new plugs put in. Bearings were all bi-layer Clevites. Rotating assembly all balanced and consists of a stock 3.622 truck crank, Gen 4 rods with ARP 2000s which were honed .002, and stock replacement dish pistons with a steel top ring. Rings were gapped accordingly for boost, with cylinders 7 and 8 opened up a couple more thou to prevent any issues that may arise. Chinese head studs were used as well as LS6 head gaskets. Heres a few pictures during the process.
Once assembled we needed to get it out of the house and into the back of the Jimmy. We literally carried the long block down a flight of stairs. I'm never going to do that again. They are heavy as HELL! We ended up using a standard 4150 flange engine hoist plate and surprisingly they have the same bolt pattern as the knock sensor valley plate.
This isn't my motor, but it's a neat little trick to save some money and reuse the stock truck windage tray. If you go to an Fbody pan you can slice the front 1/4 of the truck tray off and it works the same as an Fbody tray.
Last edited by Almonz T/A; Dec 29, 2016 at 11:04 PM.
Ended up getting my turbo in the mail just before I started cutting the car apart. Went with a cast T6 S475 with a 96mm turbine. Fairly heavy turbo for what it is, but should meet my goals. Gotta do the 'ol milk carton comparison!
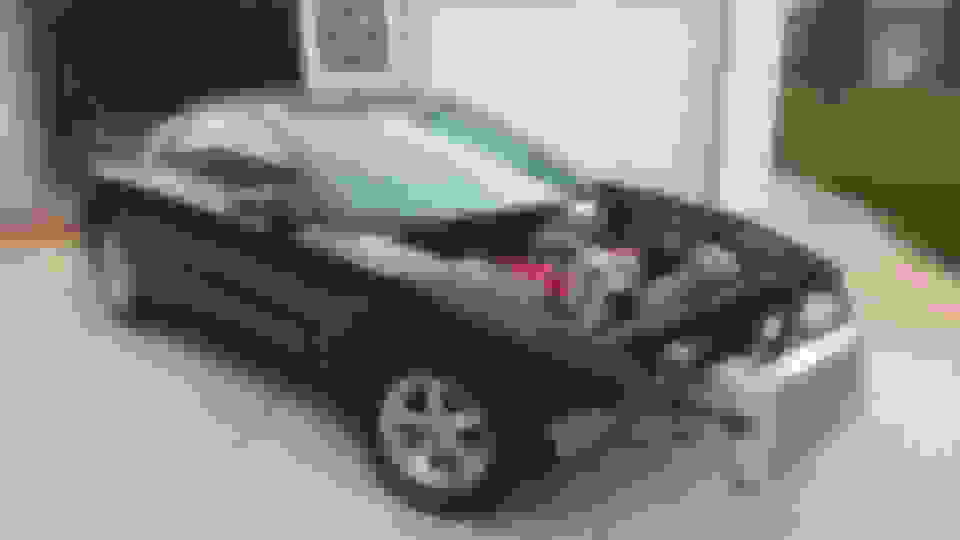
Finally started cutting into the car. I got a LOT of crap for doing this, since it's a low mile car. I really could care less though as I don't think these cars will ever be worth anything. The first cut hurt a little bit, I even took a picture of it. After that though it was smooth sailing.
The first thing I cut out was the cowl. I wanted to run a 90 degree elbow off the intake and the cowl had to go. I also wanted to make as much room as possible in the car seeing as how I would be racing it a lot. If you decide to cut the cowl make sure you go super slow with a cut off wheel and not a sawzall. I took a picture mid process as you can see here, but I ended up going to about an 1/8 from the windshield. Yes my hairs were standing on end while doing it.
Next I deleted all the AC and heat stuff which required a lot of work in the interior of the car, but frees up so much room and weight. I highly reccommend doing it for any serious builds out there. I also made my own block off plate for the huge hole in the firewall from removing it. Finally I started doing a lot of measuring for how much material to remove, but I chopped the entire front of the car off. My grandpa nearly had a heartattack when he first saw what I did.
Last edited by Almonz T/A; Dec 29, 2016 at 07:42 PM.
I will say this, I wasn't planning on it initially but if you ever get the engine bay uncluttered it's the perfect time to lay fresh paint on. I am super glad I did. Took a lot of time to get the prep work done but it came out great. I used my grandpa's spray gun, laid 4 coats of base and then another 3 of clear coat. Pictures don't do it justice.
Before:
After: You can see just how much I ended up cutting out of the car.
If you ever do a lot of painting at once these are a life saver. Definitely worth investing in so you don't choke out.
I ended up going to manual brakes. Went with a Strange master cylinder. I had to drill out the stock pedal to get it to work which is normal. I had thought about keeping the stock setup but I wanted as much room as possible and manual brakes have never bothered me on the street. You just have to get used to the feel. I also went with Spohn solid mounts, they are a nice piece.
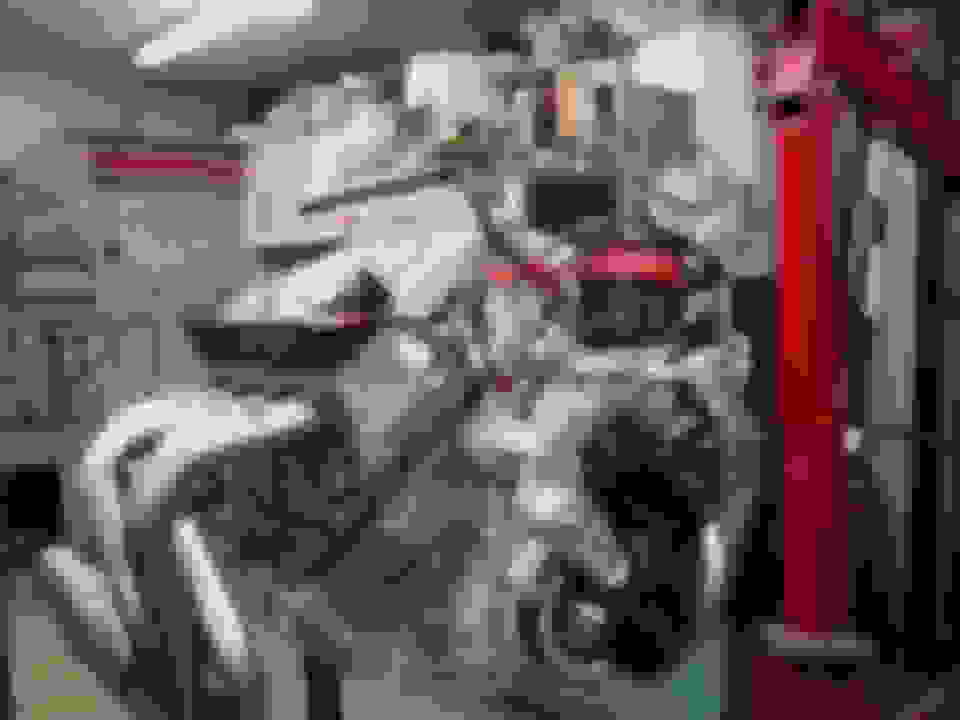
This was the night when we finally got the motor in. We went ahead and got the transmission bolted to it and threw it all in together at the same time. This was probably one of the toughest but most fun nights of the build. We had just finished getting the motor together and hauled it 30 minutes to my grandpa's where the car sits from my friend's house. We got it there and it was already 1 AM and I had to work at 7, and I said "Well we might as well get it in the car if we are this far." It was 5 AM by the time we were done and I didn't even go to bed. I was exhausted but seeing that motor in the car was the a huge motivator, and those who have built a car know it's easy to get unmotivated sometimes.
Last edited by Almonz T/A; Dec 29, 2016 at 08:06 PM.
I was already running into issues right after getting the motor in and finding out what building a car is really all about. My friend always puts it "It's like trying to put pieces of different puzzles together. They just weren't designed to do that." The passenger side header fit alright but the driver's side was hitting on the motor mount badly and needed a primary rerouted. The previous owner took a pair of Chinese turbo headers and modified them to work with a motor plate, which I was using normal mounts so that's why. I ended up calling my buddies about an hour away that run a chassis/fab shop and had them modify it. They rebuilt the primary from scratch and didn't even have to have the car there. It fit like a glove, that's how good these guys are.
I also had them weld on a different wastegate flange because I was running a 60mm vs the previous 44mm. They actually were about to just weld the new flange to the old one which worked out well.
It all fit great! And finally could do some real mockup with the turbo.
Off for fab work! My friend had all of his equipment at his house which isn't too far away so we ended up just trailering my car over for the weekend. We like to call it the "sketch trailer" since it's actually an old reinforced RV frame that he hauls his S10 on. Hauling a much wider car such as an F body on it is a little scary but it gets the job done. I also got my new wheels on just before we trailered it away.
The truck we are pulling it with is one of my friend's multitude of LS swapped vehicles. In this case it's a 2011 aluminum 5.3 in a 1990 K1500.
Our main goal for the weekend was just to get the new front hoop welded on which took a while to get everything perfect and level, but it turned out super nicely. You can see the IC and radiator supports pretty clearly in this picture.
All finished up and ready to roll. Still need some paint on the fresh metal but turned out awesome. Frees up a tons of room and believe it or not the front bumper still works just fine.
We were about to trailer it home just before I took this picture but the winch quit on us right before we got it on the trailer so it had to stay at this house for a couple more days. Another big step and motivator towards the end goal was achieved.
Immediately when I got the car back home I began work on it by taking out the old stock fuel pump setup. I planned on running E85 but also wanted to keep the stock tank so I decided to keep cost down to run a dual Walbro 450 setup utilizing the stock hat. My friend built me this and it works flawlessly. They merge into a single -8 bulkhead fitting and still has the stock float. The wiring wasn't done in this picture so that's why it looks rough. And yes I did the trap door mod. It makes changing pumps a breeze.
Next up were the brake lines. I hated the stock hard lines up front so I decided to fork over the cash and go with a -4 braided line setup all up front. It still taps into the stock rear hard line but I'll probably change that down the road as well. The flexible lines make it so much easier to work with than hard line so to me that justifies the cost. I currently don't run a proportioning valve and have no issues stopping but I might add one someday.
I decided to take the road less travelled and run a standalone setup with a VEMS V3 ecu. My friend used it on his S10 so I got his old setup. It worked great for him and it's what he had the most experience with tuning wise. The harness he had was all unloomed so I went ahead and reloomed it to make it look nice.
Next was to get the fuel pressure regulator and lines at the motor figured out. I used a Motion Raceworks bracket to mount the Magnafuel boost referenced regulator I went with. It routes the return line right under the intake which is slick. The passenger header also hit with the heater core bungs on the pump so I had a plug welded over them and my friend made me a straight thermostat housing to clear the collector. I ended up modifying the fuel lines again later on. I also got the first of many vacuum lines hooked up, which is a -4 AN braided line.
Next up was to get the cage done. My friend agreed to weld it all in for me since he had done cages in the past. I managed to catch it on sale and got a Jegs 8 point mild steel cage for 200 bucks shipped. No one had used them before so I was shooting in the dark but it actually fit well for how much it costed. It was not as fancy as some of the other options but for what it cost it was really hard to beat. So I stripped the interior down to bare metal and got the car loaded up again on the trailer.
You can see here why you need a double stall garage to do this stuff. One for the car, then the other for all the parts LOL
The beginning of installing the cage featuring a turbo S10. I ended up getting a pair of Kirkeys which are actually a lot more comfortable than you'd think as well as Racecraft seat brackets. Getting the seats in the right position was a little tricky since I'm such a small person but with some time and patience we got it nailed in the stock location.
Shortly after getting the cage in I got a MWC short torque arm in the mail since I am running a TH400 now. Super nice piece!
I also go my transmission cooler which is a Hayden "The Dawg" unit. Wasn't nearly as expensive as the Derale units out there so I decided to try it out. I had no room up front to mount it so I was forced to remote mount behind the rear seats underneath the car. I routed -6 lines to it and it works great so far. The fan is a little loud but so is the car in general.
At this point it was actually starting to look like a car again. I ended up finishing off the intake manifold with an Edelbrock 90* elbow and a Chinese throttle body. They have always worked great in my experience as long as you are on speed density due to the IAC hole sometimes not sealing the greatest. The previous owner of the turbo kit was running a Holley Hiram with a wiggins clamp so I had ended up ordering a 15* piece of 12" aluminum pipe off eBay and decided to just clamp that onto the throttle body to keep things simple.
I got my catch can off eBay. It's just a dual -10 AN can with a baffle and a vented breather. Works perfectly. I mounted it somewhat in the back to keep it out of the way. I also got some other random tidbits such as the alternator bracket from Speed Inc. It never fit properly for some reason even when installed correctly so I ended up ditching it. The alternator was one of the biggest issues I had in this build from mounting it to actually getting it to work, it just gave me the go around for the longest time.
You probably noticed the different color valve covers as well. I had to have two -10 fittings welded on so I had to blast them down again and ended up painting them in a metallic navy blue which I like a lot more than plain old red.
I also mocked up the front bumper to get the exhaust trim ring mounted and the hole cut for the 5" down pipe. The bumper still needed cleaned up and the front hoop a fresh coat of paint so this was just a temporary fit. The intercooler just barely clears, I honestly don't think it could be a more perfect fit. It's hard to read but the ring says "Boosted E-bird - panting droppin' sh*tbox". I got it from Monkey Fab Garage where he does custom ones like this.
Also started painting the cage as well as throwing the interior back together. Everything fit great around it, albeit tightly. I used black rustoleum gloss brush paint if anyone was wondering. Takes a few coats but works great.
Awesome build! Sub worthy too. Keep up the badass work.
Thanks! I got it all finished a few months ago and am just now posting it all up, but it'll never really be "done" lol. Just working on getting it all up here at the moment. Takes a while to type these up!
This was by far the most tedious part of the build - thinning out the entire factory body harness. The goal was to basically get it thinned out to the bare necessities which included lights, turn signals, windows, and the radio. It took forever, but it was worth it and saved over 10 lbs in just wiring! I am going to end up deleting the radio anyways though because it's useless LOL. I don't have any pictures but I also took all the insulation out from underneath the carpet to cut weight as well.
Afterwards this is what it all looked like. You can see just how much is eliminated behind the stock console while still looking factory on the outside.
Once all the wiring was done I wanted to cut out the license plate area on the front bumper to allow for more air to the intercooler. I also decided to get rid of the fog lights to serve the same purpose. It turned out great but I had a little accident....
I was using a utility knife with no gloves on (I know I was dumb) and pulling towards me while I was cutting out the hole for the intercooler and the knife slipped, and ended up jumping onto my hand. My friend was there with me at the time and I initially didn't even really feel it. I threw a towel on it and decided to go wash it, but I looked down and saw bone and immediately knew I needed to go to the ER. I was amazingly lucky because the cut depth somehow missed my tendon by less than a millimeter which would've resulted in major surgery to repair it. Moral of the story is don't do stupid stuff and think safety first! And also use the right tools lol
Gas Monkey Built a 6-Wheel Ferrari Testarossa With a Corvette LT4 Engine
Slideshow: The controversial Ferrari F6 swaps its original flat-12 for a Corvette Z06-derived LT4 V8 and sends power to four rear wheels through a custom-built drivetrain.
7 Most Reliable High-Performance Engines GM Has Ever Built
Slideshow:These GM engines didn't just make huge power, they survived abuse, boost, track days, and six-digit mileage with a reputation for refusing to quit.
6 Common C5 Corvette Failures and What's Involved In Repairing Them
Slideshow: From wobbling harmonic balancers to failed EBCMs, these are the issues that define long-term C5 ownership and what repairs typically involve.
Retro Modern Bandit Pontiac Trans AM Comes With Burt Reynolds' Autograph
Slideshow: A modern Camaro transformed into a retro icon, this limited-run "Bandit" build blends nostalgia with brute force in a way few revivals manage.
Top 10 Greatest Cadillac V Series Performance Models Ever, Ranked
Slideshow: Cadillac didn't just crash the high-performance luxury vehicle party, it showed up loud, supercharged, and occasionally a little unhinged...
Coachbuilt N2A Anteros Is an LS2-Powered C6 Corvette In Italian Clothes
Slideshow: A one-off sports car that looks like a vintage Italian exotic-but hides a C6 Corvette underneath-just sold for the price of a new mid-engine Corvette.