When you click on links to various merchants on this site and make a purchase, this can result in this site earning a commission. Affiliate programs and affiliations include, but are not limited to, the eBay Partner Network.
With Winter here again, I'm back to my winter sojourn of creating my DIY twin GT35 setup.
Bought:
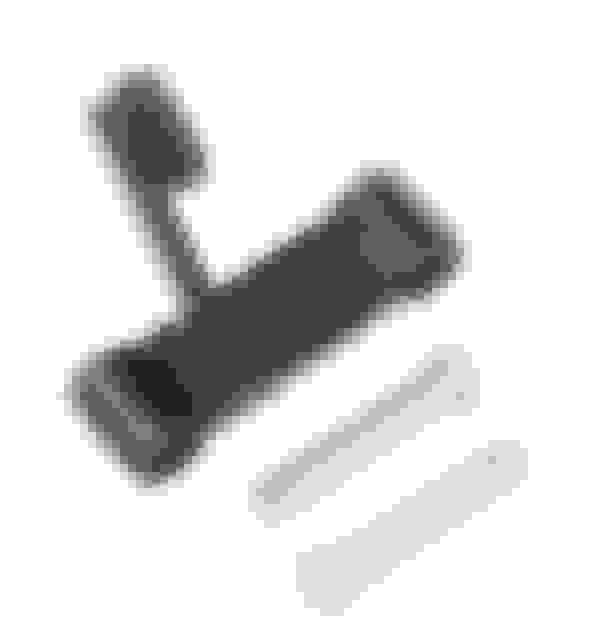
1. Intercooler for the new setup. Prior intercooler was 3.0" in/out. The new one is 2.5" in/out. Path is top section goes from drivers side to passenger side, lower section the opposite
2. Another box of 2.5" Intercooler pipes/couplers/T-Bolt clamps.
3. New BMR "Turbo" K-Member.
Last winter my tentative plan was to use a holesaw to cut some ports in the vertical steel panel behind the headlights in order to route the compressor outlets, but discovered to my relief I can actual route the piping for the airfilter and intercooler input/output thru the fender cavity with some trimming.
Old Intercooler
New Intercooler:
Mocking up the Throttle body inlet feeds. Mocking up the Throttle body inlet/feeds prior to welding.
Welded up, getting measurements for some of the piping to the fender and on to the intercooler.
Drivers side intercooler to Throttle body mockup.
Slightly different view
This shows the proximity of the various pieces. Stock flat hood closes just fine.
With the airfilter here, it will get plenty of cool air, not heated air from the engine bay.
The top pipe is coming thru the stock air filter aperture. I'll have to replicate this how on the passenger side though since it doesn't have the same provision there. No worries
Just so you can see the the intercooler in/out routing a tad better.
Showing the contrast between my old Tubular K-Member and the new Turbo clearanced BMR.
Last edited by mightyquickz28; 12-29-2019 at 10:34 PM.
Bought a spare 5.3 out of a Silverado late in 2019. Main purpose was to either have a second engine if something happens to my current one OR.... build an engine for my buddies 1980 T/A conversion. I've torn it down to the shortblock and bought an Ls1 intake, Fbody oil pan, Sloppy stage 2 cam, LS7 lifters, degree wheel kit, an adjustable timing set, had the heads done, etc.
But during the process, I also used the engine on the engine stand to mock up some bracing and doing some test fitting of my DIY twin kit. Drivers side. This was all welded up winters ago. Sorry about the poor lighting. Passenger side. As you might have read earlier, I opted for the On3 stainless V Band housings so the manifolds terminate with a 2.5" Vband. By this point, I had the truck intake off and some other debris out of the way. This has better lighting so you can see how the turbo's and down pipes layout a bit.
Great build man I have enjoyed reading your progress and it would be nice to know how to weld maybe one day. Keep posting! Also did you make your support for the FMIC? Mine was just mounted on the thin metal piece of the bumper I kept. This time around might do the same and add braces to the bottom not sure yet. It will be along time before I get anything going again.
Yes, I built the frame for the intercooler using some aluminum angle stock I purchased from Lowes or Home Depot. I measured and cut the pieces, then put two bolts in the corners to dually, bolt the frame together and pass through the front support to make it secure. I have two aluminum straps on the lower mounting points of the intercooler to keep in locked in place. I'm going to pull off the intercooler and frame and weld the frame pieces together. I didn't have a Tig welder back when I originally turbo'd the car.
On the time factor, yes, it takes so long for us hobbyists to get everything done. I'm envious of the folks on here that can start a turbo project and seem to be done in a week or weekend. I work 10 hours a day, take care of the house, cook the meals, do the laundry, car care for my other street vehicles(and get volunteered by my wife to fix her friends vehicles, lol).
At this point, I still have to
plumb the intercooler piping for the passenger side
weld a bung on the Throttle body merge for the IAT sensor
While the two 3" down pipes have all been welded up down to past the starter, I have to get that merged into the intermediate pipe
I'm curious what I will find out regarding the tune. It was starting and running great this past year with the PT7675, running stoich at idle and all cruise levels and never had a bit of knock retard at all during the drag racing passes. I guess with the boost coming in early it will change the A/F ratio.
No problem. Thanks for the info on how you framed yours up. I hear ya with working it�s hard to find time. Plus all the other projects we have going on as well. If I was able to get my build done quick I would need something else to work on to add to the list haha.
Yes it will be interesting to see how it performs once you get it together and tuned up again.
Measured and marked up the passenger side port to allow the passenger side turbos compressor outlet to pass thru the front support. Then cut it with my black and decker Jig saw for the most part. The portion closest to the outer fender was inaccessible because the saw housing would get into that area. I took my 4.5" angle grinder with the diamond cutting blade and made the remaining cuts. I then took off the cutting wheel and put on a 60 grit flap wheel and dressed the sharp edges. This is where I painfully found out that a pair of leather gloves would be beneficial in this effort since I managed to 'sand' a trench on top of my right hands pointing finger. I didn't have a first aid kit there in the shop( which is roughly 200 yds from my house) but I had rubbing alcohol. I was prepared for searing pain when I drenched my finger but, to my relief, didn't feel anything other than the cooling effect. When I got home, I put hydrogen peroxide on it and that bubbled but no pain. But when I washed it prior to bandaging it with my treated household water (salt treatment), well, THAT got my attention, lol..
Part of the conversion for the single turbo to the twin involves removing the turbowerx oil scavenge pump and it's feed to a -10AN drain on the passenger side of the oil pan and swapping out the timing cover to utilize the twin -10AN ports on the ICT unit. Of course, that entails removing my ATI Harmonic balancer/damper. Looked everywhere for the 27mm 12 point socket that fits the ARP crank bolt I had bought when I installed the ATI back in 2014. No freaking luck. So drive to Advanced and buy one. Go back to the shop and locked the flywheel, put the socket on my breaker bar and tried to budge the bolt. No luck. On my spare engine, which has the stock crank bolt, I used my harbor freight 'earthquake' 1/2" air tool and it ripped that bolt loose in a second , if that. Tried 7 times last night to do the same with the ARP. No luck. Buddy of mine has an industrial/commercial Dewalt (20v?) that he's used to remove his ARP crank bolt in his LS3 multiple times. He said I can borrow that so I will.
Along with the crank bolt, I needed to remove the 3 'hub' bolts for the 3 toed puller.. To my surprise/dismay, when I rolled under the car to remove the T47 Torx screws, one was broken off flush with the hub. WTH? I'm the only one that ever works on my car and I haven't touched the ATI since I installed it back in 2014. I removed the other 2 screws and then studied what my possibilities were now. ( a ) Mount the 3 toes face/crows foot flush on the H.B., install the two bolts and the center puller bolt(to center the crows foot), but for the 3rd bolt, put on a sturdy 'C' clamp that would keep the third leg tight to the H.Balancer. My fear on this one is that a C-clamp won't have the strength to keep that position and will flex out as I tighten the center bolt. ( b ) Remove the 6 or so T40 'Plus' torx bolts that hold the damper to the hub so I can use my 3 claw puller to remove the hub.
I know exactly what your taking about as when I was a kid I worked at a machine shop where we made parts for race cars, trains, guns a bunch of things. When certain fitting were cut out we had to sand them. Sander belts moved so quick that you didn�t know a hole started in the paper until the hole grabbed the part out of your hand and your fingers ate the spinning paper boy that was exciting...
Some progress is better then none is a good way to look at it and projects usually don�t go together perfect if it�s a one off. Did something maybe hit the bolt last time you worked on the car, something slipped and smacked the bolt. Would have to be heavy object of course and is odd how it broke.
I bought a flex plate locking tool that bolts to the starter pad and has a toothed section that interfaces with the flexplate to lock it.
Then got up front with a 4 ft cheater bar and my breaker bar. Pulled with all my weight (192lbs) but it just flexed the cheater bar. Good grief. I'll head over to my buds house tomorrow to borrow his heavy duty DeWalt. If that won't break it free. I might see if I can rent a 3/4" drive pneumatic Impact from Home Depot if that doesn't work.
If nothing else works, you can cut a slot across the top of the crank bolt to relieve the pressure of the bolt flange to damper. Hope this makes sense.
Well, borrowed my friends Dewalt 20v 1/2" impact to try on the ARP crank bolt. No good. It sits there and rattles but that bolt is not moving...
I did get the ATI outer cover off. I used a T40 'plus' 3/8" drive hand ratchet and yet, another one of the screws broke off without much resistance. So weird... The remaining other screws(5 of them) came out without a problem.
Now if I ever get that bolt out, I can see if I can get that hub pulled off.
Next up, I'm going to borrow a 3/4" drive breaker bar and the 4' cheater pipe. The 1/2" breaker bar I had flexed a lot when I tried to use it.
Nice build. I�m doing the exact same build in my 95 z28. Twin turbos and truck manifolds. I was going to run the forward and down facing and then 90 up to the turbos but I like this idea of straight pipe to the turbo. Are you positive that the flipped up and forward driver side truck manifold won�t fit? Even if you cut the flange off and do something around the pump resi to clear the shock tower just like the passenger side? Here�s truck manis flipped up and forward for a Silverado I�m building
Looks nice! Yeah, I did try the manifold that way back when I first started but I didn't try to work out any interference issues. Trying to remember my impression at the time. I *think* it pointed too high for my tastes. I was pretty much commited to the way it is now. I won't know for sure how it all shakes out till I button up everything and drive it a bit.
I've second (and third and fourth...) guessed my design as I've waited to bring this to a conclusion. But I've decided to absolutely put it together before Spring before even contemplating an alteration.
Best of luck with yours!
Originally Posted by chevykev
Nice build. I�m doing the exact same build in my 95 z28. Twin turbos and truck manifolds. I was going to run the forward and down facing and then 90 up to the turbos but I like this idea of straight pipe to the turbo. Are you positive that the flipped up and forward driver side truck manifold won�t fit? Even if you cut the flange off and do something around the pump resi to clear the shock tower just like the passenger side? Here�s truck manis flipped up and forward for a Silverado I�m building
I may give it a whirl but I was going to see if you tried first. May be to high but I think it will look a little more symmetrical from my point of view but to each their own. I was just trying to see if it hits the ps resi or shock tower before I attempt it but may be able to avoid that. Thanks I�ll be following your build closely because I want to run similar twins
Went to Harbor Freight and bought a 3/4" 3ft long breaker bar, a set of 12 point 1/2" drive deep impact sockets and some impact tool level conversions that included a 3/4" to 1/2" bit.
Assembled them, put it on the bolt and pushed on the bar from the drivers side several times. Wouldn't budge. Then got over on the passenger side where I could brace my body against the outter fender and, using both hands, pulled mightily. What was that? Did it budge? Repositioned the 12 point socket one tooth over, gave it another pull. YESS! It's moving! A couple more 'tooth' adjustments and, Viola! It was loose enough to unscrew with just my fingers. Finally!
Started pulling off the water pump next. Ran out of time though and buttoned up the shop, turned out the lights and headed home. I'll resume on Sat and Sunday.
Tonights progress:
Got the water pump off, Got the ATI hub off, got the timing cover off and put on the new twin oil return ported timing cover on. Used the ICT Billet alignment tool, torqued to 18 ft .
Got the Turbowerx pump unmounted and the port capped off on the oil pan. Aligned and torqued down.
I'll have to take the ATI hub to a machinists to see if they can extract the two broken off screws/bolts.
Looks good. Can�t believe the crank bolt gave you that much trouble. I can usually get mine off with a 1/2� breaker bar and I retorque to about 200ftlbs. I also run the excess motor sports extra long crank bolt with no issues.
the ICT covers are nice for the price given the cost of the fitting and the welding. I just pulled mine off and drilled and tapped a 3/8� NPt hole and threaded in a 3/8� to -10 45 degree fitting with PTFE paste and reassembled. Can�t do 90* bc it hits the raised seal area on the cover and I can�t weld aluminum. I hope it doesn�t leak. I was running it to the pan but the line had a bunch of bends and I wanted to simplify the drain this winter. With a 45* summit push lock fitting it clears my stock truck balancer so if it doesn�t leak this drain is going to be much more free flowing.
Innovation! I am planning on doing that same type of thing with the cover I just took off. I'd been reading some other threads regarding the -10an sized fittings where they indicated they might not flow adequately. Instead, they used aluminum nipples and tubing to go from the turbos drain to the oil pan/timing cover, feeling the orifices were larger than the -10an passages. I still have a hard time believing the tiny feed orifices allow so much oil that the -10AN drains might be unable to efficiently pass the oil to the pan. But these guys have a lot more experience than I.


 12-29-2019, 10:27 AM